wheel HYUNDAI TUCSON 2015 Manual PDF
[x] Cancel search | Manufacturer: HYUNDAI, Model Year: 2015, Model line: TUCSON, Model: HYUNDAI TUCSON 2015Pages: 653, PDF Size: 8.45 MB
Page 533 of 653

6-17
What to do in an emergency
6
6.Loosen the wheel lug nuts counter-clockwise one turn each in the
order shown above, but do not
remove any lug nuts until the tire
has been raised off of the ground. 7.Place the jack at the designated
jacking position under the frame
closest to the tire you are chang-
ing. The jacking positions are
plates welded to the frame with two
tabs and a raised dot. Never jack
any other position or part of the
vehicle. 8.Insert the jack handle into the jack
and turn it clockwise, raising the
vehicle until the tire clears the
ground. Make sure the vehicle is
stable on the jack.
OLMB063007OLMB063008OLMB063009
Page 534 of 653
6-18
What to do in an emergency
9.Loosen the lug nuts with the wheellug nut wrench and remove them
with your fingers. Remove the
wheel from the studs and lay it flat
on the ground out of the way.
Remove any dirt or debris from the
studs, mounting surfaces, andwheel.
10. Install the spare tire onto the studs of the hub.
11. Tighten the lug nuts with your fin- gers onto the studs with the
smaller end of the lug nuts clos-est to the wheel.
12. Lower the vehicle to the ground by turning the jack handle coun-
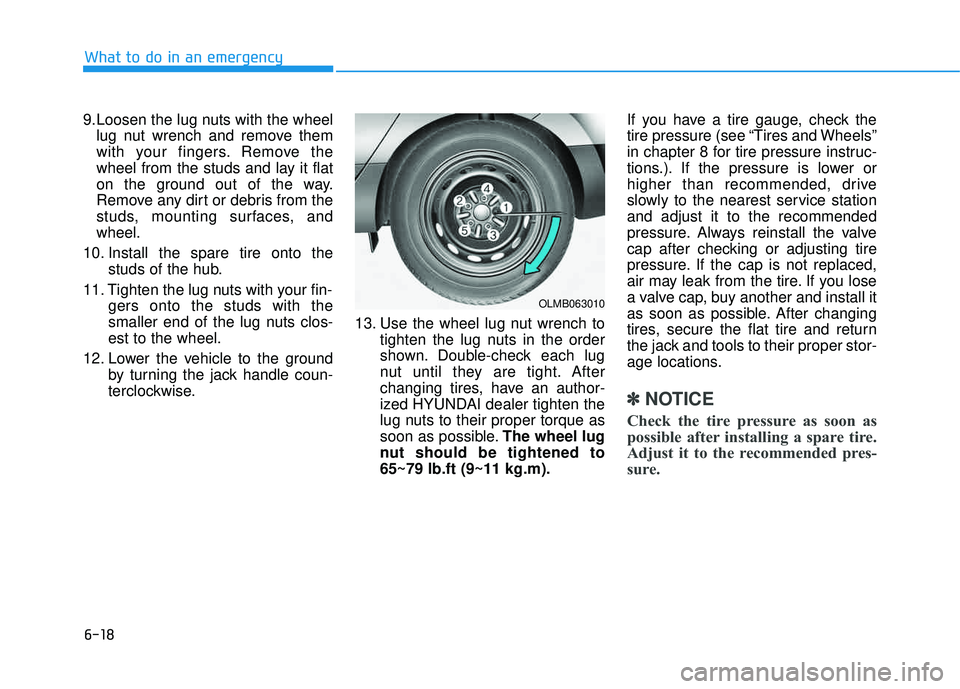
terclockwise. 13. Use the wheel lug nut wrench to
tighten the lug nuts in the order
shown. Double-check each lug
nut until they are tight. After
changing tires, have an author-
ized HYUNDAI dealer tighten the
lug nuts to their proper torque as
soon as possible. The wheel lug
nut should be tightened to65~79 lb.ft (9~11 kg.m). If you have a tire gauge, check the
tire pressure (see “Tires and Wheels”
in chapter 8 for tire pressure instruc-
tions.). If the pressure is lower or
higher than recommended, drive
slowly to the nearest service stationand adjust it to the recommended
pressure. Always reinstall the valve
cap after checking or adjusting tire
pressure. If the cap is not replaced,
air may leak from the tire. If you lose
a valve cap, buy another and install it
as soon as possible. After changing
tires, secure the flat tire and return
the jack and tools to their proper stor-
age locations.
✽✽
NOTICE
Check the tire pressure as soon as
possible after installing a spare tire.
Adjust it to the recommended pres-
sure.
OLMB063010
Page 535 of 653
6-19
What to do in an emergency
6If any of the equipment such as the
jack, lug nuts, studs, or other equip-ment is damaged or in poor condi-tion, do not attempt to change the
tire and call for assistance.
Use of compact spare tires
Compact spare tires are designed for
emergency use only. Drive carefullyon the compact spare tire and
always follow the safety precautions.When driving with the compact spare
tire mounted to your vehicle:
Check the tire pressure after
installing the compact spare tire. The compact spare tire should be
inflated to 60 psi (420 kPa).
Do not take this vehicle through an automatic car wash while the com-pact spare tire is installed.
Do not use the compact spare tire on any other vehicle because thistire has been designed especially
for your vehicle.
The compact spare tire’s tread life is shorter than a regular tire.
Inspect your compact spare tire
regularly and replace worn com-
pact spare tires with the same sizeand design, mounted on the samewheel.
Do not use more than one compact spare tire at a time.
Do not tow a trailer while the com- pact spare tire is installed.
Your vehicle has metric threads
on the studs and lug nuts. Make
certain during tire changing
that the same nuts that were
removed are reinstalled. If you
have to replace your lug nuts
make sure they have metric
threads to avoid damaging thestuds and ensure the wheel is
properly secured to the hub.
Consult an authorized
HYUNDAI dealer for assistance.CAUTION
To prevent compact spare tire
failure and loss of control pos-
sibly resulting in an accident:
Use the compact spare tire
only in an emergency.
NEVER operate your vehicle
over 50 mph (80 km/h).
Do not exceed the vehicle’s
maximum load rating or the
load carrying capacity shown
on the sidewall of the com-
pact spare tire.
Do not use the compact spare
tire continuously. Repair orreplace the original tire as
soon as possible to avoid fail-
ure of the compact spare tire.
WARNING
Page 536 of 653
6-20
What to do in an emergency
✽✽NOTICE
When the original tire and wheel are
repaired and reinstalled on the vehi-
cle, the lug nut torque must be set
correctly to prevent wheel vibration.
The correct lug nut tightening
torque is 65-79 lb.ft (9-11 kg.m).
To prevent damaging the com-
pact spare tire and your vehicle:
Drive slowly enough for the
road conditions to avoid all
hazards, such as a potholesor debris.
Avoid driving over obstacles. The compact spare tire diame-ter is smaller than the diame-
ter of a conventional tire and
reduces the ground clearance
approximately 1 in (25 mm).
Do not use tire chains on the
compact spare tire. Because
of the smaller size, a tire chain
will not fit properly.
Do not use the compact spare
tire on any other wheels, nor
should standard tires, snow
tires, wheel covers or trimrings be used with the com-pact spare wheel.
CAUTION
Page 538 of 653
6-22
What to do in an emergency
Towing service
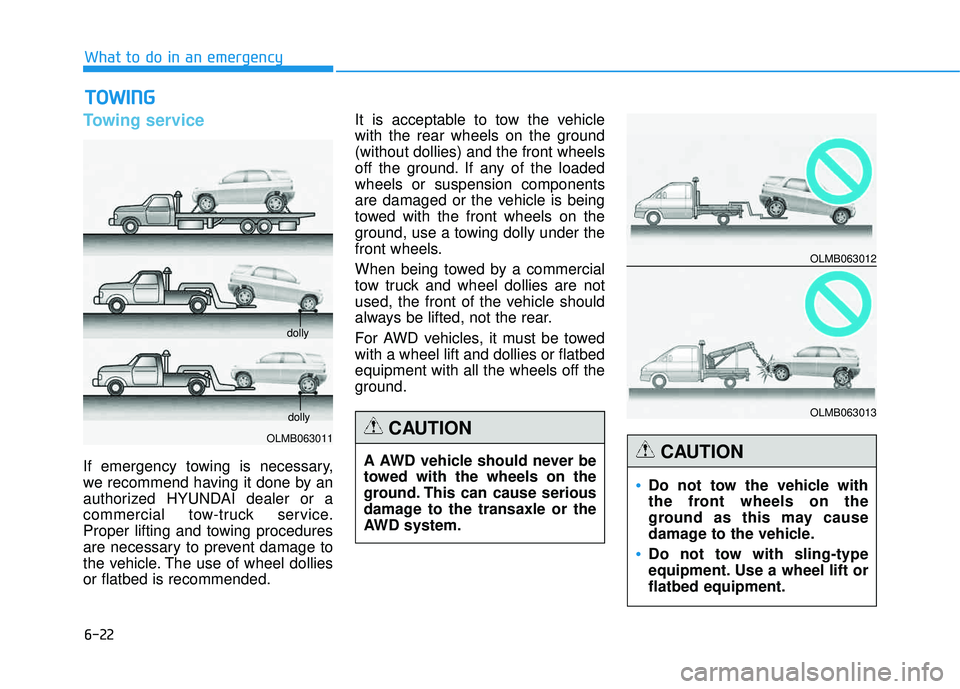
If emergency towing is necessary,
we recommend having it done by an
authorized HYUNDAI dealer or a
commercial tow-truck service.
Proper lifting and towing procedures
are necessary to prevent damage to
the vehicle. The use of wheel dolliesor flatbed is recommended.It is acceptable to tow the vehicle
with the rear wheels on the ground(without dollies) and the front wheels
off the ground. If any of the loadedwheels or suspension components
are damaged or the vehicle is being
towed with the front wheels on the
ground, use a towing dolly under the
front wheels.
When being towed by a commercial
tow truck and wheel dollies are not
used, the front of the vehicle should
always be lifted, not the rear.
For AWD vehicles, it must be towed with a wheel lift and dollies or flatbedequipment with all the wheels off the
ground.
TT
OO WW IINN GG
OLMB063011 dolly
dolly
A AWD vehicle should never be
towed with the wheels on the
ground. This can cause serious
damage to the transaxle or the
AWD system.
CAUTION
Do not tow the vehicle with
the front wheels on the
ground as this may cause
damage to the vehicle.
Do not tow with sling-type
equipment. Use a wheel lift orflatbed equipment.
CAUTION
OLMB063012
OLMB063013
Page 539 of 653
6-23
What to do in an emergency
6
When towing your vehicle in an emergency without wheel dollies:
1.Place the ignition switch in theACC position.
2.Place the shift lever in N (Neutral).
3.Release the parking brake.
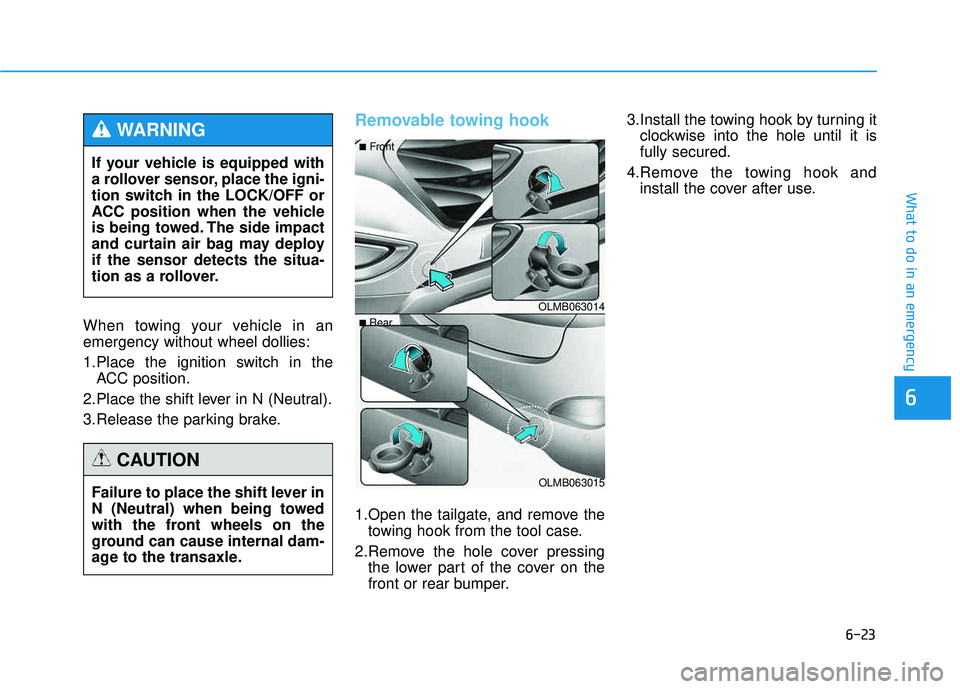
Removable towing hook
1.Open the tailgate, and remove the towing hook from the tool case.
2.Remove the hole cover pressing the lower part of the cover on the
front or rear bumper. 3.Install the towing hook by turning it
clockwise into the hole until it isfully secured.
4.Remove the towing hook and install the cover after use.
Failure to place the shift lever in
N (Neutral) when being towed
with the front wheels on the
ground can cause internal dam-
age to the transaxle.
CAUTION
OLMB063014
OLMB063015
■
Front
■ Rear
If your vehicle is equipped with
a rollover sensor, place the igni-
tion switch in the LOCK/OFF or
ACC position when the vehicle
is being towed. The side impact
and curtain air bag may deployif the sensor detects the situa-
tion as a rollover.
WARNING
Page 540 of 653
6-24
What to do in an emergency
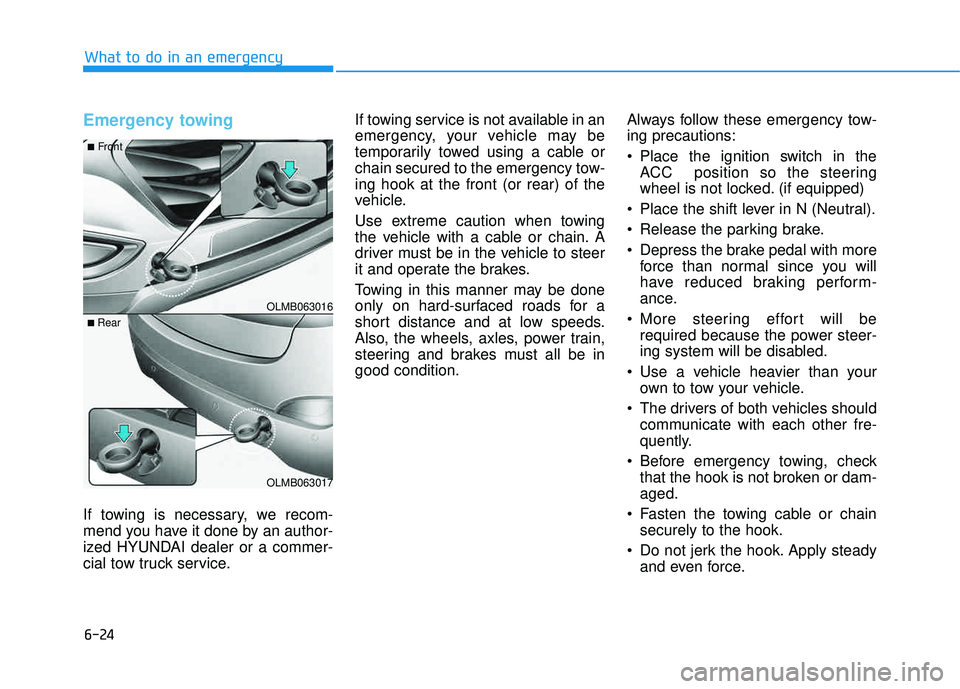
Emergency towing
If towing is necessary, we recom-
mend you have it done by an author-
ized HYUNDAI dealer or a commer-
cial tow truck service.If towing service is not available in an
emergency, your vehicle may be
temporarily towed using a cable or
chain secured to the emergency tow-ing hook at the front (or rear) of the
vehicle.
Use extreme caution when towing
the vehicle with a cable or chain. A
driver must be in the vehicle to steer
it and operate the brakes.
Towing in this manner may be done
only on hard-surfaced roads for a
short distance and at low speeds.
Also, the wheels, axles, power train,
steering and brakes must all be ingood condition.
Always follow these emergency tow-ing precautions:
Place the ignition switch in the
ACC position so the steering
wheel is not locked. (if equipped)
Place the shift lever in N (Neutral).
Release the parking brake.
Depress the brake pedal with more force than normal since you will
have reduced braking perform-
ance.
More steering effort will be required because the power steer-
ing system will be disabled.
Use a vehicle heavier than your own to tow your vehicle.
The drivers of both vehicles should communicate with each other fre-
quently.
Before emergency towing, check that the hook is not broken or dam-aged.
Fasten the towing cable or chain securely to the hook.
Do not jerk the hook. Apply steady and even force.
OLMB063016
OLMB063017
■
Front
■ Rear
Page 542 of 653
7
Maintenance
7
Maintenance
ENGINE COMPARTMENT .....................................7-3
MAINTENANCE SERVICES .....................................7-4
Owner's responsibility ...................................................7-4
Owner maintenance precautions ..................................7-4
OWNER MAINTENANCE .......................................7-6
Owner maintenance schedule ........................................7-7
SCHEDULED MAINTENANCE SERVICES ..............7-8
Normal maintenance schedule .......................................7-9
Maintenance under severe usage conditions ..........7-22
EXPLANATION OF SCHEDULED MAINTENANCE ITEMS .....................................7-24
ENGINE OIL ...........................................................7-27
Checking the engine oil level .......................................7-27
Checking the engine oil and filter ..............................7-28
ENGINE COOLANT ................................................7-29
Checking the engine coolant level..............................7-29
Changing engine coolant .............................................7-31
BRAKE FLUID ........................................................7-32
Checking the brake fluid level .....................................7-32
WASHER FLUID.....................................................7-34
Checking the washer fluid level .............................7-34
PARKING BRAKE...................................................7-35
Checking the parking brake .........................................7-35
AIR CLEANER .......................................................7-36
Filter replacement ........................................................7-36
CLIMATE CONTROL AIR CLEANER ....................7-38
Filter inspection ...............................................................7-38
WIPER BLADES.....................................................7-40
Blade inspection ..............................................................7-40
Blade replacement .......................................................7-40
BATTERY ...............................................................7-43
For best battery service................................................7-44
Battery recharging .........................................................7-44
Reset features .................................................................7-46
TIRES AND WHEELS ............................................7-47
Tire care ............................................................................7-47
Recommended cold tire inflation pressures.............7-48
Check tire inflation pressure........................................7-49
Tire rotation .....................................................................7-50
Wheel alignment and tire balance ..............................7-51
Tire replacement .............................................................7-51
Wheel replacement .........................................................7-52
Tire traction ......................................................................7-52
Tire maintenance ............................................................7-53
Tire sidewall labeling ......................................................7-53
Tire terminology and definitions.................................7-57
All season tires ................................................................7-60
Summer tires ....................................................................7-60
7
Page 548 of 653
7-7
7
Maintenance
Owner maintenance schedule
When you stop for fuel:
Check the engine oil level.
Check coolant level in the enginecoolant reservoir.
Check the windshield washer fluid level.
Check for low or under-inflated tires
While operating your vehicle:
Note any changes in the sound ofthe exhaust or any smell of
exhaust fumes in the vehicle.
Check for vibrations in the steering wheel. Notice if there is any
increased steering effort or loose-
ness in the steering wheel, or
change in its straight-ahead posi-tion.
Notice if your vehicle constantly turns slightly or “pulls” to one side
when traveling on smooth, levelroad.
When stopping, listen and check for unusual sounds, pulling to one
side, increased brake pedal travel
or “hard-to-push” brake pedal.
If any slipping or changes in the operation of your transaxle occurs,
check the transaxle fluid level.
Check the automatic transaxle P (Park) function.
Check the parking brake.
Check for fluid leaks under your vehicle (water dripping from the air
conditioning system during or after
use is normal).
At least monthly:
Check coolant level in the enginecoolant reservoir.
Check the operation of all exterior lights, including the stoplights, turn
signals and hazard warning flash-
ers.
Check the inflation pressures of all tires including the spare for tires
that are worn, show uneven wear,or are damaged.
Check for loose wheel lug nuts.
Be careful when checking your
engine coolant level when the
engine is hot. This may result in
coolant being blown out of theopening and cause serious
burns and other injuries.
WARNING
Page 567 of 653

7-26
Maintenance
Brake hoses and lines
Visually check for proper installation,
chafing, cracks, deterioration and
any leakage. Replace any deteriorat-
ed or damaged parts immediately.
Brake fluid
Check brake fluid level in the brake
fluid reservoir. The level should be
between the MIN and the MAX
marks on the side of the reservoir.
Use only hydraulic brake fluid con-
forming to DOT 3 or DOT 4 specifi-cation.
Parking brake
Inspect the parking brake system
including the parking brake pedal
and cables.
Brake discs, pads, calipers
and rotors
Check the pads for excessive wear,
discs for run out and wear, and
calipers for fluid leakage.
Exhaust pipe and muffler
Visually inspect the exhaust pipes,
muffler and hangers for cracks, dete-
rioration, or damage. Start the
engine and listen carefully for any
exhaust gas leakage. Tighten con-
nections or replace parts as neces-
sary.
Suspension mounting bolts
Check the suspension connections
for looseness or damage. Retighten
to the specified torque.
Steering gear box, linkage &
boots/lower arm ball joint
With the vehicle stopped and the
engine off, check for excessive free-
play in the steering wheel. Check the
linkage for bends or damage. Check
the dust boots and ball joints for
deterioration, cracks, or damage.
Replace any damaged parts.
Drive shafts and boots
Check the drive shafts, boots and
clamps for cracks, deterioration, or
damage. Replace any damaged
parts and, if necessary, repack the
grease.
Air conditioning refrigerant
Check the air conditioning lines and
connections for leakage and dam-
age.