height HYUNDAI TUCSON 2015 Owners Manual
[x] Cancel search | Manufacturer: HYUNDAI, Model Year: 2015, Model line: TUCSON, Model: HYUNDAI TUCSON 2015Pages: 653, PDF Size: 8.45 MB
Page 21 of 653
2-4
SSEE AA TTSS
Safety system of your vehicle
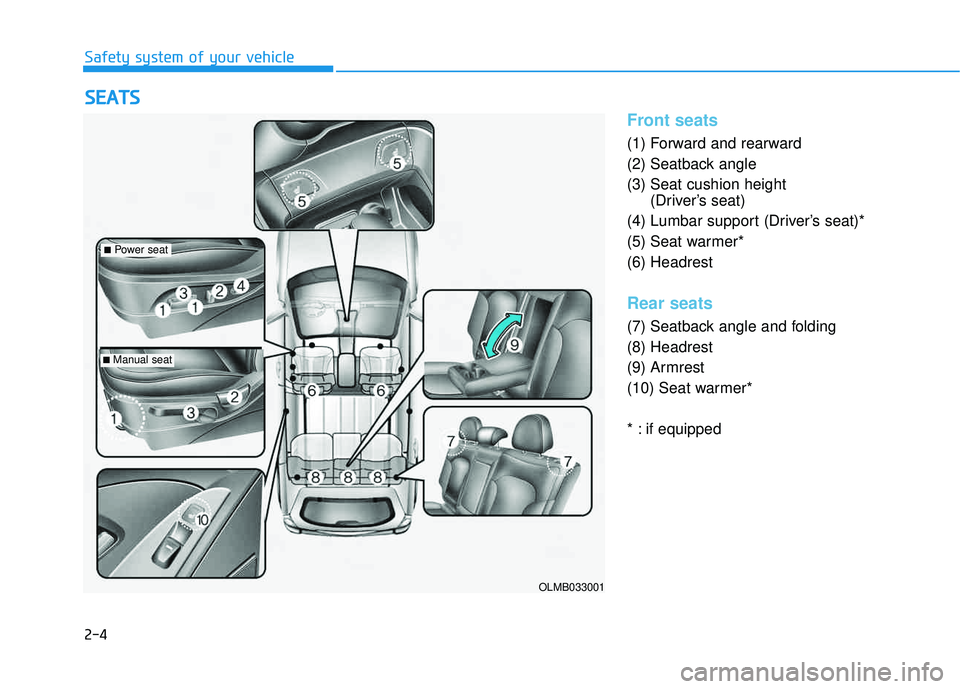
Front seats
(1) Forward and rearward
(2) Seatback angle (3) Seat cushion height
(Driver’s seat)
(4) Lumbar support (Driver’s seat)*
(5) Seat warmer* (6) Headrest
Rear seats
(7) Seatback angle and folding (8) Headrest
(9) Armrest
(10) Seat warmer*
* : if equipped
OLMB033001
■ Power seat
■Manual seat
Page 25 of 653
2-8
Safety system of your vehicle
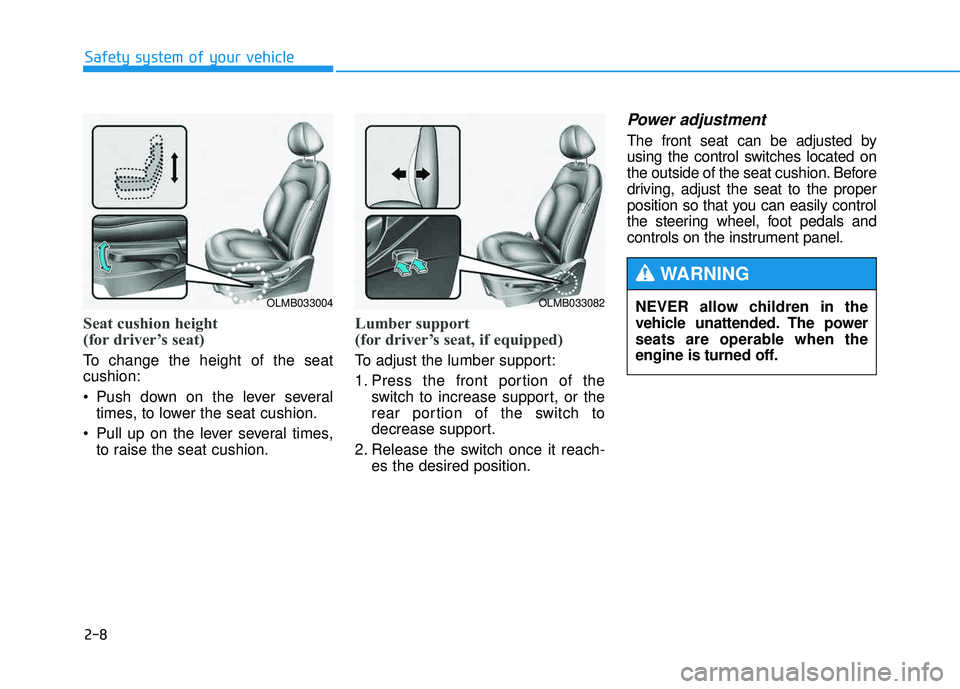
Seat cushion height
(for driver’s seat)
To change the height of the seat cushion:
Push down on the lever severaltimes, to lower the seat cushion.
Pull up on the lever several times, to raise the seat cushion.
Lumber support
(for driver’s seat, if equipped)
To adjust the lumber support:
1. Press the front portion of the switch to increase support, or the
rear portion of the switch to
decrease support.
2. Release the switch once it reach- es the desired position.
Power adjustment
The front seat can be adjusted by
using the control switches located on
the outside of the seat cushion. Before
driving, adjust the seat to the proper
position so that you can easily control
the steering wheel, foot pedals and
controls on the instrument panel.
OLMB033004OLMB033082NEVER allow children in the
vehicle unattended. The power
seats are operable when the
engine is turned off.
WARNING
Page 27 of 653
2-10
Safety system of your vehicle
Reclining seatback Sitting in a reclined position when
the vehicle is in motion can be dan-
gerous. Even when buckled up, the
protections of your restraint system
(seat belts and air bags) is greatly
reduced by reclining your seatback.Seat belts must be snug against your
hips and chest to work properly.
When the seatback is reclined, theshoulder belt cannot do its job
because it will not be snug against
your chest. Instead, it will be in front
of you. During an accident, you could
be thrown into the seat belt, causing
neck or other injuries.
The more the seatback is reclined,
the greater chance the passenger’ships will slide under the lap belt or
the passenger’s neck will strike theshoulder belt.
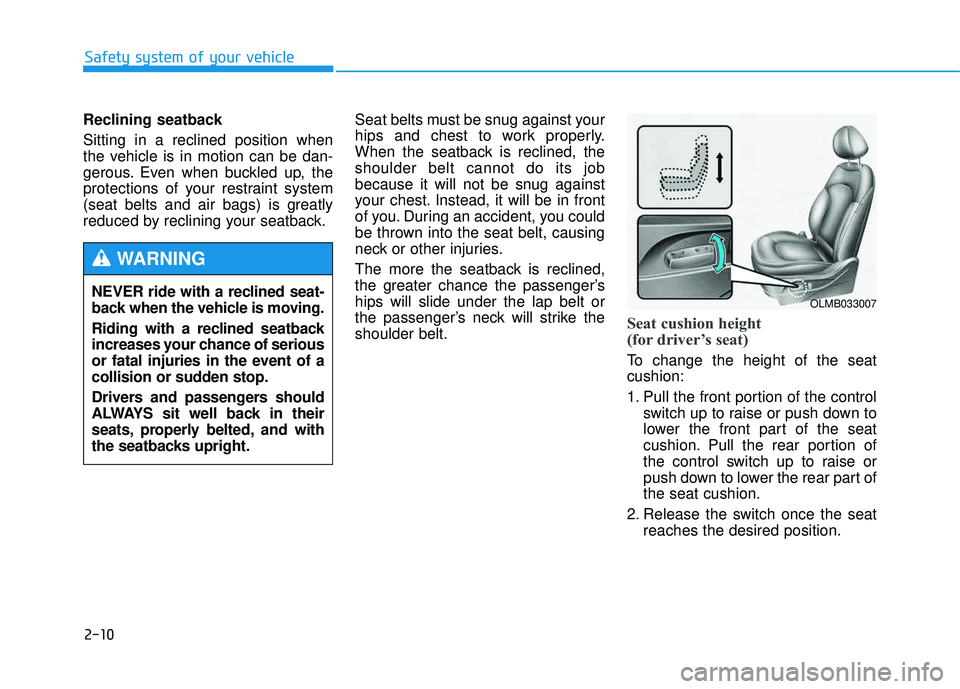
Seat cushion height
(for driver’s seat)
To change the height of the seat cushion:
1. Pull the front portion of the control
switch up to raise or push down to
lower the front part of the seat
cushion. Pull the rear portion of
the control switch up to raise or
push down to lower the rear part ofthe seat cushion.
2. Release the switch once the seat reaches the desired position.
NEVER ride with a reclined seat-
back when the vehicle is moving.
Riding with a reclined seatback
increases your chance of serious
or fatal injuries in the event of a
collision or sudden stop.
Drivers and passengers should
ALWAYS sit well back in their
seats, properly belted, and with
the seatbacks upright.
WARNING
OLMB033007
Page 32 of 653
2-15
Safety system of your vehicle
2
Headrest
The vehicle’s front and rear seats
have adjustable headrests. The head-
rests provide comfort for passengers,
but more importantly they aredesigned to help protect passengers
from whiplash and other neck and
spinal injuries during an accident,especially in a rear impact collision.
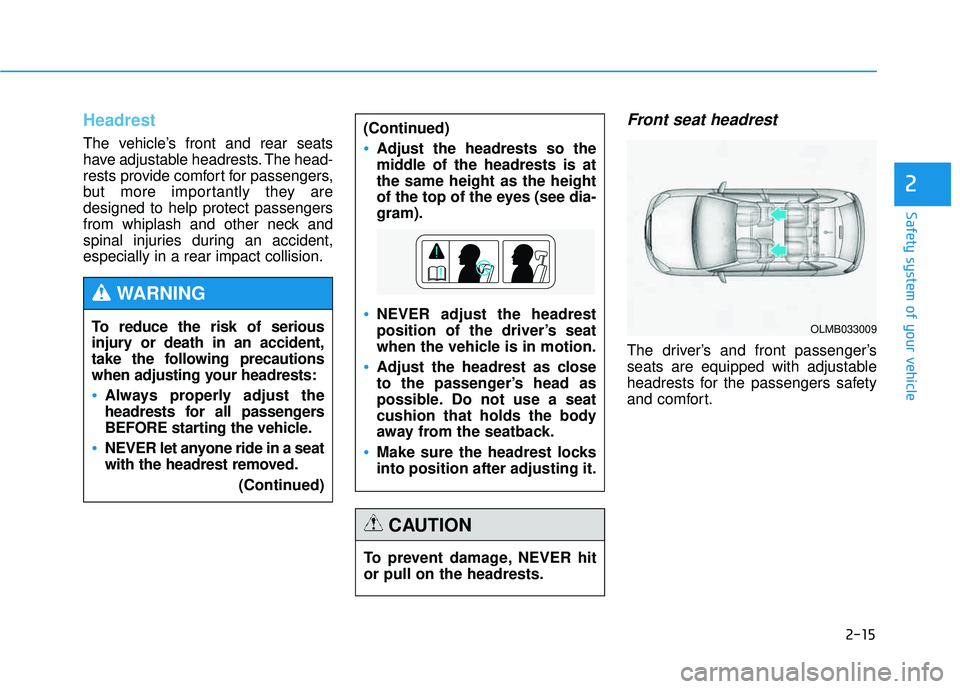
Front seat headrest
The driver’s and front passenger’s
seats are equipped with adjustable
headrests for the passengers safety
and comfort.
To reduce the risk of serious
injury or death in an accident,
take the following precautions
when adjusting your headrests:
Always properly adjust the
headrests for all passengers
BEFORE starting the vehicle.
NEVER let anyone ride in a seat
with the headrest removed.
(Continued)
WARNING
(Continued)
Adjust the headrests so the
middle of the headrests is atthe same height as the height
of the top of the eyes (see dia-gram).
NEVER adjust the headrest
position of the driver’s seat
when the vehicle is in motion.
Adjust the headrest as close
to the passenger’s head as
possible. Do not use a seat
cushion that holds the body
away from the seatback.
Make sure the headrest locks into position after adjusting it.
To prevent damage, NEVER hit or pull on the headrests.
CAUTION
OLMB033009
Page 33 of 653
2-16
Safety system of your vehicle
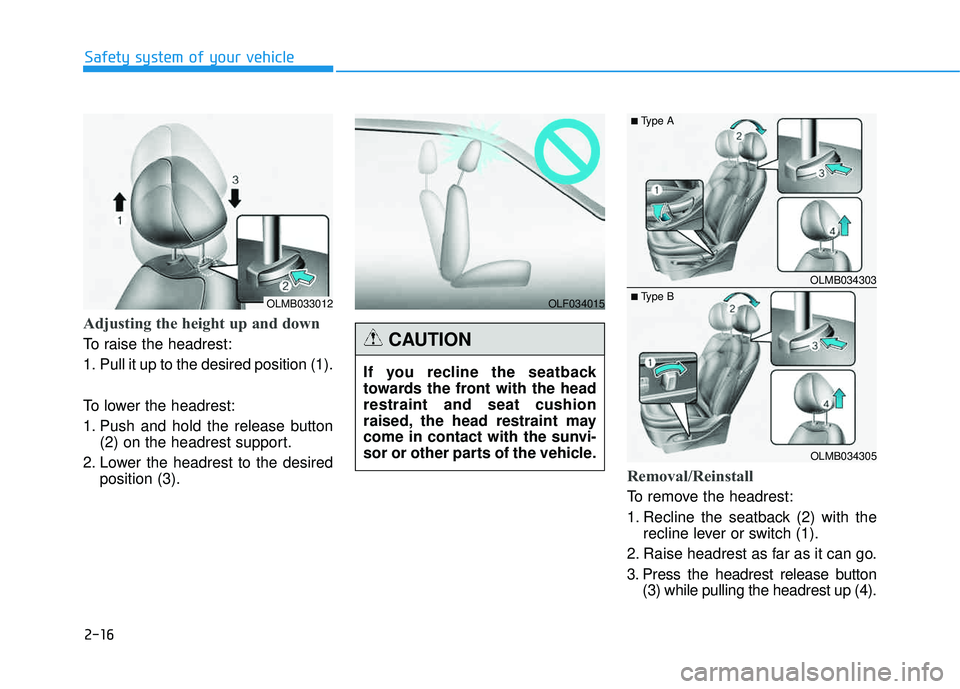
Adjusting the height up and down
To raise the headrest:
1. Pull it up to the desired position (1).
To lower the headrest:
1. Push and hold the release button(2) on the headrest support.
2. Lower the headrest to the desired position (3).
Removal/Reinstall
To remove the headrest:
1. Recline the seatback (2) with therecline lever or switch (1).
2. Raise headrest as far as it can go.
3. Press the headrest release button (3) while pulling the headrest up (4).
OLMB033012
OLMB034303
OLMB034305
■Type A
■ Type BOLF034015
If you recline the seatback
towards the front with the headrestraint and seat cushion
raised, the head restraint may
come in contact with the sunvi-
sor or other parts of the vehicle.
CAUTION
Page 34 of 653
2-17
Safety system of your vehicle
2
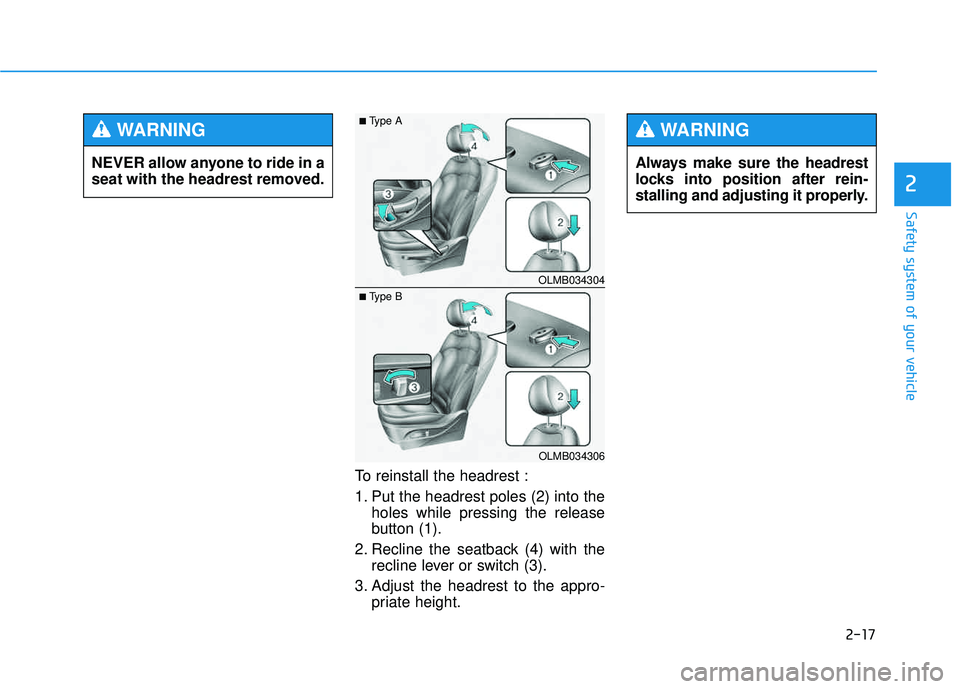
To reinstall the headrest :
1. Put the headrest poles (2) into theholes while pressing the release
button (1).
2. Recline the seatback (4) with the recline lever or switch (3).
3. Adjust the headrest to the appro- priate height. Always make sure the headrest
locks into position after rein-
stalling and adjusting it properly.
WARNING
NEVER allow anyone to ride in a
seat with the headrest removed.
WARNING
OLMB034304
OLMB034306
■
Type A
■ Type B
Page 35 of 653
2-18
Safety system of your vehicle
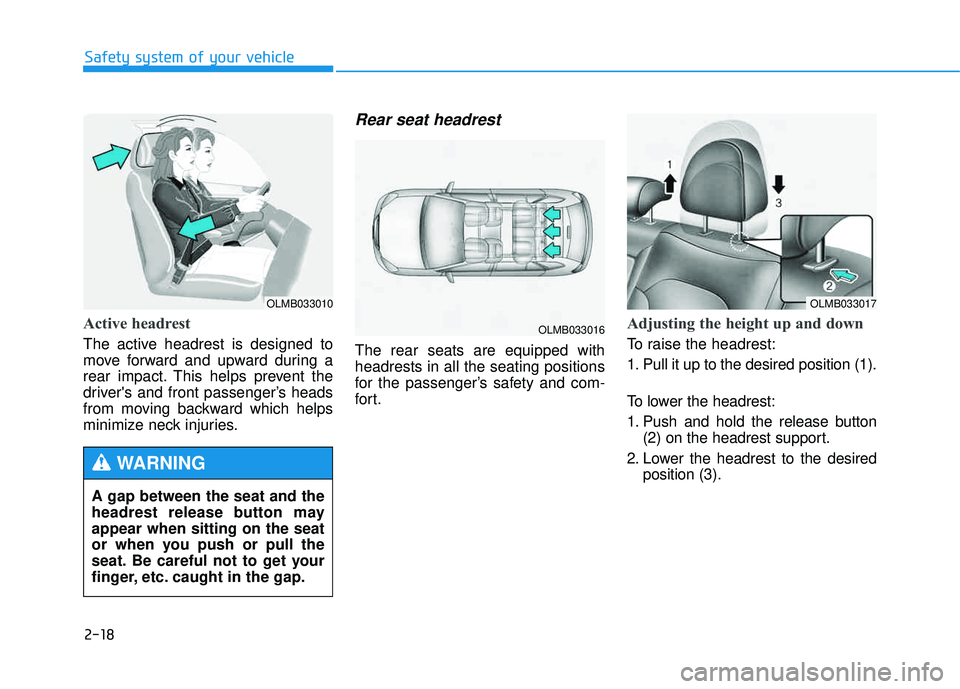
Active headrest
The active headrest is designed to
move forward and upward during a
rear impact. This helps prevent the
driver's and front passenger’s heads
from moving backward which helps
minimize neck injuries.
Rear seat headrest
The rear seats are equipped withheadrests in all the seating positions
for the passenger’s safety and com-
for t.
Adjusting the height up and down
To raise the headrest:
1. Pull it up to the desired position (1).
To lower the headrest:
1. Push and hold the release button(2) on the headrest support.
2. Lower the headrest to the desired position (3).
OLMB033017
OLMB033016
OLMB033010
A gap between the seat and the
headrest release button mayappear when sitting on the seat
or when you push or pull the
seat. Be careful not to get your
finger, etc. caught in the gap.
WARNING
Page 36 of 653
2-19
Safety system of your vehicle
2
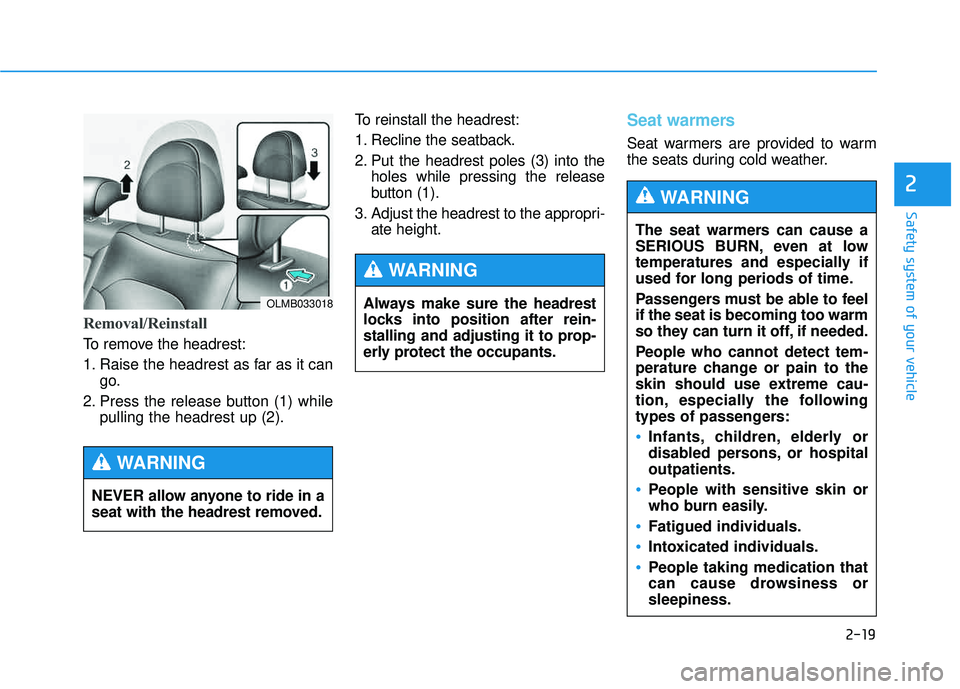
Removal/Reinstall
To remove the headrest:
1. Raise the headrest as far as it cango.
2. Press the release button (1) while pulling the headrest up (2). To reinstall the headrest:
1. Recline the seatback.
2. Put the headrest poles (3) into the
holes while pressing the release
button (1).
3. Adjust the headrest to the appropri- ate height.
Seat warmers
Seat warmers are provided to warm
the seats during cold weather.
Always make sure the headrest
locks into position after rein-
stalling and adjusting it to prop-
erly protect the occupants.
WARNING
The seat warmers can cause a
SERIOUS BURN, even at low
temperatures and especially if
used for long periods of time.
Passengers must be able to feel if the seat is becoming too warm
so they can turn it off, if needed.
People who cannot detect tem-
perature change or pain to the
skin should use extreme cau-
tion, especially the following
types of passengers:
Infants, children, elderly or
disabled persons, or hospitaloutpatients.
People with sensitive skin or
who burn easily.
Fatigued individuals.
Intoxicated individuals.
People taking medication that
can cause drowsiness orsleepiness.
WARNING
OLMB033018
NEVER allow anyone to ride in a
seat with the headrest removed.
WARNING
Page 40 of 653
2-23
Safety system of your vehicle
2
Seat belt restraint system
Seat Belt-Driver’s 3-point sys-tem with emergency lockingretractor
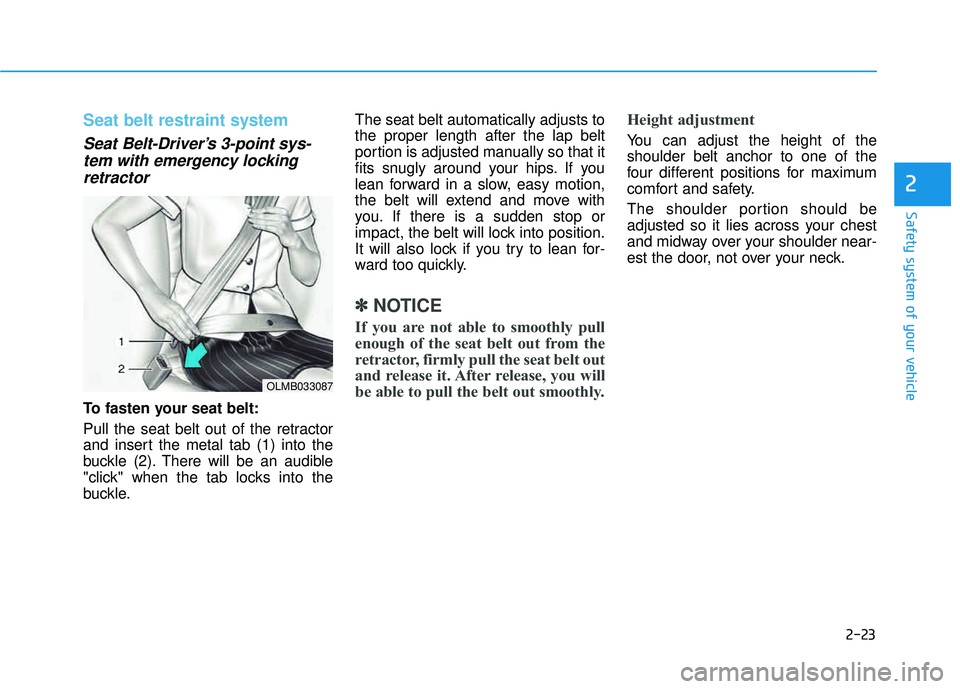
To fasten your seat belt:
Pull the seat belt out of the retractor
and insert the metal tab (1) into the
buckle (2). There will be an audible
"click" when the tab locks into the
buckle. The seat belt automatically adjusts tothe proper length after the lap belt
portion is adjusted manually so that it
fits snugly around your hips. If you
lean forward in a slow, easy motion,
the belt will extend and move with
you. If there is a sudden stop or
impact, the belt will lock into position.
It will also lock if you try to lean for-
ward too quickly.
✽✽
NOTICE
If you are not able to smoothly pull
enough of the seat belt out from the
retractor, firmly pull the seat belt out
and release it. After release, you will
be able to pull the belt out smoothly. Height adjustment
You can adjust the height of the shoulder belt anchor to one of the
four different positions for maximum
comfort and safety.
The shoulder portion should be
adjusted so it lies across your chest
and midway over your shoulder near-
est the door, not over your neck.
OLMB033087
Page 41 of 653
2-24
Safety system of your vehicle
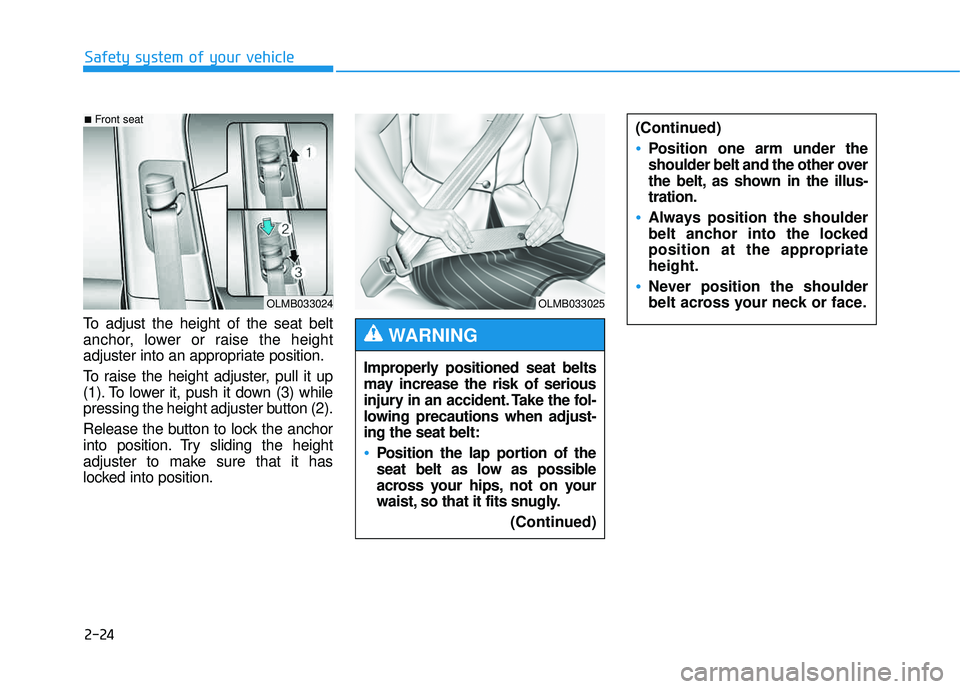
To adjust the height of the seat belt
anchor, lower or raise the height
adjuster into an appropriate position.
To raise the height adjuster, pull it up
(1). To lower it, push it down (3) while
pressing the height adjuster button (2).
Release the button to lock the anchor
into position. Try sliding the height
adjuster to make sure that it has
locked into position.(Continued)
Position one arm under the
shoulder belt and the other over
the belt, as shown in the illus-tration.
Always position the shoulder
belt anchor into the locked
position at the appropriateheight.
Never position the shoulder
belt across your neck or face.
OLMB033024
■
Front seat
OLMB033025
Improperly positioned seat belts
may increase the risk of serious
injury in an accident. Take the fol-
lowing precautions when adjust-ing the seat belt:
Position the lap portion of the
seat belt as low as possible
across your hips, not on your
waist, so that it fits snugly.
(Continued)
WARNING