turn signal HYUNDAI TUCSON 2015 Owners Manual
[x] Cancel search | Manufacturer: HYUNDAI, Model Year: 2015, Model line: TUCSON, Model: HYUNDAI TUCSON 2015Pages: 653, PDF Size: 8.45 MB
Page 16 of 653
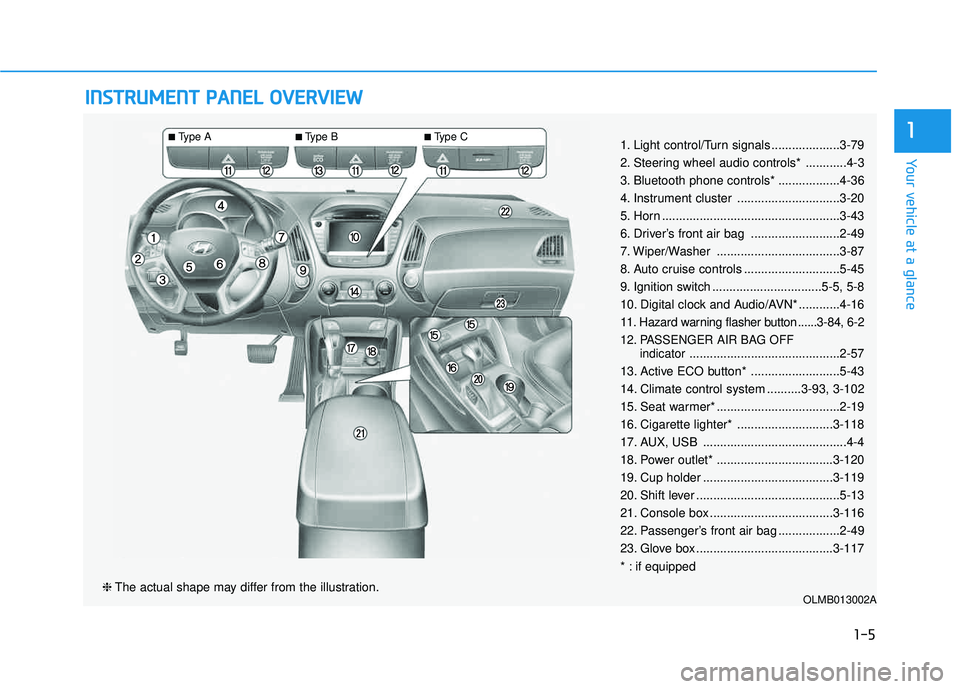
IINN SSTT RR UU MM EENN TT PP AA NN EELL OO VVEERR VV IIEE WW
OLMB013002A❈ The actual shape may differ from the illustration.
■Type A ■Type B ■
Type C
1-5
Your vehicle at a glance
11. Light control/Turn signals ....................3-79
2. Steering wheel audio controls* ............4-3
3. Bluetooth phone controls* ..................4-36
4. Instrument cluster ..............................3-20
5. Horn ....................................................3-43
6. Driver’s front air bag ..........................2-49
7. Wiper/Washer ....................................3-87
8. Auto cruise controls ............................5-45
9. Ignition switch ................................5-5, 5-8
10. Digital clock and Audio/AVN* ............4-16
11. Hazard warning flasher button ......3-84, 6-2
12. PASSENGER AIR BAG OFF
indicator............................................2-57
13. Active ECO button* ..........................5-43
14. Climate control system ..........3-93, 3-102
15. Seat warmer* ....................................2-19
16. Cigarette lighter* ............................3-118
17. AUX, USB ..........................................4-4
18. Power outlet* ..................................3-120
19. Cup holder ......................................3-119
20. Shift lever ..........................................5-13
21. Console box ....................................3-116
22. Passenger’s front air bag ..................2-49
23. Glove box ........................................3-117
* : if equipped
Page 70 of 653
2-53
Safety system of your vehicle
2
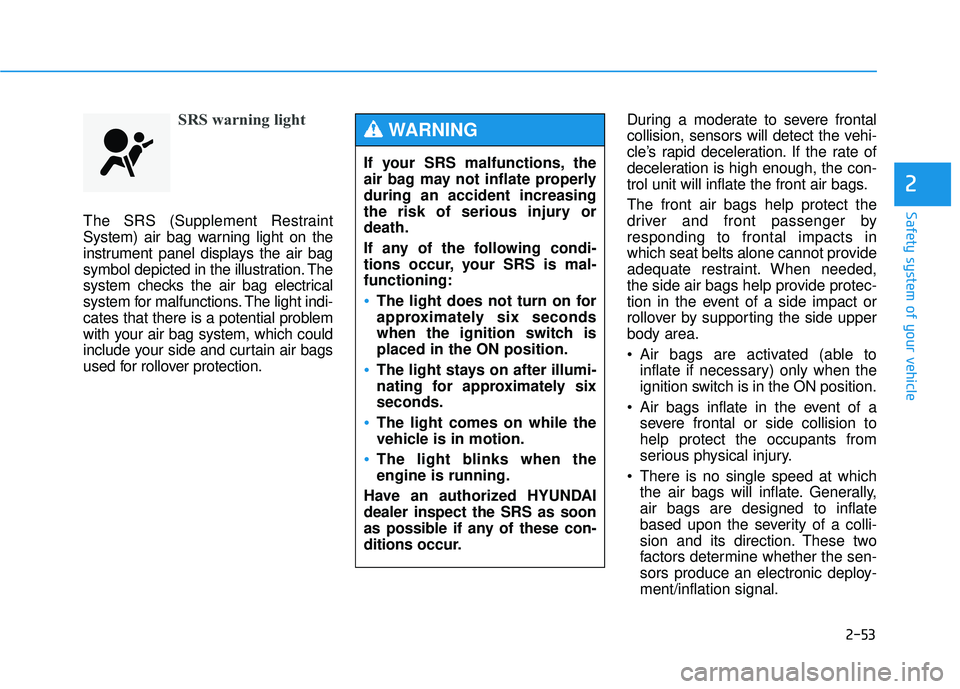
SRS warning light
The SRS (Supplement Restraint
System) air bag warning light on the
instrument panel displays the air bag
symbol depicted in the illustration. The
system checks the air bag electrical
system for malfunctions. The light indi-
cates that there is a potential problem
with your air bag system, which could
include your side and curtain air bags
used for rollover protection.During a moderate to severe frontal
collision, sensors will detect the vehi-
cle’s rapid deceleration. If the rate of
deceleration is high enough, the con-
trol unit will inflate the front air bags. The front air bags help protect the
driver and front passenger byresponding to frontal impacts in
which seat belts alone cannot provide
adequate restraint. When needed,
the side air bags help provide protec-
tion in the event of a side impact or
rollover by supporting the side upperbody area.
Air bags are activated (able to
inflate if necessary) only when the
ignition switch is in the ON position.
Air bags inflate in the event of a severe frontal or side collision tohelp protect the occupants from
serious physical injury.
There is no single speed at which the air bags will inflate. Generally,air bags are designed to inflate
based upon the severity of a colli-
sion and its direction. These two
factors determine whether the sen-
sors produce an electronic deploy-ment/inflation signal.
If your SRS malfunctions, the
air bag may not inflate properlyduring an accident increasing
the risk of serious injury ordeath.
If any of the following condi-
tions occur, your SRS is mal-functioning:
The light does not turn on for
approximately six seconds
when the ignition switch isplaced in the ON position.
The light stays on after illumi-
nating for approximately sixseconds.
The light comes on while the
vehicle is in motion.
The light blinks when the engine is running.
Have an authorized HYUNDAIdealer inspect the SRS as soon
as possible if any of these con-
ditions occur.
WARNING
Page 106 of 653
3-20
Convenient features of your vehicle
IINN SSTT RR UU MM EENN TT CC LLUU SSTT EERR
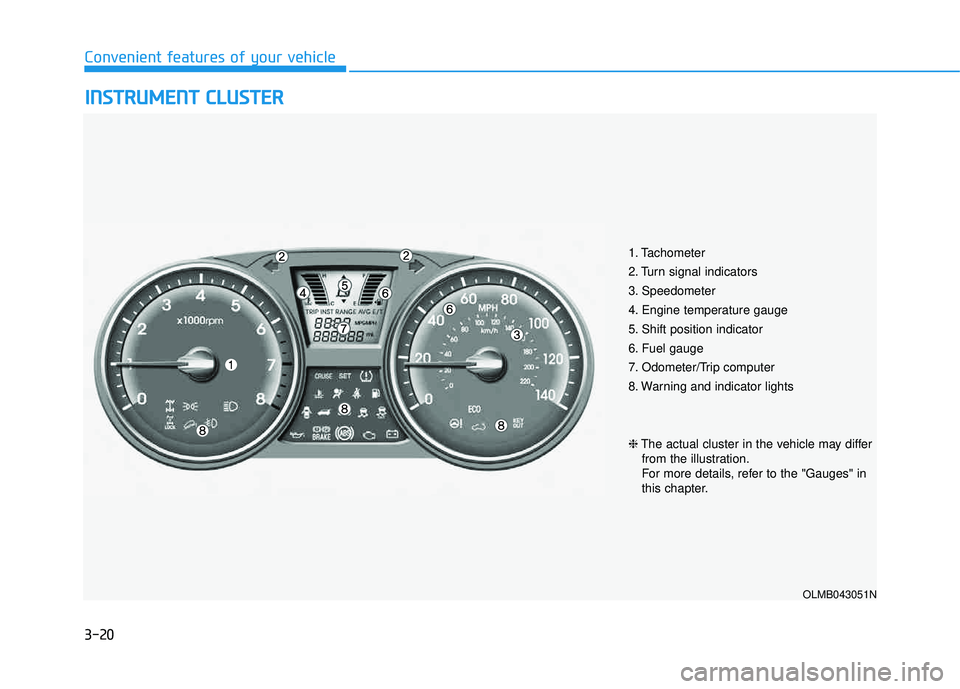
1. Tachometer
2. Turn signal indicators
3. Speedometer
4. Engine temperature gauge
5. Shift position indicator
6. Fuel gauge
7. Odometer/Trip computer
8. Warning and indicator lights
OLMB043051N
❈ The actual cluster in the vehicle may differ
from the illustration.
For more details, refer to the "Gauges" in
this chapter.
Page 117 of 653
3-31
Convenient features of your vehicle
3
Seat belt warning
As a reminder to the driver, the seat
belt warning light will blink for
approximately 6 seconds each time
you turn the ignition switch ON,
regardless of belt fastening.
For details, refer to the seat belt on chapter 2.
Turn signal indicator
The left or right turn signal blinks
when you signal a lane change or
turn. If the arrow comes on but does
not blink, blinks more rapidly than
normal, or does not illuminate at all,
a malfunction in the turn signal sys-
tem is indicated. Your dealer should
be consulted for repairs.
This indicator also blinks when the
hazard warning flasher button ispressed.
Driving the vehicle with a warn-
ing light on is dangerous. If thebrake warning light remains on,
have the brakes checked and
repaired immediately by an
authorized HYUNDAI dealer.
WARNING
Page 136 of 653
3-50
Convenient features of your vehicle
Programming HomeLink®
Please note the following:
When programming a garage door
opener, it is advised to park the
vehicle outside of the garage.
It is recommended that a new bat- tery be placed in the hand-held
transmitter of the device being pro-
grammed to HomeLink ®
for quicker
training and accurate transmission
of the radio-frequency signal.
Some vehicles may require the ignition switch to be placed in the
ACC (or "Accessories") position for
programming and/or operation ofHomeLink ®
.
In the event that there are still pro- gramming difficulties or questions
after following the programming
steps listed below, contactHomeLink ®
at: www.homelink.com
or by calling 1-800-355-3515.
Rolling code programming
Rolling code devices which are
"code-protected" and manufactured
after 1996 may be determined by the
following:
Reference the device owner's manual for verification.
The handheld transmitter appears to program the HomeLink ®
Universal Transceiver but does not
activate the device.
Press and hold the trained HomeLink button. The device has
the rolling code feature if the indi-
cator light flashes rapidly and then
turns solid after 2 seconds.
Before programming HomeLink
®
to a garage door opener or gate
operator, make sure people and
objects are out of the way of the
device to prevent potential harm
or damage. Do not use theHomeLink ®
with any garage door
opener that lacks the safety stop
and reverse features required by
U.S. federal safety standards
(this includes any garage door
opener model manufactured
before April 1, 1982). A garagedoor that cannot detect an object- signaling the door to stop and
reverse - does not meet current
U.S. federal safety standards.
Using a garage door opener
without these features increases
the risk of serious injury ordeath.WARNING
Page 137 of 653
3-51
Convenient features of your vehicle
3
To train rolling code devices, follow
these instructions:
1. At the garage door opener receiver(motor-head unit) in the garage,
locate the "learn" or "smart" button.
This can usually be found where thehanging antenna wire is attached to
the motor-head unit. Exact location
and color of the button may vary by
garage door opener brand. If there
is difficulty locating the training but-
ton, reference the device owner's
manual or please visit our Web site
at www.homelink.com.
2. Firmly press and release the "learn" or "smart" button (which activates
the "training light"). You will have 30seconds to initiate step 3. 3. Return to the vehicle and firmly
press, hold for two seconds andthen release the desiredHomeLink ®
button. Repeat the
"press/hold/release" sequence asecond time to complete the pro-
gramming. (Some devices may
require you to repeat thissequence a third time to complete
the programming.)
4. Press and hold the just-trained HomeLink ®
button and observe
the red Status Indicator LED. If the
indicator light stays on constantly,
programming is complete and
your device should activate.
5. To program the remaining two HomeLink ®
buttons, follow either
steps 1 through 4 above for other
Rolling Code devices or steps 2
through 5 in Standard Programming
for standard devices.Standard programming
To train most devices, follow these
instructions:
1. For first-time programming, press and hold the two outside buttons, HomeLink ®
Channel 1 and Channel
3 Buttons, until the indicator lightbegins to flash (after 20 seconds).
Release both buttons. Do not hold
the buttons for longer than 30 sec-
onds.
2. Position the end of your hand-held transmitter 1-3 inches (2-8 cm)
away from the HomeLink ®
buttons
while keeping the indicator light in
view.
3. Simultaneously press and hold both the HomeLink ®
and hand-
held transmitter button. DO NOT
release the buttons until step 4has been completed.
4. While continuing to hold the but- tons the red Indicator Status LED
will flash slowly and then rapidlyafter HomeLink ®
successfully
trains to the frequency signal from
the hand-held transmitter. Release
both buttons.
Page 145 of 653
3-59
Convenient features of your vehicle
3
4. Firmly press, hold for 5 secondsand release the programmed HomeLink ®
button up to two sepa-
rate times to activate the door. If the
door does not activate, press and
hold the just-trained HomeLink ®
but-
ton and observe the indicator light.
stantly, programming is complete
and your device should activatewhen the HomeLink ®
button is
pressed and released.
for 2 seconds and then turns to a
constant light, continue with
"Programming" steps 5-7 to com-
plete the programming of a rolling
code equipped device (most com-
monly a garage door opener).
5. At the garage door opener receiv- er (motor-head unit) in the garage,
locate the "learn" or "smart" but-
ton. This can usually be foundwhere the hanging antenna wire isattached to the motor-head unit. 6. Firmly press and release the
"learn" or "smart" button. (The
name and color of the button vary
by manufacturer). There are 30seconds to initiate step 7.
7. Return to the vehicle and firmly press, hold for 2 seconds and
release the programmedHomeLink ®
button. Repeat the
"press/hold/release" sequence a
second time, and, depending on
the brand of the garage dooropener (or other rolling code
equipped device), repeat thissequence a third time to complete
the programming process.
HomeLink ®
should now activate your
rolling code equipped device.Gate operator & Canadian program-
ming
During programming, your handheld
transmitter may automatically stop
transmitting. Continue to press the
Integrated HomeLink ®
Wireless
Control System button (note steps 2
through 3 in the Programming portion
of this document) while you press
and re-press ("cycle") your handheld
transmitter every two seconds untilthe frequency signal has been
learned. The indicator light will flash
slowly and then rapidly after several
seconds upon successful training.
Operating HomeLink ®
To operate, simply press and release
the programmed HomeLink
®
button.
Activation will now occur for the
trained device (i.e. garage door
opener, gate operator, security sys-
tem, entry door lock, home/office
lighting, etc.). For convenience, the
hand-held transmitter of the device
may also be used at any time.
Page 169 of 653
3-83
Convenient features of your vehicle
3
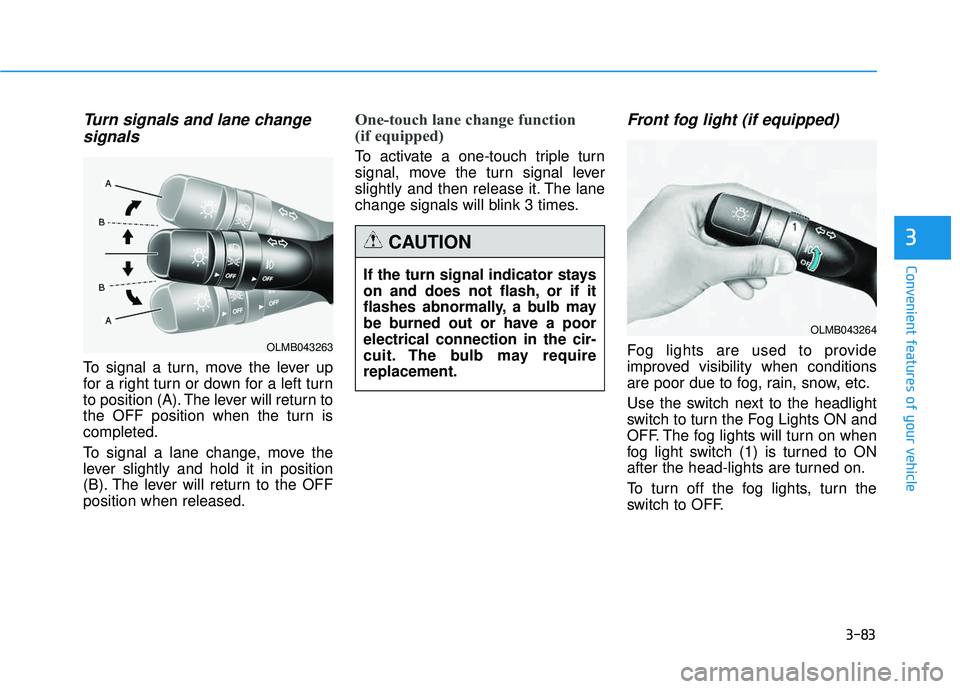
Turn signals and lane changesignals
To signal a turn, move the lever up
for a right turn or down for a left turn
to position (A). The lever will return to
the OFF position when the turn iscompleted.
To signal a lane change, move the
lever slightly and hold it in position
(B). The lever will return to the OFFposition when released.
One-touch lane change function
(if equipped)
To activate a one-touch triple turn
signal, move the turn signal lever
slightly and then release it. The lane
change signals will blink 3 times.
Front fog light (if equipped)
Fog lights are used to provide
improved visibility when conditions
are poor due to fog, rain, snow, etc.
Use the switch next to the headlight
switch to turn the Fog Lights ON and
OFF. The fog lights will turn on when
fog light switch (1) is turned to ON
after the head-lights are turned on.
To turn off the fog lights, turn the
switch to OFF.
If the turn signal indicator stays
on and does not flash, or if it
flashes abnormally, a bulb may
be burned out or have a poorelectrical connection in the cir-
cuit. The bulb may requirereplacement.
CAUTION
OLMB043264
OLMB043263
Page 170 of 653
3-84
Convenient features of your vehicle
You can use the fog lights only when
the headlights are on low beam.
When the headlight switch is in the
AUTO position, you can also use the
fog lights when the headlights turn on
automatically. The fog lights will go
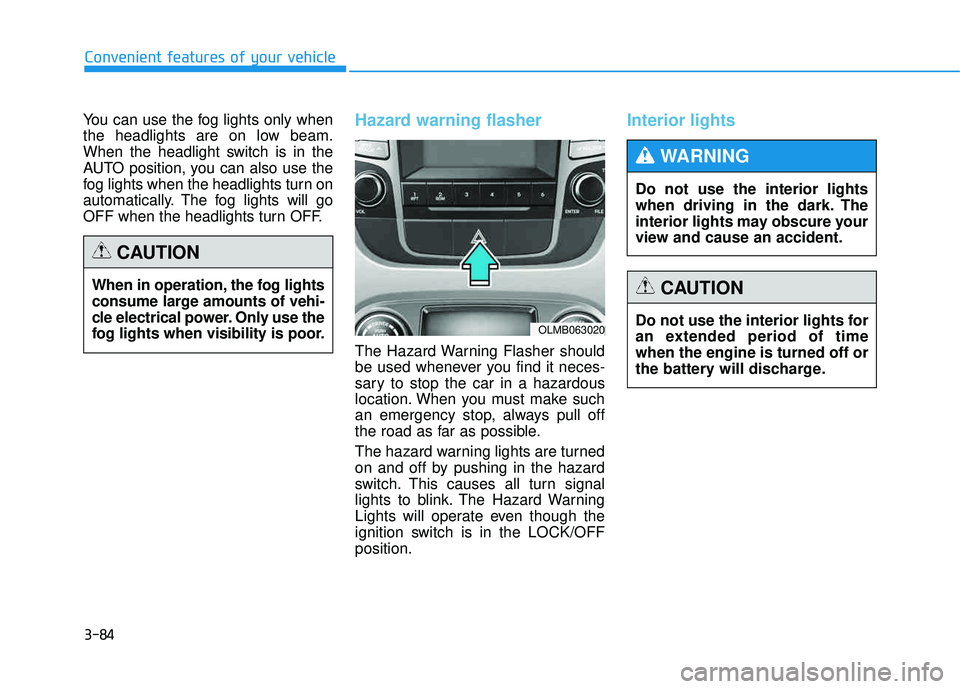
OFF when the headlights turn OFF.Hazard warning flasher
The Hazard Warning Flasher should
be used whenever you find it neces-
sary to stop the car in a hazardous
location. When you must make such
an emergency stop, always pull off
the road as far as possible.
The hazard warning lights are turned
on and off by pushing in the hazard
switch. This causes all turn signal
lights to blink. The Hazard Warning
Lights will operate even though the
ignition switch is in the LOCK/OFFposition.
Interior lights
When in operation, the fog lights
consume large amounts of vehi-
cle electrical power. Only use the
fog lights when visibility is poor.
CAUTION
OLMB063020Do not use the interior lights for
an extended period of timewhen the engine is turned off or
the battery will discharge.
CAUTION
Do not use the interior lights
when driving in the dark. The
interior lights may obscure your
view and cause an accident.
WARNING
Page 213 of 653
4-2
✽✽NOTICE
If you install an aftermarket HID headlamp, your vehicle's audio
and electronic device may mal-
function.
Prevent chemicals such as per- fume, cosmetic oil, sun cream,
hand cleaner, and air freshener
from contacting the interior parts
because they may cause damage
or discoloration. Antenna
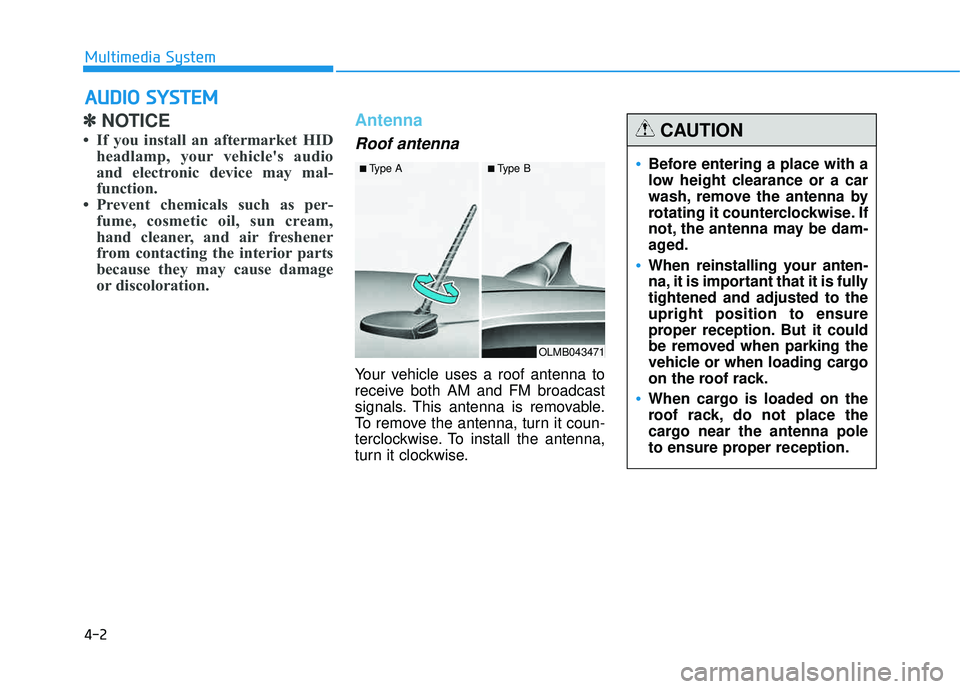
Roof antenna
Your vehicle uses a roof antenna to
receive both AM and FM broadcast
signals. This antenna is removable.
To remove the antenna, turn it coun-
terclockwise. To install the antenna,
turn it clockwise.
AAUU DDIIOO SS YY SSTT EEMM
Multimedia System
OLMB043471
■
Type A ■Type B
•Before entering a place with a
low height clearance or a car
wash, remove the antenna by
rotating it counterclockwise. If
not, the antenna may be dam-
aged.
When reinstalling your anten-
na, it is important that it is fullytightened and adjusted to theupright position to ensure
proper reception. But it could
be removed when parking the
vehicle or when loading cargo
on the roof rack.
When cargo is loaded on the
roof rack, do not place the
cargo near the antenna pole
to ensure proper reception.
CAUTION