button HYUNDAI TUCSON 2016 Owners Manual
[x] Cancel search | Manufacturer: HYUNDAI, Model Year: 2016, Model line: TUCSON, Model: HYUNDAI TUCSON 2016Pages: 642, PDF Size: 9.78 MB
Page 17 of 642
F17F17
Before driving.........................................................5-4
Before Entering the Vehicle ...........................................5-4
Before Starting ..................................................................5-4
Ignition switch ........................................................5-6
Key Ignition Switch ...........................................................5-6
Engine Start/Stop Button................................................5-9
Transmission .........................................................5-14
Automatic Transmission .................................................5-14
Ecoshift dual clutch transmission ...............................5-18
Shift-Lock System ..........................................................5-24
Shift-Lock Release .........................................................5-25
Parking ...............................................................................5-25
Good Driving Practices ..................................................5-26
Braking system.....................................................5-28
Power Brakes ...................................................................5-28
Disc Brakes Wear Indicator ..........................................5-29
Parking Brake...................................................................5-29
Anti-lock Brake System (ABS) ....................................5-31
Electronic Stability Control (ESC) ................................5-33
Vehicle Stability Management (VSM).........................5-37
Hill-Start Assist Control (HAC) ....................................5-38
Downhill Brake Control (DBC) ......................................5-39
Good Braking Practices .................................................5-41
All wheel drive (AWD) .........................................5-42
AWD operation.................................................................5-43
Emergency precautions .................................................5-47
Drive mode integrated control system .............5-49
Blind spot detection system (BSD) ...................5-51
BSD (Blind Spot Detection) /
LCA (Lane Change Assist) .............................................5-52
RCTA (Rear Cross Traffic Alert) ..................................5-55
Autonomous emergency braking (AEB) ...........5-59
System setting and activation......................................5-59
AEB warning message and system control ..............5-61
AEB front radar sensor .................................................5-64
System malfunction ........................................................5-65
Limitations of the system .............................................5-67
Lane departure warning system (LDWS) .........5-71
LDWS Operation ..............................................................5-72
Warning Light and Message.........................................5-73
Limitations of the system .............................................5-73
Cruise control .......................................................5-75
Cruise Control operation ...............................................5-75
5Driving your vehicle
Page 25 of 642
1-4
Your vehicle at a glance
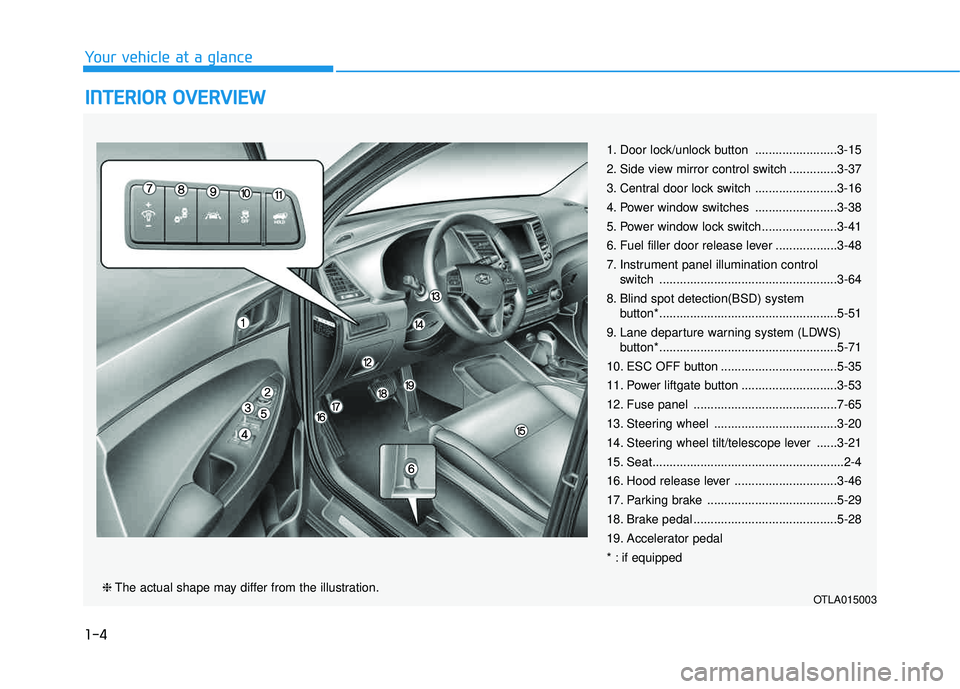
IINN TTEERR IIOO RR OO VVEERR VV IIEE WW
1. Door lock/unlock button ........................3-15
2. Side view mirror control switch ..............3-37
3. Central door lock switch ........................3-16
4. Power window switches ........................3-38
5. Power window lock switch......................3-41
6. Fuel filler door release lever ..................3-48
7. Instrument panel illumination control
switch ....................................................3-64
8. Blind spot detection(BSD) system button* ....................................................5-51
9. Lane departure warning system (LDWS) button* ....................................................5-71
10. ESC OFF button ..................................5-35
11. Power liftgate button ............................3-53
12. Fuse panel ..........................................7-65
13. Steering wheel ....................................3-20
14. Steering wheel tilt/telescope lever ......3-21
15. Seat........................................................2-4
16. Hood release lever ..............................3-46
17. Parking brake ......................................5-29
18. Brake pedal ..........................................5-28
19. Accelerator pedal
* : if equipped
OTLA015003❈ The actual shape may differ from the illustration.
Page 26 of 642
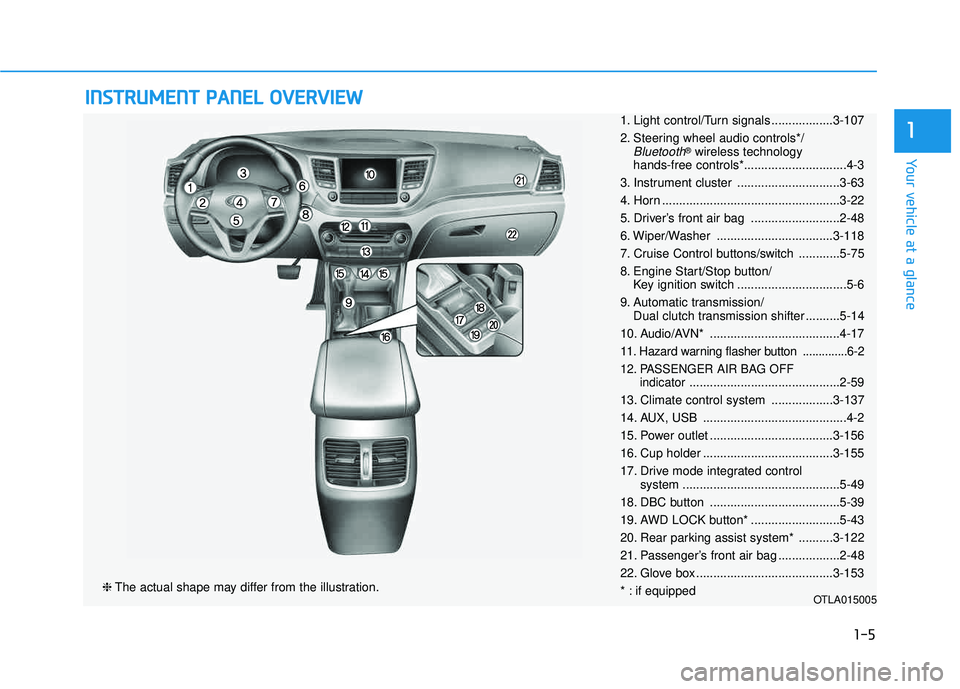
IINN SSTT RR UU MM EENN TT PP AA NN EELL OO VVEERR VV IIEE WW
❈ The actual shape may differ from the illustration.
1-5
Your vehicle at a glance
11. Light control/Turn signals ..................3-107
2. Steering wheel audio controls*/
Bluetooth®
wireless technology
hands-free controls*..............................4-3
3. Instrument cluster ..............................3-63
4. Horn ....................................................3-22
5. Driver’s front air bag ..........................2-48
6. Wiper/Washer ..................................3-118
7. Cruise Control buttons/switch ............5-75
8. Engine Start/Stop button/ Key ignition switch ................................5-6
9. Automatic transmission/ Dual clutch transmission shifter ..........5-14
10. Audio/AVN* ......................................4-17
11. Hazard warning flasher button ..............6-2
12. PASSENGER AIR BAG OFF indicator............................................2-59
13. Climate control system ..................3-137
14. AUX, USB ..........................................4-2
15. Power outlet ....................................3-156
16. Cup holder ......................................3-155
17. Drive mode integrated control system ..............................................5-49
18. DBC button ......................................5-39
19. AWD LOCK button* ..........................5-43
20. Rear parking assist system* ..........3-122
21. Passenger’s front air bag ..................2-48
22. Glove box ........................................3-153
* : if equipped
OTLA015005
Page 43 of 642
2-16
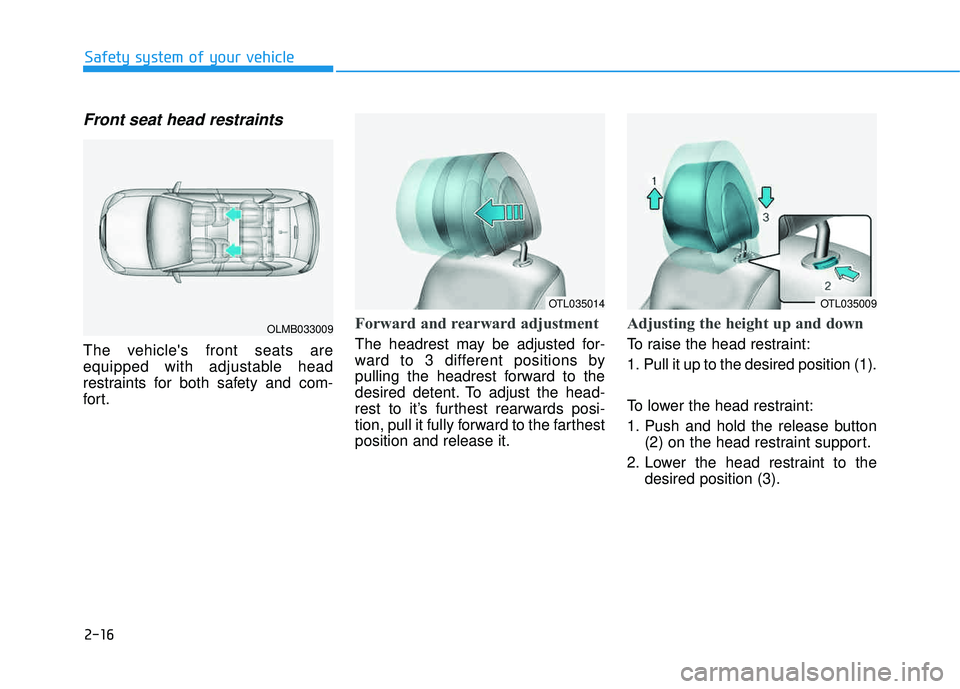
Front seat head restraints
The vehicle's front seats are
equipped with adjustable head
restraints for both safety and com-
for t.
Forward and rearward adjustment
The headrest may be adjusted for-
ward to 3 different positions by
pulling the headrest forward to the
desired detent. To adjust the head-
rest to it’s furthest rearwards posi-
tion, pull it fully forward to the farthestposition and release it.
Adjusting the height up and down
To raise the head restraint:
1. Pull it up to the desired position (1).
To lower the head restraint:
1. Push and hold the release button(2) on the head restraint support.
2. Lower the head restraint to the desired position (3).
Safety system of your vehicle
OLMB033009
OTL035014OTL035009
Page 44 of 642
2-17
Safety system of your vehicle
2
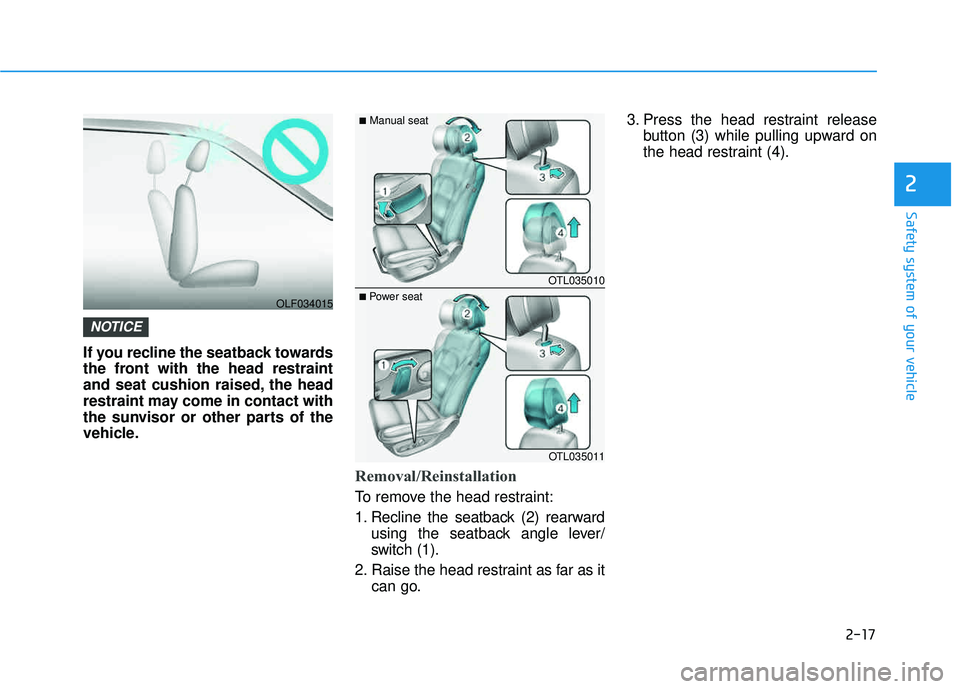
If you recline the seatback towards
the front with the head restraint
and seat cushion raised, the head
restraint may come in contact with
the sunvisor or other parts of the
vehicle.
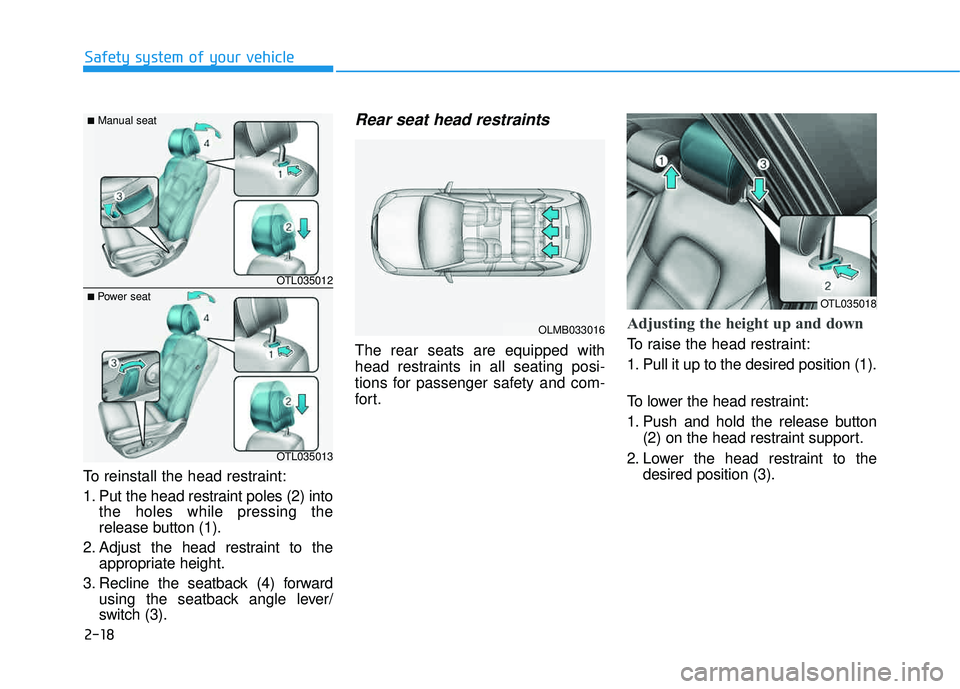
Removal/Reinstallation
To remove the head restraint:
1. Recline the seatback (2) rearwardusing the seatback angle lever/
switch (1).
2. Raise the head restraint as far as it can go. 3. Press the head restraint release
button (3) while pulling upward on
the head restraint (4).
NOTICE
OLF034015
OTL035010
OTL035011
■
Manual seat
■ Power seat
Page 45 of 642
2-18
Safety system of your vehicle
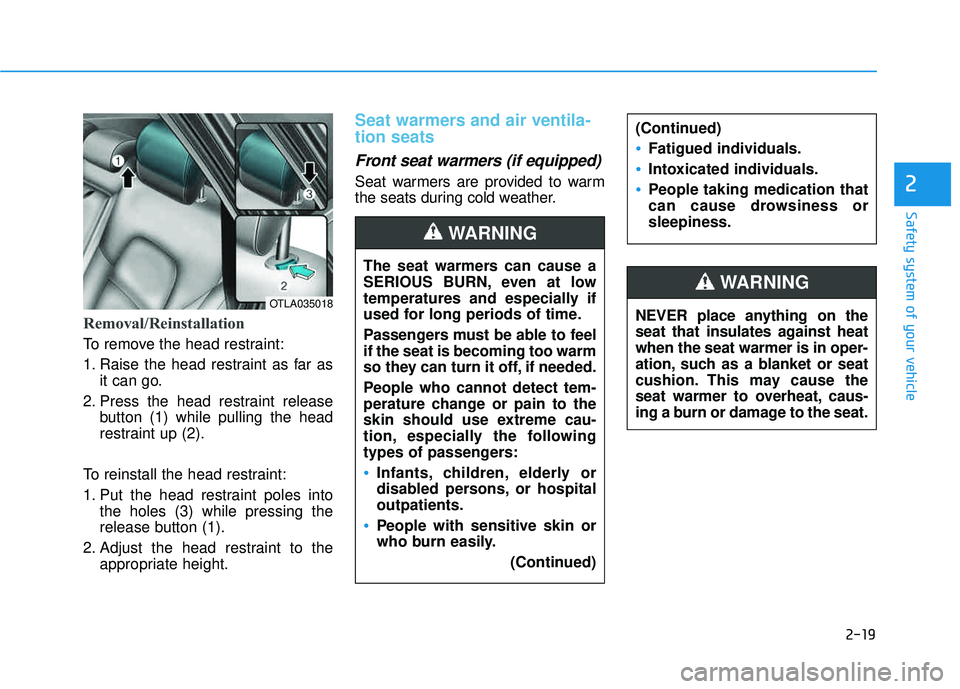
To reinstall the head restraint:
1. Put the head restraint poles (2) intothe holes while pressing the
release button (1).
2. Adjust the head restraint to the appropriate height.
3. Recline the seatback (4) forward using the seatback angle lever/
switch (3).
Rear seat head restraints
The rear seats are equipped with
head restraints in all seating posi-
tions for passenger safety and com-
for t.
Adjusting the height up and down
To raise the head restraint:
1. Pull it up to the desired position (1).
To lower the head restraint:
1. Push and hold the release button
(2) on the head restraint support.
2. Lower the head restraint to the desired position (3).
OTL035012
OTL035013
■
Manual seat
■ Power seat
OLMB033016
OTL035018
Page 46 of 642
2-19
Safety system of your vehicle
2
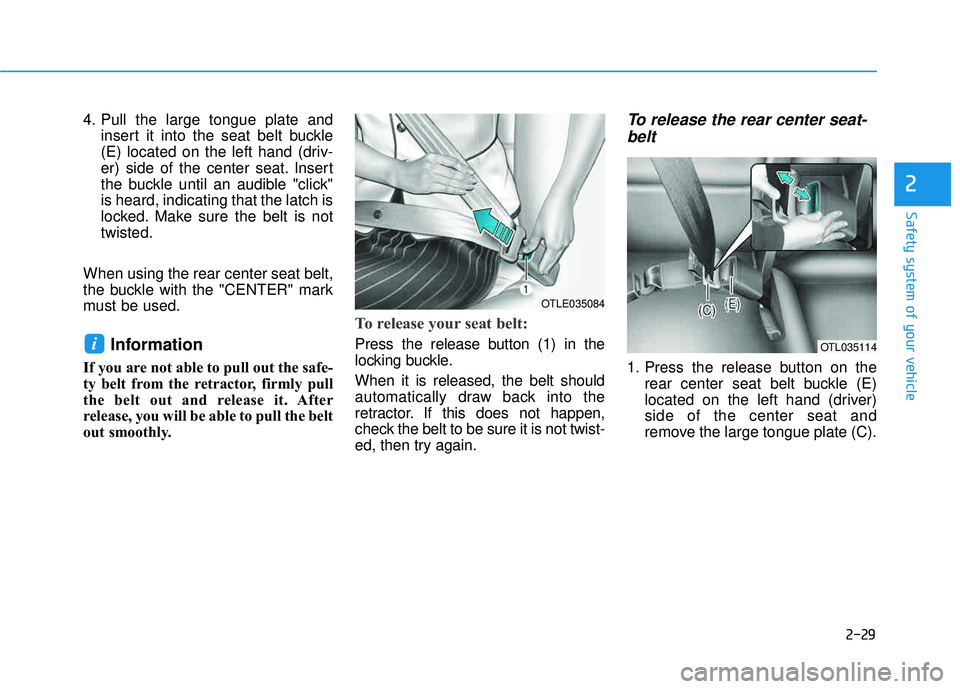
Removal/Reinstallation
To remove the head restraint:
1. Raise the head restraint as far asit can go.
2. Press the head restraint release button (1) while pulling the head
restraint up (2).
To reinstall the head restraint:
1. Put the head restraint poles into the holes (3) while pressing the
release button (1).
2. Adjust the head restraint to the appropriate height.
Seat warmers and air ventila- tion seats
Front seat warmers (if equipped)
Seat warmers are provided to warm
the seats during cold weather.
OTLA035018
The seat warmers can cause a
SERIOUS BURN, even at low
temperatures and especially if
used for long periods of time.
Passengers must be able to feel if the seat is becoming too warm
so they can turn it off, if needed.
People who cannot detect tem-
perature change or pain to the
skin should use extreme cau-
tion, especially the following
types of passengers:
Infants, children, elderly or
disabled persons, or hospitaloutpatients.
People with sensitive skin or
who burn easily.
(Continued)
(Continued)
Fatigued individuals.
Intoxicated individuals.
People taking medication that
can cause drowsiness orsleepiness.
WARNING
NEVER place anything on the
seat that insulates against heatwhen the seat warmer is in oper-
ation, such as a blanket or seat
cushion. This may cause the
seat warmer to overheat, caus-
ing a burn or damage to the seat.
WARNING
Page 54 of 642

2-27
Safety system of your vehicle
2
Height adjustment
You can adjust the height of the shoulder belt anchor to one of the
four different positions for maximum
comfort and safety.
The shoulder portion should be
adjusted so it lies across your chest
and midway over your shoulder near-
est the door, not over your neck.To adjust the height of the seat belt
anchor, lower or raise the height
adjuster into an appropriate position.
To raise the height adjuster, pull it up
(1). To lower it, push it down (3) while
pressing the height adjuster button (2).
Release the button to lock the anchor
into position. Try sliding the height
adjuster to make sure that it has
locked into position.
Rear Seat Belt – Passenger's 3-
point system with convertiblelocking retractor
This type of seat belt combines the
features of both an emergency locking
retractor seat belt and an automatic
locking retractor seat belt. Convertible
retractor type seat belts are installed inthe rear seat positions to help accom-modate the installation of child
restraint systems. Although a convert-
ible retractor is also installed in thefront passenger seat position, NEVER
place any infant/child restraint system
in the front seat of the vehicle.
(Continued)
Position one arm under the
shoulder belt and the other over
the belt, as shown in the illus-tration.
Always position the shoulder
belt anchor into the locked
position at the appropriateheight.
Never position the shoulder
belt across your neck or face.
OTL035026
■
Front seat
Page 56 of 642
2-29
Safety system of your vehicle
2
4. Pull the large tongue plate andinsert it into the seat belt buckle
(E) located on the left hand (driv-
er) side of the center seat. Insert
the buckle until an audible "click"is heard, indicating that the latch is
locked. Make sure the belt is nottwisted.
When using the rear center seat belt,
the buckle with the "CENTER" mark
must be used.
Information
If you are not able to pull out the safe-
ty belt from the retractor, firmly pull
the belt out and release it. After
release, you will be able to pull the belt
out smoothly.
To release your seat belt:
Press the release button (1) in the
locking buckle. When it is released, the belt should
automatically draw back into the
retractor. If this does not happen,
check the belt to be sure it is not twist-
ed, then try again.
To release the rear center seat- belt
1. Press the release button on the rear center seat belt buckle (E)
located on the left hand (driver)side of the center seat and
remove the large tongue plate (C).
i
OTLE035084
OTL035114
Page 73 of 642

2-46
Safety system of your vehicle
2. Fasten the lap/shoulder belt latchinto the buckle. Listen for the dis-
tinct "click" sound.
Information
Position the release button so that it is
easy to access in case of an emergency. 3. Pull the shoulder portion of the
seat belt all the way out. When the
shoulder portion of the seat belt is
fully extended, it will shift the
retractor to the "Automatic
Locking" (child restraint) mode. 4. Slowly allow the shoulder portion
of the seat belt to retract and listen
for an audible "clicking" or "ratch-
eting" sound. This indicates that
the retractor is in the "Automatic
Locking" mode. If no distinctsound is heard, repeat steps 3and 4.
i
OLMB033045OLMB033097OLMB033098