clock Hyundai Tucson 2019 - RHD (UK, Australia) Owner's Guide
[x] Cancel search | Manufacturer: HYUNDAI, Model Year: 2019, Model line: Tucson, Model: Hyundai Tucson 2019Pages: 685, PDF Size: 17.76 MB
Page 546 of 685
6-43
What to do in an emergency
6
When towing your vehicle in an
emergency without wheel dollies:
1. Place the ignition switch in theACC position.
2. Place the shift lever in N (Neutral).
3. Release the parking brake.
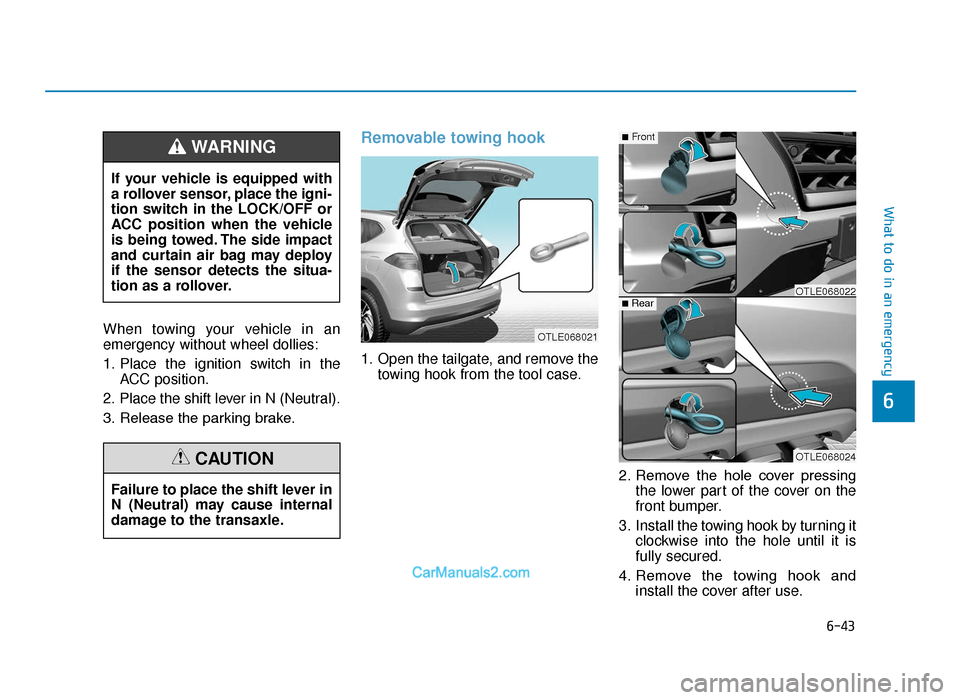
Removable towing hook
1. Open the tailgate, and remove the towing hook from the tool case.
2. Remove the hole cover pressingthe lower part of the cover on the
front bumper.
3. Install the towing hook by turning it clockwise into the hole until it is
fully secured.
4. Remove the towing hook and install the cover after use.
Failure to place the shift lever in
N (Neutral) may cause internal
damage to the transaxle.
CAUTION
OTLE068021
OTLE068022
OTLE068024
■Front
■Rear
If your vehicle is equipped with
a rollover sensor, place the igni-
tion switch in the LOCK/OFF or
ACC position when the vehicle
is being towed. The side impact
and curtain air bag may deploy
if the sensor detects the situa-
tion as a rollover.
WARNING
TLe UK 6.qxp 5/10/2018 1:22 PM Page 43
Page 570 of 685
7-21
7
Maintenance
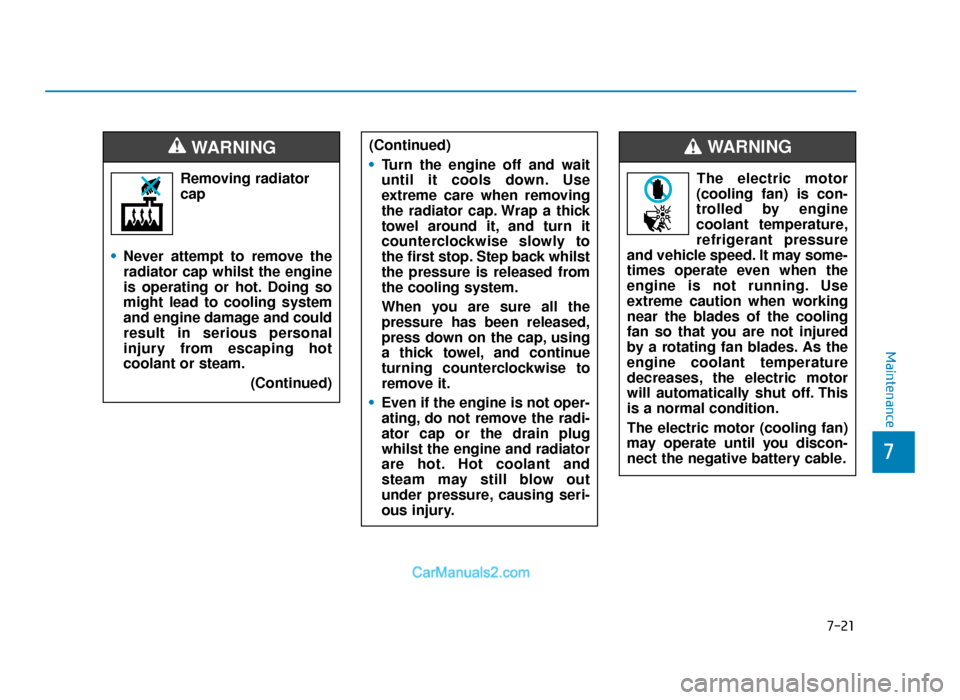
Removing radiatorcap
• Never attempt to remove the
radiator cap whilst the engine
is operating or hot. Doing so
might lead to cooling system
and engine damage and could
result in serious personal
injury from escaping hot
coolant or steam.
(Continued)
WARNING (Continued)
•Turn the engine off and wait
until it cools down. Use
extreme care when removing
the radiator cap. Wrap a thick
towel around it, and turn it
counterclockwise slowly to
the first stop. Step back whilst
the pressure is released from
the cooling system.
When you are sure all the
pressure has been released,
press down on the cap, using
a thick towel, and continue
turning counterclockwise to
remove it.
• Even if the engine is not oper-
ating, do not remove the radi-
ator cap or the drain plug
whilst the engine and radiator
are hot. Hot coolant and
steam may still blow out
under pressure, causing seri-
ous injury.
The electric motor
(cooling fan) is con-
trolled by engine
coolant temperature,
refrigerant pressure
and vehicle speed. It may some-
times operate even when the
engine is not running. Use
extreme caution when working
near the blades of the cooling
fan so that you are not injured
by a rotating fan blades. As the
engine coolant temperature
decreases, the electric motor
will automatically shut off. This
is a normal condition.
The electric motor (cooling fan)
may operate until you discon-
nect the negative battery cable.
WARNING
TLe UK 7.qxp 5/10/2018 1:33 PM Page 21
Page 601 of 685
7-52
Maintenance
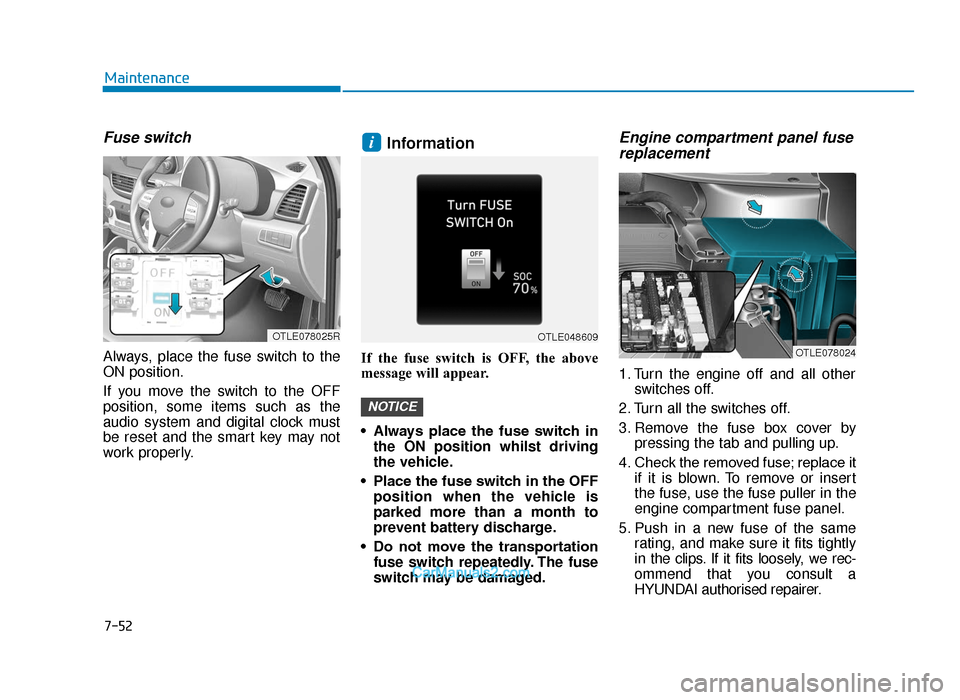
Fuse switch
Always, place the fuse switch to the
ON position.
If you move the switch to the OFF
position, some items such as the
audio system and digital clock must
be reset and the smart key may not
work properly.
Information
If the fuse switch is OFF, the above
message will appear.
• Always place the fuse switch inthe ON position whilst driving
the vehicle.
• Place the fuse switch in the OFF position when the vehicle is
parked more than a month to
prevent battery discharge.
• Do not move the transportation fuse switch repeatedly. The fuse
switch may be damaged.
Engine compartment panel fusereplacement
1. Turn the engine off and all other switches off.
2. Turn all the switches off.
3. Remove the fuse box cover by pressing the tab and pulling up.
4. Check the removed fuse; replace it if it is blown. To remove or insert
the fuse, use the fuse puller in the
engine compartment fuse panel.
5. Push in a new fuse of the same rating, and make sure it fits tightly
in the clips. If it fits loosely, we rec-
ommend that you consult a
HYUNDAI authorised repairer.
NOTICE
i
OTLE048609
OTLE078024
OTLE078025R
TLe UK 7.qxp 5/10/2018 1:35 PM Page 52
Page 619 of 685
7-70
Maintenance
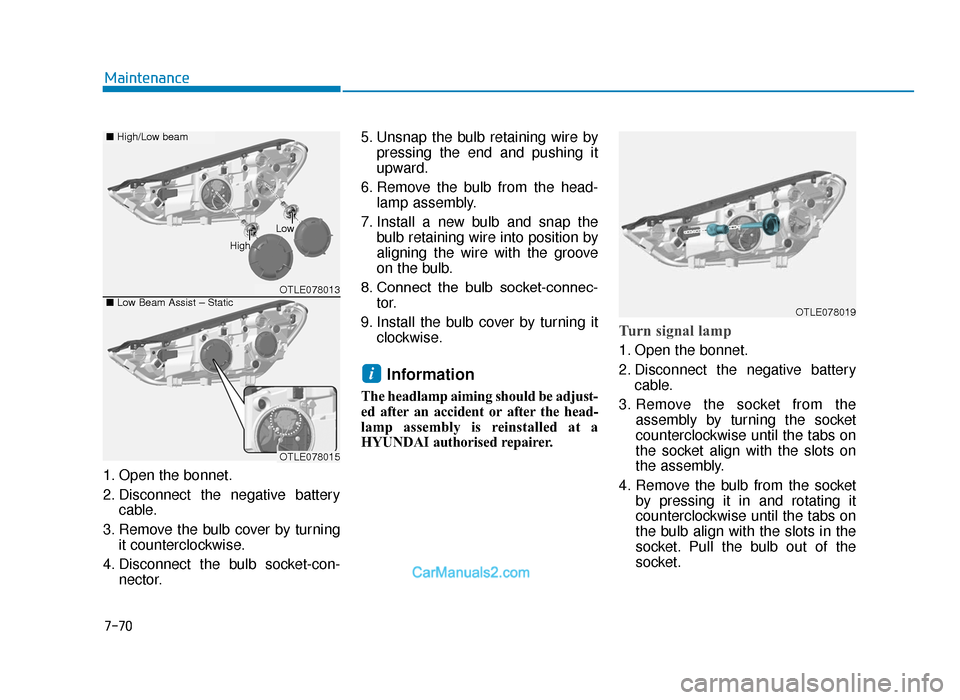
1. Open the bonnet.
2. Disconnect the negative battery cable.
3. Remove the bulb cover by turning it counterclockwise.
4. Disconnect the bulb socket-con- nector. 5. Unsnap the bulb retaining wire by
pressing the end and pushing it
upward.
6. Remove the bulb from the head- lamp assembly.
7. Install a new bulb and snap the bulb retaining wire into position by
aligning the wire with the groove
on the bulb.
8. Connect the bulb socket-connec- tor.
9. Install the bulb cover by turning it clockwise.
Information
The headlamp aiming should be adjust-
ed after an accident or after the head-
lamp assembly is reinstalled at a
HYUNDAI authorised repairer.
Turn signal lamp
1. Open the bonnet.
2. Disconnect the negative batterycable.
3. Remove the socket from the assembly by turning the socket
counterclockwise until the tabs on
the socket align with the slots on
the assembly.
4. Remove the bulb from the socket by pressing it in and rotating it
counterclockwise until the tabs on
the bulb align with the slots in the
socket. Pull the bulb out of the
socket.
i
OTLE078013
OTLE078015
■Low Beam Assist – Static
■High/Low beam
Low
High
OTLE078019
TLe UK 7.qxp 5/10/2018 1:38 PM Page 70
Page 620 of 685
7-71
7
Maintenance
5. Insert a new bulb by inserting itinto the socket and rotating it until
it locks into place.
6. Install the socket in the assembly by aligning the tabs on the socket
with the slots in the assembly.
7. Push the socket into the assembly and turn the socket clockwise.
Position lamp/Daytime running lamp
If the LED lamp does not operate, we
recommend you to have the vehicle
checked by a HYUNDAI authorised
repairer.
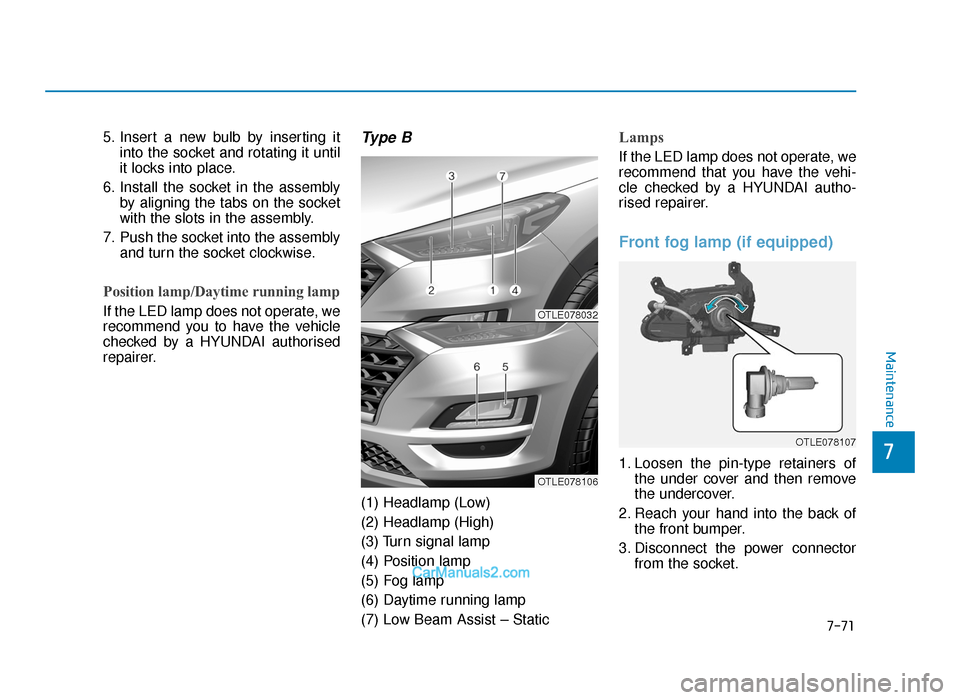
Type B
(1) Headlamp (Low)
(2) Headlamp (High)
(3) Turn signal lamp
(4) Position lamp
(5) Fog lamp
(6) Daytime running lamp
(7) Low Beam Assist – Static
Lamps
If the LED lamp does not operate, we
recommend that you have the vehi-
cle checked by a HYUNDAI autho-
rised repairer.
Front fog lamp (if equipped)
1. Loosen the pin-type retainers ofthe under cover and then remove
the undercover.
2. Reach your hand into the back of the front bumper.
3. Disconnect the power connector from the socket.
OTLE078107
OTLE078032
OTLE078106
TLe UK 7.qxp 5/10/2018 1:38 PM Page 71
Page 621 of 685
7-72
Maintenance
4. Remove the bulb-socket from the housing by turning the socket
counterclockwise until the tabs on
the socket align with the slots of
the housing.
5. Install a new bulb-socket into the housing by aligning the tabs on the
socket with the slots in the housing.
Push the socket into the housing
and turn the socket clockwise.
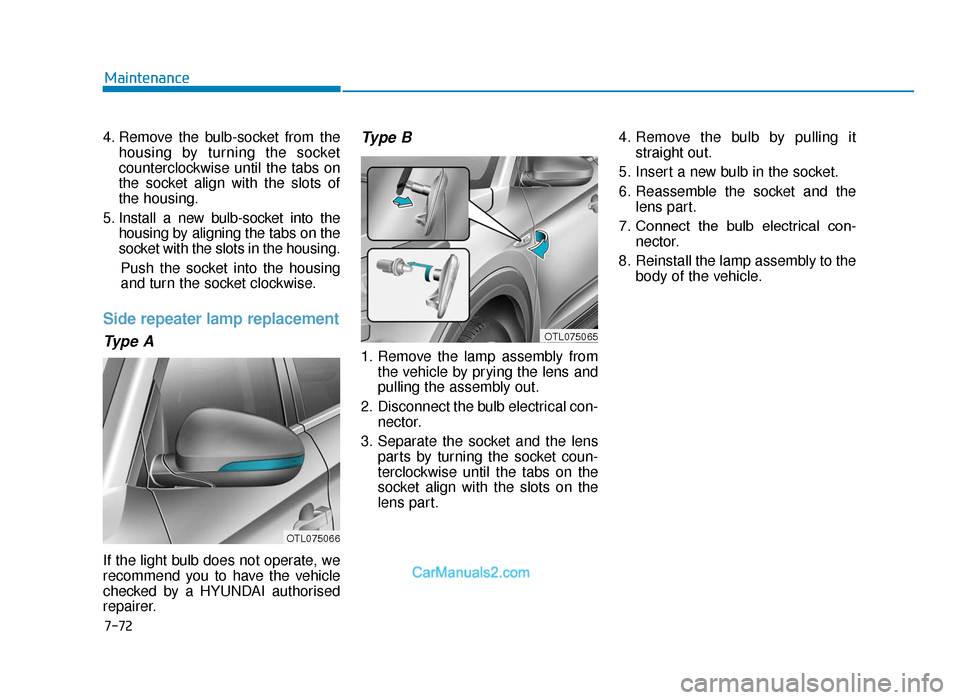
Side repeater lamp replacement
Type A
If the light bulb does not operate, we
recommend you to have the vehicle
checked by a HYUNDAI authorised
repairer.
Type B
1. Remove the lamp assembly from the vehicle by prying the lens and
pulling the assembly out.
2. Disconnect the bulb electrical con- nector.
3. Separate the socket and the lens parts by turning the socket coun-
terclockwise until the tabs on the
socket align with the slots on the
lens part. 4. Remove the bulb by pulling it
straight out.
5. Insert a new bulb in the socket.
6. Reassemble the socket and the lens part.
7. Connect the bulb electrical con- nector.
8. Reinstall the lamp assembly to the body of the vehicle.
OTL075065
OTL075066
TLe UK 7.qxp 5/10/2018 1:39 PM Page 72
Page 622 of 685
7-73
7
Maintenance
Headlamp and front fog lamp
aiming
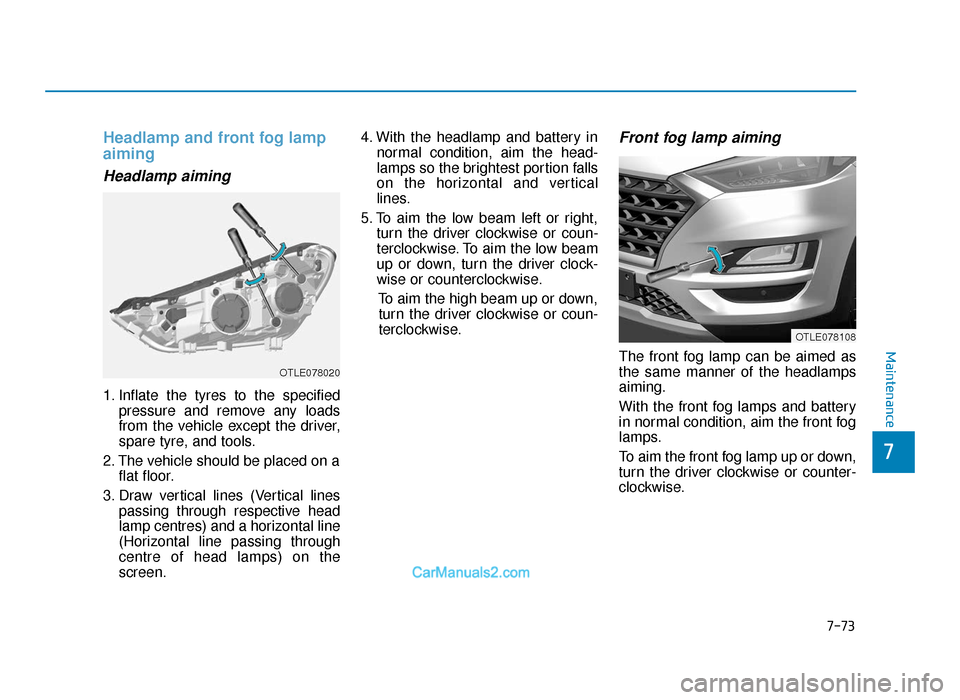
Headlamp aiming
1. Inflate the tyres to the specifiedpressure and remove any loads
from the vehicle except the driver,
spare tyre, and tools.
2. The vehicle should be placed on a flat floor.
3. Draw vertical lines (Vertical lines passing through respective head
lamp centres) and a horizontal line
(Horizontal line passing through
centre of head lamps) on the
screen. 4. With the headlamp and battery in
normal condition, aim the head-
lamps so the brightest portion falls
on the horizontal and vertical
lines.
5. To aim the low beam left or right, turn the driver clockwise or coun-
terclockwise. To aim the low beam
up or down, turn the driver clock-
wise or counterclockwise.
To aim the high beam up or down,turn the driver clockwise or coun-
terclockwise.
Front fog lamp aiming
The front fog lamp can be aimed as
the same manner of the headlamps
aiming.
With the front fog lamps and battery
in normal condition, aim the front fog
lamps.
To aim the front fog lamp up or down,
turn the driver clockwise or counter-
clockwise.
OTLE078020
OTLE078108
TLe UK 7.qxp 5/10/2018 1:39 PM Page 73
Page 627 of 685
![Hyundai Tucson 2019 - RHD (UK, Australia) Owners Guide 7-78
Maintenance
[A] : Stop/tail lamp , [B] : Turn signal lamp
5. Remove the socket from theassembly by turning the socket
counterclockwise until the tabs on
the socket align with the slots on
the ass](/img/35/19695/w960_19695-626.png "Hyundai Tucson 2019 - RHD (UK, Australia) Owners Guide 7-78
Maintenance
[A] : Stop/tail lamp , [B] : Turn signal lamp
5. Remove the socket from theassembly by turning the socket
counterclockwise until the tabs on
the socket align with the slots on
the ass")
7-78
Maintenance
[A] : Stop/tail lamp , [B] : Turn signal lamp
5. Remove the socket from theassembly by turning the socket
counterclockwise until the tabs on
the socket align with the slots on
the assembly.
6. Remove the bulb from the socket by pressing it in and rotating it
counterclockwise until the tabs on
the bulb align with the slots in the
socket. Pull the bulb out of the
socket.
7. Insert a new bulb by inserting it into the socket and rotating it until it
locks into place. 8. Install the socket in the assembly
by aligning the tabs on the socket
with the slots in the assembly.
Push the socket into the assembly
and turn the socket clockwise.
9. Reinstall the lamp assembly to the body of the vehicle.
Stop/tail lamp, tail lamp
(Type B, LED)
If the LED lamp does not operate, we
recommend you to have the vehicle
checked by a HYUNDAI authorised
repairer.
OTLE078037
TLe UK 7.qxp 5/10/2018 1:39 PM Page 78
Page 628 of 685
7-79
7
Maintenance
Inside lamp
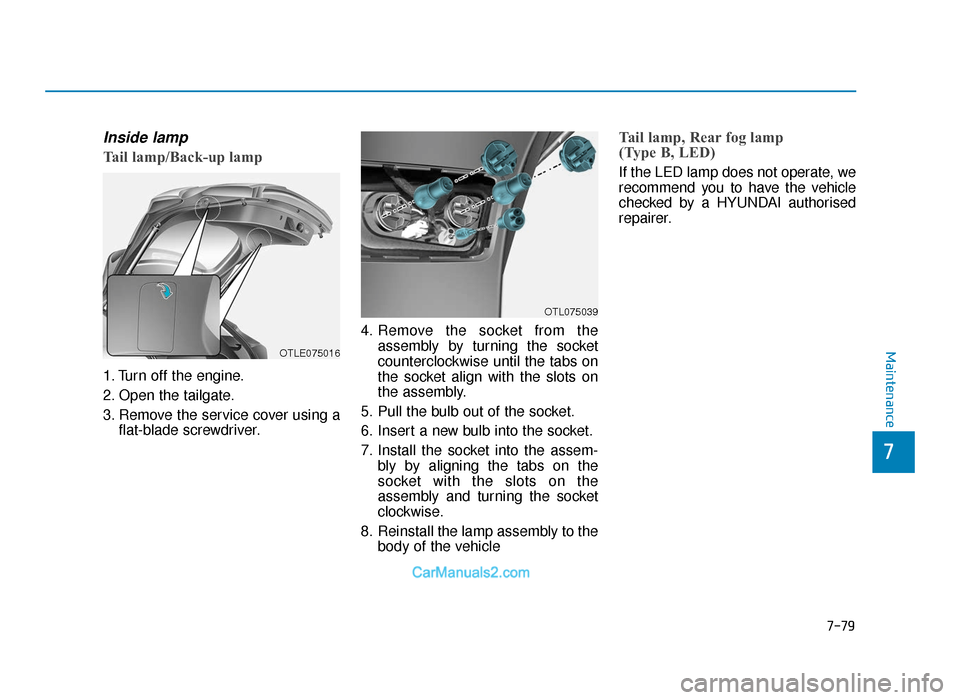
Tail lamp/Back-up lamp
1. Turn off the engine.
2. Open the tailgate.
3. Remove the service cover using aflat-blade screwdriver. 4. Remove the socket from the
assembly by turning the socket
counterclockwise until the tabs on
the socket align with the slots on
the assembly.
5. Pull the bulb out of the socket.
6. Insert a new bulb into the socket.
7. Install the socket into the assem- bly by aligning the tabs on the
socket with the slots on the
assembly and turning the socket
clockwise.
8. Reinstall the lamp assembly to the body of the vehicle
Tail lamp, Rear fog lamp
(Type B, LED)
If the LED lamp does not operate, we
recommend you to have the vehicle
checked by a HYUNDAI authorised
repairer.
OTLE075016
OTL075039
TLe UK 7.qxp 5/10/2018 1:39 PM Page 79
Page 629 of 685
7-80
Maintenance
Rear fog lamp (if equipped)
1. Remove the socket from theassembly by turning the socket
counterclockwise until the tabs on
the socket align with the slots on
the assembly.
2. Remove the bulb from the socket by pressing it in and rotating it
counterclockwise until the tabs on
the bulb align with the slots in the
socket. Pull the bulb out of the
socket.
3. Insert a new bulb in the socket.
4. Reinstall the light assembly to the body of the vehicle.
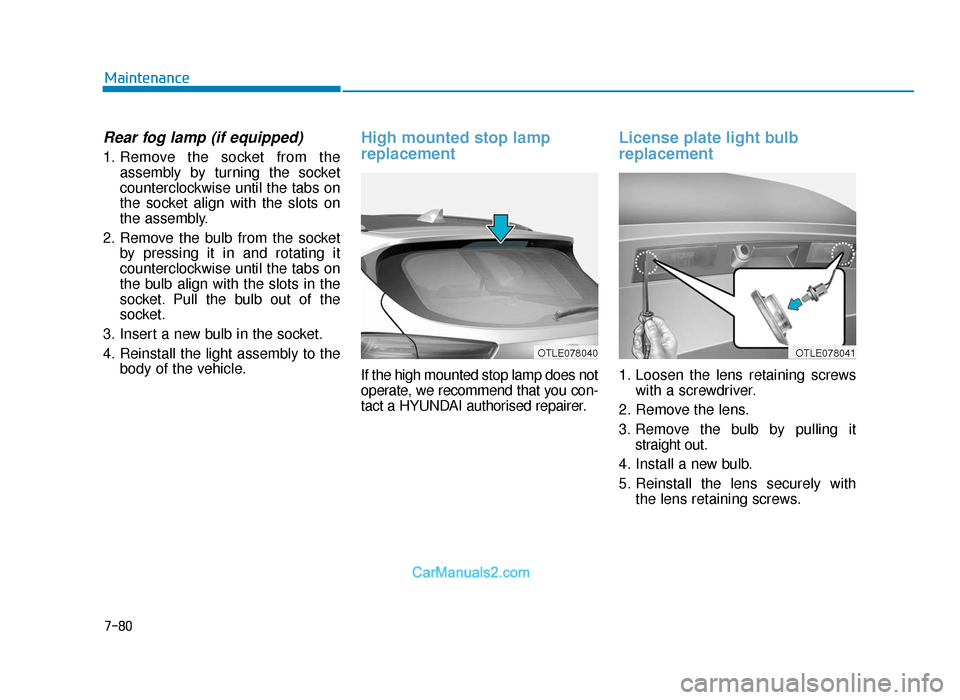
High mounted stop lamp
replacement
If the high mounted stop lamp does not
operate, we recommend that you con-
tact a HYUNDAI authorised repairer.
License plate light bulb
replacement
1. Loosen the lens retaining screwswith a screwdriver.
2. Remove the lens.
3. Remove the bulb by pulling it straight out.
4. Install a new bulb.
5. Reinstall the lens securely with the lens retaining screws.
OTLE078040OTLE078041
TLe UK 7.qxp 5/10/2018 1:39 PM Page 80