Wire Hyundai Tucson 2019 Owner's Manual
[x] Cancel search | Manufacturer: HYUNDAI, Model Year: 2019, Model line: Tucson, Model: Hyundai Tucson 2019Pages: 546, PDF Size: 61.38 MB
Page 16 of 546
I IN
NS
ST
TR
RU
UM
ME
EN
NT
T
P
PA
AN
NE
EL
L
O
OV
VE
ER
RV
VI
IE
EW
W
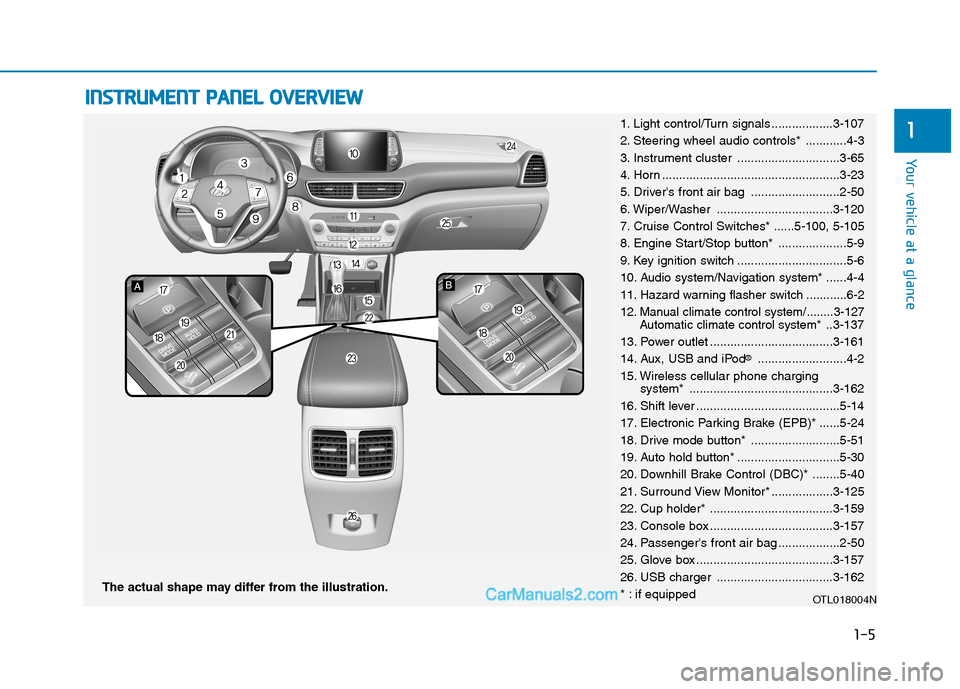
The actual shape may differ from the illustration.
1-5
Your vehicle at a glance
11. Light control/Turn signals ..................3-107
2. Steering wheel audio controls* ............4-3
3. Instrument cluster ..............................3-65
4. Horn ....................................................3-23
5. Driver's front air bag ..........................2-50
6. Wiper/Washer ..................................3-120
7. Cruise Control Switches* ......5-100, 5-105
8. Engine Start/Stop button* ....................5-9
9. Key ignition switch ................................5-6
10. Audio system/Navigation system* ......4-4
11. Hazard warning flasher switch ............6-2
12. Manual climate control system/........3-127
Automatic climate control system*..3-137
13. Power outlet ....................................3-161
14. Aux, USB and iPod
®..........................4-2
15. Wireless cellular phone charging
system* ..........................................3-162
16. Shift lever ..........................................5-14
17. Electronic Parking Brake (EPB)* ......5-24
18. Drive mode button* ..........................5-51
19. Auto hold button* ..............................5-30
20. Downhill Brake Control (DBC)* ........5-40
21. Surround View Monitor* ..................3-125
22. Cup holder* ....................................3-159
23. Console box ....................................3-157
24. Passenger's front air bag ..................2-50
25. Glove box ........................................3-157
26. USB charger ..................................3-162
* : if equipped
OTL018004N
Page 94 of 546
Convenient features of your vehicle
3
Interior Features ................................................3-159
Cup Holder ......................................................................3-159
Sunvisor ...........................................................................3-160
Power Outlet ..................................................................3-161
USB Charger ...................................................................3-162
Wireless Cellular Phone Charging System..............3-162
Clock .................................................................................3-165
Clothes Hanger ..............................................................3-165
Plastic Bag Hook ...........................................................3-166
Floor Mat Anchor(s).....................................................3-166
Cargo Net Holder ..........................................................3-167
Cargo Security Screen .................................................3-167
Luggage Tray .................................................................3-170
Exterior features ...............................................3-171
Roof Rack .......................................................................3-171
3
Page 117 of 546
3-26
Convenient features of your vehicle
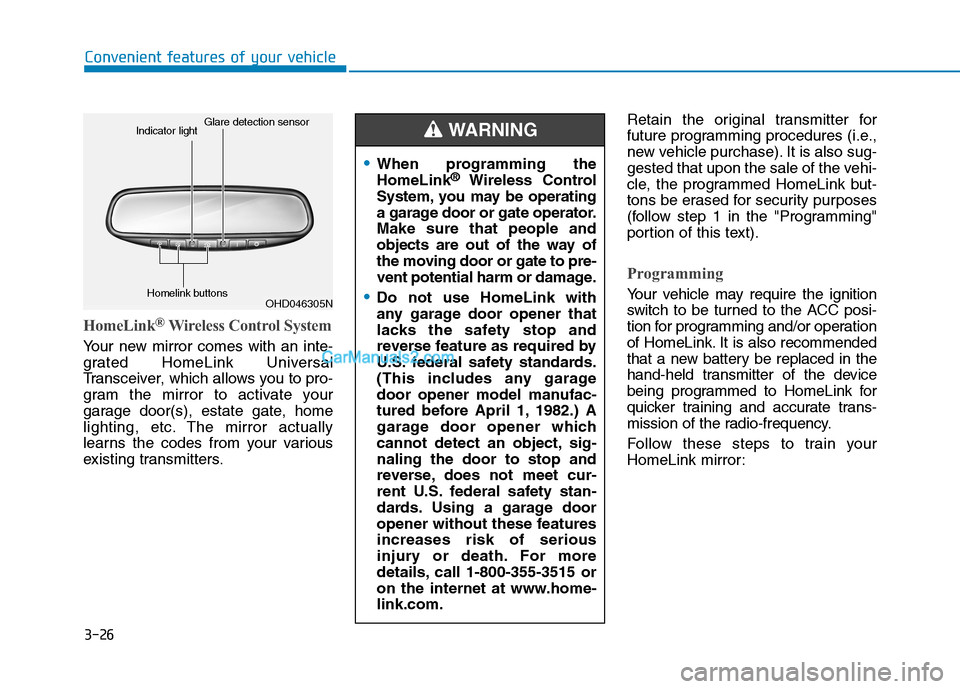
HomeLink®Wireless Control System
Your new mirror comes with an inte-
grated HomeLink Universal
Transceiver, which allows you to pro-
gram the mirror to activate your
garage door(s), estate gate, home
lighting, etc. The mirror actually
learns the codes from your various
existing transmitters.Retain the original transmitter for
future programming procedures (i.e.,
new vehicle purchase). It is also sug-
gested that upon the sale of the vehi-
cle, the programmed HomeLink but-
tons be erased for security purposes
(follow step 1 in the "Programming"
portion of this text).
Programming
Your vehicle may require the ignition
switch to be turned to the ACC posi-
tion for programming and/or operation
of HomeLink. It is also recommended
that a new battery be replaced in the
hand-held transmitter of the device
being programmed to HomeLink for
quicker training and accurate trans-
mission of the radio-frequency.
Follow these steps to train your
HomeLink mirror:
When programming the
HomeLink®Wireless Control
System, you may be operating
a garage door or gate operator.
Make sure that people and
objects are out of the way of
the moving door or gate to pre-
vent potential harm or damage.
Do not use HomeLink with
any garage door opener that
lacks the safety stop and
reverse feature as required by
U.S. federal safety standards.
(This includes any garage
door opener model manufac-
tured before April 1, 1982.) A
garage door opener which
cannot detect an object, sig-
naling the door to stop and
reverse, does not meet cur-
rent U.S. federal safety stan-
dards. Using a garage door
opener without these features
increases risk of serious
injury or death. For more
details, call 1-800-355-3515 or
on the internet at www.home-
link.com.
WARNING
OHD046305N Glare detection sensor
Indicator light
Homelink buttons
Page 119 of 546
3-28
Convenient features of your vehicle
Some gate operators and garage
door openers may require you to
replace step #3 with the "cycling"
procedure noted in the "Canadian
Programming" section of this doc-
ument.
Rolling code programming
To train a garage door opener (or
other rolling code equipped devices)
with the rolling code feature, follow
these instructions after completing
the "Programming" portion of this
text. (A second person may make the
following training procedures quicker
& easier.)
4. Locate the "learn" or "smart" but-
ton on the device's motor head
unit. Exact location and color of
the button may vary by product
brand. If there is difficulty locating
the "learn" or "smart" button, refer-
ence the device's owner's manual
or contact HomeLink at 1-800-
355-3515 or on the internet at
www.homelink.com.5. Press and release the "learn" or
"smart" button on the device’s
motor head unit. You have 30 sec-
onds to complete step number 6.
6. Return to the vehicle and firmly
press and release the pro-
grammed HomeLink button up to
three times. The rolling code
equipped device should now rec-
ognize the HomeLink signal and
activate when the HomeLink but-
ton is pressed. The remaining two
buttons may now be programmed
if this has not previously been
done. Refer to the "Programming"
portion of this text.
Operating HomeLink
To operate, simply press the pro-
grammed HomeLink button.
Activation will now occur for the
trained product (garage door, securi-
ty system, entry door lock, estate
gate, or home or office lighting). For
convenience, the hand-held trans-
mitter of the device may also be used
at any time. The HomeLink Wireless
Controls System (once programmed)
or the original hand-held transmitter
may be used to activate the device
(e.g. garage door, entry door lock,
etc.). In the event that there are still
programming difficulties, contact
HomeLink at 1-800-355-3515 or on
the internet at www.homelink.com.
NOTICE
Page 120 of 546
3-29
Convenient features of your vehicle
3
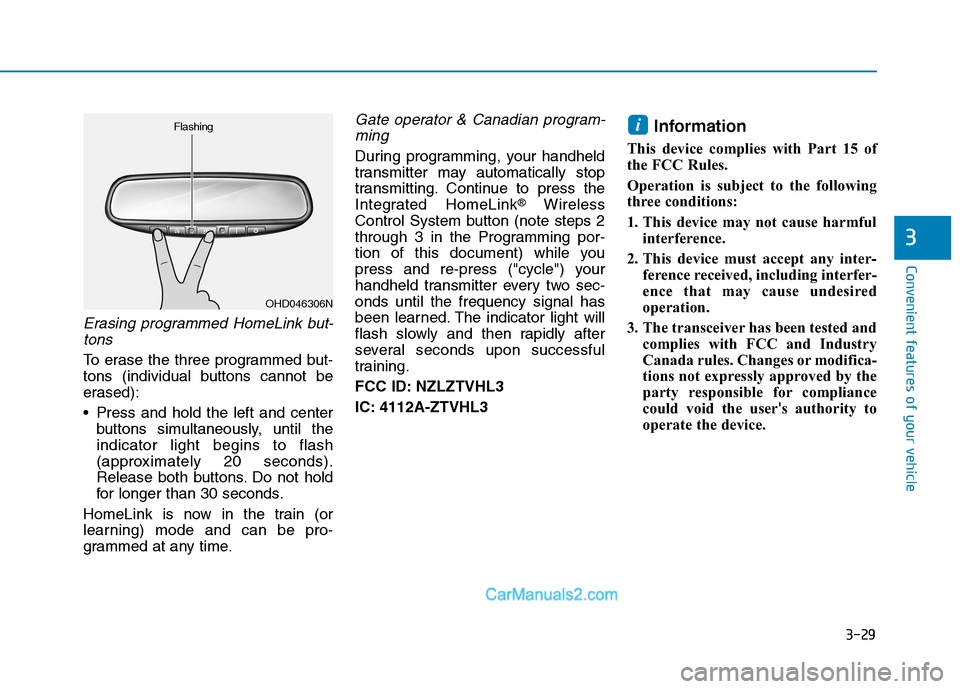
Erasing programmed HomeLink but-
tons
To erase the three programmed but-
tons (individual buttons cannot be
erased):
Press and hold the left and center
buttons simultaneously, until the
indicator light begins to flash
(approximately 20 seconds).
Release both buttons. Do not hold
for longer than 30 seconds.
HomeLink is now in the train (or
learning) mode and can be pro-
grammed at any time.
Gate operator & Canadian program-
ming
During programming, your handheld
transmitter may automatically stop
transmitting. Continue to press the
Integrated HomeLink
®Wireless
Control System button (note steps 2
through 3 in the Programming por-
tion of this document) while you
press and re-press ("cycle") your
handheld transmitter every two sec-
onds until the frequency signal has
been learned. The indicator light will
flash slowly and then rapidly after
several seconds upon successful
training.
FCC ID: NZLZTVHL3
IC: 4112A-ZTVHL3
Information
This device complies with Part 15 of
the FCC Rules.
Operation is subject to the following
three conditions:
1. This device may not cause harmful
interference.
2. This device must accept any inter-
ference received, including interfer-
ence that may cause undesired
operation.
3. The transceiver has been tested and
complies with FCC and Industry
Canada rules. Changes or modifica-
tions not expressly approved by the
party responsible for compliance
could void the user's authority to
operate the device.
i
OHD046306N Flashing
Page 121 of 546
3-30
Convenient features of your vehicle
Electrochromic mirror (ECM)
with HomeLink®system and
Blue Link®(if equipped)
Your vehicle may be equipped with a
Gentex Automatic-Dimming Mirror
and an Integrated HomeLink
®
Wireless Control System. The
HomeLink®Universal Transceiver
allows you to activate your garage
door(s), electric gate, home lighting,
etc.
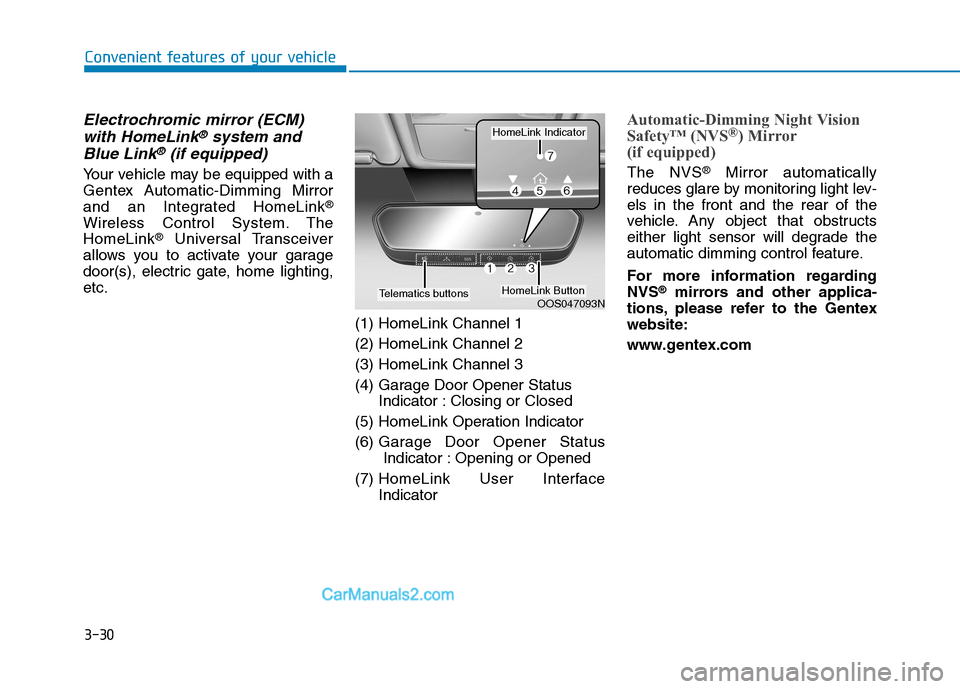
(1) HomeLink Channel 1
(2) HomeLink Channel 2
(3) HomeLink Channel 3
(4) Garage Door Opener Status
Indicator : Closing or Closed
(5) HomeLink Operation Indicator
(6) Garage Door Opener Status
Indicator : Opening or Opened
(7) HomeLink User Interface
Indicator
Automatic-Dimming Night Vision
Safety™ (NVS®) Mirror
(if equipped)
The NVS®Mirror automatically
reduces glare by monitoring light lev-
els in the front and the rear of the
vehicle. Any object that obstructs
either light sensor will degrade the
automatic dimming control feature.
For more information regarding
NVS
®mirrors and other applica-
tions, please refer to the Gentex
website:
www.gentex.comOOS047093N
HomeLink Indicator
HomeLink ButtonTelematics buttons
Page 122 of 546
3-31
Convenient features of your vehicle
3
Your mirror will automatically dim
upon detecting glare from the vehi-
cles traveling behind you. The auto-
dimming function can be controlled
by pressing the Dimming ON/OFF
button:
1. Pressing and holding the button
for 3 seconds turns the auto-dim-
ming function OFF which is indi-
cated by the green Status
Indicator LED turning off.
2. Pressing and holding the button
for 3 seconds again turns the auto-
dimming function ON which is indi-
cated by the green Status Indicator
LED turning on.
The mirror defaults to the ON posi-
tion each time the vehicle is started.Integrated HomeLink®Wireless
Control System
The HomeLink®Wireless Control
System can replace up to three
hand-held radio-frequency (RF)
transmitters with a single built-in
device. This innovative feature will
learn the radio frequency codes of
most current transmitters to operate
devices such as gate operators,
garage door openers, entry door
locks, security systems, even home
lighting. Both standard and rolling
code-equipped transmitters can be
programmed by following the out-
lined procedures.
Additional HomeLink
®information
can be found at: www.homelink.com
or by calling 1-800-355-3515.
Retain the original transmitter of the
RF device you are programming for
use in other vehicles as well as for
future HomeLink
®programming. It is
also suggested that upon the sale of
the vehicle, the programmed
HomeLink
®buttons be erased for
security purposes.
Before programming
HomeLink®to a garage door
opener or gate operator, make
sure people and objects are out
of the way of the device to pre-
vent potential harm or damage.
Do not use the HomeLink
®with
any garage door opener that
lacks the safety stop and
reverse features required by
U.S. federal safety standards
(this includes any garage door
opener model manufactured
before April 1, 1982). A garage
door that cannot detect an
object - signaling the door to
stop and reverse - does not
meet current U.S. federal safety
standards. Using a garage door
opener without these features
increases the risk of serious
injury or death.
WARNING
Page 124 of 546
3-33
Convenient features of your vehicle
3
Information
• Some garage door openers require
to press the programmed button on
the mirror up to three times right
after the programming is just com-
pleted to operate the garage door.
• The indicator (4) is turned ON in
Orange and flashes for about 60sec-
onds, during the programing mode
and if a programing is not succeed-
ed within the 60 seconds, the pro-
graming mode will be abort.
HomeLink
®should now activate your
rolling code equipped device.
Gate operator & Canadian program-
ming
During programming, your handheld
transmitter may automatically stop
transmitting. Continue to press the
Integrated HomeLink
®Wireless
Control System button while you
press and re-press ("cycle") your
handheld transmitter every two sec-
onds until the frequency signal has
been learned. The indicator light will
flash slowly and then rapidly after
several seconds upon successful
training.
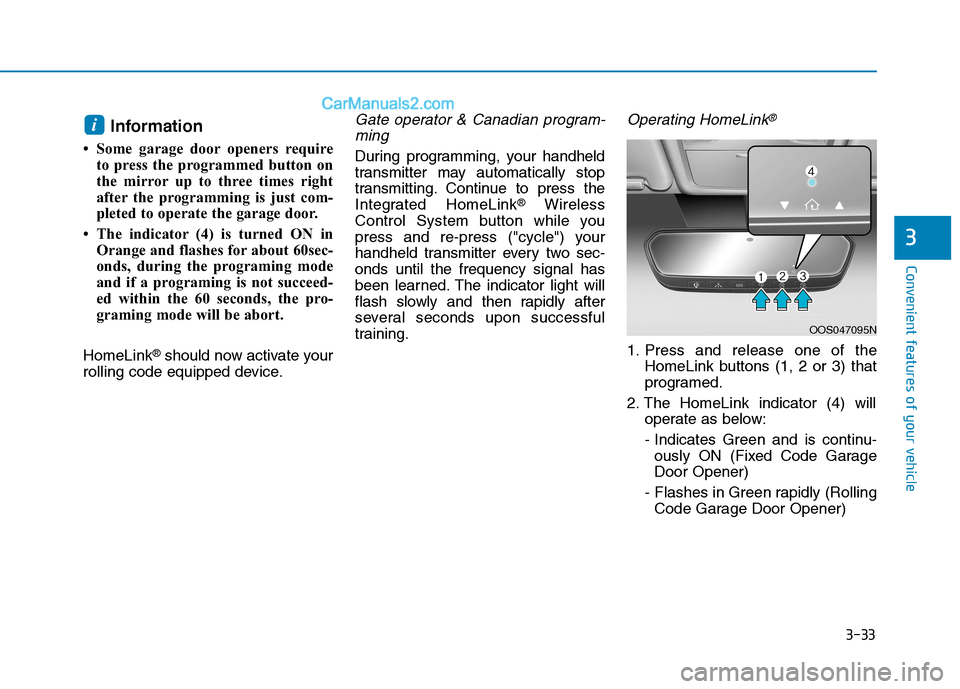
Operating HomeLink®
1. Press and release one of the
HomeLink buttons (1, 2 or 3) that
programed.
2. The HomeLink indicator (4) will
operate as below:
- Indicates Green and is continu-
ously ON (Fixed Code Garage
Door Opener)
- Flashes in Green rapidly (Rolling
Code Garage Door Opener)
i
OOS047095N
Page 191 of 546
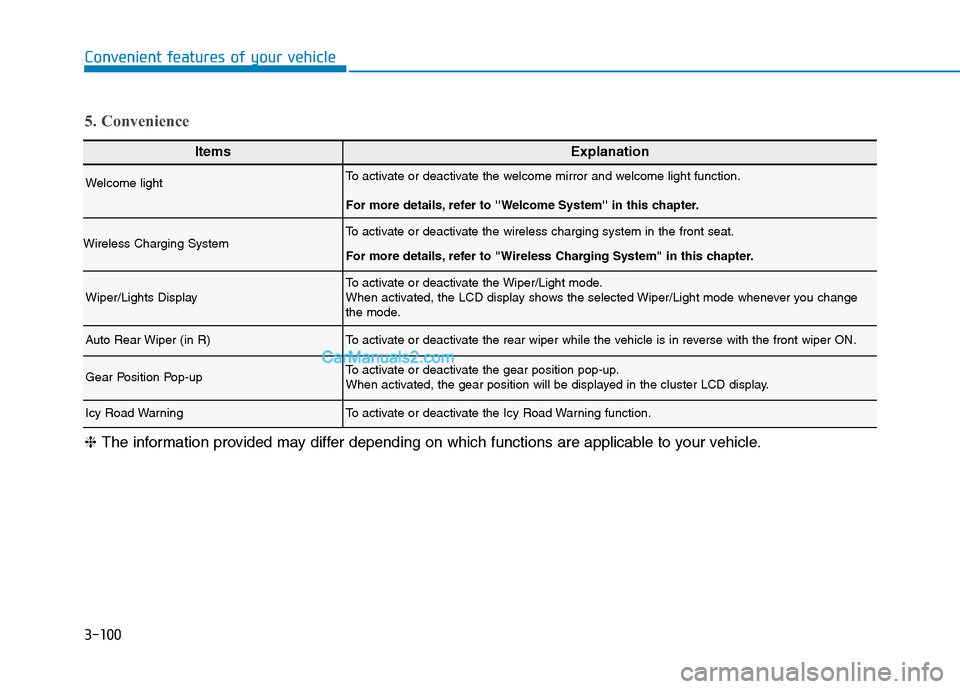
3-100
Convenient features of your vehicle
ItemsExplanation
Welcome lightTo activate or deactivate the welcome mirror and welcome light function.
For more details, refer to ''Welcome System'' in this chapter.
Wireless Charging SystemTo activate or deactivate the wireless charging system in the front seat.
For more details, refer to "Wireless Charging System" in this chapter.
Wiper/Lights DisplayTo activate or deactivate the Wiper/Light mode.
When activated, the LCD display shows the selected Wiper/Light mode whenever you change
the mode.
Auto Rear Wiper (in R)To activate or deactivate the rear wiper while the vehicle is in reverse with the front wiper ON.
Gear Position Pop-upTo activate or deactivate the gear position pop-up.
When activated, the gear position will be displayed in the cluster LCD display.
Icy Road WarningTo activate or deactivate the Icy Road Warning function.
5. Convenience
❈The information provided may differ depending on which functions are applicable to your vehicle.
Page 253 of 546
3-162
Convenient features of your vehicle
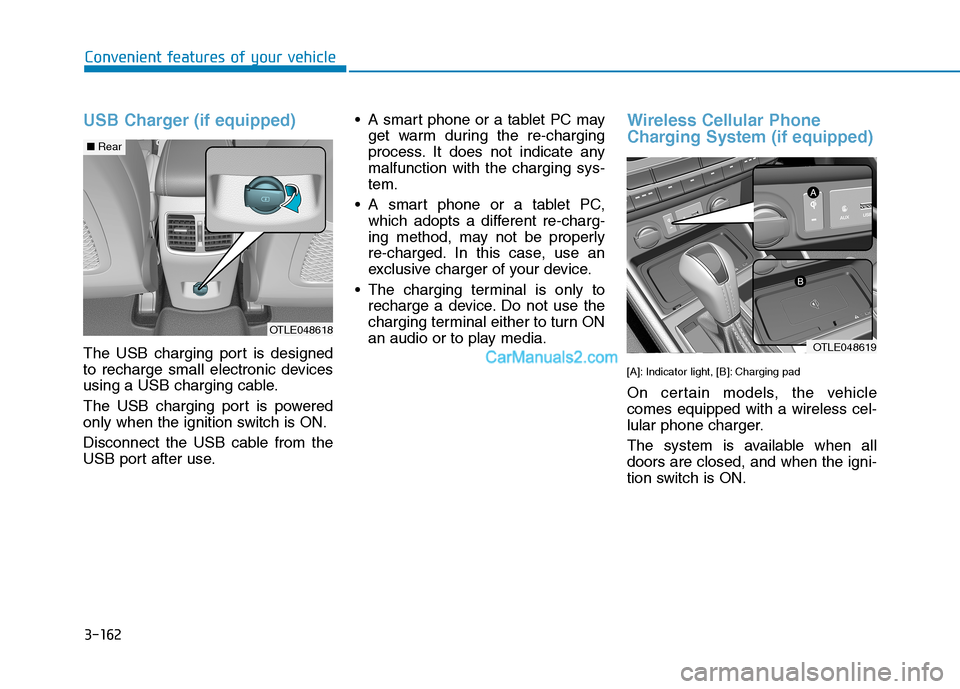
USB Charger (if equipped)
The USB charging port is designed
to recharge small electronic devices
using a USB charging cable.
The USB charging port is powered
only when the ignition switch is ON.
Disconnect the USB cable from the
USB port after use. A smart phone or a tablet PC may
get warm during the re-charging
process. It does not indicate any
malfunction with the charging sys-
tem.
A smart phone or a tablet PC,
which adopts a different re-charg-
ing method, may not be properly
re-charged. In this case, use an
exclusive charger of your device.
The charging terminal is only to
recharge a device. Do not use the
charging terminal either to turn ON
an audio or to play media.
Wireless Cellular Phone
Charging System (if equipped)
[A]: Indicator light, [B]: Charging pad
On certain models, the vehicle
comes equipped with a wireless cel-
lular phone charger.
The system is available when all
doors are closed, and when the igni-
tion switch is ON.
OTLE048618
OTLE048619
■Rear