side Hyundai Tucson 2019 Owner's Manual
[x] Cancel search | Manufacturer: HYUNDAI, Model Year: 2019, Model line: Tucson, Model: Hyundai Tucson 2019Pages: 546, PDF Size: 61.38 MB
Page 4 of 546
F4
INTRODUCTION
Congratulations, and thank you for choosing HYUNDAI. We are pleased to welcome you to the growing number of
discerning people who drive a HYUNDAI vehicle. We are very proud of the advanced engineering and high-quality
construction of each HYUNDAI we build.
Your Owner's Manual will introduce you to the features and operation of your new HYUNDAI. To become familiar with
your new HYUNDAI, so that you can fully enjoy it, read this Owner's Manual carefully before driving your new vehicle.
This manual contains important safety information and instructions intended to familiarize you with your vehicle's con-
trols and safety features so you can safely operate your vehicle.
This manual also contains information on maintenance designed to enhance safe operation of the vehicle. It is recom-
mended that all service and maintenance on your vehicle be performed by an authorized HYUNDAI dealer. HYUNDAI
dealers are prepared to provide high-quality service, maintenance and any other assistance that may be required.
This Owner's Manual should be considered a permanent part of your vehicle, and should be kept in the vehicle so you
can refer to it at any time. The manual should stay with the vehicle if you sell it to provide the next owner with impor-
tant operating, safety and maintenance information.
HYUNDAI MOTOR AMERICA
Copyright 2018 HYUNDAI Motor America. All rights reserved. No part of this publication may be reproduced, stored
in any retrieval system or transmitted in any form or by any means without the prior written permission of HYUNDAI
Motor America.Severe engine and transmission damage may result from the use of poor quality fuels and lubricants that
do not meet HYUNDAI specifications. You must always use high quality fuels and lubricants that meet the
specifications listed on Page 8-8 in the Vehicle Specifications section of the Owner's Manual.
CAUTION
Page 13 of 546
1-2
E EX
XT
TE
ER
RI
IO
OR
R
O
OV
VE
ER
RV
VI
IE
EW
W
Your vehicle at a glance
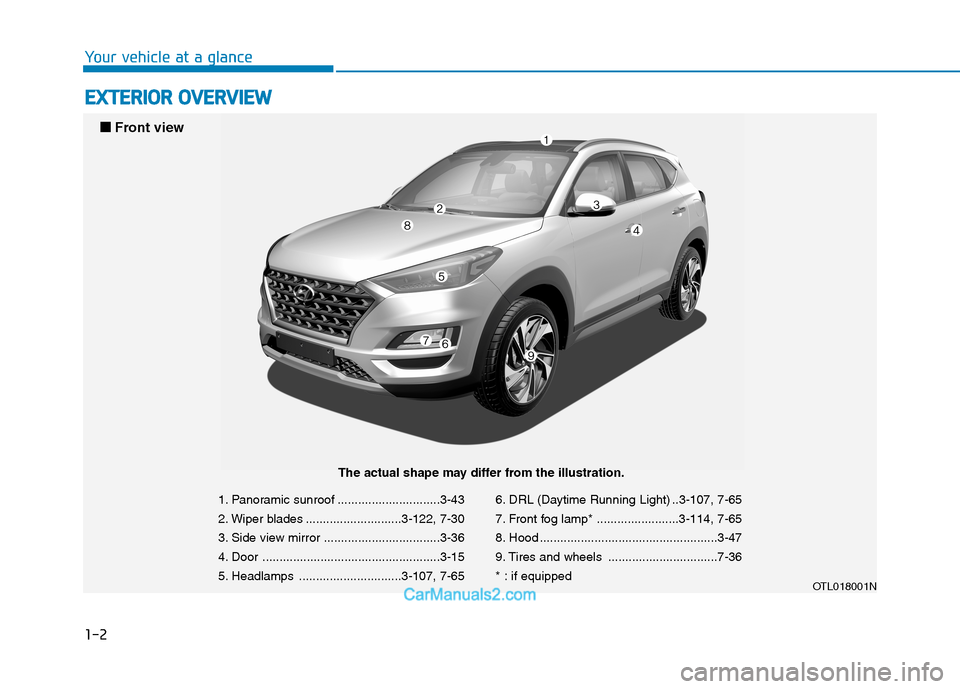
1. Panoramic sunroof ..............................3-43
2. Wiper blades ............................3-122, 7-30
3. Side view mirror ..................................3-36
4. Door ....................................................3-15
5. Headlamps ..............................3-107, 7-656. DRL (Daytime Running Light) ..3-107, 7-65
7. Front fog lamp* ........................3-114, 7-65
8. Hood ....................................................3-47
9. Tires and wheels ................................7-36
* : if equipped
OTL018001N
■ ■
Front view
The actual shape may differ from the illustration.
Page 15 of 546
1-4
Your vehicle at a glance
I IN
NT
TE
ER
RI
IO
OR
R
O
OV
VE
ER
RV
VI
IE
EW
W
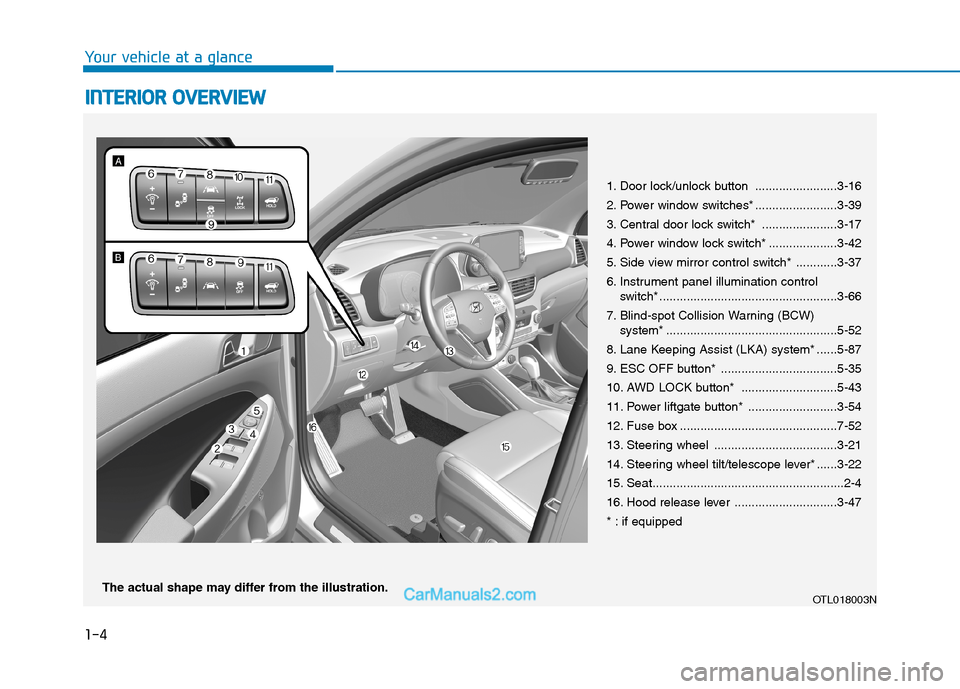
1. Door lock/unlock button ........................3-16
2. Power window switches* ........................3-39
3. Central door lock switch* ......................3-17
4. Power window lock switch* ....................3-42
5. Side view mirror control switch* ............3-37
6. Instrument panel illumination control
switch* ....................................................3-66
7. Blind-spot Collision Warning (BCW)
system* ..................................................5-52
8. Lane Keeping Assist (LKA) system* ......5-87
9. ESC OFF button* ..................................5-35
10. AWD LOCK button* ............................5-43
11. Power liftgate button* ..........................3-54
12. Fuse box ..............................................7-52
13. Steering wheel ....................................3-21
14. Steering wheel tilt/telescope lever* ......3-22
15. Seat........................................................2-4
16. Hood release lever ..............................3-47
* : if equipped
OTL018003NThe actual shape may differ from the illustration.
Page 25 of 546
2-7
Safety system of your vehicle
Manual adjustment
The front seat can be adjusted by
using the levers located on the out-
side of the seat cushion. Before driv-
ing, adjust the seat to the proper
position so that you can easily con-
trol the steering wheel, foot pedals
and controls on the instrument
panel.
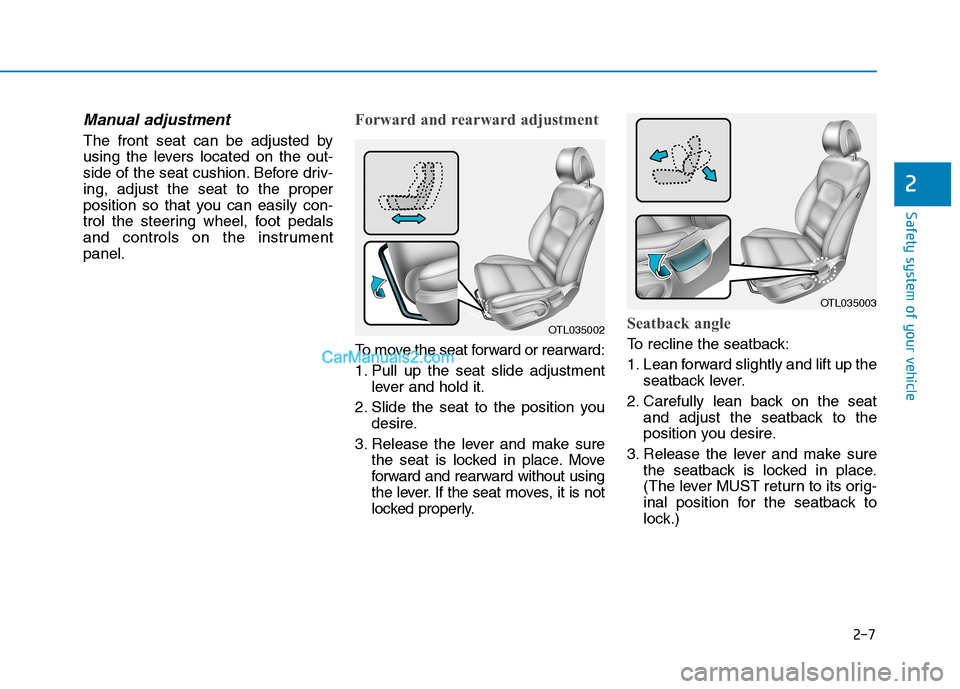
Forward and rearward adjustment
To move the seat forward or rearward:
1. Pull up the seat slide adjustment
lever and hold it.
2. Slide the seat to the position you
desire.
3. Release the lever and make sure
the seat is locked in place. Move
forward and rearward without using
the lever. If the seat moves, it is not
locked properly.
Seatback angle
To recline the seatback:
1. Lean forward slightly and lift up the
seatback lever.
2. Carefully lean back on the seat
and adjust the seatback to the
position you desire.
3. Release the lever and make sure
the seatback is locked in place.
(The lever MUST return to its orig-
inal position for the seatback to
lock.)
2
OTL035003
OTL035002
Page 27 of 546
2-9
Safety system of your vehicle
2
Power adjustment
The front seat can be adjusted by
using the control switches located on
the outside of the seat cushion.
Before driving, adjust the seat to the
proper position so that you can easi-
ly control the steering wheel, foot
pedals and controls on the instru-
ment panel.To prevent damage to the seats:
Always stop adjusting the seats
when the seat has moved as far
forward or rearward as possible.
Do not adjust the seats for
longer than necessary when the
engine is turned off. This may
result in unnecessary battery
drain.
Do not operate two or more
seats at the same time. This may
result in an electrical malfunc-
tion.
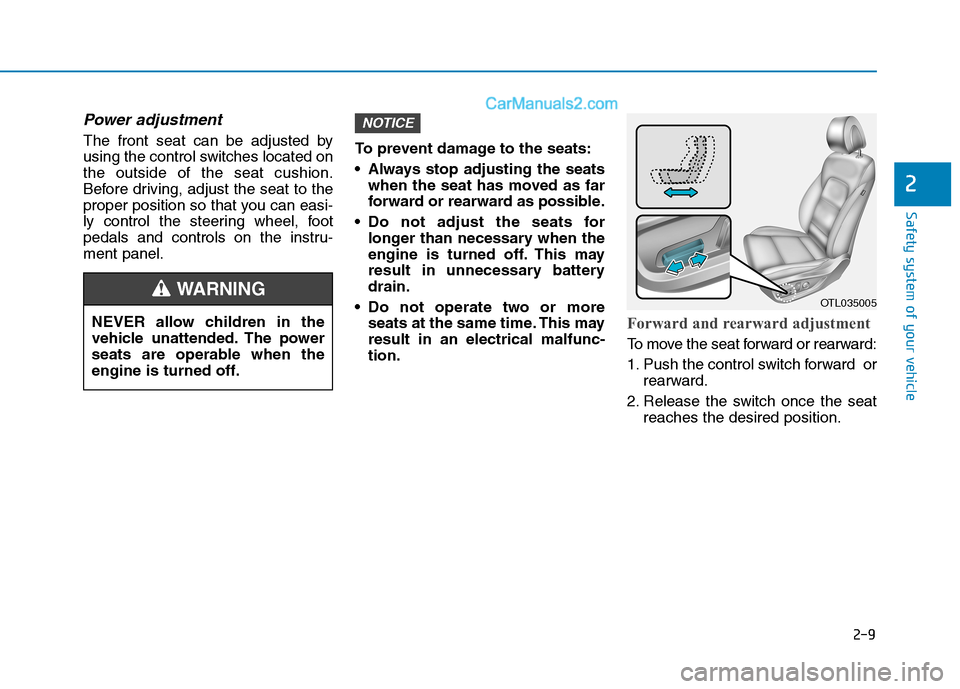
Forward and rearward adjustment
To move the seat forward or rearward:
1. Push the control switch forward or
rearward.
2. Release the switch once the seat
reaches the desired position.
NOTICE
NEVER allow children in the
vehicle unattended. The power
seats are operable when the
engine is turned off.
WARNING OTL035005
Page 38 of 546
2-20
Safety system of your vehicle
Heated Seats and Ventilated
Seats
Front seat heaters (if equipped)
Seat heaters are provided to warm
the seats during cold weather.
To prevent damage to the seat
heater and seats:
Never use a solvent such as
paint thinner, benzene, alcohol
or gasoline to clean the seats.
Do not place heavy or sharp
objects on seats equipped with
seat heater.
Do not change the seat cover. It
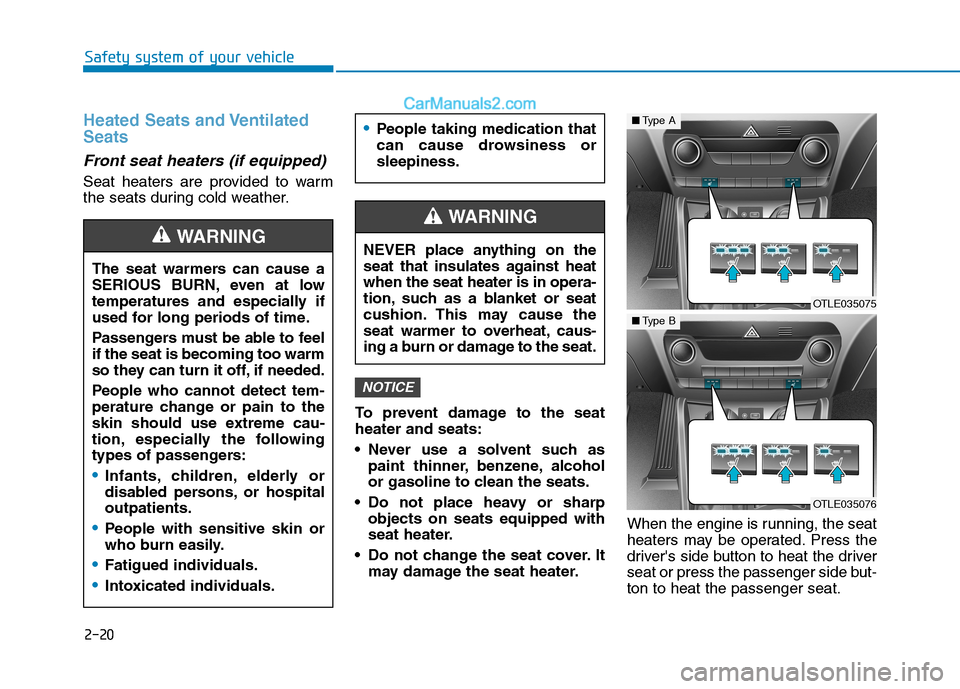
may damage the seat heater.When the engine is running, the seat
heaters may be operated. Press the
driver's side button to heat the driver
seat or press the passenger side but-
ton to heat the passenger seat.
NOTICE
The seat warmers can cause a
SERIOUS BURN, even at low
temperatures and especially if
used for long periods of time.
Passengers must be able to feel
if the seat is becoming too warm
so they can turn it off, if needed.
People who cannot detect tem-
perature change or pain to the
skin should use extreme cau-
tion, especially the following
types of passengers:
Infants, children, elderly or
disabled persons, or hospital
outpatients.
People with sensitive skin or
who burn easily.
Fatigued individuals.
Intoxicated individuals.
People taking medication that
can cause drowsiness or
sleepiness.
WARNING NEVER place anything on the
seat that insulates against heat
when the seat heater is in opera-
tion, such as a blanket or seat
cushion. This may cause the
seat warmer to overheat, caus-
ing a burn or damage to the seat.
WARNING
OTLE035075
■Type A
OTLE035076
■Type B
Page 40 of 546
2-22
Safety system of your vehicle
The ventilated seats are provided to
cool the front seats by blowing air
through small vent holes on the sur-
face of the seat cushions and seat-
backs.
When the operation of the ventilated
seat is not needed, keep the switch-
es in the OFF position.
When the engine is running, the ven-
tilated seats may be operated. Press
the driver's side button to cool the
driver seat or press the passenger
side button to cool the passenger
seat.
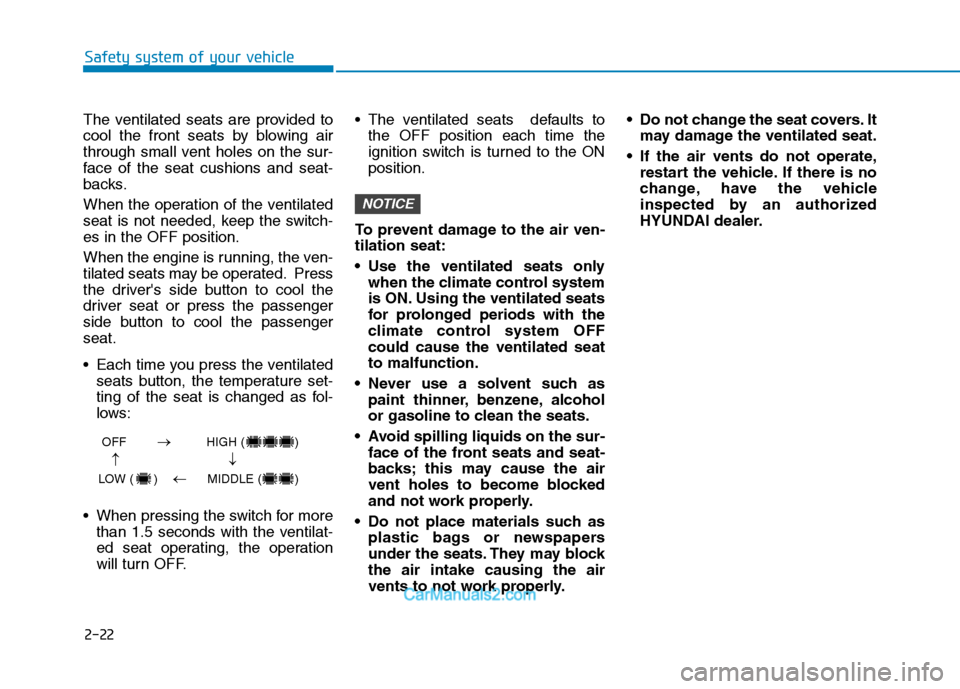
Each time you press the ventilated
seats button, the temperature set-
ting of the seat is changed as fol-
lows:
When pressing the switch for more
than 1.5 seconds with the ventilat-
ed seat operating, the operation
will turn OFF. The ventilated seats defaults to
the OFF position each time the
ignition switch is turned to the ON
position.
To prevent damage to the air ven-
tilation seat:
Use the ventilated seats only
when the climate control system
is ON. Using the ventilated seats
for prolonged periods with the
climate control system OFF
could cause the ventilated seat
to malfunction.
Never use a solvent such as
paint thinner, benzene, alcohol
or gasoline to clean the seats.
Avoid spilling liquids on the sur-
face of the front seats and seat-
backs; this may cause the air
vent holes to become blocked
and not work properly.
Do not place materials such as
plastic bags or newspapers
under the seats. They may block
the air intake causing the air
vents to not work properly. Do not change the seat covers. It
may damage the ventilated seat.
If the air vents do not operate,
restart the vehicle. If there is no
change, have the vehicle
inspected by an authorized
HYUNDAI dealer.
NOTICE
OFF HIGH ( )
LOW ( ) MIDDLE ( )
→→
→
→
Page 41 of 546
2-23
Safety system of your vehicle
2
Rear seat heaters (if equipped)
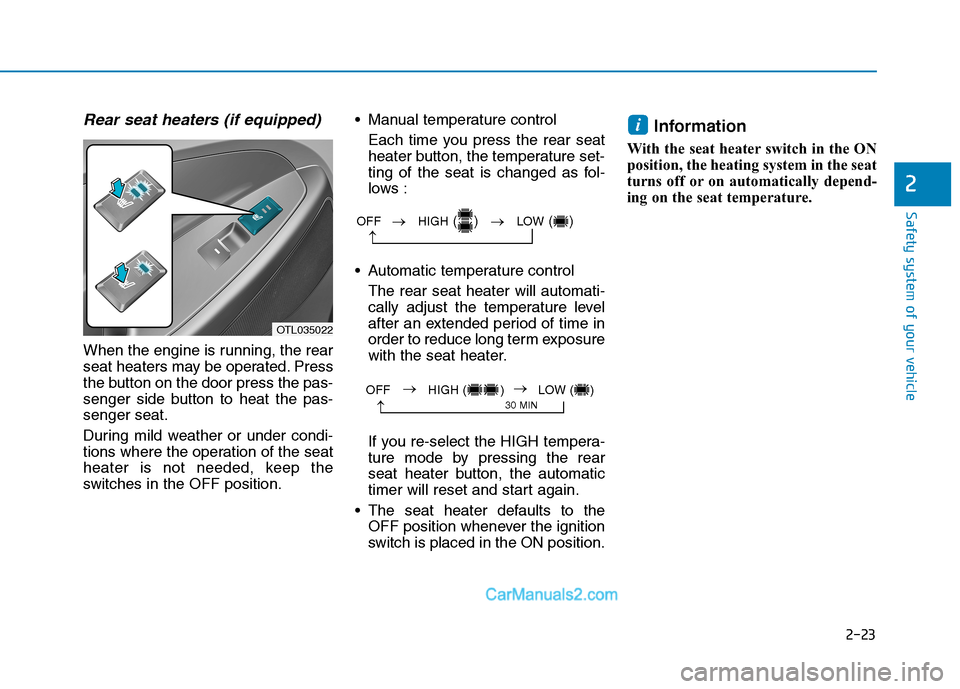
When the engine is running, the rear
seat heaters may be operated. Press
the button on the door press the pas-
senger side button to heat the pas-
senger seat.
During mild weather or under condi-
tions where the operation of the seat
heater is not needed, keep the
switches in the OFF position. Manual temperature control
Each time you press the rear seat
heater button, the temperature set-
ting of the seat is changed as fol-
lows :
Automatic temperature control
The rear seat heater will automati-
cally adjust the temperature level
after an extended period of time in
order to reduce long term exposure
with the seat heater.
If you re-select the HIGH tempera-
ture mode by pressing the rear
seat heater button, the automatic
timer will reset and start again.
The seat heater defaults to the
OFF position whenever the ignition
switch is placed in the ON position.
Information
With the seat heater switch in the ON
position, the heating system in the seat
turns off or on automatically depend-
ing on the seat temperature.
i
OTL035022
OFF →HIGH() →LOW()
→
→
30 MINOFF HIGH ( ) LOW ( )→→
Page 47 of 546
2-29
Safety system of your vehicle
2
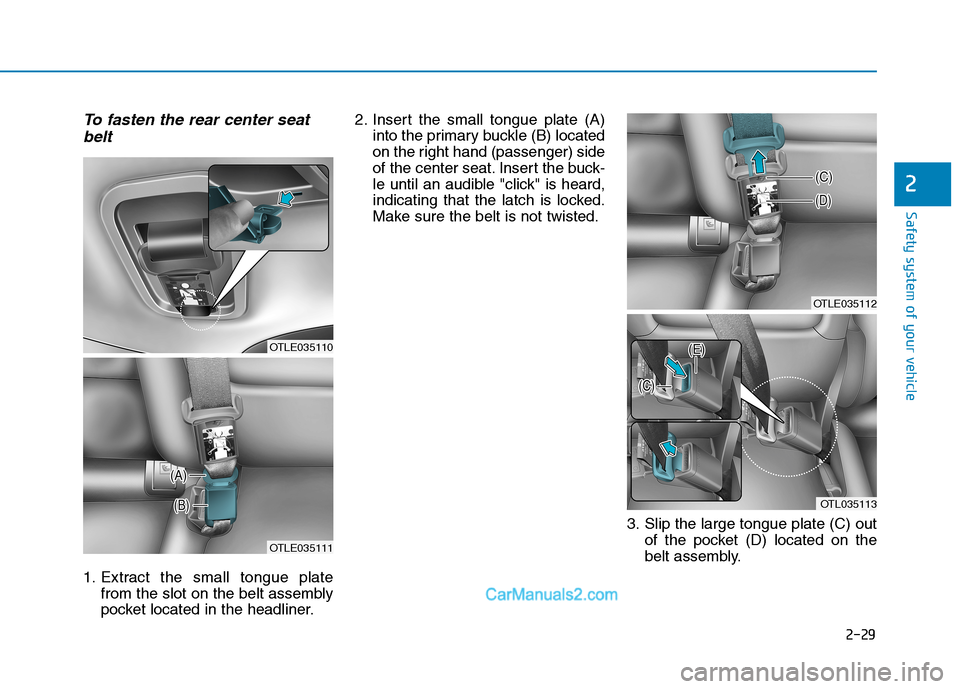
To fasten the rear center seat
belt
1. Extract the small tongue plate
from the slot on the belt assembly
pocket located in the headliner.2. Insert the small tongue plate (A)
into the primary buckle (B) located
on the right hand (passenger) side
of the center seat. Insert the buck-
le until an audible "click" is heard,
indicating that the latch is locked.
Make sure the belt is not twisted.
3. Slip the large tongue plate (C) out
of the pocket (D) located on the
belt assembly.
OTLE035110
OTLE035111
OTLE035112
OTL035113
Page 48 of 546
2-30
Safety system of your vehicle
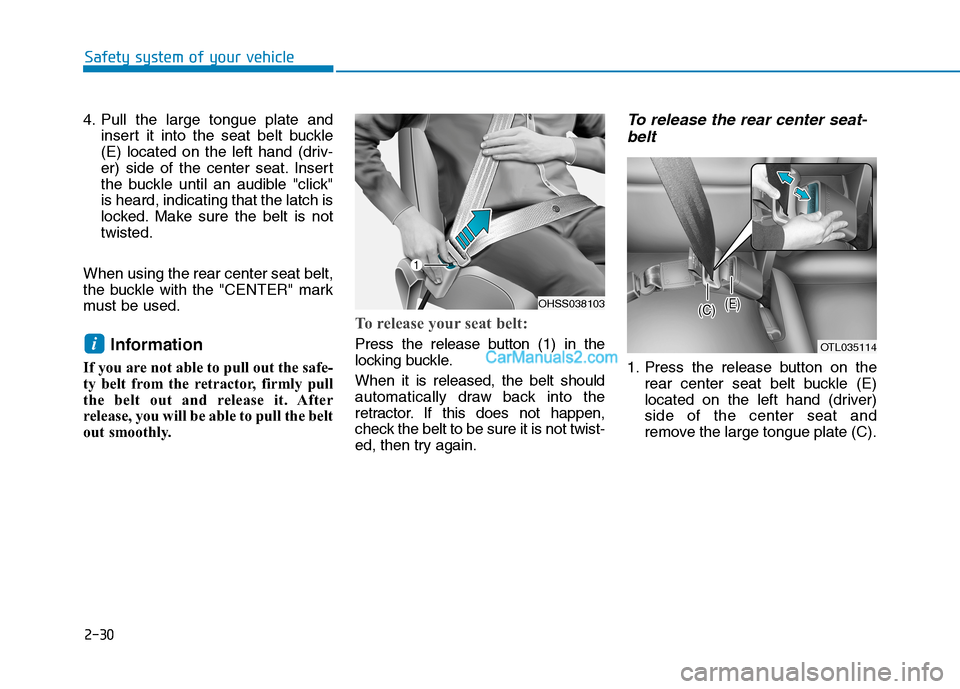
4. Pull the large tongue plate and
insert it into the seat belt buckle
(E) located on the left hand (driv-
er) side of the center seat. Insert
the buckle until an audible "click"
is heard, indicating that the latch is
locked. Make sure the belt is not
twisted.
When using the rear center seat belt,
the buckle with the "CENTER" mark
must be used.
Information
If you are not able to pull out the safe-
ty belt from the retractor, firmly pull
the belt out and release it. After
release, you will be able to pull the belt
out smoothly.
To release your seat belt:
Press the release button (1) in the
locking buckle.
When it is released, the belt should
automatically draw back into the
retractor. If this does not happen,
check the belt to be sure it is not twist-
ed, then try again.
To release the rear center seat-
belt
1. Press the release button on the
rear center seat belt buckle (E)
located on the left hand (driver)
side of the center seat and
remove the large tongue plate (C).
i
OHSS038103
OTL035114