stop start Hyundai Tucson 2020 Owner's Manual - RHD (UK, Australia)
[x] Cancel search | Manufacturer: HYUNDAI, Model Year: 2020, Model line: Tucson, Model: Hyundai Tucson 2020Pages: 637, PDF Size: 64.45 MB
Page 9 of 637
F9
Introduction
Use of MTBE
HYUNDAI recommends avoiding
fuels containing MTBE (Methyl
Tertiary Butyl Ether) over 15.0% vol.
(Oxygen Content 2.7% weight) in
your vehicle.
Fuel containing MTBE over 15.0%
vol. (Oxygen Content 2.7% weight)
may reduce vehicle performance and
produce vapour lock or hard starting.
Do not use methanol
Fuels containing methanol (wood
alcohol) should not be used in your
vehicle. This type of fuel can reduce
vehicle performance and damage
components of the fuel system,
engine control system and emission
control system.
Fuel Additives
We recommend to use unleaded
petrol which has an Octane Rating of
RON (Research Octane Number) 91
or higher.
For customers who do not use good
quality petrols including fuel addi-
tives regularly, and have problems
starting or the engine does not run
smoothly, adding one bottle of addi-
tives to the fuel tank is recommend-
ed according to the maintenance
schedule (refer to chapter 7, “Normal
Maintenance Schedule”).
Additives are available from your
authorised HYUNDAI dealer along
with information on how to use them.
Do not mix other additives.
Diesel engine
Diesel fuel
Diesel engines must be operated
only on commercially available diesel
fuel that complies with EN 590 or
comparable standard (EN stands for
"European Norm"). Do not use
marine diesel fuel, heating oils, or
non-approved fuel additives, as this
will increase wear and cause dam-
age to the engine and fuel system.
The use of non-approved fuels and /
or fuel additives will result in a limita-
tion of your warranty rights.
Diesel fuel of above cetane 51 is
used in your vehicle. If two types of
diesel fuel are available, use summer
or winter fuel properly according to
the following temperature conditions.
Above -5°C (23°F) ... Summer type
diesel fuel.
Below -5°C (23°F) ... Winter type
diesel fuel.
Watch the fuel level in the tank very
carefully : If the engine stops through
fuel failure, the circuits must be com-
pletely purged to permit restarting. Your New Vehicle Limited
Warranty may not cover dam-
age to the fuel system and any
performance problems that are
caused by the use of fuels con-
taining methanol or fuels con-
taining MTBE (Methyl Tertiary
Butyl Ether) over 15.0% vol.
(Oxygen Content 2.7% weight.)
CAUTION
Page 18 of 637
1-5
Your vehicle at a glance
1
I IN
NS
ST
TR
RU
UM
ME
EN
NT
T
P
PA
AN
NE
EL
L
O
OV
VE
ER
RV
VI
IE
EW
W
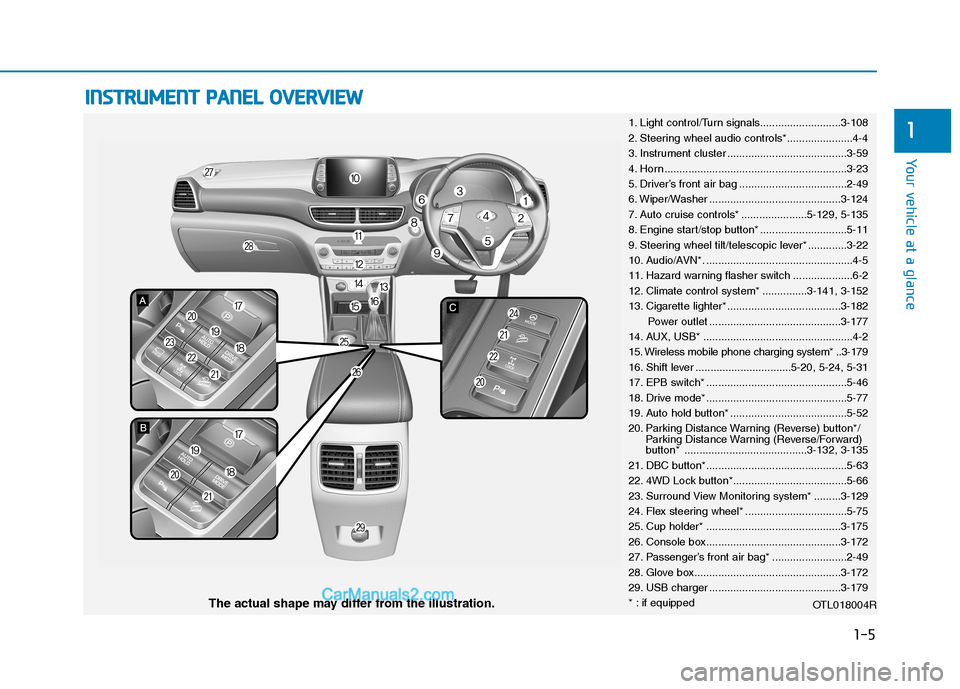
1. Light control/Turn signals...........................3-108
2. Steering wheel audio controls*......................4-4
3. Instrument cluster ........................................3-59
4. Horn .............................................................3-23
5. Driver’s front air bag ....................................2-49
6. Wiper/Washer ............................................3-124
7. Auto cruise controls* ......................5-129, 5-135
8. Engine start/stop button* .............................5-11
9. Steering wheel tilt/telescopic lever* .............3-22
10. Audio/AVN*. .................................................4-5
11. Hazard warning flasher switch ....................6-2
12. Climate control system* ...............3-141, 3-152
13. Cigarette lighter* ......................................3-182
Power outlet ............................................3-177
14. AUX, USB* ..................................................4-2
15. Wireless mobile phone charging system* ..3-179
16. Shift lever ................................5-20, 5-24, 5-31
17. EPB switch* ...............................................5-46
18. Drive mode* ...............................................5-77
19. Auto hold button* .......................................5-52
20. Parking Distance Warning (Reverse) button*/
Parking Distance Warning (Reverse/Forward)
button* .........................................3-132, 3-135
21. DBC button*...............................................5-63
22. 4WD Lock button*......................................5-66
23. Surround View Monitoring system* .........3-129
24. Flex steering wheel* ..................................5-75
25. Cup holder* .............................................3-175
26. Console box.............................................3-172
27. Passenger’s front air bag* .........................2-49
28. Glove box.................................................3-172
29. USB charger ............................................3-179
* : if equipped
OTL018004R
The actual shape may differ from the illustration.
Page 26 of 637
2-5
Safety system of your vehicle
2
Safety precautions
Adjusting the seats so that you are
sitting in a safe, comfortable position
plays an important role in driver and
passenger safety, together with seat
belts and air bags, if an accident
occurs.
Air bags
You can take steps to reduce the risk
of being injured by an inflating air
bag. Sitting too close to an air bag
greatly increases the risk of injury in
the event the air bag inflates. Move
your seat as far back as possible
from front air bags, whilst still main-
taining control of the vehicle.
Seat belts
Always fasten your seat belt before
starting any trip.
At all times, passengers should sit
upright and be properly restrained.
Infants and small children must be
restrained in appropriate Child
Restraint Systems. Children who
have outgrown a booster seat and
adults must be restrained using the
seat belts.
Do not use a cushion that
reduces friction between the
seat and the passenger. The
passenger's hips may slide
under the lap portion of the seat
belt during an accident or a
sudden stop. Serious or fatal
internal injuries could result
because the seat belt cannot
operate properly.
WARNING
To reduce the risk of serious
injury or death from an inflating
air bag, take the following pre-
cautions:
•Adjust the driver’s seat as far
to the rear as possible whilst
maintaining the ability to
maintain full control of the
vehicle.
Adjust the front passenger
seat as far to the rear as pos-
sible.
Hold the steering wheel by the
rim with hands at the 9 o’clock
and 3 o’clock positions to
minimise the risk of injuries to
your hands and arms.
NEVER place anything or any-
one between the air bag.
Do not allow the front passen-
ger to place feet or legs on the
instrument panel to minimise
the risk of leg injuries.
WARNING
Page 44 of 637
2-23
Safety system of your vehicle
This section describes how to use
the seat belts properly. It also
describes some of the things not to
do when using seat belts.
Seat belt safety precautions
Always fasten your seat belt and
make sure all passengers have fas-
tened their seat belts before starting
any trip. Air bags (if equipped) are
designed to supplement the seat belt
as an additional safety device, but
they are not a substitute. Most coun-
tries require all occupants of a vehi-
cle to wear seat belts.
S SE
EA
AT
T
B
BE
EL
LT
TS
S
2
Seat belts must be used by ALL
passengers whenever the vehi-
cle is moving. Take the following
precautions when adjusting
and wearing seat belts:
ALWAYS properly restrain
children under age 13 in the
rear seats.
NEVER allow children to ride
in the front passenger seat. If
a child age 13 or older must
be seated in the front seat,
move the seat as far back as
possible and properly restrain
them in the seat.
NEVER allow an infant or
child to be carried on an occu-
pant’s lap.
NEVER ride with the seatback
reclined when the vehicle is
moving.
Do not allow children to share
a seat or seat belt.
WARNING Do not wear the shoulder belt
under your arm or behind
your back.
Never wear a seat belt over
fragile objects. If there is a
sudden stop or impact, the
seat belt can damage it.
Do not use the seat belt if it is
twisted. A twisted seat belt
will not protect you properly
in an accident.
Do not use a seat belt if the
webbing or hardware is dam-
aged.
Do not latch the seat belt into
the buckles of other seats.
NEVER unfasten the seat belt
whilst driving. This may cause
loss of vehicle control result-
ing in an accident.
Make sure there is nothing in
the buckle interfering with the
seat belt latch mechanism.
This may prevent the seat belt
from fastening securely.
Page 95 of 637
3-9
Convenient features of your vehicle
Even though you press the outside
door handle button, the doors will not
lock and the chime will sound for
three seconds if any of the following
occur:
The Smart Key is in the vehicle.
The Engine Start/Stop button is in
the ACC or ON position.
Any door except the tailgate is
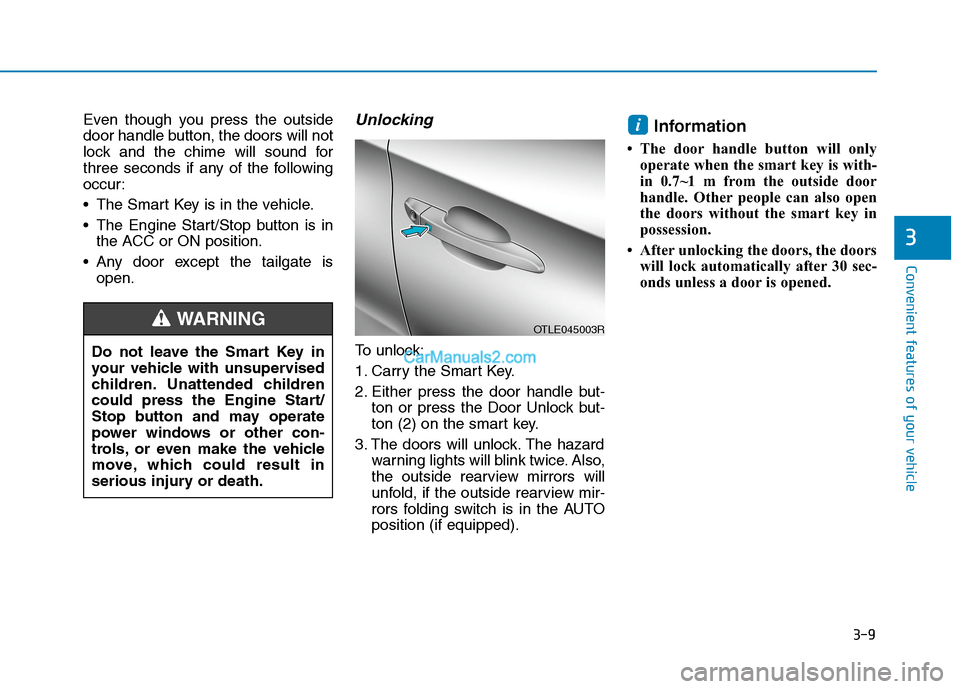
open.Unlocking
To unlock:
1. Carry the Smart Key.
2. Either press the door handle but-
ton or press the Door Unlock but-
ton (2) on the smart key.
3. The doors will unlock. The hazard
warning lights will blink twice. Also,
the outside rearview mirrors will
unfold, if the outside rearview mir-
rors folding switch is in the AUTO
position (if equipped).
Information
• The door handle button will only
operate when the smart key is with-
in 0.7~1 m from the outside door
handle. Other people can also open
the doors without the smart key in
possession.
• After unlocking the doors, the doors
will lock automatically after 30 sec-
onds unless a door is opened.
i
3
Do not leave the Smart Key in
your vehicle with unsupervised
children. Unattended children
could press the Engine Start/
Stop button and may operate
power windows or other con-
trols, or even make the vehicle
move, which could result in
serious injury or death.
WARNINGOTLE045003R
Page 96 of 637
3-10
Convenient features of your vehicle
Tailgate unlocking
To unlock:
1. Carry the smart key.
2. Either press the tailgate handle
button or press the Tailgate Unlock
button (3) on the smart key for
more than one second.
3. The hazard warning lights will
blink twice. The tailgate will unlock.
The power tailgate will unlock and
then open (if equipped).
For more details, refer to “Power
tailgate” in this chapter.
Information
After unlocking the tailgate, the tail-
gate will lock automatically after 30
seconds unless the tailgate is opened.
Start-up
You can start the engine without
inserting the key.For detailed infor-
mation refer to the Engine
Start/Stop button in chapter 5.
To prevent damaging the smart
key:
Keep the smart key away from
water or any liquid and fire. If the
inside of the smart key gets
damp (due to drinks or mois-
ture), or is heated, internal cir-
cuit may malfunction, excluding
the car from the warranty.
Avoid dropping or throwing the
smart key.
Protect the smart key from
extreme temperatures.
Always have the smart key with
you when leaving the vehicle. If
the smart key is left near the vehi-
cle, the vehicle battery may be dis-
charged.
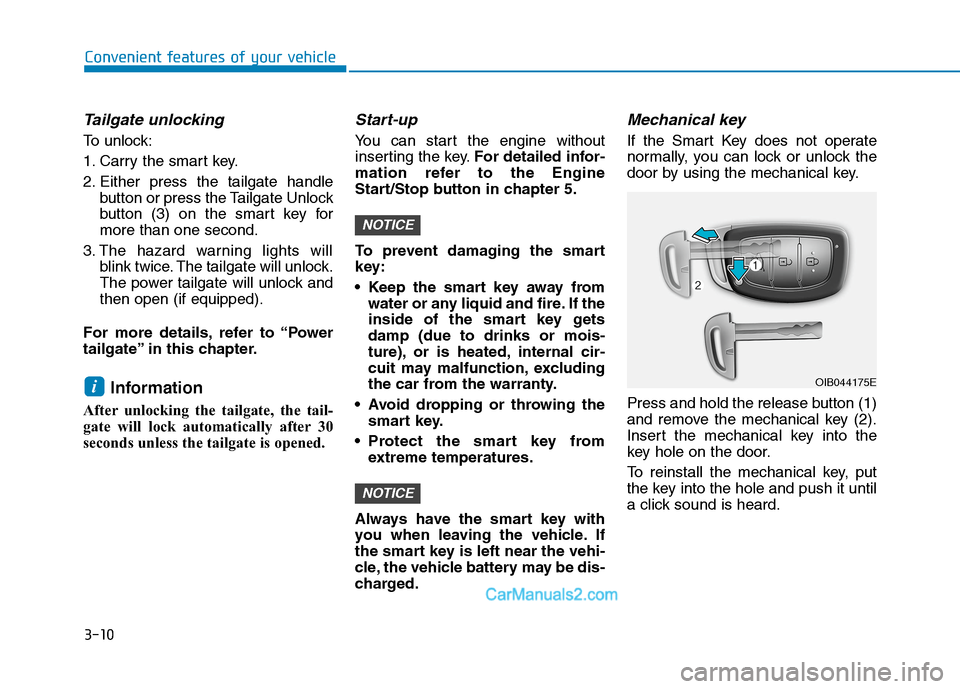
Mechanical key
If the Smart Key does not operate
normally, you can lock or unlock the
door by using the mechanical key.
Press and hold the release button (1)
and remove the mechanical key (2).
Insert the mechanical key into the
key hole on the door.
To reinstall the mechanical key, put
the key into the hole and push it until
a click sound is heard.
NOTICE
NOTICE
iOIB044175E
Page 107 of 637
3-21
Convenient features of your vehicle
3
S ST
TE
EE
ER
RI
IN
NG
G
W
WH
HE
EE
EL
L
Electric power steering (EPS)
The system assists you with steering
the vehicle. If the engine is off or if
the power steering system becomes
inoperative, the vehicle may still be
steered, but it will require increased
steering effort.
Also, the steering effort becomes
heavier as the vehicle’s speed
increases and becomes lighter as
the vehicle’s speed decreases for
better control of the steering wheel.
Should you notice any change in the
effort required to steer during normal
vehicle operation, we recommend
that the system be checked by an
authorised HYUNDAI dealer.If the Electric Power Steering
(EPS) System does not operate
normally, the warning light ( )
will illuminate on the instrument
cluster. The steering wheel may
become difficult to control or
operate. Take your vehicle to an
authorised HYUNDAI dealer and
have the system checked as soon
as possible.
Information
The following symptoms may occur
during normal vehicle operation:
• The steering effort may be high
immediately after placing the igni-
tion switch or the Engine Start/Stop
button in the ON position.
This happens as the system per-
forms the EPS system diagnostics.
When the diagnostics are complet-
ed, the steering wheel will return to
its normal condition.• A click noise may be heard from the
EPS relay after the ignition switch is
placed to the ON or LOCK/OFF
position (Without Smart key sys-
tem).
A click noise may be heard from the
EPS relay after the Engine
Start/Stop button is placed in the
ON or OFF position. (With Smart
key system)
• Motor noise may be heard when the
vehicle is at a stop or at a low driv-
ing speed.
• When you operate the steering
wheel in low temperatures, the
steering effort may be high and
abnormal noise may occur. If the
temperature rises, the noise will dis-
appear. This is a normal condition.
• When the vehicle is stationary, if
you turn the steering wheel all the
way to the left or right continuously,
the steering wheel effort increases.
This is not a system malfunction. As
time passes, the steering wheel
effort will return to its normal con-
dition.
i
NOTICE
Page 111 of 637
3-25
Convenient features of your vehicle
3
Day/night rearview mirror
(if equipped)
Make this adjustment before you
start driving and whilst the day/night
lever is in the day position.
Pull the day/night lever toward you to
reduce glare from the headlights of
the vehicles behind you during night
driving.
Remember that you lose some
rearview clarity in the night position.
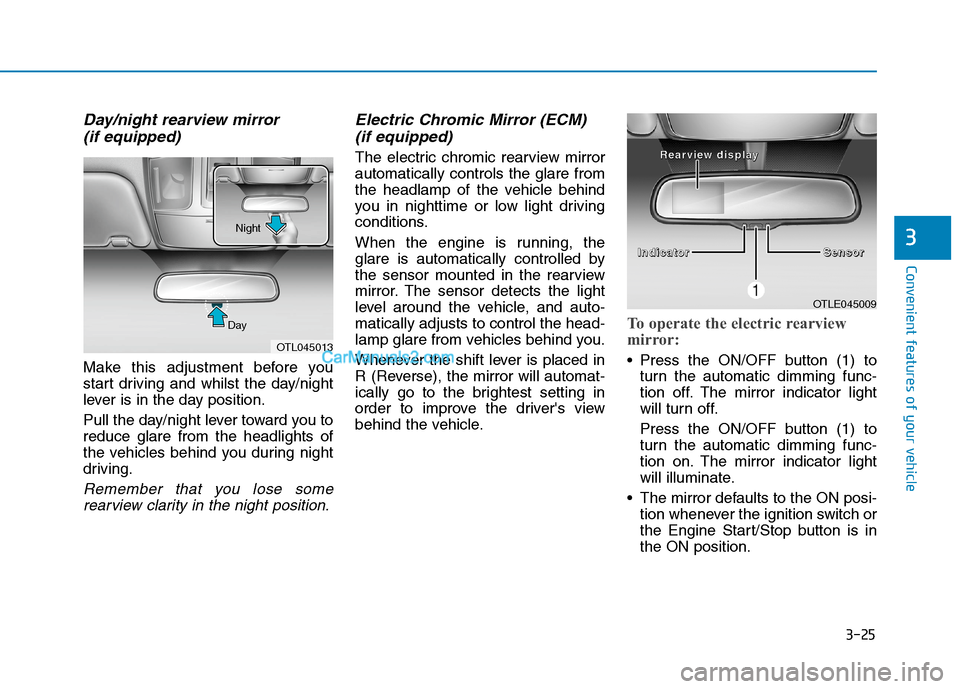
Electric Chromic Mirror (ECM)
(if equipped)
The electric chromic rearview mirror
automatically controls the glare from
the headlamp of the vehicle behind
you in nighttime or low light driving
conditions.
When the engine is running, the
glare is automatically controlled by
the sensor mounted in the rearview
mirror. The sensor detects the light
level around the vehicle, and auto-
matically adjusts to control the head-
lamp glare from vehicles behind you.
Whenever the shift lever is placed in
R (Reverse), the mirror will automat-
ically go to the brightest setting in
order to improve the driver's view
behind the vehicle.
To operate the electric rearview
mirror:
Press the ON/OFF button (1) to
turn the automatic dimming func-
tion off. The mirror indicator light
will turn off.
Press the ON/OFF button (1) to
turn the automatic dimming func-
tion on. The mirror indicator light
will illuminate.
The mirror defaults to the ON posi-
tion whenever the ignition switch or
the Engine Start/Stop button is in
the ON position.
OTLE045009
I I I I
n n n n
d d d d
i i i i
c c c c
a a a a
t t t t
o o o o
r r r r
S S S S
e e e e
n n n n
s s s s
o o o o
r r r r R R R R
e e e e
a a a a
r r r r
v v v v
i i i i
e e e e
w w w w
d d d d
i
i i i
s s s s
p p p p
l l l l
a a a a
y y y y
OTL045013 DayNight
Page 136 of 637
3-50
Convenient features of your vehicle
For emergency stop whilst operat-
ing, press any one of the Power
tailgate button, Power tailgate
handle switch, Power tailgate
inner switch or Tailgate unlock
button on the smart key shortly.
When the tailgate is restarted in
the emergency stop state, it may
be different from the direction of
operation before stopping.
Opening the tailgate
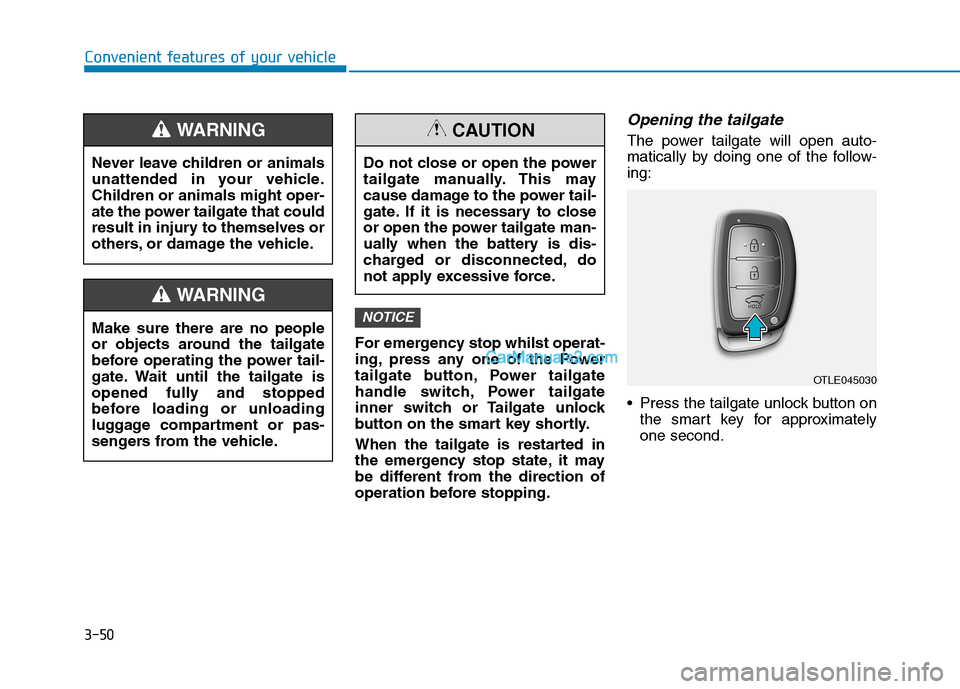
The power tailgate will open auto-
matically by doing one of the follow-
ing:
Press the tailgate unlock button on
the smart key for approximately
one second.
NOTICE
Never leave children or animals
unattended in your vehicle.
Children or animals might oper-
ate the power tailgate that could
result in injury to themselves or
others, or damage the vehicle.
WARNING
Make sure there are no people
or objects around the tailgate
before operating the power tail-
gate. Wait until the tailgate is
opened fully and stopped
before loading or unloading
luggage compartment or pas-
sengers from the vehicle.
WARNING
Do not close or open the power
tailgate manually. This may
cause damage to the power tail-
gate. If it is necessary to close
or open the power tailgate man-
ually when the battery is dis-
charged or disconnected, do
not apply excessive force.
CAUTION
OTLE045030
Page 148 of 637
3-62
Convenient features of your vehicle
Tachometer
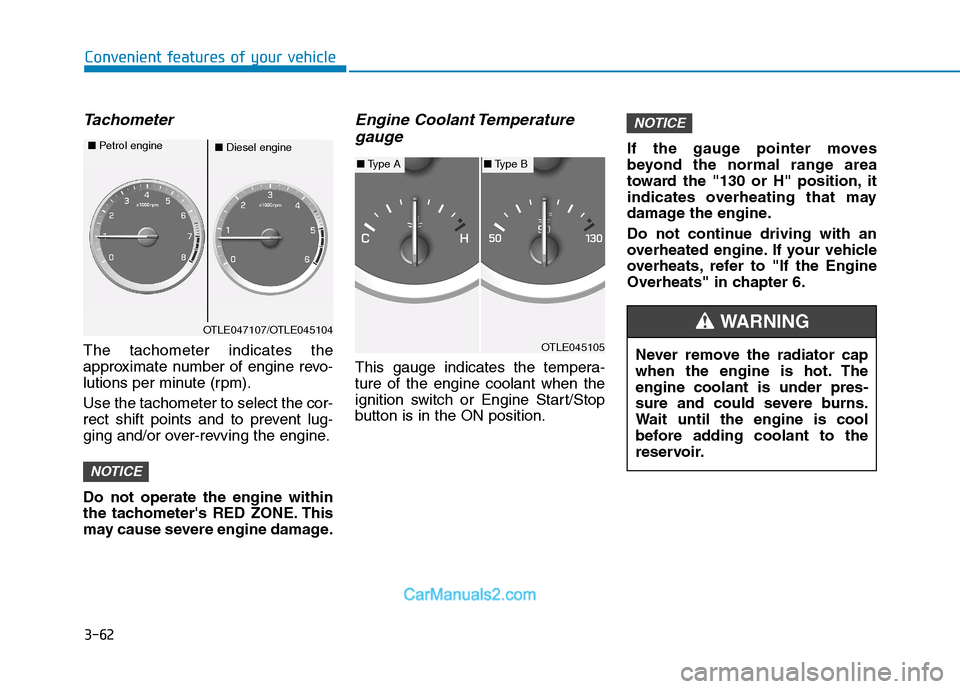
The tachometer indicates the
approximate number of engine revo-
lutions per minute (rpm).
Use the tachometer to select the cor-
rect shift points and to prevent lug-
ging and/or over-revving the engine.
Do not operate the engine within
the tachometer's RED ZONE. This
may cause severe engine damage.
Engine Coolant Temperature
gauge
This gauge indicates the tempera-
ture of the engine coolant when the
ignition switch or Engine Start/Stop
button is in the ON position.If the gauge pointer moves
beyond the normal range area
toward the "130 or H" position, it
indicates overheating that may
damage the engine.
Do not continue driving with an
overheated engine. If your vehicle
overheats, refer to "If the Engine
Overheats" in chapter 6.
NOTICE
NOTICE
OTLE047107/OTLE045104
■Diesel engine ■Petrol engine
OTLE045105
■Type A■Type B
Never remove the radiator cap
when the engine is hot. The
engine coolant is under pres-
sure and could severe burns.
Wait until the engine is cool
before adding coolant to the
reservoir.
WARNING