Warning indicator HYUNDAI TUCSON 2021 Owners Manual
[x] Cancel search | Manufacturer: HYUNDAI, Model Year: 2021, Model line: TUCSON, Model: HYUNDAI TUCSON 2021Pages: 546, PDF Size: 44.38 MB
Page 61 of 546
Safety system of your vehicle
2
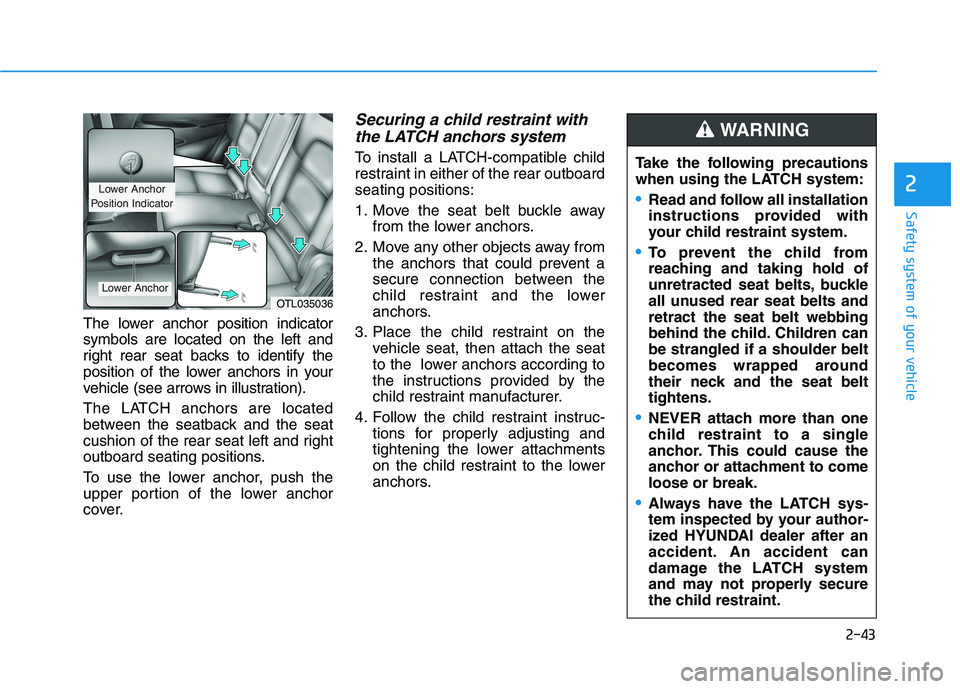
The lower anchor position indicator
symbols are located on the left and
right rear seat backs to identify the
position of the lower anchors in your
vehicle (see arrows in illustration).
The LATCH anchors are located
between the seatback and the seat
cushion of the rear seat left and right
outboard seating positions.
To use the lower anchor, push the
upper portion of the lower anchor
cover.
Securing a child restraint with
the LATCH anchors system
To install a LATCH-compatible child
restraint in either of the rear outboard
seating positions:
1. Move the seat belt buckle away
from the lower anchors.
2. Move any other objects away from
the anchors that could prevent a
secure connection between the
child restraint and the lower
anchors.
3. Place the child restraint on the
vehicle seat, then attach the seat
to the lower anchors according to
the instructions provided by the
child restraint manufacturer.
4. Follow the child restraint instruc-
tions for properly adjusting and
tightening the lower attachments
on the child restraint to the lower
anchors.
OTL035036
Lower Anchor
Position Indicator
Lower Anchor
Take the following precautions
when using the LATCH system:
Read and follow all installation
instructions provided with
your child restraint system.
To prevent the child from
reaching and taking hold of
unretracted seat belts, buckle
all unused rear seat belts and
retract the seat belt webbing
behind the child. Children can
be strangled if a shoulder belt
becomes wrapped around
their neck and the seat belt
tightens.
NEVER attach more than one
child restraint to a single
anchor. This could cause the
anchor or attachment to come
loose or break.
Always have the LATCH sys-
tem inspected by your author-
ized HYUNDAI dealer after an
accident. An accident can
damage the LATCH system
and may not properly secure
the child restraint.
WARNING
2-43
Page 79 of 546
2-61
Safety system of your vehicle
2
Wearing a thick cloth like ski wear
or hip protection wear.
Putting an additional thick cushion
on the seat.
Putting electrical devices (e.g.
notebook, satellite radio) on the
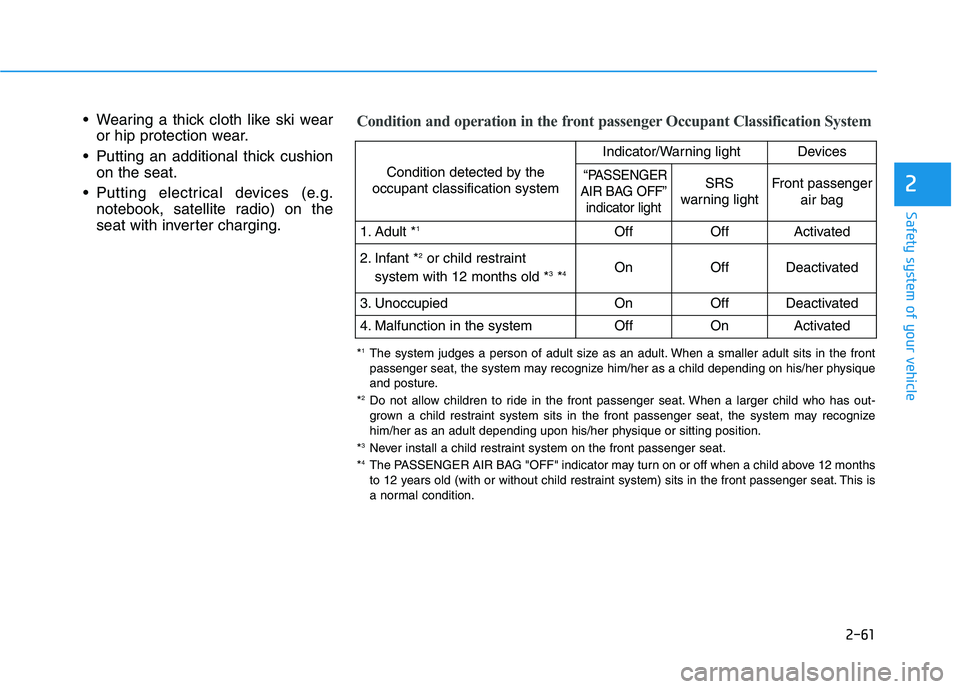
seat with inverter charging.Condition and operation in the front passenger Occupant Classification System
Condition detected by the
occupant classification system
Indicator/Warning lightDevices
“PASSENGER
AIR BAG OFF”
indicator lightSRS
warning lightFront passenger
air bag
1. Adult *1OffOffActivated
2. Infant *2or child restraint
system with 12 months old *3*4 OnOffDeactivated
3. Unoccupied OnOffDeactivated
4. Malfunction in the systemOffOnActivated
*1The system judges a person of adult size as an adult. When a smaller adult sits in the front
passenger seat, the system may recognize him/her as a child depending on his/her physique
and posture.
*
2Do not allow children to ride in the front passenger seat. When a larger child who has out-
grown a child restraint system sits in the front passenger seat, the system may recognize
him/her as an adult depending upon his/her physique or sitting position.
*
3Never install a child restraint system on the front passenger seat.
*4The PASSENGER AIR BAG "OFF" indicator may turn on or off when a child above 12 months
to 12 years old (with or without child restraint system) sits in the front passenger seat. This is
a normal condition.
Page 82 of 546
2-64
Safety system of your vehicle
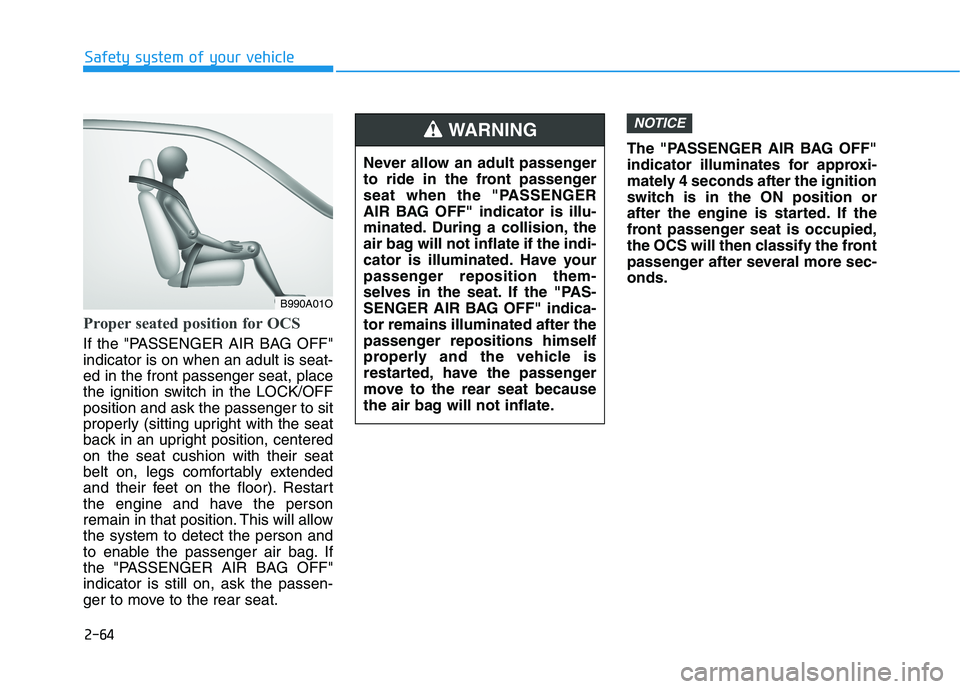
Proper seated position for OCS
If the "PASSENGER AIR BAG OFF"
indicator is on when an adult is seat-
ed in the front passenger seat, place
the ignition switch in the LOCK/OFF
position and ask the passenger to sit
properly (sitting upright with the seat
back in an upright position, centered
on the seat cushion with their seat
belt on, legs comfortably extended
and their feet on the floor). Restart
the engine and have the person
remain in that position. This will allow
the system to detect the person and
to enable the passenger air bag. If
the "PASSENGER AIR BAG OFF"
indicator is still on, ask the passen-
ger to move to the rear seat.The "PASSENGER AIR BAG OFF"
indicator illuminates for approxi-
mately 4 seconds after the ignition
switch is in the ON position or
after the engine is started. If the
front passenger seat is occupied,
the OCS will then classify the front
passenger after several more sec-
onds.
NOTICE
B990A01O
Never allow an adult passenger
to ride in the front passenger
seat when the "PASSENGER
AIR BAG OFF" indicator is illu-
minated. During a collision, the
air bag will not inflate if the indi-
cator is illuminated. Have your
passenger reposition them-
selves in the seat. If the "PAS-
SENGER AIR BAG OFF" indica-
tor remains illuminated after the
passenger repositions himself
properly and the vehicle is
restarted, have the passenger
move to the rear seat because
the air bag will not inflate.
WARNING
Page 83 of 546
2-65
Safety system of your vehicle
2
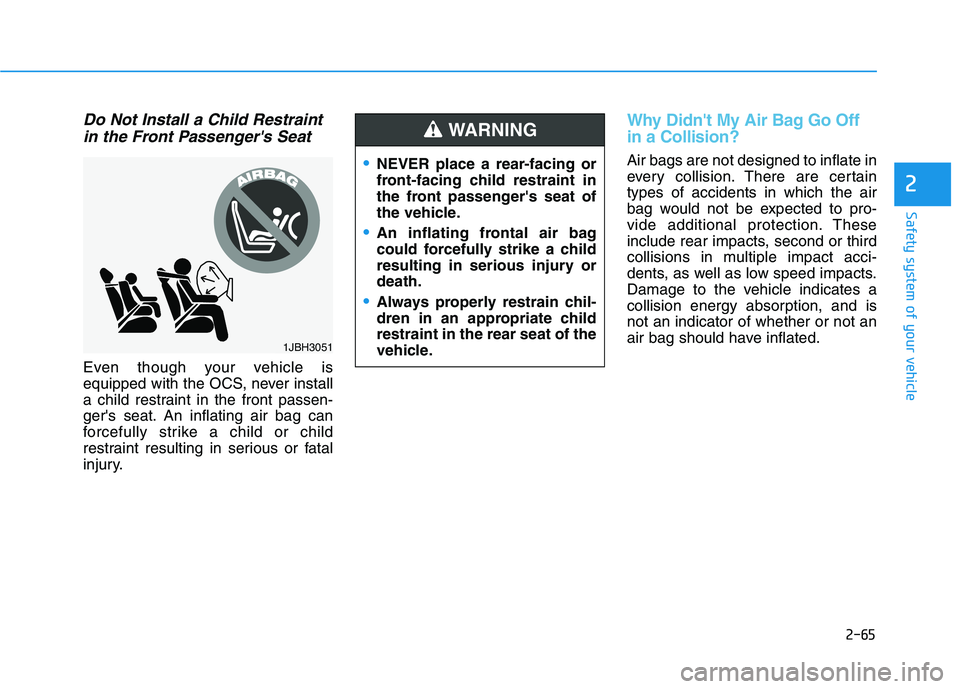
Do Not Install a Child Restraint
in the Front Passenger's Seat
Even though your vehicle is
equipped with the OCS, never install
a child restraint in the front passen-
ger's seat. An inflating air bag can
forcefully strike a child or child
restraint resulting in serious or fatal
injury.
Why Didn't My Air Bag Go Off
in a Collision?
Air bags are not designed to inflate in
every collision. There are certain
types of accidents in which the air
bag would not be expected to pro-
vide additional protection. These
include rear impacts, second or third
collisions in multiple impact acci-
dents, as well as low speed impacts.
Damage to the vehicle indicates a
collision energy absorption, and is
not an indicator of whether or not an
air bag should have inflated.NEVER place a rear-facing or
front-facing child restraint in
the front passenger's seat of
the vehicle.
An inflating frontal air bag
could forcefully strike a child
resulting in serious injury or
death.
Always properly restrain chil-
dren in an appropriate child
restraint in the rear seat of the
vehicle.
WARNING
1JBH3051
Page 92 of 546
Convenient features of your vehicle
Accessing Your Vehicle .........................................3-4
Remote Key.........................................................................3-4
Smart Key ............................................................................3-8
Immobilizer System .........................................................3-13
Door Locks ............................................................3-15
Operating Door Locks from Outside the Vehicle ....3-15
Operating Door Locks from Inside the Vehicle .......3-16
Automatic Door Lock and Unlock Features .............3-18
Child-Protector Rear Door locks ................................3-19
Theft-Alarm System ............................................3-20
Steering Wheel .....................................................3-21
Electric Power Steering (EPS) .....................................3-21
Tilt Steering/Telescope Steering.................................3-22
Heated Steering Wheel ..................................................3-23
Horn ....................................................................................3-23
Mirrors ...................................................................3-24
Inside Rearview Mirror ..................................................3-24
Side View Mirrors ...........................................................3-36
Windows ................................................................3-39
Power Windows ...............................................................3-40
Panoramic Sunroof ..............................................3-43
Sunshade ...........................................................................3-44
Sliding the Sunroof .........................................................3-44
Tilting the Sunroof .........................................................3-45
Closing the Sunroof........................................................3-45
To Reset the Sunroof.....................................................3-46
Exterior Features .................................................3-47
Hood ...................................................................................3-47
Fuel Filler Door ................................................................3-48
Liftgate ..................................................................3-52
Non-Powered liftgate ....................................................3-52
Power Liftgate .................................................................3-54
Smart Liftgate ..................................................................3-61
Instrument Cluster ...............................................3-65
Instrument Cluster Control............................................3-66
Gauges and Meters ........................................................3-67
Icy Road Warning Light .................................................3-70
Warning and Indicator Lights .......................................3-72
LCD Display Messages ...................................................3-84
LCD Display ...........................................................3-91
LCD Display Control ........................................................3-91
LCD Display Modes .........................................................3-92
Trip Computer .....................................................3-103
3
Page 104 of 546
3-13
Convenient features of your vehicle
3
If you suspect your smart key might
have sustained some damage, or
you feel your smart key is not work-
ing correctly, contact an authorized
HYUNDAI dealer.
Information
An inappropriately disposed
battery can be harmful to the
environment and human health.
Dispose of the battery according
to your local law(s) or regula-
tions.
Immobilizer System
The immobilizer system protects your
vehicle from theft. If an improperly
coded key (or other device) is used,
the engine’s fuel system is disabled.
When the ignition switch is placed in
the ON position, the immobilizer sys-
tem indicator should come on briefly,
then go off. If the indicator starts to
blink, the system does not recognize
the coding of the key.
Turn the ignition switch to the
LOCK/OFF position, then turn the igni-
tion switch to the ON position again.
The system may not recognize your
key’s coding if another immobilizer
key or other metal object (i.e., key
chain) is near the key. The engine
may not start because the metal may
interrupt the transponder signal from
transmitting normally.
If the system repeatedly does not
recognize the coding of the key, it is
recommended that you contact your
HYUNDAI dealer.Do not attempt to alter this system or
add other devices to it. Electrical
problems could result that may make
your vehicle inoperable.
The transponder in your key is an
important part of the immobilizer
system. It is designed to give
years of trouble-free service, how-
ever you should avoid exposure to
moisture, static electricity and
rough handling. Immobilizer sys-
tem malfunction could occur.
NOTICE
iIn order to prevent theft of your
vehicle, do not leave spare keys
anywhere in your vehicle. Your
immobilizer password is a cus-
tomer unique password and
should be kept confidential.
WARNING
Page 117 of 546
3-26
Convenient features of your vehicle
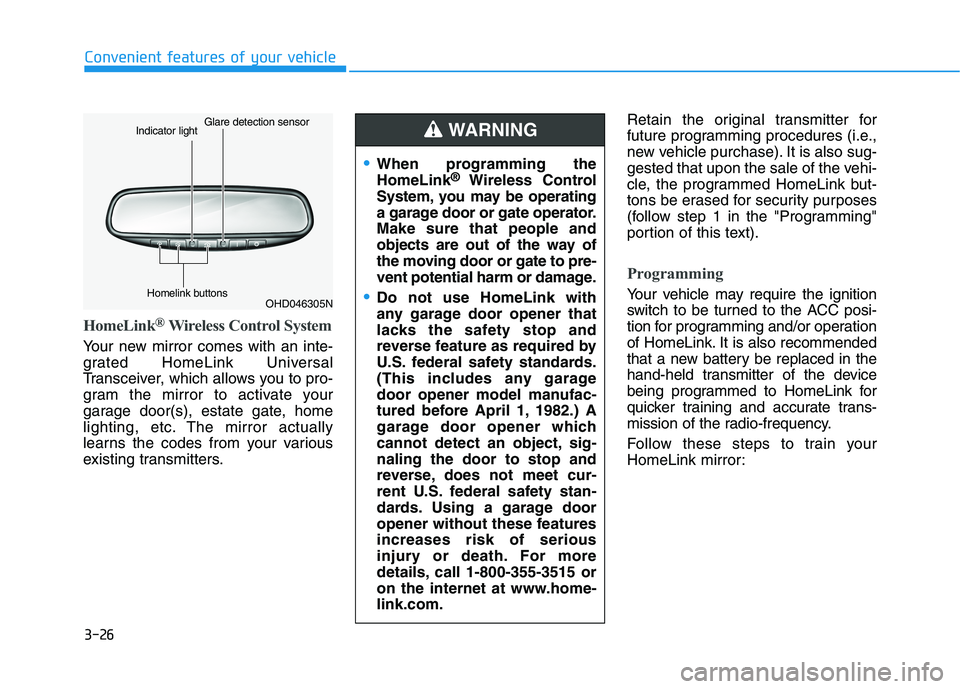
HomeLink®Wireless Control System
Your new mirror comes with an inte-
grated HomeLink Universal
Transceiver, which allows you to pro-
gram the mirror to activate your
garage door(s), estate gate, home
lighting, etc. The mirror actually
learns the codes from your various
existing transmitters.Retain the original transmitter for
future programming procedures (i.e.,
new vehicle purchase). It is also sug-
gested that upon the sale of the vehi-
cle, the programmed HomeLink but-
tons be erased for security purposes
(follow step 1 in the "Programming"
portion of this text).
Programming
Your vehicle may require the ignition
switch to be turned to the ACC posi-
tion for programming and/or operation
of HomeLink. It is also recommended
that a new battery be replaced in the
hand-held transmitter of the device
being programmed to HomeLink for
quicker training and accurate trans-
mission of the radio-frequency.
Follow these steps to train your
HomeLink mirror:
When programming the
HomeLink®Wireless Control
System, you may be operating
a garage door or gate operator.
Make sure that people and
objects are out of the way of
the moving door or gate to pre-
vent potential harm or damage.
Do not use HomeLink with
any garage door opener that
lacks the safety stop and
reverse feature as required by
U.S. federal safety standards.
(This includes any garage
door opener model manufac-
tured before April 1, 1982.) A
garage door opener which
cannot detect an object, sig-
naling the door to stop and
reverse, does not meet cur-
rent U.S. federal safety stan-
dards. Using a garage door
opener without these features
increases risk of serious
injury or death. For more
details, call 1-800-355-3515 or
on the internet at www.home-
link.com.
WARNING
OHD046305N Glare detection sensor
Indicator light
Homelink buttons
Page 122 of 546
3-31
Convenient features of your vehicle
3
Your mirror will automatically dim
upon detecting glare from the vehi-
cles traveling behind you. The auto-
dimming function can be controlled
by pressing the Dimming ON/OFF
button:
1. Pressing and holding the button
for 3 seconds turns the auto-dim-
ming function OFF which is indi-
cated by the green Status
Indicator LED turning off.
2. Pressing and holding the button
for 3 seconds again turns the auto-
dimming function ON which is indi-
cated by the green Status Indicator
LED turning on.
The mirror defaults to the ON posi-
tion each time the vehicle is started.Integrated HomeLink®Wireless
Control System
The HomeLink®Wireless Control
System can replace up to three
hand-held radio-frequency (RF)
transmitters with a single built-in
device. This innovative feature will
learn the radio frequency codes of
most current transmitters to operate
devices such as gate operators,
garage door openers, entry door
locks, security systems, even home
lighting. Both standard and rolling
code-equipped transmitters can be
programmed by following the out-
lined procedures.
Additional HomeLink
®information
can be found at: www.homelink.com
or by calling 1-800-355-3515.
Retain the original transmitter of the
RF device you are programming for
use in other vehicles as well as for
future HomeLink
®programming. It is
also suggested that upon the sale of
the vehicle, the programmed
HomeLink
®buttons be erased for
security purposes.
Before programming
HomeLink®to a garage door
opener or gate operator, make
sure people and objects are out
of the way of the device to pre-
vent potential harm or damage.
Do not use the HomeLink
®with
any garage door opener that
lacks the safety stop and
reverse features required by
U.S. federal safety standards
(this includes any garage door
opener model manufactured
before April 1, 1982). A garage
door that cannot detect an
object - signaling the door to
stop and reverse - does not
meet current U.S. federal safety
standards. Using a garage door
opener without these features
increases the risk of serious
injury or death.
WARNING
Page 156 of 546
3-65
Convenient features of your vehicle
I IN
NS
ST
TR
RU
UM
ME
EN
NT
T
C
CL
LU
US
ST
TE
ER
R
3
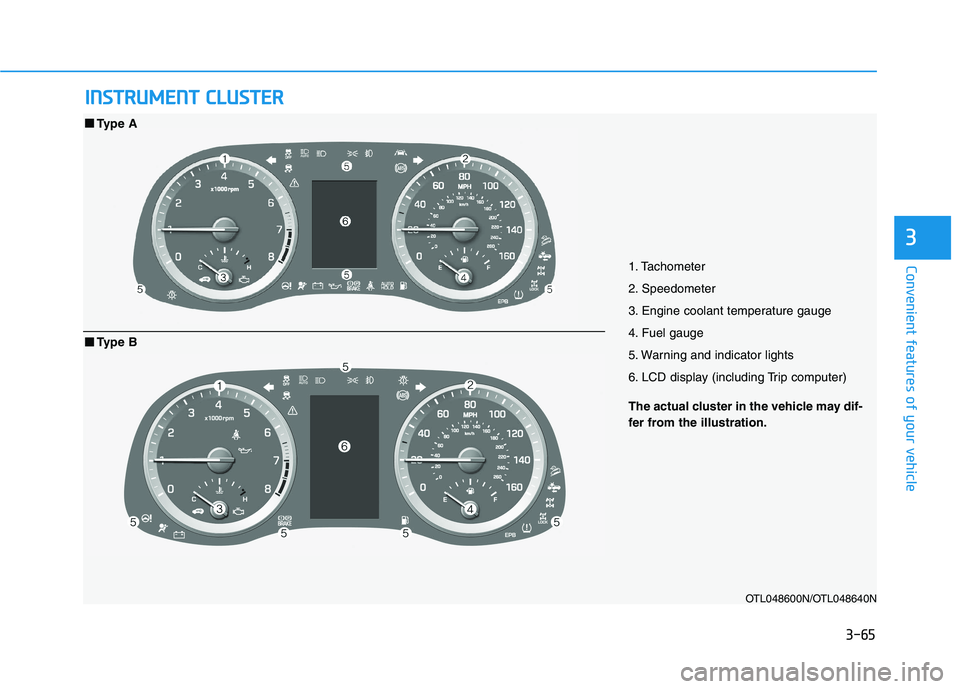
1. Tachometer
2. Speedometer
3. Engine coolant temperature gauge
4. Fuel gauge
5. Warning and indicator lights
6. LCD display (including Trip computer)
OTL048600N/OTL048640N
■ ■
Type A
The actual cluster in the vehicle may dif-
fer from the illustration.
■ ■
Type B
Page 159 of 546
3-68
Convenient features of your vehicle
If the gauge pointer moves
beyond the normal range area
toward the "H" position, it indi-
cates overheating that may dam-
age the engine.
Do not continue driving with an
overheated engine. If your vehicle
overheats, refer to "If the Engine
Overheats" in chapter 6.
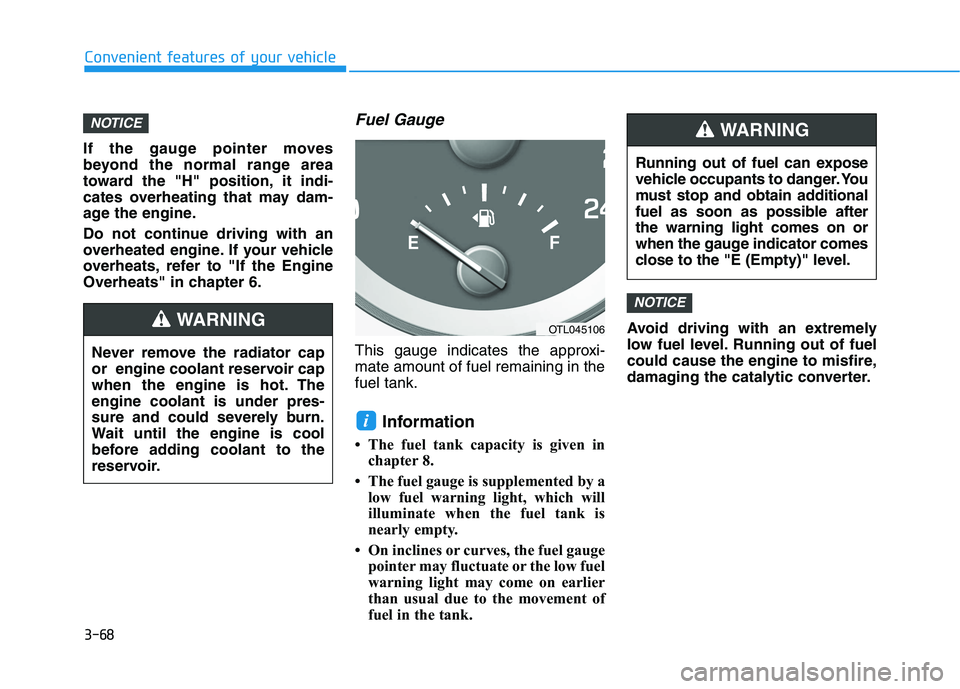
Fuel Gauge
This gauge indicates the approxi-
mate amount of fuel remaining in the
fuel tank.
Information
• The fuel tank capacity is given in
chapter 8.
• The fuel gauge is supplemented by a
low fuel warning light, which will
illuminate when the fuel tank is
nearly empty.
• On inclines or curves, the fuel gauge
pointer may fluctuate or the low fuel
warning light may come on earlier
than usual due to the movement of
fuel in the tank.Avoid driving with an extremely
low fuel level. Running out of fuel
could cause the engine to misfire,
damaging the catalytic converter.
NOTICE
i
NOTICE
Running out of fuel can expose
vehicle occupants to danger. You
must stop and obtain additional
fuel as soon as possible after
the warning light comes on or
when the gauge indicator comes
close to the "E (Empty)" level.
WARNING
Never remove the radiator cap
or engine coolant reservoir cap
when the engine is hot. The
engine coolant is under pres-
sure and could severely burn.
Wait until the engine is cool
before adding coolant to the
reservoir.
WARNINGOTL045106