child restraint HYUNDAI TUCSON 2022 User Guide
[x] Cancel search | Manufacturer: HYUNDAI, Model Year: 2022, Model line: TUCSON, Model: HYUNDAI TUCSON 2022Pages: 638, PDF Size: 82.3 MB
Page 69 of 638
Seats & Safety System
3-38
Installing a Child Restraint
System (CRS)
WARNING
Before installing your Child Restraint
System always:
Read and follow the instructions
provided by the manufacturer of the
Child Restraint System.
Failure to follow all warnings and
instructions could increase the risk of
the SERIOUS INJURY or DEATH if an
accident occurs.
WARNING
If the vehicle head restraint prevents
proper installation of a Child Restraint
System, the head restraint of the
respective seating position shall be
readjusted or entirely removed.
After selecting a proper Child Restraint
System for your child and checking that
the Child Restraint System fits properly
on the seating position, there are three
general steps for a proper installation:
• Properly secure the Child Restraint
System to the vehicle. All Child
Restraint Systems must be secured
to the vehicle with the lap belt or
lap part of a lap/shoulder part of a
lap/shoulder belt or with the LATCH
system. •
Make sure the Child Restraint System
is firmly secured. After installing a
Child Restraint System to the vehicle,
push and pull the seat forward and
from side-to-side to verify that it is
securely attached to the seat. A Child
Restraint System secured with a seat
belt should be installed as firmly as
possible. However, some side-to-side
movement can be expected.
When installing a Child Restraint
System, adjust the vehicle seat and
seatback (up and down, forward
and rearward) so that your child fits
in the Child Restraint System in a
comfortable manner.
• Secure the child in the Child
Restraint System. Make sure the
child is properly strapped in the Child
Restraint System according to the
Child Restraint System manufacturer’s
instructions.
CAUTION
A Child Restraint System in a closed
vehicle can become very hot. To prevent
burns, check the seating surface and
buckles before placing your child in the
Child Restraint System.
Page 70 of 638
03
3-39
Lower Anchors and Tether for
Children (LATCH System)
The LATCH system holds a Child
Restraint System during driving and in
an accident. This system is designed
to make installation of the Child
Restraint System easier and reduce
the possibility of improperly installing
your Child Restraint System. The LATCH
system uses anchors in the vehicle and
attachments on the Child Restraint
System. The LATCH system eliminates
the need to use seat belts to secure the
Child Restraint System to the rear seats.
Lower anchors are metal bars built into
the vehicle. There are two lower anchors
for each LATCH seating position that will
accommodate a Child Restraint System
with lower attachments.
To use the LATCH system in your vehicle,
you must have a Child Restraint System
with LATCH attachments.
The Child Restraint System manufacturer
will provide you with instructions on how
to use the Child Restraint System with its
attachments for the LATCH anchorages.
ONX4030035
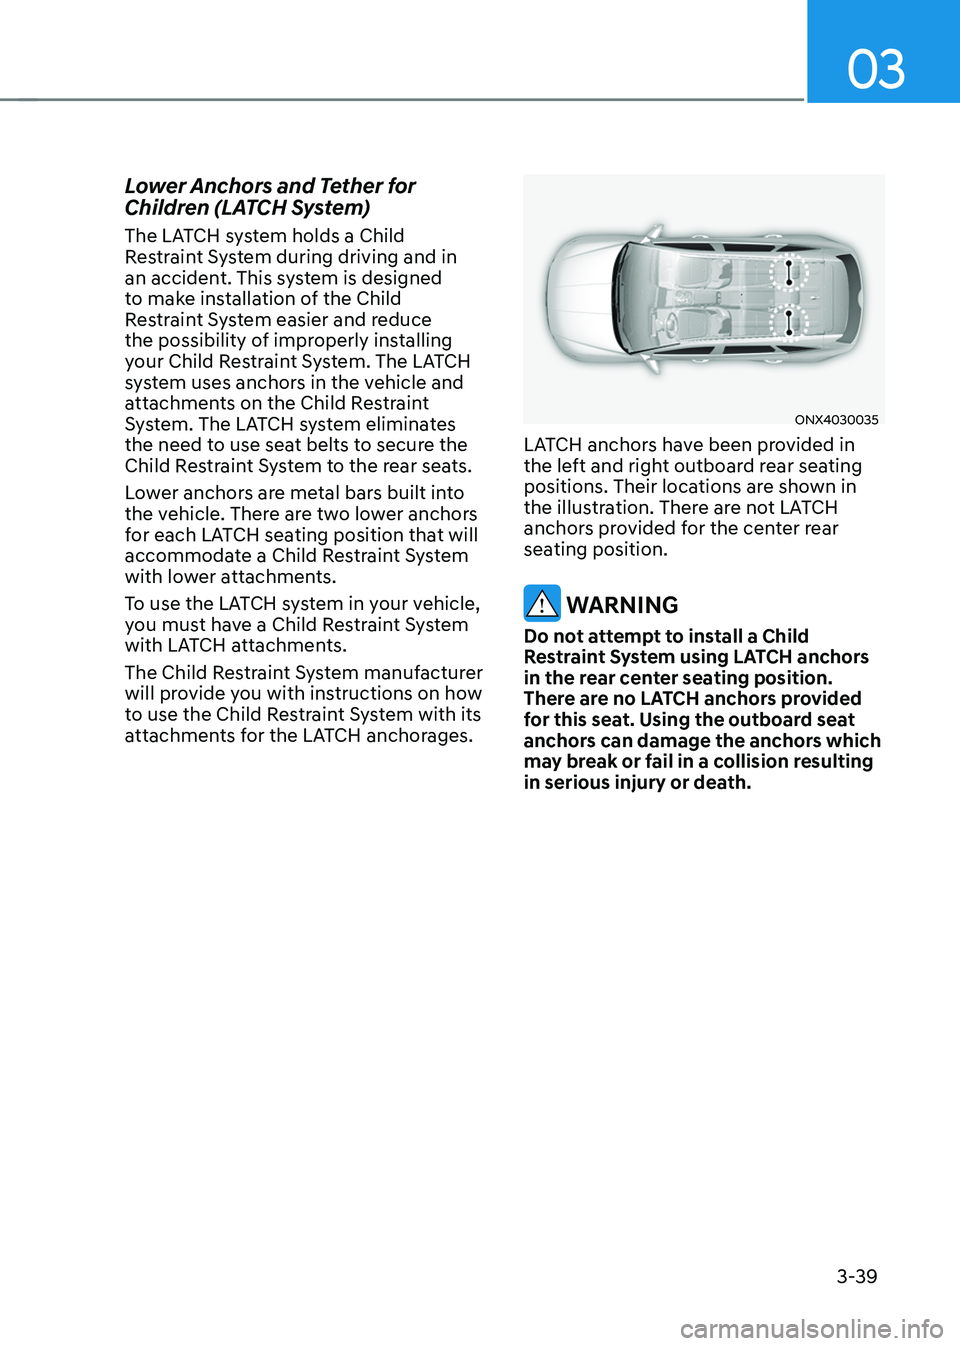
LATCH anchors have been provided in
the left and right outboard rear seating
positions. Their locations are shown in
the illustration. There are not LATCH
anchors provided for the center rear
seating position.
WARNING
Do not attempt to install a Child
Restraint System using LATCH anchors
in the rear center seating position.
There are no LATCH anchors provided
for this seat. Using the outboard seat
anchors can damage the anchors which
may break or fail in a collision resulting
in serious injury or death.
Page 71 of 638
![HYUNDAI TUCSON 2022 User Guide Seats & Safety System
3-40
„„Rear passenger seat
ONX4E030082
[A] : Lower Anchor Position Indicator(Type A- ,Type B- ),[B] : Lower Anchor
The lower anchor position indicator
symbols are lo](/img/35/41173/w960_41173-70.png "HYUNDAI TUCSON 2022 User Guide Seats & Safety System
3-40
„„Rear passenger seat
ONX4E030082
[A] : Lower Anchor Position Indicator(Type A- ,Type B- ),[B] : Lower Anchor
The lower anchor position indicator
symbols are lo")
Seats & Safety System
3-40
„„Rear passenger seat
ONX4E030082
[A] : Lower Anchor Position Indicator(Type A- ,Type B- ),[B] : Lower Anchor
The lower anchor position indicator
symbols are located on the left and right
rear seat backs to identify the position
of the lower anchors in your vehicle (see
arrows in illustration).
The LATCH anchors are located between
the seatback and the seat cushion of the
rear seat left and right outboard seating
positions.
WARNING
Before installing the Child Restraint
System, make sure that there are no
objects (e.g. toy, pen, wire) around the
lower anchor area. Those objects may
damage either the seat belt system or
the Child Restraint System during the
installment procedure. If necessary,
have the vehicle inspected by an
authorized HYUNDAI dealer.
Securing a Child Restraint System
with the “LATCH Anchors System”
To install a LATCH-compatible Child
Restraint System in either of the rear
outboard seating positions:
1. Move the seat belt buckle away from
the lower anchors.
2. Move any other objects away from
the anchorages that could prevent
a secure connection between the
Child Restraint System and the lower
anchors.
3. Place the Child Restraint System on
the vehicle seat, then attach the seat
to the lower anchors according to the
instructions provided by the Child
Restraint System manufacturer.
4. Follow the instructions of the Child
Restraint System’s manufacturer for
proper installation and connection of
the lower attachments on the Child
Restraint System to the lower anchors.
Page 72 of 638
03
3-41
WARNING
Take the following precautions when
using the LATCH system:
• Read and follow all installation
instructions provided with your Child
Restraint System.
• To prevent the child from reaching
and taking hold of unretracted
seat belts, buckle all unused rear
seat belts and retract the seat belt
webbing behind the child. Children
can be strangled if a shoulder belt
becomes wrapped around their neck
and the seat belt tightens.
• NEVER attach more than one
Child Restraint System to a single
anchorage. This could cause the
anchor or attachment to come loose
or break.
• Always have the LATCH system
inspected by your dealer after an
accident. An accident can damage
the LATCH system and may not
properly secure the Child Restraint
System.
NOTICE
The recommended weight for the
LATCH system is under 65 lb. (30 kg).
How to determine an appropriate child
restraint weight: Child weight + Child
restraint weight < 65 lb. (30kg)
Securing a Child Restraint System
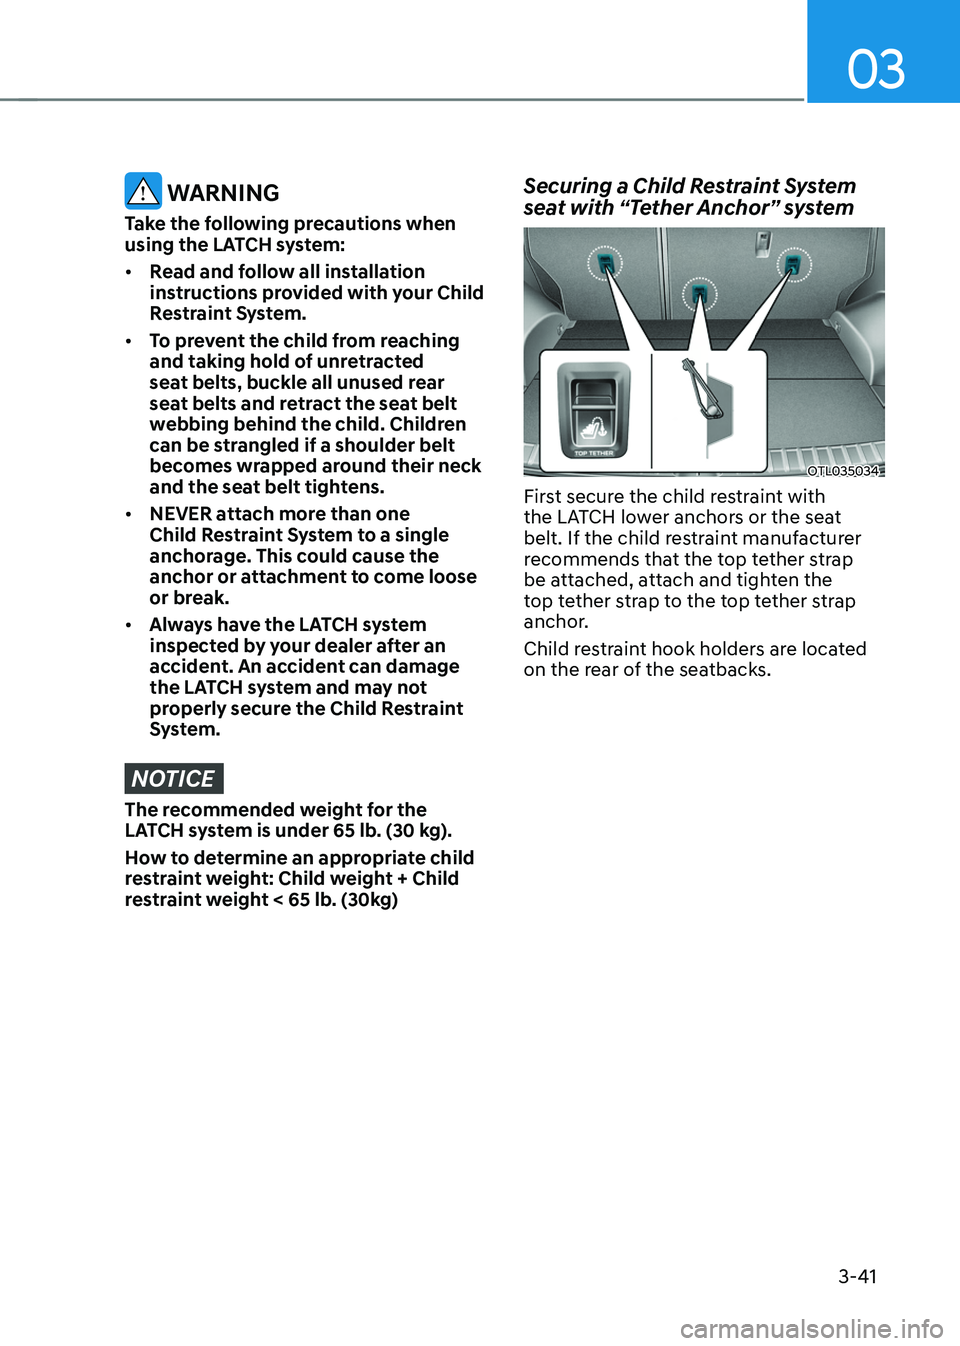
seat with “Tether Anchor” system
OTL035034
First secure the child restraint with
the LATCH lower anchors or the seat
belt. If the child restraint manufacturer
recommends that the top tether strap
be attached, attach and tighten the
top tether strap to the top tether strap
anchor.
Child restraint hook holders are located
on the rear of the seatbacks.
Page 73 of 638
Seats & Safety System
3-42
ONX4030034
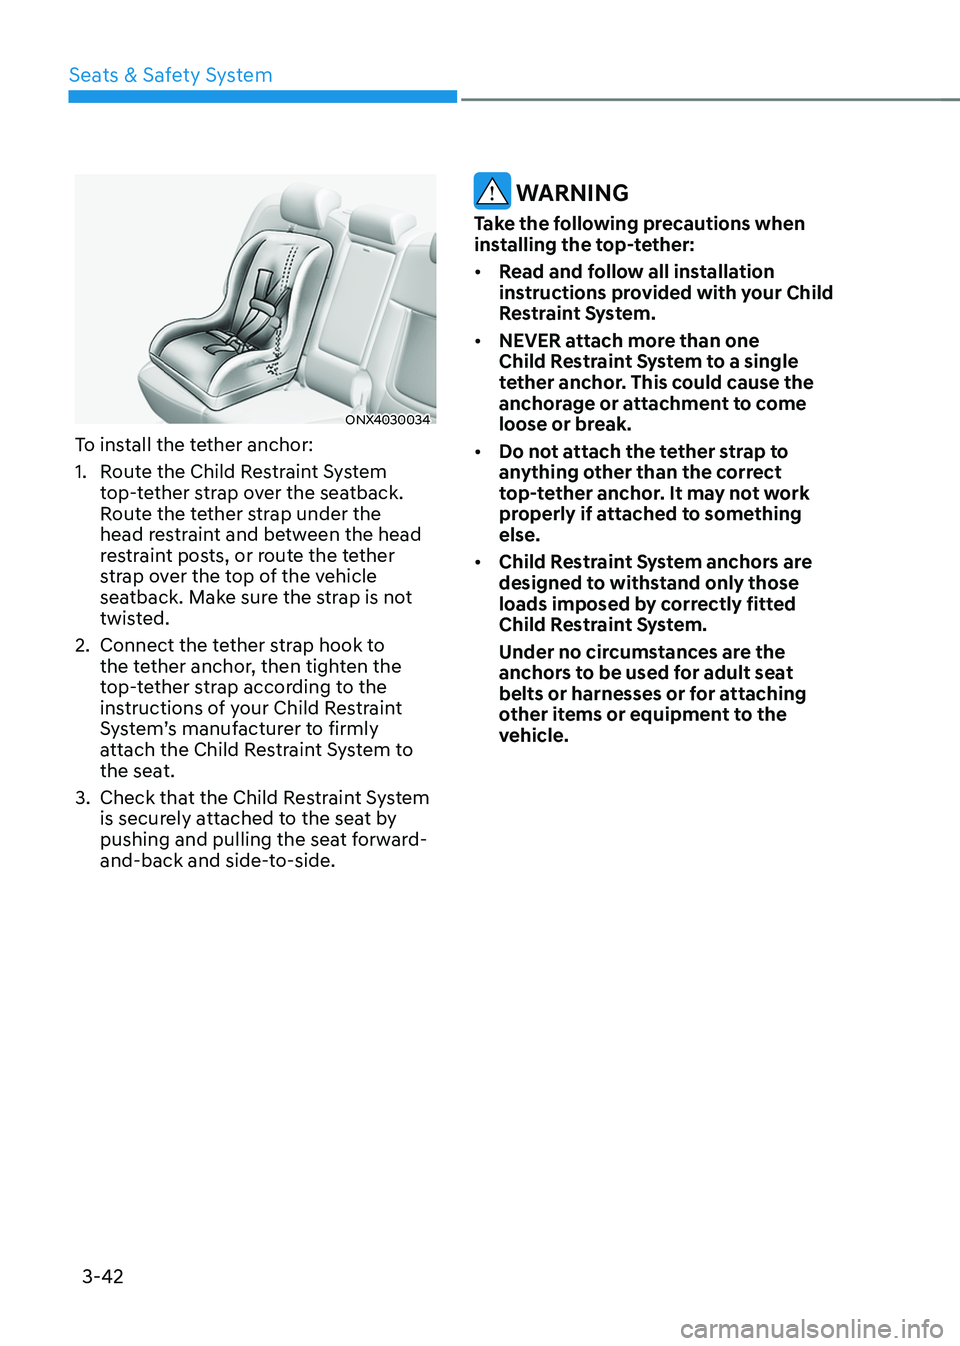
To install the tether anchor:
1. Route the Child Restraint System
top-tether strap over the seatback.
Route the tether strap under the
head restraint and between the head
restraint posts, or route the tether
strap over the top of the vehicle
seatback. Make sure the strap is not
twisted.
2. Connect the tether strap hook to
the tether anchor, then tighten the
top-tether strap according to the
instructions of your Child Restraint
System’s manufacturer to firmly
attach the Child Restraint System to
the seat.
3. Check that the Child Restraint System
is securely attached to the seat by
pushing and pulling the seat forward-
and-back and side-to-side.
WARNING
Take the following precautions when
installing the top-tether:
• Read and follow all installation
instructions provided with your Child
Restraint System.
• NEVER attach more than one
Child Restraint System to a single
tether anchor. This could cause the
anchorage or attachment to come
loose or break.
• Do not attach the tether strap to
anything other than the correct
top-tether anchor. It may not work
properly if attached to something
else.
• Child Restraint System anchors are
designed to withstand only those
loads imposed by correctly fitted
Child Restraint System.
Under no circumstances are the
anchors to be used for adult seat
belts or harnesses or for attaching
other items or equipment to the
vehicle.
Page 74 of 638
03
3-43
Securing a Child Restraint System
with a lap/shoulder belt
WARNING
ALWAYS place a rearward-facing Child
Restraint System in the rear seat of the
vehicle.
Placing a rearward-facing child restraint
in the front seat can result in serious
injury or death if the Child Restraint
System is struck by an inflating air bag.
When not using the LATCH system, all
Child Restraint Systems must be secured
to a rear seat with the lap part of a lap/
shoulder belt.
OHI038145
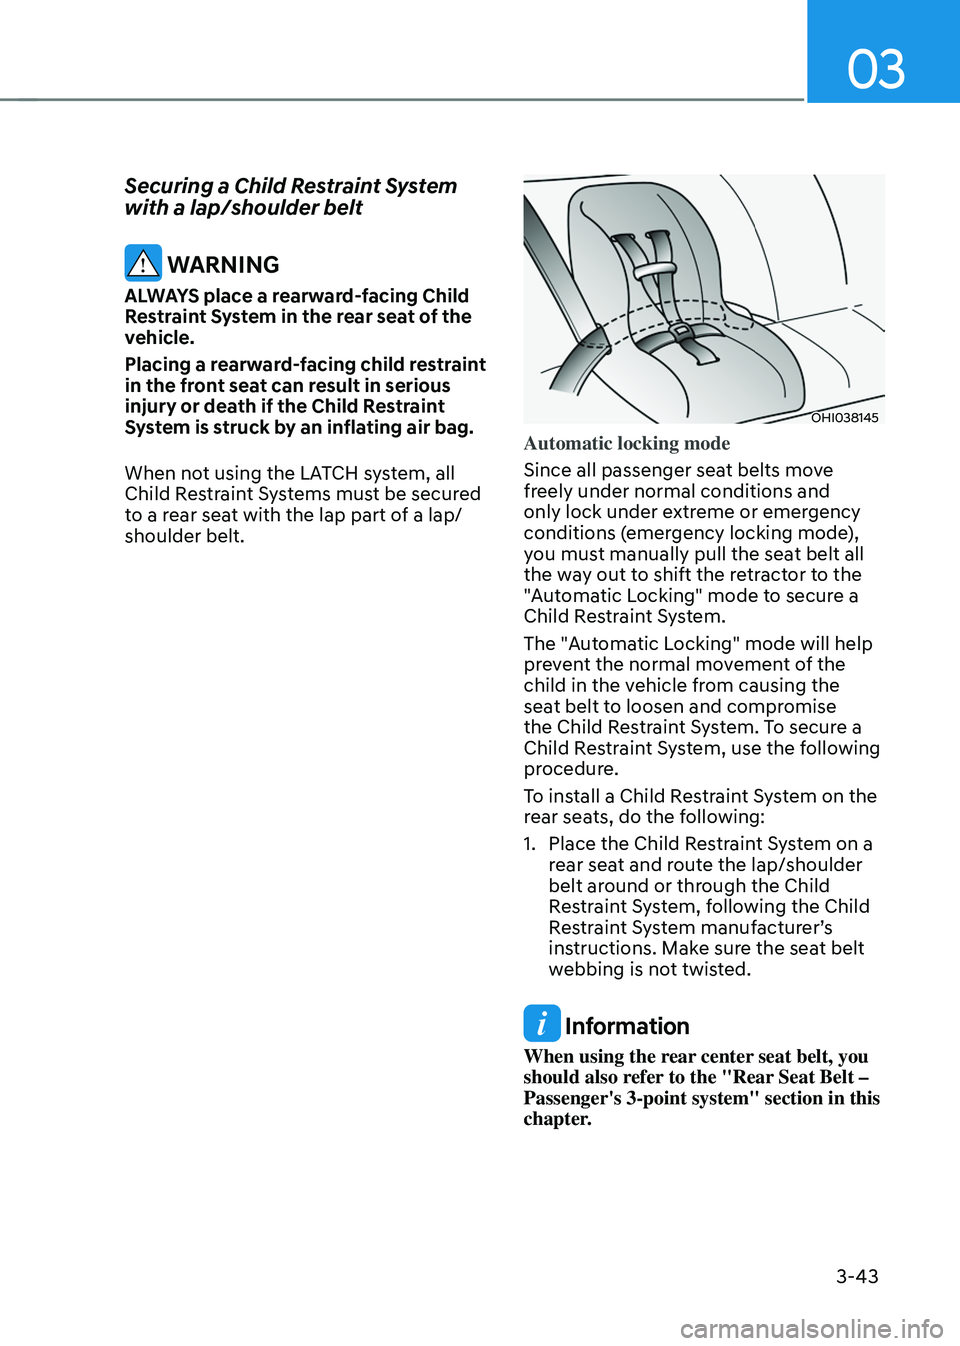
Automatic locking mode
Since all passenger seat belts move
freely under normal conditions and
only lock under extreme or emergency
conditions (emergency locking mode),
you must manually pull the seat belt all
the way out to shift the retractor to the
"Automatic Locking" mode to secure a
Child Restraint System.
The "Automatic Locking" mode will help
prevent the normal movement of the
child in the vehicle from causing the
seat belt to loosen and compromise
the Child Restraint System. To secure a
Child Restraint System, use the following
procedure.
To install a Child Restraint System on the
rear seats, do the following:
1. Place the Child Restraint System on a
rear seat and route the lap/shoulder
belt around or through the Child
Restraint System, following the Child
Restraint System manufacturer’s
instructions. Make sure the seat belt
webbing is not twisted.
Information
When using the rear center seat belt, you
should also refer to the "Rear Seat Belt –
Passenger's 3-point system" section in this
chapter.
Page 75 of 638
Seats & Safety System
3-44
OHI038146
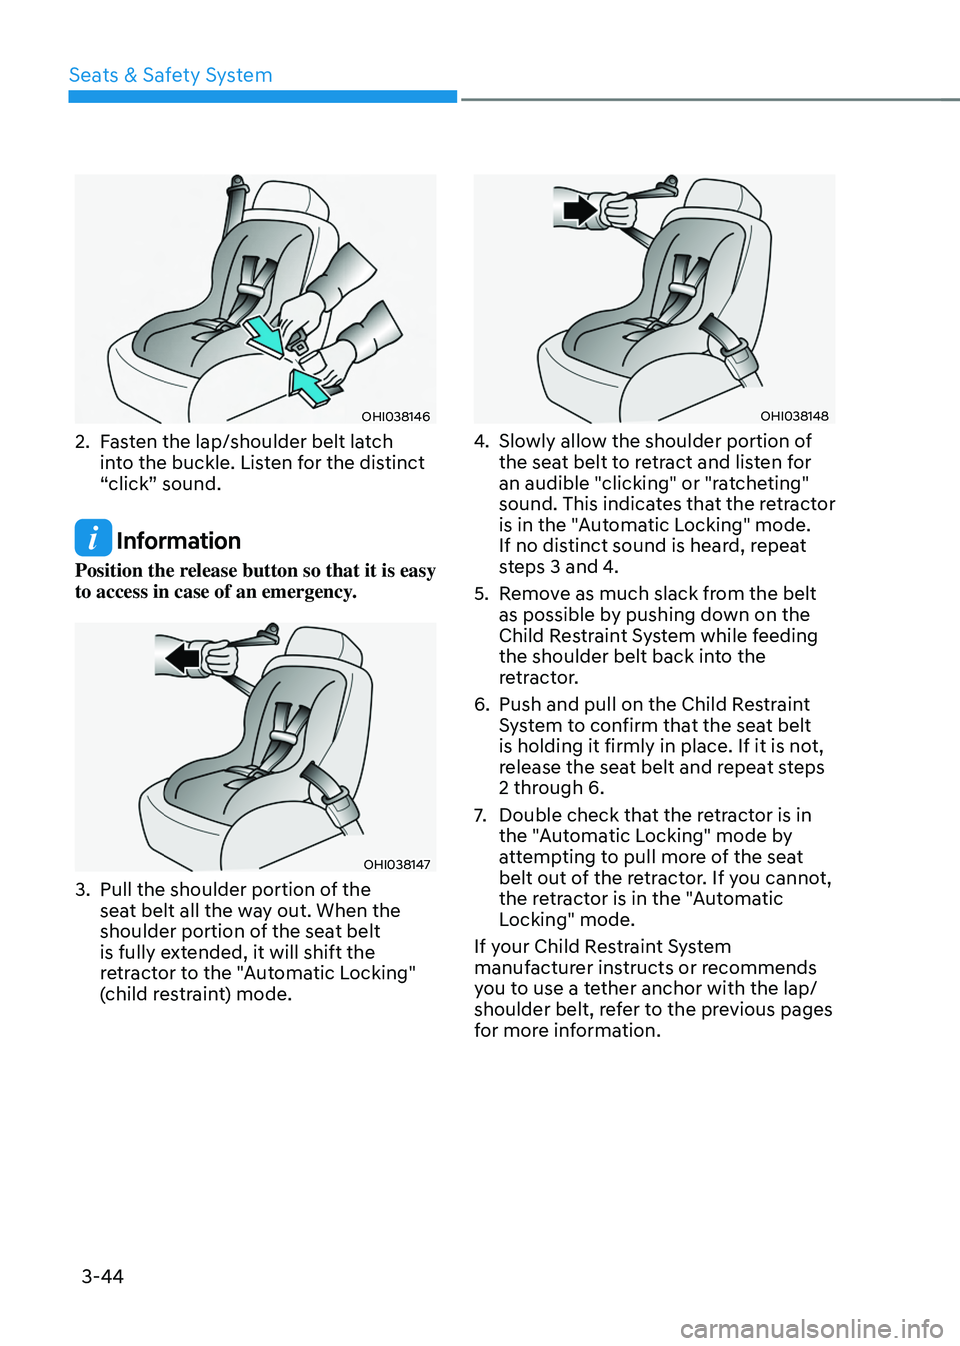
2. Fasten the lap/shoulder belt latch
into the buckle. Listen for the distinct
“click” sound.
Information
Position the release button so that it is easy
to access in case of an emergency.
OHI038147
3. Pull the shoulder portion of the
seat belt all the way out. When the
shoulder portion of the seat belt
is fully extended, it will shift the
retractor to the "Automatic Locking"
(child restraint) mode.
OHI038148
4. Slowly allow the shoulder portion of
the seat belt to retract and listen for
an audible "clicking" or "ratcheting"
sound. This indicates that the retractor
is in the "Automatic Locking" mode.
If no distinct sound is heard, repeat
steps 3 and 4.
5. Remove as much slack from the belt
as possible by pushing down on the
Child Restraint System while feeding
the shoulder belt back into the
retractor.
6. Push and pull on the Child Restraint
System to confirm that the seat belt
is holding it firmly in place. If it is not,
release the seat belt and repeat steps
2 through 6.
7. Double check that the retractor is in
the "Automatic Locking" mode by
attempting to pull more of the seat
belt out of the retractor. If you cannot,
the retractor is in the "Automatic
Locking" mode.
If your Child Restraint System
manufacturer instructs or recommends
you to use a tether anchor with the lap/
shoulder belt, refer to the previous pages
for more information.
Page 76 of 638
03
3-45
Information
When the seat belt is allowed to retract to
its fully stowed position, the retractor will
automatically switch from the “Automatic
Locking” mode to the emergency lock
mode for normal adult usage.
WARNING
If the retractor is not in the “Automatic
Locking” mode, the child restraint
can move when your vehicle turns or
stops suddenly. A child can be seriously
injured or killed if the child restraint
is not properly anchored in the car,
including manually pulling the seat belt
all the way out to shift the retractor to
the “Automatic Locking” mode.
To remove the Child Restraint System,
press the release button on the buckle
and then pull the lap/shoulder belt out of
the Child Restraint System and allow the
seat belt to retract fully.
WARNING
If a child restraint is installed in the
second row center seat, move the
second row seat far back as possible, to
minimize contact with the front center
air bag.
Page 78 of 638
03
3-47
The vehicles are equipped with a Supplemental Air Bag System for the driver’s seat and
front passenger’s seats.
The front air bags are designed to supplement the three-point seat belts. For these air
bags to provide protection, the seat belts must be worn at all times when driving.
You can be severely injured or killed in an accident if you are not wearing a seat belt.
Air bags are designed to supplement seat belts, but do not replace them. Also, air bags
are not designed to deploy in every collision. In some accidents, the seat belts are the
only restraint protecting you.
WARNING
AIR BAG SAFETY PRECAUTIONS
ALWAYS use seat belts Child Restraint Systems - every trip, every time, everyone!
Even with air bags, you can be seriously injured or killed in a collision if you are
improperly belted or not wearing your seat belt when the air bag inflates.
NEVER place a child in any Child Restraint System or booster seat in the front
passenger seat, unless the air bag is deactivated.
An inflating air bag could forcefully strike the infant or child causing serious or fatal
injuries.
ABC - Always Buckle Children under age 13 in the back seat. It is the safest place
for children of any age to ride. If a child age 13 or older must be seated in the front
seat, he or she must be properly belted and the seat should be moved as far back as
possible.
All occupants should sit upright with the seatback in an upright position, centered
on the seat cushion with their seat belt on, legs comfortably extended and their feet
on the floor until the vehicle is parked and the vehicle is turned off. If an occupant
is out of position during an accident, the rapidly deploying air bag may forcefully
contact the occupant causing serious or fatal injuries.
You and your passengers should never sit or lean unnecessarily close to the air bags
or lean against the door or center console.
Move your seat as far back as possible from front air bags, while still maintaining
control of the vehicle. The U.S. National Highway Traffic Safety Administration
(NHTSA) recommends that drivers allow at least 10 inches (25 cm) between the
center of the steering wheel and the chest.
Page 81 of 638
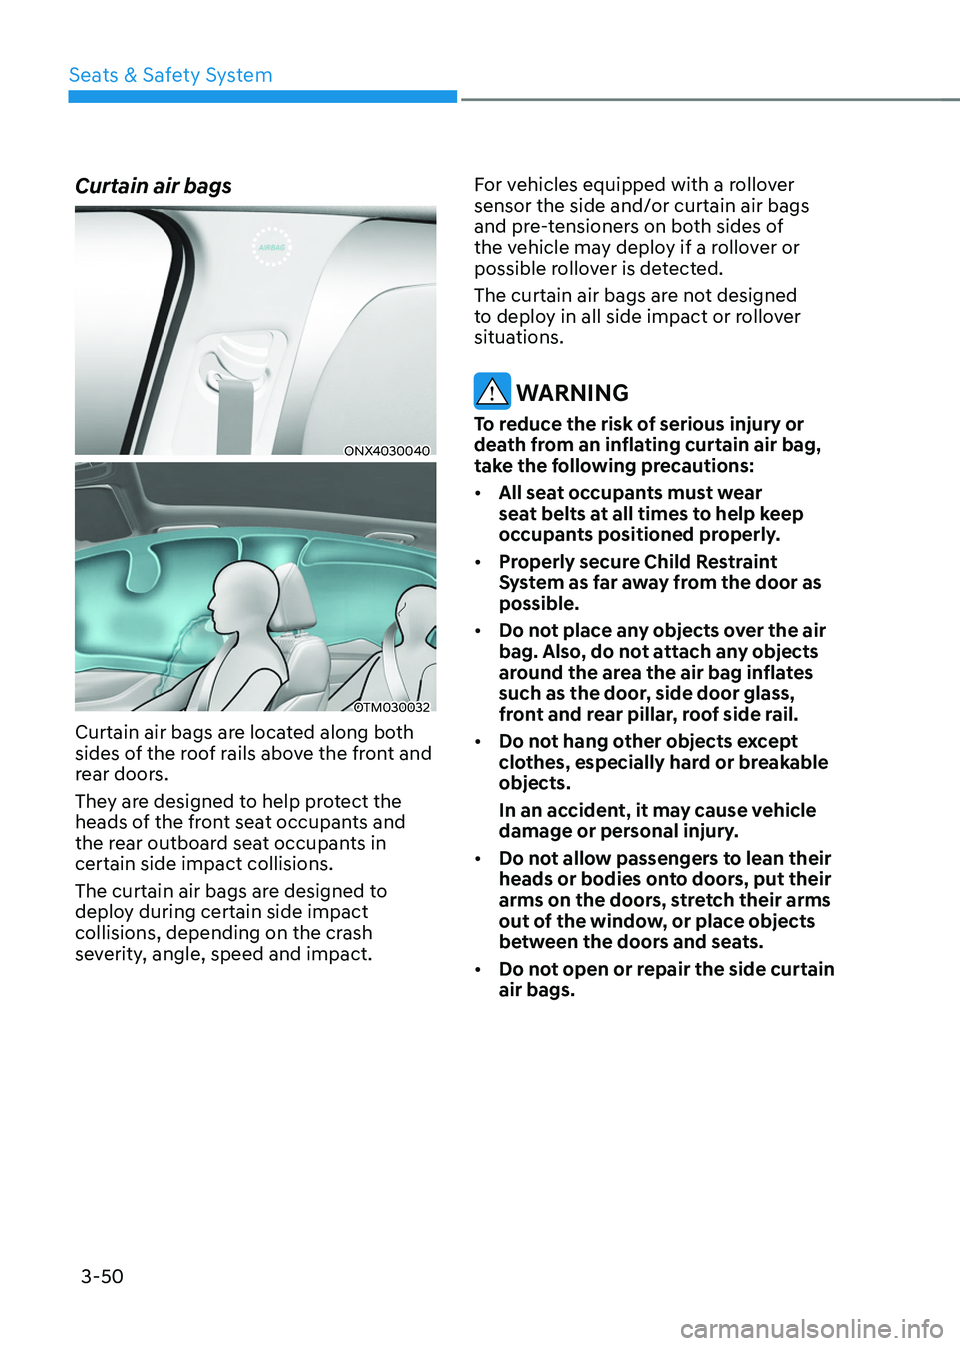
Seats & Safety System
3-50
Curtain air bags
ONX4030040
OTM030032
Curtain air bags are located along both
sides of the roof rails above the front and
rear doors.
They are designed to help protect the
heads of the front seat occupants and
the rear outboard seat occupants in
certain side impact collisions.
The curtain air bags are designed to
deploy during certain side impact
collisions, depending on the crash
severity, angle, speed and impact.For vehicles equipped with a rollover
sensor the side and/or curtain air bags
and pre-tensioners on both sides of
the vehicle may deploy if a rollover or
possible rollover is detected.
The curtain air bags are not designed
to deploy in all side impact or rollover
situations.
WARNING
To reduce the risk of serious injury or
death from an inflating curtain air bag,
take the following precautions:
•
All seat occupants must wear
seat belts at all times to help keep
occupants positioned properly.
• Properly secure Child Restraint
System as far away from the door as
possible.
• Do not place any objects over the air
bag. Also, do not attach any objects
around the area the air bag inflates
such as the door, side door glass,
front and rear pillar, roof side rail.
• Do not hang other objects except
clothes, especially hard or breakable
objects.
In an accident, it may cause vehicle
damage or personal injury.
• Do not allow passengers to lean their
heads or bodies onto doors, put their
arms on the doors, stretch their arms
out of the window, or place objects
between the doors and seats.
• Do not open or repair the side curtain
air bags.