Auto start HYUNDAI TUCSON 2022 Owner's Manual
[x] Cancel search | Manufacturer: HYUNDAI, Model Year: 2022, Model line: TUCSON, Model: HYUNDAI TUCSON 2022Pages: 638, PDF Size: 82.3 MB
Page 182 of 638
Convenient features
5-38
Recalling memory positions
1. Make sure that the vehicle is in the ON
position and the gear selector is in P
(Park).
2. Press the desired button (1 or 2). The
system will beep once and the driver’s
seat position and side view mirror
position will be automatically adjusted
to the stored positions.
3. ‘Driver 1 (or 2) settings applied’ will
appear on the cluster LCD display.
Information
• Note that while the memory settings
are being recalled, if you press the
SET button or the corresponding IMS
memory button (1 or 2) for which the
settings are being recalled, the IMS will
temporarily deactivate. If you select
the alternate IMS memory button (1 or
2), the IMS will activate according to
the settings of the alternate button.
For example, if you press the SET
button or the number 1 button with the
number 1 setting in operation, the IMS
will temporarily deactivate.
If you press the number 2 button, then
the IMS memory settings according to
number 2 will activate.
• If you adjust the driver seat settings
while the IMS is recalling the stored
positions, the memory settings will not
be applied.
Resetting the system
Follow the below procedures to reset the
Integrated Memory System (IMS) if it is
not operating properly:
Resetting the Integrated Memory
System (IMS)
1. Make sure that the vehicle is in Park
(P) and the engine is ON. Open the
driver’s door.
2. Adjust the driver’s seat and seatback
angle to the most forward positions.
3. Press the SET button and push
forward the driver’s seat movement
switch over 2 seconds simultaneously.
While resetting integrated memory
system
1. Resetting starts with a notification
sound.
2. The driver’s seat and seatback is
adjusted to the rearward position with
the notification sound.
3. The driver’s seat and seatback is
re-adjusted to the default position
(central position) with the notification
sound.
However, in the following cases, the
resetting procedure and the notification
sound may stop.
• The memory button is pressed.
• The seat control switch is operated.
• The gear is shifted out of P (Park).
• The driving speed exceeds
2 mph (3km/h).
• The driver’s door is closed.
Page 183 of 638
05
5-39
NOTICE
• While integrated memory system
is being reset, if the resetting
and notification sound stops
incompletely, restart the resetting
procedure again.
• Before performing the IMS memory
reset operation, make sure there are
no objects on or around the driver’s
seat.
Seat Easy Access Operation (if
equipped)
The system will move the driver’s seat
automatically as follows:
• Vehicles equipped with Driver’s Power
Seat and Smart Key
-The driver’s seat will move rearward
when the Engine Start/Stop button
is pressed to turn the engine OFF.
-The driver’s seat will move forward
when the Engine Start/Stop button
is pressed to the ACC or engine
START position.
Note that Seat Easy Access operation
may be limited when the driver’s seat
position setting is already close to the
maximum rearward travel position.
You can enable or disable the Seat Easy
Access feature in the User Settings menu
on the LCD display or the navigation
infotainment screen on some models.
‘Convenience → Seat Easy Access → Off/Normal/Extended’.
For more details, refer to “LCD Display”
In chapter 4.
CAUTION
The driver should be aware and be
cautious to avoid injury or damage
when using this feature if there are
objects or passengers in the driver’s
side rear seat or seat floor.
In case of emergency or to stop
movement of the front seat when the
Seat Easy Access is operating, press the
SET button or any of the driver’s seat
control switches.
Page 204 of 638
Convenient features
5-60
If your vehicle is equipped with a
sunroof, you can slide or tilt your sunroof
with the sunroof switch located on the
overhead console.
ONX4E050142
The sunroof can only be operated when
the ignition switch or Engine Start/Stop
button is in the ON or START position.
The sunroof can be operated for
approximately 3 minutes after the
ignition switch or Engine Start/Stop
button is in the ACC or LOCK/OFF
position. However, if the front door is
open, the sunroof cannot be operated
even within the 3 minutes period.
WARNING
• Never adjust the sunroof or sunshade
while driving. This could result in loss
of control and an accident that may
cause injury, or property damage.
• Do not leave the engine running
and the key in your vehicle with
unsupervised children. Unattended
children could operate the sunroof,
which could result in serious injury.
• Do not sit on the top of the vehicle. It
may cause injury or vehicle damage.
NOTICE
Do not operate the sunroof when the
roof bars are installed on the vehicle or
when there is luggage on the roof.
Power sunshade
ONX4050016
Use the power sunshade to block direct
sunlight coming through the sunroof
glass.
-Push the sunroof switch rearward to
the first detent position, the power
sunshade automatically slides open.
-Push the sunroof switch forward to
the first detent position, the power
sunshade automatically closes.
However, if the sunroof glass is open,
the glass will close first.
To stop the power sunshade at any point,
push the sunroof switch in any direction.
NOTICE
Do not pull or push the power sunshade
by hand as such action may damage
the power sunshade or cause it to
malfunction.
Information
Wrinkles formed on the power sunshade
are normal due to material characteristic.
PANORAMIC SUNROOF (IF EQUIPPED)
Page 207 of 638
05
5-63
Resetting the sunroof
ONX4E050143
In some circumstances resetting the
sunroof operation may need to be
performed. Some instances where
resetting the sunroof may be required
include:
• When the 12-volt battery is either
disconnected or discharged
• When the sunroof fuse is replaced
• If the sunroof one-touch AUTO OPEN/
CLOSE operation is not functioning
properly
Sunroof resetting procedure:
1. It is recommended to perform the
reset procedure with the vehicle
engine running. Start the vehicle in P
(Park).
2. Make sure the power sunshade and
sunroof glass are in the fully closed
position. If the power sunshade
and sunroof glass are open, push
the switch forward until the power
sunshade and sunroof glass are fully
closed.
3. Release the switch when the power
sunshade and sunroof glass are fully
closed.
4. Push the switch forward until the
power sunshade and sunroof glass
move slightly. Then release the switch.
5. Once again push and hold the sunroof
switch forward until the power
sunshade and sunroof glass slide open
and close. Do not release the switch
until the operation is completed.
If you release the switch during
operation, start the procedure again
from step 2.
Information
If the sunroof is not reset when the vehicle
battery is disconnected or discharged, or
the sunroof fuse is blown, the sunroof may
not operate normally.
Page 212 of 638
Convenient features
5-68
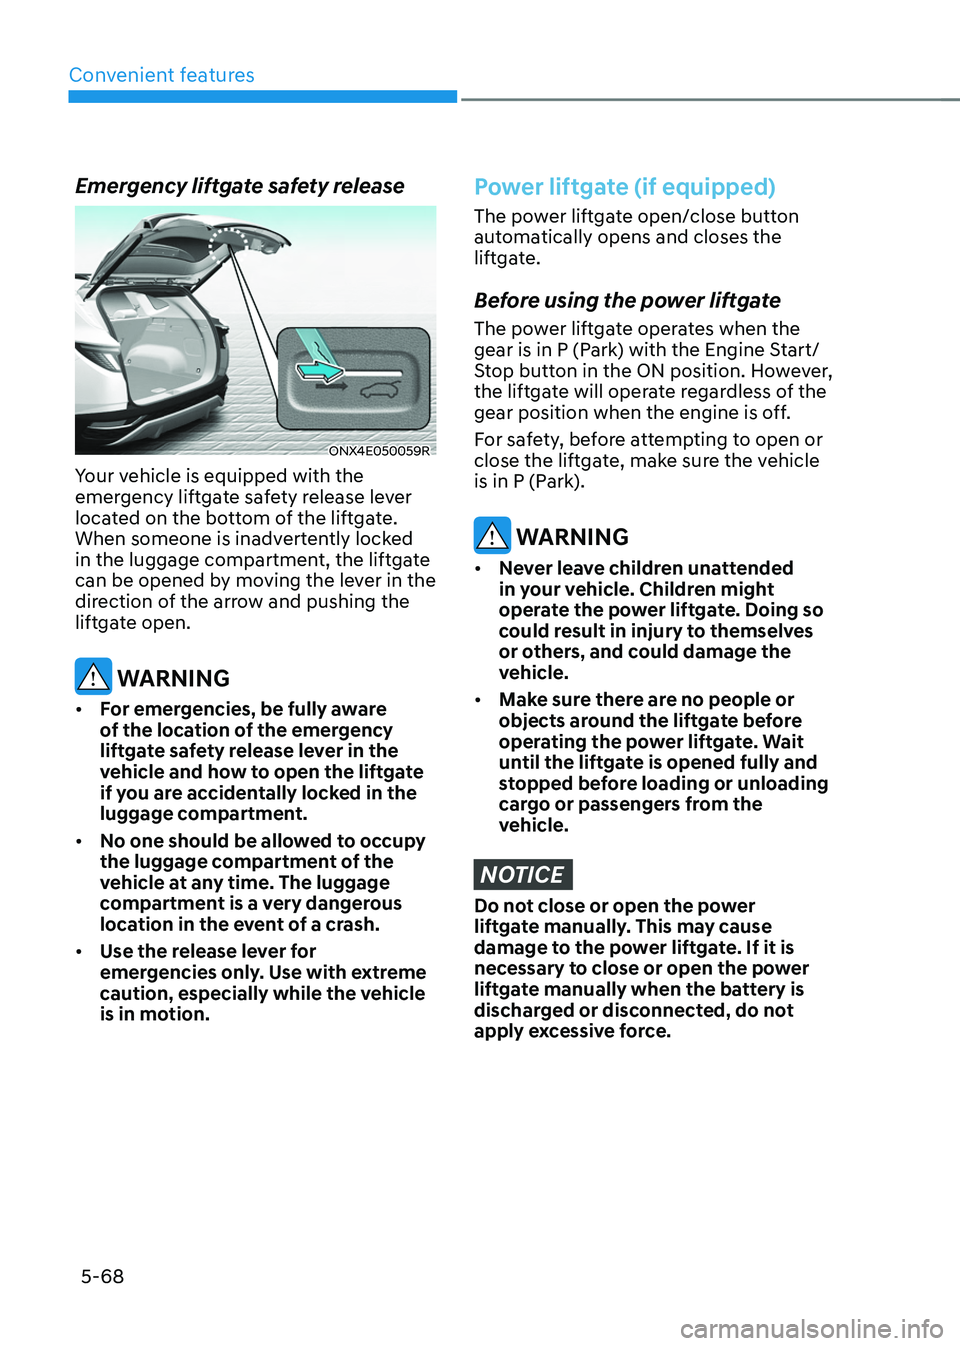
Emergency liftgate safety release
ONX4E050059R
Your vehicle is equipped with the
emergency liftgate safety release lever
located on the bottom of the liftgate.
When someone is inadvertently locked
in the luggage compartment, the liftgate
can be opened by moving the lever in the
direction of the arrow and pushing the
liftgate open.
WARNING
• For emergencies, be fully aware
of the location of the emergency
liftgate safety release lever in the
vehicle and how to open the liftgate
if you are accidentally locked in the
luggage compartment.
• No one should be allowed to occupy
the luggage compartment of the
vehicle at any time. The luggage
compartment is a very dangerous
location in the event of a crash.
• Use the release lever for
emergencies only. Use with extreme
caution, especially while the vehicle
is in motion.
Power liftgate (if equipped)
The power liftgate open/close button
automatically opens and closes the
liftgate.
Before using the power liftgate
The power liftgate operates when the
gear is in P (Park) with the Engine Start/
Stop button in the ON position. However,
the liftgate will operate regardless of the
gear position when the engine is off.
For safety, before attempting to open or
close the liftgate, make sure the vehicle
is in P (Park).
WARNING
• Never leave children unattended
in your vehicle. Children might
operate the power liftgate. Doing so
could result in injury to themselves
or others, and could damage the
vehicle.
• Make sure there are no people or
objects around the liftgate before
operating the power liftgate. Wait
until the liftgate is opened fully and
stopped before loading or unloading
cargo or passengers from the
vehicle.
NOTICE
Do not close or open the power
liftgate manually. This may cause
damage to the power liftgate. If it is
necessary to close or open the power
liftgate manually when the battery is
discharged or disconnected, do not
apply excessive force.
Page 218 of 638
Convenient features
5 -74
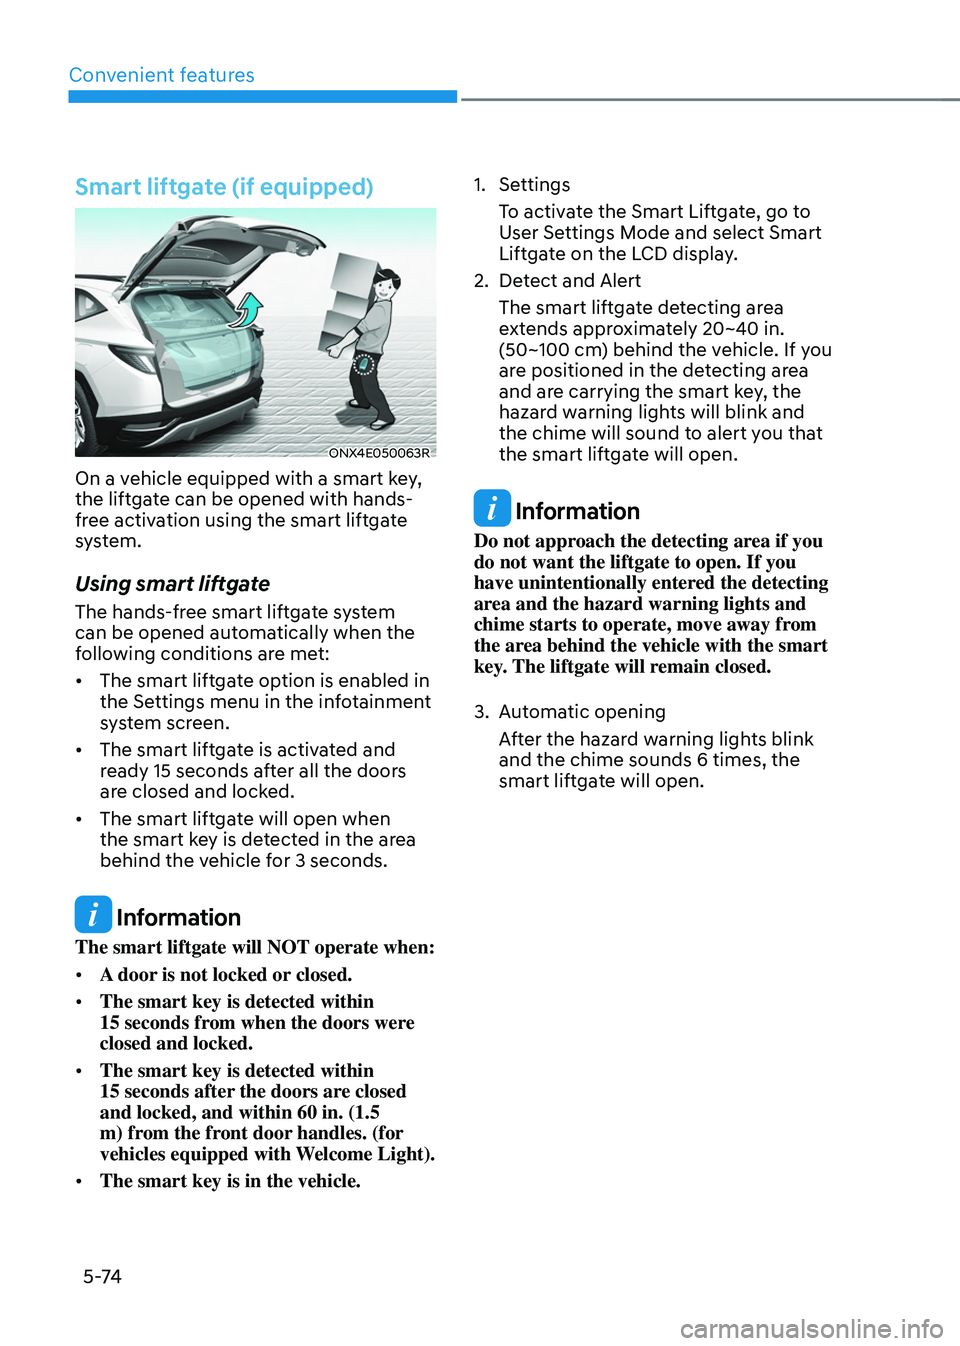
Smart liftgate (if equipped)
ONX4E050063R
On a vehicle equipped with a smart key,
the liftgate can be opened with hands-
free activation using the smart liftgate
system.
Using smart liftgate
The hands-free smart liftgate system
can be opened automatically when the
following conditions are met:
• The smart liftgate option is enabled in
the Settings menu in the infotainment
system screen.
• The smart liftgate is activated and
ready 15 seconds after all the doors
are closed and locked.
• The smart liftgate will open when
the smart key is detected in the area
behind the vehicle for 3 seconds.
Information
The smart liftgate will NOT operate when:
• A door is not locked or closed.
• The smart key is detected within
15 seconds from when the doors were closed and locked.
• The smart key is detected within
15 seconds after the doors are closed and locked, and within 60 in. (1.5
m) from the front door handles. (for
vehicles equipped with Welcome Light).
• The smart key is in the vehicle.
1. Settings
To activate the Smart Liftgate, go to
User Settings Mode and select Smart
Liftgate on the LCD display.
2. Detect and Alert
The smart liftgate detecting area
extends approximately 20~40 in.
(50~100 cm) behind the vehicle. If you
are positioned in the detecting area
and are carrying the smart key, the
hazard warning lights will blink and
the chime will sound to alert you that
the smart liftgate will open.
Information
Do not approach the detecting area if you
do not want the liftgate to open. If you
have unintentionally entered the detecting
area and the hazard warning lights and
chime starts to operate, move away from
the area behind the vehicle with the smart
key. The liftgate will remain closed.
3. Automatic opening
After the hazard warning lights blink
and the chime sounds 6 times, the
smart liftgate will open.
Page 221 of 638
05
5-77
Closing the fuel filler door
1. To install the fuel tank cap, turn it
clockwise until it “clicks” one time.
2. Close the fuel filler door until it is
latched securely.
Information
To lock the fuel filler door, make sure the
fuel filler door is completely closed. Press
the LOCK button on the remote key or
smart key to lock your vehicle. The fuel
filler door will also lock.
Note that if the fuel filler door is not
completely closed when the vehicle is
locked, the fuel filler door will not be
locked.
CAUTION
Make sure the fuel filler door is
completely closed before driving
through a car wash or operating a high
pressure spray washer.
WARNING
Automotive fuel is highly flammable
and explosive. Failure to follow these
guidelines may result in SERIOUS
INJURY or DEATH:
• Read and follow all warnings posted
at the gas station.
• Before refueling, note the location
of the Emergency Fuel Shut-Off, if
available, at the gas station.
• Before touching the fuel nozzle, you
should eliminate the potential build-
up of static electricity by touching
a metal part of the vehicle, a safe
distance away from the fuel filler
neck, nozzle, or other gas source,
with your bare hand.
• Do not use mobile phones while
refueling. Electric current and/or
electronic interference from cellular
phones can potentially ignite fuel
vapors and cause a fire. •
Do not get back into a vehicle
once you have begun refueling.
You can generate a buildup of
static electricity by touching,
rubbing or sliding against any item
or fabric capable of producing
static electricity. Static electricity
discharge can ignite fuel vapors
causing a fire. If you must re-enter
the vehicle, you should once again
eliminate potentially dangerous
static electricity discharge by
touching a metal part of the vehicle,
away from the fuel filler neck, nozzle
or other fuel source, with your bare
hand.
• When using an approved portable
fuel container, be sure to place the
container on the ground prior to
refueling. Static electricity discharge
from the container can ignite fuel
vapors causing a fire.
Once refueling has begun, contact
between your bare hand and the
vehicle should be maintained until
the filling is complete.
• Use only approved portable plastic
fuel containers designed to carry and
store fuel.
• When refueling, always shift the
gear to the P (Park) position, set
the parking brake, and press the
Engine Start/Stop button to the
OFF position. Sparks produced by
electrical components related to the
engine can ignite fuel vapors causing
a fire.
• Do not use matches or a lighter and
do not smoke or leave a lit cigarette
in your vehicle while at a gas station,
especially during refueling.
Page 230 of 638
Convenient features5-86
INTERIOR LIGHTS
WARNING
Do not use the interior lights when
driving in the dark. The interior lights
may obscure your view and cause an
accident.
NOTICE
Do not use the interior lights for
extended periods when the vehicle is
turned off or the battery will discharge.
Interior Lamp AUTO OFF
The interior lamps will automatically go
off approximately 10 minutes after the
vehicle is turned off and the doors are
closed. If a door is opened, the lamp
will go off 40 minutes after the vehicle
is turned off. If the doors are locked by
the smart key and the vehicle enters the
armed stage of the theft alarm system,
the lamps will go off five seconds later.
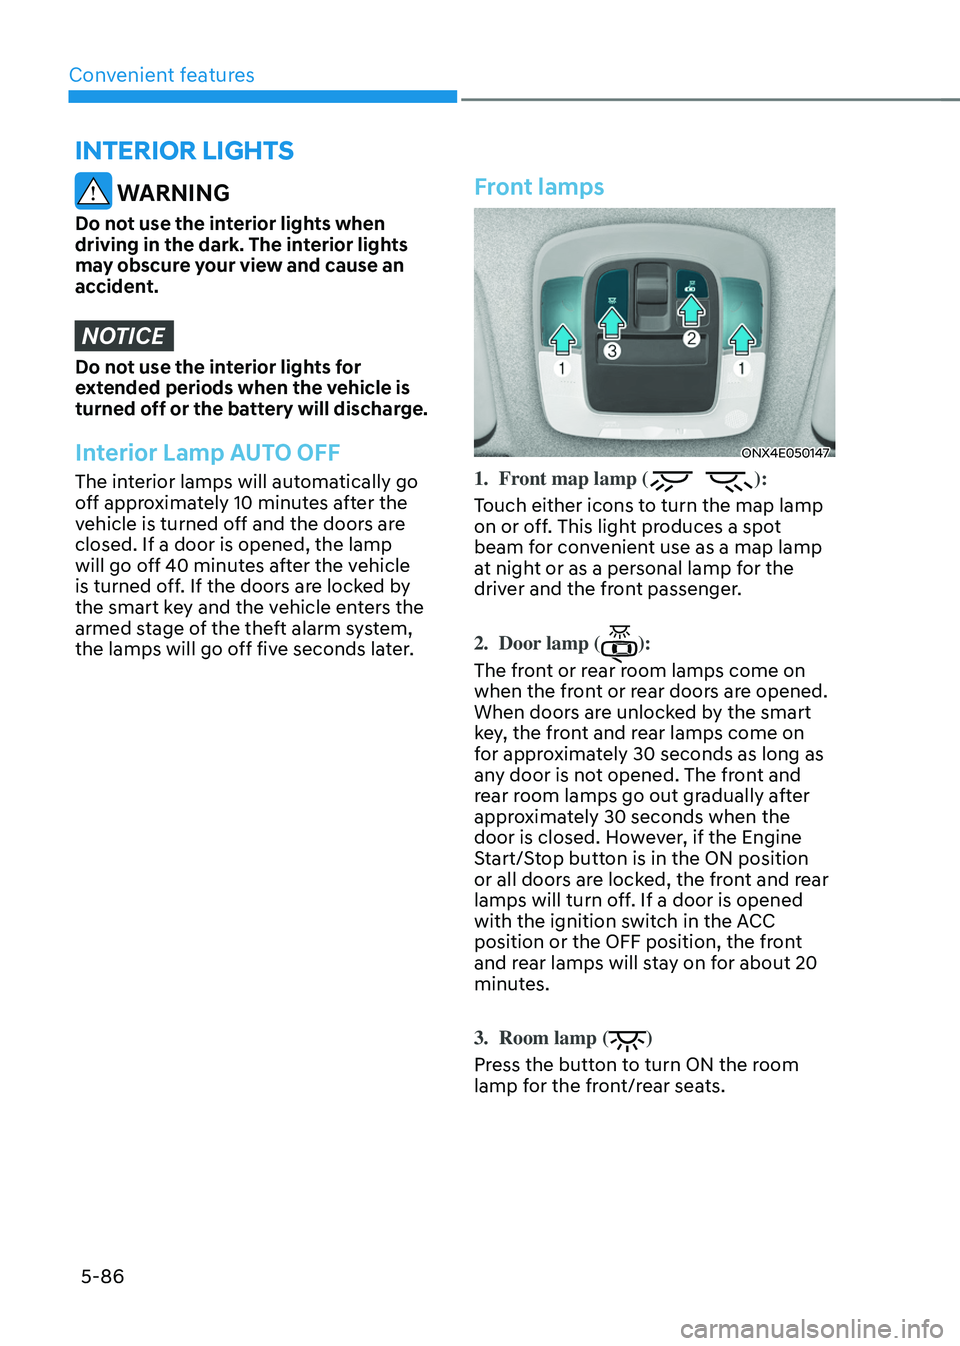
Front lamps
ONX4E050147
1. Front map lamp ():
Touch either icons to turn the map lamp
on or off. This light produces a spot
beam for convenient use as a map lamp
at night or as a personal lamp for the
driver and the front passenger.
2. Door lamp ():
The front or rear room lamps come on
when the front or rear doors are opened.
When doors are unlocked by the smart
key, the front and rear lamps come on
for approximately 30 seconds as long as
any door is not opened. The front and
rear room lamps go out gradually after
approximately 30 seconds when the
door is closed. However, if the Engine
Start/Stop button is in the ON position
or all doors are locked, the front and rear
lamps will turn off. If a door is opened
with the ignition switch in the ACC
position or the OFF position, the front
and rear lamps will stay on for about 20
minutes.
3. Room lamp ()
Press the button to turn ON the room
lamp for the front/rear seats.
Page 235 of 638
05
5-91
AUTO Wiper Control (if equipped)
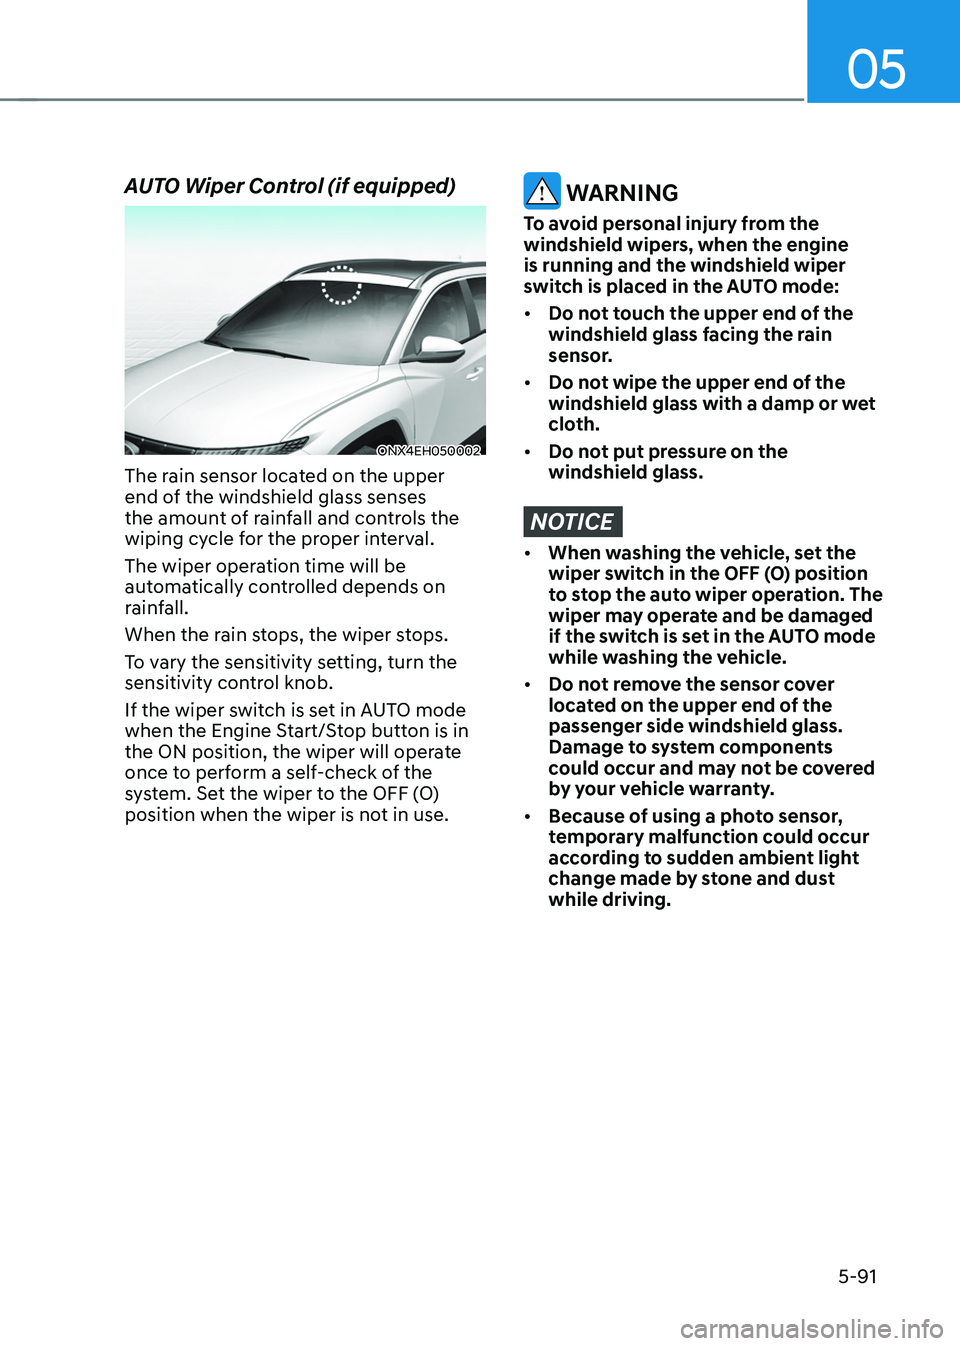
ONX4EH050002
The rain sensor located on the upper
end of the windshield glass senses
the amount of rainfall and controls the
wiping cycle for the proper interval.
The wiper operation time will be
automatically controlled depends on
rainfall.
When the rain stops, the wiper stops.
To vary the sensitivity setting, turn the
sensitivity control knob.
If the wiper switch is set in AUTO mode
when the Engine Start/Stop button is in
the ON position, the wiper will operate
once to perform a self-check of the
system. Set the wiper to the OFF (O)
position when the wiper is not in use.
WARNING
To avoid personal injury from the
windshield wipers, when the engine
is running and the windshield wiper
switch is placed in the AUTO mode:
• Do not touch the upper end of the
windshield glass facing the rain
sensor.
• Do not wipe the upper end of the
windshield glass with a damp or wet
cloth.
• Do not put pressure on the
windshield glass.
NOTICE
• When washing the vehicle, set the
wiper switch in the OFF (O) position
to stop the auto wiper operation. The
wiper may operate and be damaged
if the switch is set in the AUTO mode
while washing the vehicle.
• Do not remove the sensor cover
located on the upper end of the
passenger side windshield glass.
Damage to system components
could occur and may not be covered
by your vehicle warranty.
• Because of using a photo sensor,
temporary malfunction could occur
according to sudden ambient light
change made by stone and dust
while driving.
Page 249 of 638
05
5-105
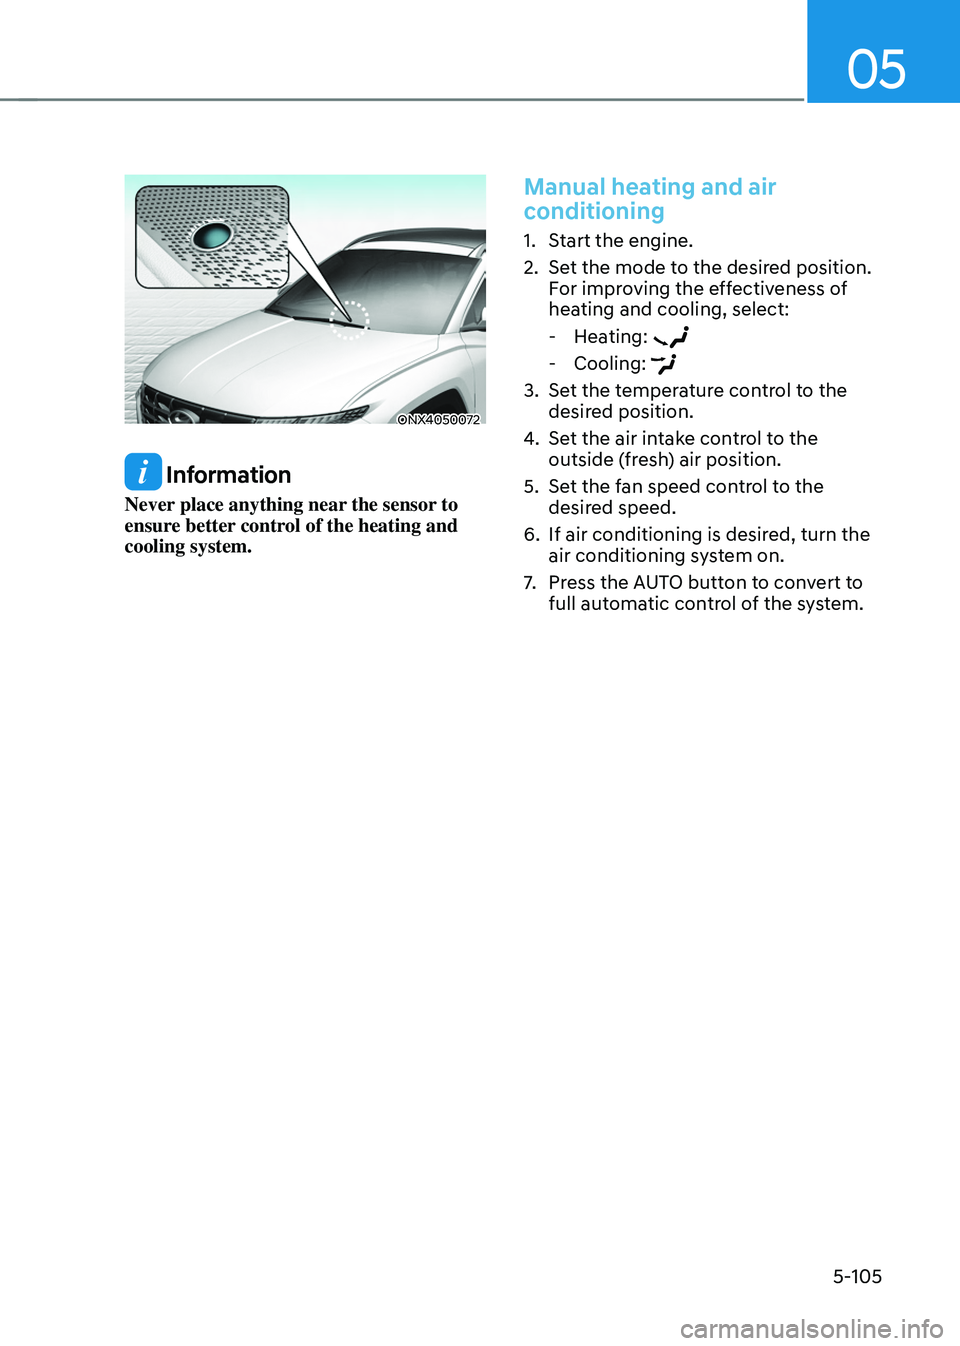
ONX4050072
Information
Never place anything near the sensor to
ensure better control of the heating and
cooling system.
Manual heating and air
conditioning
1. Start the engine.
2. Set the mode to the desired position.
For improving the effectiveness of
heating and cooling, select:
-Heating:
-Cooling:
3. Set the temperature control to the
desired position.
4. Set the air intake control to the
outside (fresh) air position.
5. Set the fan speed control to the
desired speed.
6. If air conditioning is desired, turn the
air conditioning system on.
7. Press the AUTO button to convert to
full automatic control of the system.