API HYUNDAI TUCSON 2022 Owners Manual
[x] Cancel search | Manufacturer: HYUNDAI, Model Year: 2022, Model line: TUCSON, Model: HYUNDAI TUCSON 2022Pages: 638, PDF Size: 82.3 MB
Page 26 of 638
Vehicle Information, Consumer Information and Reporting Safety Defects
2-14
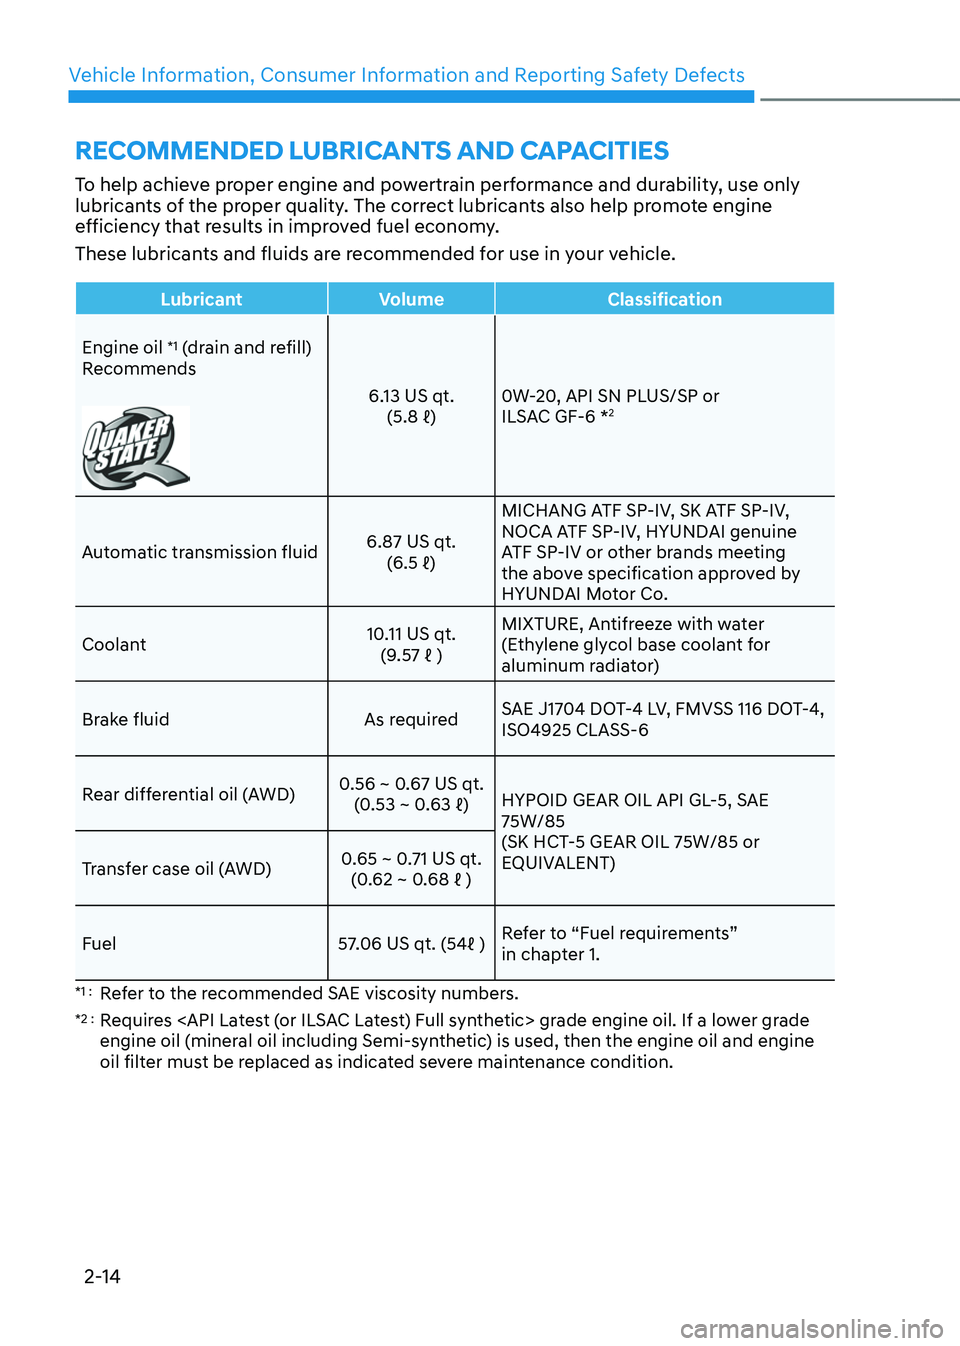
RECOMMENDED LUBRICANTS AND CAPACITIES
To help achieve proper engine and powertrain performance and durability, use only
lubricants of the proper quality. The correct lubricants also help promote engine
efficiency that results in improved fuel economy.
These lubricants and fluids are recommended for use in your vehicle.
LubricantVolume Classification
Engine oil
*1 (drain and refill)
Recommends
6.13 US qt.
(5.8 ℓ) 0W-20, API SN PLUS/SP or
ILSAC GF-6 *2
Automatic transmission fluid6.87 US qt.(6.5 ℓ)
MICHANG ATF SP-IV, SK ATF SP-IV,
NOCA ATF SP-IV, HYUNDAI genuine
ATF SP-IV or other brands meeting
the above specification approved by
HYUNDAI Motor Co.
Coolant 10.11 US qt.
(9.57 ℓ )
MIXTURE, Antifreeze with water
(Ethylene glycol base coolant for
aluminum radiator)
Brake fluid As required SAE J1704 DOT-4 LV, FMVSS 116 DOT-4,
ISO4925 CLASS-6
Rear differential oil (AWD) 0.56 ~ 0.67 US qt.
(0.53 ~ 0.63 ℓ)HYPOID GEAR OIL API GL-5, SAE
75W/85
(SK HCT-5 GEAR OIL 75W/85 or
EQUIVALENT)
Transfer case oil (AWD) 0.65 ~ 0.71 US qt.
(0.62 ~ 0.68 ℓ )
Fuel57.06 US qt. (54ℓ ) Refer to “Fuel requirements”
in chapter 1.
*1 : Refer to the recommended SAE viscosity numbers.
*2 : Requires
engine oil (mineral oil including Semi-synthetic) is used, then the engine oil and engine
oil filter must be replaced as indicated severe maintenance condition.
Page 27 of 638
02
2-15
Recommended SAE viscosity number
CAUTION
Always be sure to clean the area around any filler plug, drain plug, or dipstick before
checking or draining any lubricant. This is especially important in dusty or sandy
areas and when the vehicle is used on unpaved roads. Cleaning the plug and dipstick
areas will prevent dirt and grit from entering the engine and other mechanisms that
could be damaged.
Engine oil viscosity (thickness) has an effect on fuel economy and cold weather
operating (engine start and engine oil flowability). Lower viscosity engine oils can
provide better fuel economy and cold weather performance, however, higher viscosity
engine oils are required for satisfactory lubrication in hot weather. Using oils of any
viscosity other than those recommended could result in engine damage.
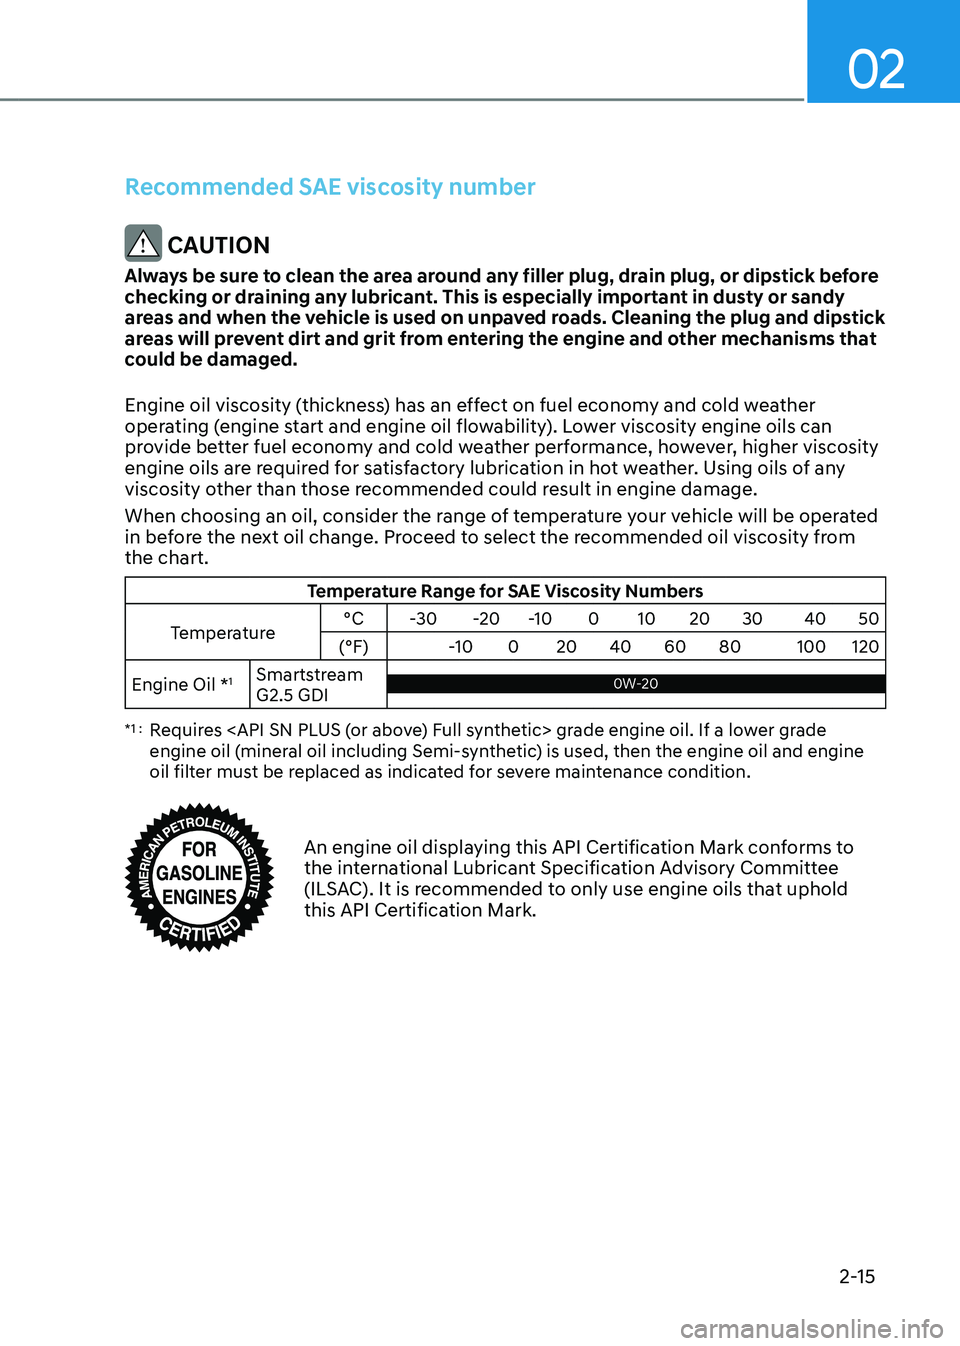
When choosing an oil, consider the range of temperature your vehicle will be operated
in before the next oil change. Proceed to select the recommended oil viscosity from
the chart.
Temperature Range for SAE Viscosity Numbers
Temperature °C
-30-20-10 010 20 30 4050
(°F) -10020 40 60 80 100120
Engine Oil *
1Smartstream
G2.5 GDI0W-20 0W-20
*1 : Requires
engine oil (mineral oil including Semi-synthetic) is used, then the engine oil and engine
oil filter must be replaced as indicated for severe maintenance condition.
An engine oil displaying this API Certification Mark conforms to the international Lubricant Specification Advisory Committee
(ILSAC). It is recommended to only use engine oils that uphold
this API Certification Mark.
Page 78 of 638
03
3-47
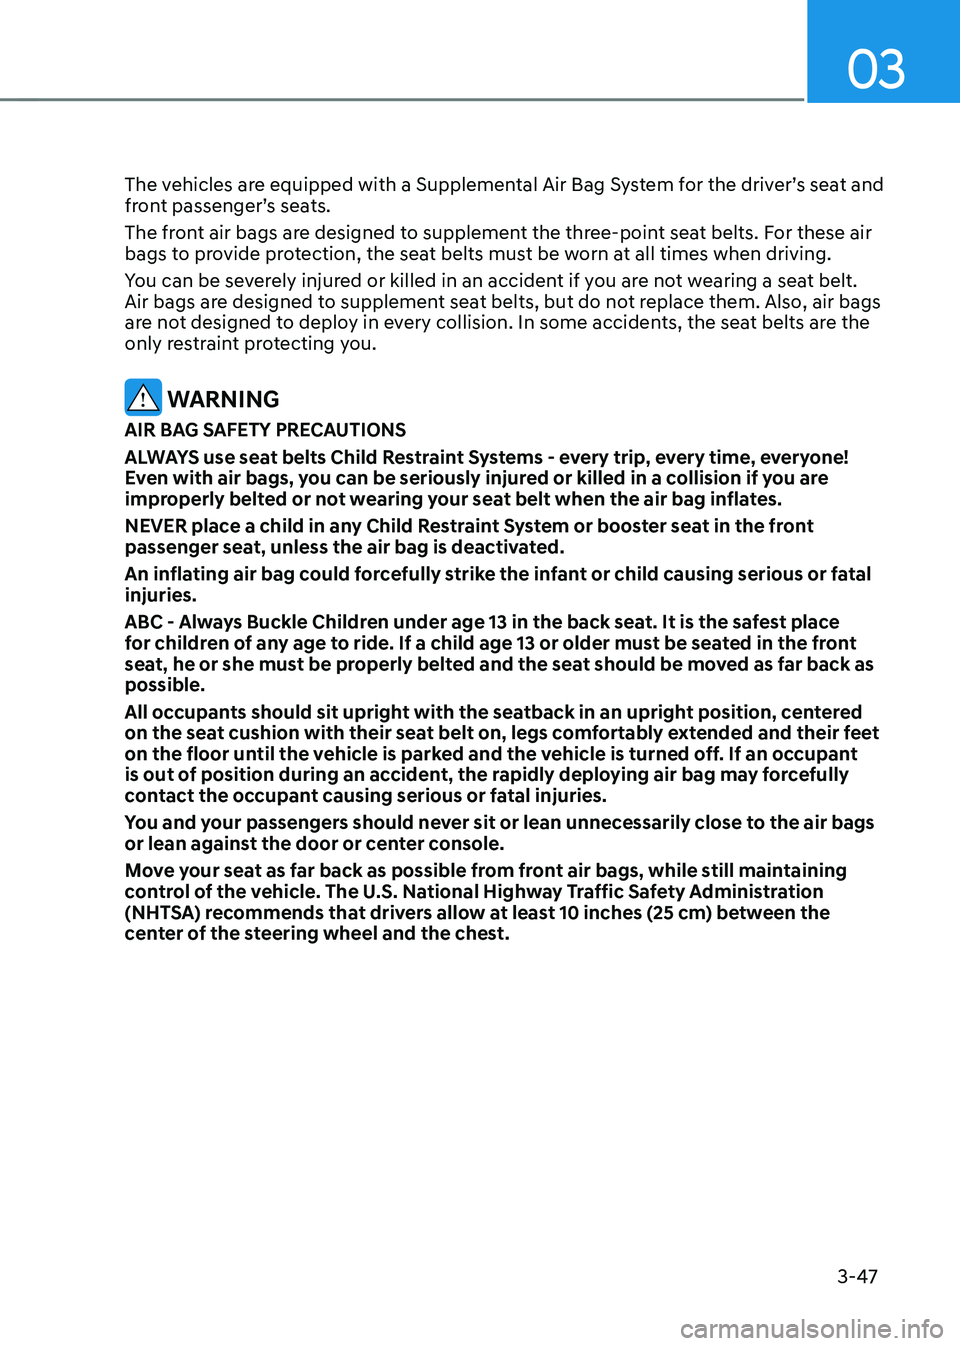
The vehicles are equipped with a Supplemental Air Bag System for the driver’s seat and
front passenger’s seats.
The front air bags are designed to supplement the three-point seat belts. For these air
bags to provide protection, the seat belts must be worn at all times when driving.
You can be severely injured or killed in an accident if you are not wearing a seat belt.
Air bags are designed to supplement seat belts, but do not replace them. Also, air bags
are not designed to deploy in every collision. In some accidents, the seat belts are the
only restraint protecting you.
WARNING
AIR BAG SAFETY PRECAUTIONS
ALWAYS use seat belts Child Restraint Systems - every trip, every time, everyone!
Even with air bags, you can be seriously injured or killed in a collision if you are
improperly belted or not wearing your seat belt when the air bag inflates.
NEVER place a child in any Child Restraint System or booster seat in the front
passenger seat, unless the air bag is deactivated.
An inflating air bag could forcefully strike the infant or child causing serious or fatal
injuries.
ABC - Always Buckle Children under age 13 in the back seat. It is the safest place
for children of any age to ride. If a child age 13 or older must be seated in the front
seat, he or she must be properly belted and the seat should be moved as far back as
possible.
All occupants should sit upright with the seatback in an upright position, centered
on the seat cushion with their seat belt on, legs comfortably extended and their feet
on the floor until the vehicle is parked and the vehicle is turned off. If an occupant
is out of position during an accident, the rapidly deploying air bag may forcefully
contact the occupant causing serious or fatal injuries.
You and your passengers should never sit or lean unnecessarily close to the air bags
or lean against the door or center console.
Move your seat as far back as possible from front air bags, while still maintaining
control of the vehicle. The U.S. National Highway Traffic Safety Administration
(NHTSA) recommends that drivers allow at least 10 inches (25 cm) between the
center of the steering wheel and the chest.
Page 83 of 638
Seats & Safety System
3-52
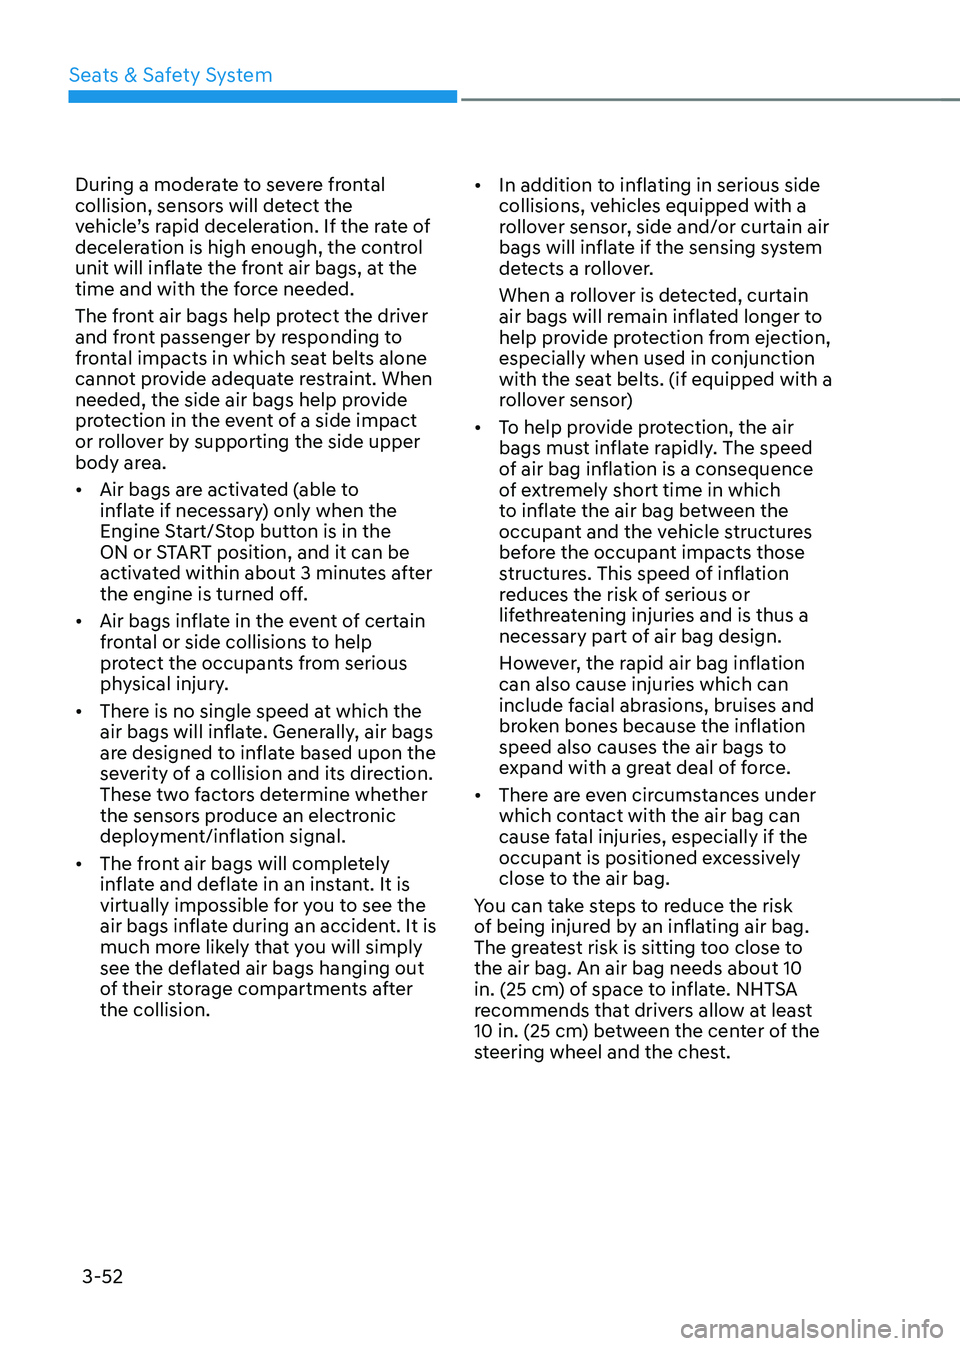
During a moderate to severe frontal
collision, sensors will detect the
vehicle’s rapid deceleration. If the rate of
deceleration is high enough, the control
unit will inflate the front air bags, at the
time and with the force needed.
The front air bags help protect the driver
and front passenger by responding to
frontal impacts in which seat belts alone
cannot provide adequate restraint. When
needed, the side air bags help provide
protection in the event of a side impact
or rollover by supporting the side upper
body area.
• Air bags are activated (able to
inflate if necessary) only when the
Engine Start/Stop button is in the
ON or START position, and it can be
activated within about 3 minutes after
the engine is turned off.
• Air bags inflate in the event of certain
frontal or side collisions to help
protect the occupants from serious
physical injury.
• There is no single speed at which the
air bags will inflate. Generally, air bags
are designed to inflate based upon the
severity of a collision and its direction.
These two factors determine whether
the sensors produce an electronic
deployment/inflation signal.
• The front air bags will completely
inflate and deflate in an instant. It is
virtually impossible for you to see the
air bags inflate during an accident. It is
much more likely that you will simply
see the deflated air bags hanging out
of their storage compartments after
the collision. •
In addition to inflating in serious side
collisions, vehicles equipped with a
rollover sensor, side and/or curtain air
bags will inflate if the sensing system
detects a rollover.
When a rollover is detected, curtain
air bags will remain inflated longer to
help provide protection from ejection,
especially when used in conjunction
with the seat belts. (if equipped with a
rollover sensor)
• To help provide protection, the air
bags must inflate rapidly. The speed
of air bag inflation is a consequence
of extremely short time in which
to inflate the air bag between the
occupant and the vehicle structures
before the occupant impacts those
structures. This speed of inflation
reduces the risk of serious or
lifethreatening injuries and is thus a
necessary part of air bag design.
However, the rapid air bag inflation
can also cause injuries which can
include facial abrasions, bruises and
broken bones because the inflation
speed also causes the air bags to
expand with a great deal of force.
• There are even circumstances under
which contact with the air bag can
cause fatal injuries, especially if the
occupant is positioned excessively
close to the air bag.
You can take steps to reduce the risk
of being injured by an inflating air bag.
The greatest risk is sitting too close to
the air bag. An air bag needs about 10
in. (25 cm) of space to inflate. NHTSA
recommends that drivers allow at least
10 in. (25 cm) between the center of the
steering wheel and the chest.
Page 116 of 638
Instrument cluster
4-18
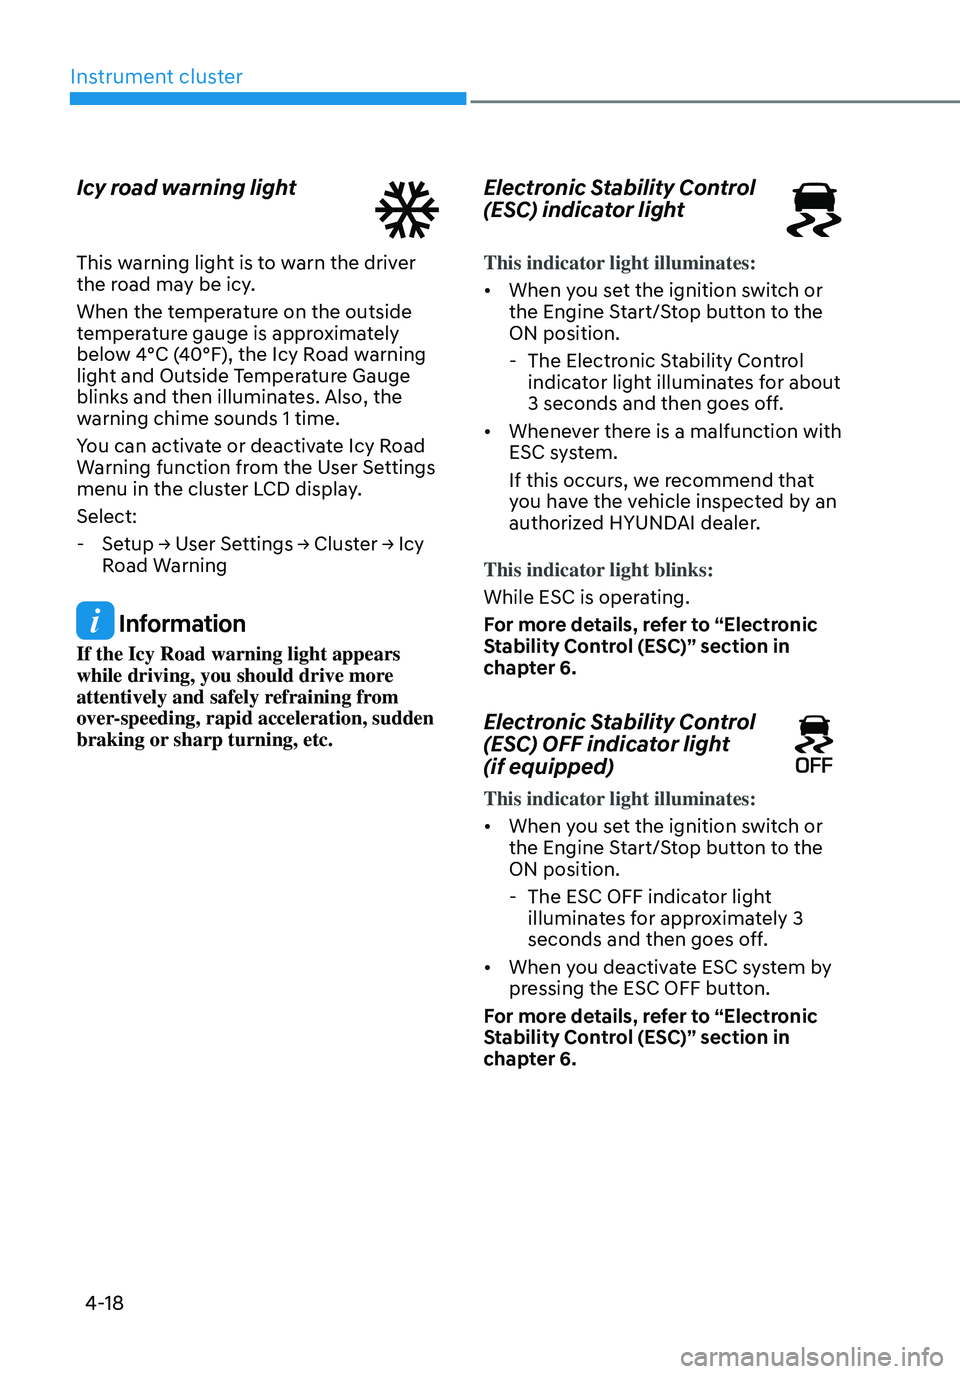
Icy road warning light
This warning light is to warn the driver
the road may be icy.
When the temperature on the outside
temperature gauge is approximately
below 4°C (40°F), the Icy Road warning
light and Outside Temperature Gauge
blinks and then illuminates. Also, the
warning chime sounds 1 time.
You can activate or deactivate Icy Road
Warning function from the User Settings
menu in the cluster LCD display.
Select:
-Setup → User Settings → Cluster → Icy
Road Warning
Information
If the Icy Road warning light appears
while driving, you should drive more
attentively and safely refraining from
over-speeding, rapid acceleration, sudden
braking or sharp turning, etc.
Electronic Stability Control
(ESC) indicator light
This indicator light illuminates:
• When you set the ignition switch or
the Engine Start/Stop button to the
ON position.
-The Electronic Stability Control
indicator light illuminates for about
3 seconds and then goes off.
• Whenever there is a malfunction with
ESC system.
If this occurs, we recommend that
you have the vehicle inspected by an
authorized HYUNDAI dealer.
This indicator light blinks:
While ESC is operating.
For more details, refer to “Electronic
Stability Control (ESC)” section in
chapter 6.
Electronic Stability Control
(ESC) OFF indicator light
(if equipped)
This indicator light illuminates:
• When you set the ignition switch or
the Engine Start/Stop button to the
ON position.
- The ESC OFF indicator light
illuminates for approximately 3
seconds and then goes off.
• When you deactivate ESC system by
pressing the ESC OFF button.
For more details, refer to “Electronic
Stability Control (ESC)” section in
chapter 6.
Page 119 of 638
04
4-21
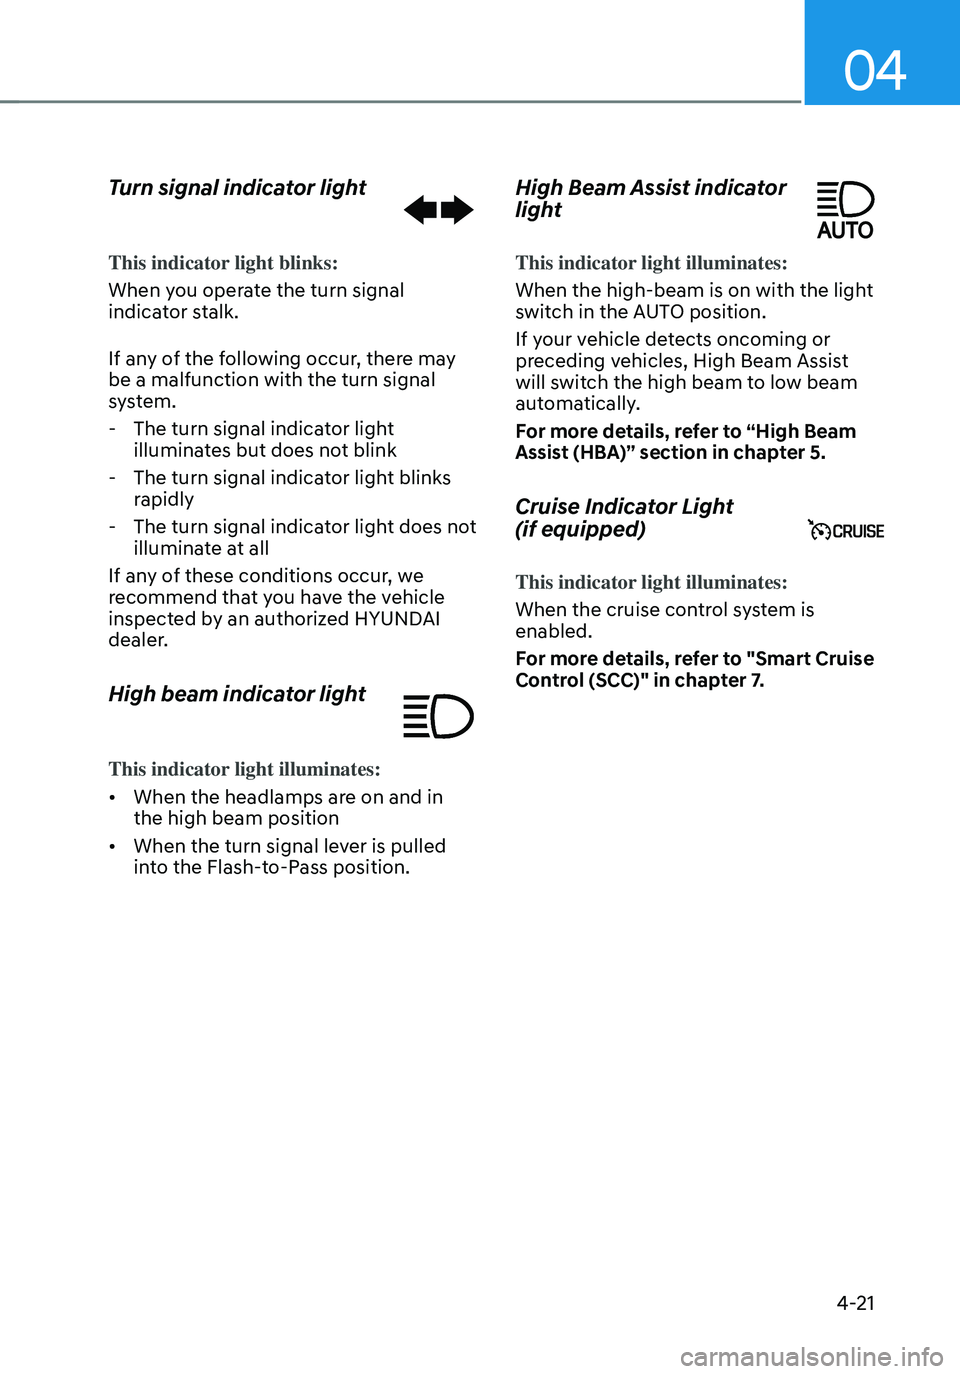
Turn signal indicator light
This indicator light blinks:
When you operate the turn signal
indicator stalk.
If any of the following occur, there may
be a malfunction with the turn signal
system.
-The turn signal indicator light
illuminates but does not blink
-The turn signal indicator light blinks
rapidly
-The turn signal indicator light does not
illuminate at all
If any of these conditions occur, we
recommend that you have the vehicle
inspected by an authorized HYUNDAI
dealer.
High beam indicator light
This indicator light illuminates:
• When the headlamps are on and in
the high beam position
• When the turn signal lever is pulled
into the Flash-to-Pass position.
High Beam Assist indicator
light
This indicator light illuminates:
When the high-beam is on with the light
switch in the AUTO position.
If your vehicle detects oncoming or
preceding vehicles, High Beam Assist
will switch the high beam to low beam
automatically.
For more details, refer to “High Beam
Assist (HBA)” section in chapter 5.
Cruise Indicator Light
(if equipped)
This indicator light illuminates:
When the cruise control system is
enabled.
For more details, refer to "Smart Cruise
Control (SCC)" in chapter 7.
Page 176 of 638
Convenient features
5-32
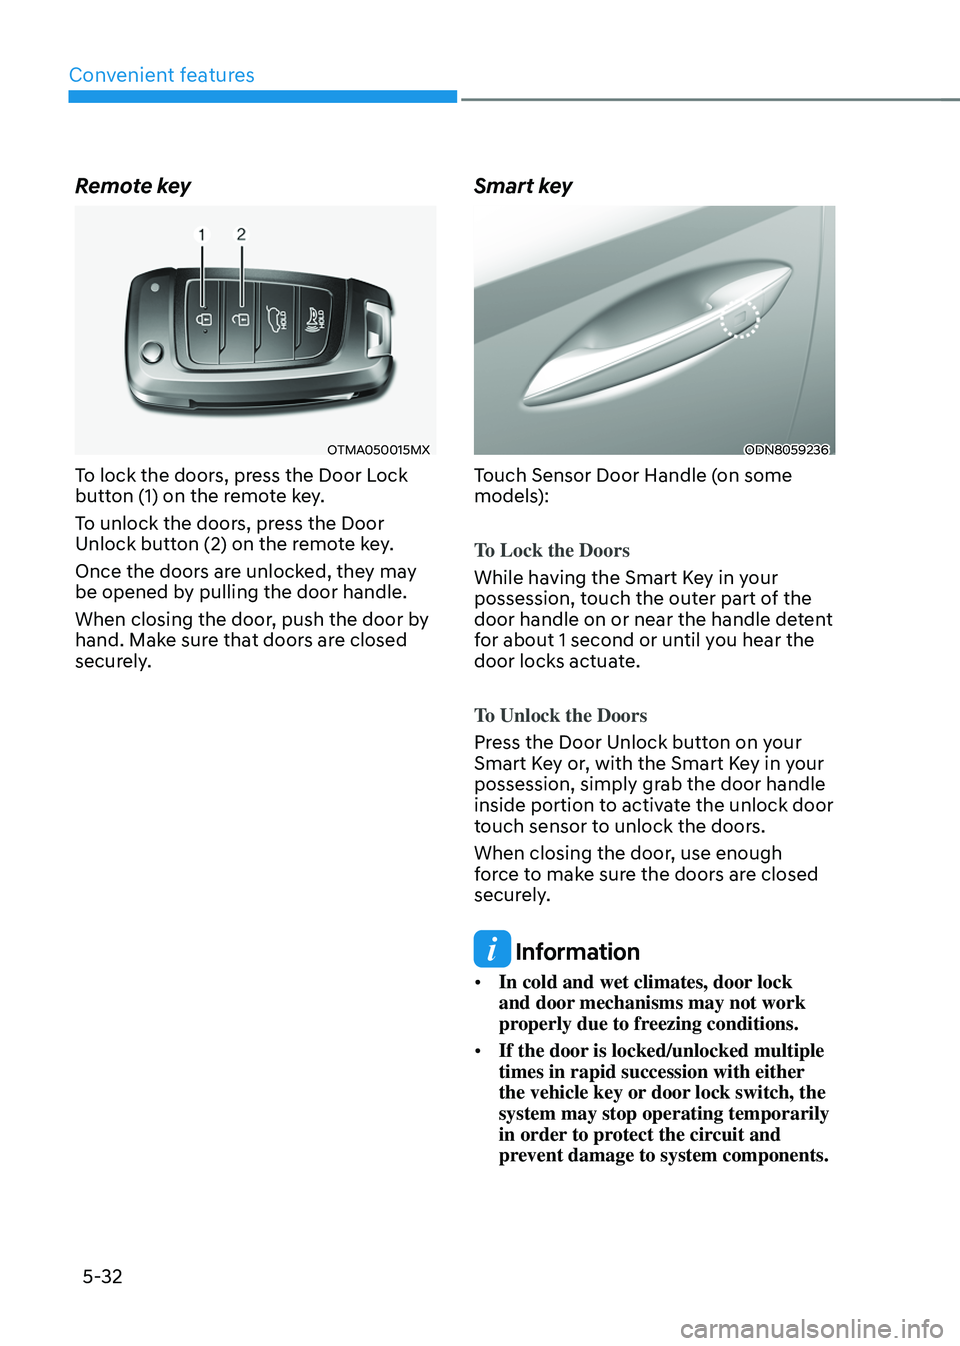
Remote key
OTMA050015MX
To lock the doors, press the Door Lock
button (1) on the remote key.
To unlock the doors, press the Door
Unlock button (2) on the remote key.
Once the doors are unlocked, they may
be opened by pulling the door handle.
When closing the door, push the door by
hand. Make sure that doors are closed
securely.
Smart key
ODN8059236
Touch Sensor Door Handle (on some
models):
To Lock the Doors
While having the Smart Key in your
possession, touch the outer part of the
door handle on or near the handle detent
for about 1 second or until you hear the
door locks actuate.
To Unlock the Doors
Press the Door Unlock button on your
Smart Key or, with the Smart Key in your
possession, simply grab the door handle
inside portion to activate the unlock door
touch sensor to unlock the doors.
When closing the door, use enough
force to make sure the doors are closed
securely.
Information
• In cold and wet climates, door lock
and door mechanisms may not work
properly due to freezing conditions.
• If the door is locked/unlocked multiple
times in rapid succession with either
the vehicle key or door lock switch, the
system may stop operating temporarily
in order to protect the circuit and
prevent damage to system components.
Page 190 of 638
Convenient features
5-46
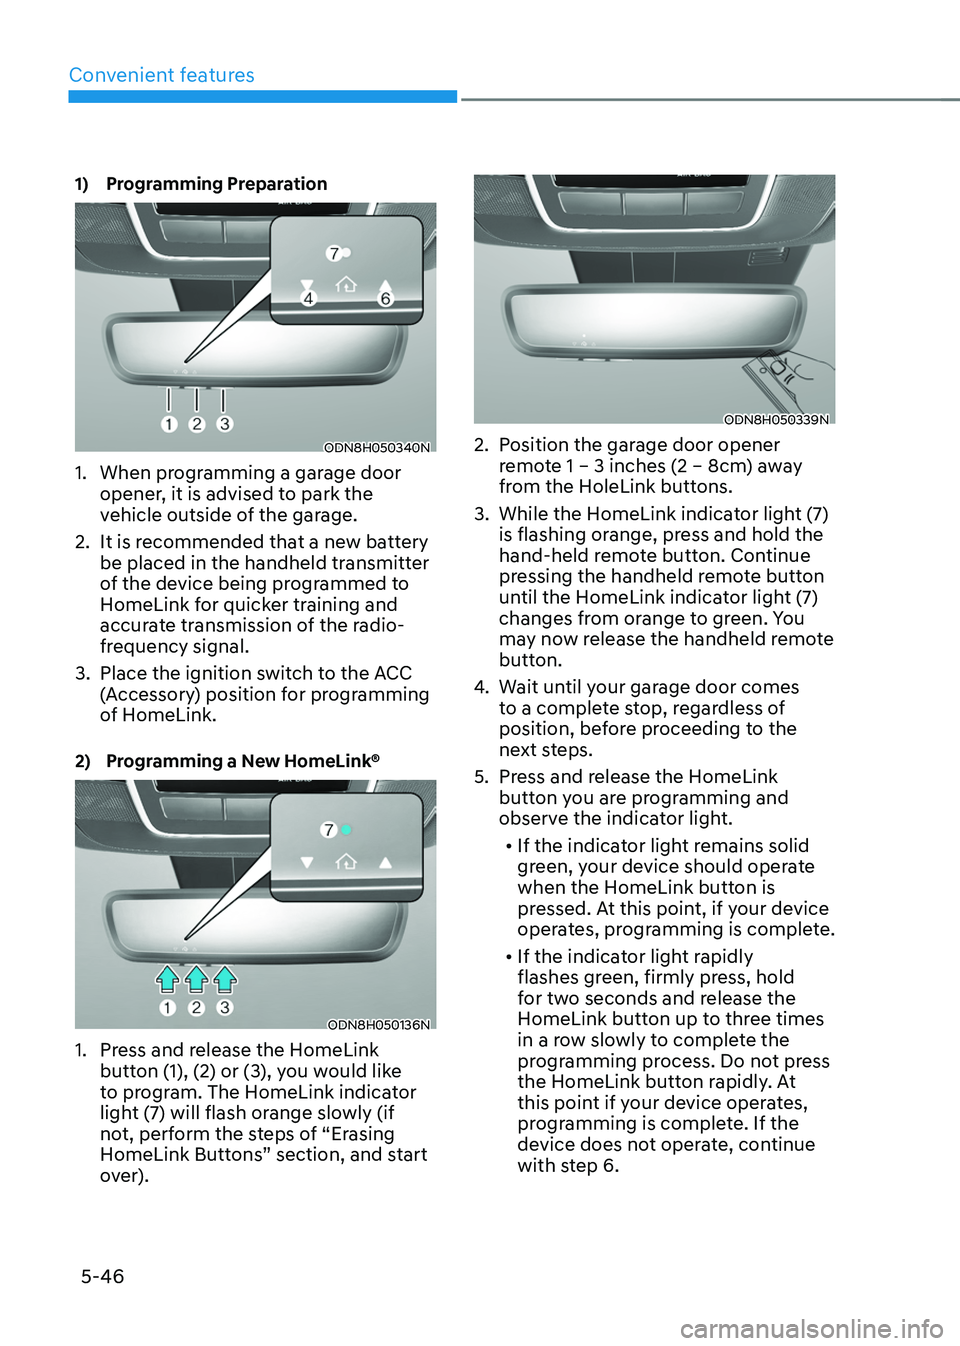
1) Programming Preparation
ODN8H050340N
1. When programming a garage door
opener, it is advised to park the
vehicle outside of the garage.
2. It is recommended that a new battery
be placed in the handheld transmitter
of the device being programmed to
HomeLink for quicker training and
accurate transmission of the radio-
frequency signal.
3. Place the ignition switch to the ACC
(Accessory) position for programming
of HomeLink.
2) Programming a New HomeLink®
ODN8H050136N
1. Press and release the HomeLink
button (1), (2) or (3), you would like
to program. The HomeLink indicator
light (7) will flash orange slowly (if
not, perform the steps of “Erasing
HomeLink Buttons” section, and start
over).
ODN8H050339N
2. Position the garage door opener
remote 1 – 3 inches (2 – 8cm) away
from the HoleLink buttons.
3. While the HomeLink indicator light (7)
is flashing orange, press and hold the
hand-held remote button. Continue
pressing the handheld remote button
until the HomeLink indicator light (7)
changes from orange to green. You
may now release the handheld remote
button.
4. Wait until your garage door comes
to a complete stop, regardless of
position, before proceeding to the
next steps.
5. Press and release the HomeLink
button you are programming and
observe the indicator light.• If the indicator light remains solid
green, your device should operate
when the HomeLink button is
pressed. At this point, if your device
operates, programming is complete.
• If the indicator light rapidly
flashes green, firmly press, hold
for two seconds and release the
HomeLink button up to three times
in a row slowly to complete the
programming process. Do not press
the HomeLink button rapidly. At
this point if your device operates,
programming is complete. If the
device does not operate, continue
with step 6.
Page 191 of 638
05
5-47
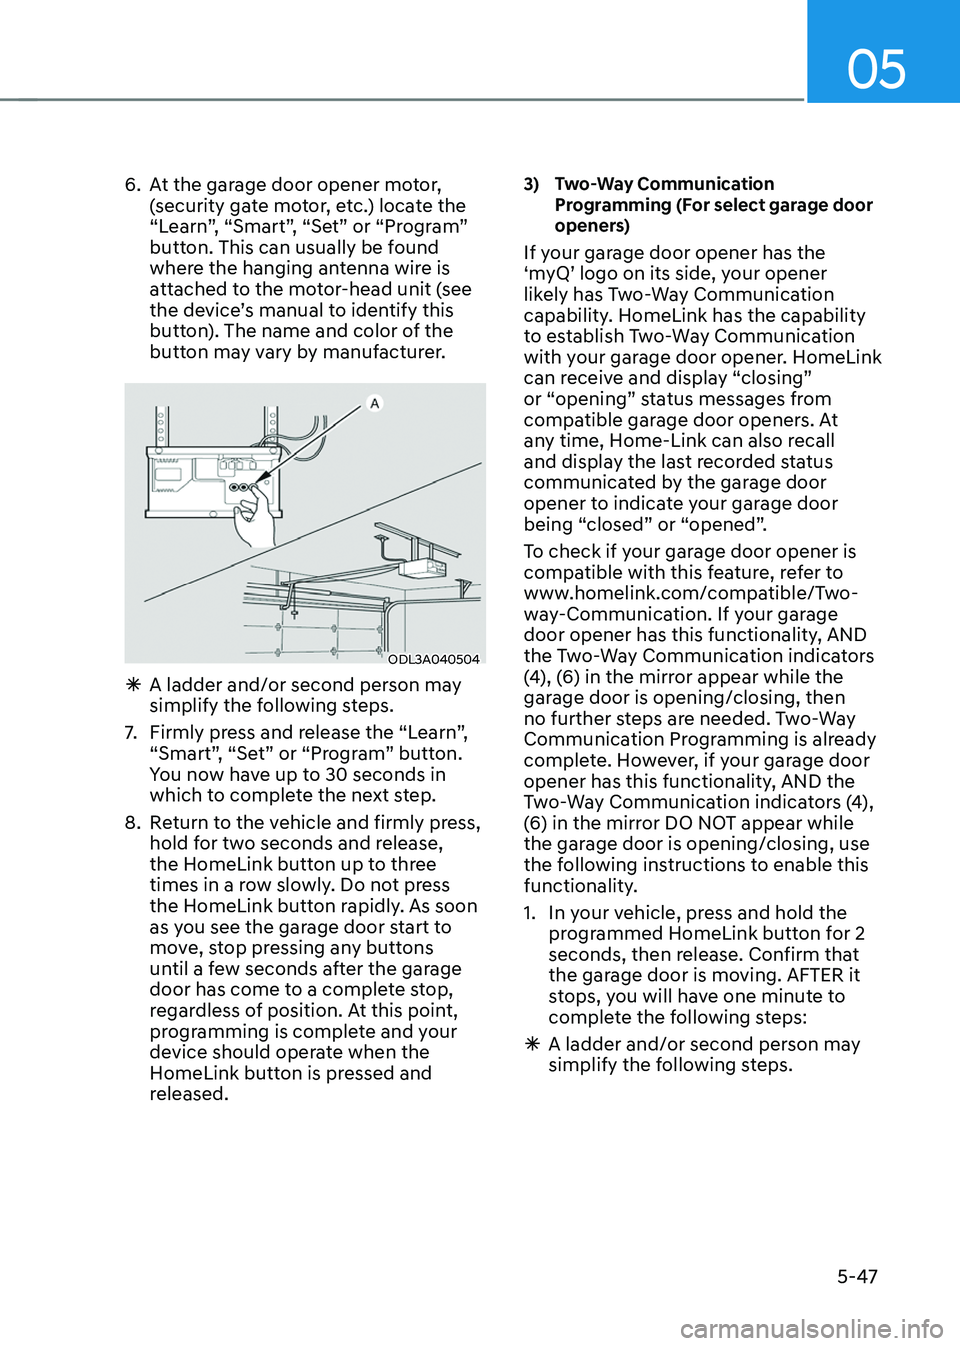
6. At the garage door opener motor,
(security gate motor, etc.) locate the
“Learn”, “Smart”, “Set” or “Program”
button. This can usually be found
where the hanging antenna wire is
attached to the motor-head unit (see
the device’s manual to identify this
button). The name and color of the
button may vary by manufacturer.
ODL3A040504
ÃA ladder and/or second person may
simplify the following steps.
7. Firmly press and release the “Learn”,
“Smart”, “Set” or “Program” button.
You now have up to 30 seconds in
which to complete the next step.
8. Return to the vehicle and firmly press,
hold for two seconds and release,
the HomeLink button up to three
times in a row slowly. Do not press
the HomeLink button rapidly. As soon
as you see the garage door start to
move, stop pressing any buttons
until a few seconds after the garage
door has come to a complete stop,
regardless of position. At this point,
programming is complete and your
device should operate when the
HomeLink button is pressed and
released.
3) Two-Way Communication Programming (For select garage door
openers)
If your garage door opener has the
‘myQ’ logo on its side, your opener
likely has Two-Way Communication
capability. HomeLink has the capability
to establish Two-Way Communication
with your garage door opener. HomeLink
can receive and display “closing”
or “opening” status messages from
compatible garage door openers. At
any time, Home-Link can also recall
and display the last recorded status
communicated by the garage door
opener to indicate your garage door
being “closed” or “opened”.
To check if your garage door opener is
compatible with this feature, refer to
www.homelink.com/compatible/Two-
way-Communication. If your garage
door opener has this functionality, AND
the Two-Way Communication indicators
(4), (6) in the mirror appear while the
garage door is opening/closing, then
no further steps are needed. Two-Way
Communication Programming is already
complete. However, if your garage door
opener has this functionality, AND the
Two-Way Communication indicators (4),
(6) in the mirror DO NOT appear while
the garage door is opening/closing, use
the following instructions to enable this
functionality.
1. In your vehicle, press and hold the
programmed HomeLink button for 2
seconds, then release. Confirm that
the garage door is moving. AFTER it
stops, you will have one minute to
complete the following steps:
ÃA ladder and/or second person may
simplify the following steps.
Page 194 of 638
Convenient features
5-50
3) Recalling Garage Door Status
HomeLink mirror with Two-Way
Communication provides a way to view
the last stored message from the garage
door opener. In order to recall the last
known status of the last activated device,
press the buttons “1 and 2” OR “2 and 3”
simultaneously.
• If the indicator (4) appears solid
Green, it indicates that the last
activated device was “closed”
properly.
• If the indicator (6) appears solid
Green, it indicates that the last
activated device was “open” properly.
3. Erasing HomeLink® Buttons
1) Erasing and Reprogramming a Single HomeLink® Button:
1. Press and hold the desired HomeLink
button you want to re-program. DO
NOT release the button.
2. The HomeLink indicator light (7) will
illuminate solid green. Release the
button as soon as the HomeLink
indicator light (7) begins to flash
orange, usually about 20 seconds.
3. Proceed with the steps in the
“Programming a New HomeLink
Button” section.
Information
If you do not complete the re-
programming of a new device to the
button, it will revert to the previously
stored programming.
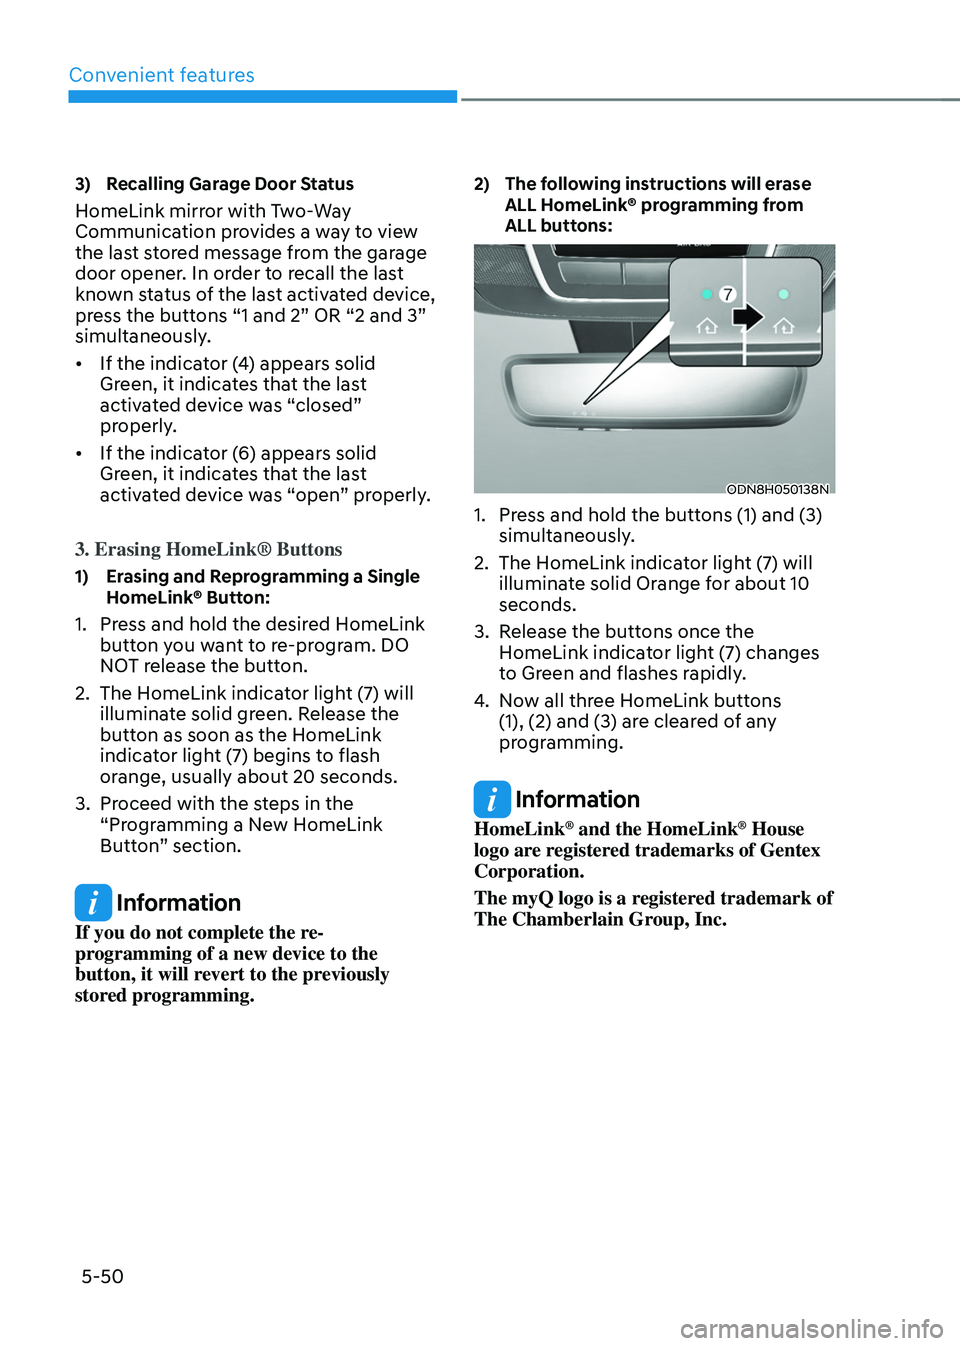
2) The following instructions will erase ALL HomeLink® programming from
ALL buttons:
ODN8H050138N
1. Press and hold the buttons (1) and (3)
simultaneously.
2. The HomeLink indicator light (7) will
illuminate solid Orange for about 10
seconds.
3. Release the buttons once the
HomeLink indicator light (7) changes
to Green and flashes rapidly.
4. Now all three HomeLink buttons
(1), (2) and (3) are cleared of any
programming.
Information
HomeLink® and the HomeLink® House
logo are registered trademarks of Gentex
Corporation.
The myQ logo is a registered trademark of
The Chamberlain Group, Inc.