front sensor HYUNDAI TUCSON 2023 User Guide
[x] Cancel search | Manufacturer: HYUNDAI, Model Year: 2023, Model line: TUCSON, Model: HYUNDAI TUCSON 2023Pages: 638, PDF Size: 26.51 MB
Page 94 of 638
03
3-63
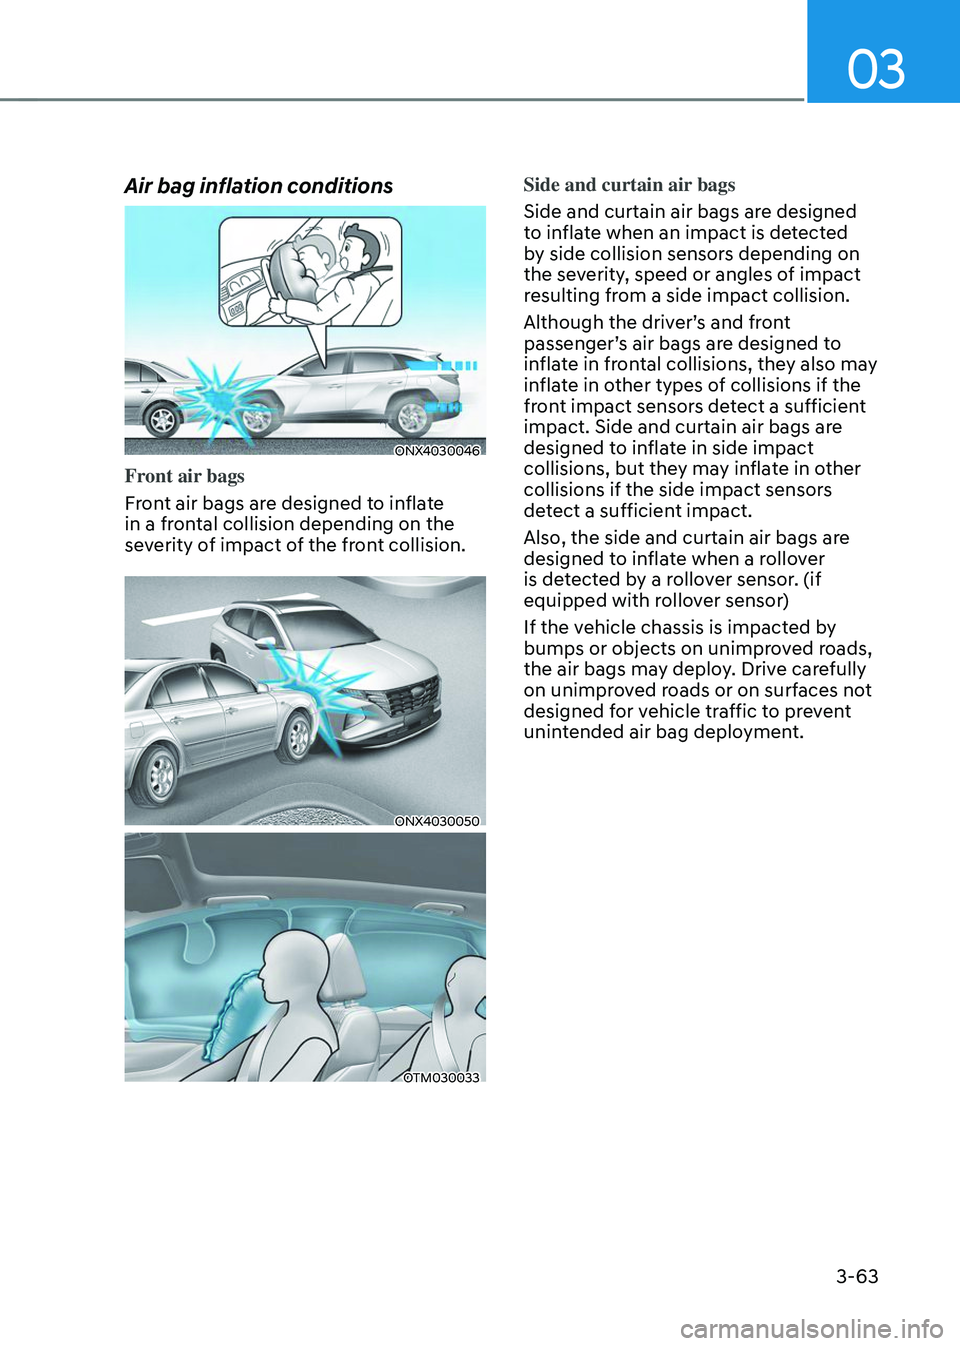
Air bag inflation conditions
ONX4030046
Front air bags
Front air bags are designed to inflate
in a frontal collision depending on the
severity of impact of the front collision.
ONX4030050
OTM030033
Side and curtain air bags
Side and curtain air bags are designed
to inflate when an impact is detected
by side collision sensors depending on
the severity, speed or angles of impact
resulting from a side impact collision.
Although the driver’s and front
passenger’s air bags are designed to
inflate in frontal collisions, they also may
inflate in other types of collisions if the
front impact sensors detect a sufficient
impact. Side and curtain air bags are
designed to inflate in side impact
collisions, but they may inflate in other
collisions if the side impact sensors
detect a sufficient impact.
Also, the side and curtain air bags are
designed to inflate when a rollover
is detected by a rollover sensor. (if
equipped with rollover sensor)
If the vehicle chassis is impacted by
bumps or objects on unimproved roads,
the air bags may deploy. Drive carefully
on unimproved roads or on surfaces not
designed for vehicle traffic to prevent
unintended air bag deployment.
Page 95 of 638
Seats & Safety System
3-64
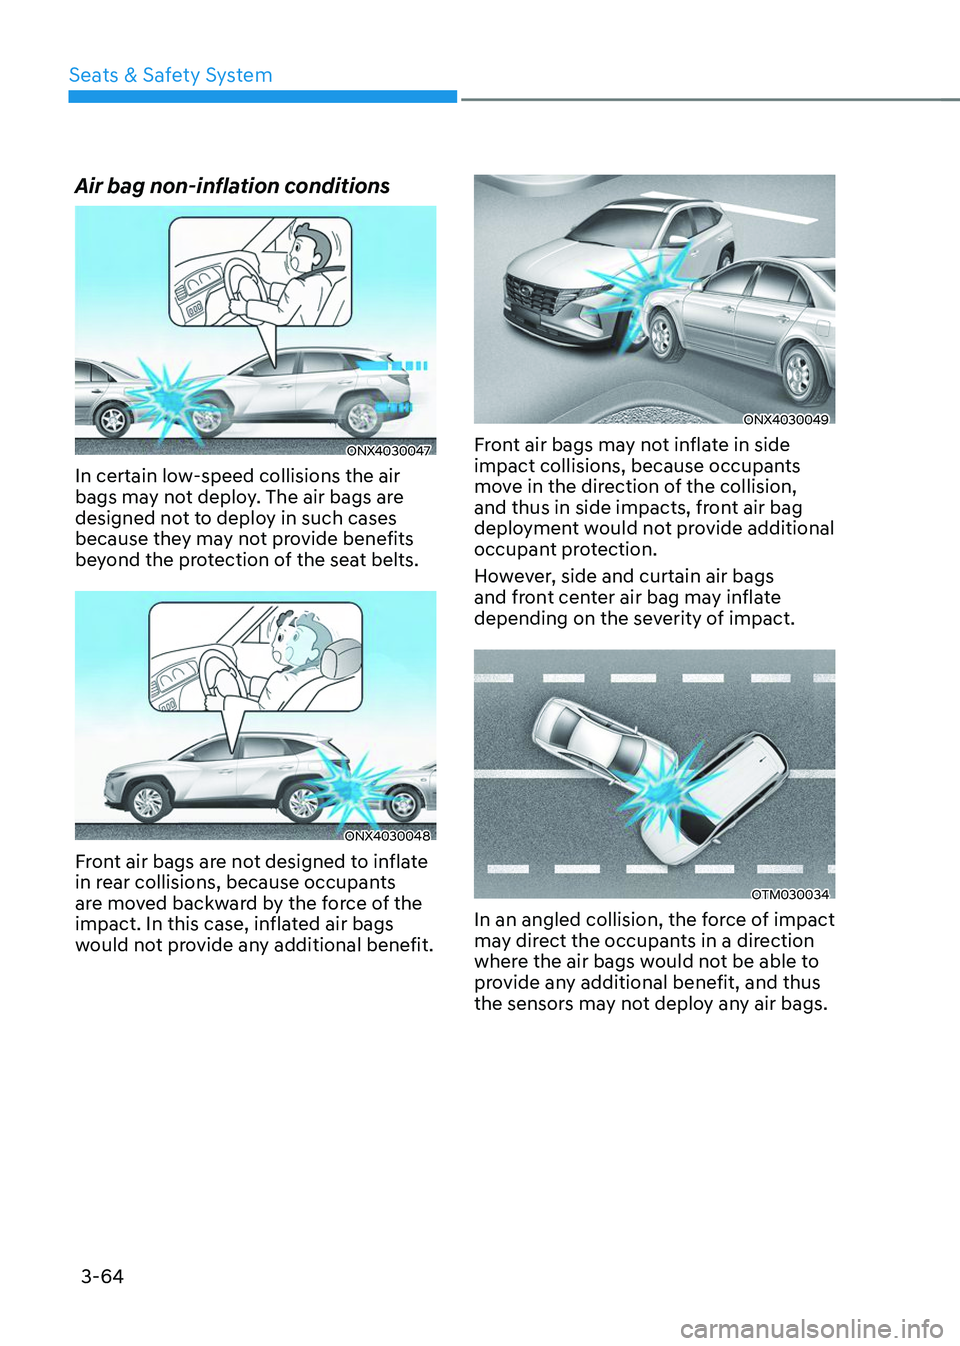
Air bag non-inflation conditions
ONX4030047
In certain low-speed collisions the air
bags may not deploy. The air bags are
designed not to deploy in such cases
because they may not provide benefits
beyond the protection of the seat belts.
ONX4030048
Front air bags are not designed to inflate
in rear collisions, because occupants
are moved backward by the force of the
impact. In this case, inflated air bags
would not provide any additional benefit.
ONX4030049
Front air bags may not inflate in side
impact collisions, because occupants
move in the direction of the collision,
and thus in side impacts, front air bag
deployment would not provide additional
occupant protection.
However, side and curtain air bags
and front center air bag may inflate
depending on the severity of impact.
OTM030034
In an angled collision, the force of impact
may direct the occupants in a direction
where the air bags would not be able to
provide any additional benefit, and thus
the sensors may not deploy any air bags.
Page 96 of 638
03
3-65
ONX4030051
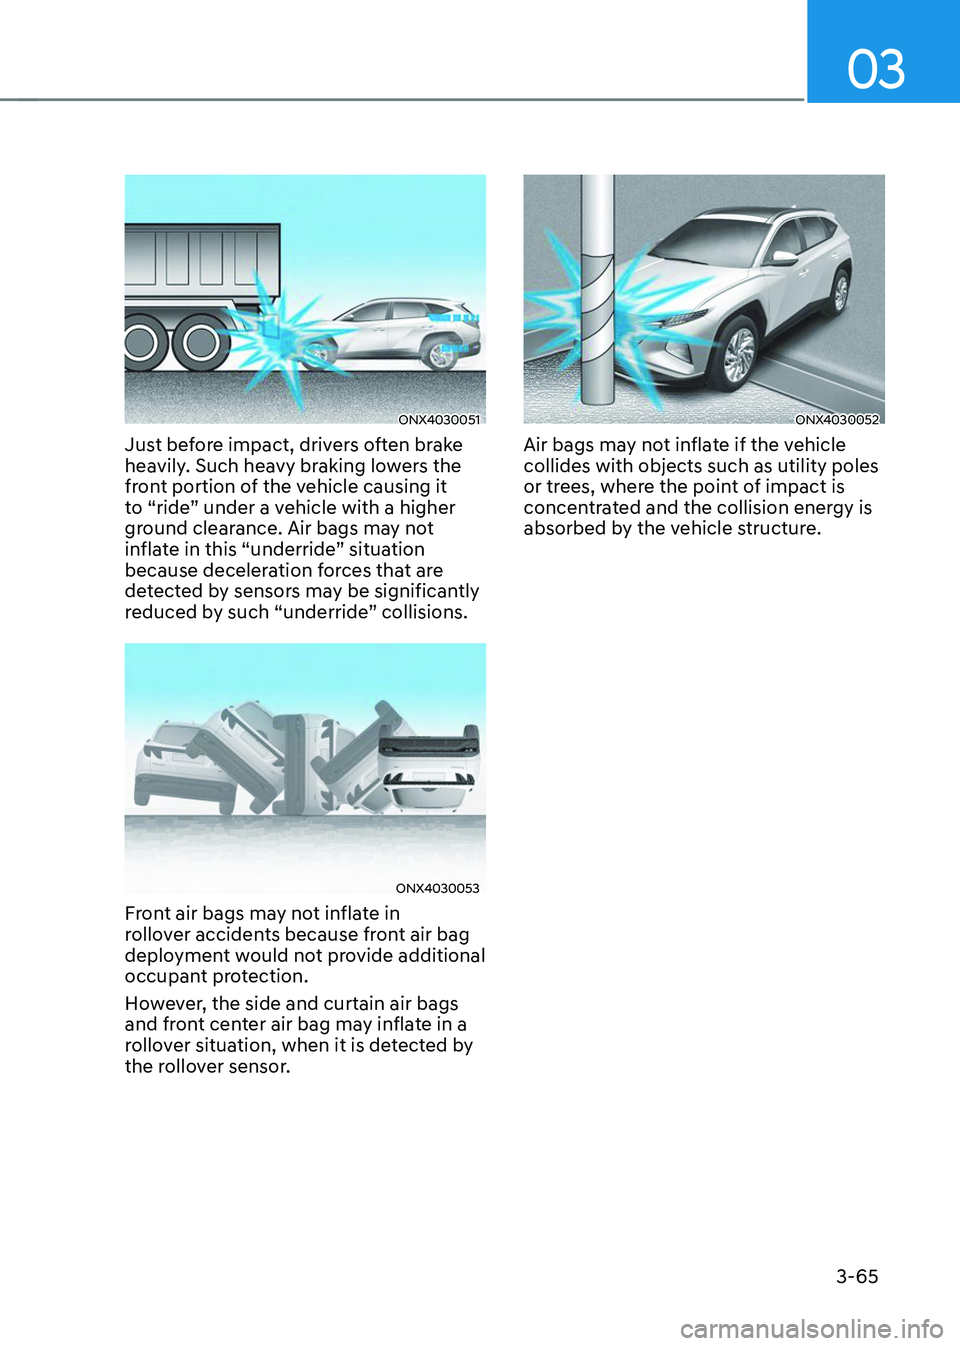
Just before impact, drivers often brake
heavily. Such heavy braking lowers the
front portion of the vehicle causing it
to “ride” under a vehicle with a higher
ground clearance. Air bags may not
inflate in this “underride” situation
because deceleration forces that are
detected by sensors may be significantly
reduced by such “underride” collisions.
ONX4030053
Front air bags may not inflate in
rollover accidents because front air bag
deployment would not provide additional
occupant protection.
However, the side and curtain air bags
and front center air bag may inflate in a
rollover situation, when it is detected by
the rollover sensor.
ONX4030052
Air bags may not inflate if the vehicle
collides with objects such as utility poles
or trees, where the point of impact is
concentrated and the collision energy is
absorbed by the vehicle structure.
Page 153 of 638
05
5-9
Note that if you press the outside door
handle to lock the doors using the touch
sensor, the doors will not lock under the
following circumstances:
• The Smart Key is in the vehicle
• The Engine Start/Stop button is in the
ACC or ON position
• Any of the doors are open (except for
the liftgate)
If this occurs, then a chime will sound
for about 3 seconds. Check the vehicle
before attempting to lock the car again.
CAUTION
Before you leave your vehicle with the
Smart Key, verify that your vehicle is
locked. When using the touch sensor
on the front door handle, listen to hear
that the lock has actuated, and then
pull the handle within 3 seconds to
confirm the doors are locked.
(if it has been longer than 3 seconds,
verify the doors are locked by pressing
the lock button on the Smart Key. You
will hear a single beep.)
WARNING
Do not leave the Smart Key in
your vehicle with children that are
unattended or unsupervised.
Children could inadvertently press
the Engine Start/Stop button or could
operate the power windows or other
vehicle controls or even cause the
vehicle to move. This could result in
serious injury or death.
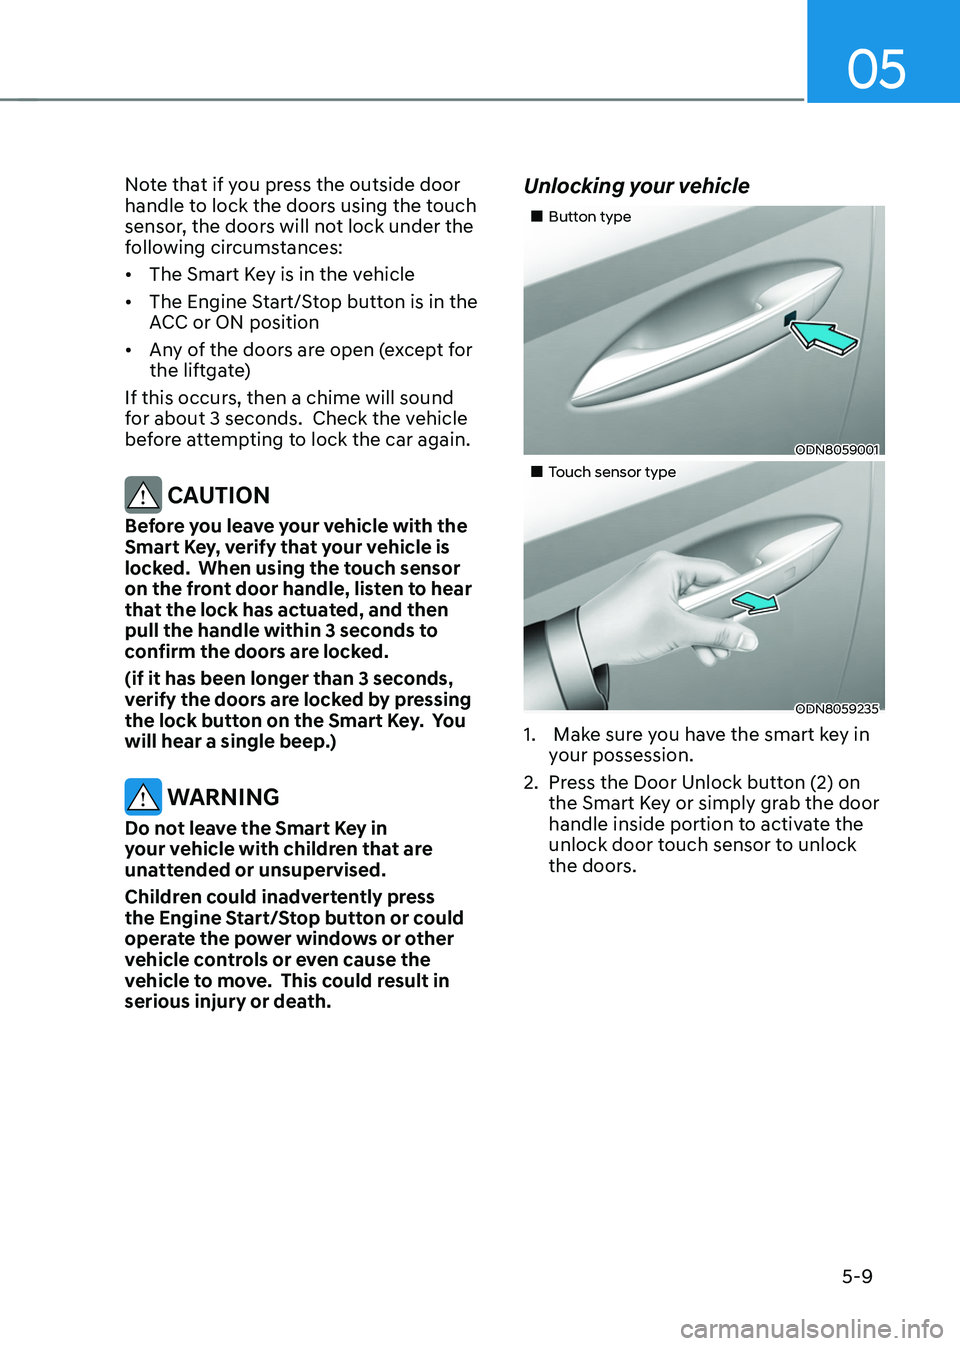
Unlocking your vehicle
„„Button type
ODN8059001
„„Touch sensor type
ODN8059235
1. Make sure you have the smart key in
your possession.
2. Press the Door Unlock button (2) on
the Smart Key or simply grab the door
handle inside portion to activate the
unlock door touch sensor to unlock
the doors.
Page 162 of 638
Convenient features
5-18
Set up main vehicle
You can manage multiple digital keys
from the Digital key app. From the list of
digital keys you own, select the vehicle
you want to make your priority vehicle.
For more information, please refer to
the ‘Tutorial’ on your Digital key app.
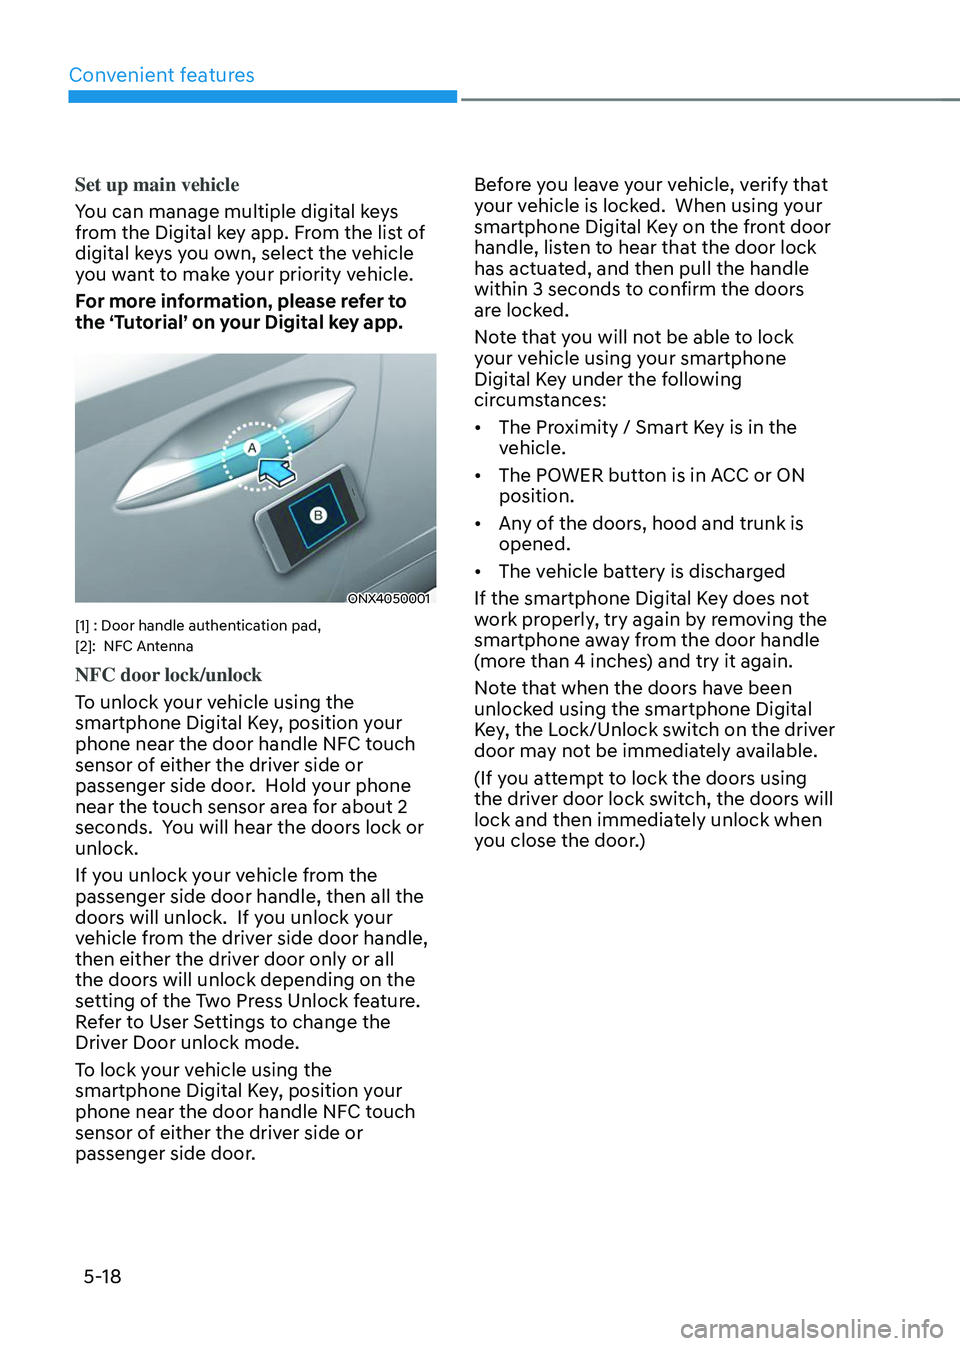
ONX4050001
[1] : Door handle authentication pad,
[2]: NFC Antenna
NFC door lock/unlock
To unlock your vehicle using the
smartphone Digital Key, position your
phone near the door handle NFC touch
sensor of either the driver side or
passenger side door. Hold your phone
near the touch sensor area for about 2
seconds. You will hear the doors lock or
unlock.
If you unlock your vehicle from the
passenger side door handle, then all the
doors will unlock. If you unlock your
vehicle from the driver side door handle,
then either the driver door only or all
the doors will unlock depending on the
setting of the Two Press Unlock feature.
Refer to User Settings to change the
Driver Door unlock mode.
To lock your vehicle using the
smartphone Digital Key, position your
phone near the door handle NFC touch
sensor of either the driver side or
passenger side door. Before you leave your vehicle, verify that
your vehicle is locked. When using your
smartphone Digital Key on the front door
handle, listen to hear that the door lock
has actuated, and then pull the handle
within 3 seconds to confirm the doors
are locked.
Note that you will not be able to lock
your vehicle using your smartphone
Digital Key under the following
circumstances:
•
The Proximity / Smart Key is in the
vehicle.
• The POWER button is in ACC or ON
position.
• Any of the doors, hood and trunk is
opened.
• The vehicle battery is discharged
If the smartphone Digital Key does not
work properly, try again by removing the
smartphone away from the door handle
(more than 4 inches) and try it again.
Note that when the doors have been
unlocked using the smartphone Digital
Key, the Lock/Unlock switch on the driver
door may not be immediately available.
(If you attempt to lock the doors using
the driver door lock switch, the doors will
lock and then immediately unlock when
you close the door.)
Page 170 of 638
![HYUNDAI TUCSON 2023 User Guide Convenient features
5-26
ONX4050002
[1] : Door handle authentication pad,
[2]: NFC Antenna
NFC door lock/unlock
To unlock your vehicle using the NFC
card key, touch the card key near the
door han HYUNDAI TUCSON 2023 User Guide Convenient features
5-26
ONX4050002
[1] : Door handle authentication pad,
[2]: NFC Antenna
NFC door lock/unlock
To unlock your vehicle using the NFC
card key, touch the card key near the
door han](/img/35/56195/w960_56195-169.png)
Convenient features
5-26
ONX4050002
[1] : Door handle authentication pad,
[2]: NFC Antenna
NFC door lock/unlock
To unlock your vehicle using the NFC
card key, touch the card key near the
door handle NFC touch sensor of either
the driver side or passenger side door.
Hold the card key near the touch sensor
area for about 2 seconds. You will hear
the doors lock or unlock.
If you unlock your vehicle from the
passenger side door handle, then all the
doors will unlock. If you unlock your
vehicle from the driver side door handle,
then either the driver door only or all
the doors will unlock depending on the
setting of the Two Press Unlock feature.
Refer to User Settings to change the
Driver Door unlock mode.
To lock your vehicle using the NFC card
key, touch the card key near the door
handle NFC touch sensor of either the
driver side or passenger side door.
Before you leave your vehicle, verify
that your vehicle is locked. When using
your NFC card key on the front door
handle, listen to hear that the door lock
has actuated, and then pull the handle
within 3 seconds to confirm the doors
are locked.
Inoperable condition
When using the NFC card key to lock or
unlock your vehicle, be sure to touch
the card key near the center of the door
handle to enable the sensor to activate.
Note that you must take the card out of
your wallet or purse to use the card key
correctly. If the card key is not touching
the door handle sensor or is in close
proximity to other NFC-enabled cards, it
may not work.
Note that if you attempt to use the
NFC card key to lock the doors, the
doors will not lock under the following
circumstances:
•
The Smart Key is in the vehicle
• The Engine Start/Stop button is in the
ACC or ON position
• Any of the doors are open (except for
the liftgate)
If this occurs, then a chime will sound
for about 3 seconds. Check the vehicle
before attempting to lock the car again.
If you have difficulty locking or unlocking
the vehicle using the NFC card key,
remove the card key away from the door
handle sensor for a few seconds (card
key must be more than 4 inches away)
and then retry.
If the card key is damaged or bent, the
sensor on the door handle may not
properly detect the card key. If this
occurs contact your authorized Hyundai
dealer for a card key replacement.
Be careful not to damage the card
key or expose the card key to extreme
temperatures or direct sunlight for long
periods of time.
Note that when the doors have been
unlocked using the NFC digital card key,
the Lock/Unlock switch on the driver
door may not be immediately available.
(If you attempt to lock the doors using
the driver door lock switch, the doors will
lock and then immediately unlock when
you close the door.)
Page 223 of 638
05
5-79
Exterior lights
Lighting control
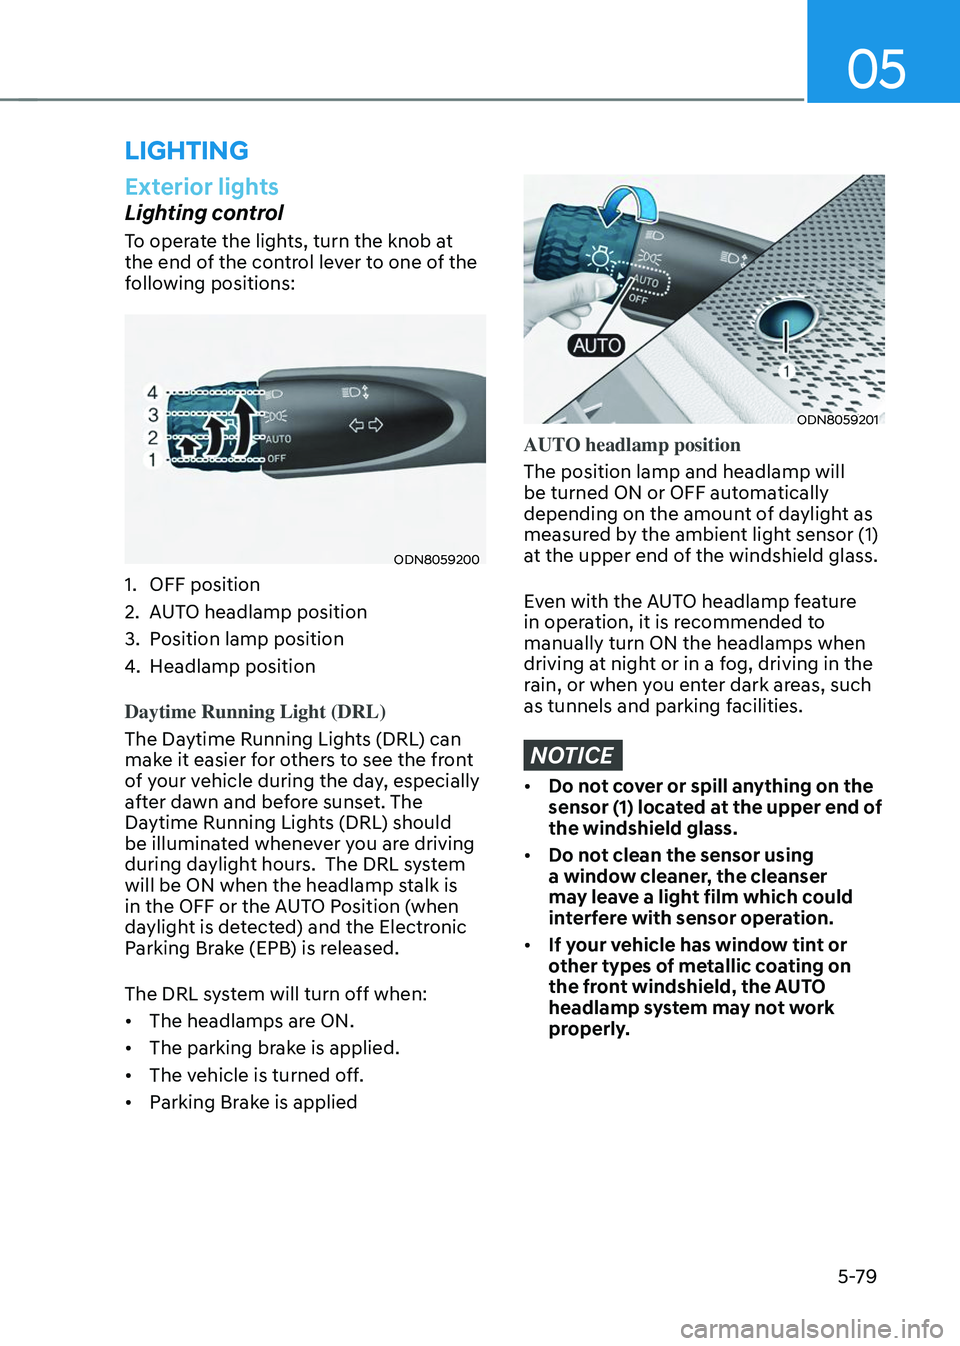
To operate the lights, turn the knob at
the end of the control lever to one of the
following positions:
ODN8059200
1. OFF position
2. AUTO headlamp position
3. Position lamp position
4. Headlamp position
Daytime Running Light (DRL)
The Daytime Running Lights (DRL) can
make it easier for others to see the front
of your vehicle during the day, especially
after dawn and before sunset. The
Daytime Running Lights (DRL) should
be illuminated whenever you are driving
during daylight hours. The DRL system
will be ON when the headlamp stalk is
in the OFF or the AUTO Position (when
daylight is detected) and the Electronic
Parking Brake (EPB) is released.
The DRL system will turn off when:
• The headlamps are ON.
• The parking brake is applied.
• The vehicle is turned off.
• Parking Brake is applied
ODN8059201
AUTO headlamp position
The position lamp and headlamp will
be turned ON or OFF automatically
depending on the amount of daylight as
measured by the ambient light sensor (1)
at the upper end of the windshield glass.
Even with the AUTO headlamp feature
in operation, it is recommended to
manually turn ON the headlamps when
driving at night or in a fog, driving in the
rain, or when you enter dark areas, such
as tunnels and parking facilities.
NOTICE
• Do not cover or spill anything on the
sensor (1) located at the upper end of
the windshield glass.
• Do not clean the sensor using
a window cleaner, the cleanser
may leave a light film which could
interfere with sensor operation.
• If your vehicle has window tint or
other types of metallic coating on
the front windshield, the AUTO
headlamp system may not work
properly.
LIGHTING
Page 227 of 638
05
5-83
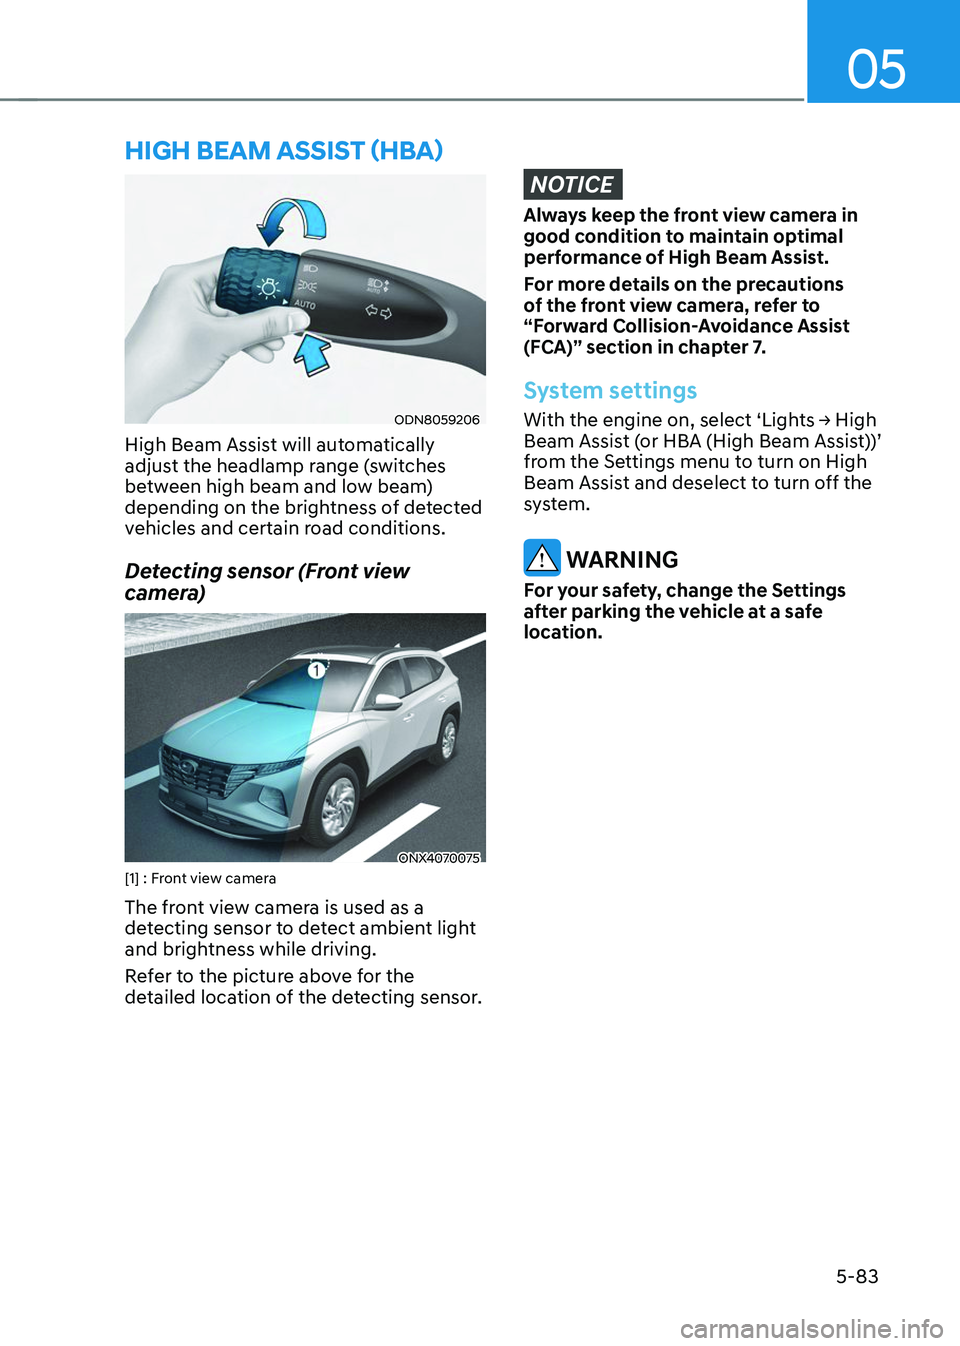
ODN8059206
High Beam Assist will automatically
adjust the headlamp range (switches
between high beam and low beam)
depending on the brightness of detected
vehicles and certain road conditions.
Detecting sensor (Front view
camera)
ONX4070075[1] : Front view camera
The front view camera is used as a
detecting sensor to detect ambient light
and brightness while driving.
Refer to the picture above for the
detailed location of the detecting sensor.
NOTICE
Always keep the front view camera in
good condition to maintain optimal
performance of High Beam Assist.
For more details on the precautions
of the front view camera, refer to
“Forward Collision-Avoidance Assist
(FCA)” section in chapter 7.
System settings
With the engine on, select ‘Lights → High Beam Assist (or HBA (High Beam Assist))’
from the Settings menu to turn on High
Beam Assist and deselect to turn off the
system.
WARNING
For your safety, change the Settings
after parking the vehicle at a safe
location.
HIGH BEAM ASSIST (HBA)
Page 262 of 638
Convenient features
5-118
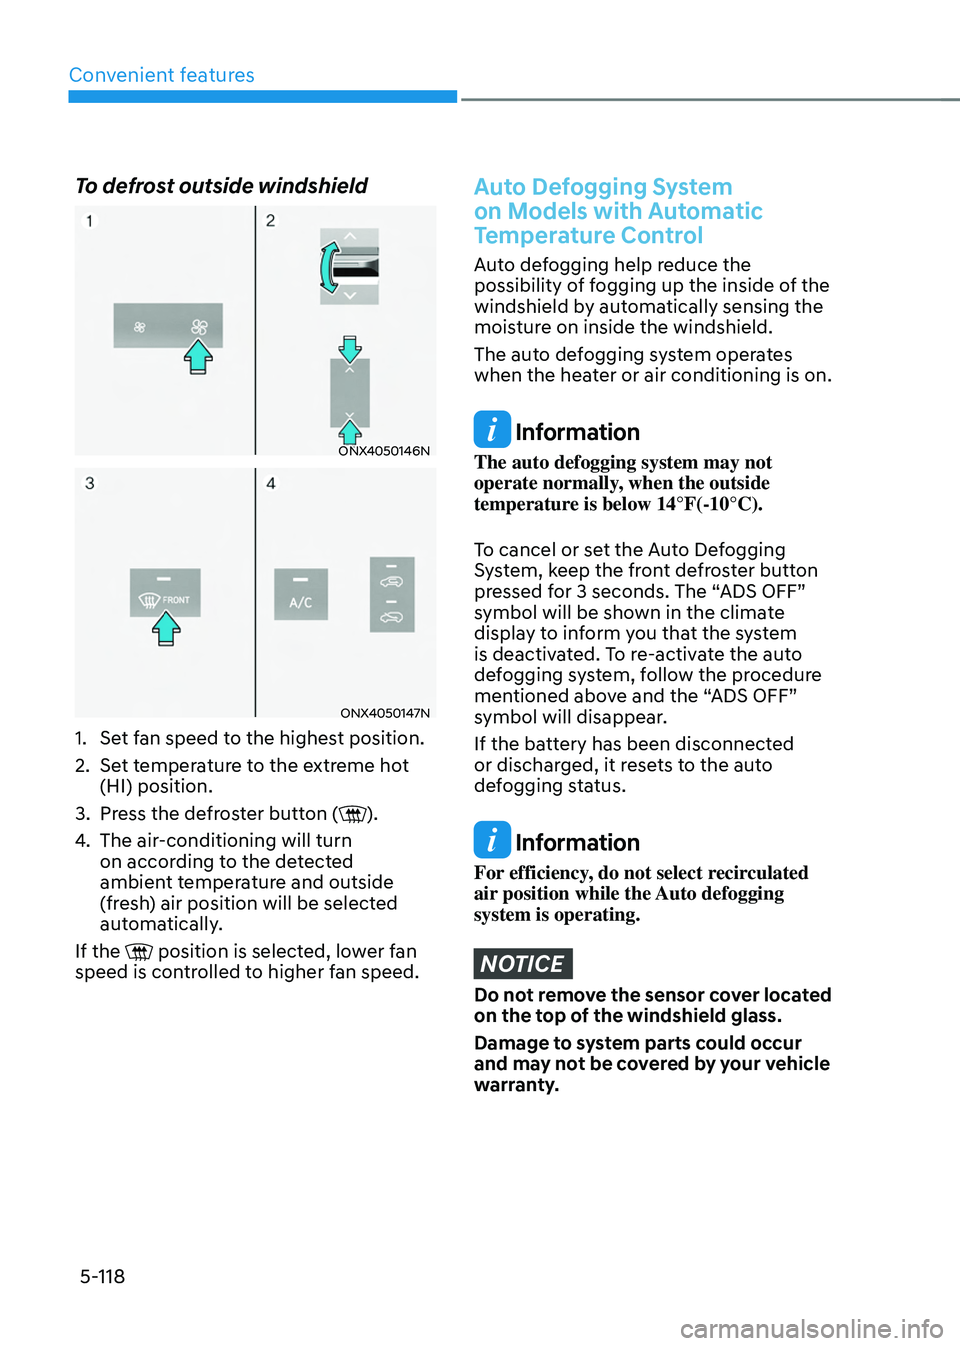
To defrost outside windshield
ONX4050146N
ONX4050147N
1. Set fan speed to the highest position.
2. Set temperature to the extreme hot
(HI) position.
3. Press the defroster button ().
4. The air-conditioning will turn
on according to the detected
ambient temperature and outside
(fresh) air position will be selected
automatically.
If the
position is selected, lower fan speed is controlled to higher fan speed.
Auto Defogging System
on Models with Automatic
Temperature Control
Auto defogging help reduce the
possibility of fogging up the inside of the
windshield by automatically sensing the
moisture on inside the windshield.
The auto defogging system operates
when the heater or air conditioning is on.
Information
The auto defogging system may not
operate normally, when the outside
temperature is below 14°F(-10°C).
To cancel or set the Auto Defogging
System, keep the front defroster button
pressed for 3 seconds. The “ADS OFF”
symbol will be shown in the climate
display to inform you that the system
is deactivated. To re-activate the auto
defogging system, follow the procedure
mentioned above and the “ADS OFF”
symbol will disappear.
If the battery has been disconnected
or discharged, it resets to the auto
defogging status.
Information
For efficiency, do not select recirculated
air position while the Auto defogging
system is operating.
NOTICE
Do not remove the sensor cover located
on the top of the windshield glass.
Damage to system parts could occur
and may not be covered by your vehicle
warranty.
Page 264 of 638
Convenient features
5-120
Auto Defogging System
on Models with Automatic
Temperature Control
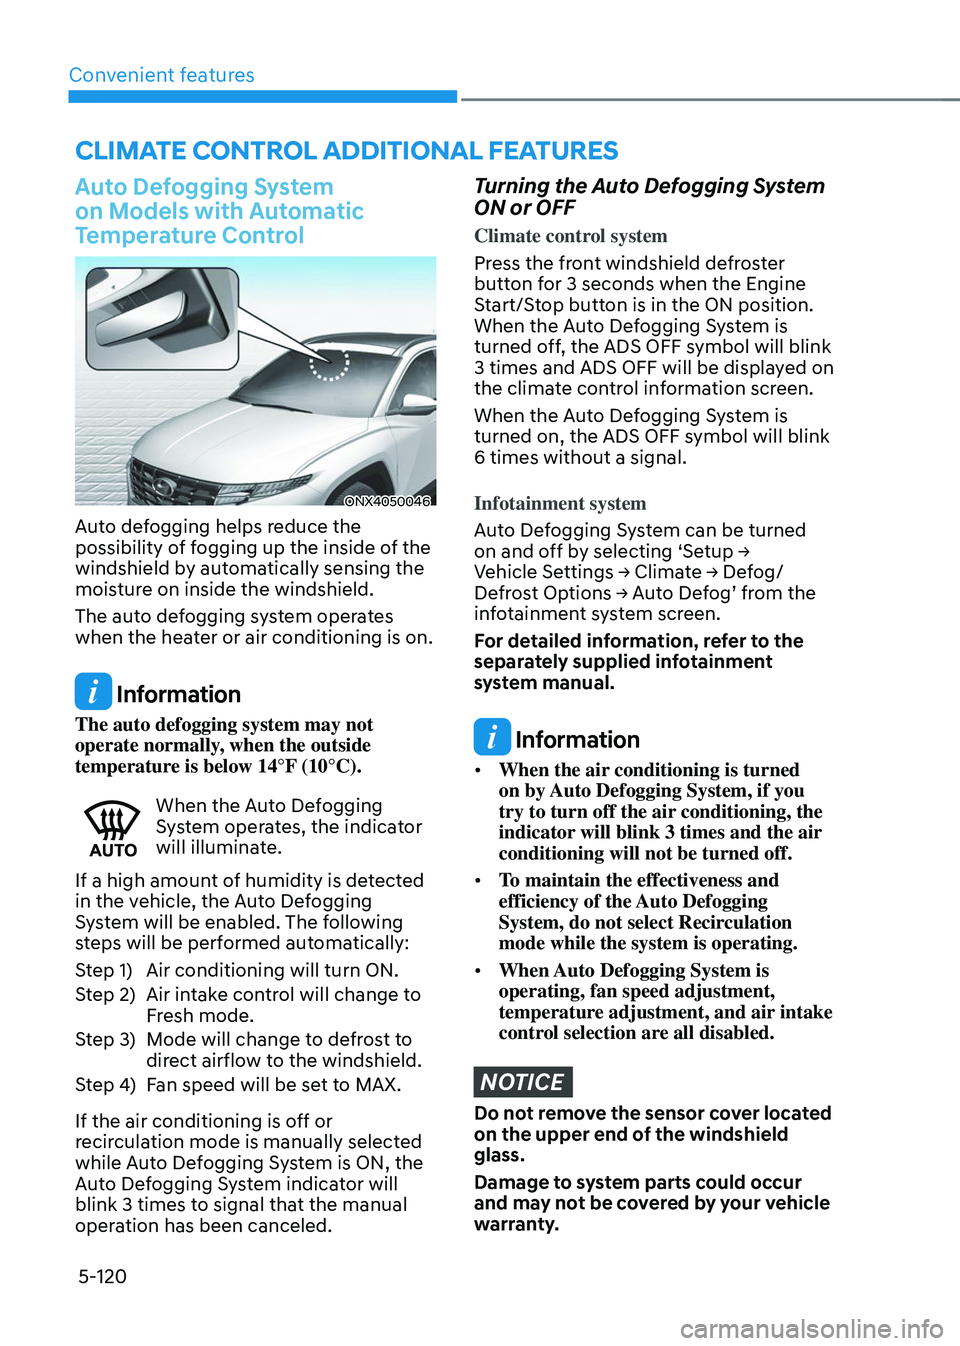
ONX4050046
Auto defogging helps reduce the
possibility of fogging up the inside of the
windshield by automatically sensing the
moisture on inside the windshield.
The auto defogging system operates
when the heater or air conditioning is on.
Information
The auto defogging system may not
operate normally, when the outside
temperature is below 14°F (10°C).
When the Auto Defogging System operates, the indicator
will illuminate.
If a high amount of humidity is detected
in the vehicle, the Auto Defogging
System will be enabled. The following
steps will be performed automatically:
Step 1) Air conditioning will turn ON.
Step 2) Air intake control will change to
Fresh mode.
Step 3) Mode will change to defrost to
direct airflow to the windshield.
Step 4) Fan speed will be set to MAX.
If the air conditioning is off or
recirculation mode is manually selected
while Auto Defogging System is ON, the
Auto Defogging System indicator will
blink 3 times to signal that the manual
operation has been canceled.
Turning the Auto Defogging System
ON or OFF
Climate control system
Press the front windshield defroster
button for 3 seconds when the Engine
Start/Stop button is in the ON position.
When the Auto Defogging System is
turned off, the ADS OFF symbol will blink
3 times and ADS OFF will be displayed on
the climate control information screen.
When the Auto Defogging System is
turned on, the ADS OFF symbol will blink
6 times without a signal.
Infotainment system
Auto Defogging System can be turned
on and off by selecting ‘Setup → Vehicle Settings → Climate → Defog/Defrost Options → Auto Defog’ from the infotainment system screen.
For detailed information, refer to the
separately supplied infotainment
system manual.
Information
• When the air conditioning is turned
on by Auto Defogging System, if you
try to turn off the air conditioning, the
indicator will blink 3 times and the air
conditioning will not be turned off.
• To maintain the effectiveness and
efficiency of the Auto Defogging
System, do not select Recirculation
mode while the system is operating.
• When Auto Defogging System is
operating, fan speed adjustment,
temperature adjustment, and air intake
control selection are all disabled.
NOTICE
Do not remove the sensor cover located
on the upper end of the windshield
glass.
Damage to system parts could occur
and may not be covered by your vehicle
warranty.
CLIMATE CONTROL ADDITIONAL FEATURES