Vehicle Light HYUNDAI TUCSON 2023 Workshop Manual
[x] Cancel search | Manufacturer: HYUNDAI, Model Year: 2023, Model line: TUCSON, Model: HYUNDAI TUCSON 2023Pages: 638, PDF Size: 26.51 MB
Page 189 of 638
05
5-45
Integrated HomeLink® Wireless Control
System
The HomeLink® Wireless Control System
provides a convenient way to replace
up to three hand held radio-frequency
transmitters used to activate compatible
devices such as gate operators, garage
door openers, entry door locks, security
systems, and home lighting.
NOTICE
HomeLink® operates while the ignition
switch is in the ACC or ON position
for safety reasons. It is to prevent
unintentional security problems from
happening when the vehicle is parked
outside the garage.
WARNING
Before programming HomeLink® to a
garage door opener or gate operator,
make sure people and objects are out
of the way of the device to prevent
potential harm or damage. Do not
use the HomeLink® with any garage
door opener that lacks the safety
stop and reverse features required
by U.S. federal safety standards (this
includes any garage door opener model
manufactured before April 1, 1982).
A garage door that cannot detect an
object - signaling the door to stop and
reverse - does not meet current U.S.
federal safety standards. Using a garage
door opener without these features
increases the risk of serious injury or
death.
For more information, contact
HomeLink® at www.homelink.com, or
call Home-Link customer support at
1-800-355-3515.
It is also recommended that a new
battery be replaced in the handheld
transmitter of the device being trained
to HomeLink® for quicker training and
accurate transmission of the radio
frequency. 1. Programming HomeLink
®
The following steps show how to
program HomeLink. If you have any
questions or are having difficulty
programming your HomeLink buttons,
refer to the HomeLink website or call the
HomeLink customer support toll-free
number. Do this before going back to the
dealer who sold you the car.
•
Visit the HomeLink website at: www.
homelink.com. Then at the top of the
page, choose your vehicle make. Then
watch the You Tube video, and/or
access additional website information.
• If you choose to access the website
via your cell phone, scan the QR code.
• Or call HomeLink customer support
at 1-800-355-3515 (Please have the
vehicle make/model and the opener
device make/model readily available.)
Page 190 of 638
Convenient features
5-46
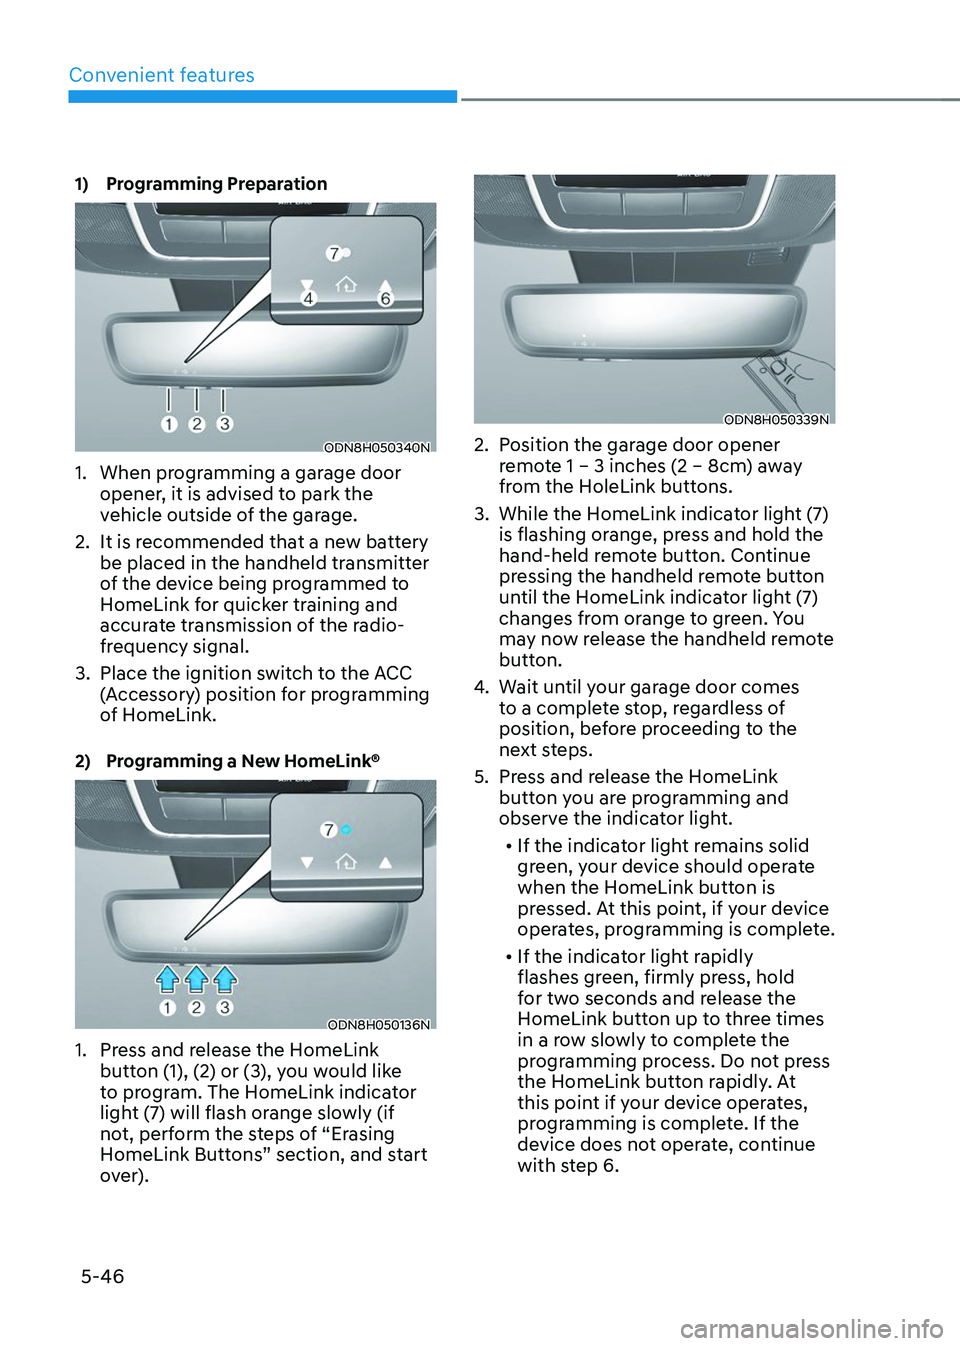
1) Programming Preparation
ODN8H050340N
1. When programming a garage door
opener, it is advised to park the
vehicle outside of the garage.
2. It is recommended that a new battery
be placed in the handheld transmitter
of the device being programmed to
HomeLink for quicker training and
accurate transmission of the radio-
frequency signal.
3. Place the ignition switch to the ACC
(Accessory) position for programming
of HomeLink.
2) Programming a New HomeLink®
ODN8H050136N
1. Press and release the HomeLink
button (1), (2) or (3), you would like
to program. The HomeLink indicator
light (7) will flash orange slowly (if
not, perform the steps of “Erasing
HomeLink Buttons” section, and start
over).
ODN8H050339N
2. Position the garage door opener
remote 1 – 3 inches (2 – 8cm) away
from the HoleLink buttons.
3. While the HomeLink indicator light (7)
is flashing orange, press and hold the
hand-held remote button. Continue
pressing the handheld remote button
until the HomeLink indicator light (7)
changes from orange to green. You
may now release the handheld remote
button.
4. Wait until your garage door comes
to a complete stop, regardless of
position, before proceeding to the
next steps.
5. Press and release the HomeLink
button you are programming and
observe the indicator light.• If the indicator light remains solid
green, your device should operate
when the HomeLink button is
pressed. At this point, if your device
operates, programming is complete.
• If the indicator light rapidly
flashes green, firmly press, hold
for two seconds and release the
HomeLink button up to three times
in a row slowly to complete the
programming process. Do not press
the HomeLink button rapidly. At
this point if your device operates,
programming is complete. If the
device does not operate, continue
with step 6.
Page 192 of 638
Convenient features
5-48
2. On your garage door opener in your
garage, locate the “Learn” button
(usually near where the hanging
antenna wire is attached to the garage
door opener). If there is difficulty
locating this button, reference the
device’s owner’s manual.
3. Press and release the “Learn” button.
4. A light on your garage door opener
may flash, and your Two-Way
Communication indicators (4), (6) in
your vehicle may flash, confirming
completion of the process.
5. Return to the vehicle and firmly
press and release the programmed
HomeLink button to activate
your garage door. The Two-Way
Communication indicators (4), (6)
flash in orange when the door is
moving. Do not make any additional
button presses until AFTER the garage
door has come to a complete stop.
6. Your Two-Way Communication
programming is now complete.
Information
If your garage door opener has Two-
Way Communication functionality,
it is possible for HomeLink to stop
functioning the garage door shortly
after initial programming, IF the Two-
Way Communication Programming
wasn’t properly completed. This
usually happens after the first 10 times
a programmed HomeLink button is
pressed. If you experience this, completing
the “Programming a New HomeLink
Button” and “Two-Way Communication
Programming” will restore door
operation.
4) Canadian Programming
Canadian radio-frequency laws require
transmitter remote signals to “time-
out” (or quit) after a couple seconds of
transmission, which may not be long
enough for HomeLink to pick up the signal
during programming.
If you live in Canada or you are having
difficulties programming a gate operator
or garage door opener by using the
programming procedures, replace
“Programming a New HomeLink Button”
step 3 with the following:
While the HomeLink indicator light (7) is
flashing orange, press and release (“cycle”)
your device’s handheld remote every two
seconds until the HomeLink indicator light
(7) changes from orange to green. You may
now release the hand-held remote button.
Then proceed with “Programming a New
HomeLink Button” step 4.
Page 204 of 638
Convenient features
5-60
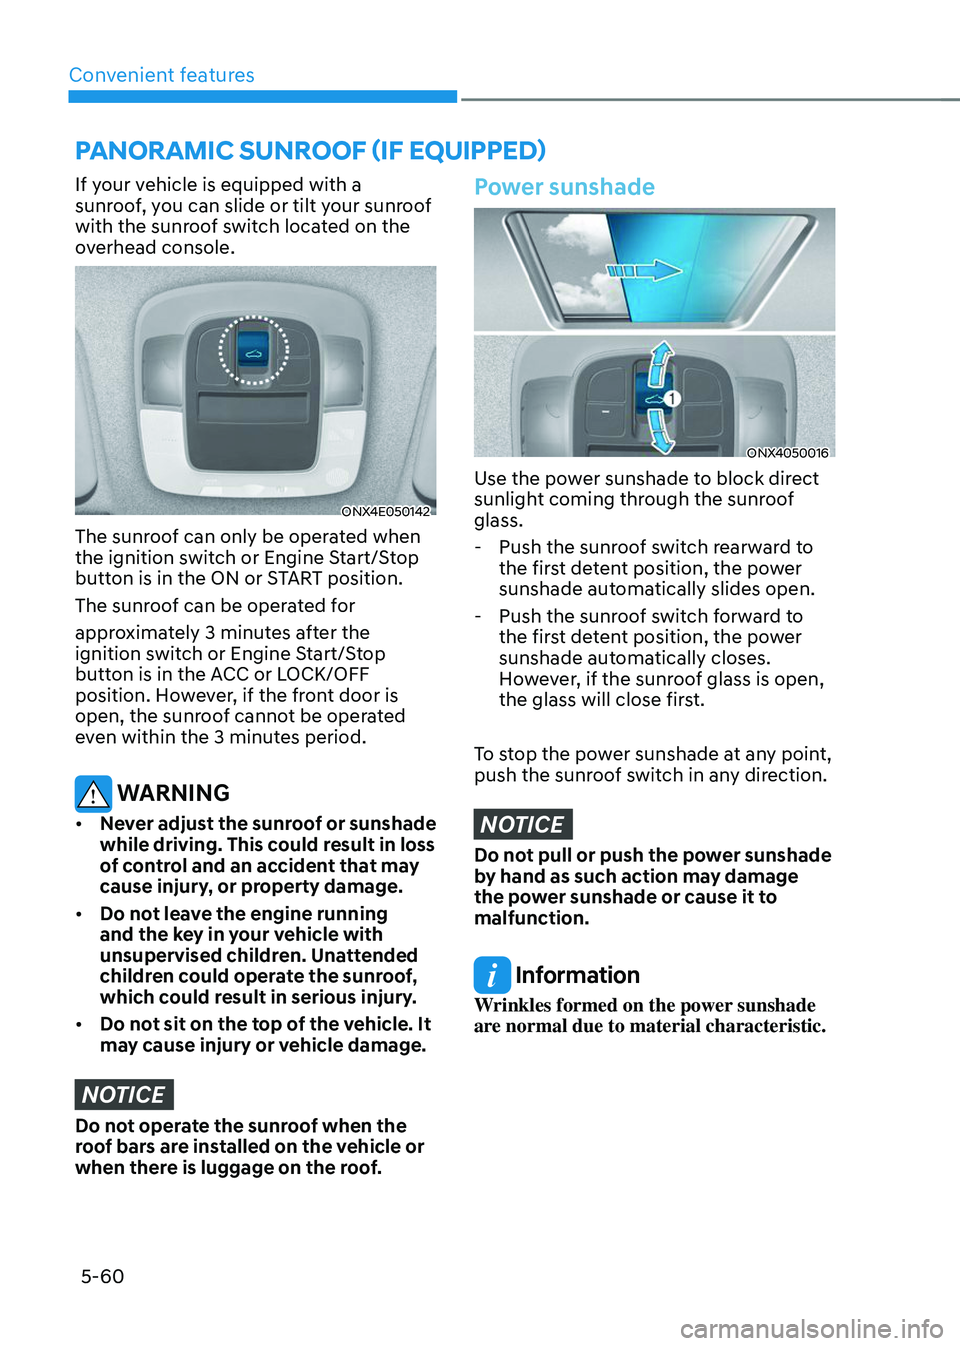
If your vehicle is equipped with a
sunroof, you can slide or tilt your sunroof
with the sunroof switch located on the
overhead console.
ONX4E050142
The sunroof can only be operated when
the ignition switch or Engine Start/Stop
button is in the ON or START position.
The sunroof can be operated for
approximately 3 minutes after the
ignition switch or Engine Start/Stop
button is in the ACC or LOCK/OFF
position. However, if the front door is
open, the sunroof cannot be operated
even within the 3 minutes period.
WARNING
• Never adjust the sunroof or sunshade
while driving. This could result in loss
of control and an accident that may
cause injury, or property damage.
• Do not leave the engine running
and the key in your vehicle with
unsupervised children. Unattended
children could operate the sunroof,
which could result in serious injury.
• Do not sit on the top of the vehicle. It
may cause injury or vehicle damage.
NOTICE
Do not operate the sunroof when the
roof bars are installed on the vehicle or
when there is luggage on the roof.
Power sunshade
ONX4050016
Use the power sunshade to block direct
sunlight coming through the sunroof
glass.
-Push the sunroof switch rearward to
the first detent position, the power
sunshade automatically slides open.
-Push the sunroof switch forward to
the first detent position, the power
sunshade automatically closes.
However, if the sunroof glass is open,
the glass will close first.
To stop the power sunshade at any point,
push the sunroof switch in any direction.
NOTICE
Do not pull or push the power sunshade
by hand as such action may damage
the power sunshade or cause it to
malfunction.
Information
Wrinkles formed on the power sunshade
are normal due to material characteristic.
PANORAMIC SUNROOF (IF EQUIPPED)
Page 207 of 638
05
5-63
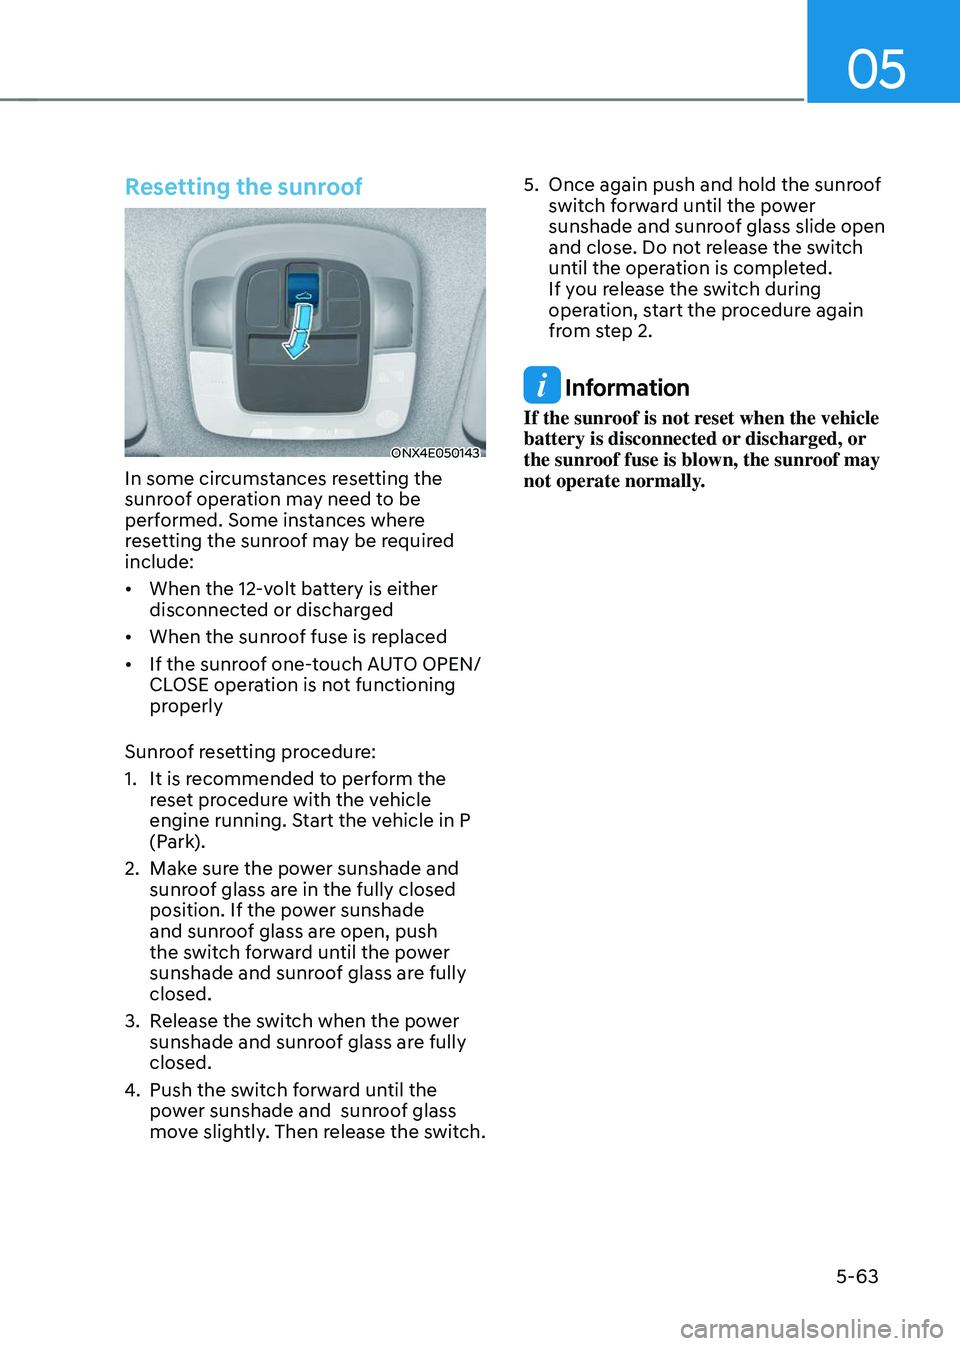
Resetting the sunroof
ONX4E050143
In some circumstances resetting the
sunroof operation may need to be
performed. Some instances where
resetting the sunroof may be required
include:
• When the 12-volt battery is either
disconnected or discharged
• When the sunroof fuse is replaced
• If the sunroof one-touch AUTO OPEN/
CLOSE operation is not functioning
properly
Sunroof resetting procedure:
1. It is recommended to perform the
reset procedure with the vehicle
engine running. Start the vehicle in P
(Park).
2. Make sure the power sunshade and
sunroof glass are in the fully closed
position. If the power sunshade
and sunroof glass are open, push
the switch forward until the power
sunshade and sunroof glass are fully
closed.
3. Release the switch when the power
sunshade and sunroof glass are fully
closed.
4. Push the switch forward until the
power sunshade and sunroof glass
move slightly. Then release the switch.
5. Once again push and hold the sunroof
switch forward until the power
sunshade and sunroof glass slide open
and close. Do not release the switch
until the operation is completed.
If you release the switch during
operation, start the procedure again
from step 2.
Information
If the sunroof is not reset when the vehicle
battery is disconnected or discharged, or
the sunroof fuse is blown, the sunroof may
not operate normally.
Page 209 of 638
05
5-65
Hood
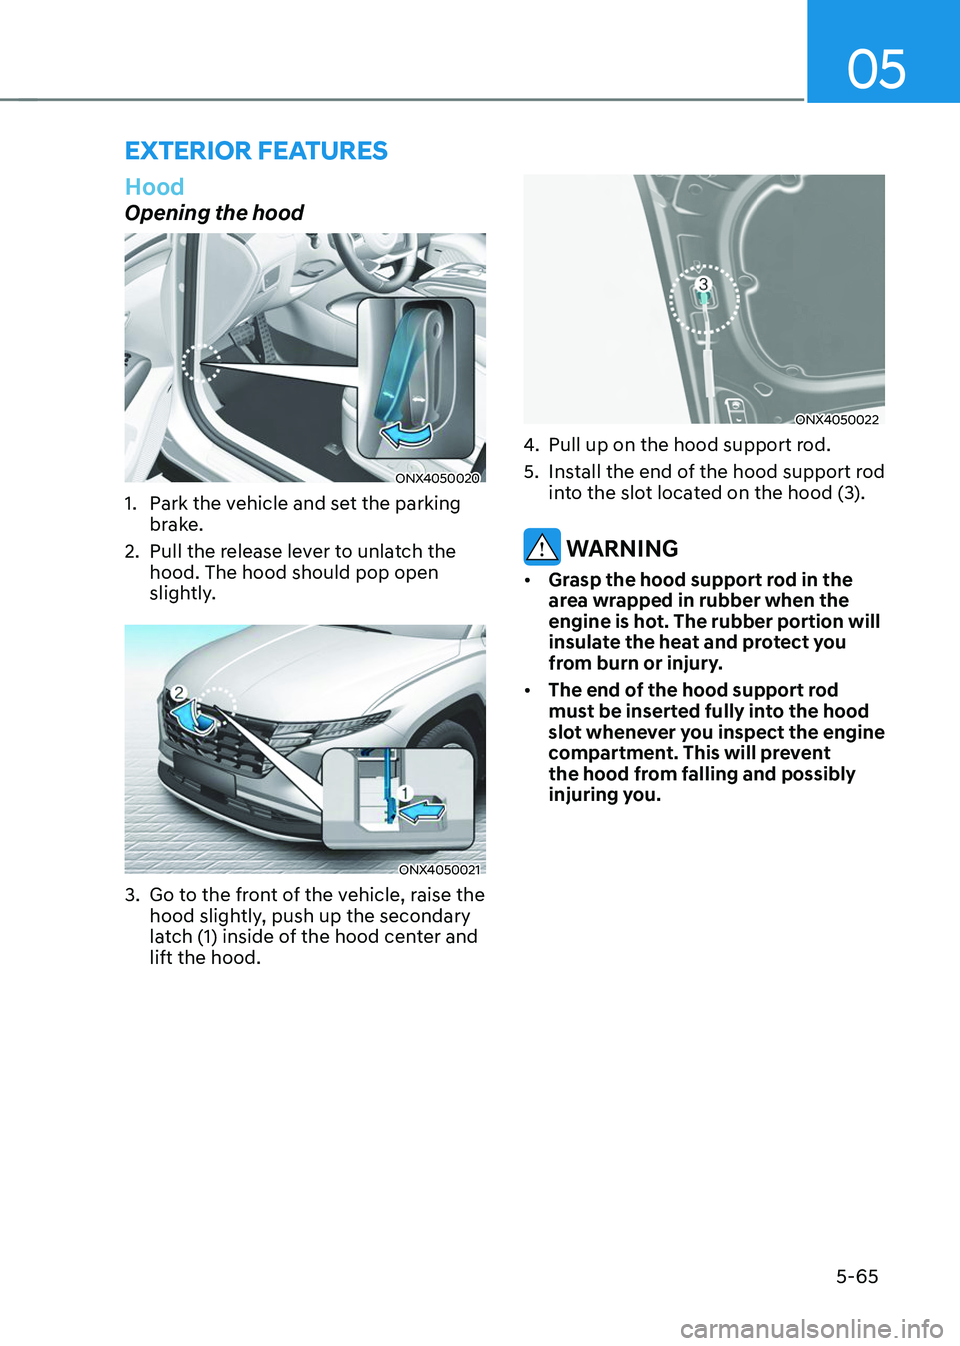
Opening the hood
ONX4050020
1. Park the vehicle and set the parking
brake.
2. Pull the release lever to unlatch the
hood. The hood should pop open
slightly.
ONX4050021
3. Go to the front of the vehicle, raise the
hood slightly, push up the secondary
latch (1) inside of the hood center and
lift the hood.
ONX4050022
4. Pull up on the hood support rod.
5. Install the end of the hood support rod
into the slot located on the hood (3).
WARNING
• Grasp the hood support rod in the
area wrapped in rubber when the
engine is hot. The rubber portion will
insulate the heat and protect you
from burn or injury.
• The end of the hood support rod
must be inserted fully into the hood
slot whenever you inspect the engine
compartment. This will prevent
the hood from falling and possibly
injuring you.
EXTERIOR FEATURES
Page 210 of 638
Convenient features
5-66
Closing the hood
1. Before closing the hood, check in and
around the engine compartment to
ensure the following:
-Any tools or other loose objects
are removed from the engine room
area or hood opening area
-All glove, rags, or other
combustible material is removed
from the engine compartment
-All filler caps are tightly and
correctly installed
2. Return the hood support rod to its clip
to prevent it from rattling.
3. Lower the hood until it is about 30 cm
(12in.) above the closed position and
let it drop. Make sure that it locks into
place.
4. Check that the hood has engaged
properly. If the hood can be raised
slightly, it is not properly engaged.
Open it again and close it with a little
more force.
WARNING
• Before closing the hood, ensure
all obstructions are removed from
around the hood opening.
• Always double check to be sure that
the hood is firmly latched before
driving away. Check there is no
hood open warning light or message
displayed on the instrument cluster.
Driving with the hood opened may
cause a total loss of visibility, which
might result in an accident.
• Do not move the vehicle with the
hood in the raised position, as vision
is obstructed, which might result in
an accident, and the hood could fall
or be damaged.
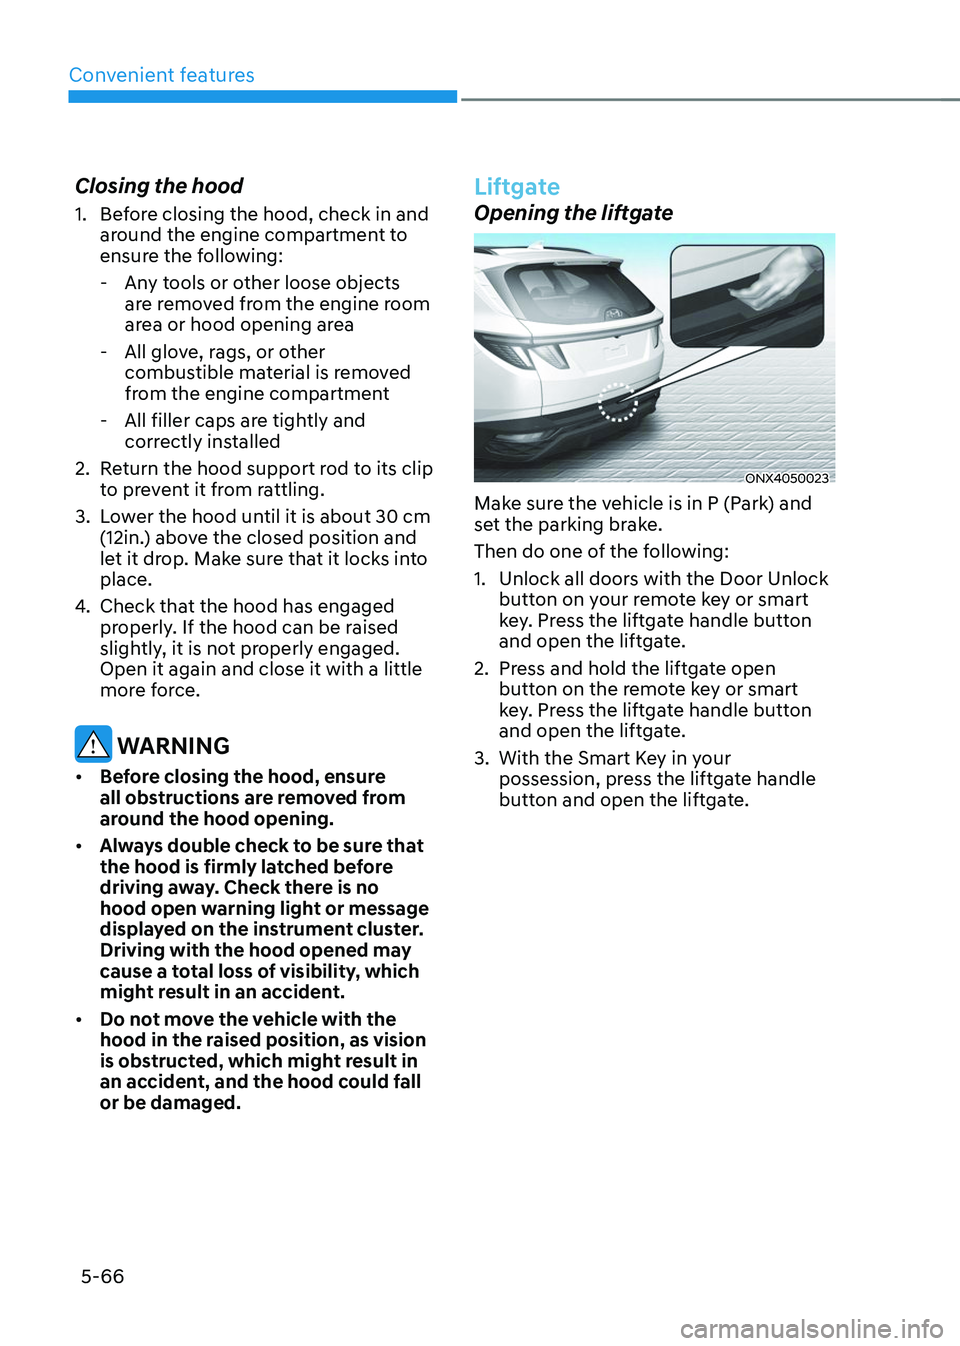
Liftgate
Opening the liftgate
ONX4050023
Make sure the vehicle is in P (Park) and
set the parking brake.
Then do one of the following:
1. Unlock all doors with the Door Unlock
button on your remote key or smart
key. Press the liftgate handle button
and open the liftgate.
2. Press and hold the liftgate open
button on the remote key or smart
key. Press the liftgate handle button
and open the liftgate.
3. With the Smart Key in your
possession, press the liftgate handle
button and open the liftgate.
Page 218 of 638
Convenient features
5 -74
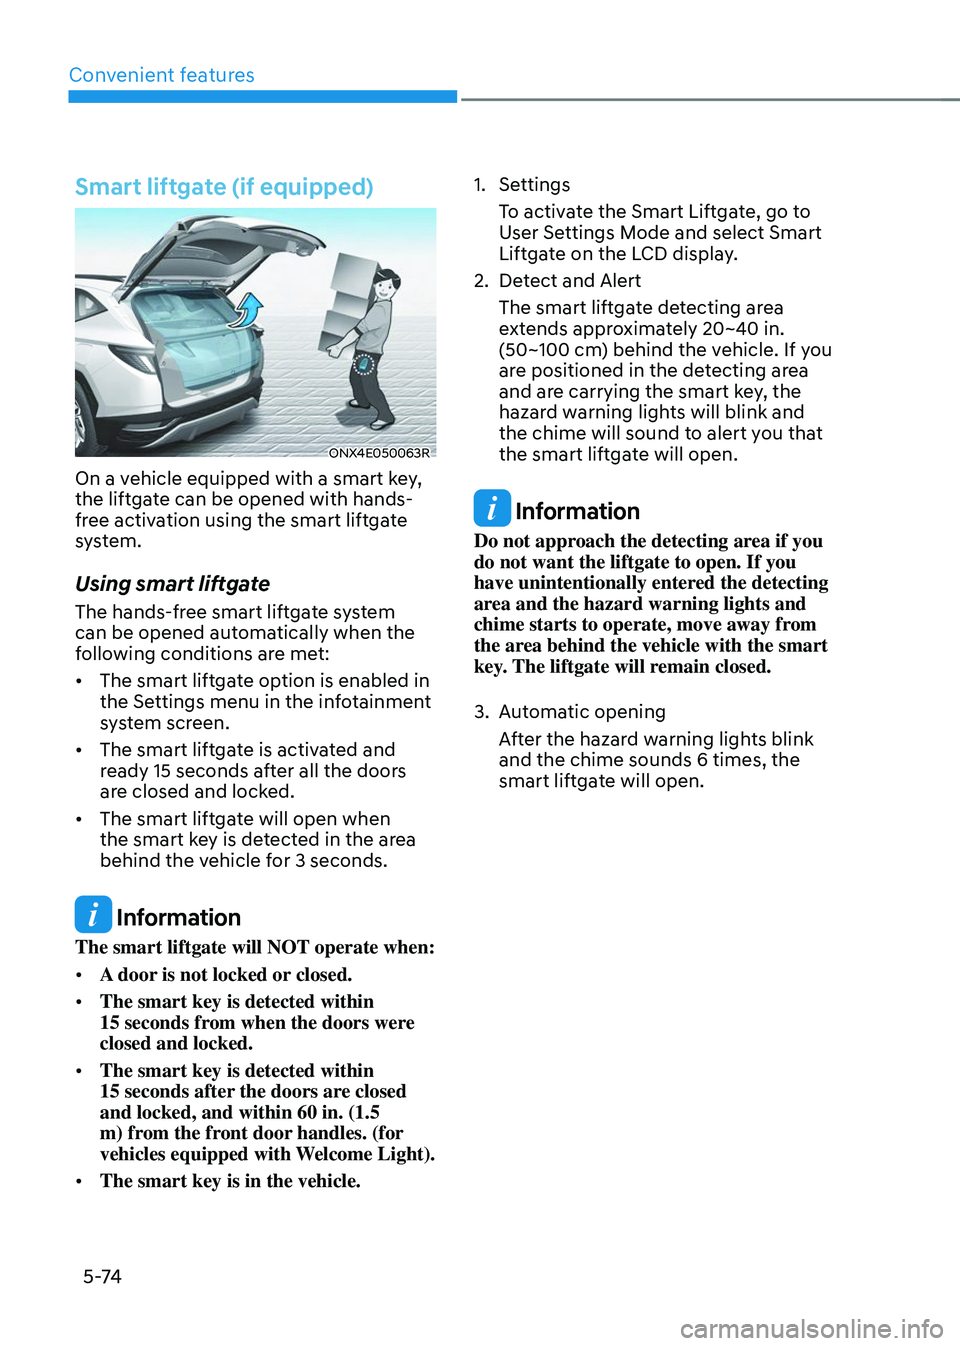
Smart liftgate (if equipped)
ONX4E050063R
On a vehicle equipped with a smart key,
the liftgate can be opened with hands-
free activation using the smart liftgate
system.
Using smart liftgate
The hands-free smart liftgate system
can be opened automatically when the
following conditions are met:
• The smart liftgate option is enabled in
the Settings menu in the infotainment
system screen.
• The smart liftgate is activated and
ready 15 seconds after all the doors
are closed and locked.
• The smart liftgate will open when
the smart key is detected in the area
behind the vehicle for 3 seconds.
Information
The smart liftgate will NOT operate when:
• A door is not locked or closed.
• The smart key is detected within
15 seconds from when the doors were closed and locked.
• The smart key is detected within
15 seconds after the doors are closed and locked, and within 60 in. (1.5
m) from the front door handles. (for
vehicles equipped with Welcome Light).
• The smart key is in the vehicle.
1. Settings
To activate the Smart Liftgate, go to
User Settings Mode and select Smart
Liftgate on the LCD display.
2. Detect and Alert
The smart liftgate detecting area
extends approximately 20~40 in.
(50~100 cm) behind the vehicle. If you
are positioned in the detecting area
and are carrying the smart key, the
hazard warning lights will blink and
the chime will sound to alert you that
the smart liftgate will open.
Information
Do not approach the detecting area if you
do not want the liftgate to open. If you
have unintentionally entered the detecting
area and the hazard warning lights and
chime starts to operate, move away from
the area behind the vehicle with the smart
key. The liftgate will remain closed.
3. Automatic opening
After the hazard warning lights blink
and the chime sounds 6 times, the
smart liftgate will open.
Page 219 of 638
05
5-75
Deactivating smart liftgate
„„Type A„„Type B
OTMA050009OTMA050010
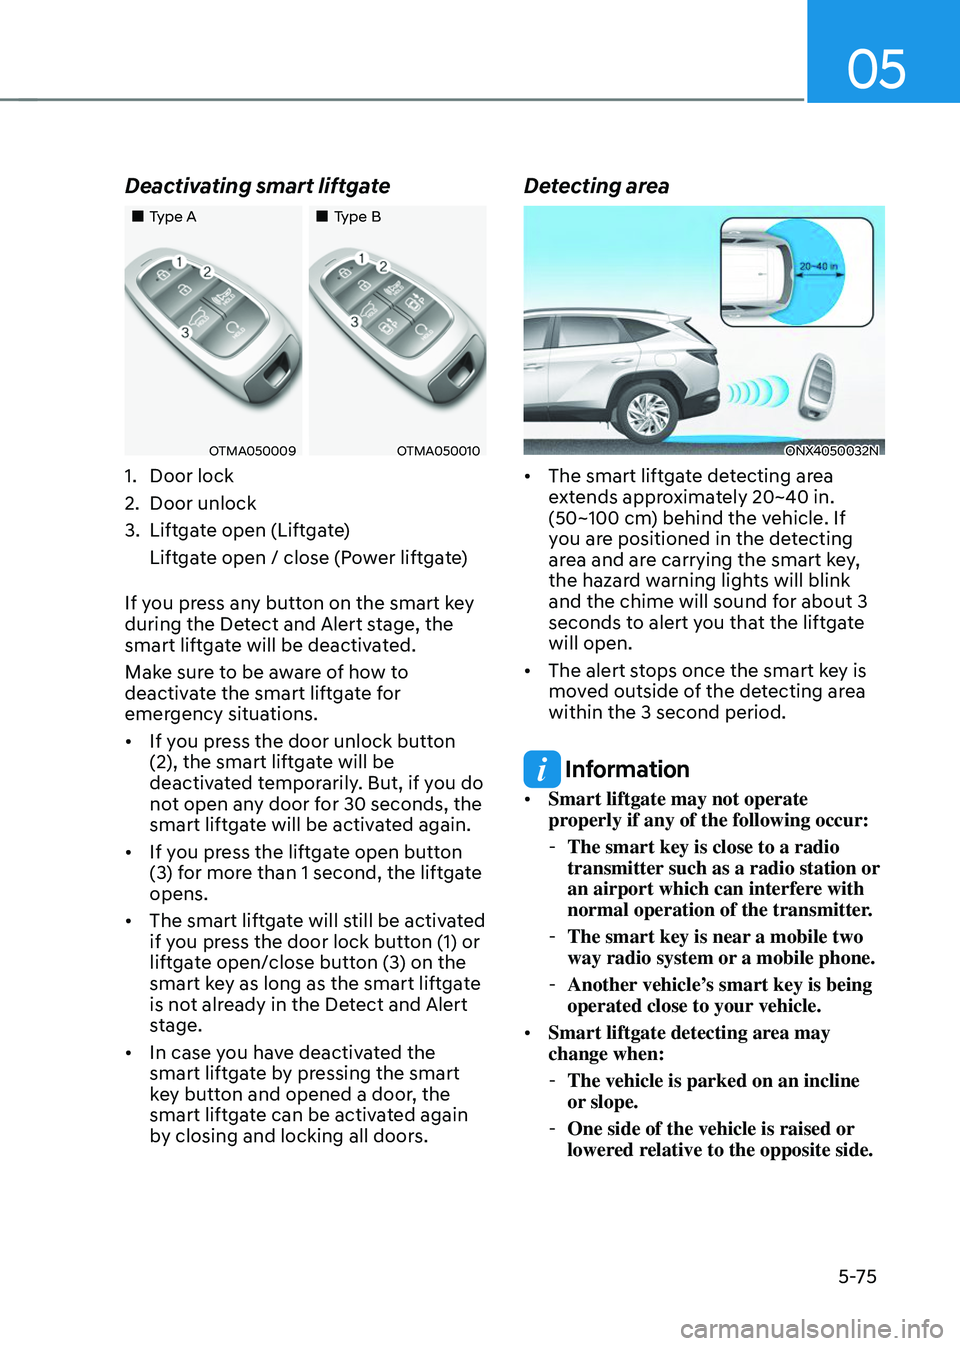
1. Door lock
2. Door unlock
3. Liftgate open (Liftgate)
Liftgate open / close (Power liftgate)
If you press any button on the smart key
during the Detect and Alert stage, the
smart liftgate will be deactivated.
Make sure to be aware of how to
deactivate the smart liftgate for
emergency situations.
• If you press the door unlock button
(2), the smart liftgate will be
deactivated temporarily. But, if you do
not open any door for 30 seconds, the
smart liftgate will be activated again.
• If you press the liftgate open button
(3) for more than 1 second, the liftgate
opens.
• The smart liftgate will still be activated
if you press the door lock button (1) or
liftgate open/close button (3) on the
smart key as long as the smart liftgate
is not already in the Detect and Alert
stage.
• In case you have deactivated the
smart liftgate by pressing the smart
key button and opened a door, the
smart liftgate can be activated again
by closing and locking all doors.
Detecting area
ONX4050032N
• The smart liftgate detecting area
extends approximately 20~40 in.
(50~100 cm) behind the vehicle. If
you are positioned in the detecting
area and are carrying the smart key,
the hazard warning lights will blink
and the chime will sound for about 3
seconds to alert you that the liftgate
will open.
• The alert stops once the smart key is
moved outside of the detecting area
within the 3 second period.
Information
• Smart liftgate may not operate
properly if any of the following occur:
-The smart key is close to a radio
transmitter such as a radio station or
an airport which can interfere with
normal operation of the transmitter.
-The smart key is near a mobile two
way radio system or a mobile phone.
-Another vehicle’s smart key is being
operated close to your vehicle.
• Smart liftgate detecting area may
change when:
-The vehicle is parked on an incline
or slope.
-One side of the vehicle is raised or
lowered relative to the opposite side.
Page 220 of 638
Convenient features
5 -76
Fuel filler door
Opening the fuel filler door
ONX4E050033
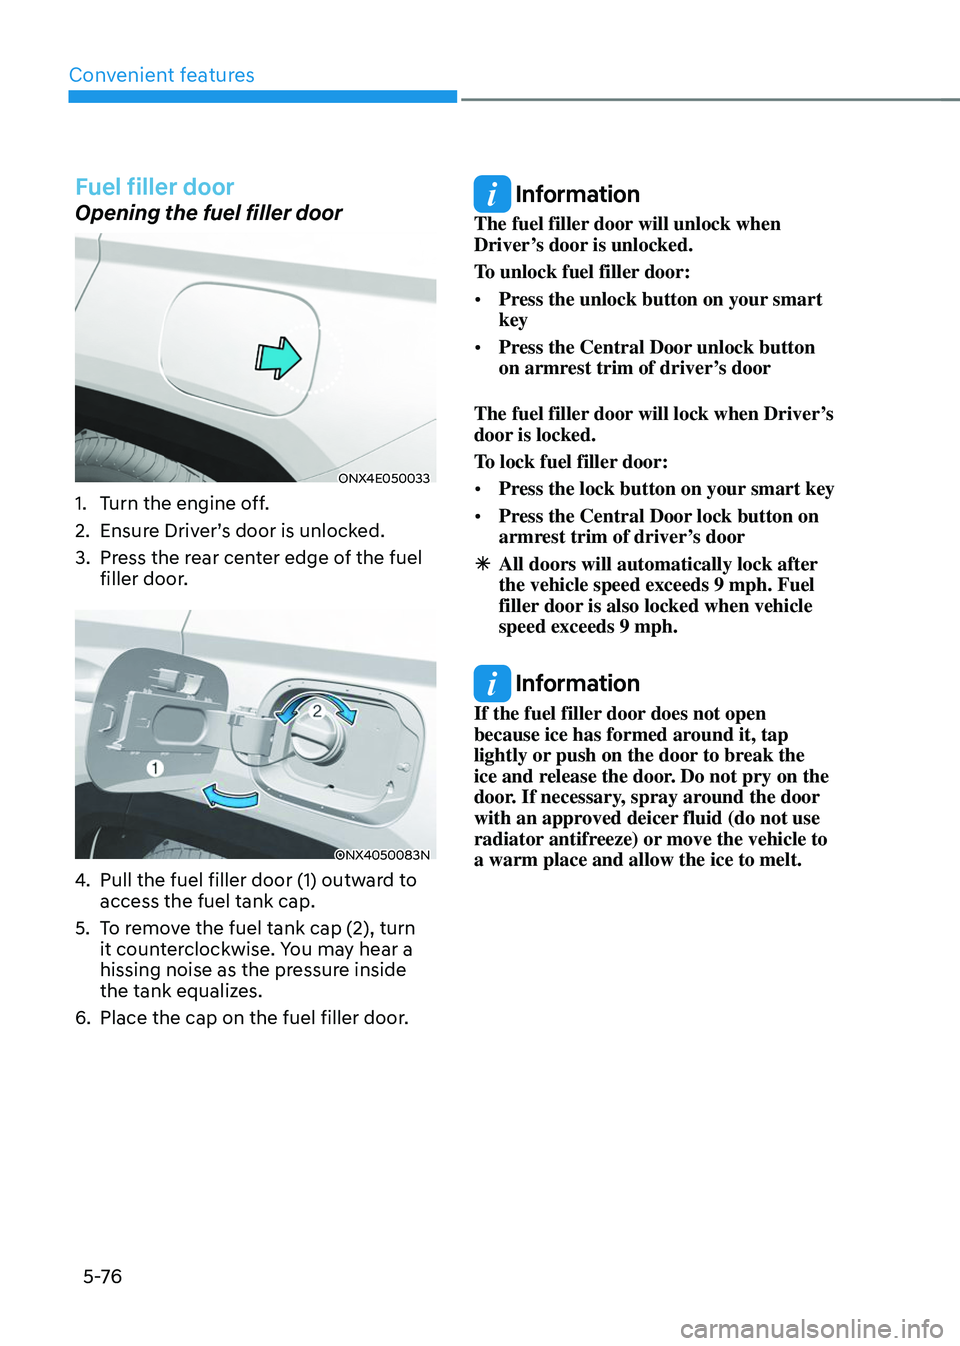
1. Turn the engine off.
2. Ensure Driver’s door is unlocked.
3. Press the rear center edge of the fuel
filler door.
ONX4050083N
4. Pull the fuel filler door (1) outward to
access the fuel tank cap.
5. To remove the fuel tank cap (2), turn
it counterclockwise. You may hear a
hissing noise as the pressure inside
the tank equalizes.
6. Place the cap on the fuel filler door.
Information
The fuel filler door will unlock when
Driver’s door is unlocked.
To unlock fuel filler door:
• Press the unlock button on your smart
key
• Press the Central Door unlock button
on armrest trim of driver’s door
The fuel filler door will lock when Driver’s
door is locked.
To lock fuel filler door:
• Press the lock button on your smart key
• Press the Central Door lock button on
armrest trim of driver’s door
ÃAll doors will automatically lock after
the vehicle speed exceeds 9 mph. Fuel
filler door is also locked when vehicle
speed exceeds 9 mph.
Information
If the fuel filler door does not open
because ice has formed around it, tap
lightly or push on the door to break the
ice and release the door. Do not pry on the
door. If necessary, spray around the door
with an approved deicer fluid (do not use
radiator antifreeze) or move the vehicle to
a warm place and allow the ice to melt.