buttons HYUNDAI TUCSON 2023 Owners Manual
[x] Cancel search | Manufacturer: HYUNDAI, Model Year: 2023, Model line: TUCSON, Model: HYUNDAI TUCSON 2023Pages: 638, PDF Size: 26.51 MB
Page 20 of 638
2-8
Vehicle Information, Consumer Information and Reporting Safety Defects
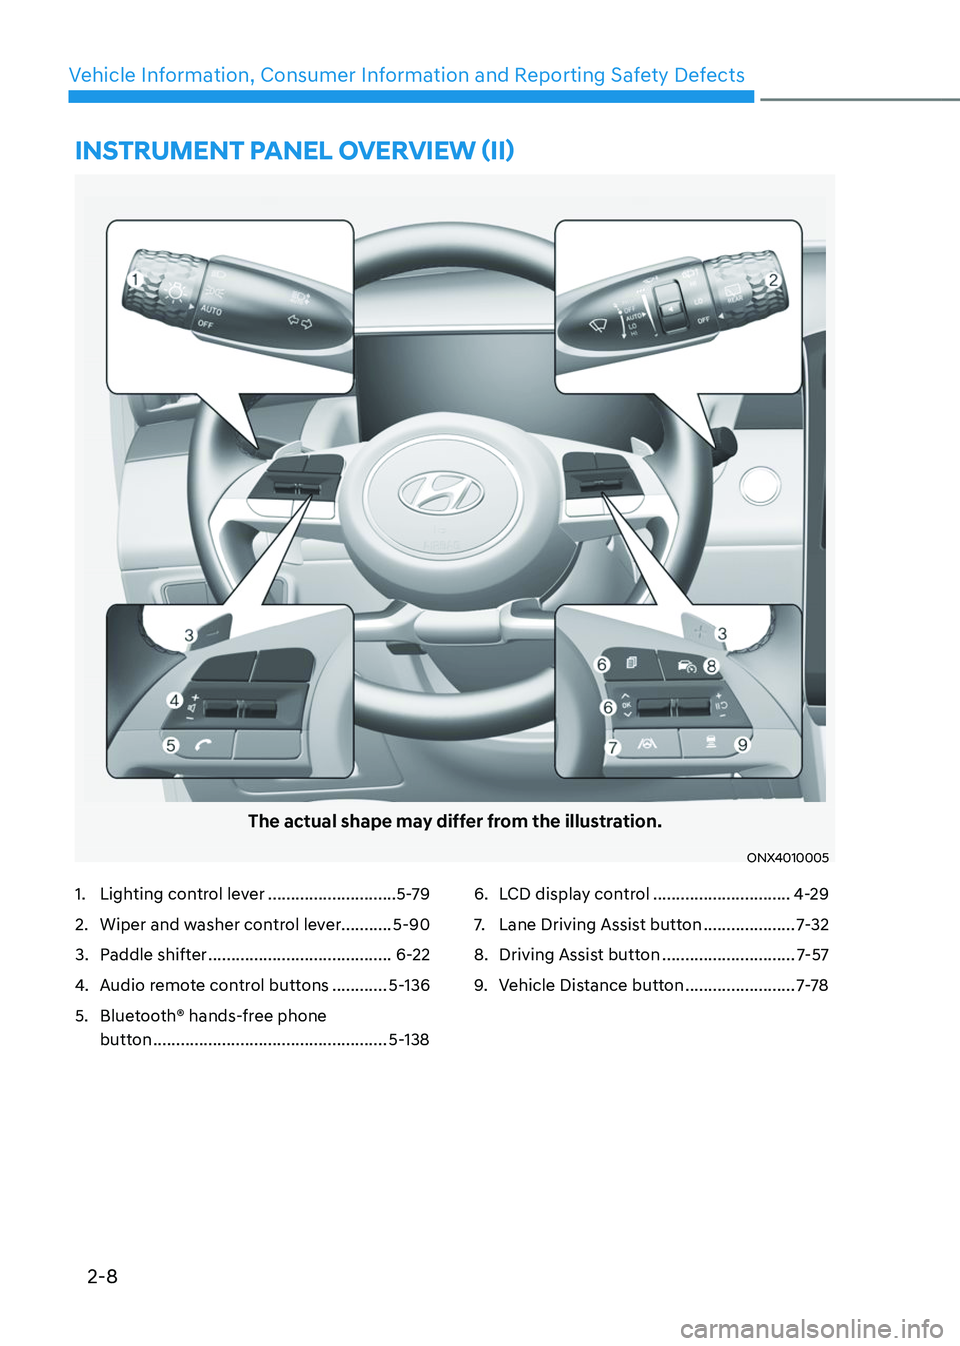
The actual shape may differ from the illustration.
ONX4010005
1. Lighting control lever ............................5-79
2. Wiper and washer control lever...........5-90
3. Paddle shifter ........................................6-22
4. Audio remote control buttons ............5-136
5. Bluetooth® hands-free phone
button
...................................................5-138
6. LCD display control ..............................4-29
7. Lane Driving Assist button ....................7-32
8. Driving Assist button .............................7-57
9. Vehicle Distance button ........................7-7 8
INSTRUMENT PANEL OVERVIEW (II)
Page 127 of 638
04
4-29
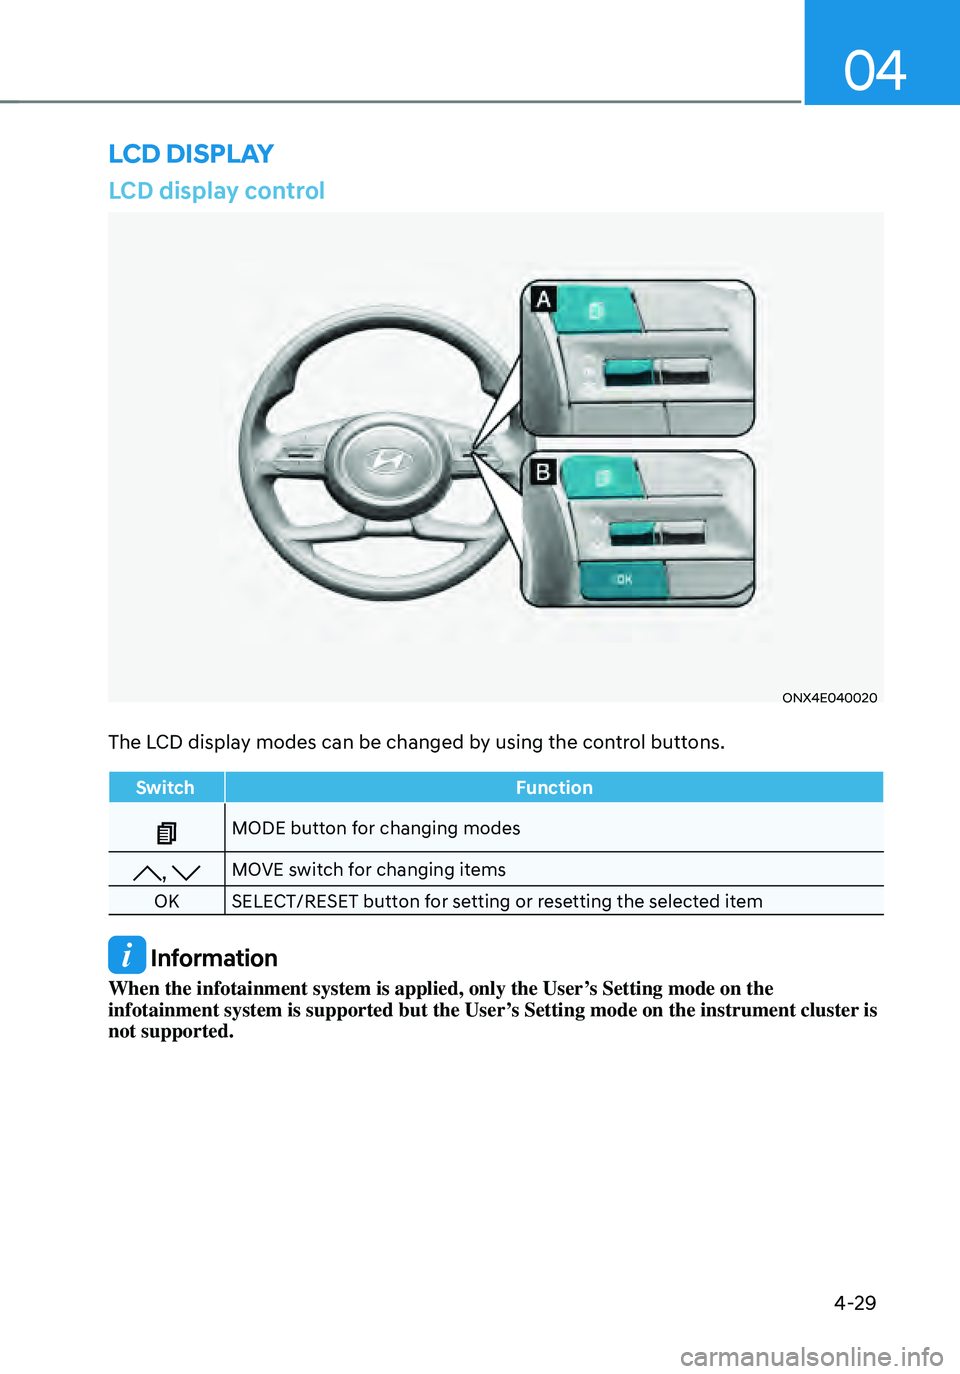
LCD display control
ONX4E040020
The LCD display modes can be changed by using the control buttons.
SwitchFunction
MODE button for changing modes
, MOVE switch for changing items
OK SELECT/RESET button for setting or resetting the selected item
Information
When the infotainment system is applied, only the User’s Setting mode on the
infotainment system is supported but the User’s Setting mode on the instrument cluster is
not supported.
LCD DISPLAY
Page 165 of 638
05
5-21
Remote Start with Digital Key
• Using the Hyundai Digital Key app
on your phone, press the Door Lock
button and then press the Remote
Start button (buttons must be pressed
within about 4 seconds). If all the
doors of your vehicle are closed
(including the hood and the liftgate),
the engine will be automatically
started.
Note that when the remote start
feature is activated, the hazard
warning lights will blink two times
and a chime will sound before engine
startup. Also note the following:
• The climate control system will come
on using the same settings from when
you last used the vehicle
• To turn off the engine, press the
Remote Engine Stop button within the
Hyundai Digital Key app.
• The engine will remain running for
approximately 10 minutes, and then
engine will automatically shut OFF.
• To keep the engine running, access
the vehicle and place the smartphone
on the wireless charging pad
(authentication pad) while the engine
is still in remote engine-ON mode.
For more information, refer to the Engine
Start/Stop button in chapter 6. Vehicle information Display
The digital key application displays
the vehicle information such as
driving or door conditions through the
communication with the vehicle.
•
How to check : Select the vehicle
what you want to check and touch
the vehicle image, then vehicle
information display page will be
shown.
• Contents : accumulated odometer,
latest fuel economy, driving range,
fuel remaining, tire pressure, doors
lock/unlock status and last data
updated time.
ÃNote that displayed vehicle data may
be slightly different from the current
vehicle condition
ÃFor more information, please refer to
the ‘Tutorial’ on your Digital key app.
Page 181 of 638
05
5-37
ONX4050007
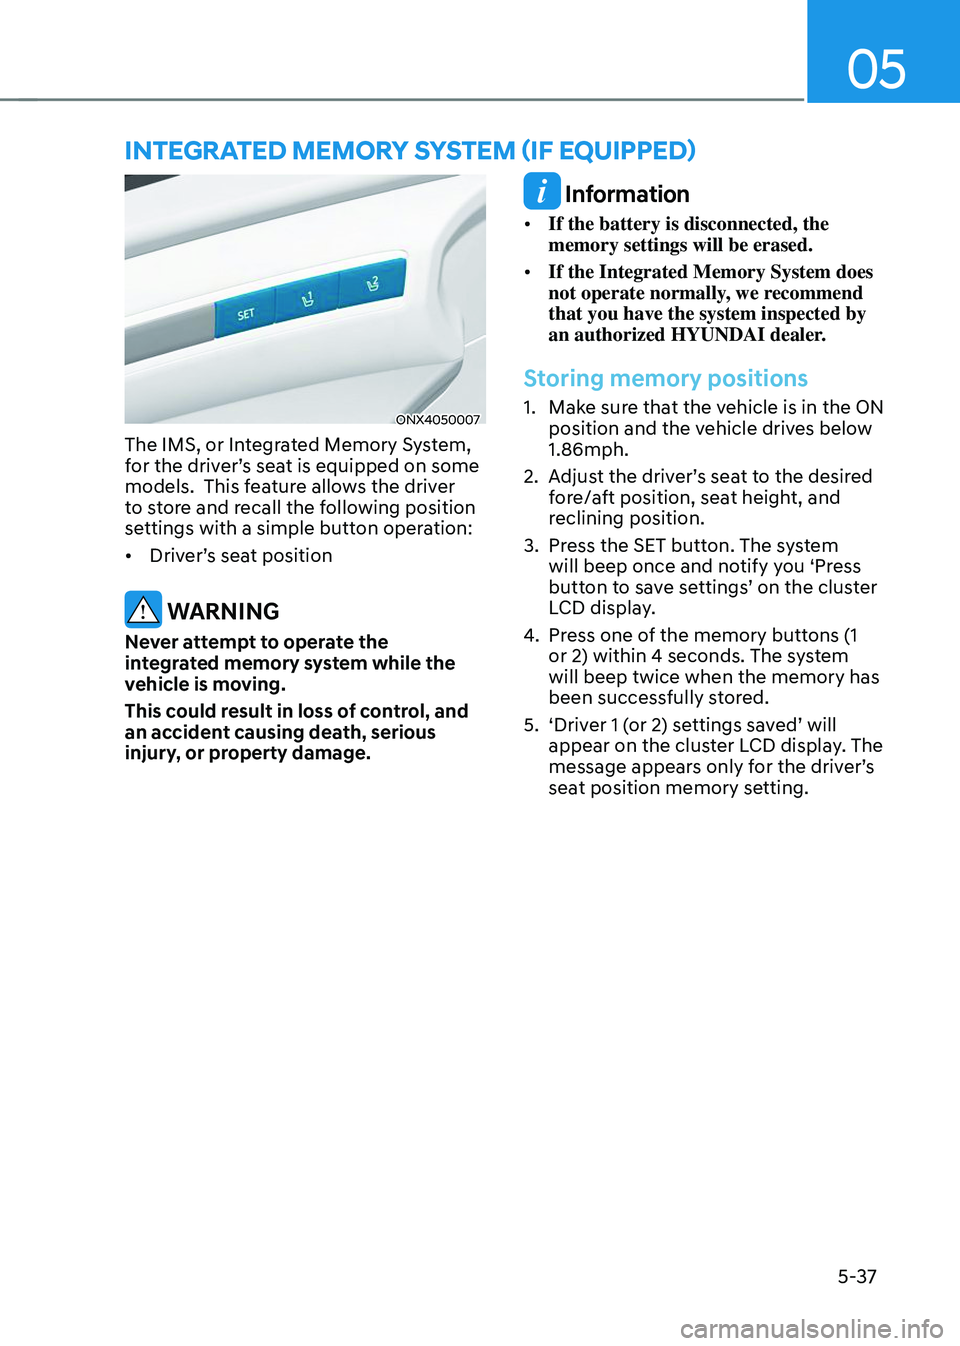
The IMS, or Integrated Memory System,
for the driver’s seat is equipped on some
models. This feature allows the driver
to store and recall the following position
settings with a simple button operation:
• Driver’s seat position
WARNING
Never attempt to operate the
integrated memory system while the
vehicle is moving.
This could result in loss of control, and
an accident causing death, serious
injury, or property damage.
Information
• If the battery is disconnected, the
memory settings will be erased.
• If the Integrated Memory System does
not operate normally, we recommend
that you have the system inspected by
an authorized HYUNDAI dealer.
Storing memory positions
1. Make sure that the vehicle is in the ON
position and the vehicle drives below
1.86mph.
2. Adjust the driver’s seat to the desired
fore/aft position, seat height, and
reclining position.
3. Press the SET button. The system
will beep once and notify you ‘Press
button to save settings’ on the cluster
LCD display.
4. Press one of the memory buttons (1
or 2) within 4 seconds. The system
will beep twice when the memory has
been successfully stored.
5. ‘Driver 1 (or 2) settings saved’ will
appear on the cluster LCD display. The
message appears only for the driver’s
seat position memory setting.
INTEGRATED MEMORY SYSTEM (IF EQUIPPED)
Page 189 of 638
05
5-45
Integrated HomeLink® Wireless Control
System
The HomeLink® Wireless Control System
provides a convenient way to replace
up to three hand held radio-frequency
transmitters used to activate compatible
devices such as gate operators, garage
door openers, entry door locks, security
systems, and home lighting.
NOTICE
HomeLink® operates while the ignition
switch is in the ACC or ON position
for safety reasons. It is to prevent
unintentional security problems from
happening when the vehicle is parked
outside the garage.
WARNING
Before programming HomeLink® to a
garage door opener or gate operator,
make sure people and objects are out
of the way of the device to prevent
potential harm or damage. Do not
use the HomeLink® with any garage
door opener that lacks the safety
stop and reverse features required
by U.S. federal safety standards (this
includes any garage door opener model
manufactured before April 1, 1982).
A garage door that cannot detect an
object - signaling the door to stop and
reverse - does not meet current U.S.
federal safety standards. Using a garage
door opener without these features
increases the risk of serious injury or
death.
For more information, contact
HomeLink® at www.homelink.com, or
call Home-Link customer support at
1-800-355-3515.
It is also recommended that a new
battery be replaced in the handheld
transmitter of the device being trained
to HomeLink® for quicker training and
accurate transmission of the radio
frequency. 1. Programming HomeLink
®
The following steps show how to
program HomeLink. If you have any
questions or are having difficulty
programming your HomeLink buttons,
refer to the HomeLink website or call the
HomeLink customer support toll-free
number. Do this before going back to the
dealer who sold you the car.
•
Visit the HomeLink website at: www.
homelink.com. Then at the top of the
page, choose your vehicle make. Then
watch the You Tube video, and/or
access additional website information.
• If you choose to access the website
via your cell phone, scan the QR code.
• Or call HomeLink customer support
at 1-800-355-3515 (Please have the
vehicle make/model and the opener
device make/model readily available.)
Page 190 of 638
Convenient features
5-46
1) Programming Preparation
ODN8H050340N
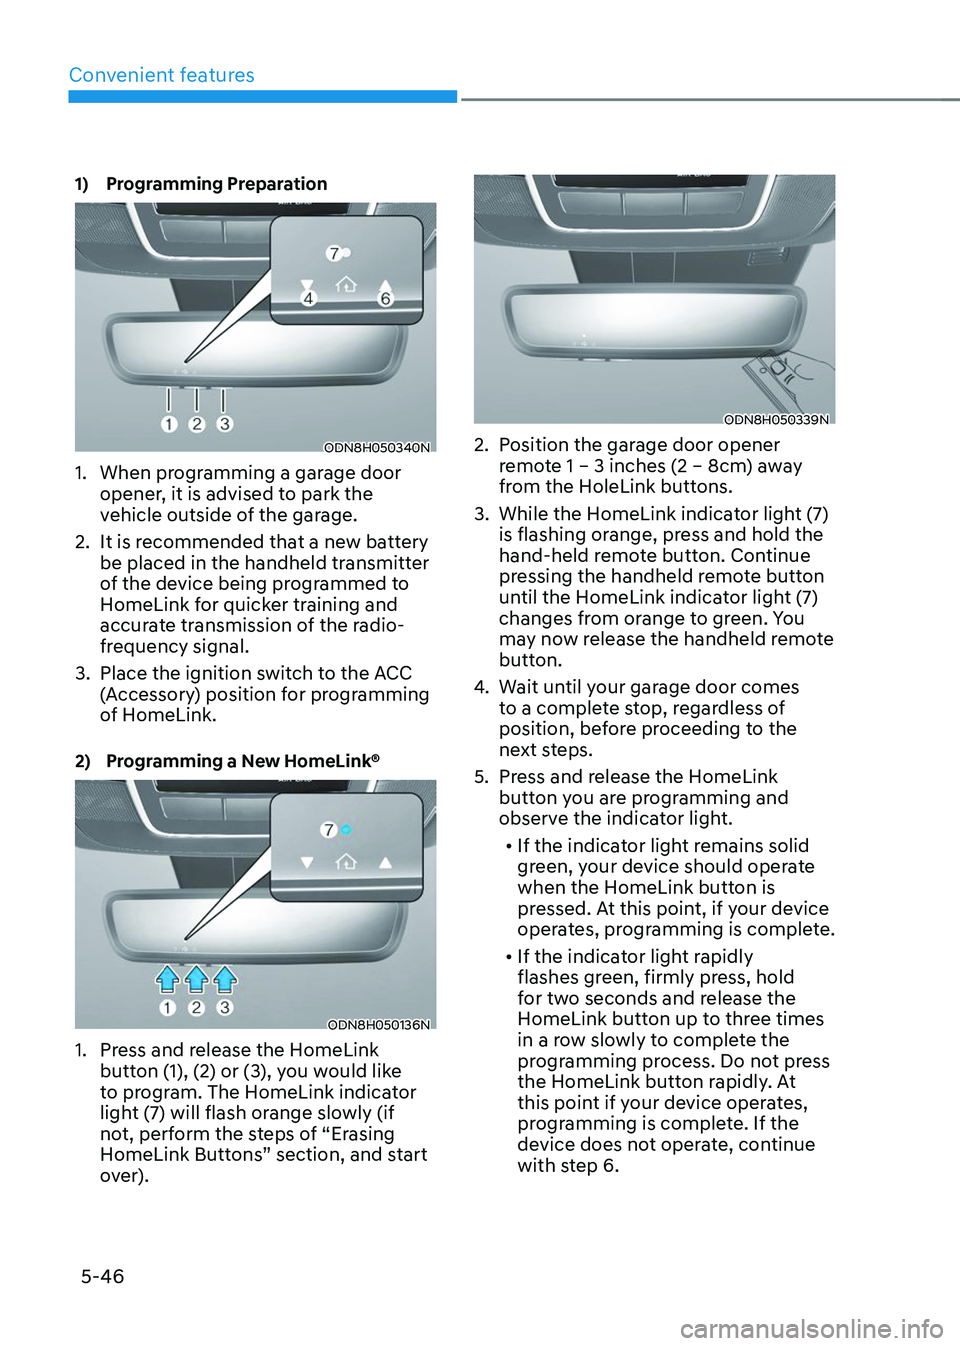
1. When programming a garage door
opener, it is advised to park the
vehicle outside of the garage.
2. It is recommended that a new battery
be placed in the handheld transmitter
of the device being programmed to
HomeLink for quicker training and
accurate transmission of the radio-
frequency signal.
3. Place the ignition switch to the ACC
(Accessory) position for programming
of HomeLink.
2) Programming a New HomeLink®
ODN8H050136N
1. Press and release the HomeLink
button (1), (2) or (3), you would like
to program. The HomeLink indicator
light (7) will flash orange slowly (if
not, perform the steps of “Erasing
HomeLink Buttons” section, and start
over).
ODN8H050339N
2. Position the garage door opener
remote 1 – 3 inches (2 – 8cm) away
from the HoleLink buttons.
3. While the HomeLink indicator light (7)
is flashing orange, press and hold the
hand-held remote button. Continue
pressing the handheld remote button
until the HomeLink indicator light (7)
changes from orange to green. You
may now release the handheld remote
button.
4. Wait until your garage door comes
to a complete stop, regardless of
position, before proceeding to the
next steps.
5. Press and release the HomeLink
button you are programming and
observe the indicator light.• If the indicator light remains solid
green, your device should operate
when the HomeLink button is
pressed. At this point, if your device
operates, programming is complete.
• If the indicator light rapidly
flashes green, firmly press, hold
for two seconds and release the
HomeLink button up to three times
in a row slowly to complete the
programming process. Do not press
the HomeLink button rapidly. At
this point if your device operates,
programming is complete. If the
device does not operate, continue
with step 6.
Page 191 of 638
05
5-47
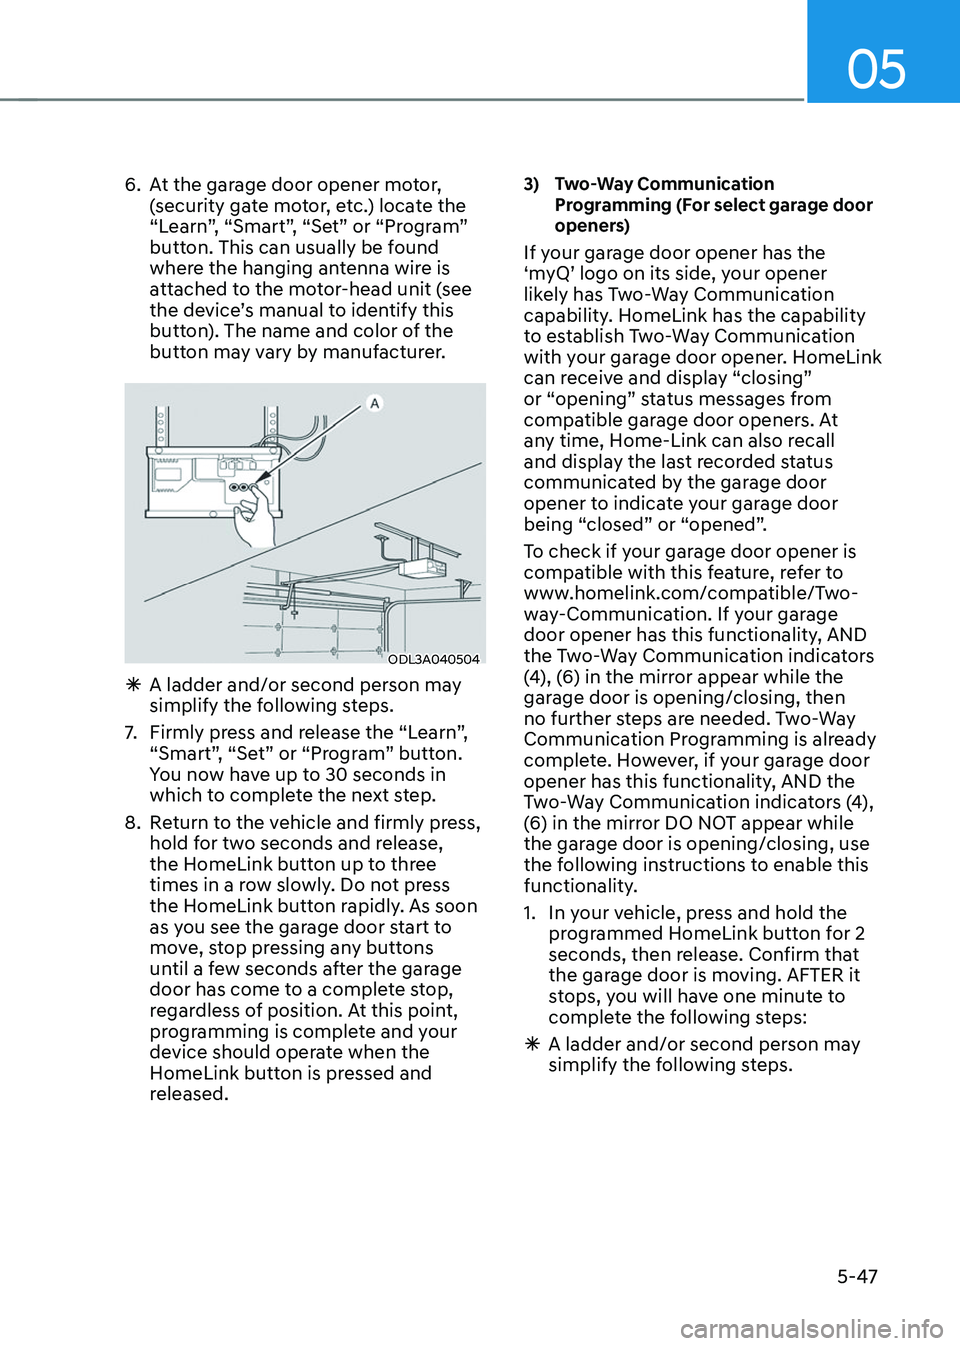
6. At the garage door opener motor,
(security gate motor, etc.) locate the
“Learn”, “Smart”, “Set” or “Program”
button. This can usually be found
where the hanging antenna wire is
attached to the motor-head unit (see
the device’s manual to identify this
button). The name and color of the
button may vary by manufacturer.
ODL3A040504
ÃA ladder and/or second person may
simplify the following steps.
7. Firmly press and release the “Learn”,
“Smart”, “Set” or “Program” button.
You now have up to 30 seconds in
which to complete the next step.
8. Return to the vehicle and firmly press,
hold for two seconds and release,
the HomeLink button up to three
times in a row slowly. Do not press
the HomeLink button rapidly. As soon
as you see the garage door start to
move, stop pressing any buttons
until a few seconds after the garage
door has come to a complete stop,
regardless of position. At this point,
programming is complete and your
device should operate when the
HomeLink button is pressed and
released.
3) Two-Way Communication Programming (For select garage door
openers)
If your garage door opener has the
‘myQ’ logo on its side, your opener
likely has Two-Way Communication
capability. HomeLink has the capability
to establish Two-Way Communication
with your garage door opener. HomeLink
can receive and display “closing”
or “opening” status messages from
compatible garage door openers. At
any time, Home-Link can also recall
and display the last recorded status
communicated by the garage door
opener to indicate your garage door
being “closed” or “opened”.
To check if your garage door opener is
compatible with this feature, refer to
www.homelink.com/compatible/Two-
way-Communication. If your garage
door opener has this functionality, AND
the Two-Way Communication indicators
(4), (6) in the mirror appear while the
garage door is opening/closing, then
no further steps are needed. Two-Way
Communication Programming is already
complete. However, if your garage door
opener has this functionality, AND the
Two-Way Communication indicators (4),
(6) in the mirror DO NOT appear while
the garage door is opening/closing, use
the following instructions to enable this
functionality.
1. In your vehicle, press and hold the
programmed HomeLink button for 2
seconds, then release. Confirm that
the garage door is moving. AFTER it
stops, you will have one minute to
complete the following steps:
ÃA ladder and/or second person may
simplify the following steps.
Page 193 of 638
05
5-49
2. Operating HomeLink®
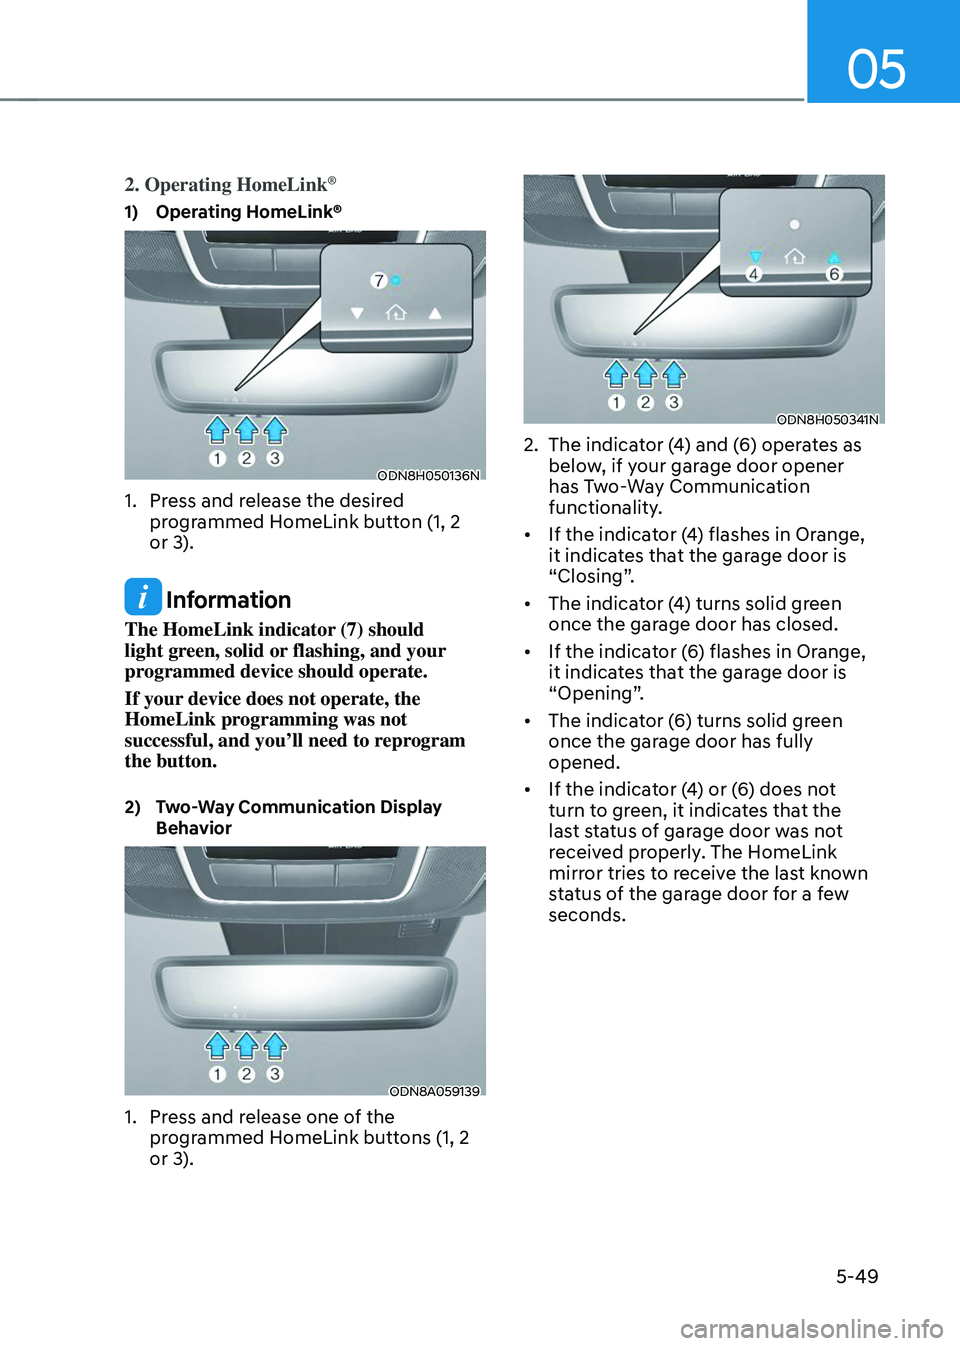
1) Operating HomeLink®
ODN8H050136N
1. Press and release the desired
programmed HomeLink button (1, 2
or 3).
Information
The HomeLink indicator (7) should
light green, solid or flashing, and your
programmed device should operate.
If your device does not operate, the
HomeLink programming was not
successful, and you’ll need to reprogram
the button.
2) Two-Way Communication Display Behavior
ODN8A059139
1. Press and release one of the
programmed HomeLink buttons (1, 2
or 3).
ODN8H050341N
2. The indicator (4) and (6) operates as
below, if your garage door opener
has Two-Way Communication
functionality.
• If the indicator (4) flashes in Orange,
it indicates that the garage door is
“Closing”.
• The indicator (4) turns solid green
once the garage door has closed.
• If the indicator (6) flashes in Orange,
it indicates that the garage door is
“Opening”.
• The indicator (6) turns solid green
once the garage door has fully
opened.
• If the indicator (4) or (6) does not
turn to green, it indicates that the
last status of garage door was not
received properly. The HomeLink
mirror tries to receive the last known
status of the garage door for a few
seconds.
Page 194 of 638
Convenient features
5-50
3) Recalling Garage Door Status
HomeLink mirror with Two-Way
Communication provides a way to view
the last stored message from the garage
door opener. In order to recall the last
known status of the last activated device,
press the buttons “1 and 2” OR “2 and 3”
simultaneously.
• If the indicator (4) appears solid
Green, it indicates that the last
activated device was “closed”
properly.
• If the indicator (6) appears solid
Green, it indicates that the last
activated device was “open” properly.
3. Erasing HomeLink® Buttons
1) Erasing and Reprogramming a Single HomeLink® Button:
1. Press and hold the desired HomeLink
button you want to re-program. DO
NOT release the button.
2. The HomeLink indicator light (7) will
illuminate solid green. Release the
button as soon as the HomeLink
indicator light (7) begins to flash
orange, usually about 20 seconds.
3. Proceed with the steps in the
“Programming a New HomeLink
Button” section.
Information
If you do not complete the re-
programming of a new device to the
button, it will revert to the previously
stored programming.
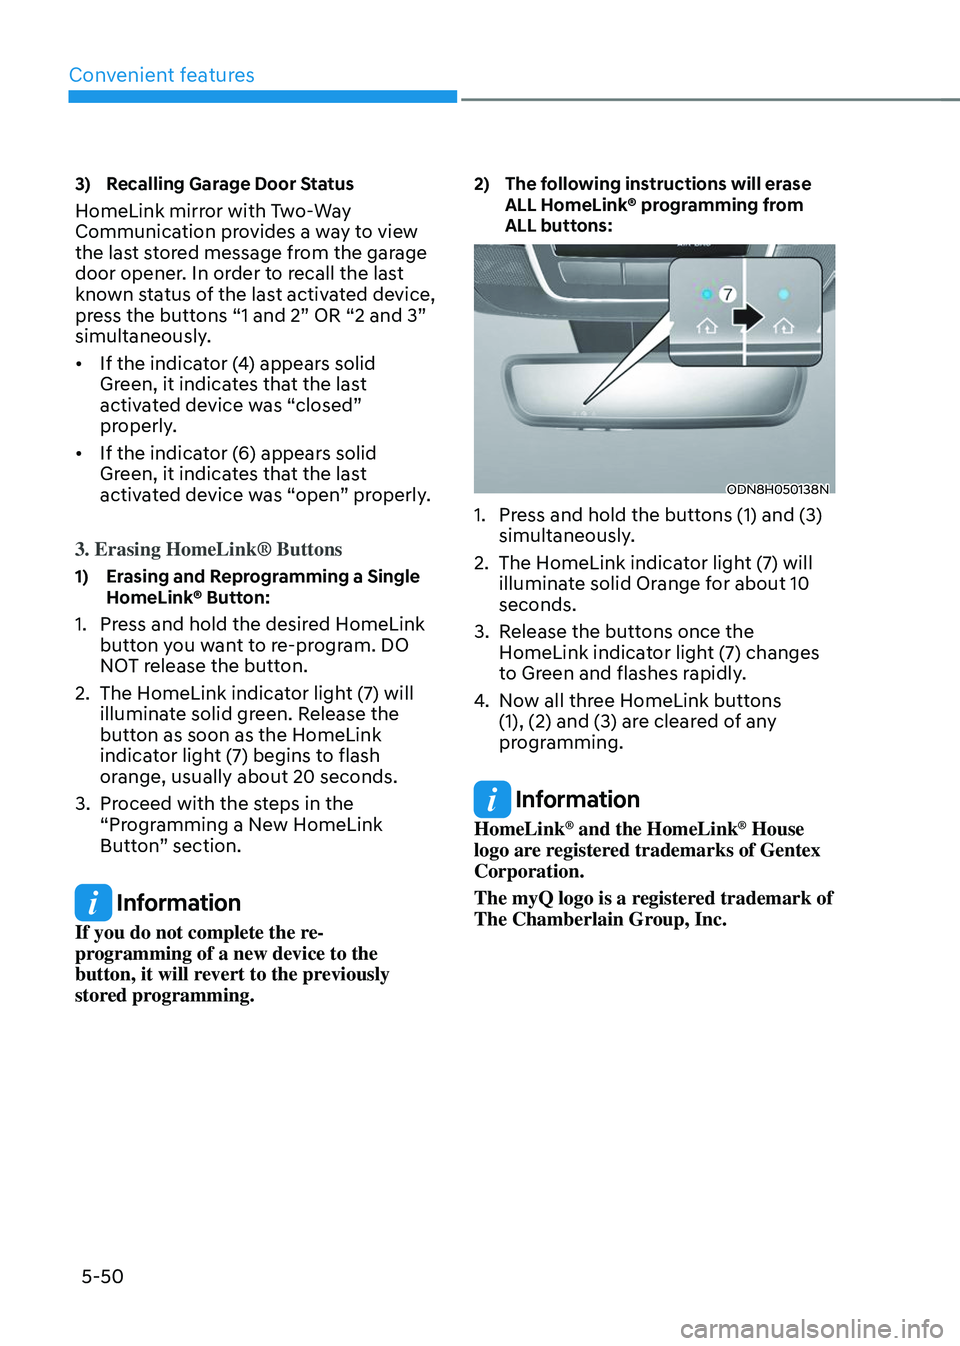
2) The following instructions will erase ALL HomeLink® programming from
ALL buttons:
ODN8H050138N
1. Press and hold the buttons (1) and (3)
simultaneously.
2. The HomeLink indicator light (7) will
illuminate solid Orange for about 10
seconds.
3. Release the buttons once the
HomeLink indicator light (7) changes
to Green and flashes rapidly.
4. Now all three HomeLink buttons
(1), (2) and (3) are cleared of any
programming.
Information
HomeLink® and the HomeLink® House
logo are registered trademarks of Gentex
Corporation.
The myQ logo is a registered trademark of
The Chamberlain Group, Inc.
Page 215 of 638
05
5-71
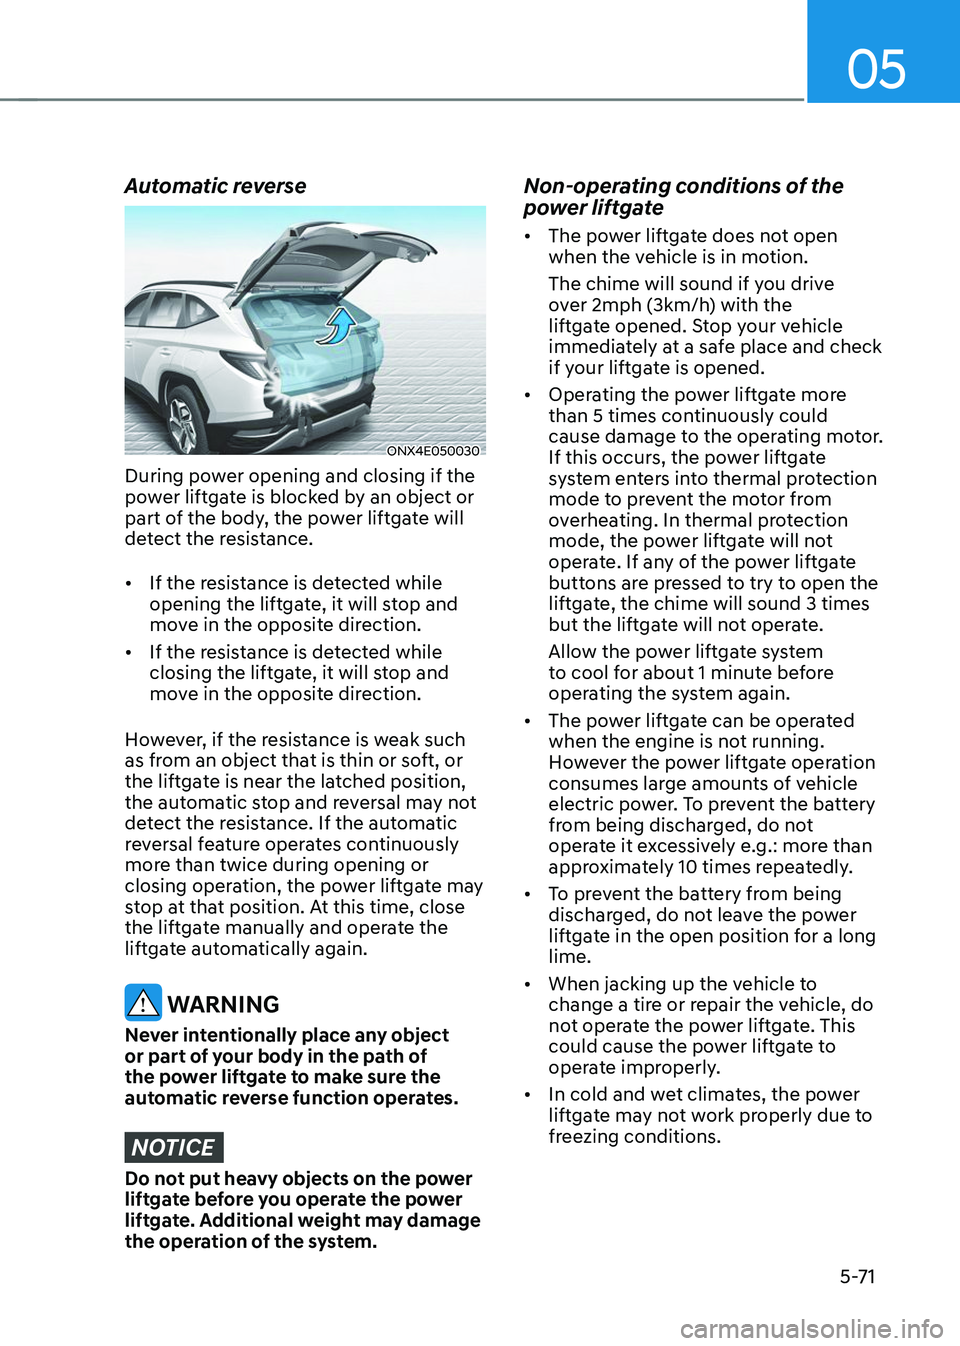
Automatic reverse
ONX4E050030
During power opening and closing if the
power liftgate is blocked by an object or
part of the body, the power liftgate will
detect the resistance.
• If the resistance is detected while
opening the liftgate, it will stop and
move in the opposite direction.
• If the resistance is detected while
closing the liftgate, it will stop and
move in the opposite direction.
However, if the resistance is weak such
as from an object that is thin or soft, or
the liftgate is near the latched position,
the automatic stop and reversal may not
detect the resistance. If the automatic
reversal feature operates continuously
more than twice during opening or
closing operation, the power liftgate may
stop at that position. At this time, close
the liftgate manually and operate the
liftgate automatically again.
WARNING
Never intentionally place any object
or part of your body in the path of
the power liftgate to make sure the
automatic reverse function operates.
NOTICE
Do not put heavy objects on the power
liftgate before you operate the power
liftgate. Additional weight may damage
the operation of the system.
Non-operating conditions of the
power liftgate
• The power liftgate does not open
when the vehicle is in motion.
The chime will sound if you drive
over 2mph (3km/h) with the
liftgate opened. Stop your vehicle
immediately at a safe place and check
if your liftgate is opened.
• Operating the power liftgate more
than 5 times continuously could
cause damage to the operating motor.
If this occurs, the power liftgate
system enters into thermal protection
mode to prevent the motor from
overheating. In thermal protection
mode, the power liftgate will not
operate. If any of the power liftgate
buttons are pressed to try to open the
liftgate, the chime will sound 3 times
but the liftgate will not operate.
Allow the power liftgate system
to cool for about 1 minute before
operating the system again.
• The power liftgate can be operated
when the engine is not running.
However the power liftgate operation
consumes large amounts of vehicle
electric power. To prevent the battery
from being discharged, do not
operate it excessively e.g.: more than
approximately 10 times repeatedly.
• To prevent the battery from being
discharged, do not leave the power
liftgate in the open position for a long
lime.
• When jacking up the vehicle to
change a tire or repair the vehicle, do
not operate the power liftgate. This
could cause the power liftgate to
operate improperly.
• In cold and wet climates, the power
liftgate may not work properly due to
freezing conditions.