height HYUNDAI TUCSON 2023 Owners Manual
[x] Cancel search | Manufacturer: HYUNDAI, Model Year: 2023, Model line: TUCSON, Model: HYUNDAI TUCSON 2023Pages: 638, PDF Size: 26.51 MB
Page 22 of 638
Vehicle Information, Consumer Information and Reporting Safety Defects
2-10
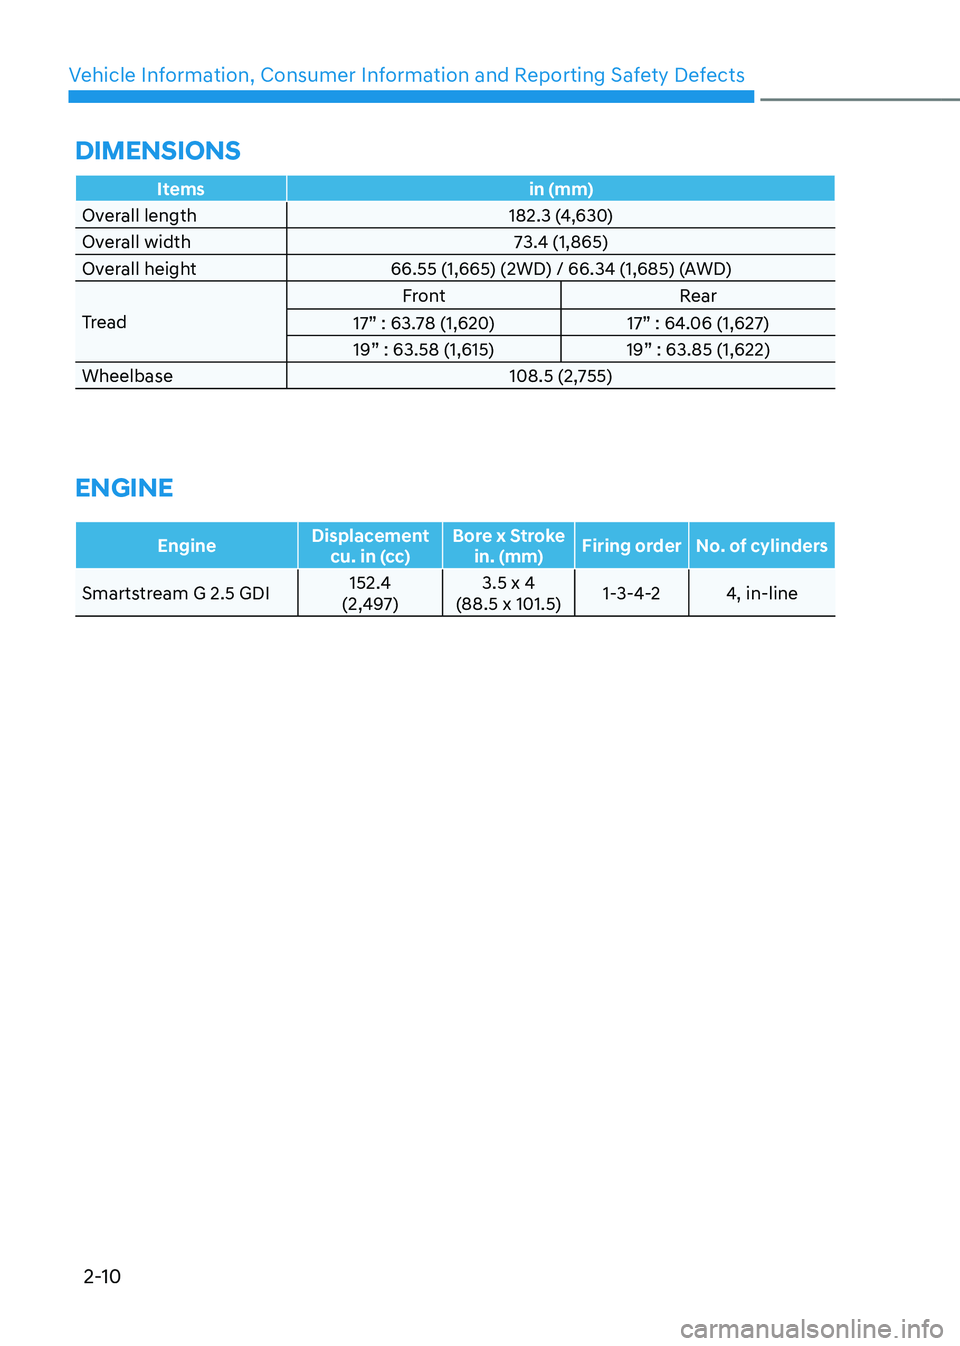
Itemsin (mm)
Overall length 182.3 (4,630)
Overall width 73.4 (1,865)
Overall height 66.55 (1,665) (2WD) / 66.34 (1,685) (AWD)
Tread Front
Rear
17” : 63.78 (1,620) 17” : 64.06 (1,627)
19” : 63.58 (1,615) 19” : 63.85 (1,622)
Wheelbase 108.5 (2,755)
ENGINE
EngineDisplacement
cu. in (cc) Bore x Stroke
in. (mm) Firing order
No. of cylinders
Smartstream G 2.5 GDI 152.4
(2,497) 3.5 x 4
(88.5 x 101.5) 1-3-4-2
4, in-line
DIMENSIONS
Page 34 of 638
3-3
03
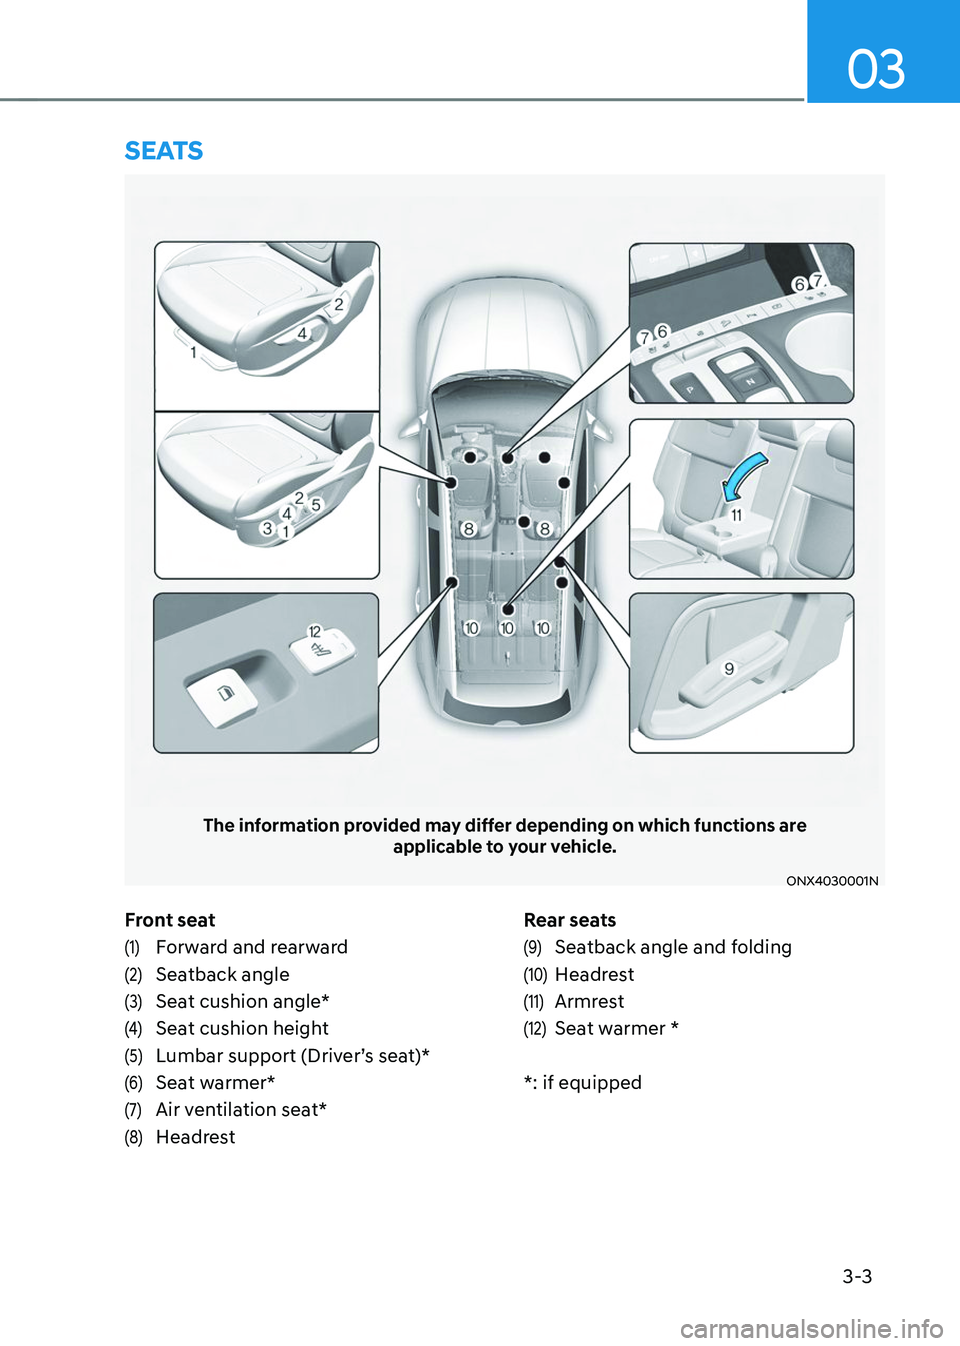
Front seat
(1) Forward and rearward
(2) Seatback angle
(3) Seat cushion angle*
(4) Seat cushion height
(5) Lumbar support (Driver’s seat)*
(6) Seat warmer*
(7) Air ventilation seat*
(8) HeadrestRear seats
(9) Seatback angle and folding
(10) Headrest
(11) Armrest
(12) Seat warmer *
*: if equipped
SEATS
The information provided may differ depending on which functions are
applicable to your vehicle.
ONX4030001N
Page 38 of 638
03
3 -7
Seat belts must be snug against your
hips and chest to work properly. When
the seatback is reclined, the shoulder
belt cannot do its job because it will not
be snug against your chest. Instead,
it will be in front of you. During an
accident, you could be thrown into the
seat belt, causing neck or other injuries.
The more the seatback is reclined,
the greater chance the passenger’s
hips will slide under the lap belt or the
passenger’s neck will strike the shoulder
belt.
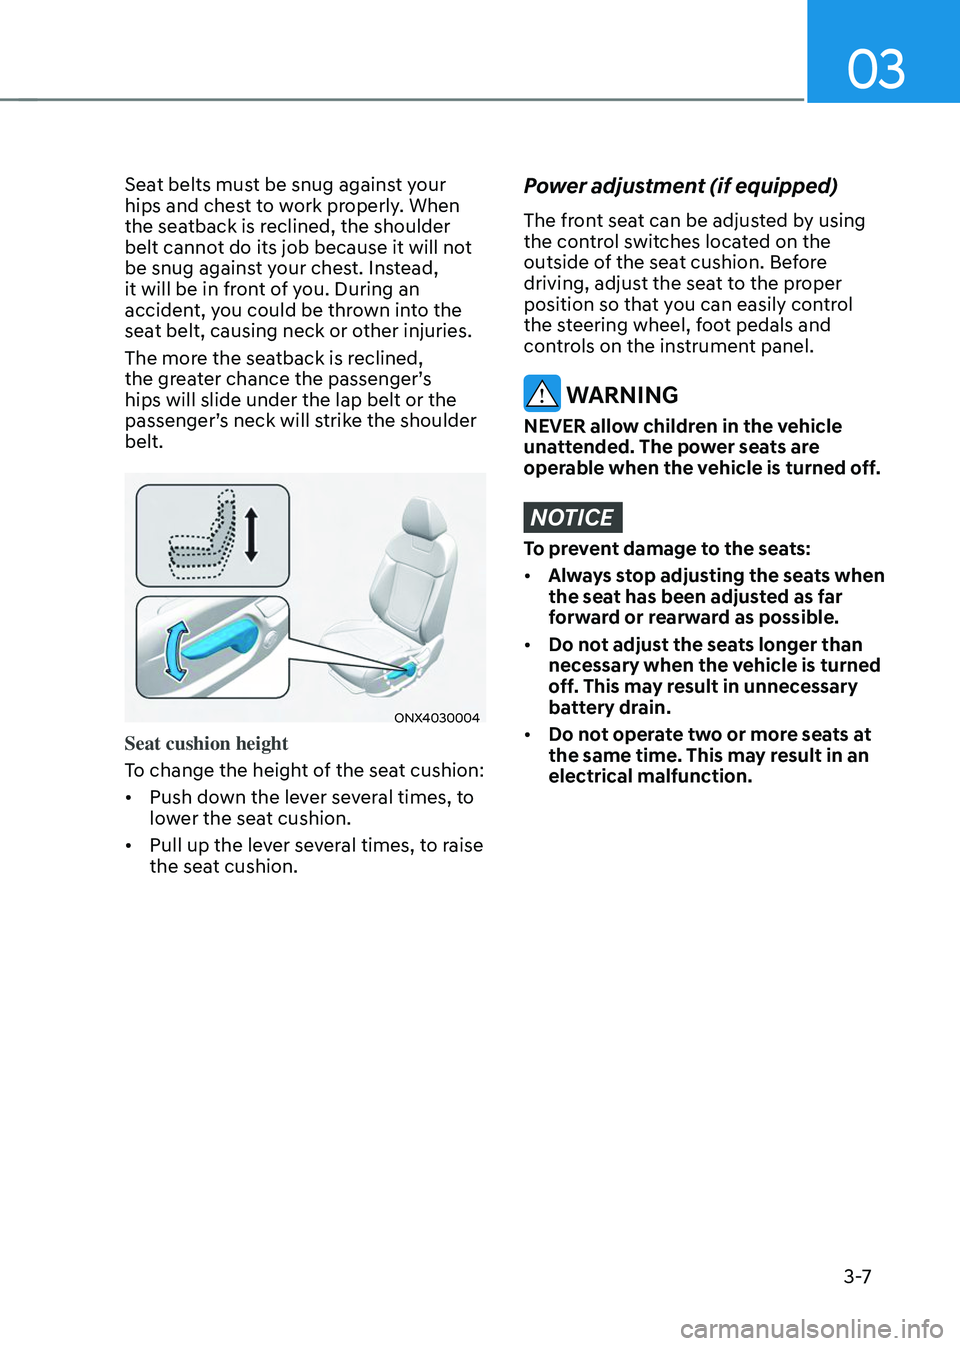
ONX4030004
Seat cushion height
To change the height of the seat cushion:
• Push down the lever several times, to
lower the seat cushion.
• Pull up the lever several times, to raise
the seat cushion.
Power adjustment (if equipped)
The front seat can be adjusted by using
the control switches located on the
outside of the seat cushion. Before
driving, adjust the seat to the proper
position so that you can easily control
the steering wheel, foot pedals and
controls on the instrument panel.
WARNING
NEVER allow children in the vehicle
unattended. The power seats are
operable when the vehicle is turned off.
NOTICE
To prevent damage to the seats:
• Always stop adjusting the seats when
the seat has been adjusted as far
forward or rearward as possible.
• Do not adjust the seats longer than
necessary when the vehicle is turned
off. This may result in unnecessary
battery drain.
• Do not operate two or more seats at
the same time. This may result in an
electrical malfunction.
Page 40 of 638
03
3-9
Seat belts must be snug against your
hips and chest to work properly. When
the seatback is reclined, the shoulder
belt cannot do its job because it will not
be snug against your chest. Instead,
it will be in front of you. During an
accident, you could be thrown into the
seat belt, causing neck or other injuries.
The more the seatback is reclined,
the greater chance the passenger’s
hips will slide under the lap belt or the
passenger’s neck will strike the shoulder
belt.
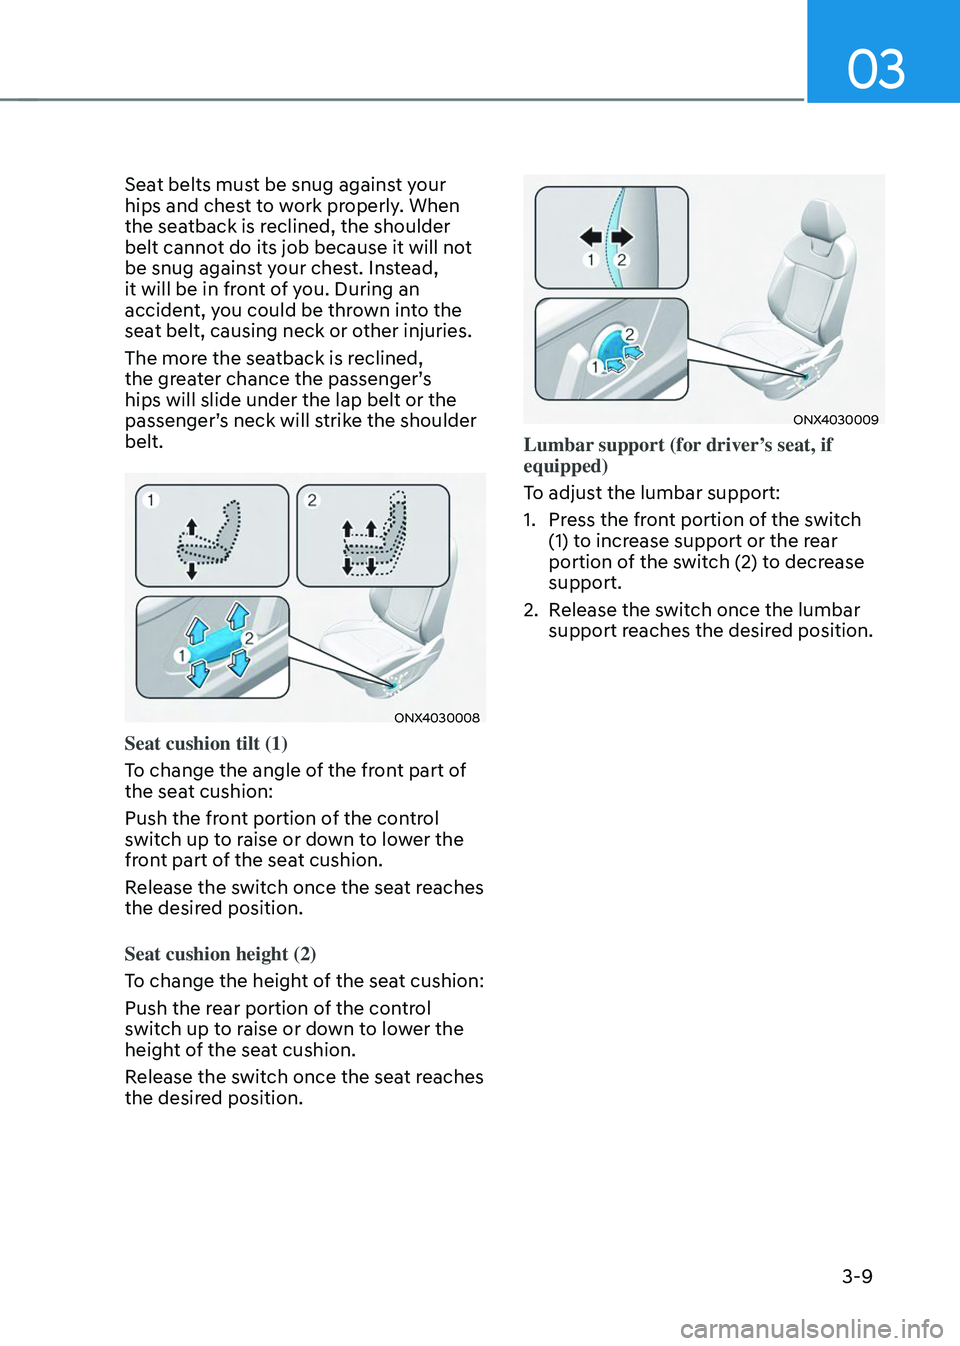
ONX4030008
Seat cushion tilt (1)
To change the angle of the front part of
the seat cushion:
Push the front portion of the control
switch up to raise or down to lower the
front part of the seat cushion.
Release the switch once the seat reaches
the desired position.
Seat cushion height (2)
To change the height of the seat cushion:
Push the rear portion of the control
switch up to raise or down to lower the
height of the seat cushion.
Release the switch once the seat reaches
the desired position.
ONX4030009
Lumbar support (for driver’s seat, if
equipped)
To adjust the lumbar support:
1. Press the front portion of the switch
(1) to increase support or the rear
portion of the switch (2) to decrease
support.
2. Release the switch once the lumbar
support reaches the desired position.
Page 45 of 638
Seats & Safety System
3-14
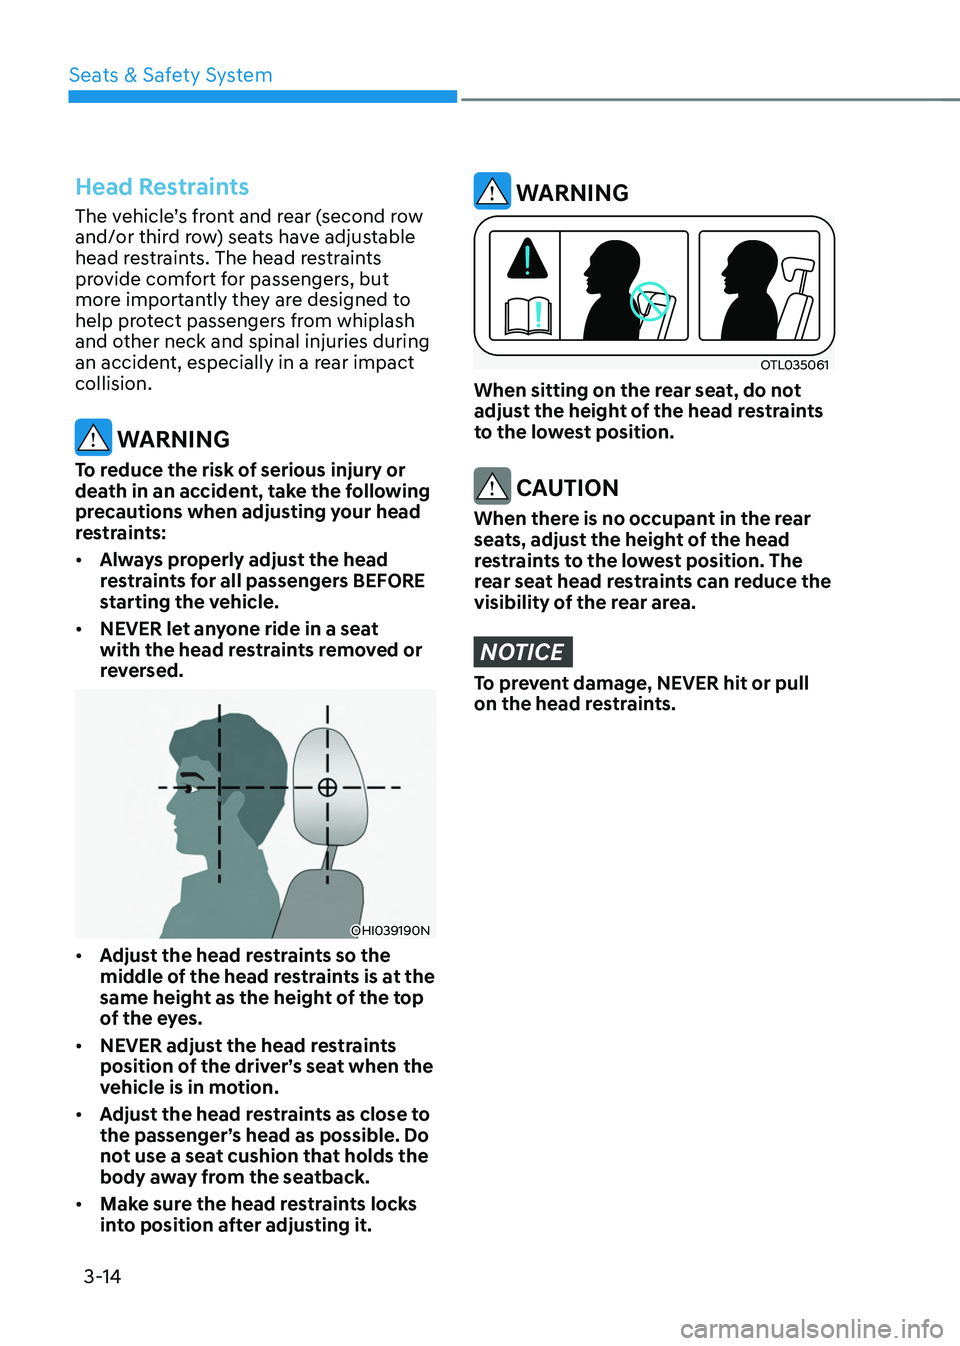
Head Restraints
The vehicle’s front and rear (second row
and/or third row) seats have adjustable
head restraints. The head restraints
provide comfort for passengers, but
more importantly they are designed to
help protect passengers from whiplash
and other neck and spinal injuries during
an accident, especially in a rear impact
collision.
WARNING
To reduce the risk of serious injury or
death in an accident, take the following
precautions when adjusting your head
restraints:
• Always properly adjust the head
restraints for all passengers BEFORE
starting the vehicle.
• NEVER let anyone ride in a seat
with the head restraints removed or
reversed.
OHI039190N
• Adjust the head restraints so the
middle of the head restraints is at the
same height as the height of the top
of the eyes.
• NEVER adjust the head restraints
position of the driver’s seat when the
vehicle is in motion.
• Adjust the head restraints as close to
the passenger’s head as possible. Do
not use a seat cushion that holds the
body away from the seatback.
• Make sure the head restraints locks
into position after adjusting it.
WARNING
OTL035061
When sitting on the rear seat, do not
adjust the height of the head restraints
to the lowest position.
CAUTION
When there is no occupant in the rear
seats, adjust the height of the head
restraints to the lowest position. The
rear seat head restraints can reduce the
visibility of the rear area.
NOTICE
To prevent damage, NEVER hit or pull
on the head restraints.
Page 46 of 638
03
3-15
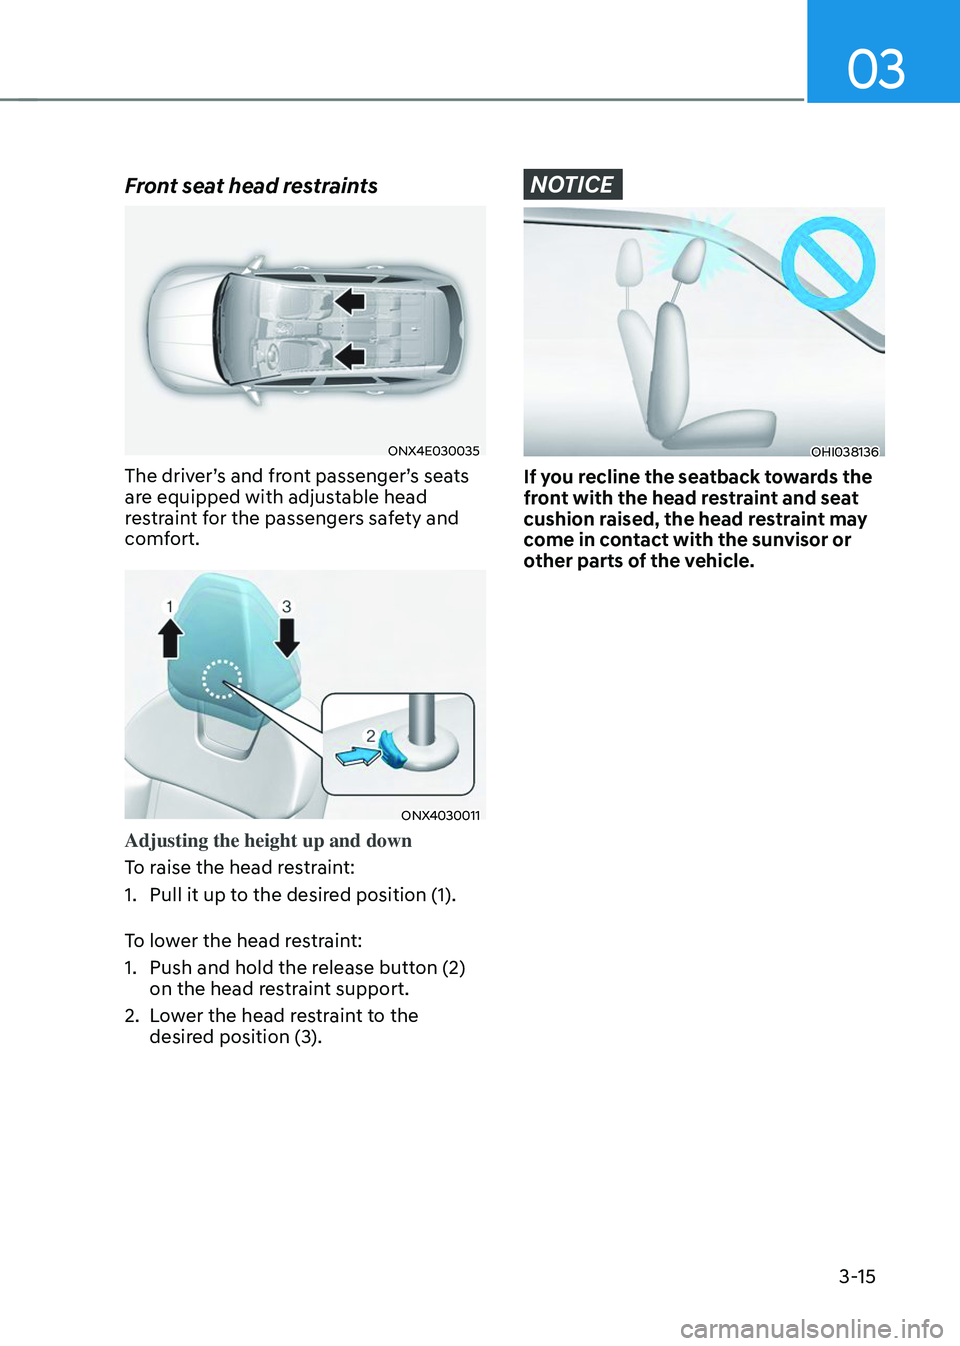
Front seat head restraints
ONX4E030035
The driver’s and front passenger’s seats
are equipped with adjustable head
restraint for the passengers safety and
comfort.
ONX4030011
Adjusting the height up and down
To raise the head restraint:
1. Pull it up to the desired position (1).
To lower the head restraint:
1. Push and hold the release button (2)
on the head restraint support.
2. Lower the head restraint to the
desired position (3).
NOTICE
OHI038136
If you recline the seatback towards the
front with the head restraint and seat
cushion raised, the head restraint may
come in contact with the sunvisor or
other parts of the vehicle.
Page 47 of 638
Seats & Safety System
3-16
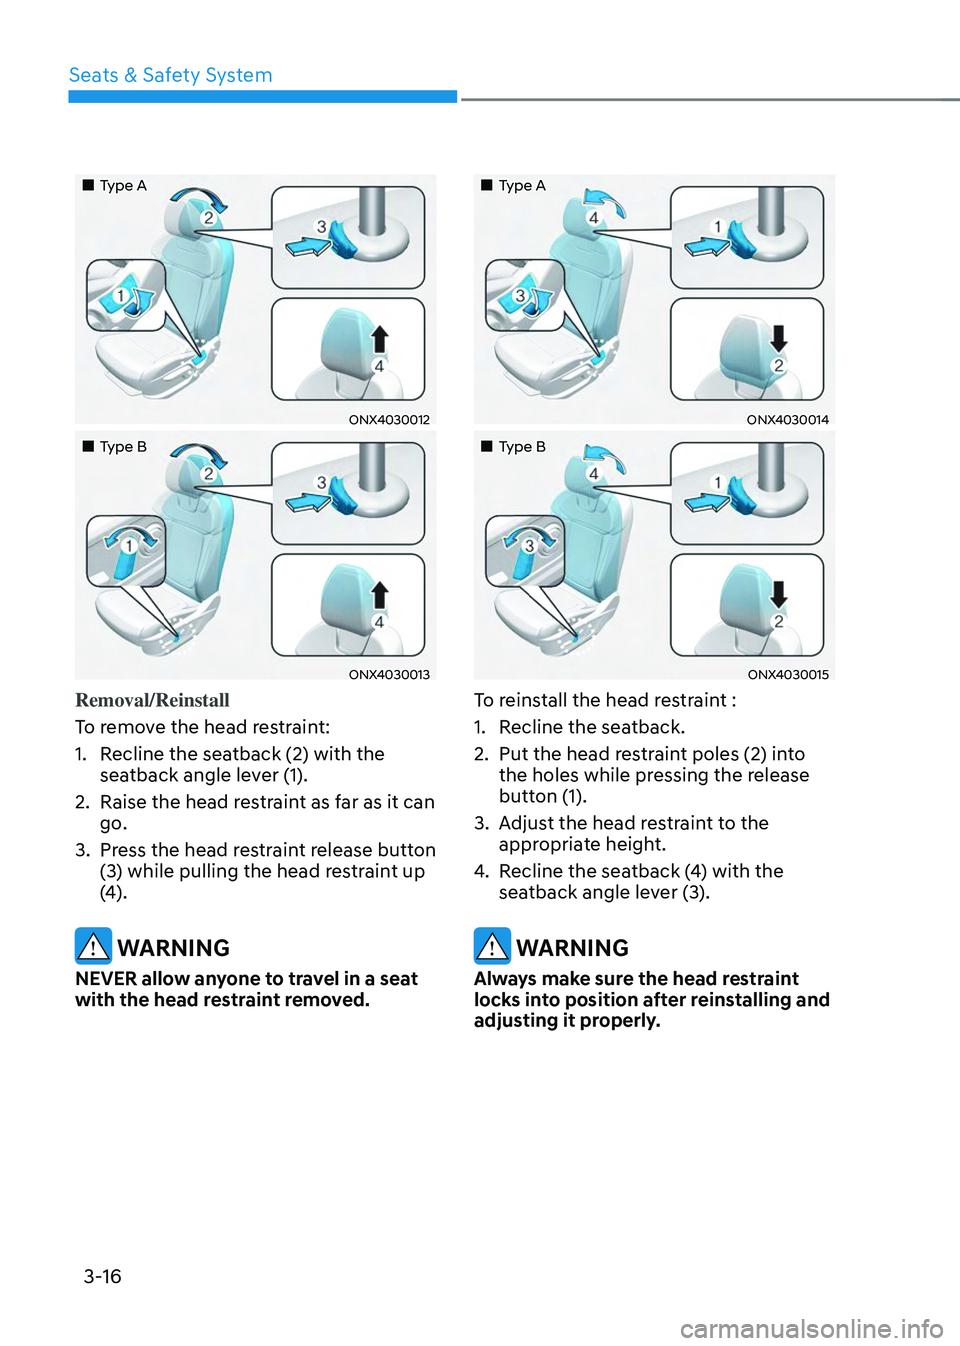
„„Type A
ONX4030012
„„Type B
ONX4030013
Removal/Reinstall
To remove the head restraint:
1. Recline the seatback (2) with the
seatback angle lever (1).
2. Raise the head restraint as far as it can
go.
3. Press the head restraint release button
(3) while pulling the head restraint up
(4).
WARNING
NEVER allow anyone to travel in a seat
with the head restraint removed.
„„Type A
ONX4030014
„„Type B
ONX4030015
To reinstall the head restraint :
1. Recline the seatback.
2. Put the head restraint poles (2) into
the holes while pressing the release
button (1).
3. Adjust the head restraint to the
appropriate height.
4. Recline the seatback (4) with the
seatback angle lever (3).
WARNING
Always make sure the head restraint
locks into position after reinstalling and
adjusting it properly.
Page 48 of 638
03
3-17
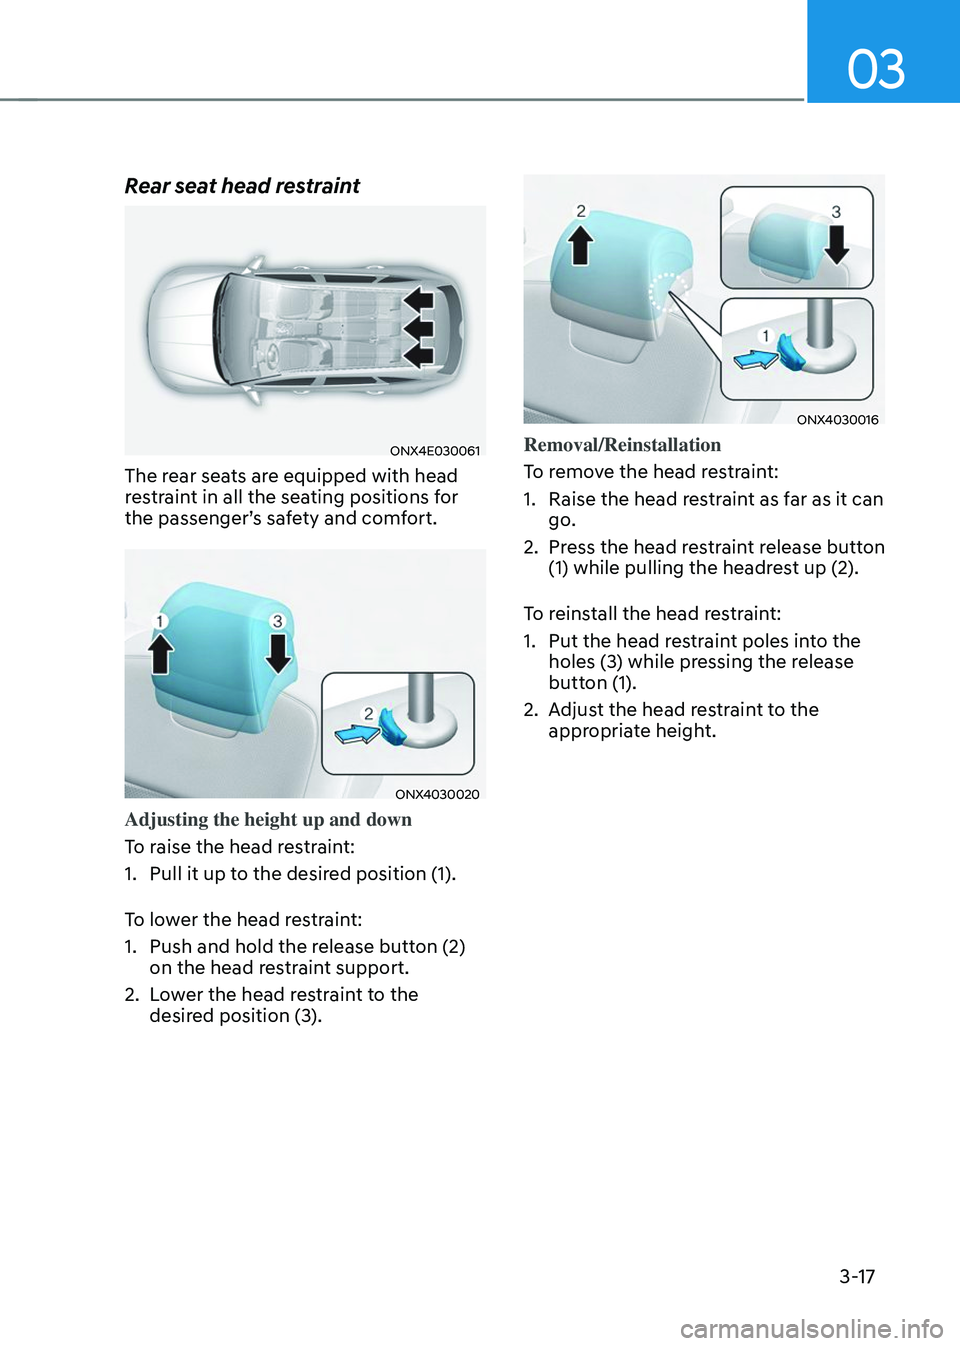
Rear seat head restraint
ONX4E030061
The rear seats are equipped with head
restraint in all the seating positions for
the passenger’s safety and comfort.
ONX4030020
Adjusting the height up and down
To raise the head restraint:
1. Pull it up to the desired position (1).
To lower the head restraint:
1. Push and hold the release button (2)
on the head restraint support.
2. Lower the head restraint to the
desired position (3).
ONX4030016
Removal/Reinstallation
To remove the head restraint:
1. Raise the head restraint as far as it can
go.
2. Press the head restraint release button
(1) while pulling the headrest up (2).
To reinstall the head restraint:
1. Put the head restraint poles into the
holes (3) while pressing the release
button (1).
2. Adjust the head restraint to the
appropriate height.
Page 57 of 638
Seats & Safety System
3-26
Seat belt restraint system
WARNING
OHI038182L
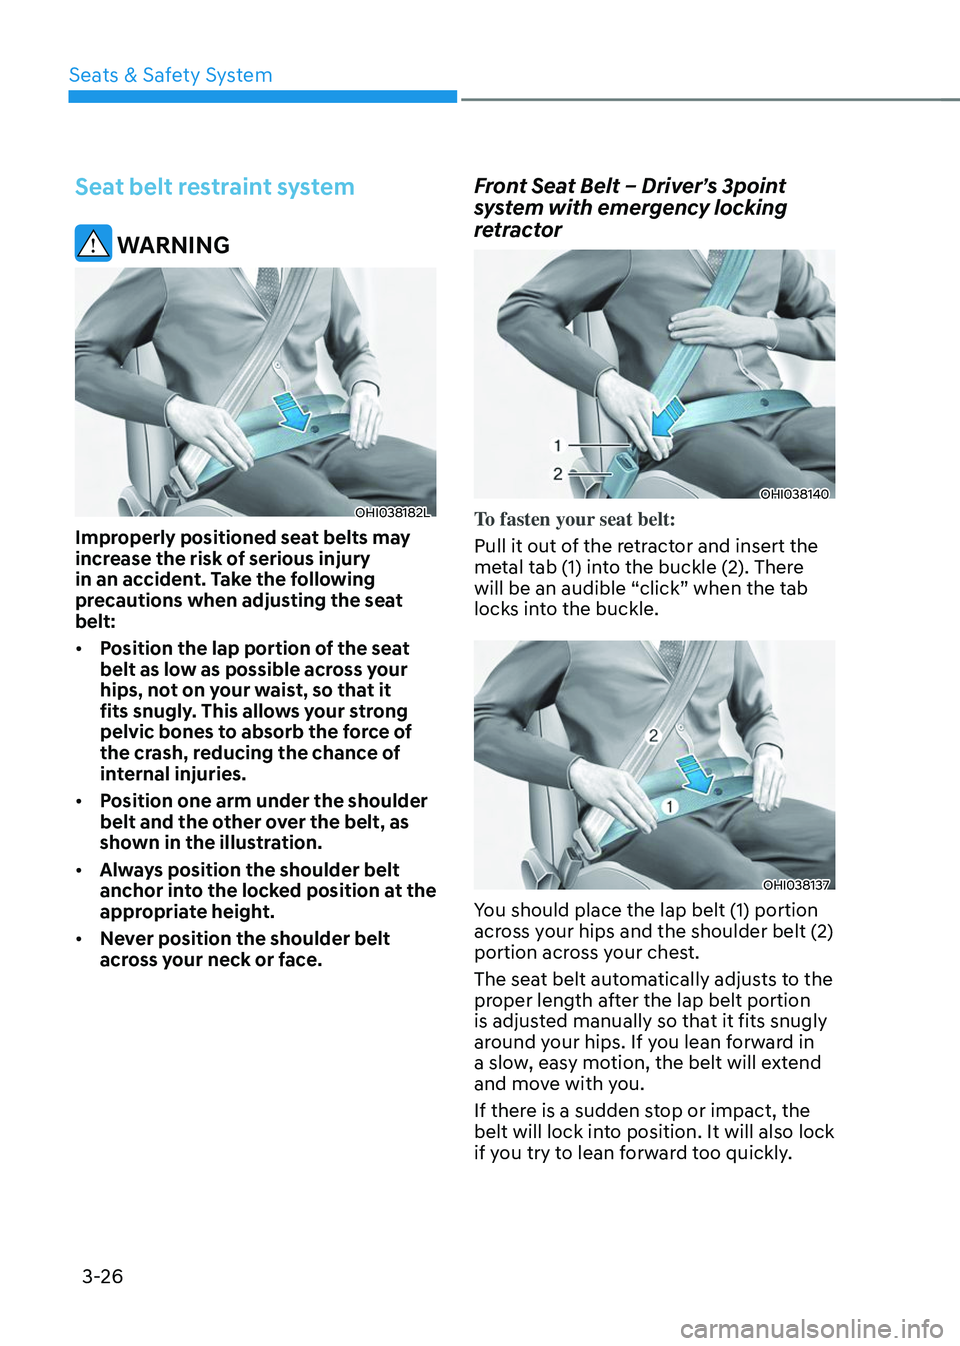
Improperly positioned seat belts may
increase the risk of serious injury
in an accident. Take the following
precautions when adjusting the seat
belt:
• Position the lap portion of the seat
belt as low as possible across your
hips, not on your waist, so that it
fits snugly. This allows your strong
pelvic bones to absorb the force of
the crash, reducing the chance of
internal injuries.
• Position one arm under the shoulder
belt and the other over the belt, as
shown in the illustration.
• Always position the shoulder belt
anchor into the locked position at the
appropriate height.
• Never position the shoulder belt
across your neck or face.
Front Seat Belt – Driver’s 3point
system with emergency locking
retractor
OHI038140
To fasten your seat belt:
Pull it out of the retractor and insert the
metal tab (1) into the buckle (2). There
will be an audible “click” when the tab
locks into the buckle.
OHI038137
You should place the lap belt (1) portion
across your hips and the shoulder belt (2)
portion across your chest.
The seat belt automatically adjusts to the
proper length after the lap belt portion
is adjusted manually so that it fits snugly
around your hips. If you lean forward in
a slow, easy motion, the belt will extend
and move with you.
If there is a sudden stop or impact, the
belt will lock into position. It will also lock
if you try to lean forward too quickly.
Page 58 of 638
03
3-27
Information
If you are not able to smoothly pull
enough of the seat belt out from the
retractor, firmly pull the seat belt out and
release it. After release, you will be able to
pull the belt out smoothly.
Height adjustment
You can adjust the height of the shoulder
belt anchor to one of the four different
positions for maximum comfort and
safety.
The shoulder portion should be adjusted
so it lies across your chest and midway
over your shoulder nearest the door, not
over your neck.
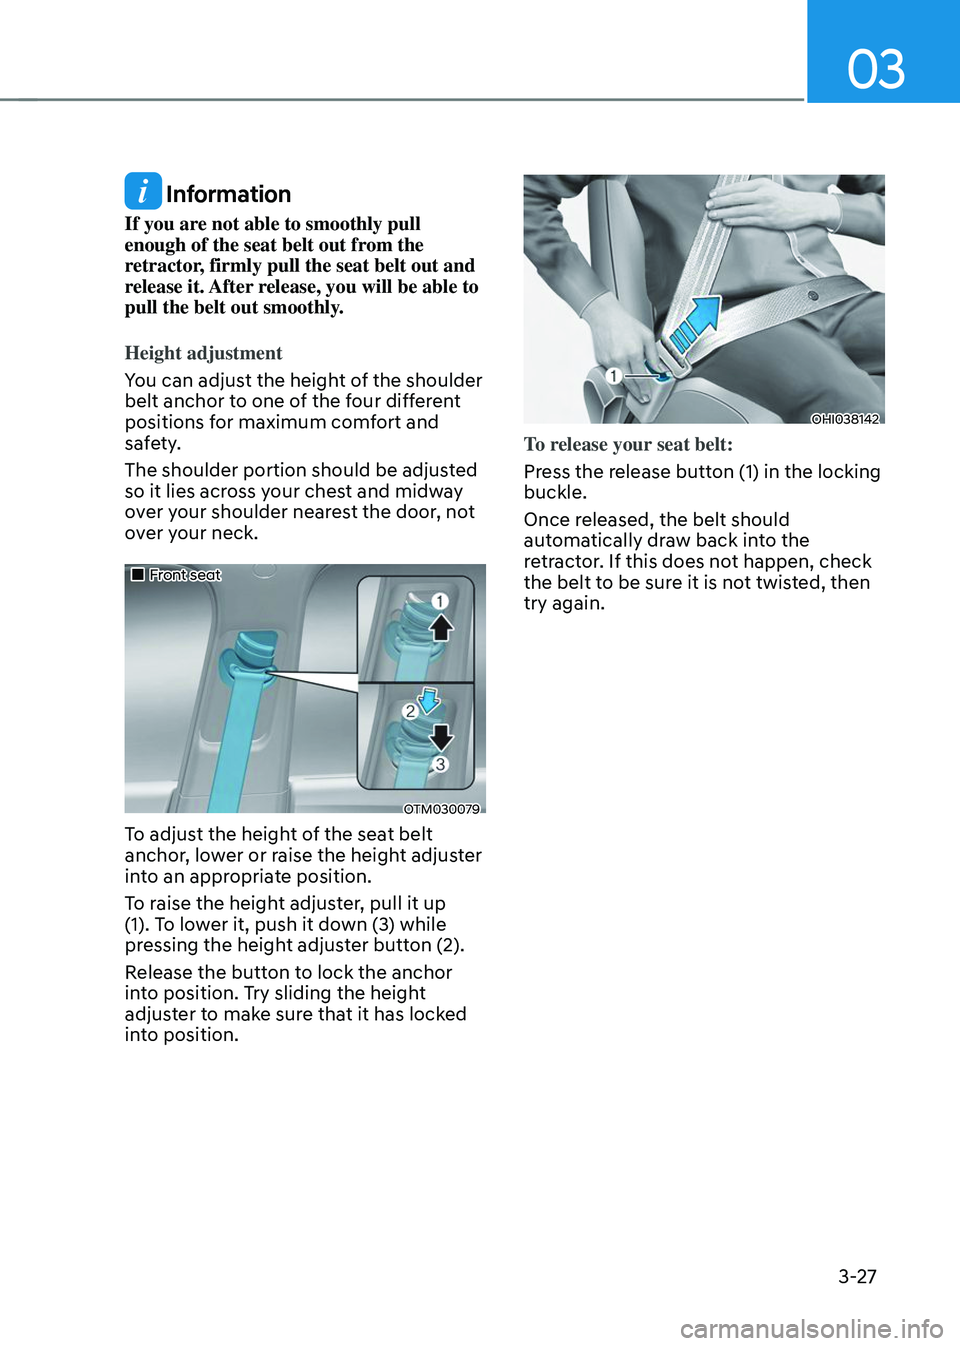
„„Front seat
OTM030079
To adjust the height of the seat belt
anchor, lower or raise the height adjuster
into an appropriate position.
To raise the height adjuster, pull it up
(1). To lower it, push it down (3) while
pressing the height adjuster button (2).
Release the button to lock the anchor
into position. Try sliding the height
adjuster to make sure that it has locked
into position.
OHI038142
To release your seat belt:
Press the release button (1) in the locking
buckle.
Once released, the belt should
automatically draw back into the
retractor. If this does not happen, check
the belt to be sure it is not twisted, then
try again.