rear view mirror HYUNDAI TUCSON 2023 Owners Manual
[x] Cancel search | Manufacturer: HYUNDAI, Model Year: 2023, Model line: TUCSON, Model: HYUNDAI TUCSON 2023Pages: 638, PDF Size: 26.51 MB
Page 16 of 638
2-4
Vehicle Information, Consumer Information and Reporting Safety Defects
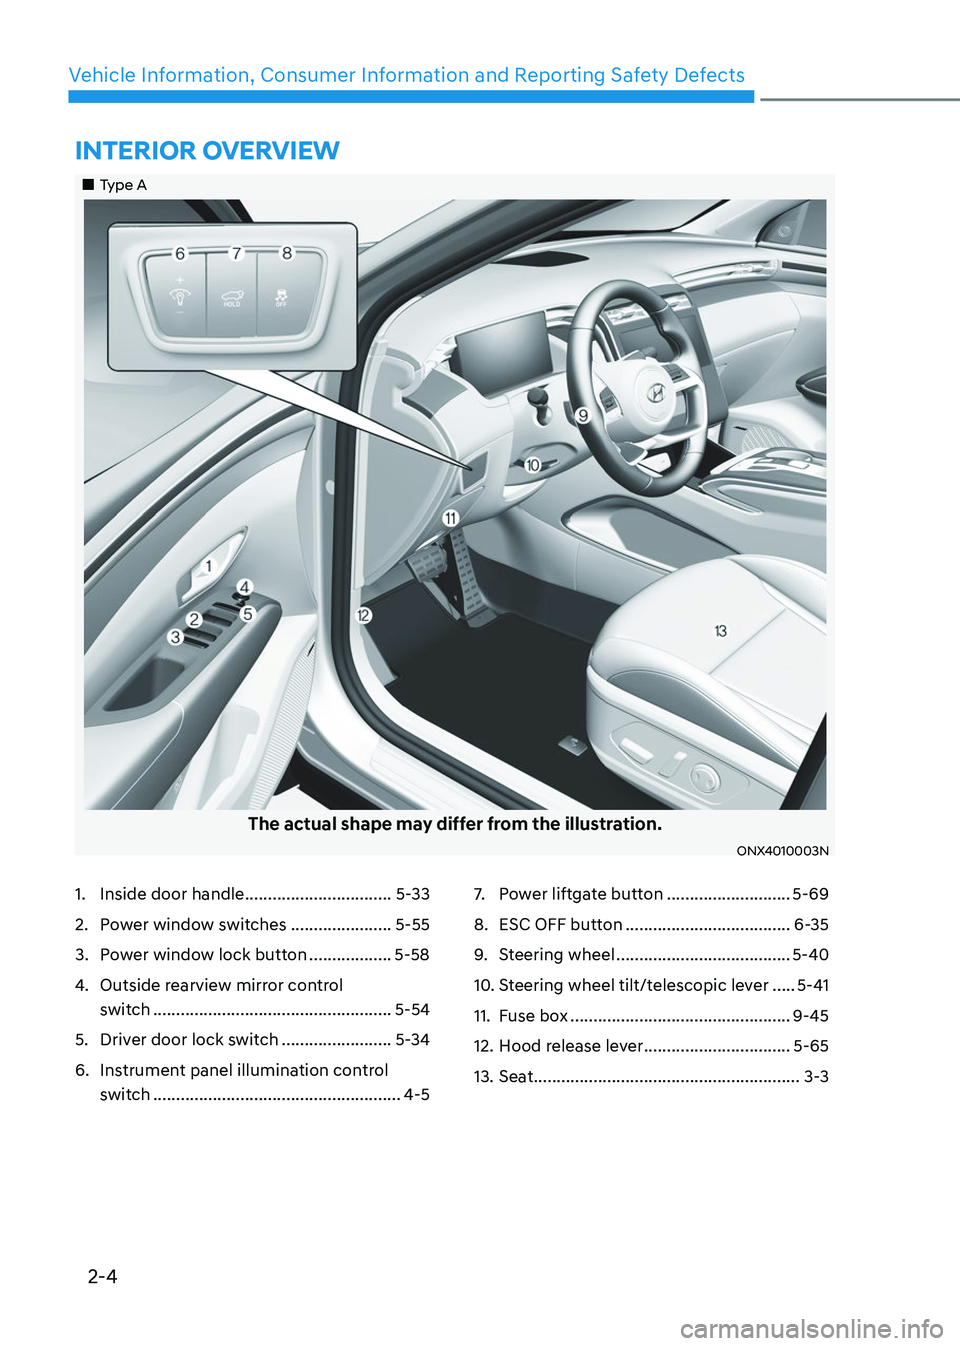
1. Inside door handle ................................5-33
2. Power window switches ......................5-55
3. Power window lock button ..................5-58
4. Outside rearview mirror control
switch
....................................................5-54
5. Driver door lock switch ........................5-34
6. Instrument panel illumination control
switch
......................................................4-5
7. Power liftgate button ...........................5-69
8. ESC OFF button ....................................6-35
9. Steering wheel ......................................5-40
10. Steering wheel tilt/telescopic lever .....5-41
11. Fuse box ................................................9-45
12. Hood release lever ................................5-65
13. Seat ..........................................................3-3
INTERIOR OVERVIEW
„„Type A
The actual shape may differ from the illustration.
ONX4010003N
Page 17 of 638
2-5
02
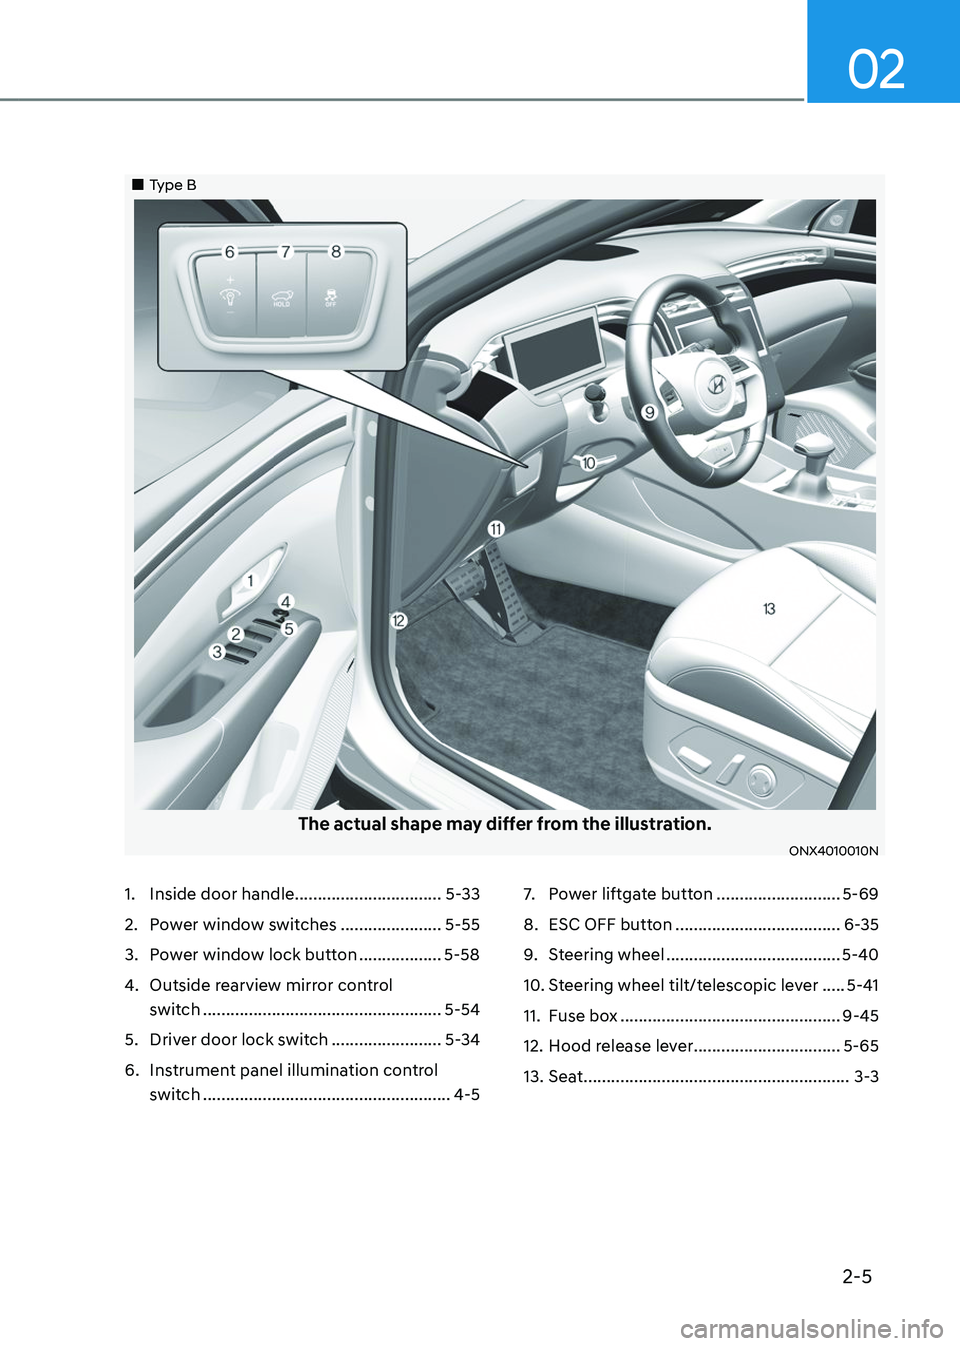
1. Inside door handle ................................5-33
2. Power window switches ......................5-55
3. Power window lock button ..................5-58
4. Outside rearview mirror control
switch
....................................................5-54
5. Driver door lock switch ........................5-34
6. Instrument panel illumination control
switch
......................................................4-5
7. Power liftgate button ...........................5-69
8. ESC OFF button ....................................6-35
9. Steering wheel ......................................5-40
10. Steering wheel tilt/telescopic lever .....5-41
11. Fuse box ................................................9-45
12. Hood release lever ................................5-65
13. Seat ..........................................................3-3
„„Type B
The actual shape may differ from the illustration.
ONX4010010N
Page 136 of 638
Instrument cluster
4-38
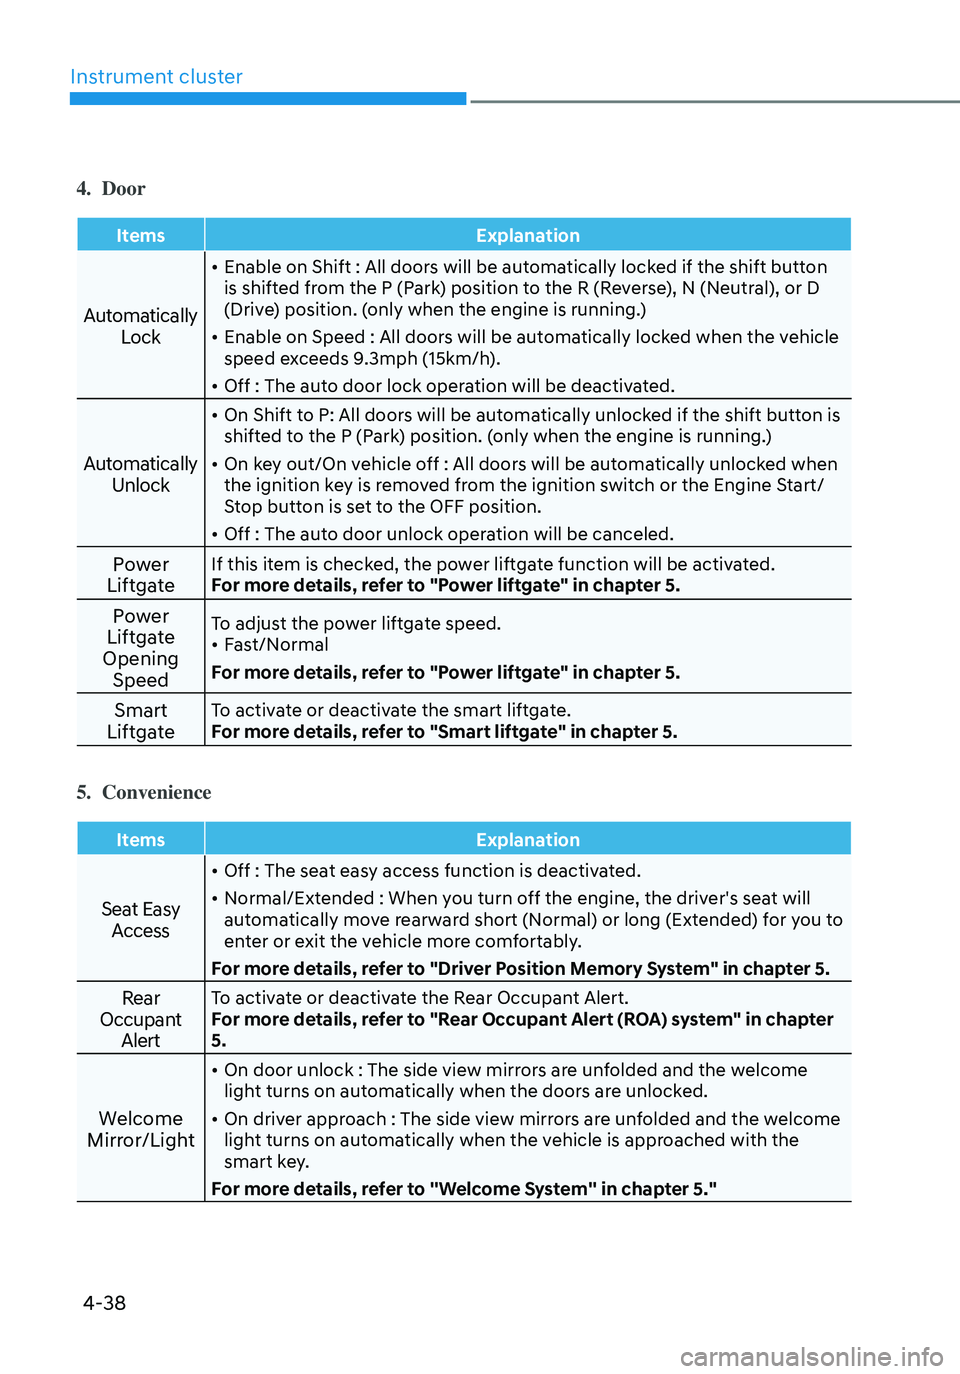
4. Door
ItemsExplanation
Automatically
Lock
• Enable on Shift : All doors will be automatically locked if the shift button
is shifted from the P (Park) position to the R (Reverse), N (Neutral), or D
(Drive) position. (only when the engine is running.)
• Enable on Speed : All doors will be automatically locked when the vehicle
speed exceeds 9.3mph (15km/h).
• Off : The auto door lock operation will be deactivated.
Automatically Unlock
• On Shift to P: All doors will be automatically unlocked if the shift button is
shifted to the P (Park) position. (only when the engine is running.)
• On key out/On vehicle off : All doors will be automatically unlocked when
the ignition key is removed from the ignition switch or the Engine Start/
Stop button is set to the OFF position.
• Off : The auto door unlock operation will be canceled.
Power
LiftgateIf this item is checked, the power liftgate function will be activated.
For more details, refer to "Power liftgate" in chapter 5.
Power
Liftgate
Opening SpeedTo adjust the power liftgate speed.• Fast/Normal
For more details, refer to "Power liftgate" in chapter 5.
Smart
LiftgateTo activate or deactivate the smart liftgate.
For more details, refer to "Smart liftgate" in chapter 5.
5. Convenience
Items Explanation
Seat Easy
Access
• Off : The seat easy access function is deactivated.
• Normal/Extended : When you turn off the engine, the driver's seat will
automatically move rearward short (Normal) or long (Extended) for you to
enter or exit the vehicle more comfortably.
For more details, refer to "Driver Position Memory System" in chapter 5.
Rear
Occupant AlertTo activate or deactivate the Rear Occupant Alert.
For more details, refer to "Rear Occupant Alert (ROA) system" in chapter
5.
Welcome
Mirror/Light
• On door unlock : The side view mirrors are unfolded and the welcome
light turns on automatically when the doors are unlocked.
• On driver approach : The side view mirrors are unfolded and the welcome
light turns on automatically when the vehicle is approached with the
smart key.
For more details, refer to ''Welcome System'' in chapter 5."
Page 145 of 638
Convenient features
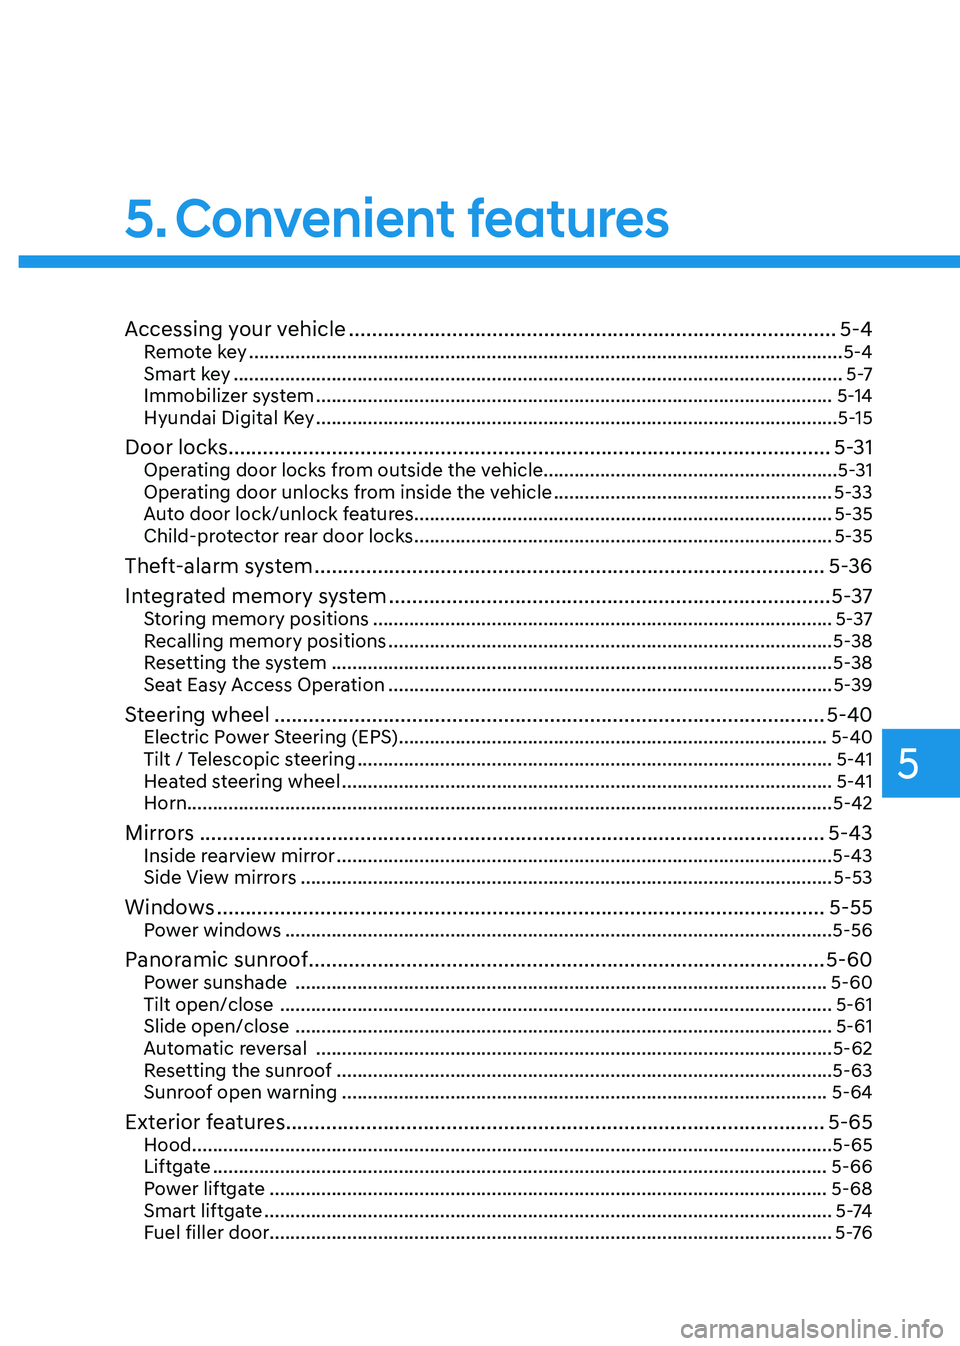
Accessing your vehicle ........................................................................\
.............5-4Remote key ........................................................................\
...........................................5-4
Smart key ........................................................................\
..............................................5 -7
Immobilizer system ........................................................................\
............................5-14
Hyundai Digital Key ........................................................................\
.............................5-15
Door locks........................................................................\
................................. 5-31Operating door locks from outside the vehicle.........................................................5-31
Operating door unlocks from inside the vehicle ......................................................5-33
Auto door lock/unlock features ........................................................................\
......... 5-35
Child-protector rear door locks
........................................................................\
.........5-35
Theft-alarm system ........................................................................\
.................5-36
Integrated memory system
........................................................................\
.....5-37Storing memory positions ........................................................................\
.................5-37
Recalling memory positions ........................................................................\
..............5-38
Resetting the system ........................................................................\
.........................5-38
Seat Easy Access Operation ........................................................................\
..............5-39
Steering wheel ........................................................................\
........................5-40Electric Power Steering (EPS) ........................................................................\
...........5-40
Tilt / Telescopic steering ........................................................................\
....................5-41
Heated steering wheel ........................................................................\
.......................5-41
Horn ........................................................................\
..................................................... 5-42
Mirrors ........................................................................\
.....................................5-43Inside rearview mirror ........................................................................\
........................5-43
Side View mirrors ........................................................................\
...............................5-53
Windows ........................................................................\
..................................5-55Power windows ........................................................................\
..................................5-56
Panoramic sunroof ........................................................................\
..................5-60Power sunshade ........................................................................\
...............................5-60
Tilt open/close ........................................................................\
...................................5-61
Slide open/close ........................................................................\
................................5-61
Automatic reversal ........................................................................\
............................5-62
Resetting the sunroof ........................................................................\
........................5-63
Sunroof open warning ........................................................................\
......................5-64
Exterior features ........................................................................\
......................5-65Hood ........................................................................\
....................................................5-65
Liftgate ........................................................................\
...............................................5-66
Power liftgate ........................................................................\
....................................5-68
Smart liftgate ........................................................................\
......................................5 -74
Fuel filler door ........................................................................\
..................................... 5 -76
5. Convenient features
5
Page 182 of 638
Convenient features
5-38
Recalling memory positions
1. Make sure that the vehicle is in the ON
position and the gear selector is in P
(Park).
2. Press the desired button (1 or 2). The
system will beep once and the driver’s
seat position and side view mirror
position will be automatically adjusted
to the stored positions.
3. ‘Driver 1 (or 2) settings applied’ will
appear on the cluster LCD display.
Information
• Note that while the memory settings
are being recalled, if you press the
SET button or the corresponding IMS
memory button (1 or 2) for which the
settings are being recalled, the IMS will
temporarily deactivate. If you select
the alternate IMS memory button (1 or
2), the IMS will activate according to
the settings of the alternate button.
For example, if you press the SET
button or the number 1 button with the
number 1 setting in operation, the IMS
will temporarily deactivate.
If you press the number 2 button, then
the IMS memory settings according to
number 2 will activate.
• If you adjust the driver seat settings
while the IMS is recalling the stored
positions, the memory settings will not
be applied.
Resetting the system
Follow the below procedures to reset the
Integrated Memory System (IMS) if it is
not operating properly:
Resetting the Integrated Memory
System (IMS)
1. Make sure that the vehicle is in Park
(P) and the engine is ON. Open the
driver’s door.
2. Adjust the driver’s seat and seatback
angle to the most forward positions.
3. Press the SET button and push
forward the driver’s seat movement
switch over 2 seconds simultaneously.
While resetting integrated memory
system
1. Resetting starts with a notification
sound.
2. The driver’s seat and seatback is
adjusted to the rearward position with
the notification sound.
3. The driver’s seat and seatback is
re-adjusted to the default position
(central position) with the notification
sound.
However, in the following cases, the
resetting procedure and the notification
sound may stop.
• The memory button is pressed.
• The seat control switch is operated.
• The gear is shifted out of P (Park).
• The driving speed exceeds
2 mph (3km/h).
• The driver’s door is closed.
Page 187 of 638
05
5-43
Inside rearview mirror
Before driving your vehicle, check to
see that your inside rearview mirror is
properly positioned. Adjust the rearview
mirror so that the view through the rear
window is properly centered.
WARNING
Make sure your line of sight is not
obstructed. Do not place objects in the
rear seat, cargo area, or behind the rear
headrests which could interfere with
your vision through the rear window.
WARNING
To prevent serious injury during an
accident or deployment of the air bag,
do not modify the rearview mirror and
do not install a wide mirror.
WARNING
NEVER adjust the mirror while driving.
This may cause loss of vehicle control
resulting in an accident.
NOTICE
When cleaning the mirror, use a paper
towel or similar material dampened
with glass cleaner. Do not spray glass
cleaner directly on the mirror as this
may cause the liquid cleaner to enter
the mirror housing.
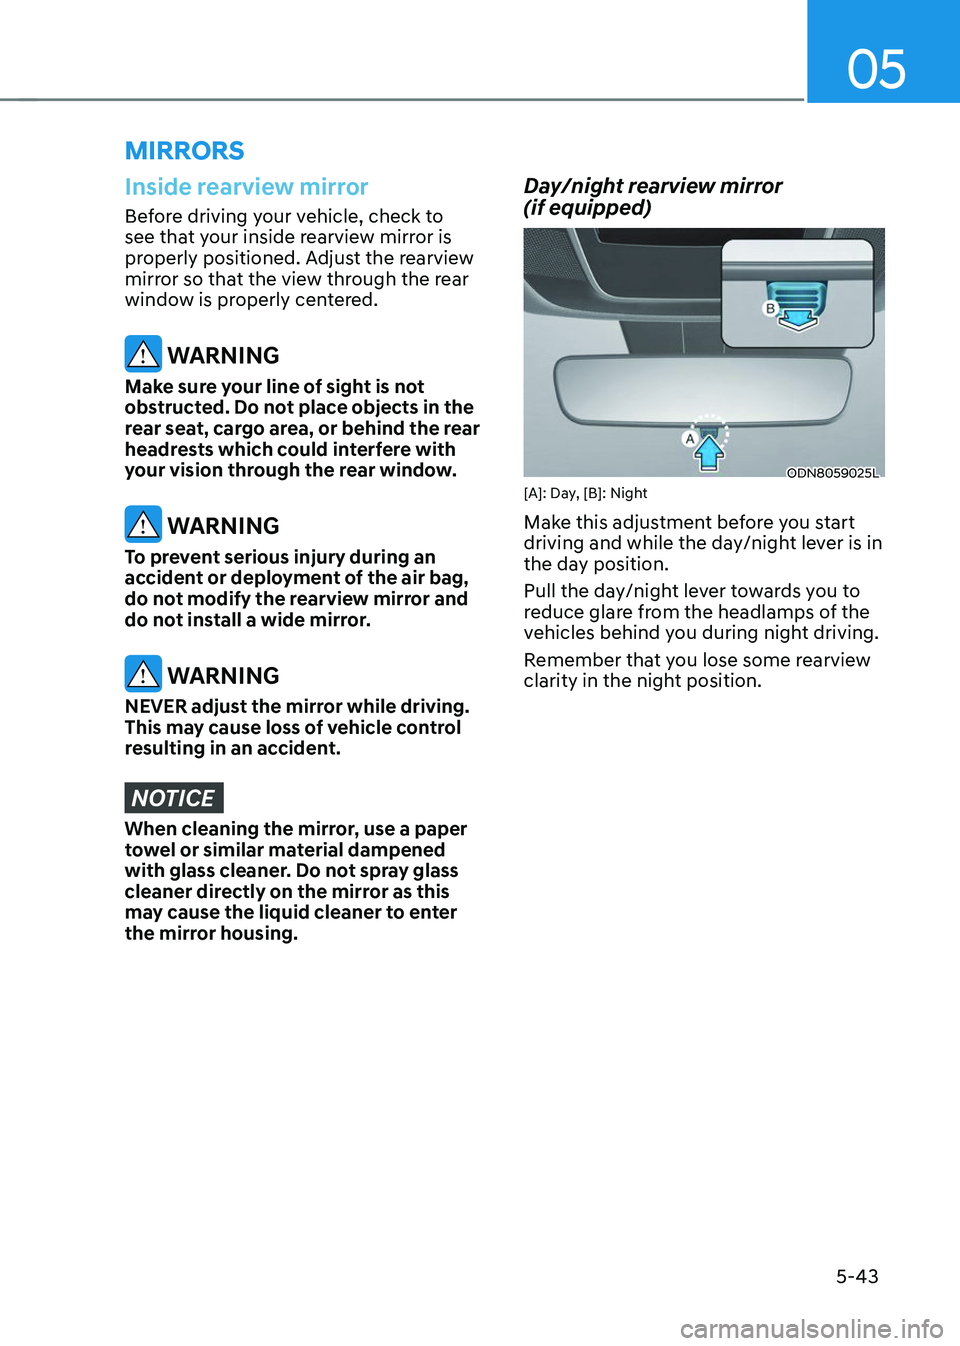
Day/night rearview mirror
(if equipped)
ODN8059025L[A]: Day, [B]: Night
Make this adjustment before you start
driving and while the day/night lever is in
the day position.
Pull the day/night lever towards you to
reduce glare from the headlamps of the
vehicles behind you during night driving.
Remember that you lose some rearview
clarity in the night position.
MIRRORS
Page 188 of 638
Convenient features
5-44
Electrochromic Mirror
(if equipped)
ODN8059023LThe electric rearview mirror
automatically controls the glare from the
headlamp of the vehicle behind you in
nighttime or low light driving conditions.
When the engine is running, the glare is
automatically controlled by the sensor
mounted in the rearview mirror. The
sensor detects the light level around the
vehicle, and automatically adjusts to
control the headlamp glare from vehicles
behind you.
Whenever the the transmission is
shifted to R (Reverse), the mirror will
automatically go to the brightest setting
in order to improve the driver’s view
behind the vehicle.
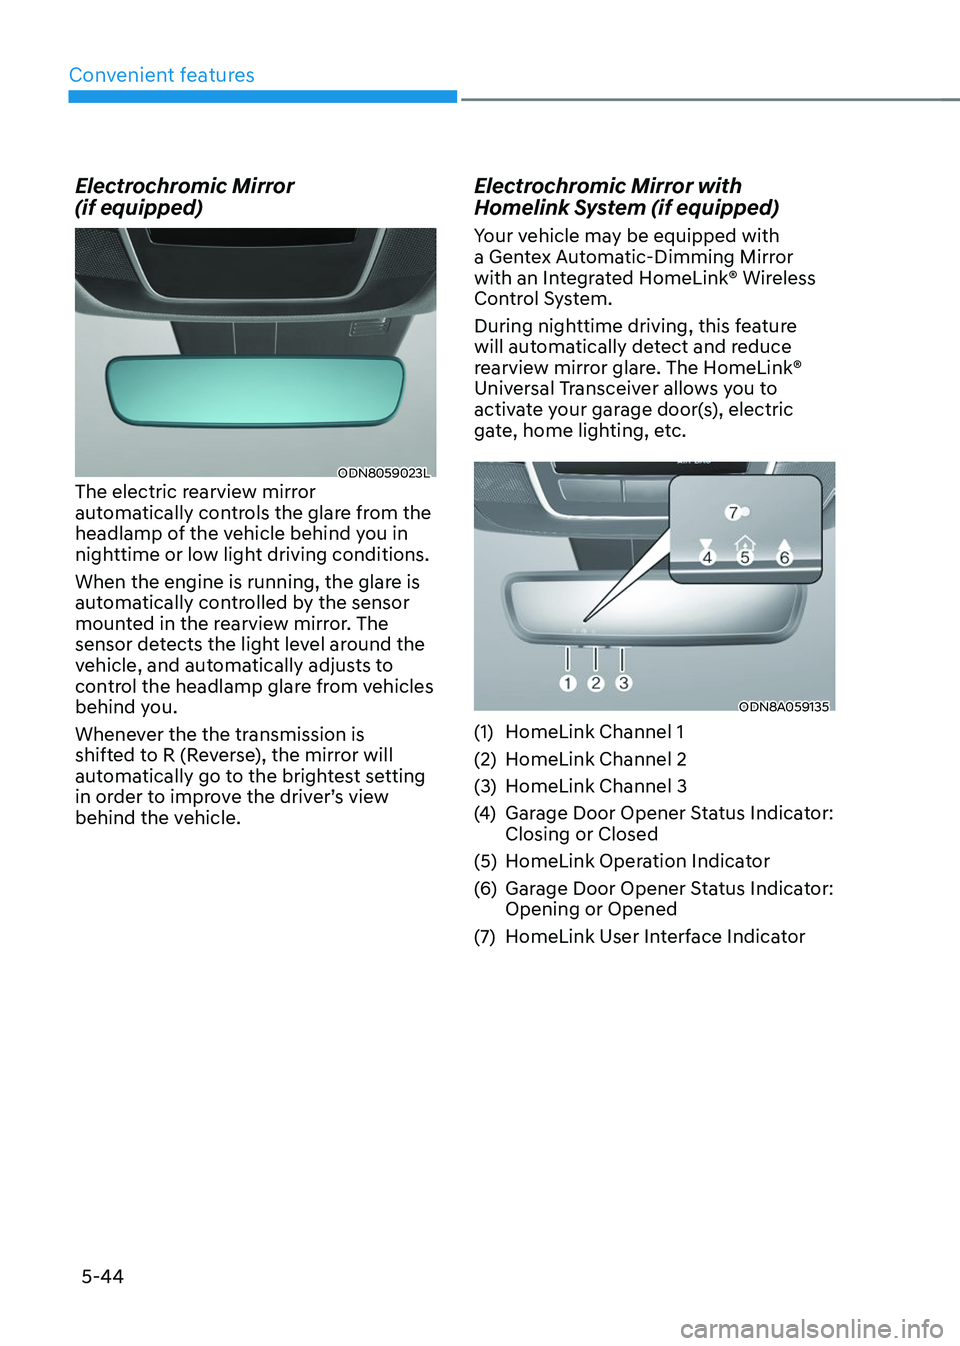
Electrochromic Mirror with
Homelink System (if equipped)
Your vehicle may be equipped with
a Gentex Automatic-Dimming Mirror
with an Integrated HomeLink® Wireless
Control System.
During nighttime driving, this feature
will automatically detect and reduce
rearview mirror glare. The HomeLink®
Universal Transceiver allows you to
activate your garage door(s), electric
gate, home lighting, etc.
ODN8A059135
(1) HomeLink Channel 1
(2) HomeLink Channel 2
(3) HomeLink Channel 3
(4) Garage Door Opener Status Indicator:
Closing or Closed
(5) HomeLink Operation Indicator
(6) Garage Door Opener Status Indicator:
Opening or Opened
(7) HomeLink User Interface Indicator
Page 197 of 638
05
5-53
Side View mirrors
ONX4050009
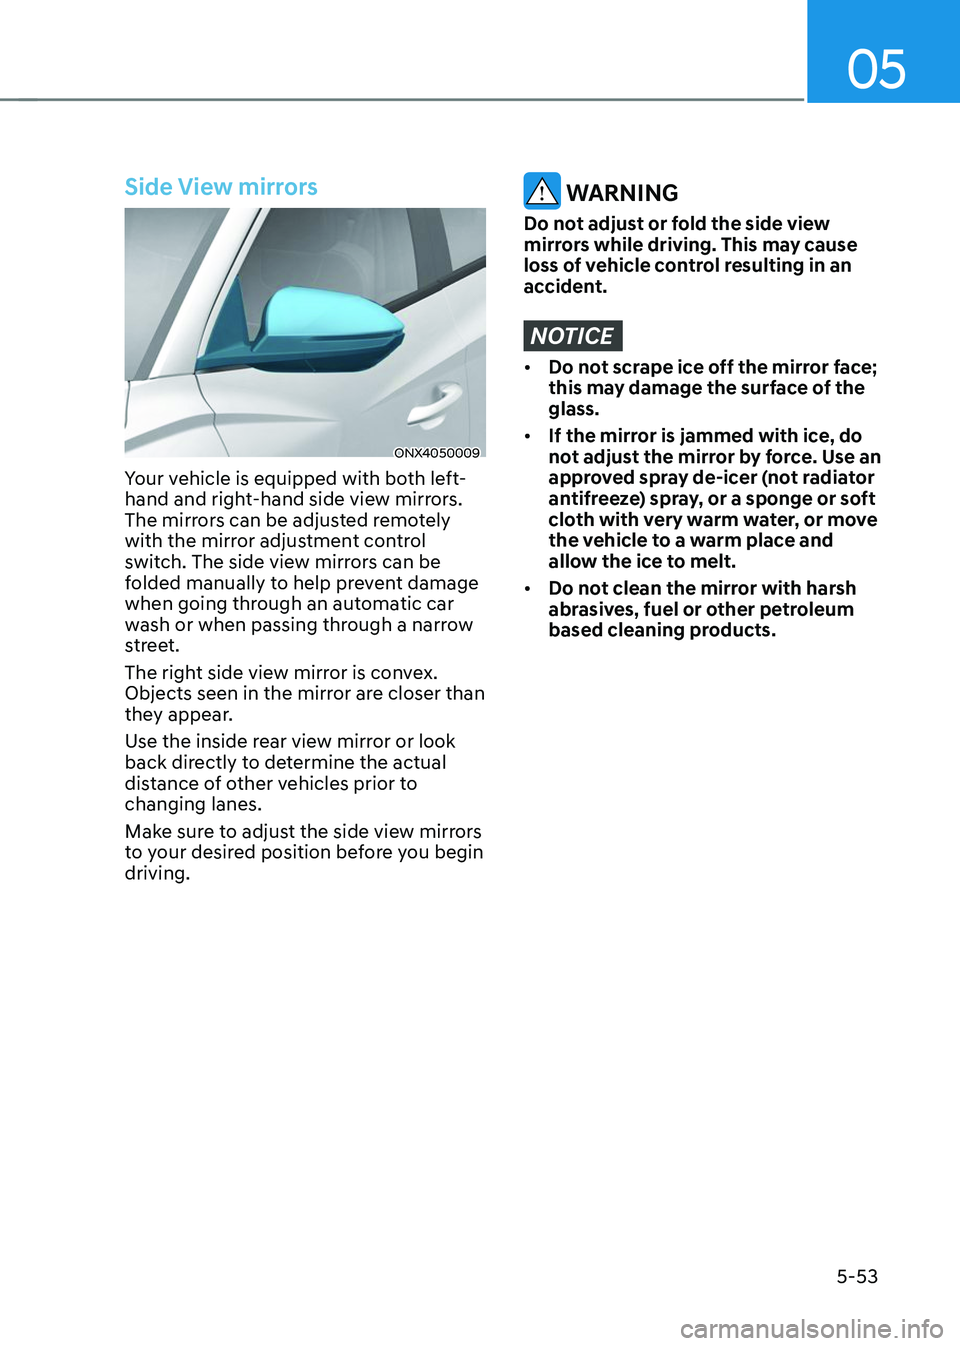
Your vehicle is equipped with both left-
hand and right-hand side view mirrors.
The mirrors can be adjusted remotely
with the mirror adjustment control
switch. The side view mirrors can be
folded manually to help prevent damage
when going through an automatic car
wash or when passing through a narrow
street.
The right side view mirror is convex.
Objects seen in the mirror are closer than
they appear.
Use the inside rear view mirror or look
back directly to determine the actual
distance of other vehicles prior to
changing lanes.
Make sure to adjust the side view mirrors
to your desired position before you begin
driving.
WARNING
Do not adjust or fold the side view
mirrors while driving. This may cause
loss of vehicle control resulting in an
accident.
NOTICE
• Do not scrape ice off the mirror face;
this may damage the surface of the
glass.
• If the mirror is jammed with ice, do
not adjust the mirror by force. Use an
approved spray de-icer (not radiator
antifreeze) spray, or a sponge or soft
cloth with very warm water, or move
the vehicle to a warm place and
allow the ice to melt.
• Do not clean the mirror with harsh
abrasives, fuel or other petroleum
based cleaning products.
Page 198 of 638
Convenient features
5-54
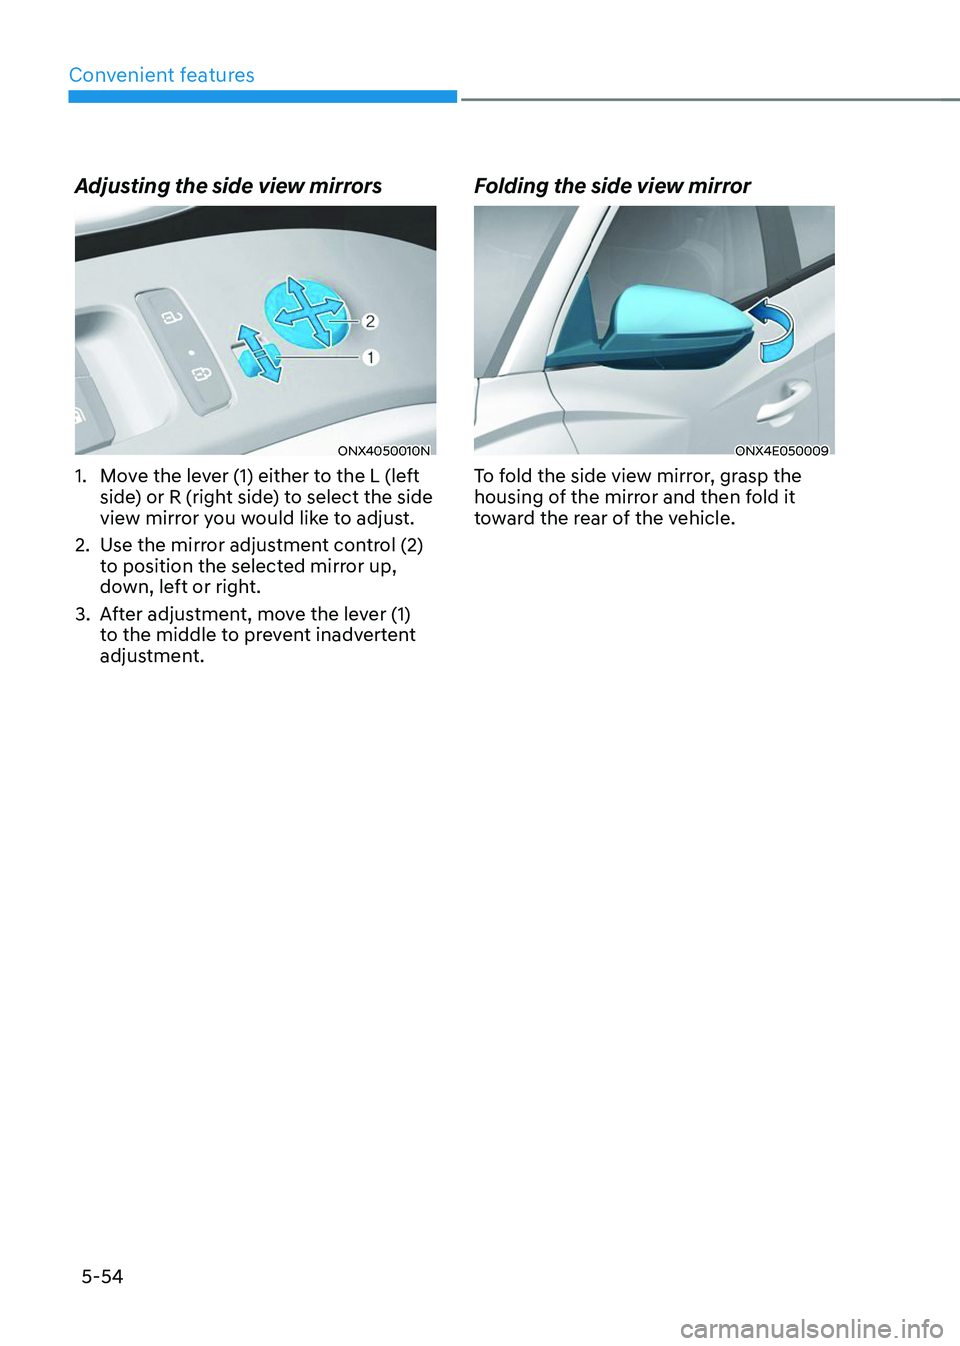
Adjusting the side view mirrors
ONX4050010N
1. Move the lever (1) either to the L (left
side) or R (right side) to select the side
view mirror you would like to adjust.
2. Use the mirror adjustment control (2)
to position the selected mirror up,
down, left or right.
3. After adjustment, move the lever (1)
to the middle to prevent inadvertent
adjustment.
Folding the side view mirror
ONX4E050009
To fold the side view mirror, grasp the
housing of the mirror and then fold it
toward the rear of the vehicle.
Page 260 of 638
Convenient features5-116
WARNING
Windshield heating
Do not use the
position during cooling operation in extremely humid
weather. The difference between the
temperature of the outside air and that
of the windshield could cause the outer
surface of the windshield to fog up,
causing loss of visibility could cause
an accident resulting in serious injury
or death. In this case, set the mode
selection button to the
position and fan speed control knob to a lower
speed.
• For maximum defrost performance,
set the temperature control to the
highest temperature setting and
the fan speed control to the highest
setting.
• If warm air to the floor is desired while
defrosting or defogging, set the mode
to the floor-defrost position.
• Before driving, clear all snow and ice
from the windshield, rear window,
side view mirrors, and all side
windows.
• Clear all snow and ice from the
hood and air inlet in the cowl grill
to improve heater and defroster
efficiency and to reduce the
probability of fogging up the inside of
the windshield.
NOTICE
If the engine temperature is still cold
after starting, then a brief engine warm
up period may be required for the
vented air flow to become warm or hot.
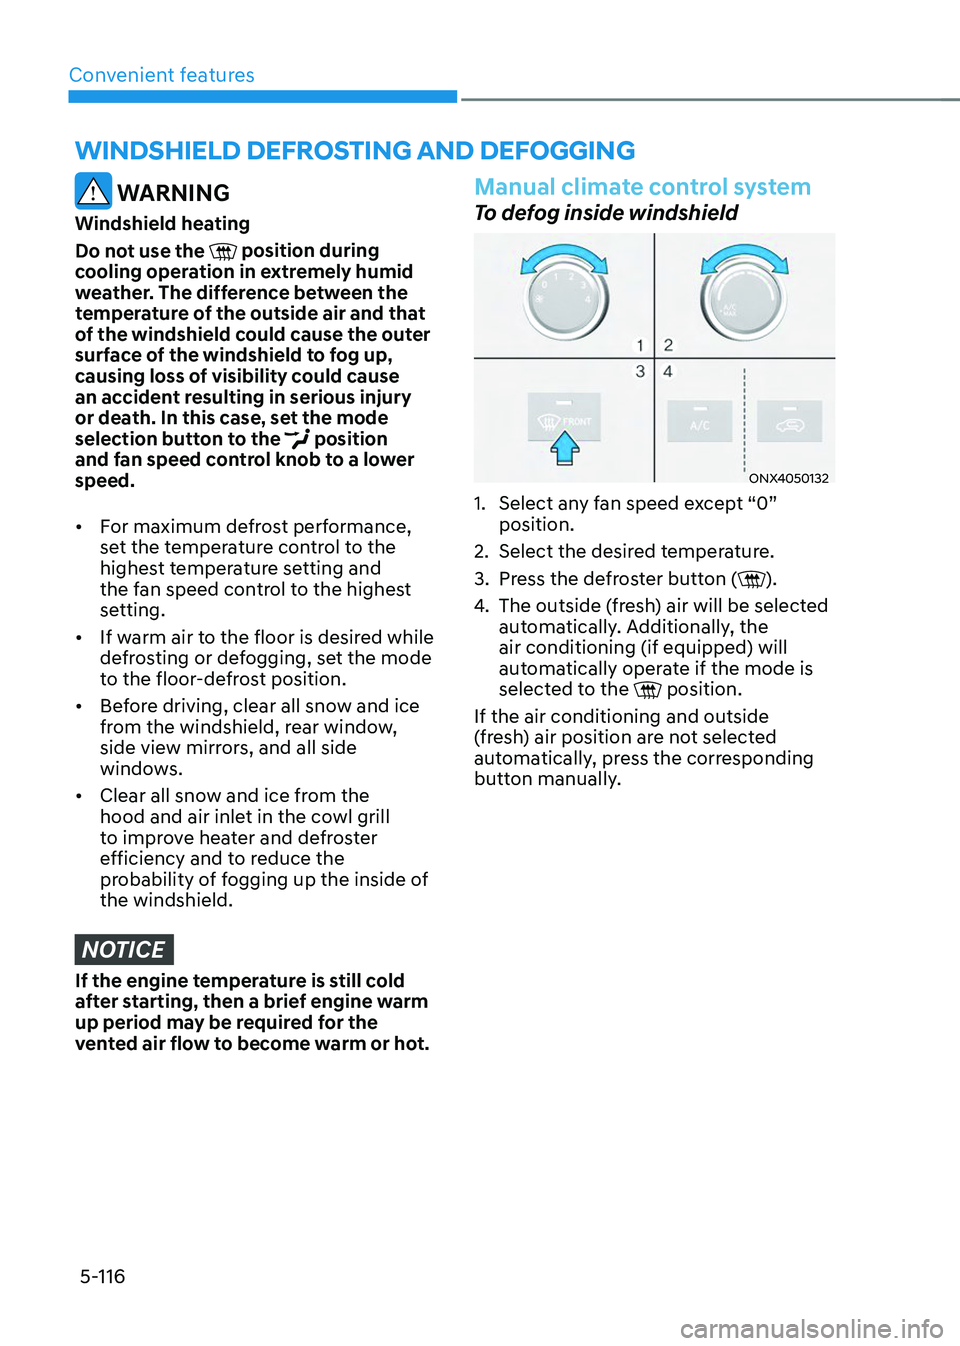
Manual climate control system
To defog inside windshield
ONX4050132
1. Select any fan speed except “0”
position.
2. Select the desired temperature.
3. Press the defroster button ().
4. The outside (fresh) air will be selected
automatically. Additionally, the
air conditioning (if equipped) will
automatically operate if the mode is
selected to the
position.
If the air conditioning and outside
(fresh) air position are not selected
automatically, press the corresponding
button manually.
WINDSHIELD DEFROSTING AND DEFOGGING