warning light HYUNDAI TUCSON HYBRID 2021 Service Manual
[x] Cancel search | Manufacturer: HYUNDAI, Model Year: 2021, Model line: TUCSON HYBRID, Model: HYUNDAI TUCSON HYBRID 2021Pages: 630, PDF Size: 77.98 MB
Page 199 of 630
Convenient features
5-42
Tilt / Telescopic steering
When adjusting the steering wheel to a
comfortable position, adjust the steering
wheel so that it points toward your chest,
not toward your face. Make sure you can
see the instrument cluster warning lights
and gauges. After adjusting, push the
steering wheel both up and down to be
certain it is locked in position.
Always adjust the position of the steering
wheel before driving.
WARNING
NEVER adjust the steering wheel while
driving. This may cause loss of vehicle
control resulting in an accident.
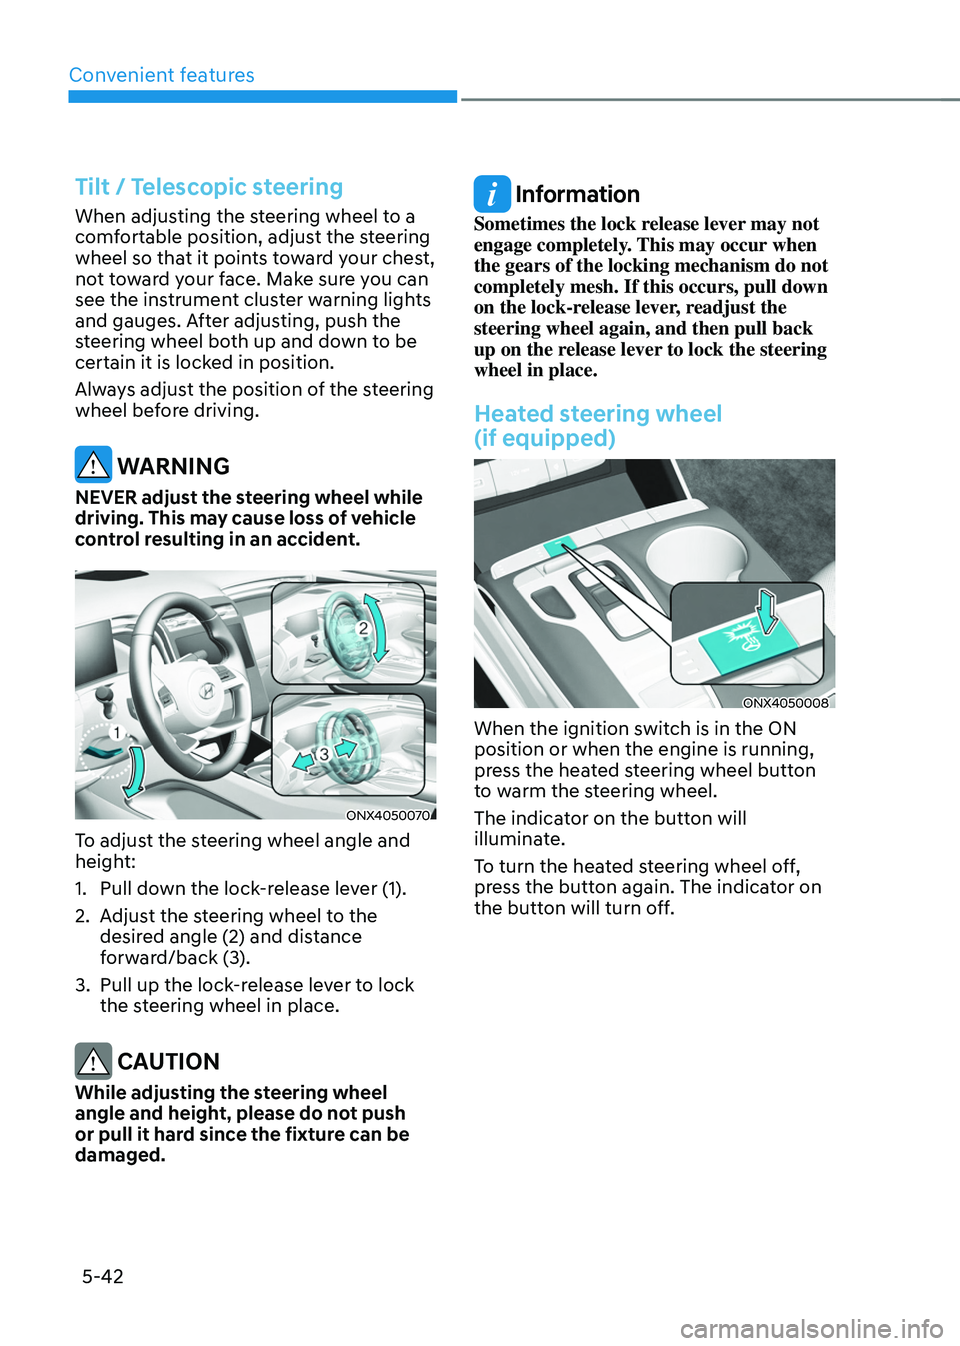
ONX4050070
To adjust the steering wheel angle and
height:
1.
Pull down the lock
-release lever (1).
2.
Adjus
t the steering wheel to the
desired angle (2) and distance
forward/back (3).
3.
Pull up the lock-r
elease lever to lock
the steering wheel in place.
CAUTION
While adjusting the steering wheel
angle and height, please do not push
or pull it hard since the fixture can be
damaged.
Information
Sometimes the lock release lever may not
engage completely. This may occur when
the gears of the locking mechanism do not
completely mesh. If this occurs, pull down
on the lock-release lever, readjust the
steering wheel again, and then pull back
up on the release lever to lock the steering
wheel in place.
Heated steering wheel
(if equipped)
ONX4050008
When the ignition switch is in the ON
position or when the engine is running,
press the heated steering wheel button
to warm the steering wheel.
The indicator on the button will
illuminate.
To turn the heated steering wheel off,
press the button again. The indicator on
the button will turn off.
Page 203 of 630
Convenient features
5-46
Integrated HomeLink® Wireless Control
System
The HomeLink® Wireless Control System
provides a convenient way to replace
up to three hand held radio-frequency
transmitters used to activate compatible
devices such as gate operators, garage
door openers, entry door locks, security
systems, and home lighting.
NOTICE
HomeLink® operates while the ignition
switch is in the ACC or ON position
for safety reasons. It is to prevent
unintentional security problems from
happening when the vehicle is parked
outside the garage.
WARNING
Before programming HomeLink® to a
garage door opener or gate operator,
make sure people and objects are out
of the way of the device to prevent
potential harm or damage. Do not
use the HomeLink® with any garage
door opener that lacks the safety
stop and reverse features required
by U.S. federal safety standards (this
includes any garage door opener model
manufactured before April 1, 1982).
A garage door that cannot detect an
object - signaling the door to stop and
reverse - does not meet current U.S.
federal safety standards. Using a garage
door opener without these features
increases the risk of serious injury or
death.
For more information, contact
HomeLink® at www.homelink.com, or
call Home-Link customer support at
1-800-355-3515.
It is also recommended that a new
battery be replaced in the handheld
transmitter of the device being trained
to HomeLink® for quicker training and
accurate transmission of the radio
frequency.
Page 209 of 630
Convenient features
5-52
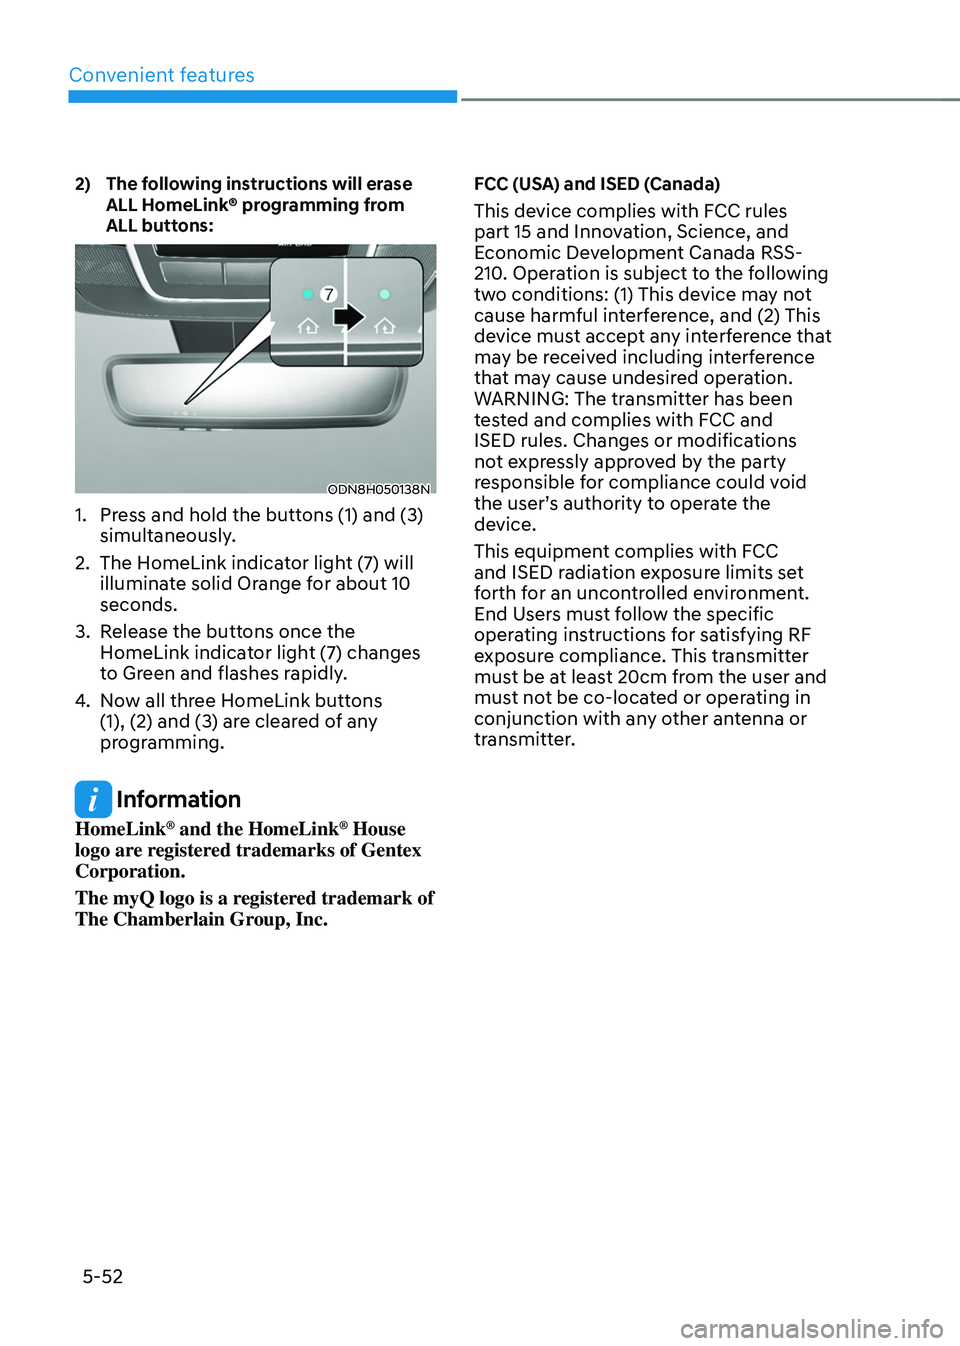
2) The following instructions will erase
ALL HomeLink® programming from
ALL buttons:
ODN8H050138N
1. Press and hold the buttons (1) and (3)
simultaneously .
2.
The HomeLink indica
tor light (7) will
illuminate solid Orange for about 10
seconds.
3.
Release the butt
ons once the
HomeLink indicator light (7) changes
to Green and flashes rapidly.
4.
No
w all three HomeLink buttons
(1), (2) and (3) are cleared of any
programming.
Information
HomeLink® and the HomeLink® House
logo are registered trademarks of Gentex
Corporation.
The myQ logo is a registered trademark of
The Chamberlain Group, Inc.
FCC (USA) and ISED (Canada)
This device complies with FCC rules
part 15 and Innovation, Science, and
Economic Development Canada RSS-
210. Operation is subject to the following
two conditions: (1) This device may not
cause harmful interference, and (2) This
device must accept any interference that
may be received including interference
that may cause undesired operation.
WARNING: The transmitter has been
tested and complies with FCC and
ISED rules. Changes or modifications
not expressly approved by the party
responsible for compliance could void
the user’s authority to operate the
device.
This equipment complies with FCC
and ISED radiation exposure limits set
forth for an uncontrolled environment.
End Users must follow the specific
operating instructions for satisfying RF
exposure compliance. This transmitter
must be at least 20cm from the user and
must not be co-located or operating in
conjunction with any other antenna or
transmitter.
Page 224 of 630
05
5-67
exterior feAtures
Hood
Opening the hood
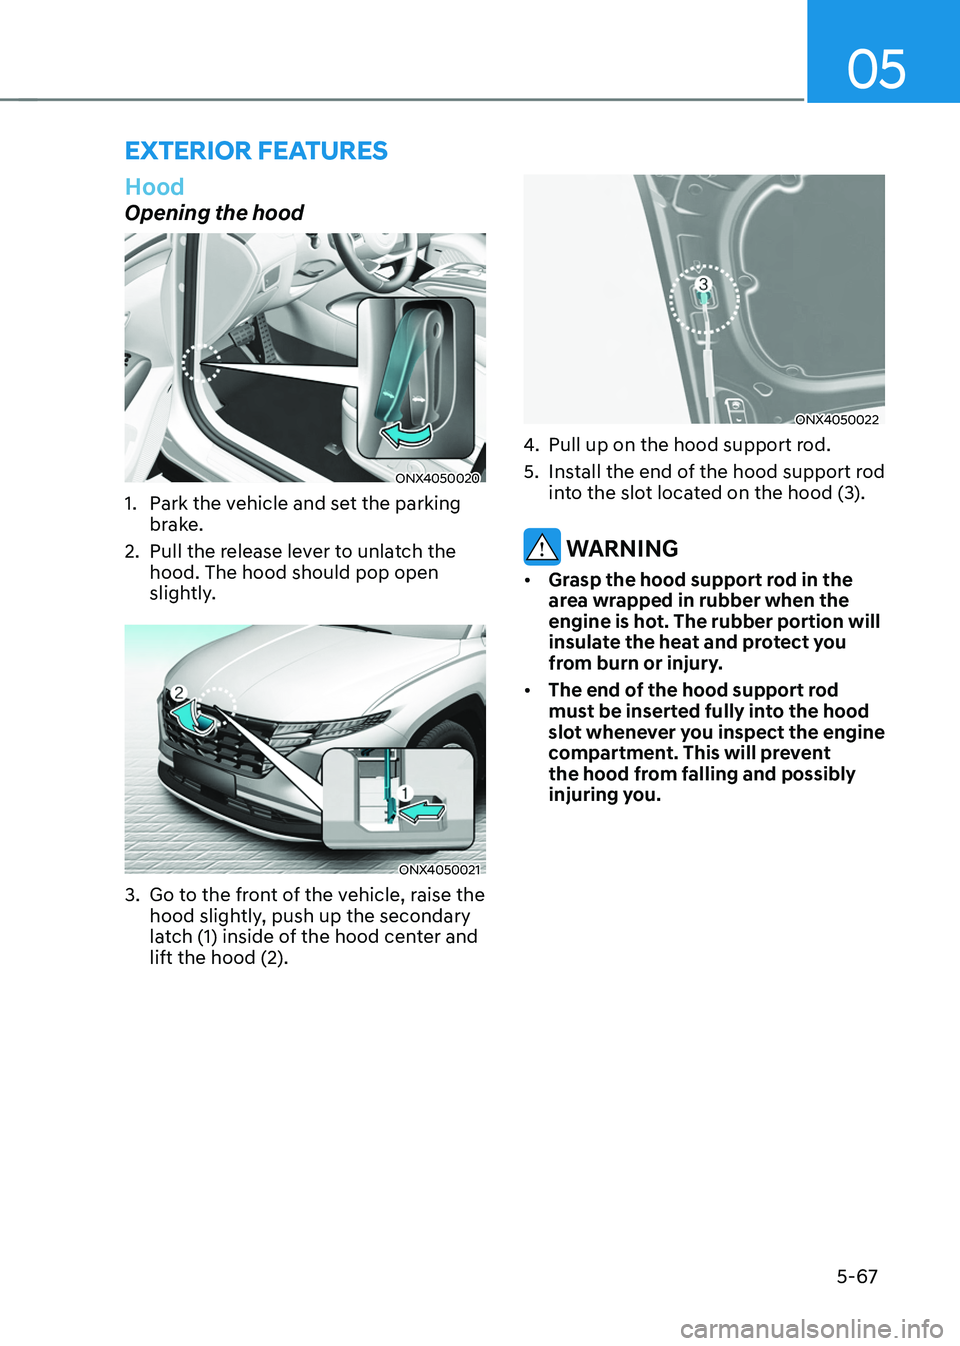
ONX4050020
1. Park the vehicle and set the parking
brake.
2.
Pull the release le
ver to unlatch the
hood. The hood should pop open
slightly.
ONX4050021
3. Go to the front of the vehicle, raise the
hood sligh tly, push up the secondary
latch (1) inside of the hood center and
lift the hood (2).
ONX4050022
4. Pull up on the hood support rod.
5.
Install the end o
f the hood support rod
into the slot located on the hood (3).
WARNING
• Grasp the hood support rod in the
area wrapped in rubber when the
engine is hot. The rubber portion will
insulate the heat and protect you
from burn or injury.
• The end of the hood support rod
must be inserted fully into the hood
slot whenever you inspect the engine
compartment. This will prevent
the hood from falling and possibly
injuring you.
Page 225 of 630
Convenient features
5-68
Closing the hood
1. Before closing the hood, check in and
around the engine compartment to
ensure the following:
- Any t
ools or other loose objects
are removed from the engine room
area or hood opening area
- All glov
e, rags, or other
combustible material is removed
from the engine compartment
- All filler caps are tigh
tly and
correctly installed
2.
Re
turn the hood support rod rod to its
clip to prevent it from rattling.
3.
Lo
wer the hood until it is about 30 cm
(12in.) above the closed position and
let it drop. Make sure that it locks into
place.
4.
Check that the hood has engaged
pr
operly. If the hood can be raised
slightly, it is not properly engaged.
Open it again and close it with a little
more force.
WARNING
• Before closing the hood, ensure
all obstructions are removed from
around the hood opening.
• Always double check to be sure that
the hood is firmly latched before
driving away. Check there is no
hood open warning light or message
displayed on the instrument cluster.
Driving with the hood opened may
cause a total loss of visibility, which
might result in an accident.
• Do not move the vehicle with the
hood in the raised position, as vision
is obstructed, which might result in
an accident, and the hood could fall
or be damaged.
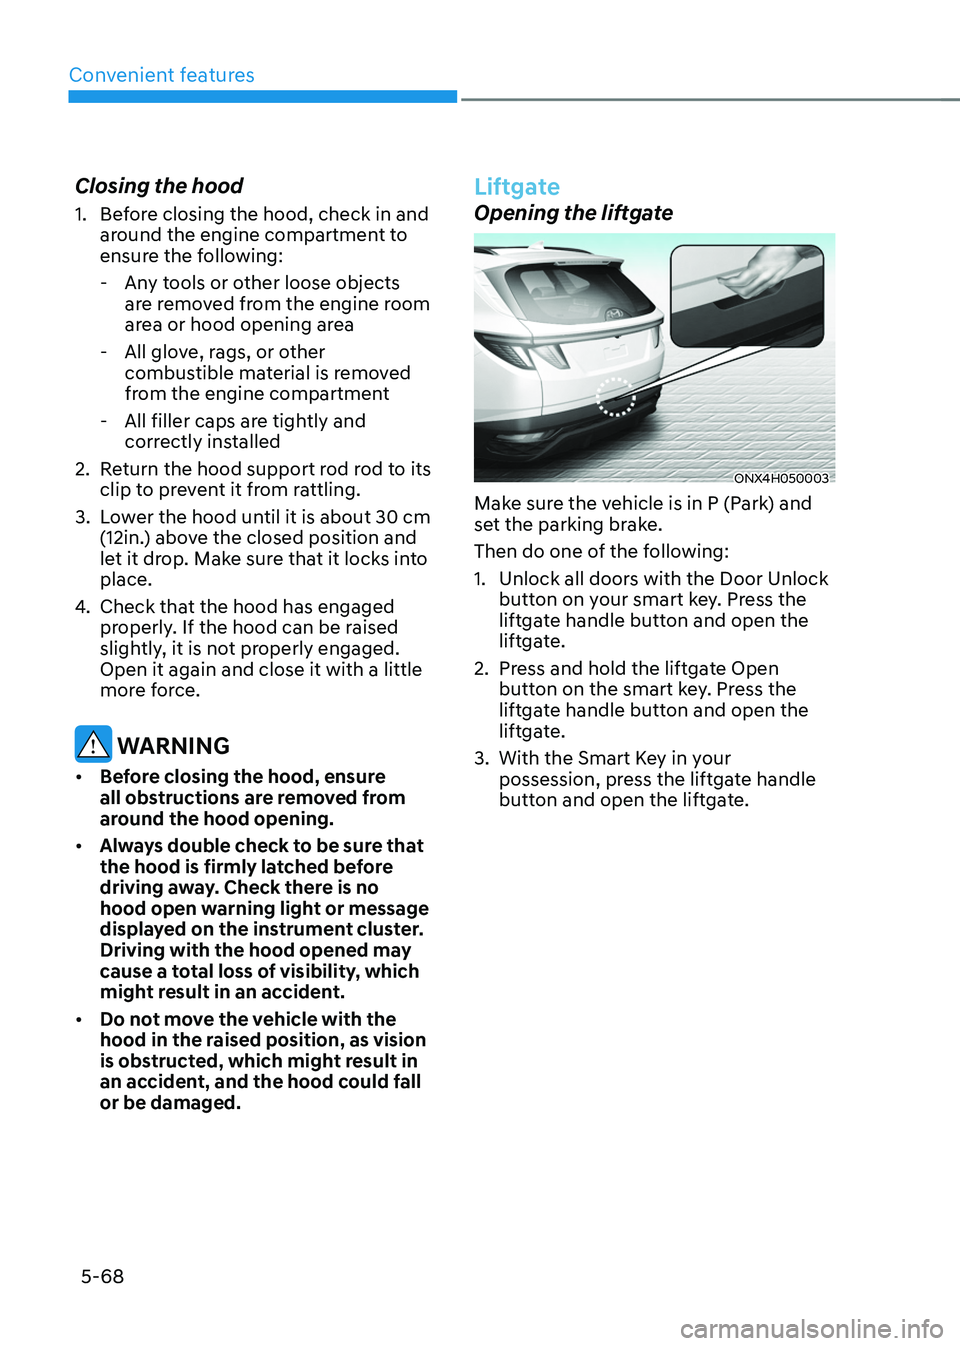
Liftgate
Opening the liftgate
ONX4H050003
Make sure the vehicle is in P (Park) and
set the parking brake.
Then do one of the following:
1.
Unlock all doors with the Door Unlock
butt
on on your smart key. Press the
liftgate handle button and open the
liftgate.
2.
Press and hold the lift
gate Open
button on the smart key. Press the
liftgate handle button and open the
liftgate.
3.
With the Smart Ke
y in your
possession, press the liftgate handle
button and open the liftgate.
Page 233 of 630
Convenient features
5 -76
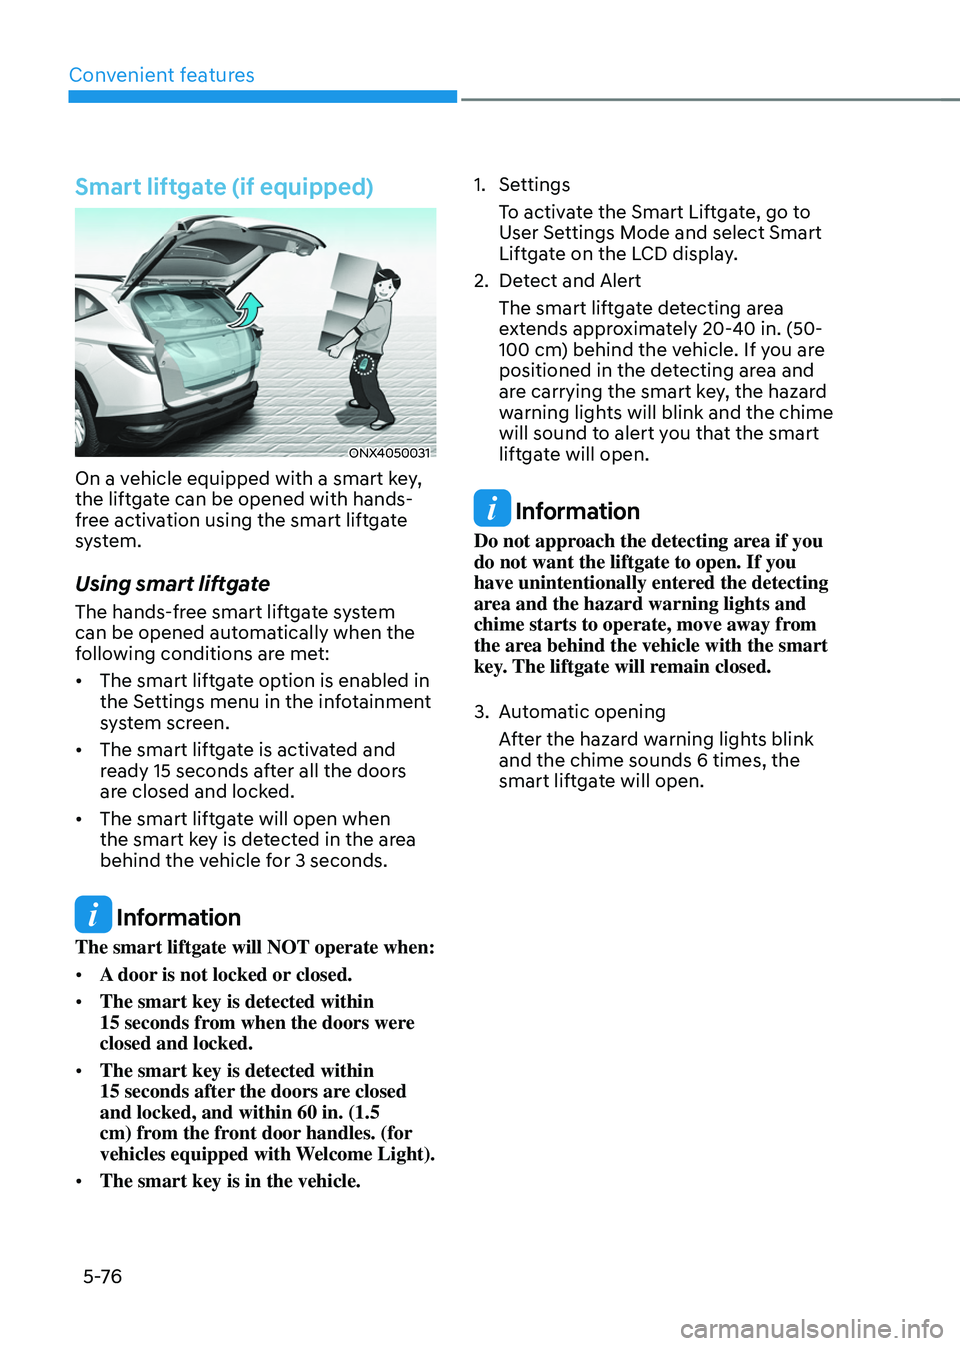
Smart liftgate (if equipped)
ONX4050031
On a vehicle equipped with a smart key,
the liftgate can be opened with hands-
free activation using the smart liftgate
system.
Using smart liftgate
The hands-free smart liftgate system
can be opened automatically when the
following conditions are met:
• The smart liftgate option is enabled in
the Settings menu in the infotainment
system screen.
• The smart liftgate is activated and
ready 15 seconds after all the doors
are closed and locked.
• The smart liftgate will open when
the smart key is detected in the area
behind the vehicle for 3 seconds.
Information
The smart liftgate will NOT operate when:
• A door is not locked or closed.
• The smart key is detected within
15
seconds fr
om when the doors were
closed and locked.
• The smart key is detected within
15
seconds after
the doors are closed
and locked, and within 60 in. (1.5
cm) from the front door handles. (for
vehicles equipped with Welcome Light).
• The smart key is in the vehicle. 1.
Settings
T
o activate the Smart Liftgate, go to
User Settings Mode and select Smart
Liftgate on the LCD display.
2.
Det
ect and Alert
The smart liftgate detecting area
extends approximately 20-40 in. (50-
100 cm) behind the vehicle. If you are
positioned in the detecting area and
are carrying the smart key, the hazard
warning lights will blink and the chime
will sound to alert you that the smart
liftgate will open.
Information
Do not approach the detecting area if you
do not want the liftgate to open. If you
have unintentionally entered the detecting
area and the hazard warning lights and
chime starts to operate, move away from
the area behind the vehicle with the smart
key. The liftgate will remain closed.
3.
Aut
omatic opening
After the hazard warning lights blink
and the chime sounds 6 times, the
smart liftgate will open.
Page 234 of 630
05
5-77
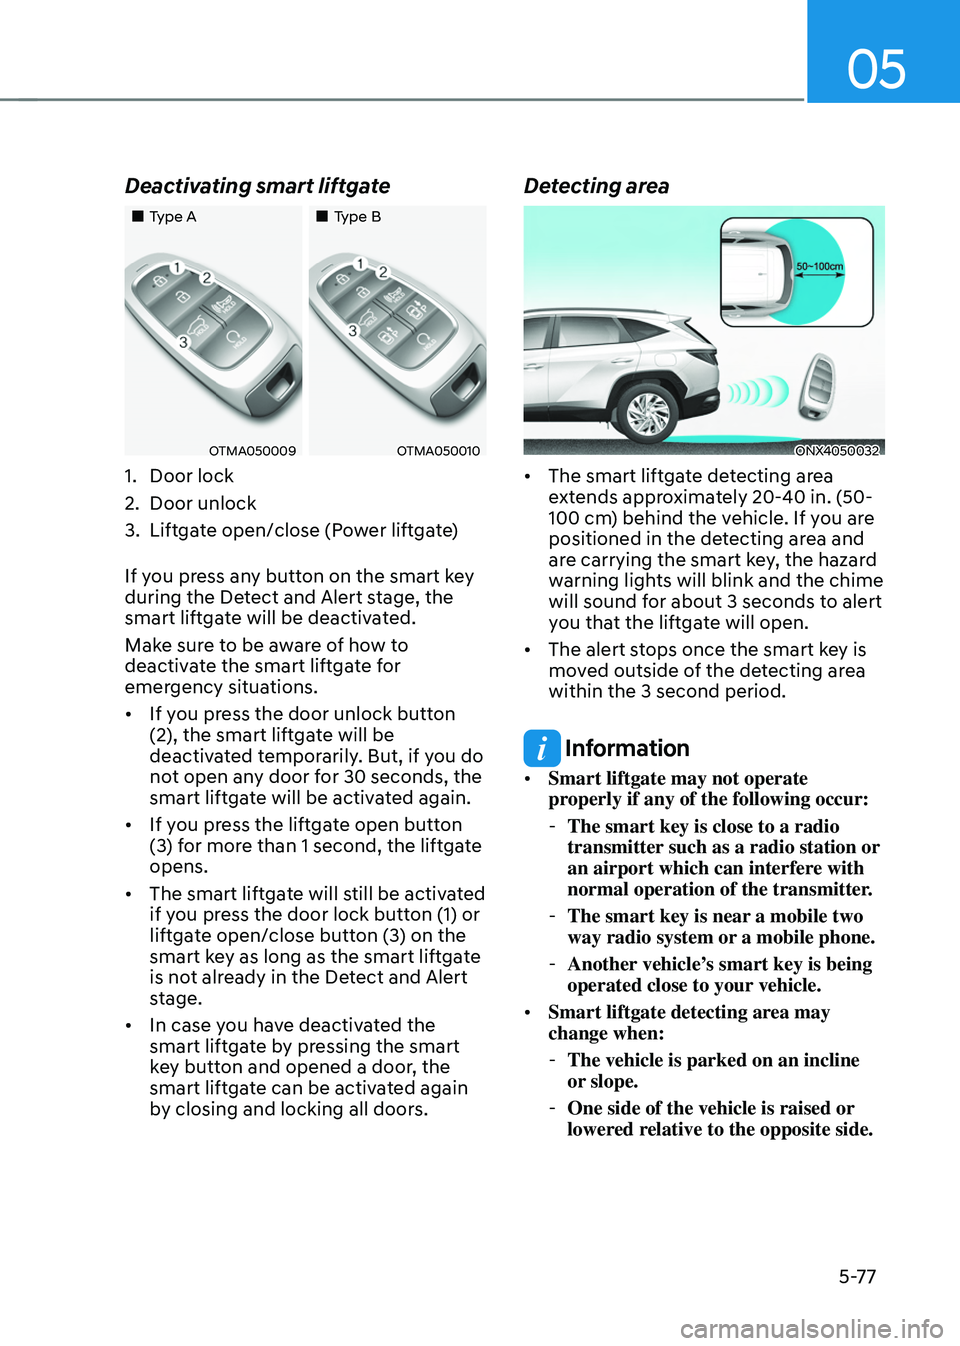
Deactivating smart liftgate
„„Type A„„Type B
OTMA050009OTMA050010
1. Door lock
2.
Door unlock
3.
Liftga
te open/close (Power liftgate)
If you press any button on the smart key
during the Detect and Alert stage, the
smart liftgate will be deactivated.
Make sure to be aware of how to
deactivate the smart liftgate for
emergency situations.
• If you press the door unlock button
(2), the smart liftgate will be
deactivated temporarily. But, if you do
not open any door for 30 seconds, the
smart liftgate will be activated again.
• If you press the liftgate open button
(3) for more than 1 second, the liftgate
opens.
• The smart liftgate will still be activated
if you press the door lock button (1) or
liftgate open/close button (3) on the
smart key as long as the smart liftgate
is not already in the Detect and Alert
stage.
• In case you have deactivated the
smart liftgate by pressing the smart
key button and opened a door, the
smart liftgate can be activated again
by closing and locking all doors.
Detecting area
ONX4050032
• The smart liftgate detecting area
extends approximately 20-40 in. (50-
100 cm) behind the vehicle. If you are
positioned in the detecting area and
are carrying the smart key, the hazard
warning lights will blink and the chime
will sound for about 3 seconds to alert
you that the liftgate will open.
• The alert stops once the smart key is
moved outside of the detecting area
within the 3 second period.
Information
• Smart liftgate may not operate
properly if any of the following occur:
-The smart key is close to a radio
transmitter such as a radio station or
an airport which can interfere with
normal operation of the transmitter.
- The smart key is near a mobile two
way radio system or
a mobile phone.
-Another vehicle’
s smart key is being
operated close to your vehicle.
• Smart liftgate detecting area may
change when:
-The vehicle is parked on an incline
or slope.
-One side of the vehicle is raised or
lower
ed relative to the opposite side.
Page 236 of 630
05
5-79
Closing the fuel filler door
1. To install the fuel tank cap, turn it
clockwise until it “clicks” one time.
2.
Close the fuel filler door until it is
la
tched securely.
Information
To lock the fuel filler door, make sure the
fuel filler door is completely closed. Press
the LOCK button on the remote key or
smart key to lock your vehicle. The fuel
filler door will also lock.
Note that if the fuel filler door is not
completely closed when the vehicle is
locked, the fuel filler door will not be
locked.
CAUTION
Make sure the fuel filler door is
completely closed before driving
through a car wash or operating a high
pressure spray washer.
WARNING
Automotive fuel is highly flammable
and explosive. Failure to follow these
guidelines may result in SERIOUS
INJURY or DEATH:
• Read and follow all warnings posted
at the gas station.
• Before refueling, note the location
of the Emergency Fuel Shut-Off, if
available, at the gas station.
• Before touching the fuel nozzle, you
should eliminate the potential build-
up of static electricity by touching
a metal part of the vehicle, a safe
distance away from the fuel filler
neck, nozzle, or other gas source,
with your bare hand.
• Do not use mobile phones while
refueling. Electric current and/or
electronic interference from cellular
phones can potentially ignite fuel
vapors and cause a fire. •
Do not get back into a vehicle
once you have begun refueling.
You can generate a buildup of
static electricity by touching,
rubbing or sliding against any item
or fabric capable of producing
static electricity. Static electricity
discharge can ignite fuel vapors
causing a fire. If you must re-enter
the vehicle, you should once again
eliminate potentially dangerous
static electricity discharge by
touching a metal part of the vehicle,
away from the fuel filler neck, nozzle
or other fuel source, with your bare
hand.
• When using an approved portable
fuel container, be sure to place the
container on the ground prior to
refueling. Static electricity discharge
from the container can ignite fuel
vapors causing a fire.
Once refueling has begun, contact
between your bare hand and the
vehicle should be maintained until
the filling is complete.
• Use only approved portable plastic
fuel containers designed to carry and
store fuel.
• When refueling, always shift the
gear to the P (Park) position, set
the parking brake, and press the
Engine Start/Stop button to the
OFF position. Sparks produced by
electrical components related to the
engine can ignite fuel vapors causing
a fire.
• Do not use matches or a lighter and
do not smoke or leave a lit cigarette
in your vehicle while at a gas station,
especially during refueling.
• Do not over-fill or top-off your
vehicle tank, which can cause fuel
spillage.
Page 242 of 630
05
5-85
hIgh Beam assIsT (hBa)
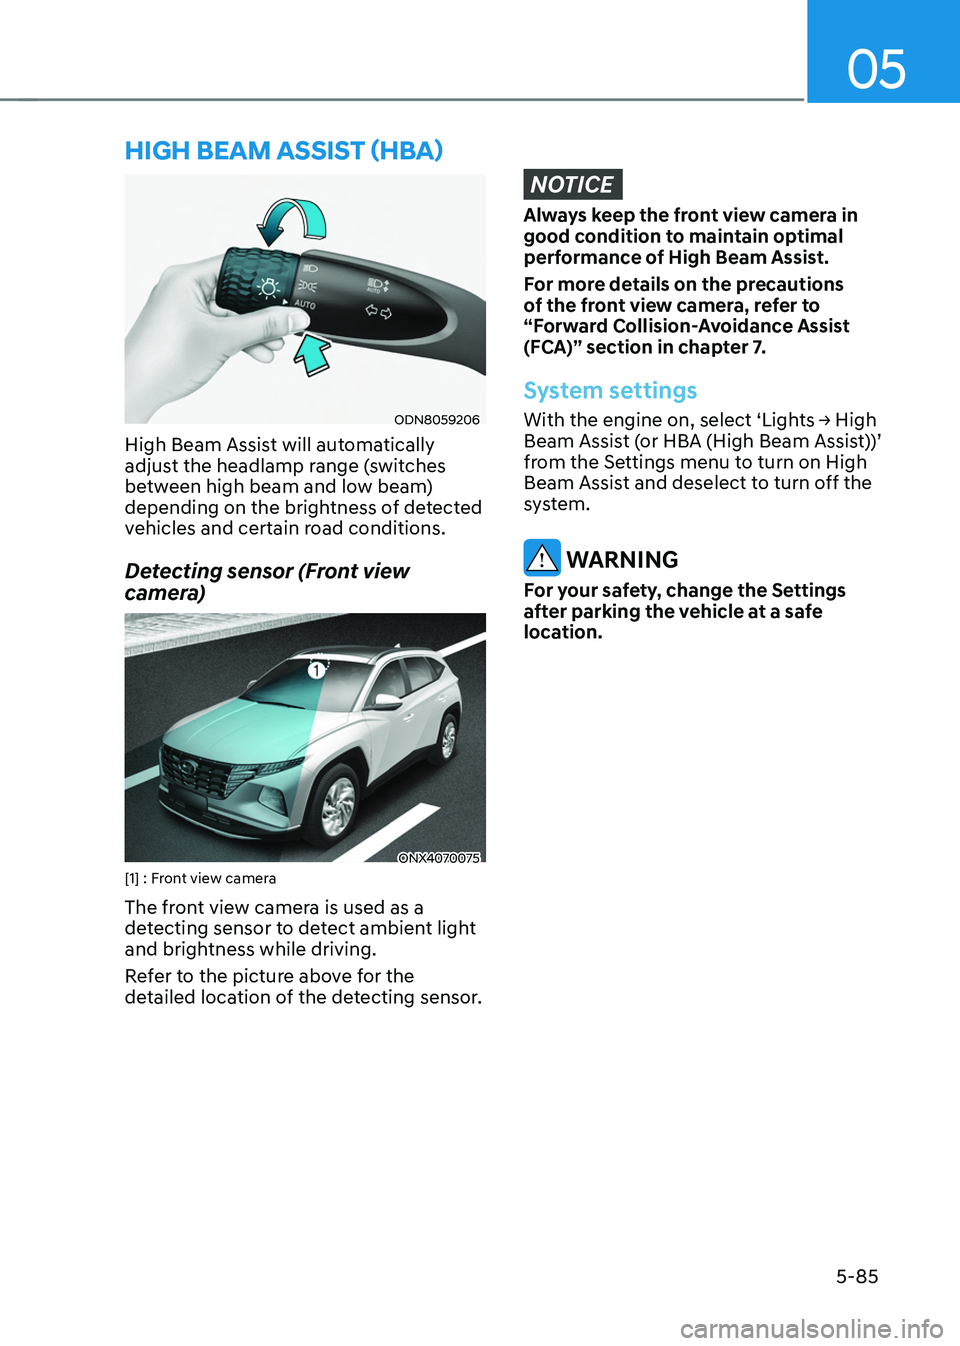
ODN8059206
High Beam Assist will automatically
adjust the headlamp range (switches
between high beam and low beam)
depending on the brightness of detected
vehicles and certain road conditions.
Detecting sensor (Front view
camera)
ONX4070075[1] : Front view camera
The front view camera is used as a
detecting sensor to detect ambient light
and brightness while driving.
Refer to the picture above for the
detailed location of the detecting sensor.
NOTICE
Always keep the front view camera in
good condition to maintain optimal
performance of High Beam Assist.
For more details on the precautions
of the front view camera, refer to
“Forward Collision-Avoidance Assist
(FCA)” section in chapter 7.
System settings
With the engine on, select ‘Lights → High Beam Assist (or HBA (High Beam Assist))’
from the Settings menu to turn on High
Beam Assist and deselect to turn off the
system.
WARNING
For your safety, change the Settings
after parking the vehicle at a safe
location.
Page 243 of 630
Convenient features
5-86
System operation
Display and control
• After selecting ‘High Beam Assist’
in the Settings menu, High Beam
Assist will operate by following the
procedure below.
- Place the headlamp swit
ch in
the AUTO position and push
the headlamp lever towards the
instrument cluster. The High Beam
Assist (
) indicator light will
illuminate on the cluster and the
system will be enabled.
- When the sy
stem is enabled, high
beam will turn on when vehicle
speed is above 25 mph (40 km/h).
When vehicle speed is below 15
mph (25 km/h), high beam will not
turn on.
- The High Beam () indicator light
will illuminate on the cluster when
high beam is on.
• When High Beam Assist is operating, if
the headlamp lever or switch is used,
the system operates as follow:
- If the headlamp lev
er is pulled
towards you when the high beam
is off, the high beam will turn on
without High Beam Assist canceled.
When you let go of the headlamp
lever, the lever will move to the
middle and the high beam will turn
off.
- If the headlamp lev
er is pulled
towards you when the high beam is
on by High Beam Assist, low beam
will be on and the system will turn
off.
- If the headlamp swit
ch is placed
from AUTO to another position
(headlamp/position/off), High
Beam Assist will turn off and the
corresponding lamp will turn on. •
When High Beam Assist is operating,
high beam switches to low beam if
any of the following conditions occur:
- When the headlamp of an
oncoming v
ehicle is detected.
- When the tail lamp of a v
ehicle in
front is detected.
- When the headlamp or tail lamp of a mo
torcycle or a bicycle is detected.
- When the surrounding ambien
t light
is bright enough that high beams
are not required.
- When str
eetlights or other lights are
detected.
System malfunction and
limitations
System malfunction
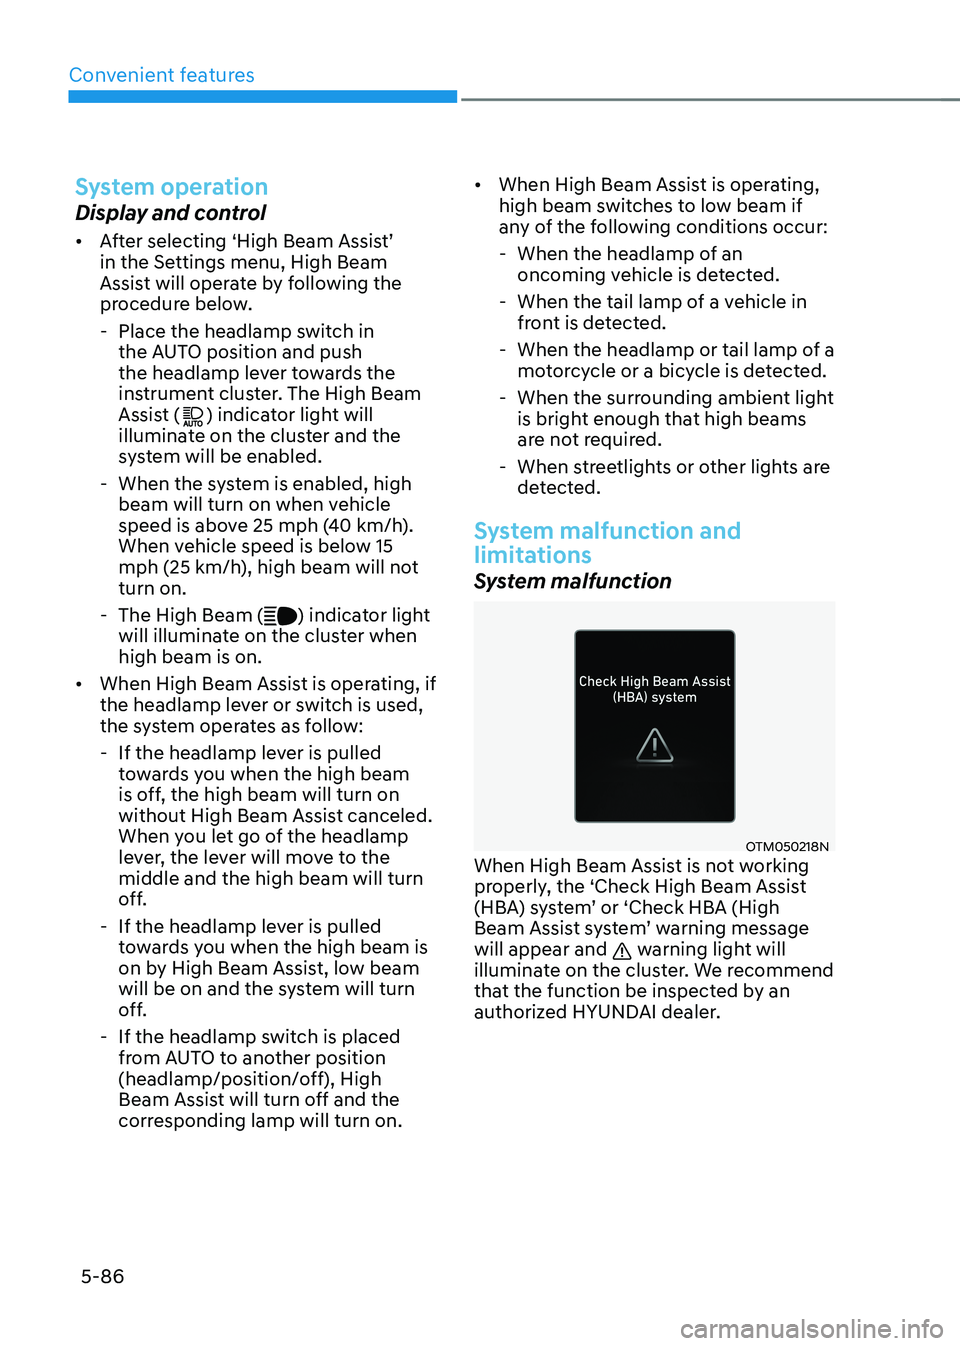
OTM050218NWhen High Beam Assist is not working
properly, the ‘Check High Beam Assist
(HBA) system’ or ‘Check HBA (High
Beam Assist system’ warning message
will appear and
warning light will
illuminate on the cluster. We recommend
that the function be inspected by an
authorized HYUNDAI dealer.