trip computer HYUNDAI TUCSON HYBRID 2022 Owners Manual
[x] Cancel search | Manufacturer: HYUNDAI, Model Year: 2022, Model line: TUCSON HYBRID, Model: HYUNDAI TUCSON HYBRID 2022Pages: 630, PDF Size: 77.98 MB
Page 115 of 630

4. Instrument cluster
Stop safely and check power supply ......................................................................4-27
Check virtual engine sound system ........................................................................\
4-27
Refuel to prevent Hybrid battery damage
.............................................................4-27
Refill inverter coolant ........................................................................\
......................4-27
Park with engine On to charge battery ..................................................................4-27
Start engine to avoid battery discharge .................................................................4-27
LCD display ........................................................................\
..............................4-28LCD display control ........................................................................\
............................4-28
View modes ........................................................................\
........................................4-29
Trip computer mode ........................................................................\
.......................4-30
Turn By Turn (TBT) mode ........................................................................\
................4-30
Driving Assist mode ........................................................................\
........................4-30
Master warning group ........................................................................\
.....................4-31
User settings mode ........................................................................\
..........................4-33
Trip computer (4.2-inch) ........................................................................\
...................4-40
Trip modes ........................................................................\
.......................................4-40
Trip computer (10.25-inch) ........................................................................\
...............4-43
Trip modes ........................................................................\
.......................................4-43
4
Page 116 of 630
4-4
Instrument cluster
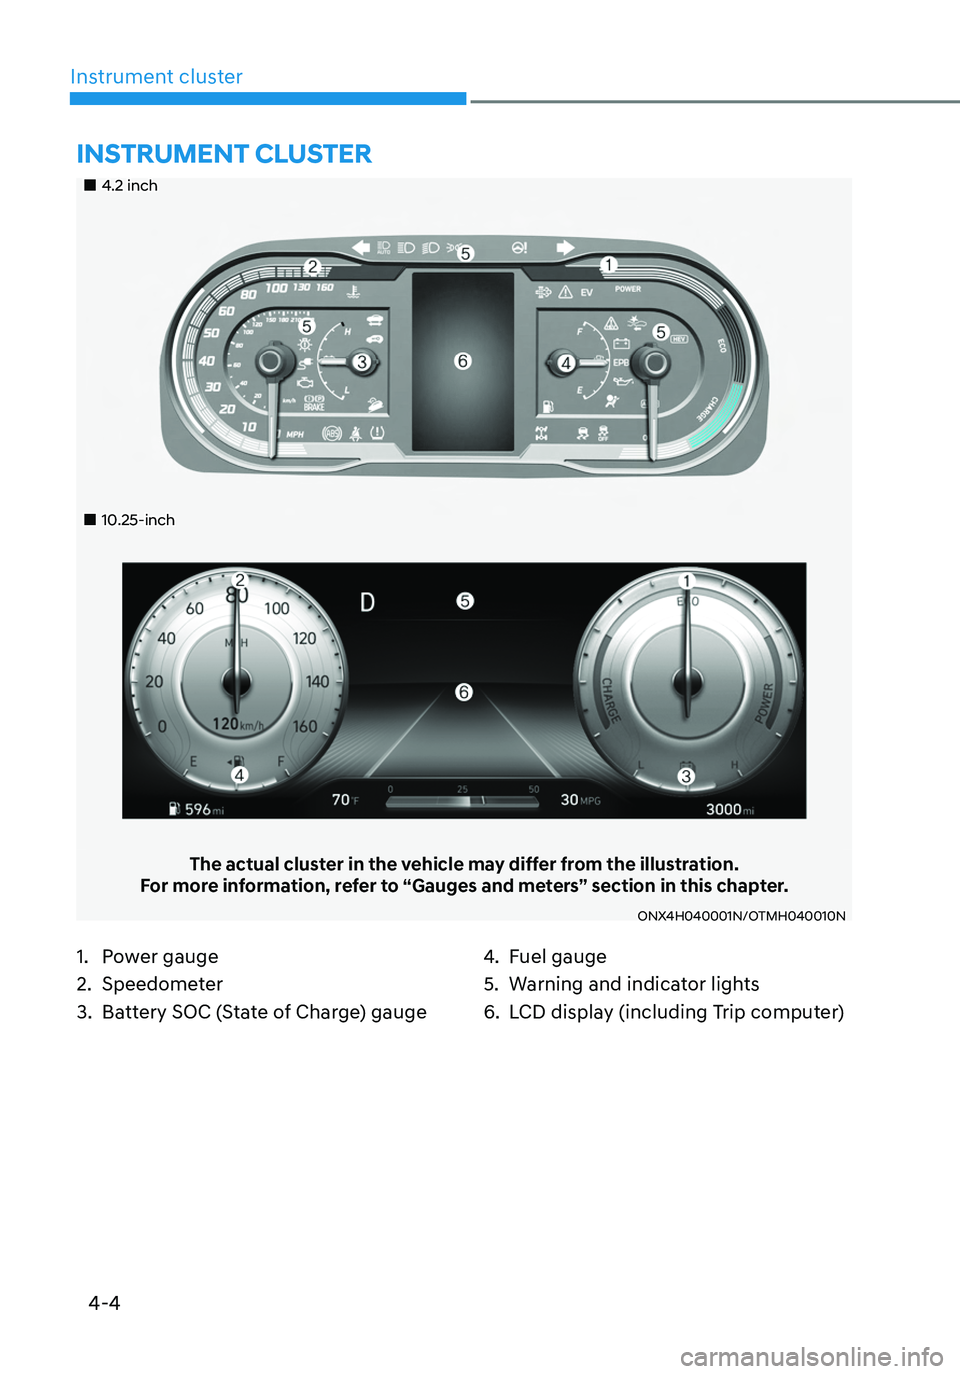
„„4.2 inch
„„10.25-inch
The actual cluster in the vehicle may differ from the illustration.
For more information, refer to “Gauges and meters” section in this chapter.
ONX4H040001N/OTMH040010N
1. Power gauge
2. Speedometer
3. Battery SOC (State of Charge) gauge
4. Fuel gauge
5. Warning and indicator lights
6. LCD display (including Trip computer)
INSTRUMENT CLUSTER
Page 120 of 630
Instrument cluster
4-8
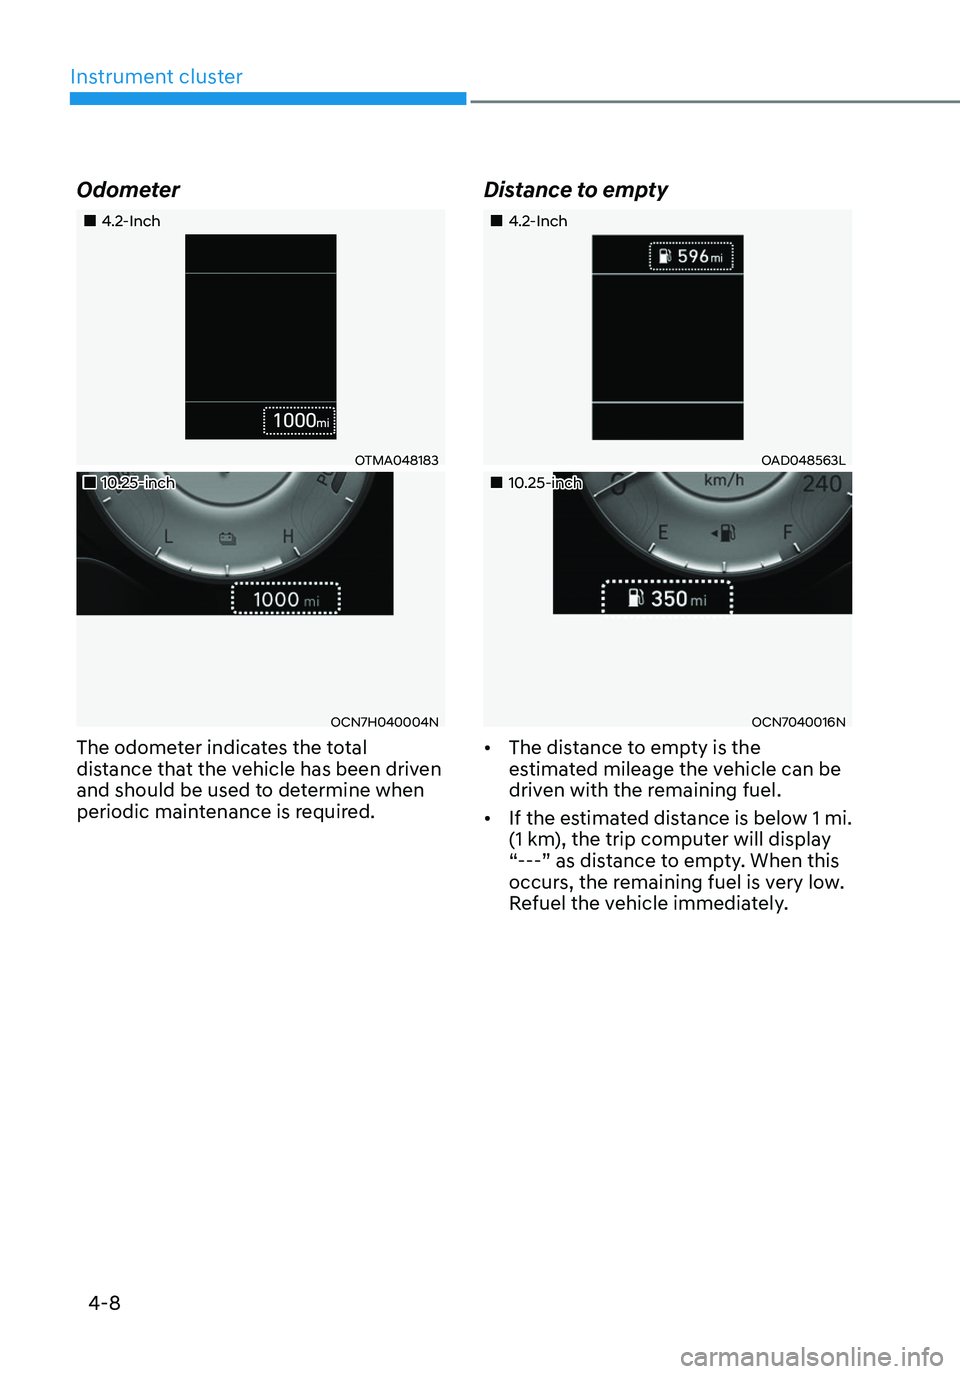
Odometer
„„4.2-Inch
OTMA048183
„„10.25-inch
OCN7H040004N
The odometer indicates the total
distance that the vehicle has been driven
and should be used to determine when
periodic maintenance is required.
Distance to empty
„„4.2-Inch
OAD048563L
„„10.25-inch
OCN7040016N
• The distance to empty is the
estimated mileage the vehicle can be
driven with the remaining fuel.
• If the estimated distance is below 1 mi.
(1 km), the trip computer will display
“---” as distance to empty. When this
occurs, the remaining fuel is very low.
Refuel the vehicle immediately.
Page 141 of 630
04
4-29
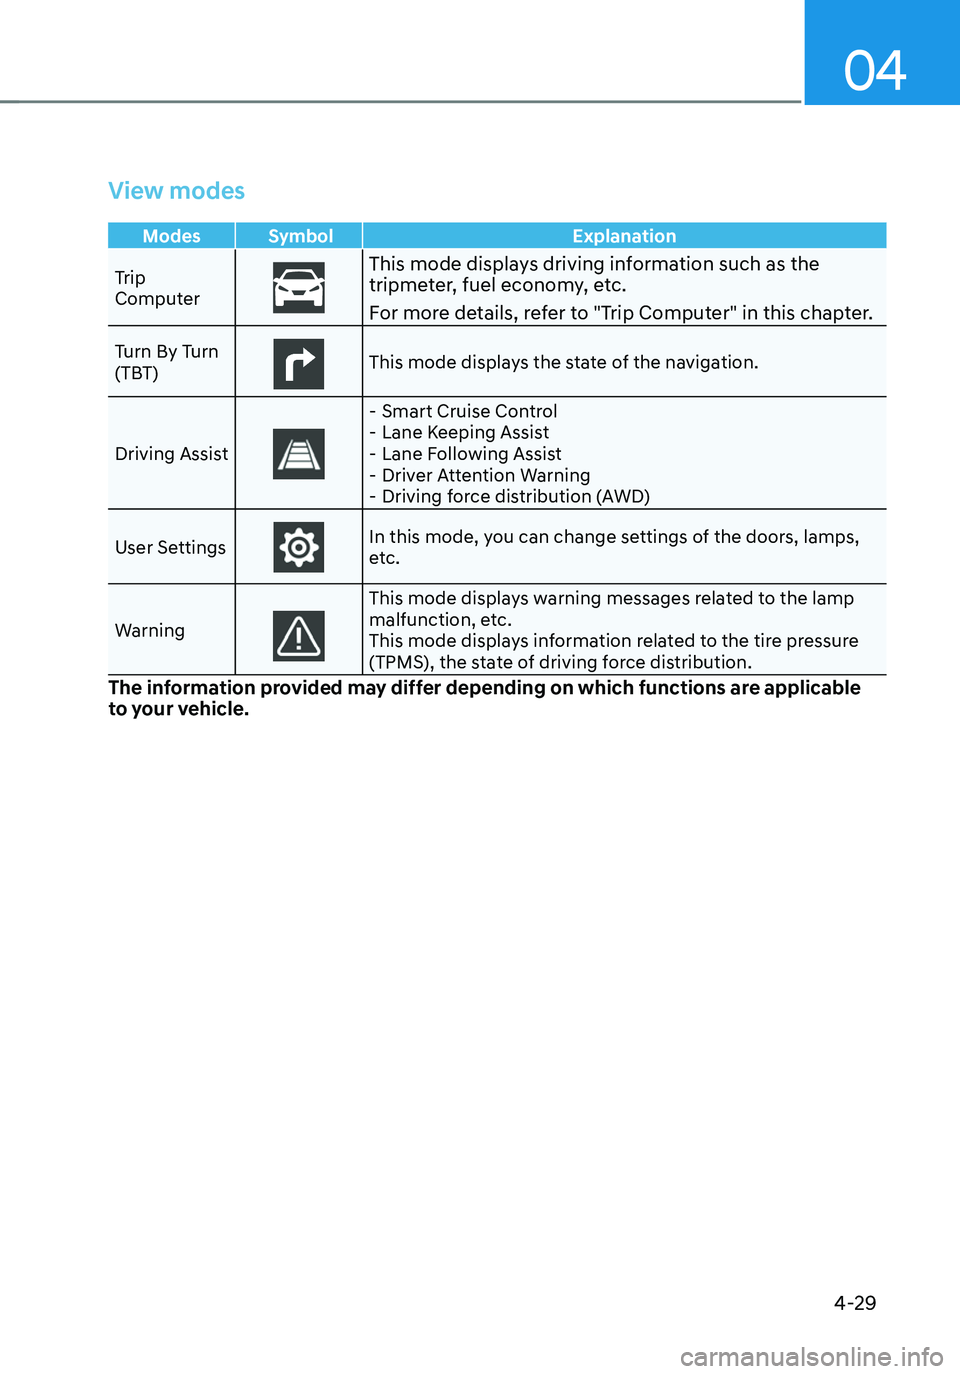
View modes
Modes Symbol Explanation
Trip
Computer
This mode displays driving information such as the tripmeter, fuel economy, etc.
For more details, refer to "Trip Computer" in this chapter.
Turn By Turn
(TBT)This mode displays the state of the navigation.
Driving Assist
- Smart Cruise Control -Lane Keeping Assist -Lane Following Assist -Driver Attention Warning -Driving force distribution (AWD)
User Settings
In this mode, you can change settings of the doors, lamps,
etc.
Warning
This mode displays warning messages related to the lamp
malfunction, etc.
This mode displays information related to the tire pressure
(TPMS), the state of driving force distribution.
The information provided may differ depending on which functions are applicable
to your vehicle.
Page 142 of 630
4-30
Instrument cluster
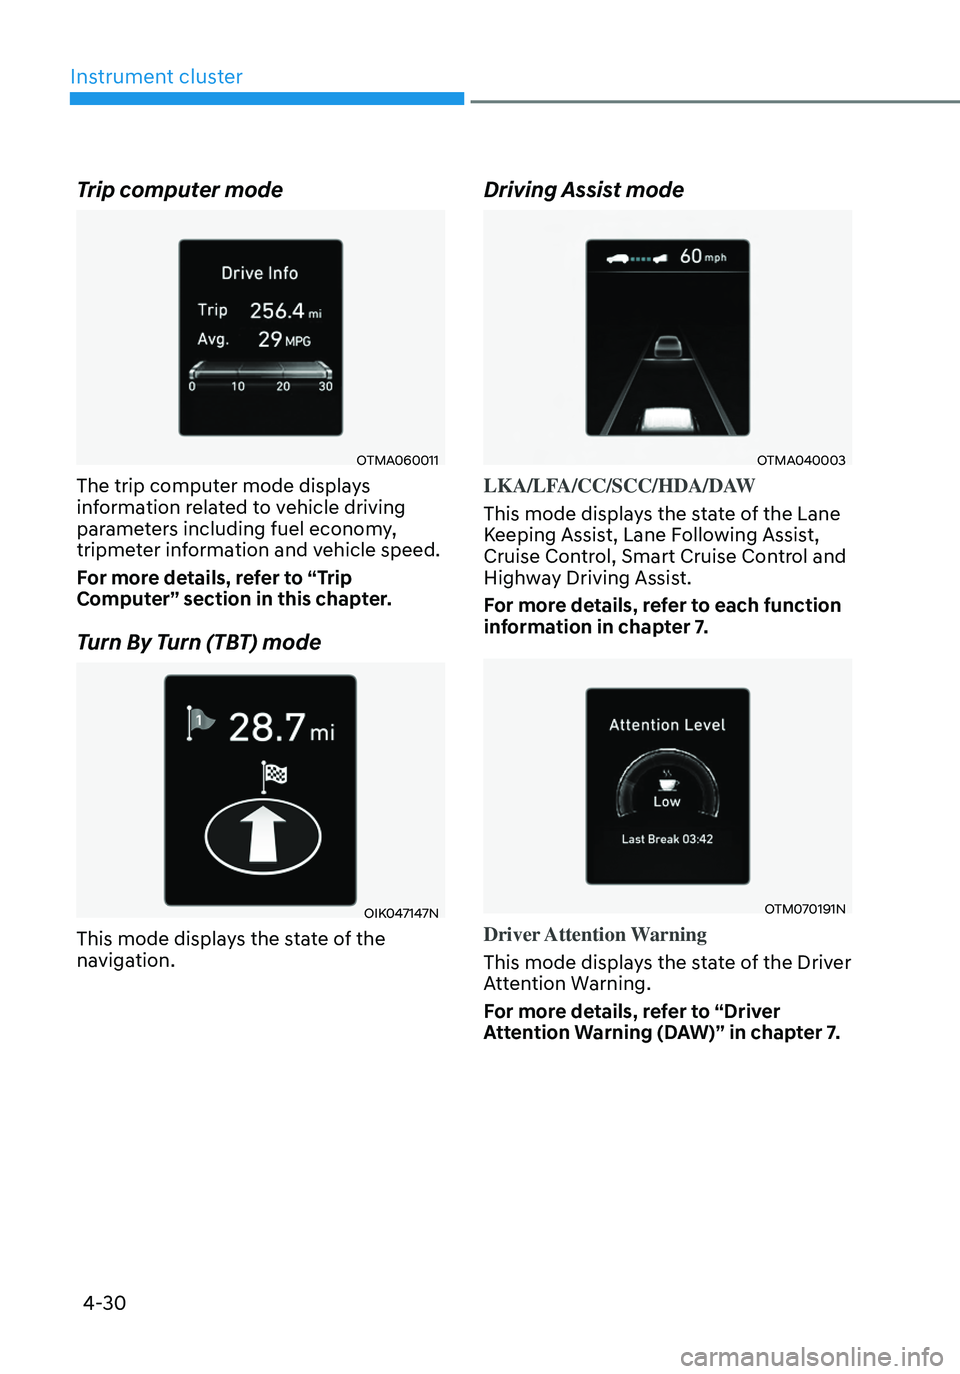
Trip computer mode
OTMA060011
The trip computer mode displays
information related to vehicle driving
parameters including fuel economy,
tripmeter information and vehicle speed.
For more details, refer to “Trip
Computer” section in this chapter.
Turn By Turn (TBT) mode
OIK047147N
This mode displays the state of the
navigation.
Driving Assist mode
OTMA040003
LKA/LFA/CC/SCC/HDA/DAW
This mode displays the state of the Lane
Keeping Assist, Lane Following Assist,
Cruise Control, Smart Cruise Control and
Highway Driving Assist.
For more details, refer to each function
information in chapter 7.
OTM070191N
Driver Attention Warning
This mode displays the state of the Driver
Attention Warning.
For more details, refer to “Driver
Attention Warning (DAW)” in chapter 7.
Page 152 of 630
Instrument cluster
4-40
Trip computer (4.2-inch)
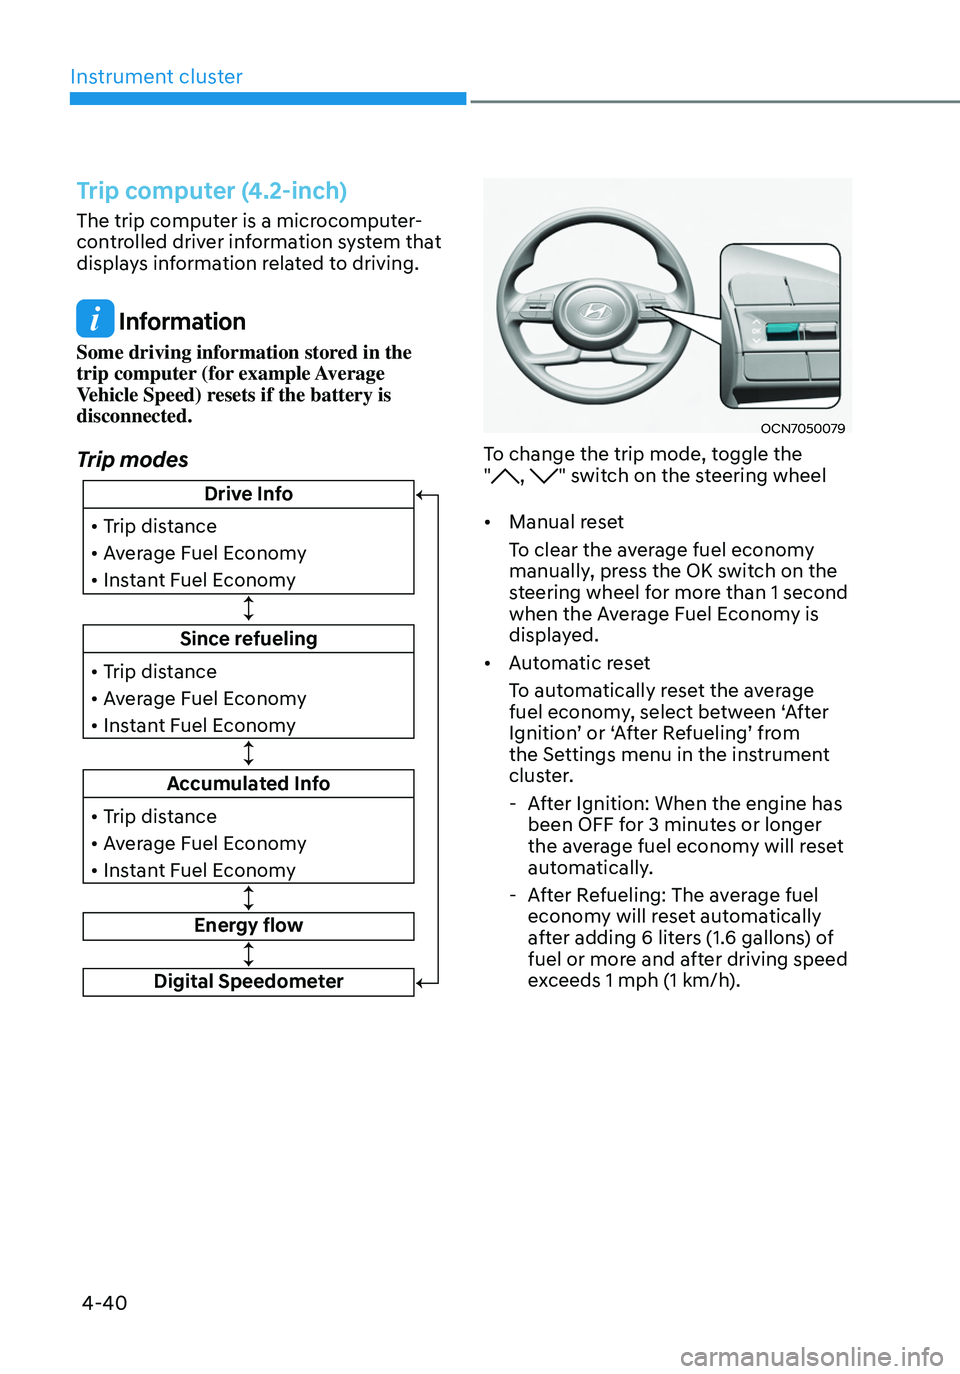
The trip computer is a microcomputer-
controlled driver information system that
displays information related to driving.
Information
Some driving information stored in the
trip computer (for example Average
Vehicle Speed) resets if the battery is
disconnected.
Trip modes
Since refueling
• Trip distance
• Average Fuel Economy
• Instant Fuel Economy
Drive Info
• Trip distance
• Average Fuel Economy
• Instant Fuel Economy
Accumulated Info
• Trip distance
• Average Fuel Economy
• Instant Fuel Economy
Energy flow
Digital Speedometer
OCN7050079
To change the trip mode, toggle the
", " switch on the steering wheel
• Manual reset
To clear the average fuel economy
manually, press the OK switch on the
steering wheel for more than 1 second
when the Average Fuel Economy is
displayed.
• Automatic reset
To automatically reset the average
fuel economy, select between ‘After
Ignition’ or ‘After Refueling’ from
the Settings menu in the instrument
cluster.
- After Ignition: When the engine has
been OFF for 3 minutes or longer
the average fuel economy will reset
automatically.
-After Refueling: The average fuel
economy will reset automatically
after adding 6 liters (1.6 gallons) of
fuel or more and after driving speed
exceeds 1 mph (1 km/h).
Page 155 of 630
04
4-43
Trip computer (10.25-inch)
The trip computer is a microcomputer-
controlled driver information system that
displays information related to driving.
Information
Some driving information stored in the
trip computer (for example Average
Vehicle Speed) resets if the battery is
disconnected.
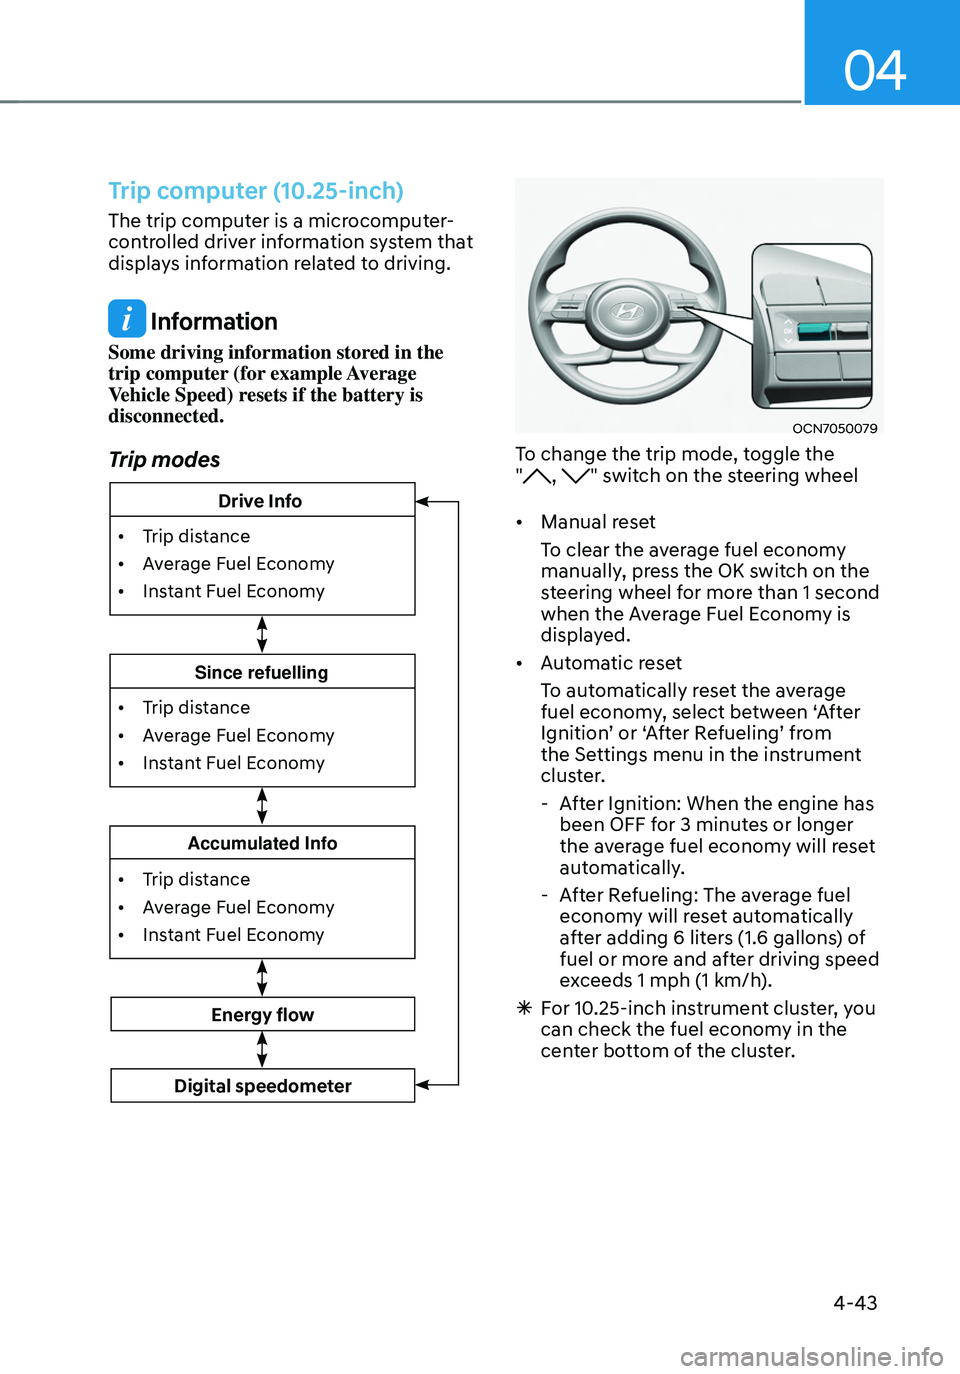
Trip modes
• Trip distance
•
Av
erage Fuel Economy
•
Instan
t Fuel Economy
Accumulated Info
• Trip distance
•
Av
erage Fuel Economy
•
Instan
t Fuel Economy
Since refuelling
Energy flow
Digital speedometer
• Trip distance
•
Av
erage Fuel Economy
•
Instan
t Fuel Economy
Drive Info
OCN7050079
To change the trip mode, toggle the
", " switch on the steering wheel
• Manual reset
To clear the average fuel economy
manually, press the OK switch on the
steering wheel for more than 1 second
when the Average Fuel Economy is
displayed.
• Automatic reset
To automatically reset the average
fuel economy, select between ‘After
Ignition’ or ‘After Refueling’ from
the Settings menu in the instrument
cluster.
-After Ignition: When the engine has
been OFF for 3 minutes or longer
the average fuel economy will reset
automatically.
-After Refueling: The average fuel
economy will reset automatically
after adding 6 liters (1.6 gallons) of
fuel or more and after driving speed
exceeds 1 mph (1 km/h).
à For 10.25-inch instrument cluster, you
can check the fuel economy in the
center bottom of the cluster.
Page 525 of 630
08
8-5
if tHe 12 volt Battery is discHar ged
Before Jump Starting
This vehicle does not have a regular 12V
battery that needs periodic replacement.
It is lithium ion polymer type integrated
into the HEV high voltage battery. The
vehicle has a 12V battery protection
system that cuts 12V battery from vehicle
draw to prevent full discharge.
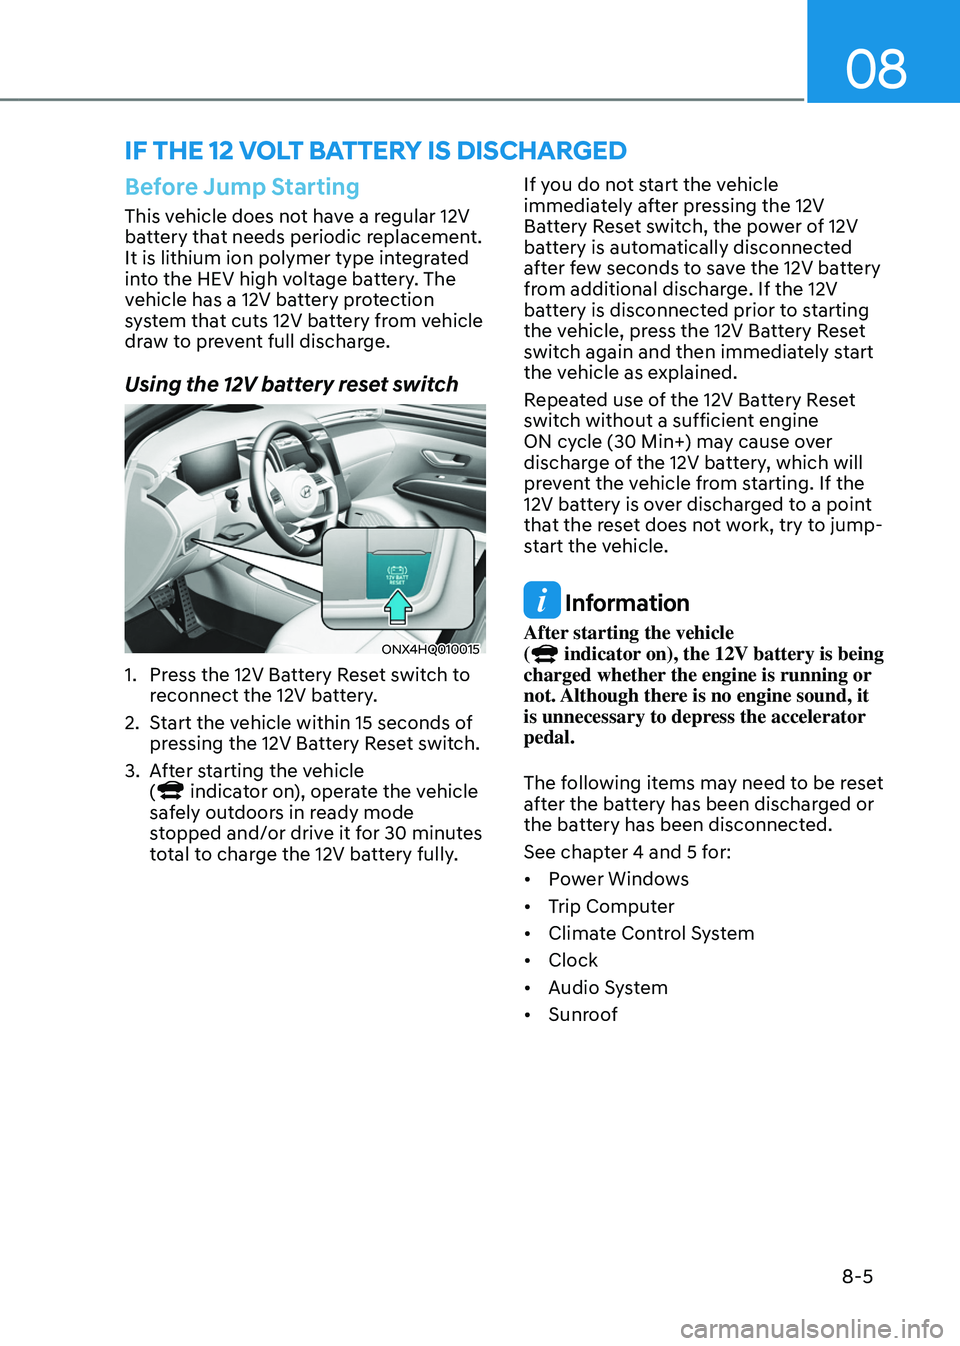
Using the 12V battery reset switch
ONX4HQ010015
1. Press the 12V Battery Reset switch to
r
econnect the 12V battery.
2.
Start the v
ehicle within 15 seconds of
pressing the 12V Battery Reset switch.
3.
Aft
er starting the vehicle
(
indicator on), operate the vehicle
safely outdoors in ready mode
stopped and/or drive it for 30 minutes
total to charge the 12V battery fully. If you do not start the vehicle
immediately after pressing the 12V
Battery Reset switch, the power of 12V
battery is automatically disconnected
after few seconds to save the 12V battery
from additional discharge. If the 12V
battery is disconnected prior to starting
the vehicle, press the 12V Battery Reset
switch again and then immediately start
the vehicle as explained.
Repeated use of the 12V Battery Reset
switch without a sufficient engine
ON cycle (30 Min+) may cause over
discharge of the 12V battery, which will
prevent the vehicle from starting. If the
12V battery is over discharged to a point
that the reset does not work, try to jump-
start the vehicle.
Information
After starting the vehicle
( indicator on), the 12V battery is being
charged whether the engine is running or
not. Although there is no engine sound, it
is unnecessary to depress the accelerator
pedal.
The following items may need to be reset
after the battery has been discharged or
the battery has been disconnected.
See chapter 4 and 5 for:
• Power Windows
• Trip Computer
• Climate Control System
• Clock
• Audio System
• Sunroof
Page 577 of 630
Maintenance
9-30
• The negative battery cable must
be removed first and installed last
when the battery is disconnected.
Disconnect the battery charger in the
following order:
1.
Turn o
ff the battery charger main
switch.
2.
Unhook the nega
tive clamp from
the negative battery terminal.
3.
Unhook the positiv
e clamp from
the positive battery terminal.
• We recommend that you use
batteries for replacement from an
authorized HYUNDAI dealer.
NOTICE
AGM battery (if equipped)
• Absorbent Glass Matt (AGM)
batteries are maintenance-free
and we recommend that the AGM
battery be serviced by an authorized
HYUNDAI dealer. For charging
your AGM battery, use only fully
automatic battery chargers that
are specially developed for AGM
batteries.
• When replacing the AGM battery,
we recommend that you use parts
for replacement from an authorized
HYUNDAI dealer.
• Do not open or remove the cap on
top of the battery. This may cause
leaks of internal electrolyte that
could result in severe injury.
By jump starting
After a jump start from a good battery,
drive the vehicle for 20-30 minutes
before it is shutoff. The vehicle may
not restart if you shut it off before the
battery had a chance to adequately
recharge. See “Jump Starting” in chapter
9 for more information on jump starting
procedures.
Information
An inappropriately disposed
battery can be harmful to the
environment and human health.
Dispose of the battery according
to your local law(s) or regulation.
Reset items
The following items may need to be reset
after the battery has been discharged or
the battery has been disconnected.
• Auto up/down window (see chapter 5)
• Sunroof (see chapter 5)
• Trip computer (see chapter 5)
• Climate control system (see chapter 5)
• Driver position memory system (see
chapter 5)
• Clock (see chapter 5)
• Infotainment system (see
infotainment system manual)
Page 626 of 630
I
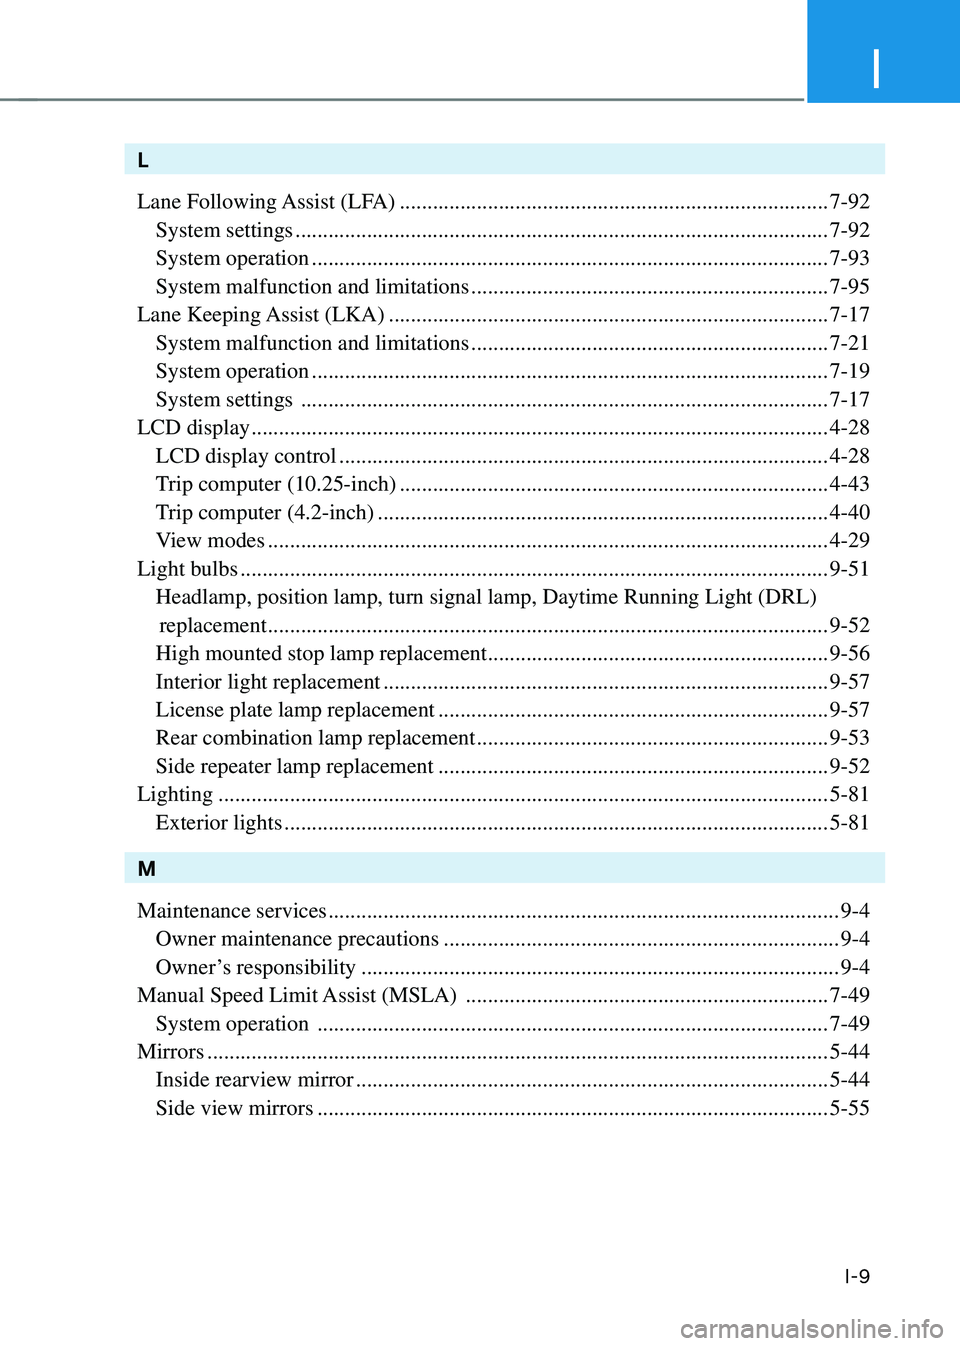
I-9
L
Lane Following Assist (LFA)
........................................................................\
......7-92
System settings ........................................................................\
.........................7-92
System operation ........................................................................\
......................7-93
System malfunction and limitations .................................................................7-95
Lane Keeping Assist (LKA)
........................................................................\
........7-17
System malfunction and limitations .................................................................7-21
System operation ........................................................................\
......................7-19
System settings ........................................................................\
........................7-17
LCD display
........................................................................\
.................................4-28
LCD display control ........................................................................\
.................4-28
Trip computer (10.25-inch) ........................................................................\
......4-43
Trip computer (4.2-inch) ........................................................................\
..........4-40
View modes ........................................................................\
..............................4-29
Light bulbs
........................................................................\
...................................9-51
Headlamp, position lamp, turn signal lamp, Daytime Running Light (DRL)\
replacement ........................................................................\
..............................9-52
High mounted stop lamp replacement ..............................................................9-56
Interior light replacement ........................................................................\
.........9-57
License plate lamp replacement .......................................................................9-57
Rear combination lamp replacement ................................................................9-53
Side repeater lamp replacement .......................................................................9-52
Lighting
........................................................................\
.......................................5-81
Exterior lights ........................................................................\
...........................5-81
M
Maintenance services
........................................................................\
.....................9-4
Owner maintenance precautions ........................................................................\
9-4
Owner’s responsibility ........................................................................\
...............9-4
Manual Speed Limit Assist (MSLA)
..................................................................7-49
System operation ........................................................................\
.....................7-49
Mirrors
........................................................................\
.........................................5-44
Inside rearview mirror ........................................................................\
..............5-44
Side view mirrors ........................................................................\
.....................5-55