HYUNDAI TUCSON LIMITED 2017 Owners Manual
Manufacturer: HYUNDAI, Model Year: 2017, Model line: TUCSON LIMITED, Model: HYUNDAI TUCSON LIMITED 2017Pages: 642, PDF Size: 9.78 MB
Page 141 of 642
3-43
Convenient features of your vehicle
3
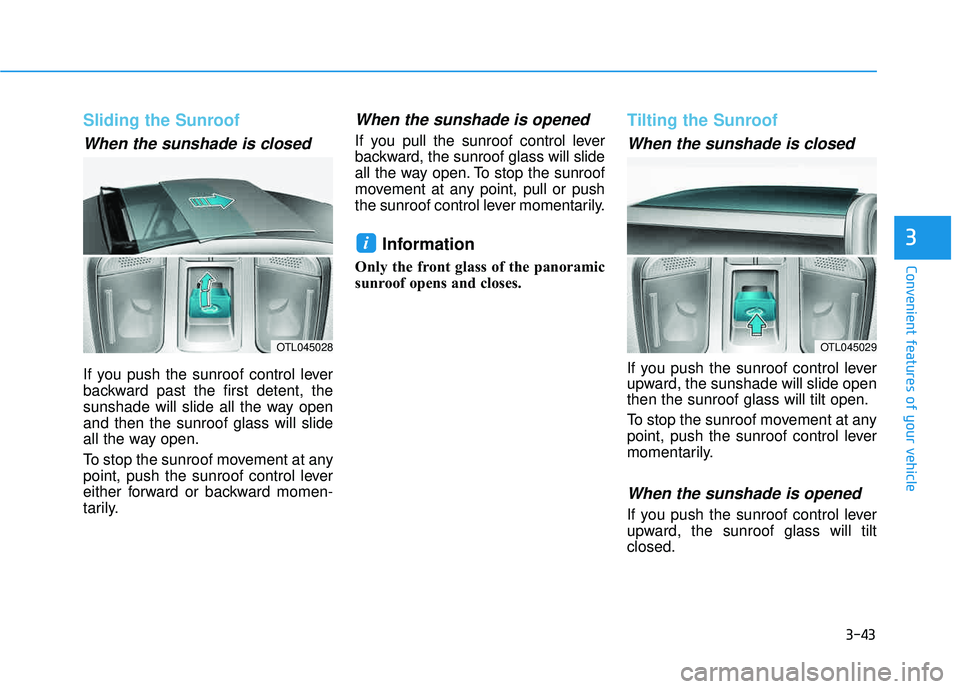
Sliding the Sunroof
When the sunshade is closed
If you push the sunroof control lever
backward past the first detent, the
sunshade will slide all the way openand then the sunroof glass will slide
all the way open.
To stop the sunroof movement at any
point, push the sunroof control lever
either forward or backward momen-
tarily.
When the sunshade is opened
If you pull the sunroof control lever
backward, the sunroof glass will slide
all the way open. To stop the sunroof
movement at any point, pull or push
the sunroof control lever momentarily.
Information
Only the front glass of the panoramic
sunroof opens and closes.
Tilting the Sunroof
When the sunshade is closed
If you push the sunroof control lever
upward, the sunshade will slide openthen the sunroof glass will tilt open.
To stop the sunroof movement at any
point, push the sunroof control lever
momentarily.
When the sunshade is opened
If you push the sunroof control lever
upward, the sunroof glass will tiltclosed.
i
OTL045028OTL045029
Page 142 of 642
3-44
Convenient features of your vehicle
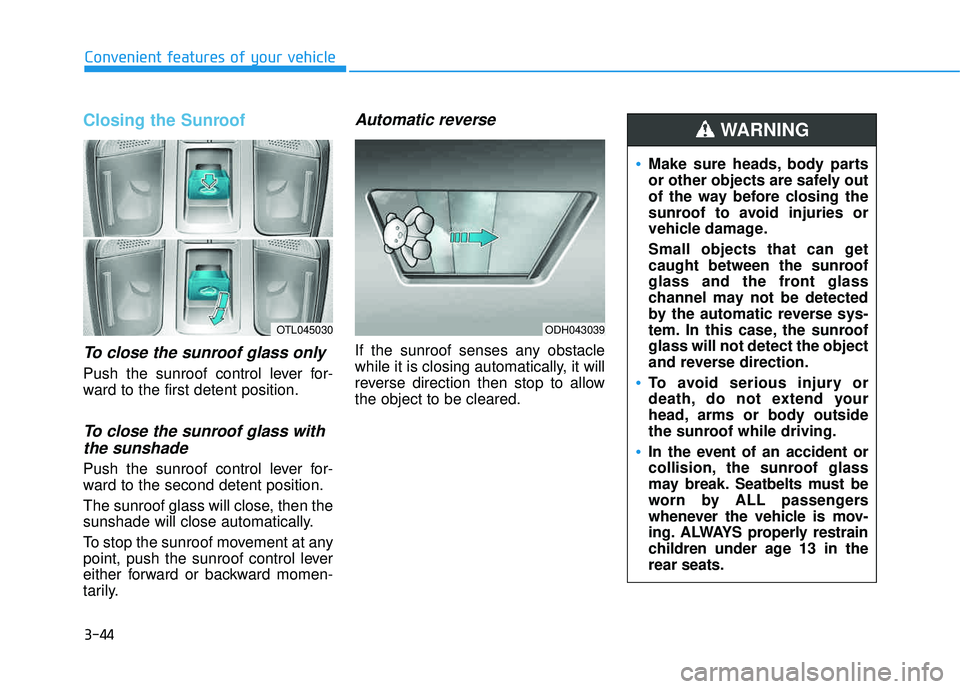
Closing the Sunroof
To close the sunroof glass only
Push the sunroof control lever for-
ward to the first detent position.
To close the sunroof glass withthe sunshade
Push the sunroof control lever for-
ward to the second detent position.
The sunroof glass will close, then the
sunshade will close automatically.
To stop the sunroof movement at any
point, push the sunroof control lever
either forward or backward momen-
tarily.
Automatic reverse
If the sunroof senses any obstacle
while it is closing automatically, it will
reverse direction then stop to allowthe object to be cleared.
OTL045030ODH043039
Make sure heads, body parts
or other objects are safely out
of the way before closing the
sunroof to avoid injuries or
vehicle damage.
Small objects that can get
caught between the sunroof
glass and the front glass
channel may not be detected
by the automatic reverse sys-
tem. In this case, the sunroofglass will not detect the object
and reverse direction.
To avoid serious injury or
death, do not extend your
head, arms or body outside
the sunroof while driving.
In the event of an accident or
collision, the sunroof glass
may break. Seatbelts must be
worn by ALL passengers
whenever the vehicle is mov-
ing. ALWAYS properly restrain
children under age 13 in therear seats.
WARNING
Page 143 of 642
3-45
Convenient features of your vehicle
3
Periodically remove any dirt thatmay accumulate on the sunroof guide rail or between the sun-
roof and roof panel.
Do not try to open the sunroof when the temperature is below
freezing or when the sunroof is
covered with snow or ice, the
motor could be damaged.
Information
After the vehicle is washed or in a
rainstorm, be sure to wipe off any
water that is on the sunroof before
operating it.
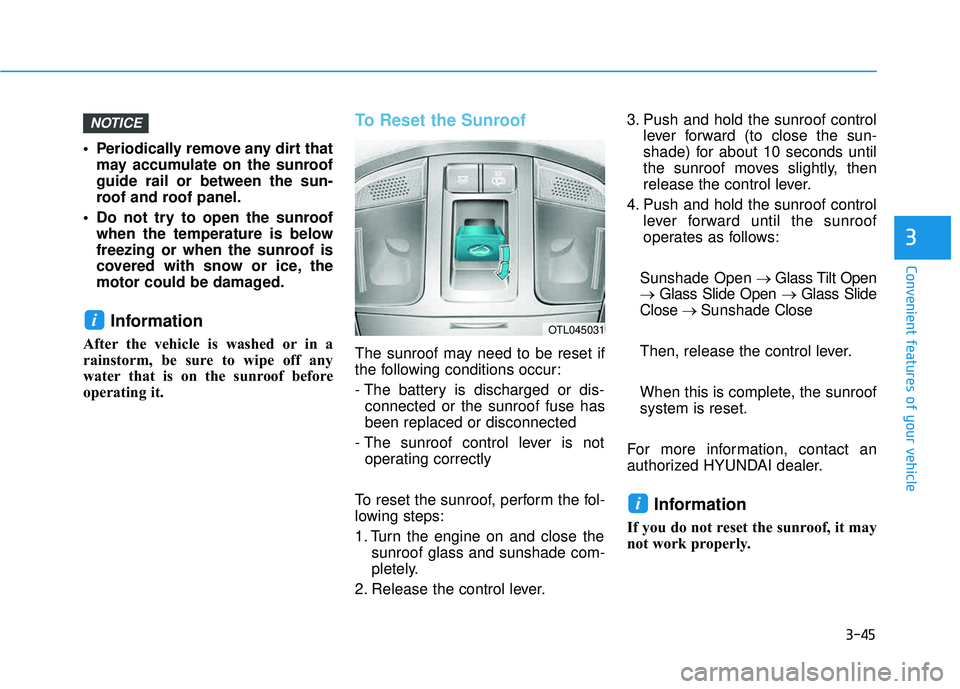
To Reset the Sunroof
The sunroof may need to be reset if
the following conditions occur:
- The battery is discharged or dis-connected or the sunroof fuse has been replaced or disconnected
- The sunroof control lever is not operating correctly
To reset the sunroof, perform the fol-
lowing steps:
1. Turn the engine on and close the sunroof glass and sunshade com-
pletely.
2. Release the control lever. 3. Push and hold the sunroof control
lever forward (to close the sun-
shade) for about 10 seconds until
the sunroof moves slightly, then
release the control lever.
4. Push and hold the sunroof control lever forward until the sunroof
operates as follows:
Sunshade Open � Glass Tilt Open
� Glass Slide Open � Glass Slide
Close � Sunshade Close
Then, release the control lever.
When this is complete, the sunroof system is reset.
For more information, contact an
authorized HYUNDAI dealer.
Information
If you do not reset the sunroof, it may
not work properly.
i
i
NOTICE
OTL045031
Page 144 of 642
3-46
Convenient features of your vehicle
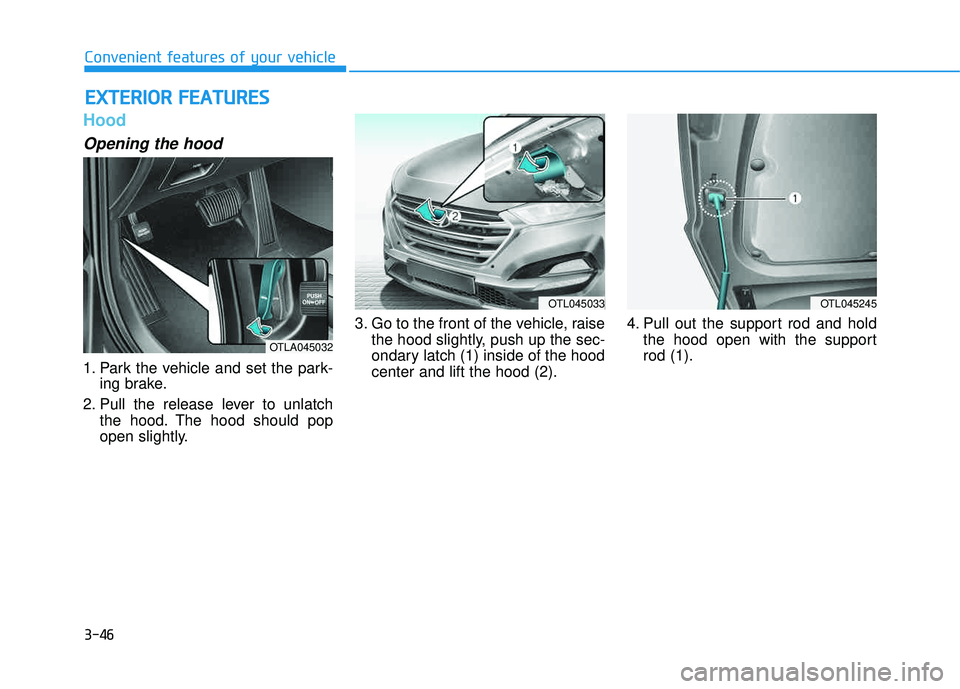
Hood
Opening the hood
1. Park the vehicle and set the park-ing brake.
2. Pull the release lever to unlatch the hood. The hood should pop
open slightly. 3. Go to the front of the vehicle, raise
the hood slightly, push up the sec-
ondary latch (1) inside of the hoodcenter and lift the hood (2). 4. Pull out the support rod and hold
the hood open with the supportrod (1).
EEXX TTEERR IIOO RR FF EE AA TTUU RREESS
OTLA045032
OTL045033OTL045245
Page 145 of 642

3-47
Convenient features of your vehicle
Closing the hood
1. Before closing the hood, check thefollowing:
partment must be correctly installed.
bustible material must be
removed from the engine com-
partment.
2. Return the support rod to its clip to prevent it from rattling.
3. Lower the hood halfway and push down to securely lock in place.
Then double check to be sure the
hood is secure.
3
Before closing the hood, ensure all obstructions are
removed from around hoodopening.
Always double check to be
sure that the hood is firmly
latched before driving away. If
it is not latched, the hood
could open while the vehicle
is being driven, causing a
total loss of visibility, whichmight result in an accident.
Do not move the vehicle with the hood in the raised posi-
tion, as vision is obstructed.Doing so could result in an
accident. The hood could also
fall and become damaged.
WARNING
Grasp the support rod in the area
wrapped in rubber. The rubber
will help prevent you from being
burned by hot metal when theengine is hot.
WARNING
Page 146 of 642
3-48
Convenient features of your vehicle
Fuel Filler Door
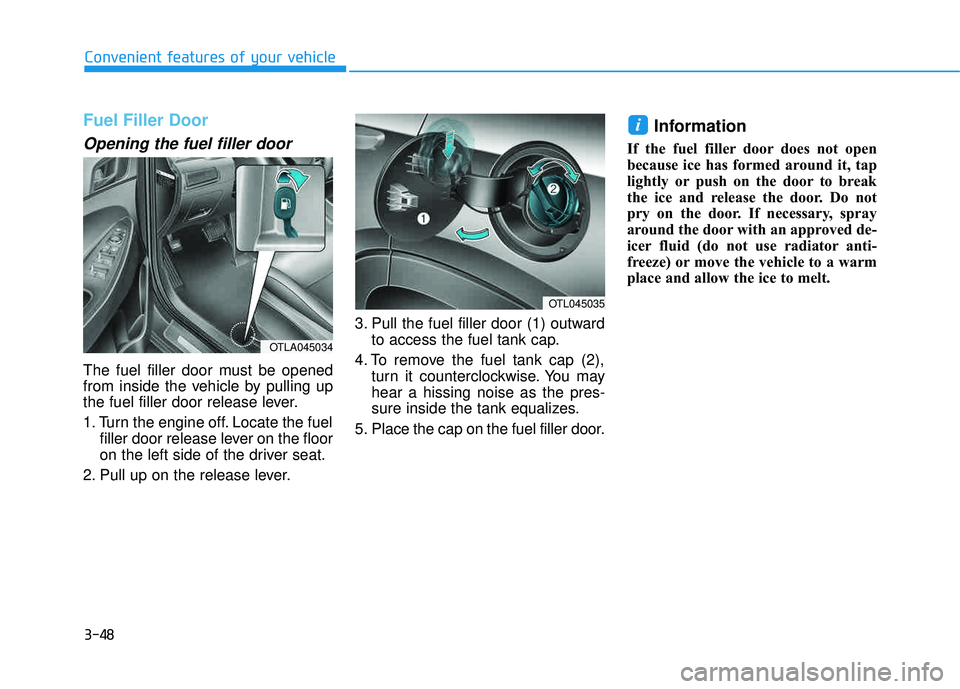
Opening the fuel filler door
The fuel filler door must be opened
from inside the vehicle by pulling up
the fuel filler door release lever.
1. Turn the engine off. Locate the fuelfiller door release lever on the floor
on the left side of the driver seat.
2. Pull up on the release lever. 3. Pull the fuel filler door (1) outward
to access the fuel tank cap.
4. To remove the fuel tank cap (2), turn it counterclockwise. You mayhear a hissing noise as the pres-
sure inside the tank equalizes.
5. Place the cap on the fuel filler door.
Information
If the fuel filler door does not open
because ice has formed around it, tap
lightly or push on the door to break
the ice and release the door. Do not
pry on the door. If necessary, spray
around the door with an approved de-
icer fluid (do not use radiator anti-
freeze) or move the vehicle to a warm
place and allow the ice to melt.
i
OTL045035
OTLA045034
Page 147 of 642
3-49
Convenient features of your vehicle
3
Closing the fuel filler door
1. To install the fuel tank cap, turn itclockwise until it "clicks" one time.
2. Close the fuel filler door until it is latched securely. (Continued)Do not get back into a vehicle
once you have begun refuel-
ing. You can generate a build-
up of static electricity by
touching, rubbing or sliding
against any item or fabric
capable of producing static
electricity. Static electricity
discharge can ignite fuel
vapors causing a fire. If you
must re-enter the vehicle, you
should once again eliminate
potentially dangerous static
electricity discharge by touch-
ing a metal part of the vehicle,
away from the fuel filler neck,nozzle or other gasoline
source, with your bare hand.
When using an approved
portable fuel container, besure to place the container on
the ground prior to refueling.
Static electricity discharge
from the container can ignite
fuel vapors causing a fire.
(Continued)
Gasoline is highly flammable
and explosive. Failure to follow
these guidelines may result in
SERIOUS INJURY or DEATH:
Read and follow all warnings posted at the gas station.
Before refueling, note the
location of the Emergency
Gasoline Shut-Off, if available,at the gas station.
Before touching the fuel noz-
zle, you should eliminate the
potential build-up of static
electricity by touching a metal
part of the vehicle, a safe dis-
tance away from the fuel filler
neck, nozzle, or other gas
source, with your bare hand.
Do not use cellular phones
while refueling. Electric cur-
rent and/or electronic interfer-
ence from cellular phones can
potentially ignite fuel vapors
and cause a fire.(Continued)
WARNING
Page 148 of 642
3-50
Convenient features of your vehicle
Information
Make sure to refuel your vehicle
according to the "Fuel Requirements"
suggested in the Introduction chapter.
Do not spill fuel on the exteriorsurfaces of the vehicle. Any type of fuel spilled on painted sur-
faces may damage the paint.
If the fuel filler cap requires replacement, use only a genuine
HYUNDAI cap or the equivalent
specified for your vehicle. Anincorrect fuel filler cap canresult in a serious malfunctionof the fuel system or emission
control system.
NOTICE
i(Continued)
Once refueling has begun,
contact between your bare
hand and the vehicle shouldbe maintained until the filling
is complete.
Use only approved portable
plastic fuel containers designed
to carry and store gasoline.
When refueling, always move
the shift lever to the P (Park)
position, set the parking
brake, and place the ignition
switch to the LOCK/OFF posi-
tion. Sparks produced byelectrical components relatedto the engine can ignite fuel
vapors causing a fire.
Do not use matches or a lighter and do not smoke or
leave a lit cigarette in your
vehicle while at a gas station,
especially during refueling.
Do not over-fill or top-off your
vehicle tank, which can cause
gasoline spillage. (Continued)
(Continued)
If a fire breaks out during refu-
eling, leave the vicinity of the
vehicle, and immediately con-
tact the manager of the gasstation and then contact the
local fire department. Follow
any safety instructions they
provide.
If pressurized fuel sprays out,
it can cover your clothes or
skin and thus subject you to
the risk of fire and burns.
Always remove the fuel cap
carefully and slowly. If the cap
is venting fuel or if you hear a
hissing sound, wait until the
condition stops before com-
pletely removing the cap.
Always check that the fuel cap
is installed securely to pre-
vent fuel spillage in the eventof an accident.
Page 149 of 642
3-51
Convenient features of your vehicle
Non-Powered liftgate
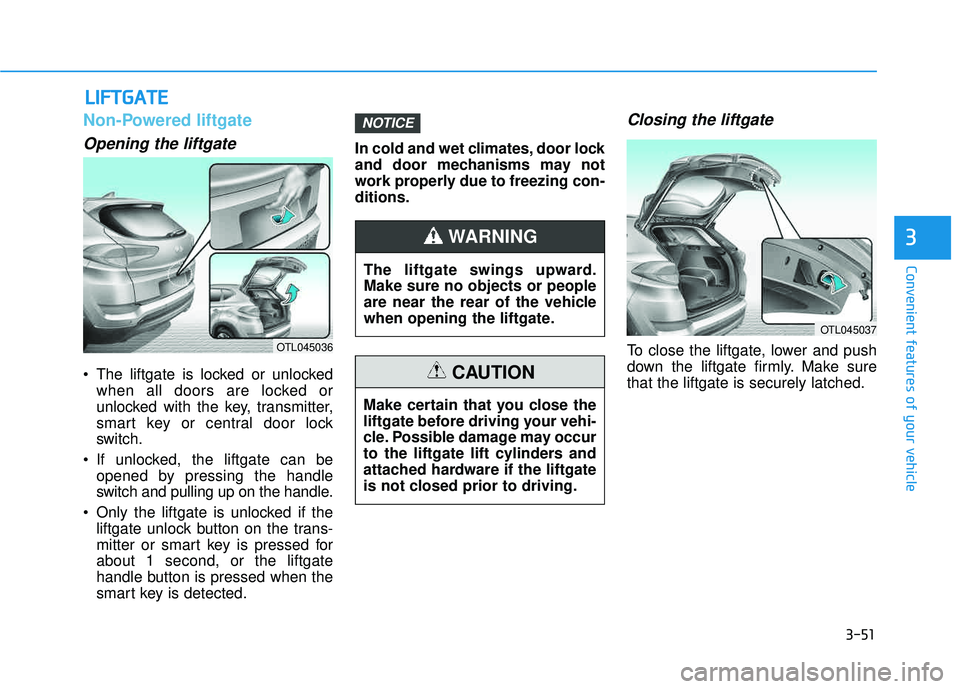
Opening the liftgate
The liftgate is locked or unlockedwhen all doors are locked or
unlocked with the key, transmitter,
smart key or central door lock
switch.
If unlocked, the liftgate can be opened by pressing the handle
switch and pulling up on the handle.
Only the liftgate is unlocked if the liftgate unlock button on the trans-
mitter or smart key is pressed forabout 1 second, or the liftgate
handle button is pressed when the
smart key is detected. In cold and wet climates, door lock
and door mechanisms may not
work properly due to freezing con-ditions.
Closing the liftgate
To close the liftgate, lower and push
down the liftgate firmly. Make surethat the liftgate is securely latched.
NOTICE
LL
IIFF TT GG AATTEE
3
OTL045036
The liftgate swings upward. Make sure no objects or people
are near the rear of the vehicle
when opening the liftgate.
WARNING
Make certain that you close the
liftgate before driving your vehi-
cle. Possible damage may occur
to the liftgate lift cylinders and
attached hardware if the liftgate
is not closed prior to driving.
CAUTION
OTL045037
Page 150 of 642
3-52
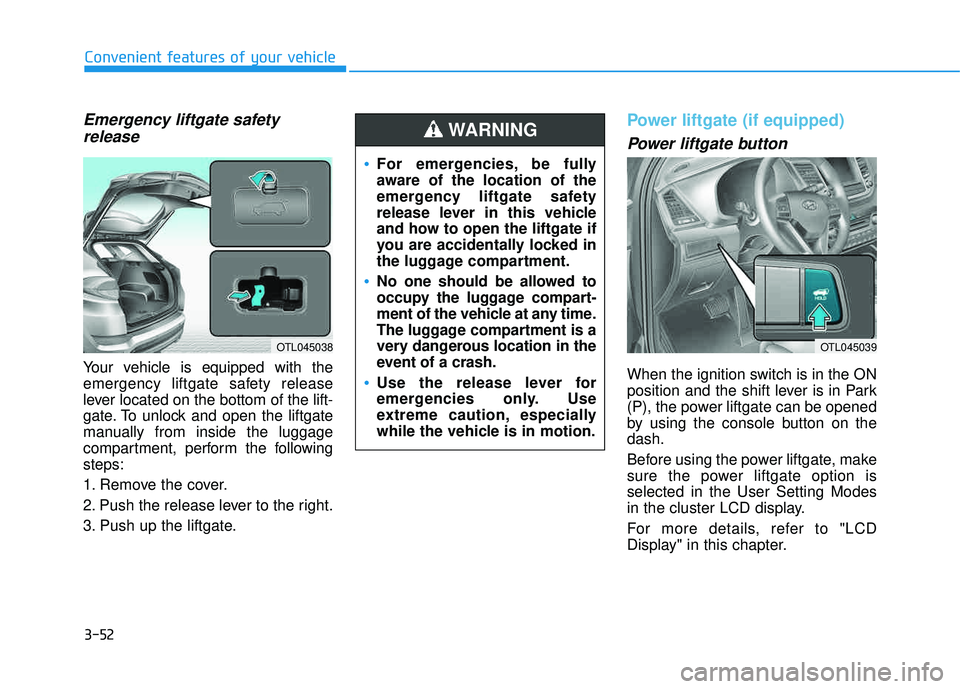
Emergency liftgate safetyrelease
Your vehicle is equipped with the
emergency liftgate safety release
lever located on the bottom of the lift-
gate. To unlock and open the liftgate
manually from inside the luggage
compartment, perform the followingsteps:
1. Remove the cover.
2. Push the release lever to the right.
3. Push up the liftgate.
Power liftgate (if equipped)
Power liftgate button
When the ignition switch is in the ON
position and the shift lever is in Park
(P), the power liftgate can be opened
by using the console button on thedash.
Before using the power liftgate, make
sure the power liftgate option isselected in the User Setting Modes
in the cluster LCD display.
For more details, refer to "LCD
Display" in this chapter.
Convenient features of your vehicle
OTL045038
For emergencies, be fully
aware of the location of the
emergency liftgate safety
release lever in this vehicle
and how to open the liftgate if
you are accidentally locked in
the luggage compartment.
No one should be allowed to
occupy the luggage compart-
ment of the vehicle at any time.
The luggage compartment is a
very dangerous location in the
event of a crash.
Use the release lever for
emergencies only. Use
extreme caution, especially
while the vehicle is in motion.
WARNING
OTL045039