oil HYUNDAI TUCSON LIMITED 2017 Service Manual
[x] Cancel search | Manufacturer: HYUNDAI, Model Year: 2017, Model line: TUCSON LIMITED, Model: HYUNDAI TUCSON LIMITED 2017Pages: 642, PDF Size: 9.78 MB
Page 588 of 642
![HYUNDAI TUCSON LIMITED 2017 Service Manual 7-75
7
Maintenance
Engine compartment main fuse panel
Fuse Name Fuse ratingCircuit Protected
WIPER FRT1 25A Ignition Switch (W/O Smart Key), PDM (IG2) Relay (With Smart Key)
TCU1 15A [G4FJ] TCM HYUNDAI TUCSON LIMITED 2017 Service Manual 7-75
7
Maintenance
Engine compartment main fuse panel
Fuse Name Fuse ratingCircuit Protected
WIPER FRT1 25A Ignition Switch (W/O Smart Key), PDM (IG2) Relay (With Smart Key)
TCU1 15A [G4FJ] TCM](/img/35/56197/w960_56197-587.png)
7-75
7
Maintenance
Engine compartment main fuse panel
Fuse Name Fuse ratingCircuit Protected
WIPER FRT1 25A Ignition Switch (W/O Smart Key), PDM (IG2) Relay (With Smart Key)
TCU1 15A [G4FJ] TCM (7DCT)
WIPER FRT2 10A BCM ECU3 20A PCM (G4NC) / ECM (G4FJ)
HORN 15A Horn Relay
BATTERY
MANAGEMENT 10A Battery
Sensor
SENSOR2 10A [G4NC] Oil Control Valve #1/#2, Camshaft Position Sensor #1/#2, Purge Control Solenoid Valve,
Variable Intake Solenoid Valve, Canister Close Valve, Fuel Pump Relay
[G4FJ] Oil Control Valve #1/#2, Purge Control Solenoid Valve, Canister Close Valve, Fuel Pump Relay
SENSOR1 15A [G4NC] PCM, Oxygen Sensor (Up)/(Down) [G4FJ] ECM, Oxygen Sensor (Up)/(Down) ECU2 20A IGNITION COIL #1/#2/#3/#4, Condenser (G4NC)
ECU5 15A PCM (G4NC) / ECM (G4FJ)
ECU4 15A PCM (G4NC) / ECM (G4FJ)
SENSOR3 10A [G4NC] E/R Junction Block (Cooling Fan High Relay)
[G4FJ] Brake Vacuum Switch, RCV Control Solenoid Valve, E/R Junction Block (Cooling Fan High
Relay)
DEICER 15A E/R Junction Block (Front Deicer Relay)
FUEL PUMP1 20A Fuel Pump Relay
MODULE1 7.5A Adaptive Front Lighting Module
B/ALARM HORN 10A E/R Junction Block (B/Alarm Horn Relay) ABS3 10A ESC Module
Page 591 of 642
7-78
Maintenance
Headlamp, Parking lamp, Turn
signal lamp, side marker and
front fog lamp bulb replace- ment
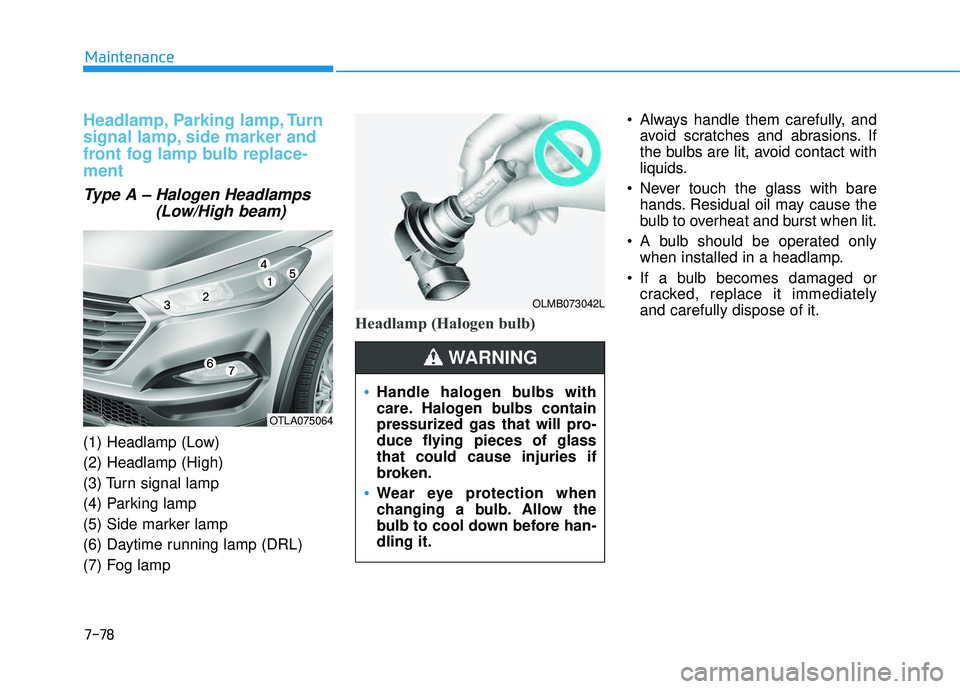
Type A – Halogen Headlamps(Low/High beam)
(1) Headlamp (Low) (2) Headlamp (High)
(3) Turn signal lamp
(4) Parking lamp
(5) Side marker lamp
(6) Daytime running lamp (DRL)
(7) Fog lamp
Headlamp (Halogen bulb)
Always handle them carefully, andavoid scratches and abrasions. If
the bulbs are lit, avoid contact with
liquids.
Never touch the glass with bare hands. Residual oil may cause the
bulb to overheat and burst when lit.
A bulb should be operated only when installed in a headlamp.
If a bulb becomes damaged or cracked, replace it immediatelyand carefully dispose of it.
OTLA075064
OLMB073042L
Handle halogen bulbs with
care. Halogen bulbs contain
pressurized gas that will pro-
duce flying pieces of glassthat could cause injuries if
broken.
Wear eye protection when
changing a bulb. Allow the
bulb to cool down before han-dling it.
WARNING
Page 596 of 642
7-83
7
Maintenance
Always handle them carefully, andavoid scratches and abrasions. If
the bulbs are lit, avoid contact with
liquids.
Never touch the glass with bare hands. Residual oil may cause the
bulb to overheat and burst when lit.
A bulb should be operated only when installed in a headlamp.
If a bulb becomes damaged or cracked, replace it immediatelyand carefully dispose of it. 1. Open the hood.
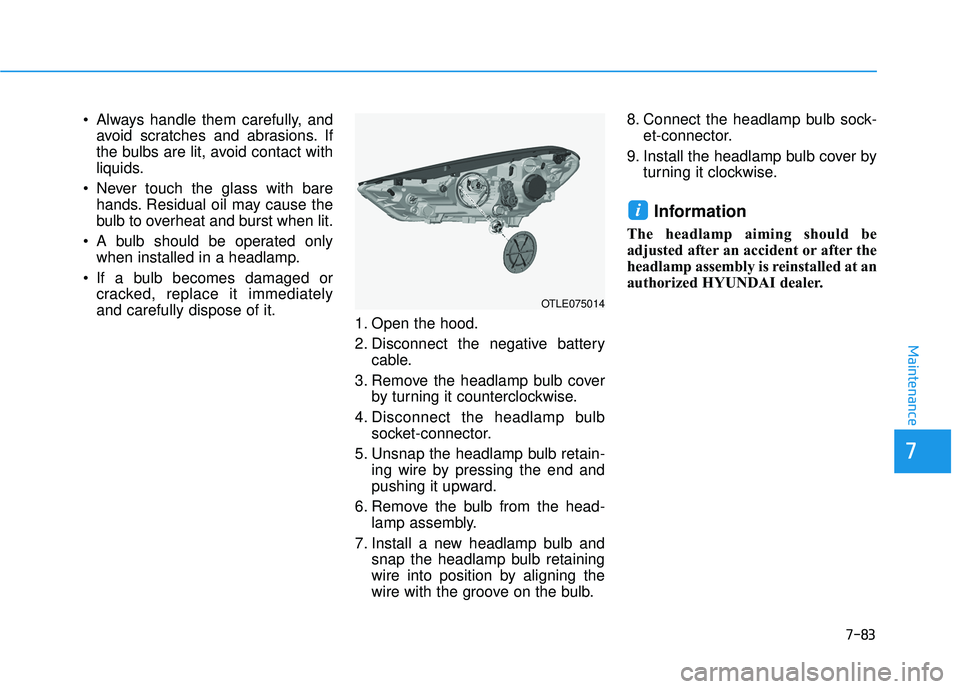
2. Disconnect the negative battery
cable.
3. Remove the headlamp bulb cover by turning it counterclockwise.
4. Disconnect the headlamp bulb socket-connector.
5. Unsnap the headlamp bulb retain- ing wire by pressing the end and
pushing it upward.
6. Remove the bulb from the head- lamp assembly.
7. Install a new headlamp bulb and snap the headlamp bulb retaining
wire into position by aligning the
wire with the groove on the bulb. 8. Connect the headlamp bulb sock-
et-connector.
9. Install the headlamp bulb cover by turning it clockwise.
Information
The headlamp aiming should be
adjusted after an accident or after the
headlamp assembly is reinstalled at an
authorized HYUNDAI dealer.
i
OTLE075014
Page 599 of 642
7-86
Maintenance
Always handle them carefully, andavoid scratches and abrasions. If
the bulbs are lit, avoid contact with
liquids.
Never touch the glass with bare hands. Residual oil may cause the
bulb to overheat and burst when lit.
A bulb should be operated only when installed in a headlamp.
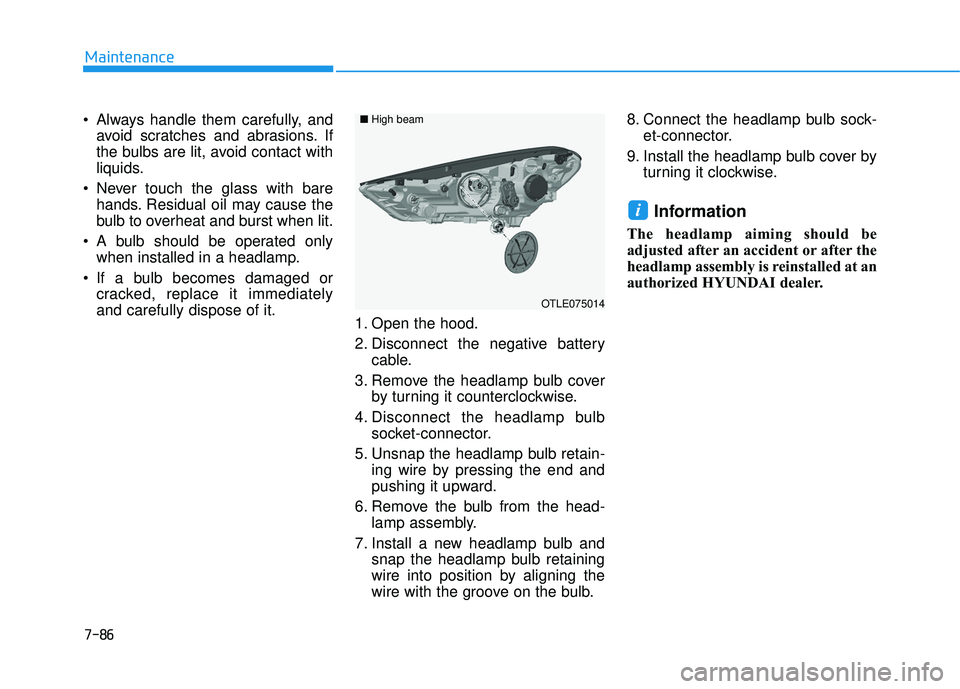
If a bulb becomes damaged or cracked, replace it immediatelyand carefully dispose of it. 1. Open the hood.
2. Disconnect the negative battery
cable.
3. Remove the headlamp bulb cover by turning it counterclockwise.
4. Disconnect the headlamp bulb socket-connector.
5. Unsnap the headlamp bulb retain- ing wire by pressing the end and
pushing it upward.
6. Remove the bulb from the head- lamp assembly.
7. Install a new headlamp bulb and snap the headlamp bulb retaining
wire into position by aligning the
wire with the groove on the bulb. 8. Connect the headlamp bulb sock-
et-connector.
9. Install the headlamp bulb cover by turning it clockwise.
Information
The headlamp aiming should be
adjusted after an accident or after the
headlamp assembly is reinstalled at an
authorized HYUNDAI dealer.
i
OTLE075014
■
High beam
Page 604 of 642
7-91
7
Maintenance
Stop and tail lamp (LED type)
If the LED lamp does not operate,
have the vehicle checked by an
authorized HYUNDAI dealer.
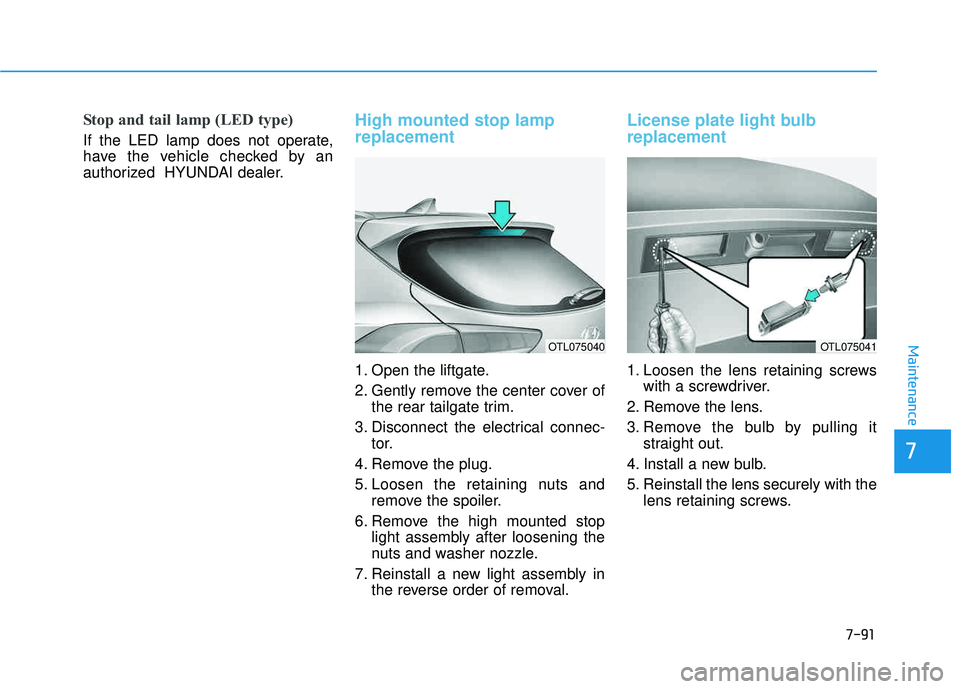
High mounted stop lamp replacement
1. Open the liftgate.
2. Gently remove the center cover ofthe rear tailgate trim.
3. Disconnect the electrical connec- tor.
4. Remove the plug.
5. Loosen the retaining nuts and remove the spoiler.
6. Remove the high mounted stop light assembly after loosening the
nuts and washer nozzle.
7. Reinstall a new light assembly in the reverse order of removal.
License plate light bulb replacement
1. Loosen the lens retaining screwswith a screwdriver.
2. Remove the lens.
3. Remove the bulb by pulling it straight out.
4. Install a new bulb.
5. Reinstall the lens securely with the lens retaining screws.
OTL075040OTL075041
Page 608 of 642
7-95
7
Maintenance
Waxing
A good coat of wax provides a barri-
er between your paint and environ-mental contamination.
Keeping a good coat of wax on your
vehicle will help protect it.
Wax the vehicle when water will no longer bead on the paint.
Always wash and dry the vehicle
before waxing. Use a good quality
liquid or paste wax, and follow the
manufacturer’s instructions. Wax all
metal trim to protect it and to main-
tain its luster.
Removing oil, tar, and similar materi-
als with a spot remover will usually
strip the wax from the finish. Be sure
to re-wax these areas even if the rest
of the vehicle does not yet need wax-ing.
OLMB073082
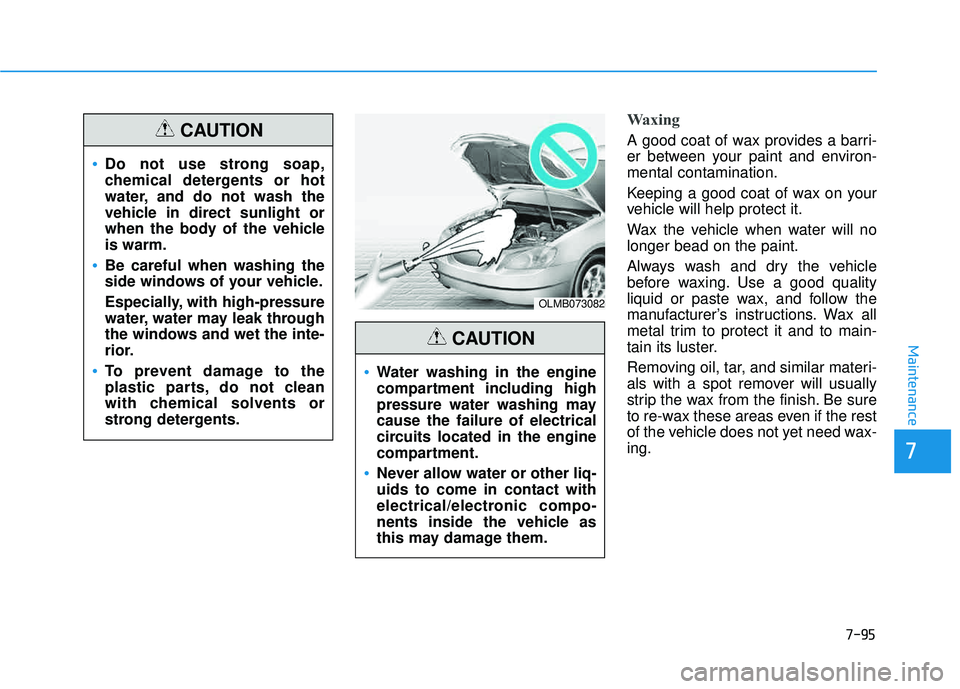
Water washing in the engine
compartment including high
pressure water washing maycause the failure of electrical
circuits located in the engine
compartment.
Never allow water or other liq- uids to come in contact with
electrical/electronic compo-
nents inside the vehicle as
this may damage them.
CAUTION
Do not use strong soap,
chemical detergents or hot
water, and do not wash the
vehicle in direct sunlight or
when the body of the vehicleis warm.
Be careful when washing the
side windows of your vehicle.
Especially, with high-pressure
water, water may leak through
the windows and wet the inte-
rior.
To prevent damage to the
plastic parts, do not clean
with chemical solvents or
strong detergents.
CAUTION
Page 612 of 642
7-99
7
Maintenance
vehicle, pay particular attention to
the components under the fendersand other areas that are hidden
from view. Do a thorough job; just
dampening the accumulated mud
rather than washing it away will
accelerate corrosion rather than
prevent it. Water under high pres-
sure and steam are particularly
effective in removing accumulated
mud and corrosive materials.
When cleaning lower door panels, rocker panels and frame members,
be sure that drain holes are keptopen so that moisture can escape
and not be trapped inside to accel-
erate corrosion.Keep your garage dry
Don’t park your car in a damp, poor-
ly ventilated garage. This creates a
favorable environment for corrosion.
This is particularly true if you wash
your vehicle in the garage or drive it
into the garage when it is still wet or
covered with snow, ice or mud. Even
a heated garage can contribute to
corrosion unless it is well ventilatedso moisture is dispersed.
Keep paint and trim in good condition
Scratches or chips in the finish
should be covered with "touch-up"
paint as soon as possible to reduce
the possibility of corrosion. If bare
metal is showing through, the atten-tion of a qualified body and paintshop is recommended.
Bird droppings are highly corrosive
and may damage painted surfaces in
just a few hours. Always remove bird
droppings as soon as possible.
Interior Care
Interior general precautions
Prevent caustic solutions such as perfume and cosmetic oil, from con-
tacting the interior parts because
they may cause damage or discol-
oration. If they do contact the interior
parts, wipe them off immediately.
See the instructions for the proper
way to clean vinyl.
Never allow water or other liq- uids to come in contact with
electrical/electronic compo-
nents inside the vehicle as
this may damage them.
When cleaning leather prod-
ucts (steering wheel, seats
etc.), use neutral detergents
or low alcohol content solu-
tions. If you use high alcoholcontent solutions or acid/
alkaline detergents, the color
of the leather may fade or the
surface may get stripped off.
CAUTION
Page 613 of 642
7-100
Maintenance
Cleaning the upholstery andinterior trim
Vinyl
Remove dust and loose dirt from
vinyl with a whisk broom or vacuum
cleaner. Clean vinyl surfaces with a
vinyl cleaner.
Fabric
Remove dust and loose dirt from fab-
ric with a whisk broom or vacuum
cleaner. Clean with a mild soap solu-
tion recommended for upholstery or
carpets. Remove fresh spots imme-
diately with a fabric spot cleaner. If
fresh spots do not receive immediate
attention, the fabric can be stained
and its color can be affected. Also, its
fire-resistant properties can be
reduced if the material is not proper-ly maintained.
Cleaning the seat belt webbing
Clean the belt webbing with any mild
soap solution recommended for
cleaning upholstery or carpet. Follow
the instructions provided with the
soap. Do not bleach or re-dye the
webbing because this may weakenthe seat belt.
Cleaning the interior windowglass
If the interior glass surfaces of the
vehicle become fogged (that is, cov-
ered with an oily, greasy or waxy
film), they should be cleaned with
glass cleaner. Follow the directions
on the glass cleaner container.
Using anything but recom-
mended cleaners and proce-
dures may affect the fabric’sappearance and fire-resistant
properties.
CAUTION
Do not scrape or scratch the
inside of the rear window. This
may result in damage to the rear
window defroster grid.
CAUTION
Page 625 of 642
8-7
88
Specifications, Consumer information and Reporting safety defects
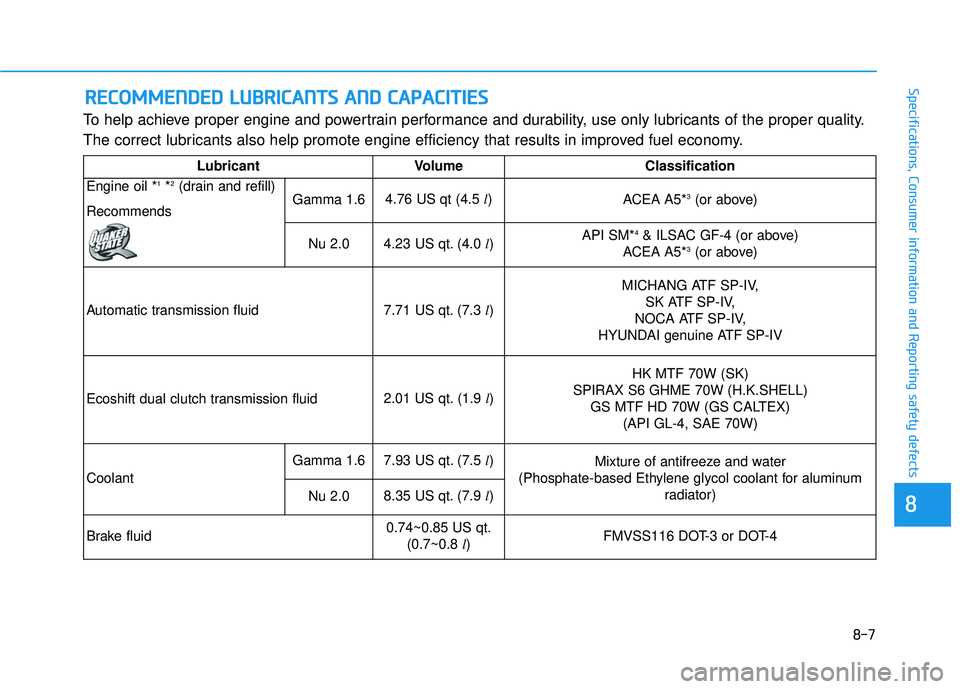
To help achieve proper engine and powertrain performance and durability, use only lubricants of the proper quality.
The correct lubricants also help promote engine efficiency that results in improved fuel economy.
RREECCOO MM MMEENN DDEEDD LL UU BBRRIICC AA NN TTSS AA NN DD CC AA PPAA CCIITT IIEE SS
Lubricant Volume Classification
Engine oil * 1
*2
(drain and refill)
Recommends Gamma 1.6
4.76 US qt (4.5
l)
ACEA A5*3
(or above)
Nu 2.0 4.23 US qt. (4.0
l) API SM*
4
& ILSAC GF-4 (or above)
ACEA A5* 3
(or above)
Automatic transmission fluid 7.71 US qt. (7.3
l) MICHANG ATF SP-IV,
SK ATF SP-IV,
NOCA ATF SP-IV,
HYUNDAI genuine ATF SP-IV
Ecoshift dual clutch transmission fluid 2.01 US qt. (1.9
l) HK MTF 70W (SK)
SPIRAX S6 GHME 70W (H.K.SHELL) GS MTF HD 70W (GS CALTEX) (API GL-4, SAE 70W)
Coolant Gamma 1.6
7.93 US qt. (7.5
l)
Mixture of antifreeze and water
(Phosphate-based Ethylene glycol coolant for aluminum radiator)
Nu 2.08.35 US qt. (7.9 l)
Brake fluid 0.74~0.85 US qt.
(0.7~0.8 l) FMVSS116 DOT-3 or DOT-4
Page 626 of 642
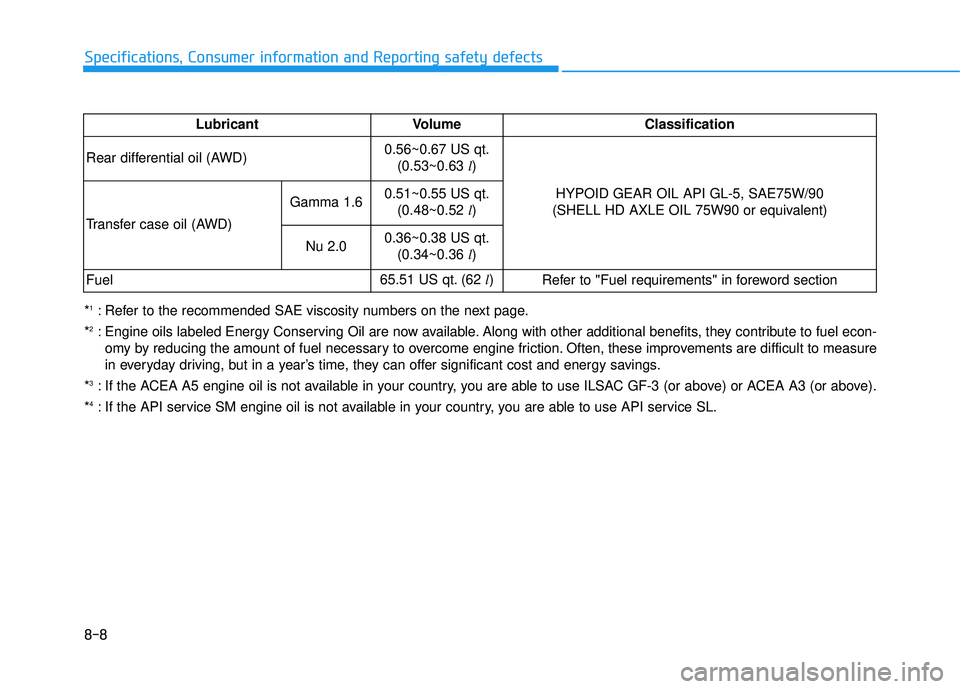
8-8
Specifications, Consumer information and Reporting safety defects
*1
: Refer to the recommended SAE viscosity numbers on the next page.
* 2
: Engine oils labeled Energy Conserving Oil are now available. Along with other additional benefits, they contribute to fuel econ -
omy by reducing the amount of fuel necessary to overcome engine friction. Often, these improvements are difficult to measure
in everyday driving, but in a year’s time, they can offer significant cost and energy savings.
* 3
: If the ACEA A5 engine oil is not available in your country, you are able to use ILSAC GF-3 (or above) or ACEA A3 (or above).
* 4
: If the API service SM engine oil is not available in your country, you are able to use API service SL. Lubricant Volume Classification
Rear differential oil (AWD) 0.56~0.67 US qt.
(0.53~0.63 l)
HYPOID GEAR OIL API GL-5, SAE75W/90
(SHELL HD AXLE OIL 75W90 or equivalent)
Transfer case oil (AWD) Gamma 1.6
0.51~0.55 US qt.
(0.48~0.52 l)
Nu 2.0 0.36~0.38 US qt.
(0.34~0.36 l)
Fuel 65.51 US qt. (62
l)
Refer to "Fuel requirements" in foreword section