transmission HYUNDAI TUCSON LIMITED 2017 Owners Manual
[x] Cancel search | Manufacturer: HYUNDAI, Model Year: 2017, Model line: TUCSON LIMITED, Model: HYUNDAI TUCSON LIMITED 2017Pages: 642, PDF Size: 9.78 MB
Page 4 of 642
F4
INTRODUCTION
Congratulations, and thank you for choosing HYUNDAI. We are pleased to welcome you to the growing number of dis-
criminating people who drive HYUNDAIS. We are very proud of the advanced engineering and high-quality construc-
tion of each HYUNDAI we build.
Your Owner’s Manual will introduce you to the features and operation of your new HYUNDAI. To become familiar with
your new HYUNDAI, so that you can fully enjoy it, read this Owner’s Manual carefully before driving your new vehicle.
This manual contains important safety information and instructions intended to familiarize you with your vehicle’s con-
trols and safety features so you can safely operate your vehicle.
This manual also contains information on maintenance designed to enhance safe operation of the vehicle. It is recom-
mended that all service and maintenance on your car be performed by an authorized HYUNDAI dealer. HYUNDAI deal-
ers are prepared to provide high-quality service, maintenance and any other assistance that may be required.
This Owner’s Manual should be considered a permanent part of your vehicle, and should be kept in the vehicle so you
can refer to it at any time. The manual should stay with the vehicle if you sell it to provide the next owner with impor-
tant operating, safety and maintenance information.
HYUNDAI MOTOR AMERICA
Copyright 2015 HYUNDAI Motor America. All rights reserved. No part of this publication may be reproduced, stored
in any retrieval system or transmitted in any form or by any means without the prior written permission of HYUNDAI
Motor America.Severe engine and transmission damage may result from the use of poor quality fuels and lubricants that
do not meet HYUNDAI specifications. You must always use high quality fuels and lubricants that meet the
specifications listed on Page 8-7 in the Vehicle Specifications section of the Owner’s Manual.
CAUTION
Page 17 of 642
F17F17
Before driving.........................................................5-4
Before Entering the Vehicle ...........................................5-4
Before Starting ..................................................................5-4
Ignition switch ........................................................5-6
Key Ignition Switch ...........................................................5-6
Engine Start/Stop Button................................................5-9
Transmission .........................................................5-14
Automatic Transmission .................................................5-14
Ecoshift dual clutch transmission ...............................5-18
Shift-Lock System ..........................................................5-24
Shift-Lock Release .........................................................5-25
Parking ...............................................................................5-25
Good Driving Practices ..................................................5-26
Braking system.....................................................5-28
Power Brakes ...................................................................5-28
Disc Brakes Wear Indicator ..........................................5-29
Parking Brake...................................................................5-29
Anti-lock Brake System (ABS) ....................................5-31
Electronic Stability Control (ESC) ................................5-33
Vehicle Stability Management (VSM).........................5-37
Hill-Start Assist Control (HAC) ....................................5-38
Downhill Brake Control (DBC) ......................................5-39
Good Braking Practices .................................................5-41
All wheel drive (AWD) .........................................5-42
AWD operation.................................................................5-43
Emergency precautions .................................................5-47
Drive mode integrated control system .............5-49
Blind spot detection system (BSD) ...................5-51
BSD (Blind Spot Detection) /
LCA (Lane Change Assist) .............................................5-52
RCTA (Rear Cross Traffic Alert) ..................................5-55
Autonomous emergency braking (AEB) ...........5-59
System setting and activation......................................5-59
AEB warning message and system control ..............5-61
AEB front radar sensor .................................................5-64
System malfunction ........................................................5-65
Limitations of the system .............................................5-67
Lane departure warning system (LDWS) .........5-71
LDWS Operation ..............................................................5-72
Warning Light and Message.........................................5-73
Limitations of the system .............................................5-73
Cruise control .......................................................5-75
Cruise Control operation ...............................................5-75
5Driving your vehicle
Page 26 of 642
IINN SSTT RR UU MM EENN TT PP AA NN EELL OO VVEERR VV IIEE WW
❈ The actual shape may differ from the illustration.
1-5
Your vehicle at a glance
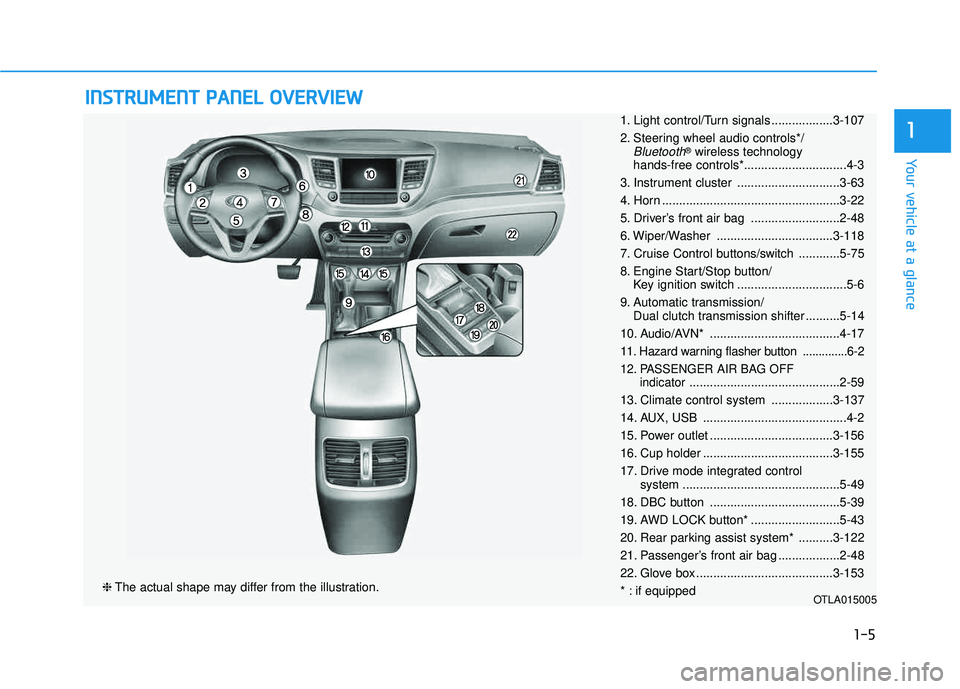
11. Light control/Turn signals ..................3-107
2. Steering wheel audio controls*/
Bluetooth®
wireless technology
hands-free controls*..............................4-3
3. Instrument cluster ..............................3-63
4. Horn ....................................................3-22
5. Driver’s front air bag ..........................2-48
6. Wiper/Washer ..................................3-118
7. Cruise Control buttons/switch ............5-75
8. Engine Start/Stop button/ Key ignition switch ................................5-6
9. Automatic transmission/ Dual clutch transmission shifter ..........5-14
10. Audio/AVN* ......................................4-17
11. Hazard warning flasher button ..............6-2
12. PASSENGER AIR BAG OFF indicator............................................2-59
13. Climate control system ..................3-137
14. AUX, USB ..........................................4-2
15. Power outlet ....................................3-156
16. Cup holder ......................................3-155
17. Drive mode integrated control system ..............................................5-49
18. DBC button ......................................5-39
19. AWD LOCK button* ..........................5-43
20. Rear parking assist system* ..........3-122
21. Passenger’s front air bag ..................2-48
22. Glove box ........................................3-153
* : if equipped
OTLA015005
Page 130 of 642
3-32
Convenient features of your vehicle
Programming HomeLink®
Please note the following:
When programming a garage door
opener, it is advised to park the
vehicle outside of the garage.
It is recommended that a new bat- tery be placed in the hand-held
transmitter of the device being pro-
grammed to HomeLink
®for quicker
training and accurate transmission
of the radio-frequency signal.
Some vehicles may require the ignition switch to be placed in the
ACC (or "Accessories") position for
programming and/or operation ofHomeLink
®.
In the event that there are still pro- gramming difficulties or questions
after following the programming
steps listed below, contactHomeLink
®at: www.homelink.com
or by calling 1-800-355-3515.
Programming
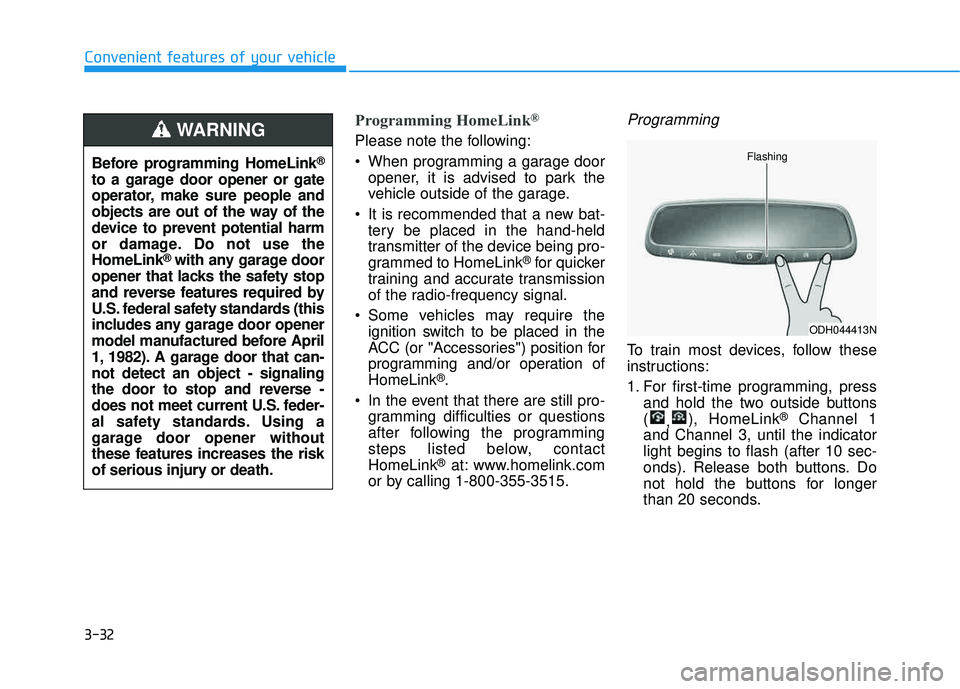
To train most devices, follow these
instructions:
1. For first-time programming, press and hold the two outside buttons ( ,), HomeLink
®Channel 1
and Channel 3, until the indicatorlight begins to flash (after 10 sec-
onds). Release both buttons. Do
not hold the buttons for longer
than 20 seconds.
ODH044413N
Flashing
Before programming HomeLink®
to a garage door opener or gate
operator, make sure people and
objects are out of the way of the
device to prevent potential harm
or damage. Do not use theHomeLink
®with any garage door
opener that lacks the safety stop
and reverse features required by
U.S. federal safety standards (this
includes any garage door opener
model manufactured before April
1, 1982). A garage door that can-not detect an object - signaling
the door to stop and reverse -
does not meet current U.S. feder-
al safety standards. Using a
garage door opener without
these features increases the risk
of serious injury or death.
WARNING
Page 166 of 642
3-68
Convenient features of your vehicle
The outside temperature on the dis-
play may not change immediately
like a general thermometer to pre-
vent the driver from being inattentive.
To change the temperature unit from °F to °C or °C to °F:
- Go to User Settings Mode ➝Other
Features ➝Temperature Unit.
- Press the AUTO button for 3 sec- onds while pressing the OFF button.
(Automatic climate control system)
Both the temperature unit on the
cluster LCD display and climate con-
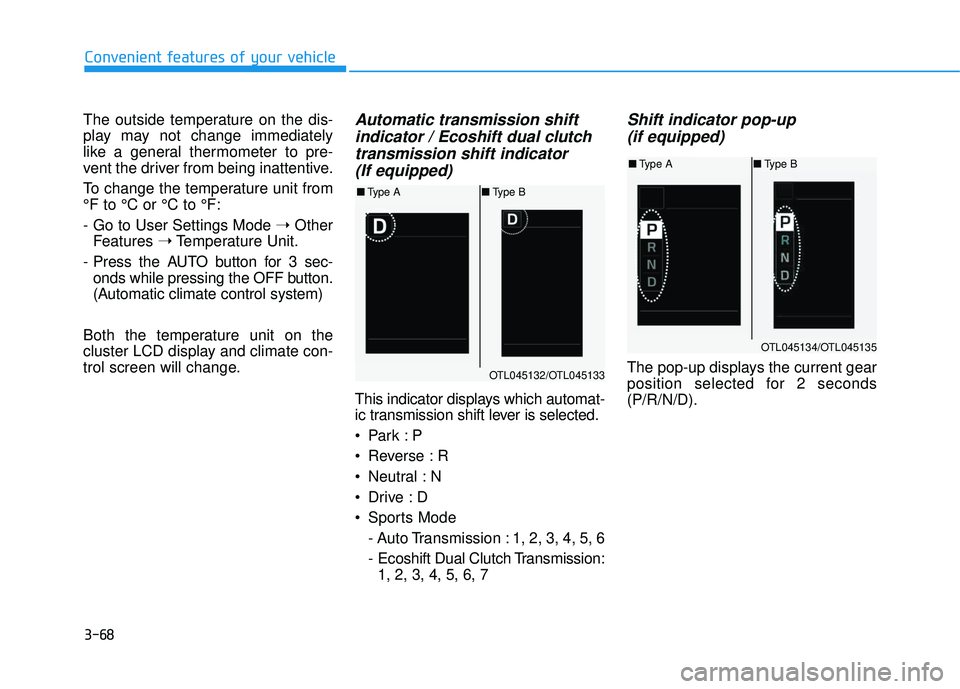
trol screen will change.Automatic transmission shift indicator / Ecoshift dual clutchtransmission shift indicator (If equipped)
This indicator displays which automat-
ic transmission shift lever is selected.
Reverse : R
Neutral : N
Sports Mode
- Auto Transmission : 1, 2, 3, 4, 5, 6
- Ecoshift Dual Clutch Transmission:1, 2, 3, 4, 5, 6, 7
Shift indicator pop-up
(if equipped)
The pop-up displays the current gear
position selected for 2 seconds(P/R/N/D).OTL045132/OTL045133
■ Type A ■Type B
OTL045134/OTL045135
■Type A ■Type B
Page 174 of 642
3-76
Convenient features of your vehicle
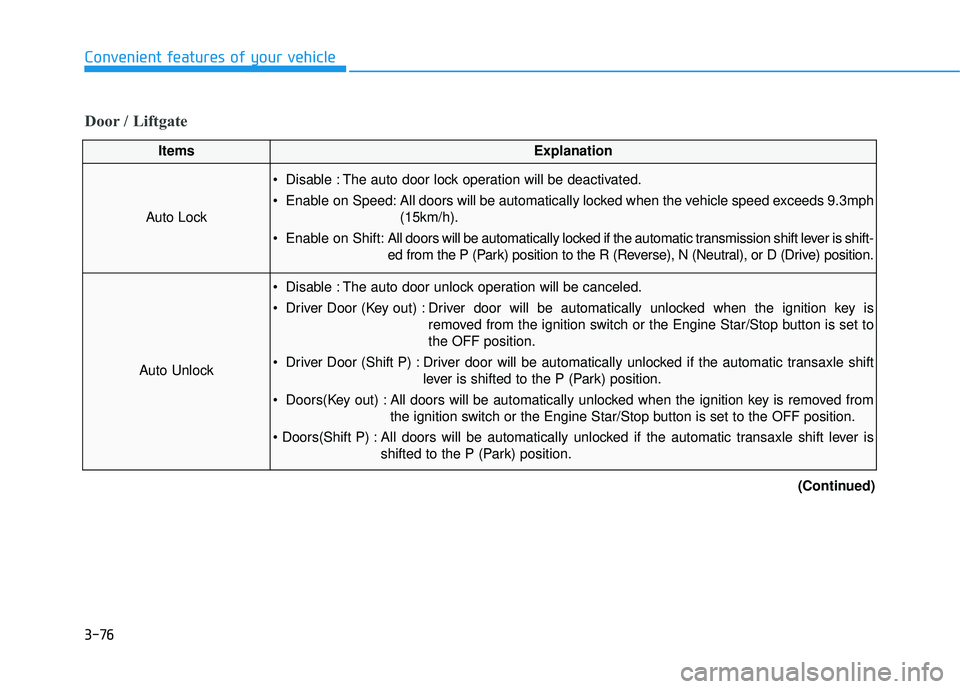
Door / Liftgate
ItemsExplanation
Auto Lock
Disable : The auto door lock operation will be deactivated.
Enable on Speed: All doors will be automatically locked when the vehicle speed exceeds 9.3mph(15km/h).
Enable on Shift: All doors will be automatically locked if the automatic transmission shift lever is shift-
ed from the P (Park) position to the R (Reverse), N (Neutral), or D (Drive) position.
Auto Unlock
Disable : The auto door unlock operation will be canceled.
Driver Door (Key out) : Driver door will be automatically unlocked when the ignition key is
removed from the ignition switch or the Engine Star/Stop button is set to the OFF position.
Driver Door (Shift P) : Driver door will be automatically unlocked if the automatic transaxle shift lever is shifted to the P (Park) position.
Doors(Key out) : All doors will be automatically unlocked when the ignition key is removed from the ignition switch or the Engine Star/Stop button is set to the OFF position.
All doors will be automatically unlocked if the automatic transaxle shift lever is shifted to the P (Park) position.
(Continued)
Page 385 of 642
Driving your vehicle
5
Before driving.........................................................5-4
Before Entering the Vehicle ...........................................5-4
Before Starting ..................................................................5-4
Ignition switch ........................................................5-6
Key Ignition Switch ...........................................................5-6
Engine Start/Stop Button................................................5-9
Transmission .........................................................5-14
Automatic Transmission .................................................5-14
Ecoshift dual clutch transmission ...............................5-18
Shift-Lock System ..........................................................5-24
Shift-Lock Release .........................................................5-25
Parking ...............................................................................5-25
Good Driving Practices ..................................................5-26
Braking system.....................................................5-28
Power Brakes ...................................................................5-28
Disc Brakes Wear Indicator ..........................................5-29
Parking Brake...................................................................5-29
Anti-lock Brake System (ABS) ....................................5-31
Electronic Stability Control (ESC) ................................5-33
Vehicle Stability Management (VSM).........................5-37
Hill-Start Assist Control (HAC) ....................................5-38
Downhill Brake Control (DBC) ......................................5-39
Good Braking Practices .................................................5-41
All wheel drive (AWD) .........................................5-42
AWD operation.................................................................5-43
Emergency precautions .................................................5-47
Drive mode integrated control system .............5-49
Blind spot detection system (BSD) ...................5-51
BSD (Blind Spot Detection) /
LCA (Lane Change Assist) .............................................5-52
RCTA (Rear Cross Traffic Alert) ..................................5-55
Autonomous emergency braking (AEB) ...........5-59
System setting and activation......................................5-59
AEB warning message and system control ..............5-61
AEB front radar sensor .................................................5-64
System malfunction ........................................................5-65
Limitations of the system .............................................5-67
Lane departure warning system (LDWS) .........5-71
LDWS Operation ..............................................................5-72
Warning Light and Message.........................................5-73
Limitations of the system .............................................5-73
Cruise control .......................................................5-75
Cruise Control operation ...............................................5-75
Page 398 of 642
5-14
Driving your vehicle
Automatic Transmission
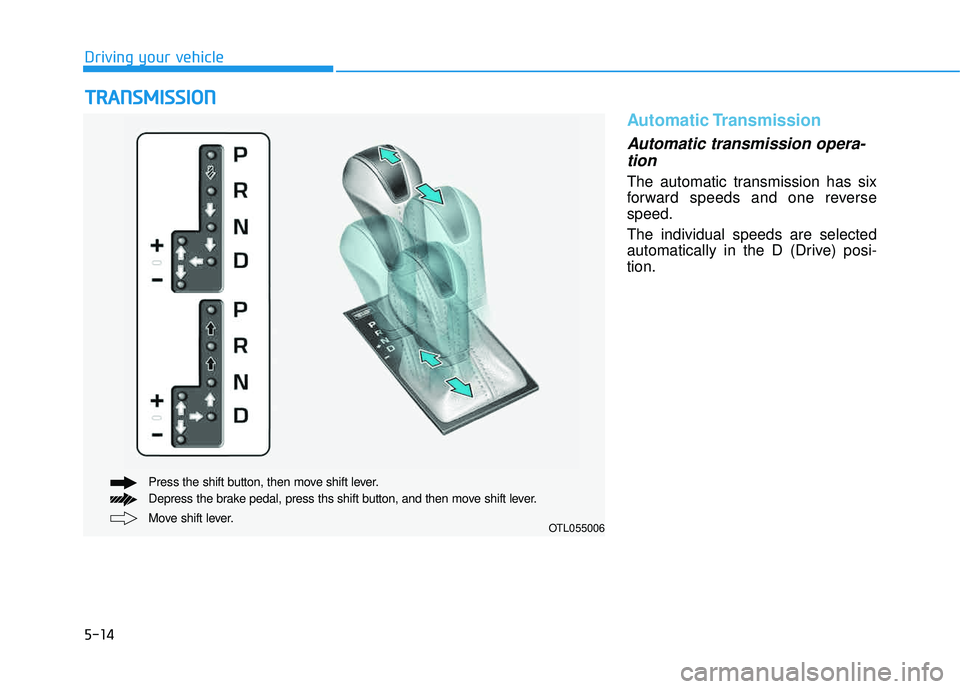
Automatic transmission opera-tion
The automatic transmission has six
forward speeds and one reversespeed. The individual speeds are selected
automatically in the D (Drive) posi-tion.
TT RR AA NN SSMM IISS SSIIOO NN
Move shift lever.
Press the shift button, then move shift lever.
Depress the brake pedal, press ths shift button, and then move shift lever.OTL055006
Page 400 of 642
5-16
Driving your vehicle
R (Reverse)
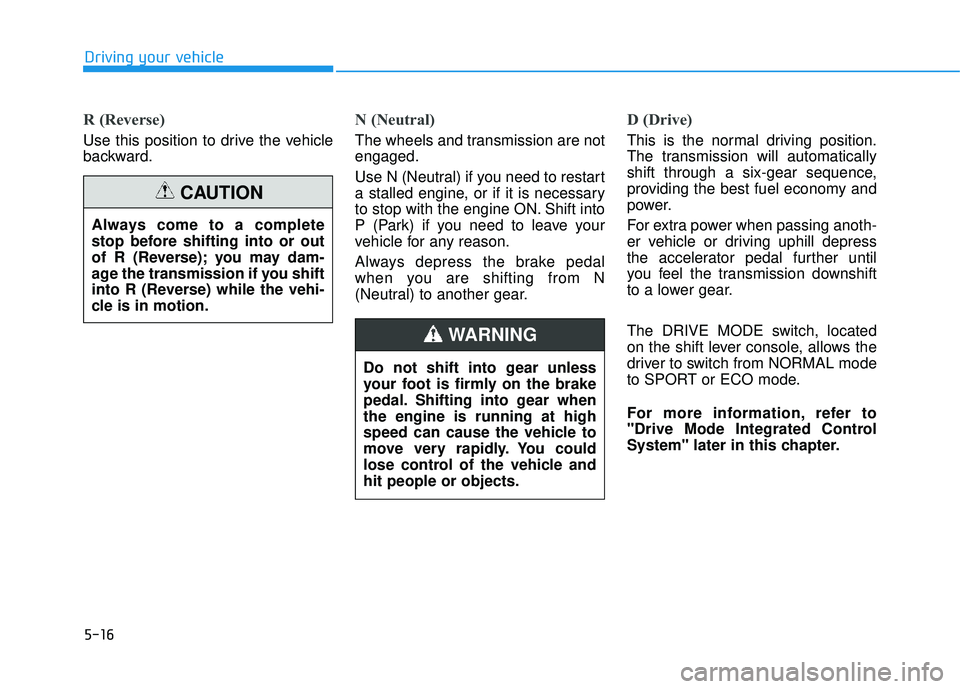
Use this position to drive the vehicle
backward.
N (Neutral)
The wheels and transmission are not engaged.
Use N (Neutral) if you need to restart
a stalled engine, or if it is necessary
to stop with the engine ON. Shift into
P (Park) if you need to leave your
vehicle for any reason.
Always depress the brake pedal
when you are shifting from N
(Neutral) to another gear.
D (Drive)
This is the normal driving position.
The transmission will automatically
shift through a six-gear sequence,
providing the best fuel economy and
power.
For extra power when passing anoth-
er vehicle or driving uphill depress
the accelerator pedal further until
you feel the transmission downshift
to a lower gear.
The DRIVE MODE switch, located
on the shift lever console, allows the
driver to switch from NORMAL mode
to SPORT or ECO mode.
For more information, refer to
"Drive Mode Integrated Control
System" later in this chapter.
Always come to a complete
stop before shifting into or out
of R (Reverse); you may dam-
age the transmission if you shift
into R (Reverse) while the vehi-
cle is in motion.
CAUTION
Do not shift into gear unless
your foot is firmly on the brake
pedal. Shifting into gear whenthe engine is running at high
speed can cause the vehicle to
move very rapidly. You could
lose control of the vehicle andhit people or objects.
WARNING
Page 401 of 642
5-17
Driving your vehicle
5
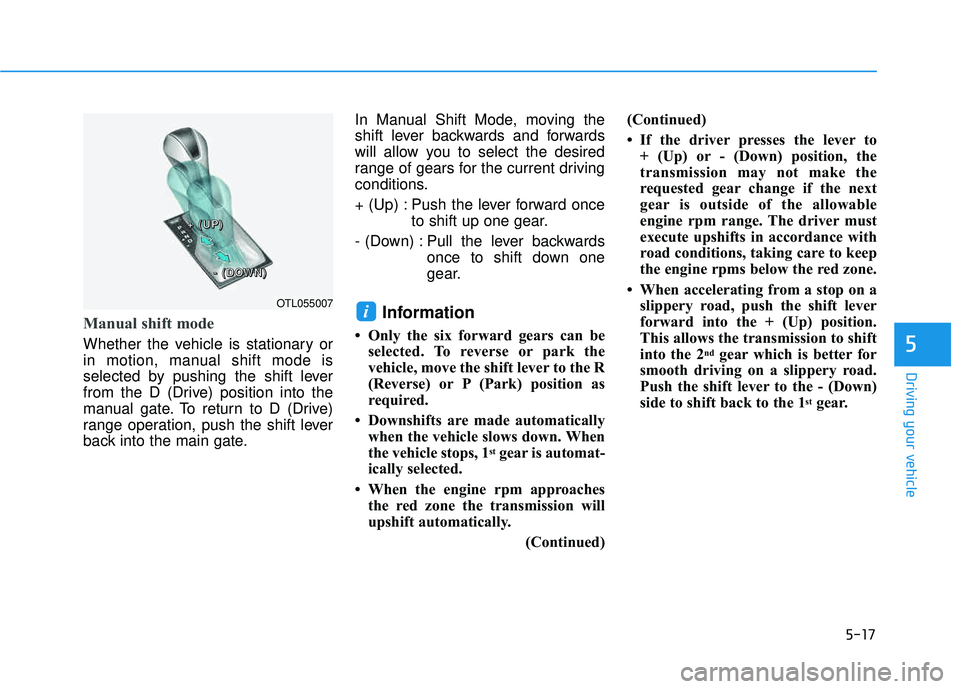
Manual shift mode
Whether the vehicle is stationary or
in motion, manual shift mode is
selected by pushing the shift lever
from the D (Drive) position into the
manual gate. To return to D (Drive)
range operation, push the shift lever
back into the main gate.In Manual Shift Mode, moving the
shift lever backwards and forwards
will allow you to select the desired
range of gears for the current driving
conditions.
+ (Up) : Push the lever forward once
to shift up one gear.
- (Down) : Pull the lever backwards once to shift down one
gear.
Information
Only the six forward gears can beselected. To reverse or park the
vehicle, move the shift lever to the R
(Reverse) or P (Park) position as
required.
Downshifts are made automatically when the vehicle slows down. When
the vehicle stops, 1
stgear is automat-
ically selected.
When the engine rpm approaches the red zone the transmission will
upshift automatically.
(Continued)(Continued)
If the driver presses the lever to
+ (Up) or - (Down) position, the
transmission may not make the
requested gear change if the next
gear is outside of the allowable
engine rpm range. The driver must
execute upshifts in accordance with
road conditions, taking care to keep
the engine rpms below the red zone.
When accelerating from a stop on a slippery road, push the shift lever
forward into the + (Up) position.
This allows the transmission to shift
into the 2
ndgear which is better for
smooth driving on a slippery road.
Push the shift lever to the - (Down)
side to shift back to the 1
stgear.
iOTL055007
++++ ((((UUUUPPPP))))
---- ((((DDDDOOOOWWWWNNNN))))