warning lights HYUNDAI TUCSON LIMITED 2017 Owners Manual
[x] Cancel search | Manufacturer: HYUNDAI, Model Year: 2017, Model line: TUCSON LIMITED, Model: HYUNDAI TUCSON LIMITED 2017Pages: 642, PDF Size: 9.78 MB
Page 14 of 642
F14F14
LCD Display ...........................................................3-70
LCD Modes ........................................................................3-70
Trip Computer Mode.......................................................3-71
Turn By Turn (TBT) Mode ............................................3-72
LDWS Mode ......................................................................3-72
A/V Mode..........................................................................3-72
Information Mode ...........................................................3-73
User Settings Mode ........................................................3-75
Warning Messages..........................................................3-81
Trip computer .......................................................3-89
Overview............................................................................3-89
Trip A/B .............................................................................3-90
Fuel Economy...................................................................3-91
Digital Speedometer .......................................................3-93
Warning and indicator lights ..............................3-94
Warning Lights .................................................................3-94
Indicator Lights ..............................................................3-102
Light .....................................................................3-107
Exterior Lights ...............................................................3-107
Welcome System ...........................................................3-113
Interior Lights ................................................................3-114
Wipers and washers ..........................................3-118
Windshield Wipers ........................................................3-118
Windshield Washers .....................................................3-119
Rear window wiper and washer switch ..................3-120
Driver Assist System .........................................3-121
Rear View Camera ........................................................3-121
Rear Parking Assist System .......................................3-122
Rear parking assist system precautions .................3-125
Defroster .............................................................3-126
Rear Window Defroster ..............................................3-126
Manual climate control system........................3-127
Heating and Air Conditioning .....................................3-128
System Operation .........................................................3-133
System Maintenance....................................................3-135
Automatic climate control system ...................3-137
Automatic Heating and Air Conditioning.................3-138
Manual Heating and Air Conditioning......................3-139
System Operation .........................................................3-145
System Maintenance....................................................3-147
Windshield defrosting and defogging ............3-149
Manual Climate Control System ................................3-149
Automatic Climate Control System ...........................3-150
Defogging logic..............................................................3-151
Page 87 of 642
2-60
Safety system of your vehicle
Always be sure that you and all vehi-
cle occupants are seated properly
and wearing the seat belt properly for
the most effective protection by theair bag and the seat belt.
The OCS may not function properly if
the passenger takes actions which
can affect the classification system.These include:
Failing to sit in an upright position.
Leaning against the door or centerconsole.
Sitting towards the sides of the front of the seat.
Putting their legs on the dashboard or resting them on other locations which reduce the passenger
weight on the front seat.
Wearing the seat belt improperly.
Reclining the seatback.
Wearing a thick cloth like ski wear or hip protection wear.
Putting an additional thick cushion on the seat.
Putting electrical devices (e.g. notebook, satellite radio) on the
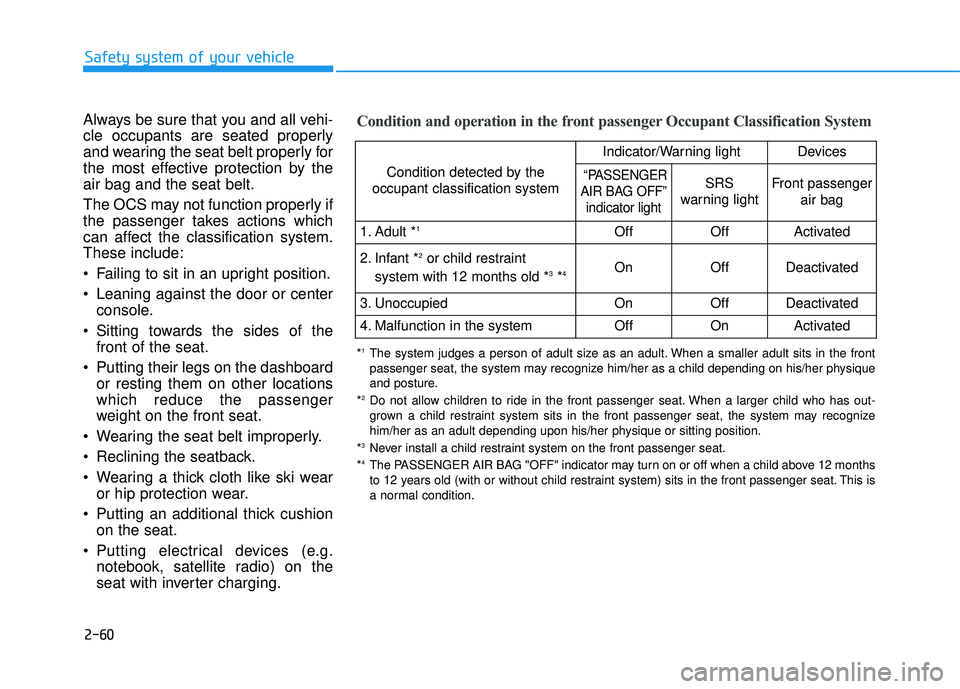
seat with inverter charging.Condition and operation in the front passenger Occupant Classification System
Condition detected by the
occupant classification system
Indicator/Warning lightDevices
“PASSENGER
AIR BAG OFF”
indicator lightSRS
warning lightFront passenger
air bag
1. Adult * 1OffOffActivated
2. Infant * 2
or child restraint
system with 12 months old * 3
*4 OnOffDeactivated
3. Unoccupied OnOffDeactivated
4. Malfunction in the systemOffOnActivated
*
1
The system judges a person of adult size as an adult. When a smaller adult sits in the front
passenger seat, the system may recognize him/her as a child depending on his/her physique
and posture.
* 2
Do not allow children to ride in the front passenger seat. When a larger child who has out-
grown a child restraint system sits in the front passenger seat, the system may recognize
him/her as an adult depending upon his/her physique or sitting position.
* 3
Never install a child restraint system on the front passenger seat.
* 4
The PASSENGER AIR BAG "OFF" indicator may turn on or off when a child above 12 months
to 12 years old (with or without child restraint system) sits in the front passenger seat. This is
a normal condition.
Page 100 of 642
LCD Display ...........................................................3-70
LCD Modes ........................................................................3-70
Trip Computer Mode.......................................................3-71
Turn By Turn (TBT) Mode ............................................3-72
LDWS Mode ......................................................................3-72
A/V Mode..........................................................................3-72
Information Mode ...........................................................3-73
User Settings Mode ........................................................3-75
Warning Messages..........................................................3-81
Trip computer .......................................................3-89
Overview............................................................................3-89
Trip A/B .............................................................................3-90
Fuel Economy...................................................................3-91
Digital Speedometer .......................................................3-93
Warning and indicator lights ..............................3-94
Warning Lights .................................................................3-94
Indicator Lights ..............................................................3-102
Light .....................................................................3-107
Exterior Lights ...............................................................3-107
Welcome System ...........................................................3-113
Interior Lights ................................................................3-114
Wipers and washers ..........................................3-118
Windshield Wipers ........................................................3-118
Windshield Washers .....................................................3-119
Rear window wiper and washer switch ..................3-120
Driver Assist System .........................................3-121
Rear View Camera ........................................................3-121
Rear Parking Assist System .......................................3-122
Rear parking assist system precautions .................3-125
Defroster .............................................................3-126
Rear Window Defroster ..............................................3-126
Manual climate control system........................3-127
Heating and Air Conditioning .....................................3-128
System Operation .........................................................3-133
System Maintenance....................................................3-135
Automatic climate control system ...................3-137
Automatic Heating and Air Conditioning.................3-138
Manual Heating and Air Conditioning......................3-139
System Operation .........................................................3-145
System Maintenance....................................................3-147
Windshield defrosting and defogging ............3-149
Manual Climate Control System ................................3-149
Automatic Climate Control System ...........................3-150
Defogging logic..............................................................3-151
3
Page 102 of 642
3-4
Convenient features of your vehicle
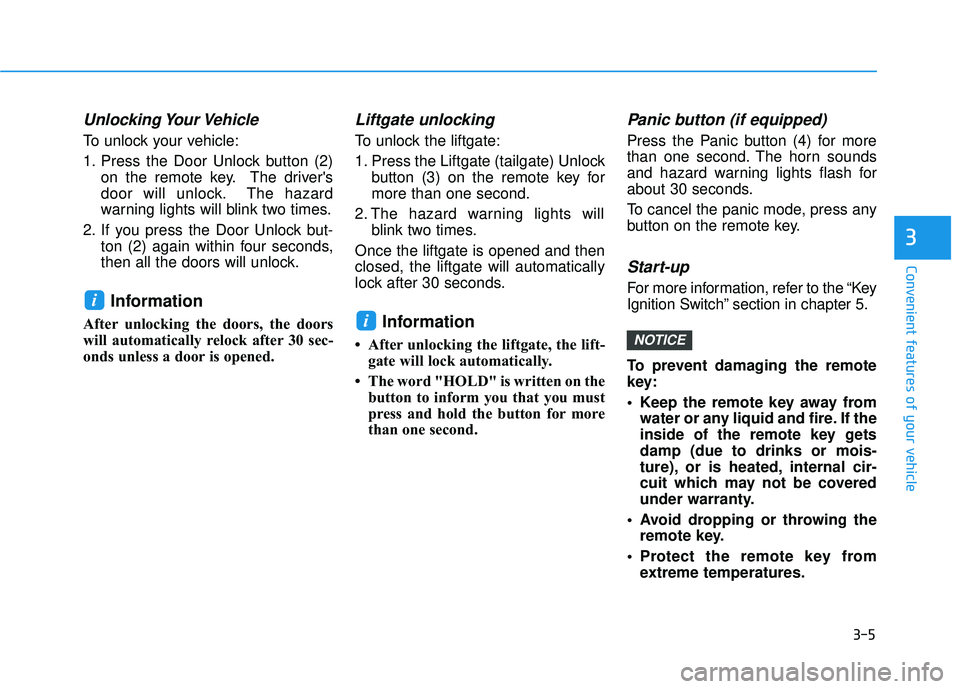
Remote Key (if equipped)
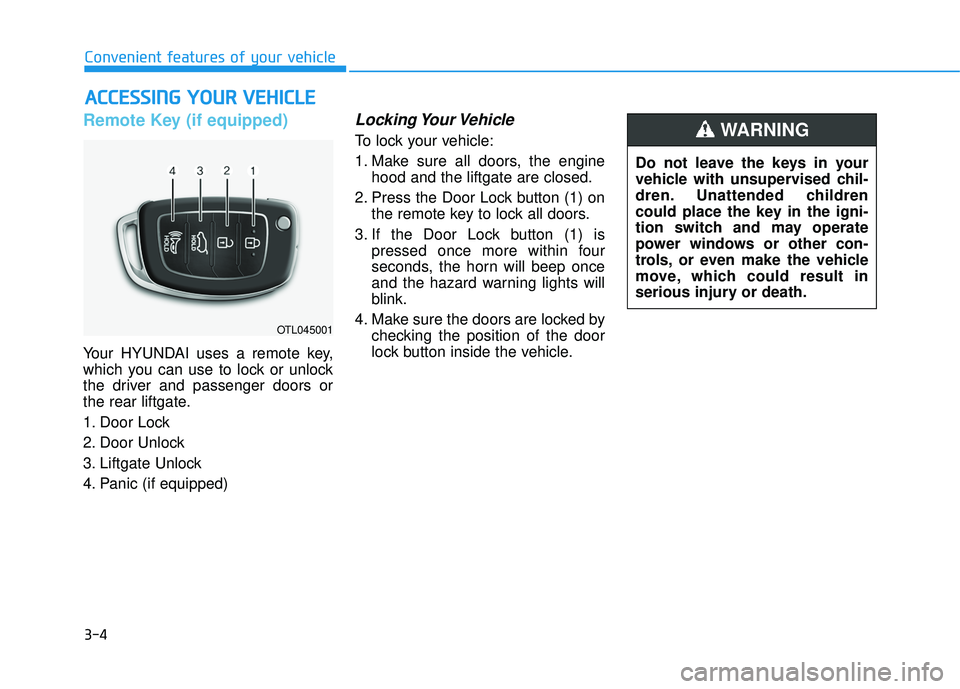
Your HYUNDAI uses a remote key,
which you can use to lock or unlock
the driver and passenger doors or
the rear liftgate.
1. Door Lock
2. Door Unlock
3. Liftgate Unlock
4. Panic (if equipped)
Locking Your Vehicle
To lock your vehicle:
1. Make sure all doors, the enginehood and the liftgate are closed.
2. Press the Door Lock button (1) on the remote key to lock all doors.
3. If the Door Lock button (1) is pressed once more within four
seconds, the horn will beep once
and the hazard warning lights will
blink.
4. Make sure the doors are locked by checking the position of the door
lock button inside the vehicle.
AACCCC EE SSSS IINN GG YY OO UURR VV EEHH IICC LLEE
OTL045001
Do not leave the keys in your
vehicle with unsupervised chil-
dren. Unattended children
could place the key in the igni-
tion switch and may operate
power windows or other con-
trols, or even make the vehicle
move, which could result in
serious injury or death.
WARNING
Page 103 of 642
3-5
Convenient features of your vehicle
Unlocking Your Vehicle
To unlock your vehicle:
1. Press the Door Unlock button (2)on the remote key. The driver's
door will unlock. The hazard
warning lights will blink two times.
2. If you press the Door Unlock but- ton (2) again within four seconds,
then all the doors will unlock.
Information
After unlocking the doors, the doors
will automatically relock after 30 sec-
onds unless a door is opened.
Liftgate unlocking
To unlock the liftgate:
1. Press the Liftgate (tailgate) Unlockbutton (3) on the remote key for more than one second.
2. The hazard warning lights will blink two times.
Once the liftgate is opened and thenclosed, the liftgate will automatically
lock after 30 seconds.
Information
After unlocking the liftgate, the lift- gate will lock automatically.
The word "HOLD" is written on the button to inform you that you must
press and hold the button for more
than one second.
Panic button (if equipped)
Press the Panic button (4) for more
than one second. The horn sounds
and hazard warning lights flash for
about 30 seconds.
To cancel the panic mode, press any
button on the remote key.
Start-up
For more information, refer to the “Key
Ignition Switch” section in chapter 5.
To prevent damaging the remote
key:
• Keep the remote key away fromwater or any liquid and fire. If the
inside of the remote key getsdamp (due to drinks or mois-
ture), or is heated, internal cir-
cuit which may not be covered
under warranty.
Avoid dropping or throwing the remote key.
Protect the remote key from extreme temperatures.
NOTICE
i
i
3
Page 106 of 642
3-8
Convenient features of your vehicle
Smart Key (if equipped)
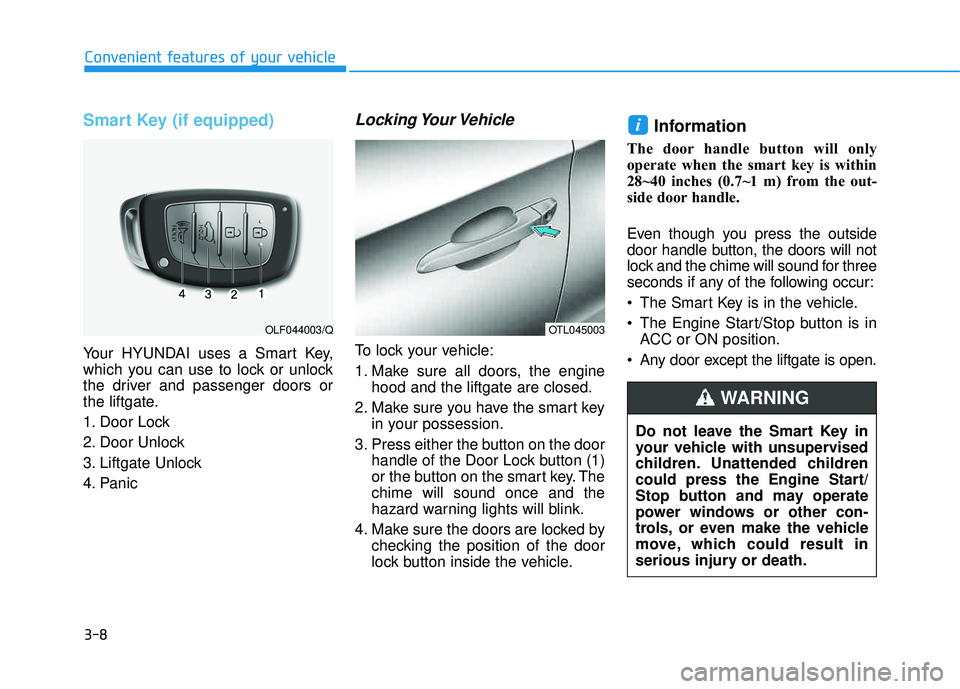
Your HYUNDAI uses a Smart Key,
which you can use to lock or unlock
the driver and passenger doors or
the liftgate.
1. Door Lock
2. Door Unlock
3. Liftgate Unlock
4. Panic
Locking Your Vehicle
To lock your vehicle:
1. Make sure all doors, the enginehood and the liftgate are closed.
2. Make sure you have the smart key in your possession.
3. Press either the button on the door handle of the Door Lock button (1)
or the button on the smart key. Thechime will sound once and the
hazard warning lights will blink.
4. Make sure the doors are locked by checking the position of the door
lock button inside the vehicle.
Information
The door handle button will only
operate when the smart key is within
28~40 inches (0.7~1 m) from the out-
side door handle.
Even though you press the outside
door handle button, the doors will not
lock and the chime will sound for three
seconds if any of the following occur:
The Smart Key is in the vehicle.
The Engine Start/Stop button is inACC or ON position.
Any door except the liftgate is open.
i
OTL045003OLF044003/Q
Do not leave the Smart Key in
your vehicle with unsupervised
children. Unattended children
could press the Engine Start/
Stop button and may operate
power windows or other con-
trols, or even make the vehicle
move, which could result in
serious injury or death.
WARNING
Page 107 of 642
3-9
Convenient features of your vehicle
3
Unlocking Your Vehicle
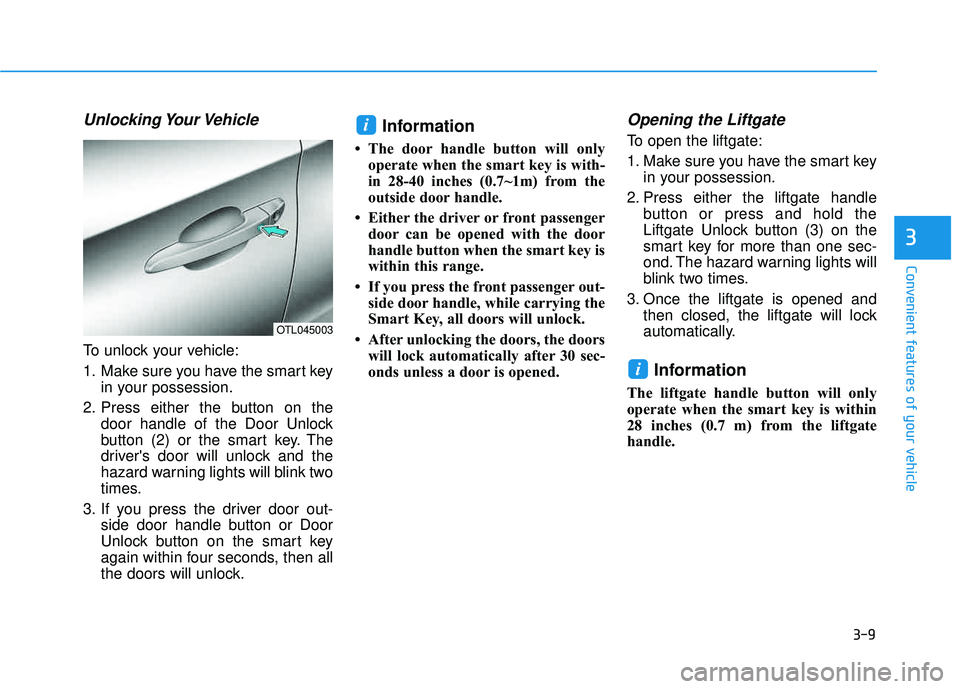
To unlock your vehicle:
1. Make sure you have the smart keyin your possession.
2. Press either the button on the door handle of the Door Unlock
button (2) or the smart key. The
driver's door will unlock and the
hazard warning lights will blink two
times.
3. If you press the driver door out- side door handle button or Door
Unlock button on the smart key
again within four seconds, then all
the doors will unlock.
Information
The door handle button will onlyoperate when the smart key is with-
in 28-40 inches (0.7~1m) from the
outside door handle.
Either the driver or front passenger door can be opened with the door
handle button when the smart key is
within this range.
If you press the front passenger out- side door handle, while carrying the
Smart Key, all doors will unlock.
After unlocking the doors, the doors will lock automatically after 30 sec-
onds unless a door is opened.
Opening the Liftgate
To open the liftgate:
1. Make sure you have the smart key in your possession.
2. Press either the liftgate handle button or press and hold the
Liftgate Unlock button (3) on the
smart key for more than one sec-
ond. The hazard warning lights will
blink two times.
3. Once the liftgate is opened and then closed, the liftgate will lock
automatically.
Information
The liftgate handle button will only
operate when the smart key is within
28 inches (0.7 m) from the liftgate
handle.
i
i
OTL045003
Page 108 of 642
3-10
Convenient features of your vehicle
Panic button
Press the Panic button (4) and hold
for more than one second. The horn
sounds and hazard warning lights
blink for about 30 seconds. To cancel
the panic mode, press any button on
the Smart Key.
Start-up
You can start the engine without
inserting the key.
For more information, refer to the
"Engine Start/Stop Button" sec-
tion in chapter 5.To prevent damaging the smart key:
Keep the smart key in a cool, dry
place to avoid damage or mal-
function. Exposure to moisture
or high temperature may cause
the internal circuit of the smart
key to malfunction which may
not be covered under warranty.
Avoid dropping or throwing the smart key.
Protect the smart key from extreme temperatures.
Mechanical key
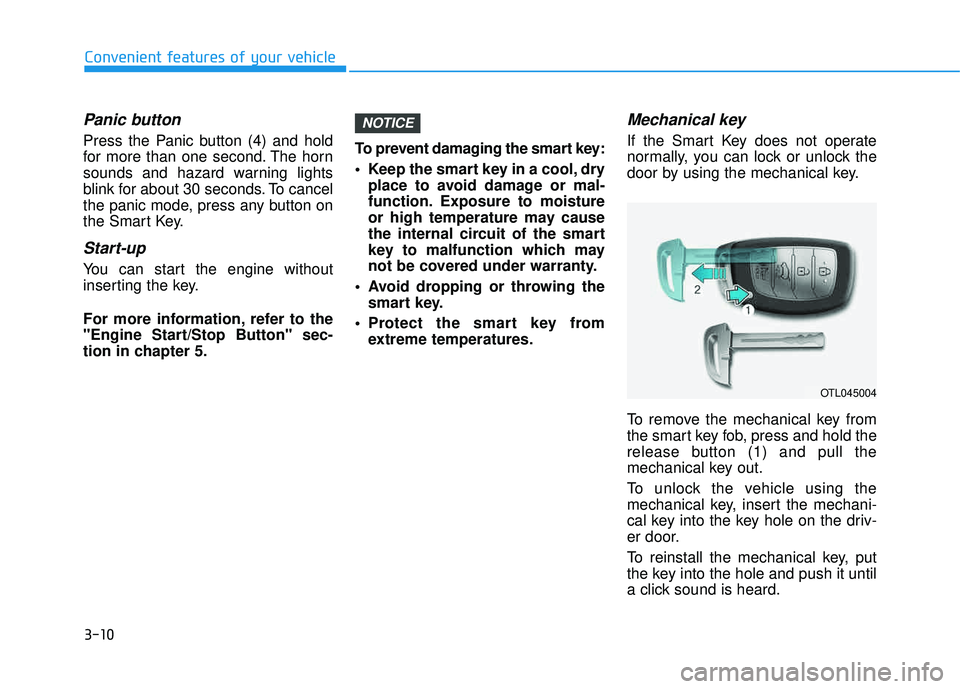
If the Smart Key does not operate
normally, you can lock or unlock the
door by using the mechanical key.
To remove the mechanical key from
the smart key fob, press and hold the
release button (1) and pull the
mechanical key out.
To unlock the vehicle using the
mechanical key, insert the mechani-
cal key into the key hole on the driv-
er door.
To reinstall the mechanical key, put
the key into the hole and push it until
a click sound is heard.
NOTICE
OTL045004
Page 117 of 642
3-19
Convenient features of your vehicle
This system helps to protect your
vehicle and valuables. The horn will
sound and the hazard warning lights
will blink continuously if any of the
following occurs:
- A door is opened without using theremote key or smart key.
- The liftgate is opened without using the remote key or smart key.
- The engine hood is opened.
The alarm continues for 30 seconds,
then the system resets. To turn off
the alarm, unlock the doors with the
remote key or smart key.
The Theft Alarm System automatical-
ly sets 30 seconds after you lock the
doors and the liftgate. For the system
to activate, you must lock the doors
and the liftgate from outside the vehi-
cle with the remote key or smart key
or by pressing the button on the out-
side of the door handle with the smart
key in your possession.
The hazard warning lights will blink and the chime will sound once to
indicate the system is armed. Once the security system is set,
opening any door, the liftgate, or the
hood without using the remote key or
smart key will cause the alarm to
activate.
The Theft Alarm System will not set if
the hood, the liftgate, or any door is
not fully closed. If the system will not
set, check the hood, the liftgate, orthe doors are fully closed. Do not attempt to alter this system or
add other devices to it.Information
Do not lock the doors until all pas-
sengers have left the vehicle. If the
remaining passenger leaves the
vehicle when the system is armed,
the alarm will be activated.
If the vehicle is not disarmed with the remote key or smart key, open the
doors by using the mechanical key
and place the ignition switch in the
ON position (for remote key) or start
the engine (for smart key) by direct-
ly pressing the ignition switch with
the smart key.
If the system is disarmed by unlock- ing the vehicle, but neither a door or
the liftgate is opened within 30 sec-
onds, the doors will relock and the
system will rearm automatically.
i
TTHH EEFFTT --AA LLAA RRMM SS YY SSTT EEMM
3
Page 119 of 642
3-21
Convenient features of your vehicle
3
Tilt Steering / Telescope Steering
When adjusting the steering wheel to
a comfortable position, adjust the
steering wheel so that it points
toward your chest, not toward your
face. Make sure you can see the
instrument panel warning lights and
gauges. After adjusting, push the
steering wheel both up and down to
be certain it is locked in position.
Always adjust the position of the
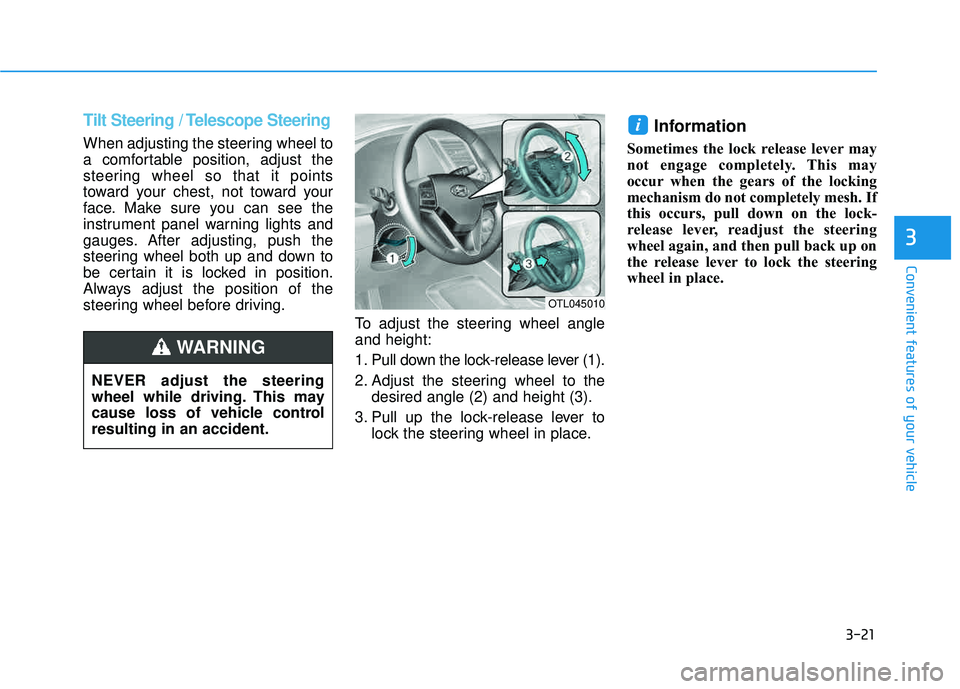
steering wheel before driving.To adjust the steering wheel angleand height:
1. Pull down the lock-release lever (1).
2. Adjust the steering wheel to thedesired angle (2) and height (3).
3. Pull up the lock-release lever to lock the steering wheel in place.
Information
Sometimes the lock release lever may
not engage completely. This may
occur when the gears of the locking
mechanism do not completely mesh. If
this occurs, pull down on the lock-
release lever, readjust the steering
wheel again, and then pull back up on
the release lever to lock the steering
wheel in place.
i
OTL045010
NEVER adjust the steering
wheel while driving. This may
cause loss of vehicle controlresulting in an accident.
WARNING