door lock HYUNDAI VELOSTER 2011 Owners Manual
[x] Cancel search | Manufacturer: HYUNDAI, Model Year: 2011, Model line: VELOSTER, Model: HYUNDAI VELOSTER 2011Pages: 386, PDF Size: 7.79 MB
Page 12 of 386
Introduction
6 1
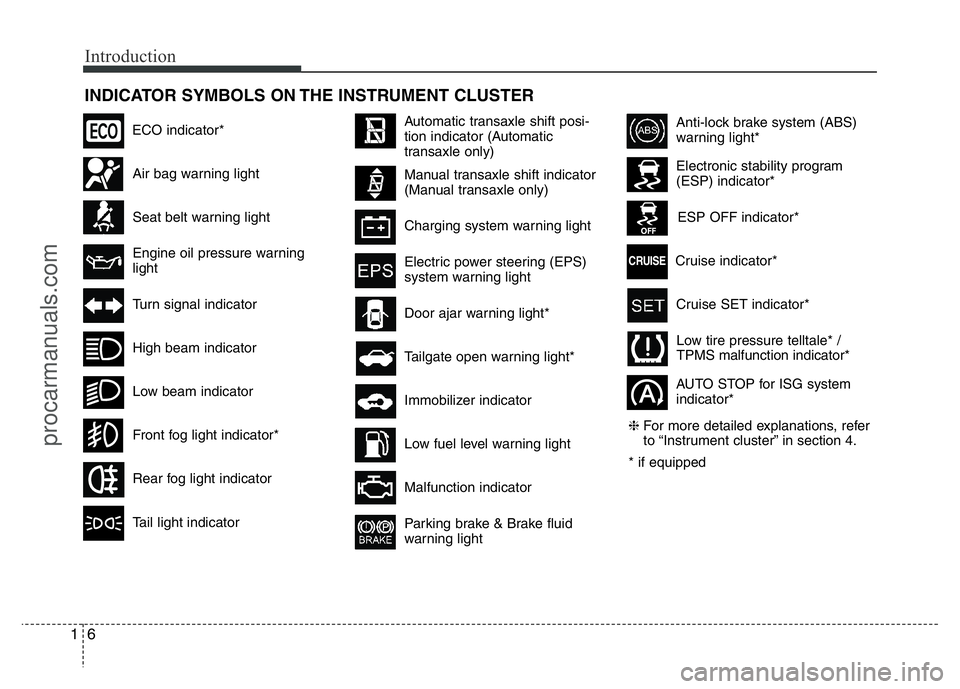
INDICATOR SYMBOLS ON THE INSTRUMENT CLUSTER
Seat belt warning light
High beam indicator
Turn signal indicator
Anti-lock brake system (ABS)
warning light*
Parking brake & Brake fluid
warning light
Malfunction indicator
Immobilizer indicator Tailgate open warning light*
Charging system warning light
Door ajar warning light*
Electronic stability program
(ESP) indicator*
ESP OFF indicator*
Front fog light indicator*
Engine oil pressure warning
lightElectric power steering (EPS)
system warning light
Air bag warning light
Low tire pressure telltale* /
TPMS malfunction indicator*
Rear fog light indicator
Cruise SET indicator*
AUTO STOP for ISG system
indicator* Cruise indicator*
Tail light indicator
Automatic transaxle shift posi-
tion indicator (Automatic
transaxle only)
Manual transaxle shift indicator
(Manual transaxle only)
Low fuel level warning light
Low beam indicator
❈For more detailed explanations, refer
to “Instrument cluster” in section 4.
* if equipped
ECO indicator*
CRUISE
procarmanuals.com
Page 14 of 386
Your vehicle at a glance
2 2
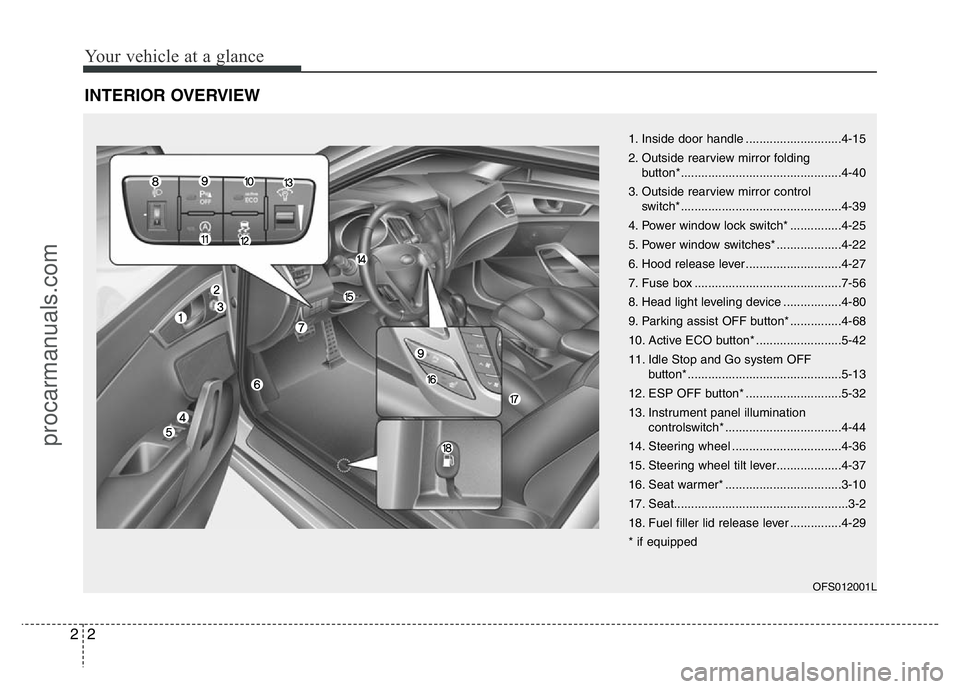
INTERIOR OVERVIEW
1. Inside door handle ............................4-15
2. Outside rearview mirror folding
button*...............................................4-40
3. Outside rearview mirror control
switch*...............................................4-39
4. Power window lock switch* ...............4-25
5. Power window switches* ...................4-22
6. Hood release lever ............................4-27
7. Fuse box ...........................................7-56
8. Head light leveling device .................4-80
9. Parking assist OFF button* ...............4-68
10. Active ECO button* .........................5-42
11.
Idle Stop and Go system OFF
button*.............................................5-13
12. ESP OFF button* ............................5-32
13. Instrument panel illumination
controlswitch* ..................................4-44
14. Steering wheel ................................4-36
15. Steering wheel tilt lever...................4-37
16. Seat warmer* ..................................3-10
17. Seat...................................................3-2
18. Fuel filler lid release lever ...............4-29
* if equipped
OFS012001L
procarmanuals.com
Page 35 of 386
319
Safety features of your vehicle
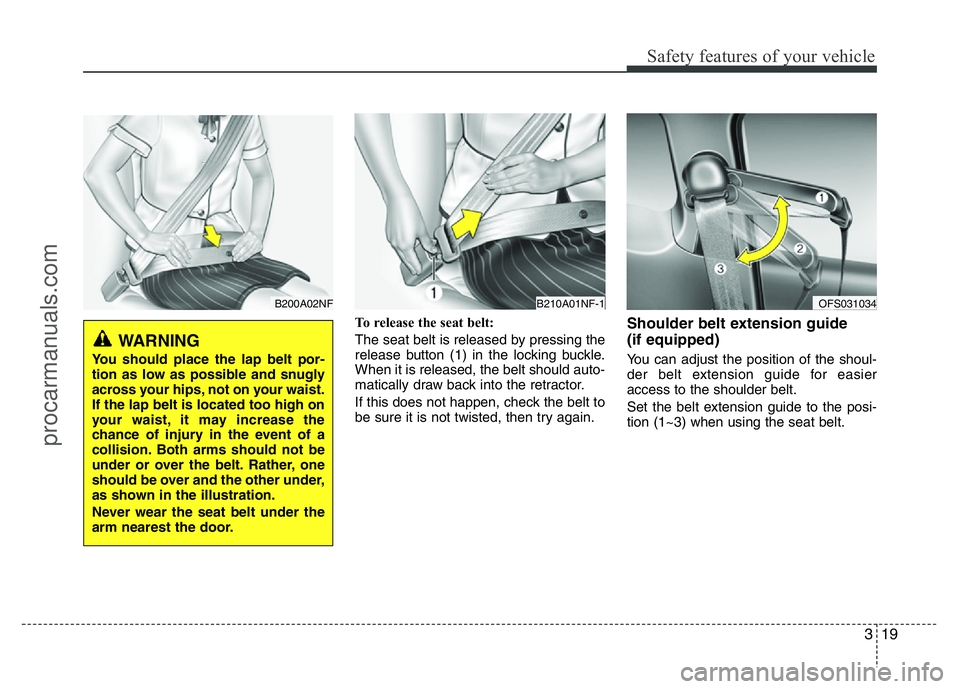
To release the seat belt:
The seat belt is released by pressing the
release button (1) in the locking buckle.
When it is released, the belt should auto-
matically draw back into the retractor.
If this does not happen, check the belt to
be sure it is not twisted, then try again.Shoulder belt extension guide
(if equipped)
You can adjust the position of the shoul-
der belt extension guide for easier
access to the shoulder belt.
Set the belt extension guide to the posi-
tion (1~3) when using the seat belt.
B210A01NF-1OFS031034B200A02NF
WARNING
You should place the lap belt por-
tion as low as possible and snugly
across your hips, not on your waist.
If the lap belt is located too high on
your waist, it may increase the
chance of injury in the event of a
collision. Both arms should not be
under or over the belt. Rather, one
should be over and the other under,
as shown in the illustration.
Never wear the seat belt under the
arm nearest the door.
procarmanuals.com
Page 55 of 386
339
Safety features of your vehicle
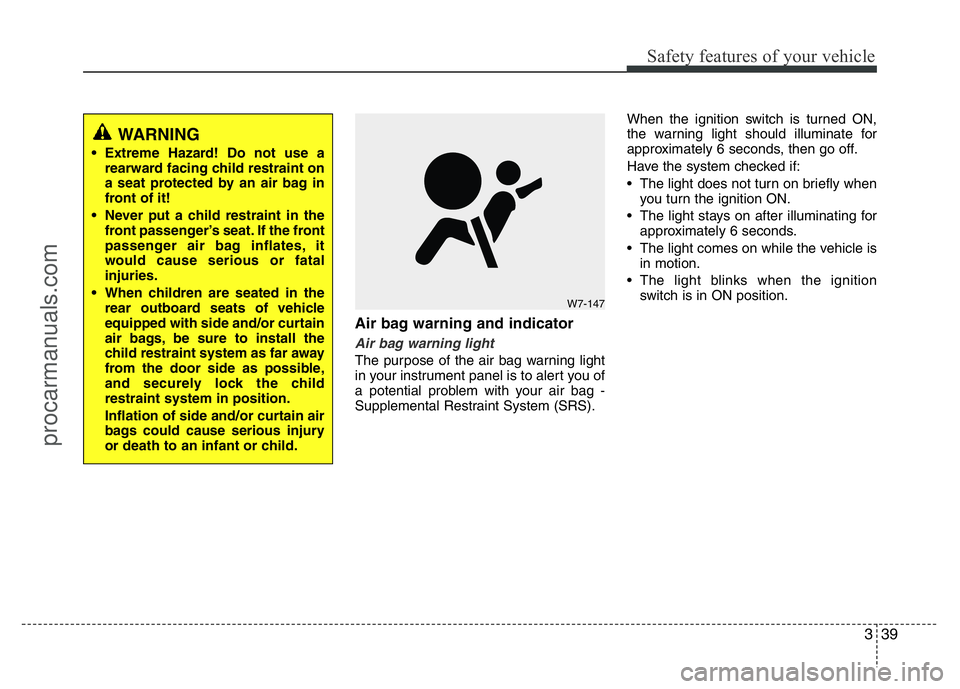
Air bag warning and indicator
Air bag warning light
The purpose of the air bag warning light
in your instrument panel is to alert you of
a potential problem with your air bag -
Supplemental Restraint System (SRS).When the ignition switch is turned ON,
the warning light should illuminate for
approximately 6 seconds, then go off.
Have the system checked if:
• The light does not turn on briefly when
you turn the ignition ON.
• The light stays on after illuminating for
approximately 6 seconds.
• The light comes on while the vehicle is
in motion.
• The light blinks when the ignition
switch is in ON position.
WARNING
• Extreme Hazard! Do not use a
rearward facing child restraint on
a seat protected by an air bag in
front of it!
• Never put a child restraint in the
front passenger’s seat. If the front
passenger air bag inflates, it
would cause serious or fatal
injuries.
• When children are seated in the
rear outboard seats of vehicle
equipped with side and/or curtain
air bags, be sure to install the
child restraint system as far away
from the door side as possible,
and securely lock the child
restraint system in position.
Inflation of side and/or curtain air
bags could cause serious injury
or death to an infant or child.
W7-147
procarmanuals.com
Page 66 of 386
Safety features of your vehicle
50 3
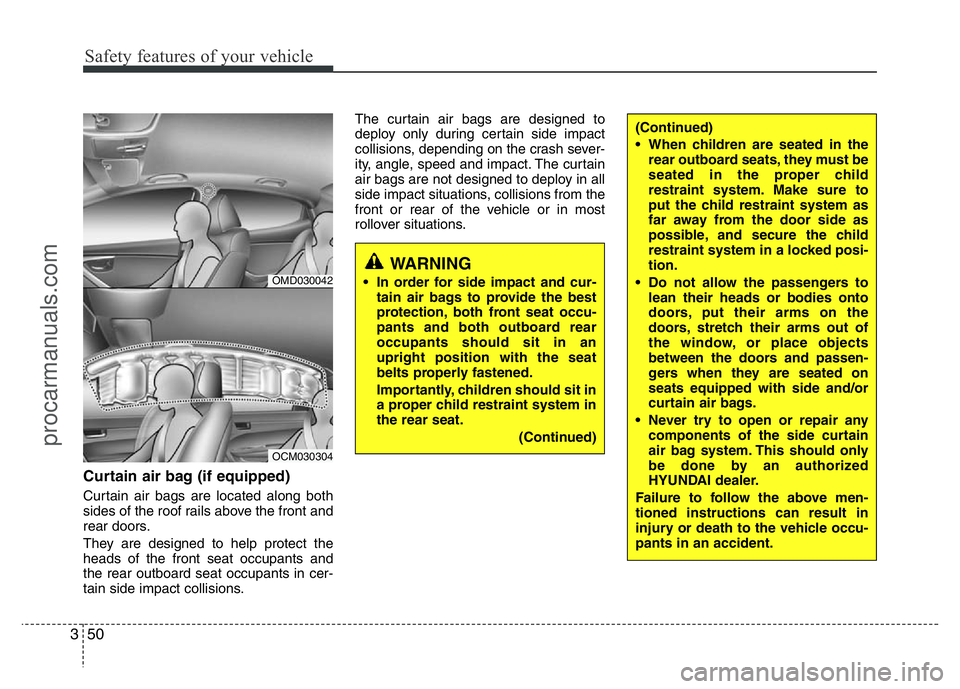
Curtain air bag (if equipped)
Curtain air bags are located along both
sides of the roof rails above the front and
rear doors.
They are designed to help protect the
heads of the front seat occupants and
the rear outboard seat occupants in cer-
tain side impact collisions.The curtain air bags are designed to
deploy only during certain side impact
collisions, depending on the crash sever-
ity, angle, speed and impact. The curtain
air bags are not designed to deploy in all
side impact situations, collisions from the
front or rear of the vehicle or in most
rollover situations.
WARNING
• In order for side impact and cur-
tain air bags to provide the best
protection, both front seat occu-
pants and both outboard rear
occupants should sit in an
upright position with the seat
belts properly fastened.
Importantly, children should sit in
a proper child restraint system in
the rear seat.
(Continued)
(Continued)
• When children are seated in the
rear outboard seats, they must be
seated in the proper child
restraint system. Make sure to
put the child restraint system as
far away from the door side as
possible, and secure the child
restraint system in a locked posi-
tion.
• Do not allow the passengers to
lean their heads or bodies onto
doors, put their arms on the
doors, stretch their arms out of
the window, or place objects
between the doors and passen-
gers when they are seated on
seats equipped with side and/or
curtain air bags.
• Never try to open or repair any
components of the side curtain
air bag system. This should only
be done by an authorized
HYUNDAI dealer.
Failure to follow the above men-
tioned instructions can result in
injury or death to the vehicle occu-
pants in an accident.
OMD030042
OCM030304
procarmanuals.com
Page 75 of 386
4
Keys / 4-2
Remote keyless entry / 4-5
Smart key / 4-8
Theft-alarm system / 4-12
Door locks / 4-14
Tailgate / 4-19
Windows / 4-22
Hood / 4-27
Fuel filler lid / 4-29
Panorama sunroof / 4-32
Steering wheel / 4-36
Mirrors / 4-37
Instrument cluster / 4-42
Rear parking assist system / 4-68
Rearview camera / 4-72
Hazard warning flasher / 4-73
Lighting / 4-74
Wipers and washers / 4-81
Interior light / 4-85
Defroster / 4-88
Manual climate control system / 4-89
Automatic climate control system / 4-98
Windshield defrosting and defogging / 4-106
Storage compartment / 4-109
Interior features / 4-111
Audio system / 4-117
Features of your vehicle
procarmanuals.com
Page 76 of 386
Features of your vehicle
2 4
Record your key number
The key code number is
stamped on the bar
code tag attached to the
key set. Should you
lose your keys, this
number will enable an authorized
HYUNDAI dealer to duplicate the keys
easily. Remove the bar code tag and
store it in a safe place. Also, record the
code number and keep it in a safe place
(not in the vehicle).
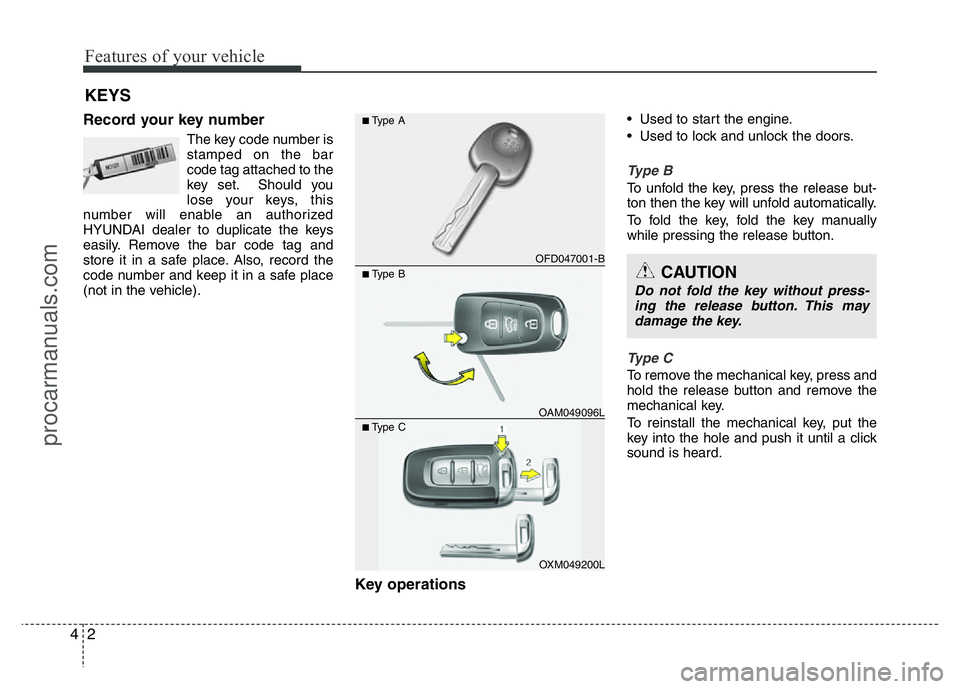
Key operations
• Used to start the engine.
• Used to lock and unlock the doors.
Type B
To unfold the key, press the release but-
ton then the key will unfold automatically.
To fold the key, fold the key manually
while pressing the release button.
Type C
To remove the mechanical key, press and
hold the release button and remove the
mechanical key.
To reinstall the mechanical key, put the
key into the hole and push it until a click
sound is heard.
KEYS
CAUTION
Do not fold the key without press-
ing the release button. This may
damage the key.
OFD047001-B
■Type A
■Type B
OXM049200L
■Type COAM049096L
procarmanuals.com
Page 79 of 386
45
Features of your vehicle
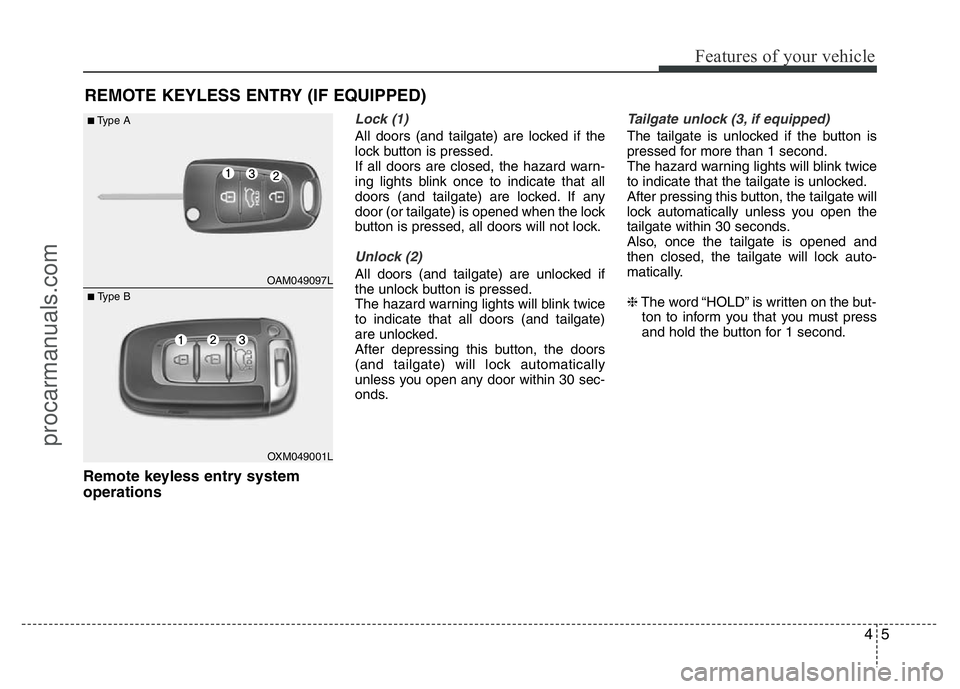
Remote keyless entry system
operations
Lock (1)
All doors (and tailgate) are locked if the
lock button is pressed.
If all doors are closed, the hazard warn-
ing lights blink once to indicate that all
doors (and tailgate) are locked. If any
door (or tailgate) is opened when the lock
button is pressed, all doors will not lock.
Unlock (2)
All doors (and tailgate) are unlocked if
the unlock button is pressed.
The hazard warning lights will blink twice
to indicate that all doors (and tailgate)
are unlocked.
After depressing this button, the doors
(and tailgate) will lock automatically
unless you open any door within 30 sec-
onds.
Tailgate unlock (3, if equipped)
The tailgate is unlocked if the button is
pressed for more than 1 second.
The hazard warning lights will blink twice
to indicate that the tailgate is unlocked.
After pressing this button, the tailgate will
lock automatically unless you open the
tailgate within 30 seconds.
Also, once the tailgate is opened and
then closed, the tailgate will lock auto-
matically.
❈The word “HOLD” is written on the but-
ton to inform you that you must press
and hold the button for 1 second.
REMOTE KEYLESS ENTRY (IF EQUIPPED)
OAM049097L
OXM049001L
■Type A
■ Type B
procarmanuals.com
Page 80 of 386
Features of your vehicle
6 4
Transmitter precautions
✽NOTICE
The transmitter may not work if any of
following occur:
• The ignition key is in ignition switch.
• You exceed the operating distance
limit (about 10 m [30 feet]).
• The battery in the transmitter is
weak.
• Other vehicles or objects may be
blocking the signal.
• The weather is extremely cold.
• The transmitter is close to a radio
transmitter such as a radio station or
an airport which can interfere with
normal operation of the transmitter.
When the transmitter does not work
properly, open and close the door with
the ignition key. If you have a problem
with the transmitter, contact an author-
ized HYUNDAI dealer.
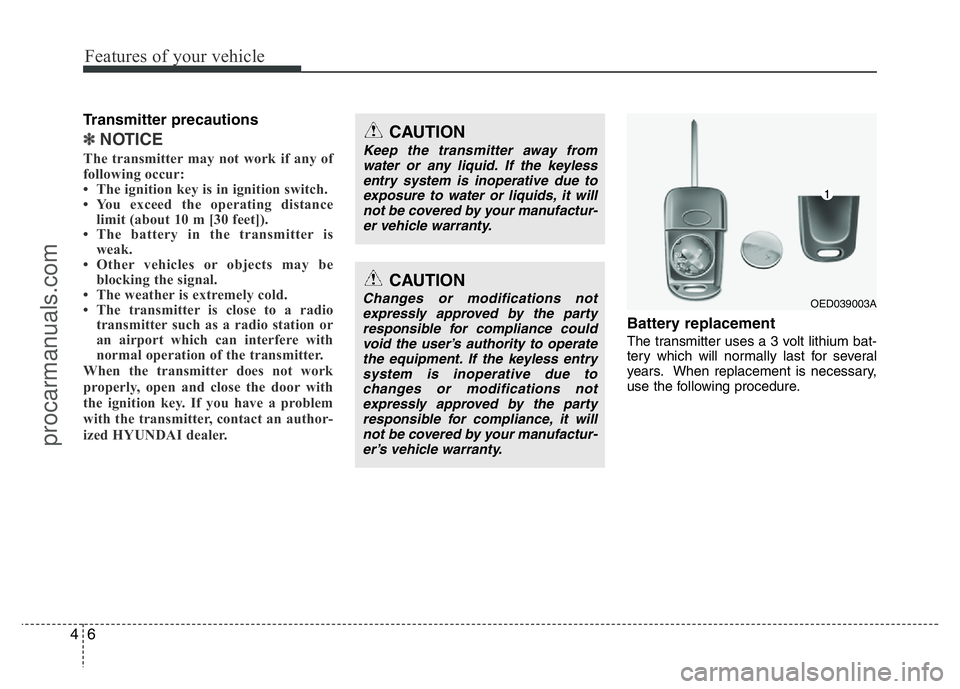
Battery replacement
The transmitter uses a 3 volt lithium bat-
tery which will normally last for several
years. When replacement is necessary,
use the following procedure.
OED039003A
CAUTION
Keep the transmitter away from
water or any liquid. If the keyless
entry system is inoperative due to
exposure to water or liquids, it will
not be covered by your manufactur-
er vehicle warranty.
CAUTION
Changes or modifications not
expressly approved by the party
responsible for compliance could
void the user’s authority to operate
the equipment. If the keyless entry
system is inoperative due to
changes or modifications not
expressly approved by the party
responsible for compliance, it will
not be covered by your manufactur-
er’s vehicle warranty.
procarmanuals.com
Page 82 of 386
Features of your vehicle
8 4
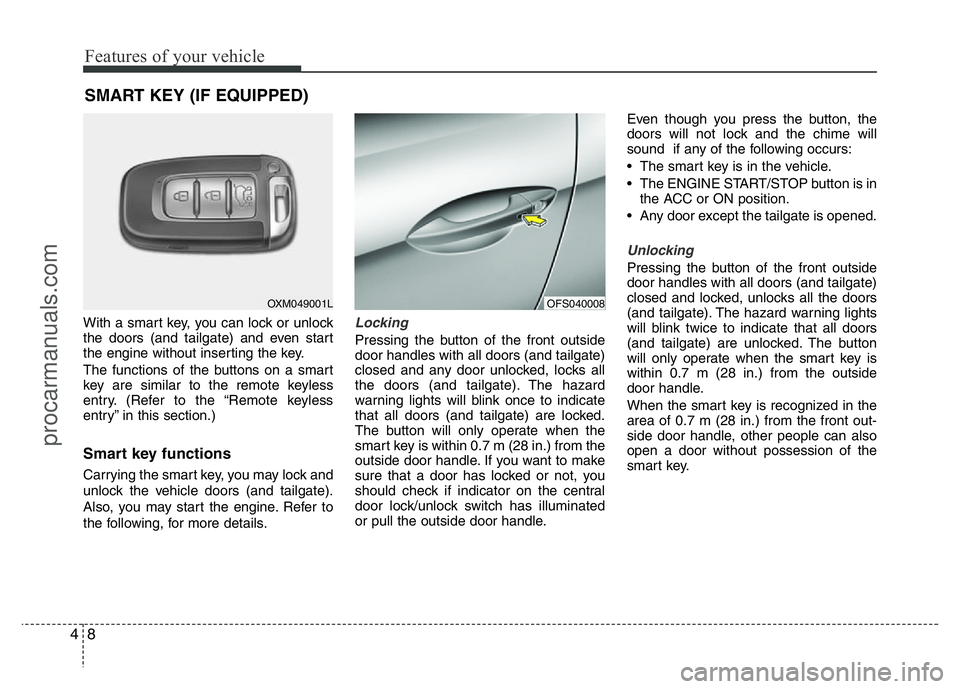
With a smart key, you can lock or unlock
the doors (and tailgate) and even start
the engine without inserting the key.
The functions of the buttons on a smart
key are similar to the remote keyless
entry. (Refer to the “Remote keyless
entry” in this section.)
Smart key functions
Carrying the smart key, you may lock and
unlock the vehicle doors (and tailgate).
Also, you may start the engine. Refer to
the following, for more details.
Locking
Pressing the button of the front outside
door handles with all doors (and tailgate)
closed and any door unlocked, locks all
the doors (and tailgate). The hazard
warning lights will blink once to indicate
that all doors (and tailgate) are locked.
The button will only operate when the
smart key is within 0.7 m (28 in.) from the
outside door handle. If you want to make
sure that a door has locked or not, you
should check if indicator on the central
door lock/unlock switch has illuminated
or pull the outside door handle.Even though you press the button, the
doors will not lock and the chime will
sound if any of the following occurs:
• The smart key is in the vehicle.
• The ENGINE START/STOP button is in
the ACC or ON position.
• Any door except the tailgate is opened.
Unlocking
Pressing the button of the front outside
door handles with all doors (and tailgate)
closed and locked, unlocks all the doors
(and tailgate). The hazard warning lights
will blink twice to indicate that all doors
(and tailgate) are unlocked. The button
will only operate when the smart key is
within 0.7 m (28 in.) from the outside
door handle.
When the smart key is recognized in the
area of 0.7 m (28 in.) from the front out-
side door handle, other people can also
open a door without possession of the
smart key.
SMART KEY (IF EQUIPPED)
OXM049001LOFS040008
procarmanuals.com