change time HYUNDAI VELOSTER 2011 Owners Manual
[x] Cancel search | Manufacturer: HYUNDAI, Model Year: 2011, Model line: VELOSTER, Model: HYUNDAI VELOSTER 2011Pages: 386, PDF Size: 7.79 MB
Page 1 of 386
All information in this Owner's Manual is current at the time of publication.
However, Hyundai reserves the right to make changes at any time so that
our policy of continual product improvement may be carried out.
This manual applies to all Hyundai models and includes descriptions and
explanations of optional as well as standard equipment. As a result, you
may find material in this manual that does not apply to your specific vehi-
cle.
Please note that some models are equipped with Right-Hand Drive (RHD).
The explanations and illustrations for some operations in RHD models are
opposite of those written in this manual.
OWNER'S MANUAL
Operation
Maintenance
Specifications
procarmanuals.com
Page 22 of 386
Safety features of your vehicle
6 3
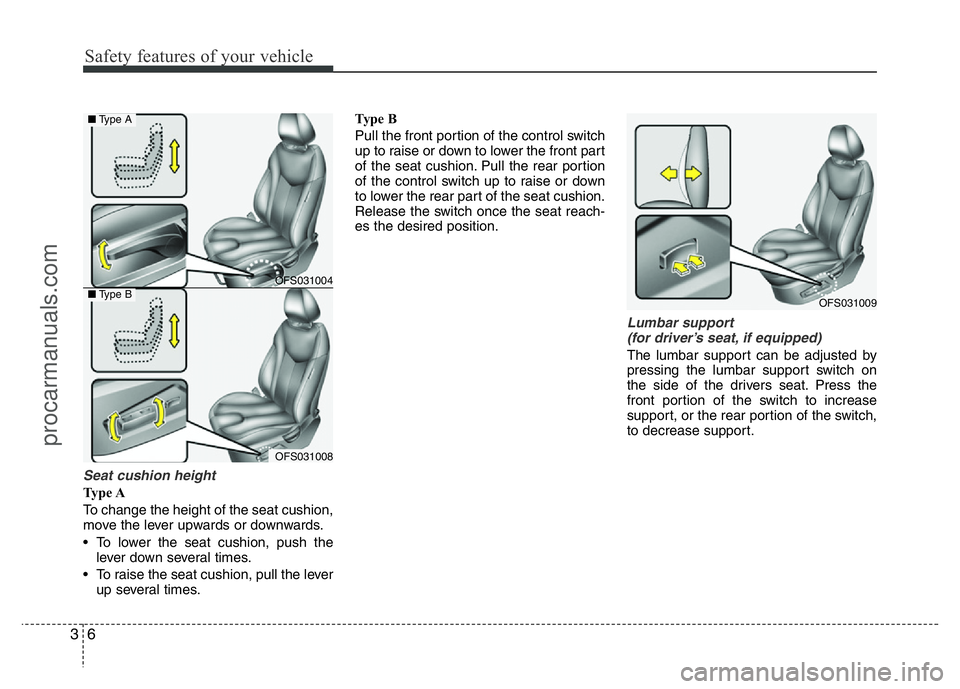
Seat cushion height
Ty p e A
To change the height of the seat cushion,
move the lever upwards or downwards.
• To lower the seat cushion, push the
lever down several times.
• To raise the seat cushion, pull the lever
up several times.Ty p e B
Pull the front portion of the control switch
up to raise or down to lower the front part
of the seat cushion. Pull the rear portion
of the control switch up to raise or down
to lower the rear part of the seat cushion.
Release the switch once the seat reach-
es the desired position.
Lumbar support
(for driver’s seat, if equipped)
The lumbar support can be adjusted by
pressing the lumbar support switch on
the side of the drivers seat. Press the
front portion of the switch to increase
support, or the rear portion of the switch,
to decrease support.
OFS031004
OFS031008
■Type A
■Type BOFS031009
procarmanuals.com
Page 126 of 386
Features of your vehicle
52 4
You can change the item by pressing the
TRIP button and choose the item by
pressing the RESET button.Auto door lock (if equipped)
Off - The auto door lock operation will be
canceled.
Speed - All doors will be automatically
locked when the vehicle speed
exceeds 15km/h (9.3mph).
Shift Lever - All doors will be automati-
cally locked if the shift lever
is shifted from the P(Park)
position to the R(Reverse),
N(Neutral) or D(Drive) posi-
tion.
Auto Triple Turn (One-touch triple
turn signal) (if equipped)
On - The lane change signals will blink 3
times when the turn signal lever is
moved slightly.
Off - The Auto Triple Turn function will be
inactivated.
Auto door unlock (if equipped)
Off - The auto door unlock operation will
be canceled.
Key Out - All doors will be automatically
unlocked when the ignition key
is removed from ignition switch
(or smart key is removed from
the smart key holder).
Shift Lever - All doors will be automati-
cally unlocked if the shift
lever is shifted to the
P(Park) position.
AVG fuel economy
Auto Reset - The average fuel economy
will reset automatically
when you drive after refuel-
ing.
Manual Reset - The average fuel econo-
my will not reset auto-
matically when you drive
after refueling.
Headlamp escort
On - If you turn the ignition switch to the
ACC or OFF position with the head-
lamp ON, the headlamp remain on
for about 20 minutes. And the head
lamp welcome operation will be
activated. Refer to the [LIGHTING]
in this chapter.
Off - The headlamp escort and head-
lamp welcome operation will be
canceled.
procarmanuals.com
Page 152 of 386
Features of your vehicle
78 4
If the indicator continues to flash after a
turn, manually return the lever to the off
position.
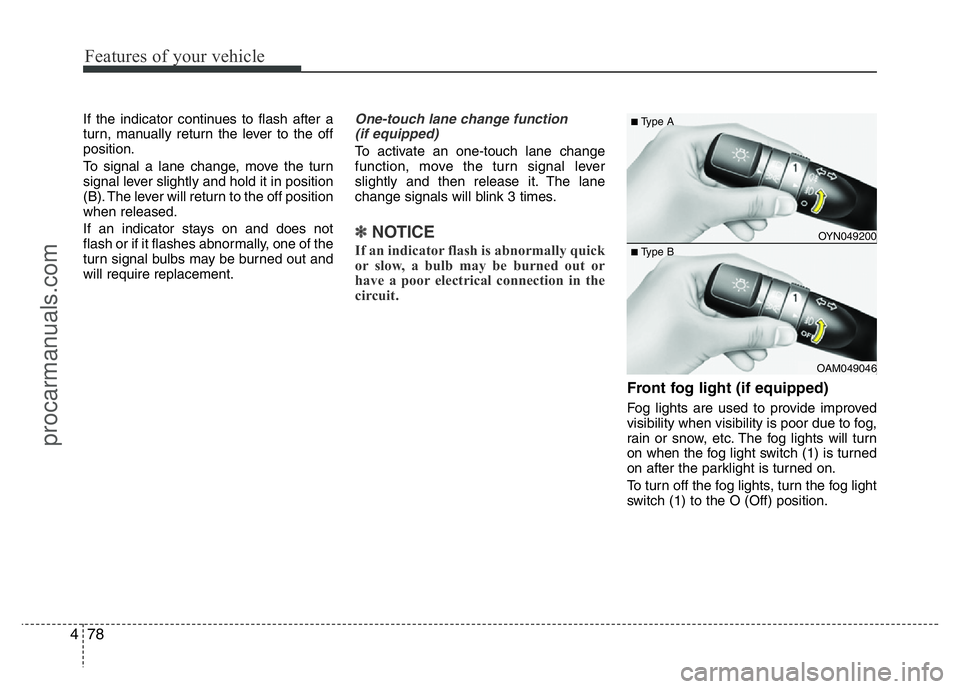
To signal a lane change, move the turn
signal lever slightly and hold it in position
(B). The lever will return to the off position
when released.
If an indicator stays on and does not
flash or if it flashes abnormally, one of the
turn signal bulbs may be burned out and
will require replacement.One-touch lane change function
(if equipped)
To activate an one-touch lane change
function, move the turn signal lever
slightly and then release it. The lane
change signals will blink 3 times.
✽NOTICE
If an indicator flash is abnormally quick
or slow, a bulb may be burned out or
have a poor electrical connection in the
circuit.
Front fog light (if equipped)
Fog lights are used to provide improved
visibility when visibility is poor due to fog,
rain or snow, etc. The fog lights will turn
on when the fog light switch (1) is turned
on after the parklight is turned on.
To turn off the fog lights, turn the fog light
switch (1) to the O (Off) position.
OYN049200
OAM049046
■Type A
■Type B
procarmanuals.com
Page 170 of 386
Features of your vehicle
96 4
✽NOTICE
• When using the air conditioning sys-
tem, monitor the temperature gauge
closely while driving up hills or in
heavy traffic when outside tempera-
tures are high. Air conditioning sys-
tem operation may cause engine over-
heating. Continue to use the blower
fan but turn the air conditioning sys-
tem off if the temperature gauge indi-
cates engine overheating.
• When opening the windows in humid
weather air conditioning may create
water droplets inside the vehicle.
Since excessive water droplets may
cause damage to electrical equipment,
air conditioning should only be used
with the windows closed.
Air conditioning system operation tips
• If the vehicle has been parked in direct
sunlight during hot weather, open the
windows for a short time to let the hot
air inside the vehicle escape.
• To help reduce moisture inside of the
windows on rainy or humid days,
decrease the humidity inside the vehi-
cle by operating the air conditioning
system.• During air conditioning system opera-
tion, you may occasionally notice a
slight change in engine speed as the
air conditioning compressor cycles.
This is a normal system operation
characteristic.
• Use the air conditioning system every
month only for a few minutes to ensure
maximum system performance.
• When using the air conditioning sys-
tem, you may notice clear water drip-
ping (or even puddling) on the ground
under the passenger side of the vehi-
cle. This is a normal system operation
characteristic.
• Operating the air conditioning system
in the recirculated air position provides
maximum cooling, however, continual
operation in this mode may cause the
air inside the vehicle to become stale.
• During cooling operation, you may
occasionally notice a misty air flow
because of rapid cooling and humid air
intake. This is a normal system opera-
tion characteristics.
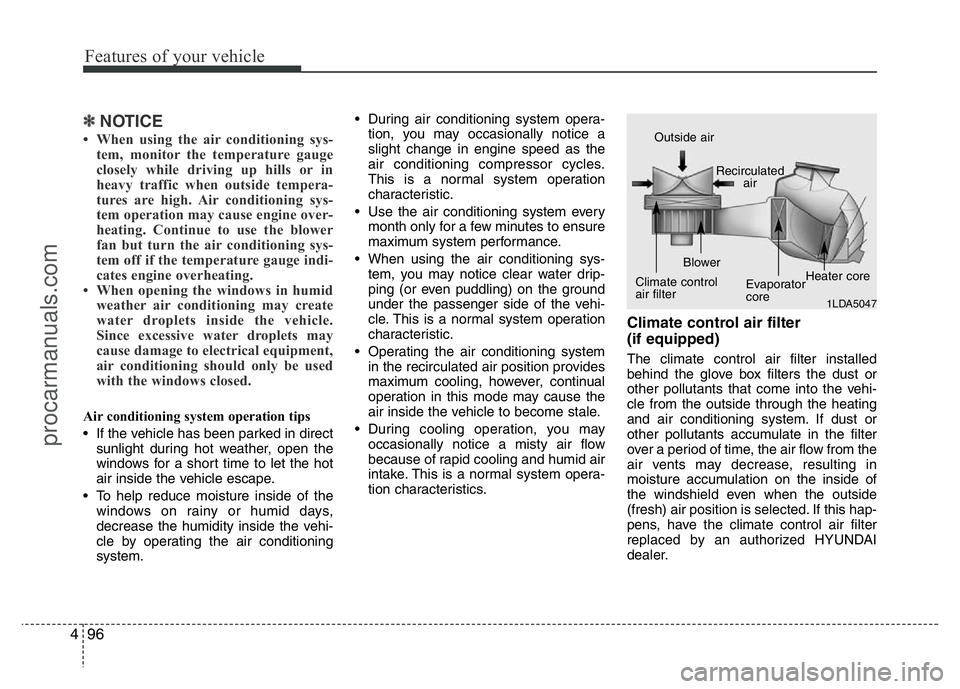
Climate control air filter
(if equipped)
The climate control air filter installed
behind the glove box filters the dust or
other pollutants that come into the vehi-
cle from the outside through the heating
and air conditioning system. If dust or
other pollutants accumulate in the filter
over a period of time, the air flow from the
air vents may decrease, resulting in
moisture accumulation on the inside of
the windshield even when the outside
(fresh) air position is selected. If this hap-
pens, have the climate control air filter
replaced by an authorized HYUNDAI
dealer.
1LDA5047
Outside air
Recirculated
air
Climate control
air filterBlower
Evaporator
coreHeater core
procarmanuals.com
Page 185 of 386
4111
Features of your vehicle
INTERIOR FEATURES
Clock
Type A
This allows you to set the time format
and the clock.
• Time format: Change the time format
between the “12h” and “24h”.
• Setting the clock
- Press ▲or ▼on the left side of the
clock to set the hour.
- Press ▲or ▼on the right side of the
clock to set the minute.
- If you set the [Time format] to [12h],
set the [am] or [pm].
Type B
This allows you to set the time format
and the summer time.
• Time format: Change the time format
between the “12h” and “24h”.
• Summer time: Set the summer time
between the “On” and “Off ”. The unit
sets the clock automatically by detect-
ing the summer time whether it is the
summer time season or not. Even
though the summer time is set to "On",
the unit sets the clock to normal time
(not +1 hour) when it's not summer
time season.
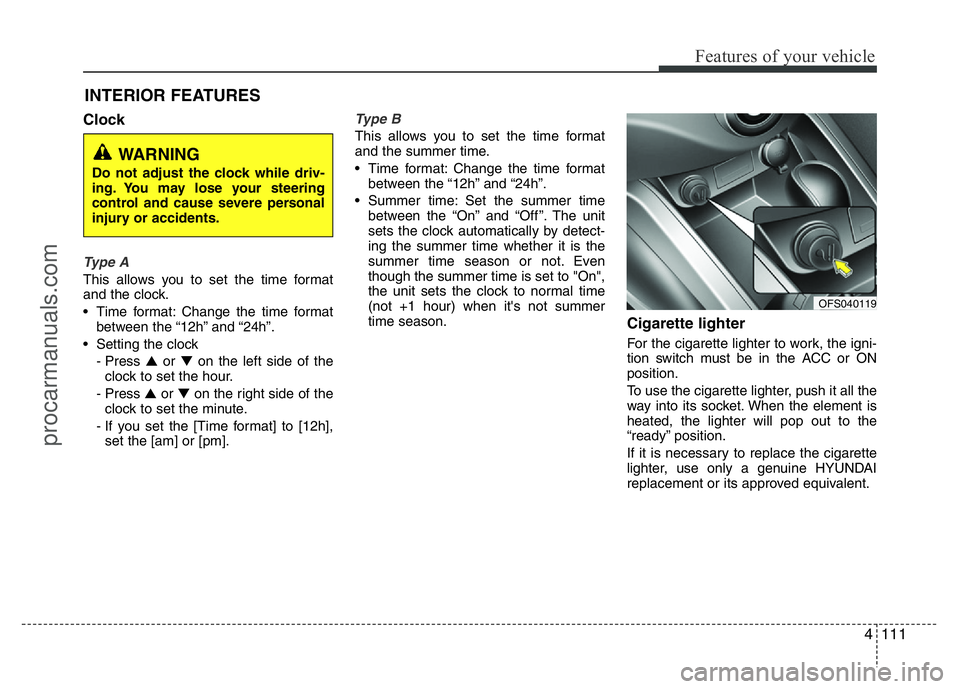
Cigarette lighter
For the cigarette lighter to work, the igni-
tion switch must be in the ACC or ON
position.
To use the cigarette lighter, push it all the
way into its socket. When the element is
heated, the lighter will pop out to the
“ready” position.
If it is necessary to replace the cigarette
lighter, use only a genuine HYUNDAI
replacement or its approved equivalent.
WARNING
Do not adjust the clock while driv-
ing. You may lose your steering
control and cause severe personal
injury or accidents.
OFS040119
procarmanuals.com
Page 209 of 386
Driving your vehicle
2 5
WARNING- ENGINE EXHAUST CAN BE DANGEROUS!
Engine exhaust fumes can be extremely dangerous. If, at any time, you smell exhaust fumes inside the vehicle, open the win-
dows immediately.
• Do not inhale exhaust fumes.
Exhaust fumes contain carbon monoxide, a colorless, odorless gas that can cause unconsciousness and death by asphyxia-
tion.
• Be sure the exhaust system does not leak.
The exhaust system should be checked whenever the vehicle is raised to change the oil or for any other purpose. If you hear
a change in the sound of the exhaust or if you drive over something that strikes the underneath side of the car, have the
exhaust system checked as soon as possible by an authorized HYUNDAI dealer.
• Do not run the engine in an enclosed area.
Letting the engine idle in your garage, even with the garage door open, is a hazardous practice. Never run the engine in your
garage any longer than it takes to start the engine and back the vehicle out.
• Avoid idling the engine for prolonged periods with people inside the vehicle.
If it is necessary to idle the engine for a prolonged period with people inside the vehicle, be sure to do so only in an open area
with the air intake set at "Fresh" and fan operating at one of the higher speeds so fresh air is drawn into the interior.
If you must drive with the tailgate open because you are carrying objects that make this necessary:
1. Close all windows.
2. Open side vents.
3. Set the air intake control at "Fresh", the air flow control at "Floor" or "Face" and the fan at one of the higher speeds.
To assure proper operation of the ventilation system, be sure the ventilation air intakes located just in front of the windshield are
kept clear of snow, ice, leaves or other obstructions.
procarmanuals.com
Page 217 of 386
Driving your vehicle
10 5
START/RUN
• With manual transaxle
To start the engine, depress the clutch
pedal and brake pedal, then press the
ENGINE START/STOP with the shift
lever in the Neutral position.
• With automatic transaxle/DCT
To start the engine, depress the brake
pedal and press the ENGINE START/
STOP button with the shift lever in the P
(Park) or the N (Neutral) position. For
your safety, start the engine with the shift
lever in the P (Park) position.
✽ NOTICE
If you press the ENGINE START/STOP
button without depressing the clutch
pedal for manual transaxle vehicles or
without depressing the brake pedal for
automatic transaxle vehicles, the engine
will not start and the ENGINE START/
STOP button changes as follow:
OFF
➔ACC ➔ON ➔OFF or ACC
✽ NOTICE
If you leave the ENGINE START/ STOP
button in the ACC or ON position for a
long time, the battery will discharge.
WARNING
• Never press the ENGINE START/
STOP button while the vehicle is
in motion. This would result in
loss of directional control and
braking function, which could
cause an accident.
• The anti-theft steering column
lock is not a substitute for the
parking brake. Before leaving the
driver's seat, always make sure
the shift lever is engaged in P
(Park), set the parking brake fully
and shut the engine off.
Unexpected and sudden vehicle
movement may occur if these
precautions are not taken.
(Continued)
(Continued)
• Never reach for the ENGINE
START/STOP button or any other
controls through the steering
wheel while the vehicle is in
motion. The presence of your
hand or arm in the area could
cause loss of vehicle control, an
accident and serious bodily
injury or death.
• Do not place any movable objects
around the driver's seat as they
may move while driving, interfere
with the driver and lead to an
accident.
• While driving, if you push the
ENGINE START/ STOP button, the
warning buzzer sounds for 1 sec-
ond.
procarmanuals.com
Page 230 of 386
523
Driving your vehicle
D (Drive)
This is the normal forward driving posi-
tion. The transaxle will automatically shift
through a 6-gear sequence, providing the
best fuel economy and power.
For extra power when passing another
vehicle or climbing grades, depress the
accelerator fully, at which time the
transaxle will automatically downshift to
the next lower gear.
✽NOTICE
Always ensure vehicle is stationary, at a
complete stop, before selecting D
(Drive).
Sports mode
Whether the vehicle is stationary or in
motion, sports mode is selected by push-
ing the shift lever from the D (Drive) posi-
tion into the manual gate. To return to D
(Drive) range operation, push the shift
lever back into the main gate.
In sports mode, moving the shift lever
backwards and forwards will allow you to
make gearshifts rapidly.
Up (+) : Push the lever forward once to
shift up one gear.
Down (-) : Pull the lever backwards once
to shift down one gear.DS mode (Drive Sporty) - DCT
Ds mode supports the performance
mode for driver. To shift the Ds mode,
shift the transaxle to Ds mode which is
center of sports mode. If you shift [+] or
[–] gear, the mode is change to sports
mode. The transmission shift is automat-
ically changed at higher engine speeds
by engine load, your driving style, vehicle
condition.
In Ds mode, while coasting downhill, the
engine does not support the vehicle to
slow down.
In Ds mode, if you control the paddle
shifter, the gear will be changed to sports
mode. If the gear is changed to D (Drive),
the gear will be changed to D (Drive)
mode.
✽NOTICE- DCT
While stopping the vehicle by applying
parking brake in D gear, even if you
release the parking brake, the vehicle
may not move. In this case, you can
drive the vehicle by applying the foot
brake and release, applying the acceler-
ator or shifting the lever (D
→ N → D).
procarmanuals.com
Page 231 of 386
Driving your vehicle
24 5
✽NOTICE
• In sports mode, the driver must exe-
cute upshifts in accordance with road
conditions, taking care to keep the
engine speed below the red zone.
• In sports mode, only the 6 forward
gears can be selected. To reverse or
park the vehicle, move the shift lever
to the R (Reverse) or P (Park) position
as required.
• In sports mode, downshifts are made
automatically when the vehicle slows
down. When the vehicle stops, 1st gear
is automatically selected.
• In sports mode, when the engine rpm
approaches the red zone shift points
are varied to upshift automatically.
• To maintain the required levels of
vehicle performance and safety, the
system may not execute certain
gearshifts when the shift lever is oper-
ated.
• When driving on a slippery road,
push the shift lever forward into the
+(up) position. This causes the
transaxle to shift into the 2nd gear
which is better for smooth driving on
a slippery road. Push the shift lever to
the -(down) side to shift back to the 1st
gear.
Paddle shifter (if equipped)
The paddle shifter is available when the
shift lever is in the D position or the sport
mode.
With the shift lever in the D position
The paddle shifter can operate when the
vehicle speed is more than 10km/h.
Pull the [+] or [-] paddle shifter once to
shift up or down one gear and the system
changes from automatic mode to manual
mode.
If the vehicle speed is lower than 10km/h,
if you depress the accelerator pedal for
more than 7 seconds or if you shift the
shift lever from D to sport mode and shift
it from sport mode to D again, the system
will change from manual mode to auto-
matic mode.
With the shift lever in the sport mode
Pull the [+] or [-] paddle shifter once to
shift up or down one gear.
✽NOTICE
If you pull the [+] and [-] paddle shifters
at the same time, you can't shift the gear.
Shift lock system (if equipped)
For your safety, the automatic transaxle
has a shift lock system which prevents
shifting the transaxle from P (Park) or N
(Neutral) into R (Reverse) unless the
brake pedal is depressed.
To shift the transaxle from P (Park) or N
(Neutral) into R (Reverse):
1. Depress and hold the brake pedal.
2. Start the engine or turn the ignition
switch to the ON position.
3. Move the shift lever.
If the brake pedal is repeatedly
depressed and released with the shift
lever in the P (Park) position, a chattering
noise near the shift lever may be heard.
This is a normal condition.
WARNING
Always fully depress the brake
pedal before and while shifting out
of the P (Park) position into anoth-
er position to avoid inadvertent
motion of the vehicle which could
injure persons in or around the car.
procarmanuals.com