HYUNDAI VELOSTER 2012 Owners Manual
Manufacturer: HYUNDAI, Model Year: 2012, Model line: VELOSTER, Model: HYUNDAI VELOSTER 2012Pages: 385, PDF Size: 24.4 MB
Page 201 of 385
Features of your vehicle
122 4
Using a cellular phone or a two-way
radio
When a cellular phone is used inside the
vehicle, noise may be produced from the
audio equipment. This does not mean
that something is wrong with the audio
equipment. In such a case, use the cellu-
lar phone at a place as far as possible
from the audio equipment.
Care of disc
If the temperature inside the car is too
high, open the car windows for ventilation
before using your car audio.
It is illegal to copy and use MP3/WMA
files without permission. Use CDs that
are created only by lawful means.
Do not apply volatile agents such as
benzene and thinner, normal cleaners
and magnetic sprays made for ana-
logue disc onto CDs.
To prevent the disc surface from get-
ting damaged. Hold and carry CDs by
the edges or the edges of the center
hole only.
Clean the disc surface with a piece of
soft cloth before playback (wipe it from
the center to the outside edge).
Do not damage the disc surface or
attach pieces of sticky tape or paper
onto it.
Make sure on undesirable matter other
than CDs are inserted into the CD
player (Do not insert more than one
CD at a time). Keep CDs in their cases after use to
protect them from scratches or dirt.
Depending on the type of CD-R/CD-
RW CDs, certain CDs may not operate
normally according to manufacturing
companies or making and recording
methods. In such circumstances, if you
still continue to use those CDs, they
may cause the malfunction of your car
audio system.
✽ ✽
NOTICE- Playing an
Incompatible Copy
Protected Audio CD
Some copy protected CDs, which do not
comply with the international audio CD
standards (Red Book), may not play on
your car audio. Please note that if you
try to play copy protected CDs and the
CD player does not perform correctly
the CDs maybe defective, not the CD
player.
CAUTION
When using a communication sys-
tem such a cellular phone or a radio
set inside the vehicle, a separate
external antenna must be fitted.
When a cellular phone or a radio set
is used with an internal antenna
alone, it may interfere with the vehi-
cle's electrical system and adverse-
ly affect safe operation of the vehi-
cle.
WARNING
Do not use a cellular phone while
driving. Stop at a safe location to
use a cellular phone.
Page 202 of 385
4123
Features of your vehicle
■ ■
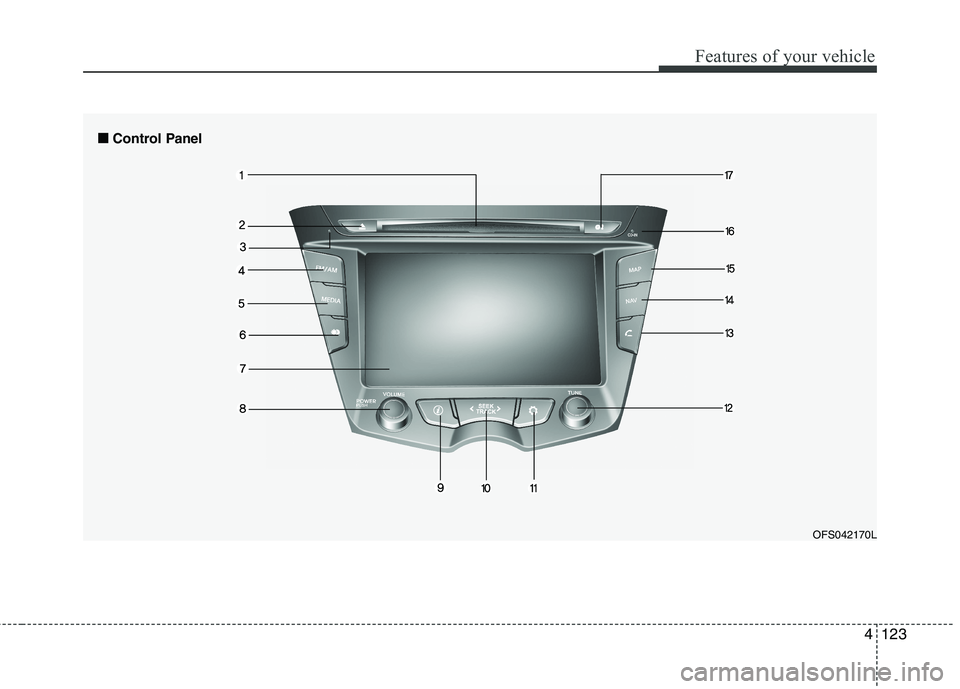
Control Panel
OFS042170L
Page 203 of 385
Features of your vehicle
124 4
1. Disc slot
2. Eject ( )
Press to eject a disc from the unit.
3. RESET hole
You can reset the unit when it doesn't
operate normally. Press the RESET hole
with a sharp object.
4. FM/AM
Selects the FM/AM band.
5. MEDIA
Selects a source: CD, USB, iPod, BT,
AUX.
6. Display on/off ( )
Press to switch between the display on
and off.
7. LCD
8. Left rotary (POWER/VOLUME)
- Press: Power on/off
- Turn: Volume control
9. Info ( )
Press to view the destination, route, and
traffic information when the route guid-
ance is active.
• Destination: Shows the information of
current vehicle position and destina-
tion.
Route: Shows the route information
from the current vehicle position to the
destination.
Traffic: Shows the traffic information.
- Traffic info on route: The list of traffic
information found on the recommend-
ed route from the current vehicle
position to the destination is dis-
played.
- Traffic info nearby: The list of traffic
information around the current vehi-
cle position is displayed.
10.
Press this button.
- Automatic tuning:
- Track up/down:
Press and hold this button.
- Search (FF/REW):
11. SETUP ( )
Press to access system settings.
Press and hold to check the device ID,
the software version, the navigation
version, and the map version.
BT
iPodCDUSB
BT
iPodCDUSB
RADIO
Page 204 of 385
4125
Features of your vehicle
12. Right rotary (TUNE)
Rotate it clockwise/counterclockwise.
Searches the previous or next radio
frequency.
- Manual tuning
Skips a track/file up/down in all list
screen.
ZOOM IN/ ZOOM OUT
- Rotate to change the map scale on
the map screen.
Repeat voice guidance
Press to repeat the voice guidance.
13. PHONE ( )
Use to enable Bluetooth Hands-Free
Phone.
14. NAV
Press to enter a destination menu.
Various methods for entering a destina-
tion are available.
15. MAP
Press to display the current location map
screen.
16. CD indicator light (CD-IN)
When a disc is inserted, the indicator is
illuminated.
17. Clock ( )
Press to display the digital/analog
clock and outside temperature in
power on/off status.
Press and hold to move to the [Clock]
menu.
Page 205 of 385
Features of your vehicle
126 4
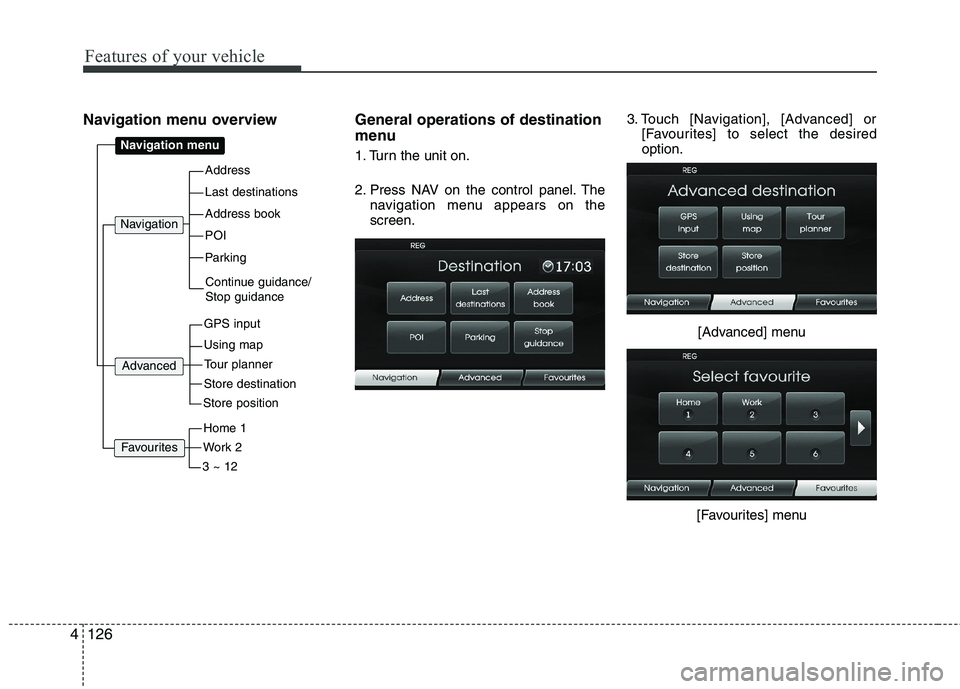
Navigation menu overview General operations of destination
menu
1. Turn the unit on.
2. Press NAV on the control panel. The
navigation menu appears on the
screen.3. Touch [Navigation], [Advanced] or
[Favourites] to select the desired
option.
[Advanced] menu
[Favourites] menuAddress
Last destinations
POI
Address book
Parking
Navigation menu
GPS input
Using map
Navigation
Continue guidance/
Stop guidance
Advanced
Store destination
Tour planner
Store position
Work 2
Home 1
3 ~ 12
Favourites
Page 206 of 385
4127
Features of your vehicle
4. Touch the preferred setting method.
Address: Finds a destination by setting
an address.
Last destinations: Sets a destination to
a location that you have lastly set.
Address book: Sets a destination to a
location stored in the Address book.
POI: Searches for a destination from
various categories of businesses or
locations.
Parking: Sets a parking as your desti-
nation.
Continue/Stop guidance: Sets the
guidance to On/Off.
GPS input: Sets a latitude and a longi-
tude as your destination.
Using map: Searches for a destination
by scrolling the map.
Tour planner: Adds new destination or
way point.
Store destination: Stores your destina-
tion in the Address book.
Store position: Stores your position in
the Address book.
Home 1/ Work 2/ 3 ~ 12: You can set a
home location, work location or etc you
want for the place you return to most
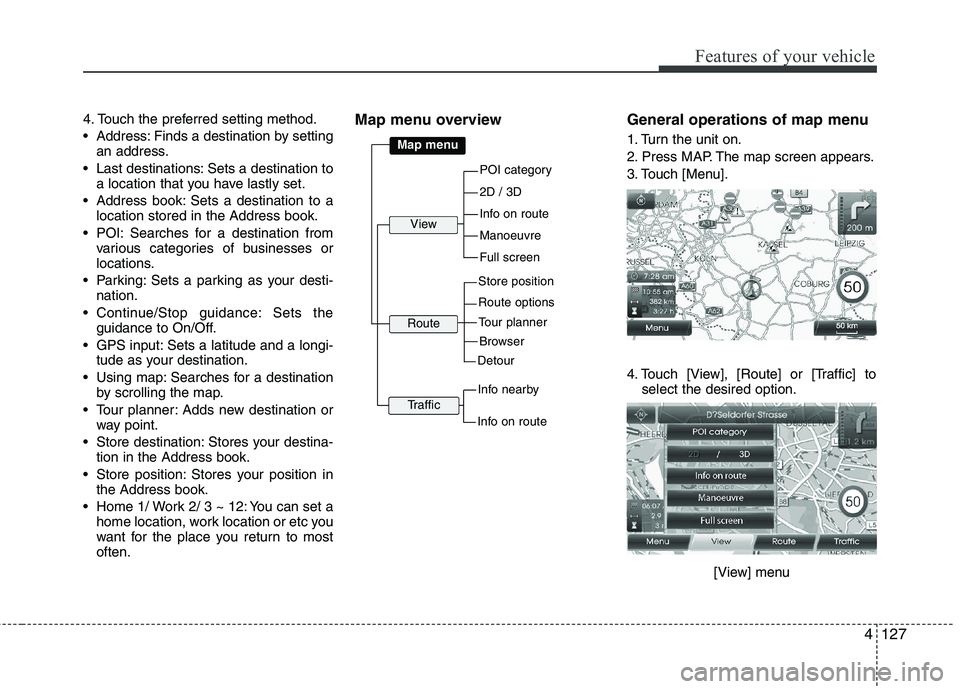
often.Map menu overview General operations of map menu
1. Turn the unit on.
2. Press MAP. The map screen appears.
3. Touch [Menu].
4. Touch [View], [Route] or [Traffic] to
select the desired option.
[View] menu
POI category
2D / 3D
Manoeuvre
Info on route
Full screen
Map menu
Store position
Route options
View
Route
Browser
Tour planner
Detour
Info nearby
Traffic
Info on route
Page 207 of 385
![HYUNDAI VELOSTER 2012 Owners Manual Features of your vehicle
128 4
[Route] menu
[Traffic] menu
5. Touch the preferred setting method.
Understanding Bluetooth wire-
less technology
Bluetooth wireless technology establish-
es a wireless HYUNDAI VELOSTER 2012 Owners Manual Features of your vehicle
128 4
[Route] menu
[Traffic] menu
5. Touch the preferred setting method.
Understanding Bluetooth wire-
less technology
Bluetooth wireless technology establish-
es a wireless](/img/35/56215/w960_56215-206.png)
Features of your vehicle
128 4
[Route] menu
[Traffic] menu
5. Touch the preferred setting method.
Understanding Bluetooth wire-
less technology
Bluetooth wireless technology establish-
es a wireless link between two devices,
such as your phone and the unit. The first
time you use two devices together you
must connect them by establishing a
relationship using a PIN code. After the
initial connecting, the two devices can
connect automatically each time you turn
them on.
NOTE:
• There may be restrictions on using
Bluetooth technology in some loca-
tions.
Due to the variety of Bluetooth
phones and their firmware version,
your device may respond differently
when performing over Bluetooth.
As difference in functional opera-
tion by model is mainly resulted
from feature of a hands-free phone,
consult manufacturer of a phone if
you have any question.
You can check the Bluetooth phone
compatibility list on the web-site
(http://www.navigation.com/hyundai
).
Connecting your unit and blue-
tooth phone
To connect using the unit settings (1)
1. Press on the control panel.
2. Touch [Bluetooth].
3. Touch [Search for Bluetooth devices].
If you want to cancel, touch [Cancel].
Page 208 of 385
4129
Features of your vehicle
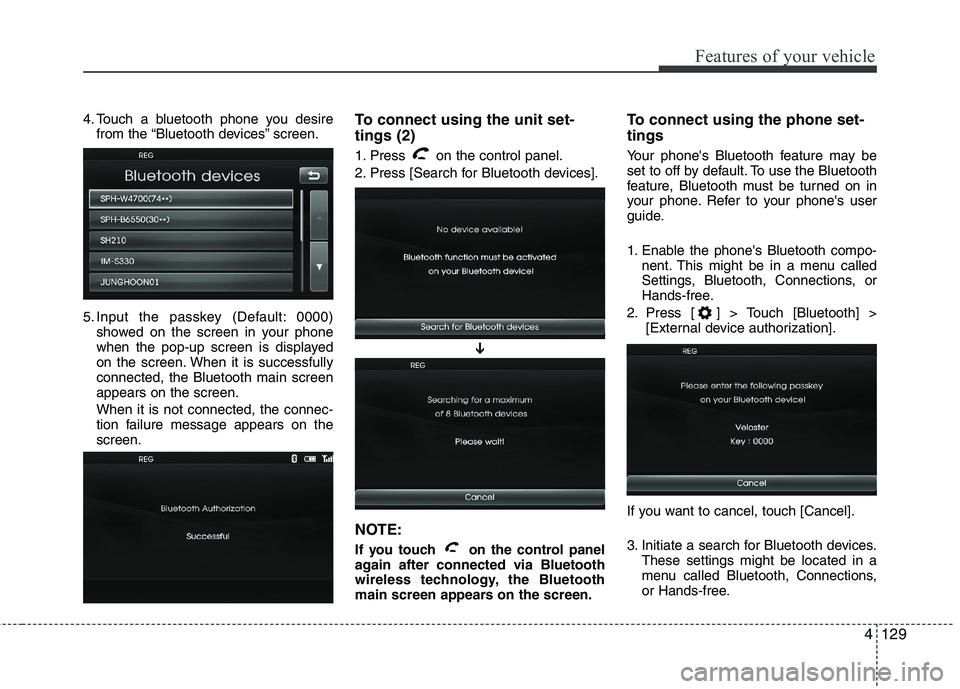
4. Touch a bluetooth phone you desire
from the “Bluetooth devices” screen.
5. Input the passkey (Default: 0000)
showed on the screen in your phone
when the pop-up screen is displayed
on the screen. When it is successfully
connected, the Bluetooth main screen
appears on the screen.
When it is not connected, the connec-
tion failure message appears on the
screen.To connect using the unit set-
tings (2)
1. Press on the control panel.
2. Press [Search for Bluetooth devices].
NOTE:
If you touch on the control panel
again after connected via Bluetooth
wireless technology, the Bluetooth
main screen appears on the screen.
To connect using the phone set-
tings
Your phone's Bluetooth feature may be
set to off by default. To use the Bluetooth
feature, Bluetooth must be turned on in
your phone. Refer to your phone's user
guide.
1. Enable the phone's Bluetooth compo-
nent. This might be in a menu called
Settings, Bluetooth, Connections, or
Hands-free.
2. Press [ ] > Touch [Bluetooth] >
[External device authorization].
If you want to cancel, touch [Cancel].
3. Initiate a search for Bluetooth devices.
These settings might be located in a
menu called Bluetooth, Connections,
or Hands-free.
➔
Page 209 of 385
Features of your vehicle
130 4
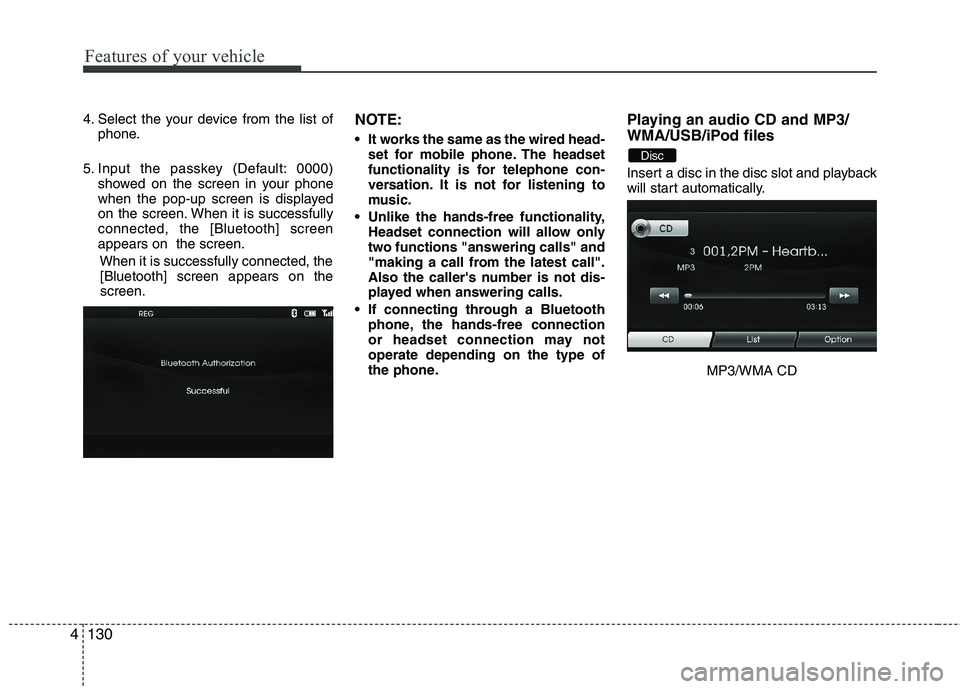
4. Select the your device from the list of
phone.
5. Input the passkey (Default: 0000)
showed on the screen in your phone
when the pop-up screen is displayed
on the screen. When it is successfully
connected, the [Bluetooth] screen
appears on the screen.
When it is successfully connected, the
[Bluetooth] screen appears on the
screen.NOTE:
It works the same as the wired head-
set for mobile phone. The headset
functionality is for telephone con-
versation. It is not for listening to
music.
Unlike the hands-free functionality,
Headset connection will allow only
two functions "answering calls" and
"making a call from the latest call".
Also the caller's number is not dis-
played when answering calls.
If connecting through a Bluetooth
phone, the hands-free connection
or headset connection may not
operate depending on the type of
the phone.
Playing an audio CD and MP3/
WMA/USB/iPod files
Insert a disc in the disc slot and playback
will start automatically.
MP3/WMA CD
Disc
Page 210 of 385
4131
Features of your vehicle
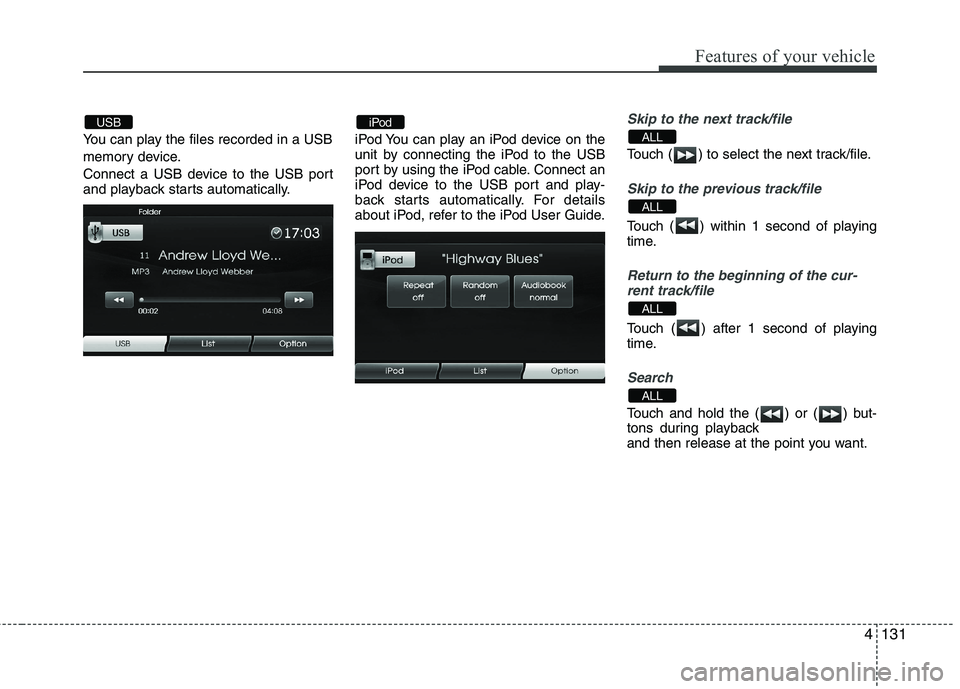
You can play the files recorded in a USB
memory device.
Connect a USB device to the USB port
and playback starts automatically.iPod You can play an iPod device on the
unit by connecting the iPod to the USB
port by using the iPod cable. Connect an
iPod device to the USB port and play-
back starts automatically. For details
about iPod, refer to the iPod User Guide.
Skip to the next track/file
Touch ( ) to select the next track/file.
Skip to the previous track/file
Touch ( ) within 1 second of playing
time.
Return to the beginning of the cur-
rent track/file
Touch ( ) after 1 second of playing
time.
Search
Touch and hold the ( ) or ( ) but-
tons during playback
and then release at the point you want.
ALL
ALL
ALL
ALLiPodUSB