warning light HYUNDAI VELOSTER 2013 Owner's Manual
[x] Cancel search | Manufacturer: HYUNDAI, Model Year: 2013, Model line: VELOSTER, Model: HYUNDAI VELOSTER 2013Pages: 372, PDF Size: 22.04 MB
Page 82 of 372
Features of your vehicle
6 4
Tailgate unlocking
Using the tailgate handle button
1. Carry the smart key.
2. Press the tailgate handle button.
3. When all doors are locked, the hazard
warning lights will blink two times.
Once the tailgate is opened and then
closed, the tailgate will lock automati-
cally.
✽ ✽
NOTICE
The button will only operate when the
smart key is within 28~40in. (0.7~1m)
from the tailgate handle.
Using the button on the smart key
1. Press the tailgate unlock button(3) for
more than 1 second.
2. When all doors are locked, the hazard
warning lights will blink two times.
Panic
1. Press the panic button(4) for more than
1.5 second.
2. The horn sounds and hazard warning
light flash for about 30 seconds.
✽ ✽
NOTICE
To stop the horn and lights, press any
button on the smart key.
Start-up
You can start the engine without inserting
the key. For detailed information refer to
the “Engine start/stop button” in section 5.
Loss of the smart key
A maximum of 2 smart keys can be reg-
istered to a single vehicle.
If you happen to lose your smart key, you
will not be able to start the engine. You
should immediately take the vehicle and
remaining key to your authorized
HYUNDAI dealer(tow the vehicle, if nec-
essary) to protect it from potential theft.
Smart key precautions
The smart key will not work if any of
the following occur:
- The smart key is close to a radio
transmitter such as a radio station or
an airport which can interfere with
normal operation of the smart key.
- The smart key is near a mobile two
way radio system or a cellular phone.
- Another vehicle’s smart key is being
operated close to your vehicle.
When the smart key does not work cor-
rectly, open and close the door with the
mechanical key and contact an author-
ized HYUNDAI dealer.
If the smart key is in close proximity to
your cell phone or smart phone, the
signal from the smart key could be
blocked by normal operation of your
cell phone or smart phone. This is
especially important when the phone is
active such as making call, receiving
calls, text messaging, and/or send-
ing/receiving emails. Avoid placing the
smart key and your cell phone or smart
phone in the same pants or jacket
pocket and maintain adequate dis-
tance between the two devices.
Page 85 of 372
49
Features of your vehicle
Battery replacement
A smart key battery should last for sever-
al years, but if the smart key is not work-
ing properly, try replacing the battery with
a new one. If you are unsure how to use
your smart key or replace the battery,
contact an authorized HYUNDAI dealer.
✽ ✽
NOTICE
The circuit inside the smart key can have
a problem if exposed to moisture or stat-
ic electricity. If you are unsure how to use
your smart key or replace the battery,
contact an authorized HYUNDAI dealer.
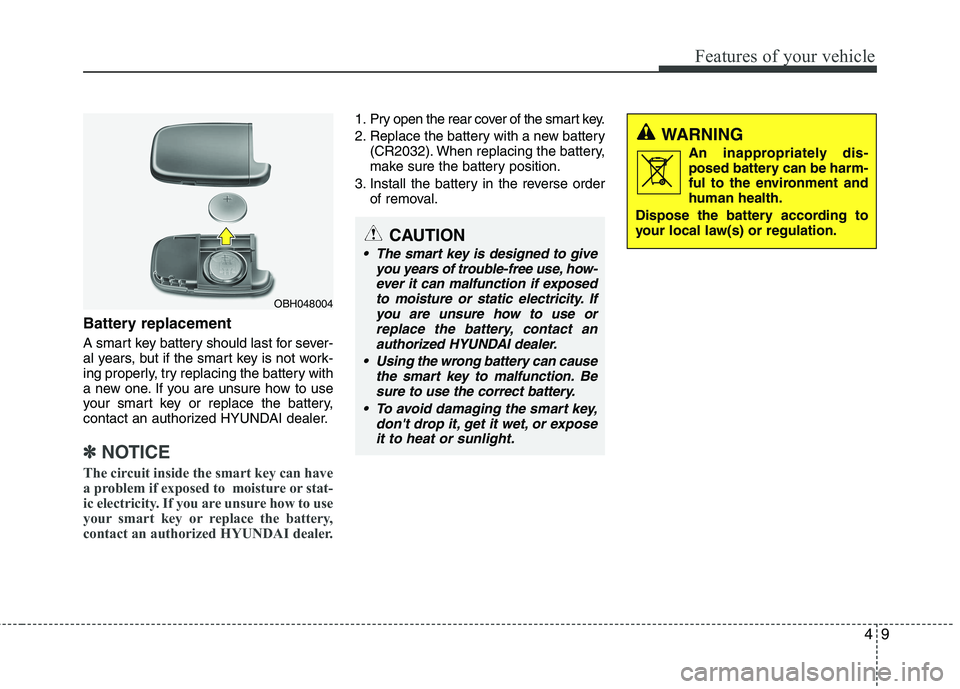
1. Pry open the rear cover of the smart key.
2. Replace the battery with a new battery
(CR2032). When replacing the battery,
make sure the battery position.
3. Install the battery in the reverse order
of removal.
CAUTION
The smart key is designed to give
you years of trouble-free use, how-
ever it can malfunction if exposed
to moisture or static electricity. If
you are unsure how to use or
replace the battery, contact an
authorized HYUNDAI dealer.
Using the wrong battery can cause
the smart key to malfunction. Be
sure to use the correct battery.
To avoid damaging the smart key,
don't drop it, get it wet, or expose
it to heat or sunlight.
WARNING
An inappropriately dis-
posed battery can be harm-
ful to the environment and
human health.
Dispose the battery according to
your local law(s) or regulation.
OBH048004
Page 86 of 372
Features of your vehicle
10 4
Remote keyless entry system
operations
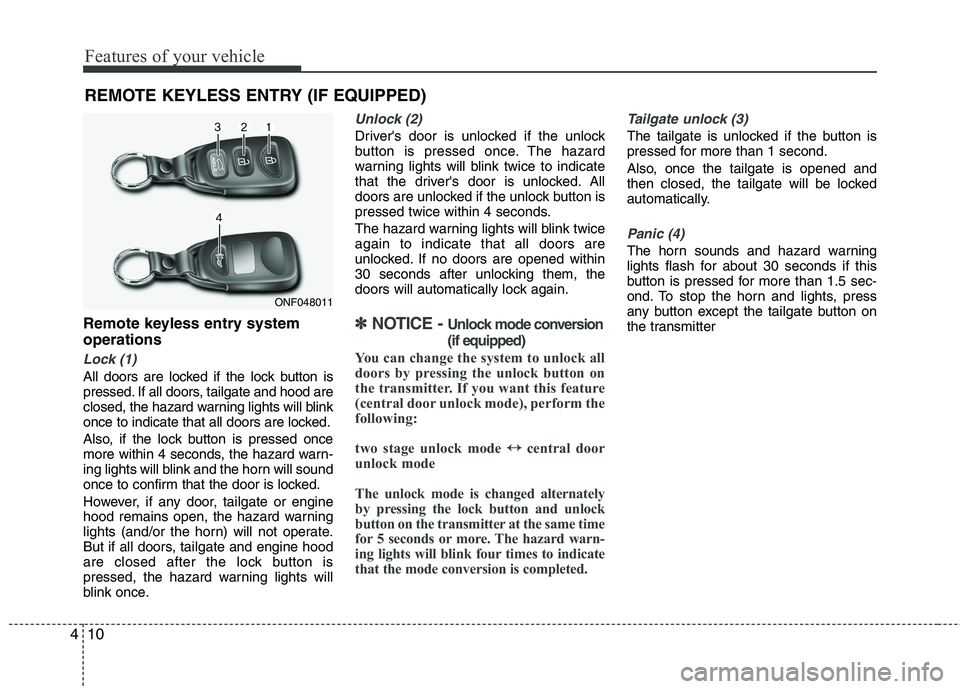
Lock (1)
All doors are locked if the lock button is
pressed. If all doors, tailgate and hood are
closed, the hazard warning lights will blink
once to indicate that all doors are locked.
Also, if the lock button is pressed once
more within 4 seconds, the hazard warn-
ing lights will blink and the horn will sound
once to confirm that the door is locked.
However, if any door, tailgate or engine
hood remains open, the hazard warning
lights (and/or the horn) will not operate.
But if all doors, tailgate and engine hood
are closed after the lock button is
pressed, the hazard warning lights will
blink once.
Unlock (2)
Driver's door is unlocked if the unlock
button is pressed once. The hazard
warning lights will blink twice to indicate
that the driver's door is unlocked. All
doors are unlocked if the unlock button is
pressed twice within 4 seconds.
The hazard warning lights will blink twice
again to indicate that all doors are
unlocked. If no doors are opened within
30 seconds after unlocking them, the
doors will automatically lock again.
✽ ✽
NOTICE - Unlock mode conversion
(if equipped)
You can change the system to unlock all
doors by pressing the unlock button on
the transmitter. If you want this feature
(central door unlock mode), perform the
following:
two stage unlock mode ↔ ↔
central door
unlock mode
The unlock mode is changed alternately
by pressing the lock button and unlock
button on the transmitter at the same time
for 5 seconds or more. The hazard warn-
ing lights will blink four times to indicate
that the mode conversion is completed.
Tailgate unlock (3)
The tailgate is unlocked if the button is
pressed for more than 1 second.
Also, once the tailgate is opened and
then closed, the tailgate will be locked
automatically.
Panic (4)
The horn sounds and hazard warning
lights flash for about 30 seconds if this
button is pressed for more than 1.5 sec-
ond. To stop the horn and lights, press
any button except the tailgate button on
the transmitter
REMOTE KEYLESS ENTRY (IF EQUIPPED)
ONF048011
Page 89 of 372
413
Features of your vehicle
Battery replacement
The transmitter uses a 3 volt lithium bat-
tery which will normally last for several
years. When replacement is necessary,
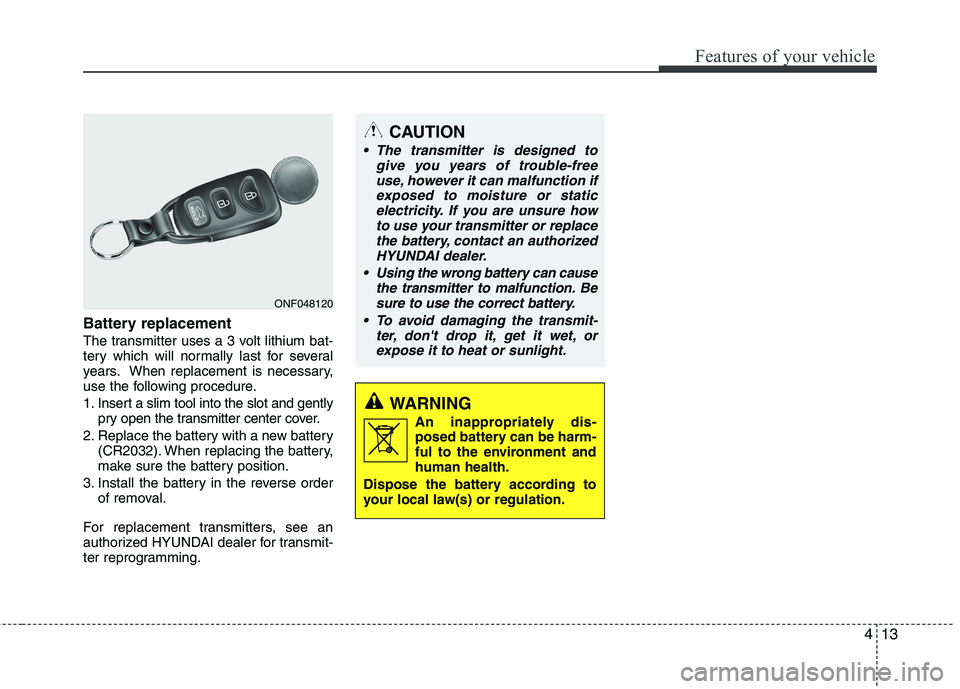
use the following procedure.
1. Insert a slim tool into the slot and gently
pry open the transmitter center cover.
2. Replace the battery with a new battery
(CR2032). When replacing the battery,
make sure the battery position.
3. Install the battery in the reverse order
of removal.
For replacement transmitters, see an
authorized HYUNDAI dealer for transmit-
ter reprogramming.
CAUTION
The transmitter is designed to
give you years of trouble-free
use, however it can malfunction if
exposed to moisture or static
electricity. If you are unsure how
to use your transmitter or replace
the battery, contact an authorized
HYUNDAI dealer.
Using the wrong battery can cause
the transmitter to malfunction. Be
sure to use the correct battery.
To avoid damaging the transmit-
ter, don't drop it, get it wet, or
expose it to heat or sunlight.
WARNING
An inappropriately dis-
posed battery can be harm-
ful to the environment and
human health.
Dispose the battery according to
your local law(s) or regulation.
ONF048120
Page 90 of 372
Features of your vehicle
14 4
THEFT-ALARM SYSTEM
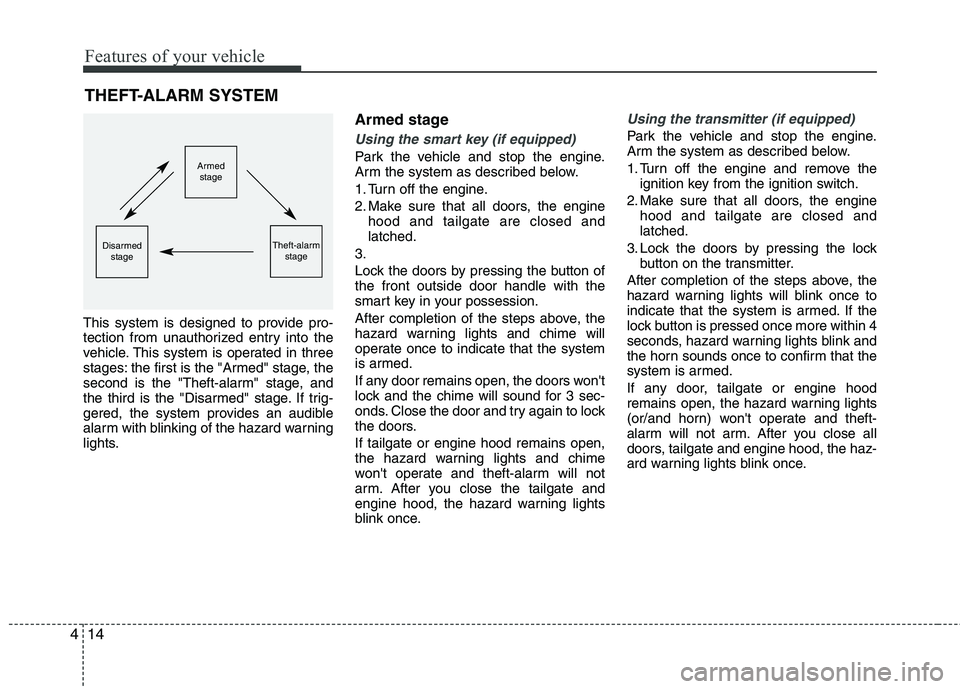
This system is designed to provide pro-
tection from unauthorized entry into the
vehicle. This system is operated in three
stages: the first is the "Armed" stage, the
second is the "Theft-alarm" stage, and
the third is the "Disarmed" stage. If trig-
gered, the system provides an audible
alarm with blinking of the hazard warning
lights.
Armed stage
Using the smart key (if equipped)
Park the vehicle and stop the engine.
Arm the system as described below.
1. Turn off the engine.
2. Make sure that all doors, the engine
hood and tailgate are closed and
latched.
3.
Lock the doors by pressing the button of
the front outside door handle with the
smart key in your possession.
After completion of the steps above, the
hazard warning lights and chime will
operate once to indicate that the system
is armed.
If any door remains open, the doors won't
lock and the chime will sound for 3 sec-
onds. Close the door and try again to lock
the doors.
If tailgate or engine hood remains open,
the hazard warning lights and chime
won't operate and theft-alarm will not
arm. After you close the tailgate and
engine hood, the hazard warning lights
blink once.
Using the transmitter (if equipped)
Park the vehicle and stop the engine.
Arm the system as described below.
1. Turn off the engine and remove the
ignition key from the ignition switch.
2. Make sure that all doors, the engine
hood and tailgate are closed and
latched.
3. Lock the doors by pressing the lock
button on the transmitter.
After completion of the steps above, the
hazard warning lights will blink once to
indicate that the system is armed. If the
lock button is pressed once more within 4
seconds, hazard warning lights blink and
the horn sounds once to confirm that the
system is armed.
If any door, tailgate or engine hood
remains open, the hazard warning lights
(or/and horn) won't operate and theft-
alarm will not arm. After you close all
doors, tailgate and engine hood, the haz-
ard warning lights blink once.
Armed
stage
Theft-alarm
stageDisarmed
stage
Page 91 of 372
415
Features of your vehicle
Using the mechanical key
Park the vehicle and stop the engine.
Arm the system as described below.
1. Turn off the engine and remove the key
from the ignition switch(if equipped).
2. Make sure that all doors, the engine
hood and tailgate are closed and
latched.
3. Lock the doors by inserting the key into
the key hole on the front outside door
handle and turning the key toward the
front of the vehicle.
If any door, tailgate or engine hood
remains open, the theft-alarm will not
arm.
✽ ✽
NOTICE
If you lock or unlock the doors by using
the mechanical key, the hazard warning
light won't operate.
Do not arm the system until all pas-
sengers have left the vehicle. If the
system is armed while a passenger(s)
remains in the vehicle, the alarm may
be activated when the remaining pas-
senger(s) leave the vehicle. If any
door (or tailgate) or engine hood is
opened within 30 seconds after the
system enters the armed stage, the
system is disarmed to prevent an
unnecessary alarm.Theft-alarm stage
The alarm will be activated if any of the
following occurs while the system is
armed.
A door is opened without using the
transmitter (or smart key or mechani-
cal key).
The tailgate is opened without using
the transmitter (or smart key).
The engine hood is opened.
The horn will sound and the hazard
warning lights will blink continuously for
approximately 30 seconds. The alarm will
repeat once more unless the system is
disarmed. To turn off the system, unlock
the doors with the mechanical key or
transmitter or smart key.
Page 92 of 372
Features of your vehicle
16 4
Opening the tailgate with the
alarm armed (if equipped)
When the alarm is armed, the alarm will
not sound if the tailgate is opened with
the transmitter (or smart key).
Once the tailgate is opened and then
closed, the tailgate will be locked auto-
matically and the system will be armed
again.
Also, if any of the doors or hood is
opened while the tailgate is open and the
alarm is armed, the alarm will sound.
Disarmed stage
Using the smart key (if equipped)
The system will be disarmed when the
doors are unlocked by pressing the
unlock button on the smart key or press-
ing the lock/unlock button of the front out-
side door handle with the smart key in
your possession.
After unlocking the doors, the hazard
warning lights and chime will operate
twice to indicate that the system is dis-
armed.
After unlocking the doors, if any door is
not opened within 30 seconds, the sys-
tem will be rearmed.
Using the transmitter (if equipped)
The system will be disarmed when the
doors are unlocked by pressing the
unlock button on the transmitter.
After unlocking the doors, the hazard
warning lights will blink twice to indicate
that the system is disarmed.
After unlocking the doors, if any door is
not opened within 30 seconds, the sys-
tem will be rearmed.
Using the mechanical key
The system will be disarmed when the
doors are unlocked with the mechanical
key.
✽ ✽
NOTICE
If you lock or unlock the doors by using
the mechanical key, the hazard warning
light and chime sound won't operate.
Page 94 of 372
Features of your vehicle
18 4
Operating door locks from out-
side the vehicle
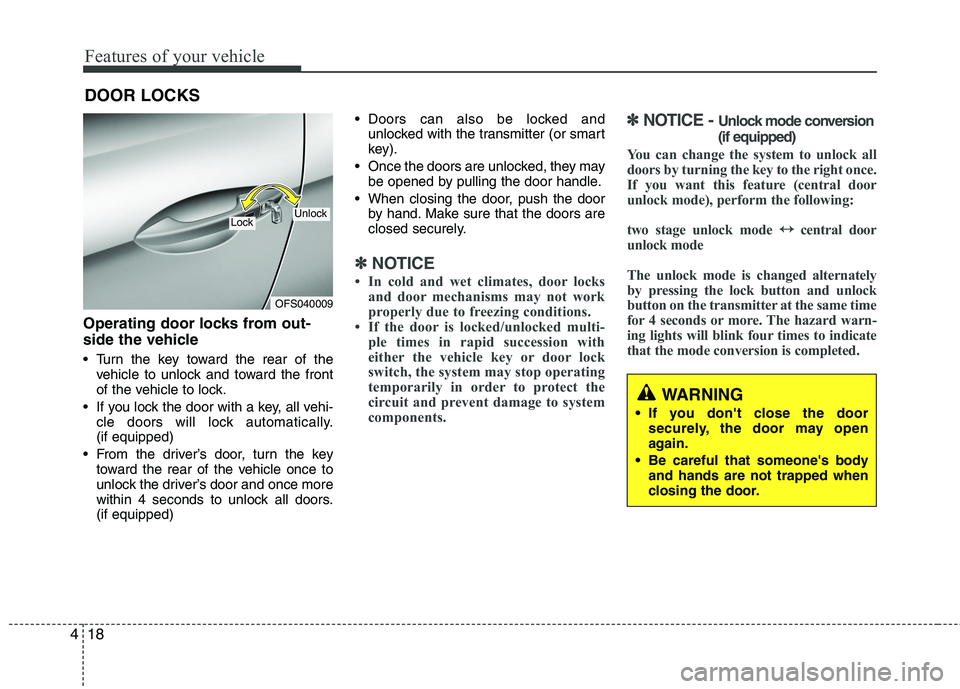
Turn the key toward the rear of the
vehicle to unlock and toward the front
of the vehicle to lock.
If you lock the door with a key, all vehi-
cle doors will lock automatically.
(if equipped)
From the driver’s door, turn the key
toward the rear of the vehicle once to
unlock the driver’s door and once more
within 4 seconds to unlock all doors.
(if equipped) Doors can also be locked and
unlocked with the transmitter (or smart
key).
Once the doors are unlocked, they may
be opened by pulling the door handle.
When closing the door, push the door
by hand. Make sure that the doors are
closed securely.
✽ ✽
NOTICE
• In cold and wet climates, door locks
and door mechanisms may not work
properly due to freezing conditions.
• If the door is locked/unlocked multi-
ple times in rapid succession with
either the vehicle key or door lock
switch, the system may stop operating
temporarily in order to protect the
circuit and prevent damage to system
components.
✽ ✽
NOTICE - Unlock mode conversion
(if equipped)
You can change the system to unlock all
doors by turning the key to the right once.
If you want this feature (central door
unlock mode), perform the following:
two stage unlock mode ↔ ↔
central door
unlock mode
The unlock mode is changed alternately
by pressing the lock button and unlock
button on the transmitter at the same time
for 4 seconds or more. The hazard warn-
ing lights will blink four times to indicate
that the mode conversion is completed.
DOOR LOCKS
OFS040009
UnlockLock
WARNING
If you don't close the door
securely, the door may open
again.
Be careful that someone's body
and hands are not trapped when
closing the door.
Page 105 of 372
429
Features of your vehicle
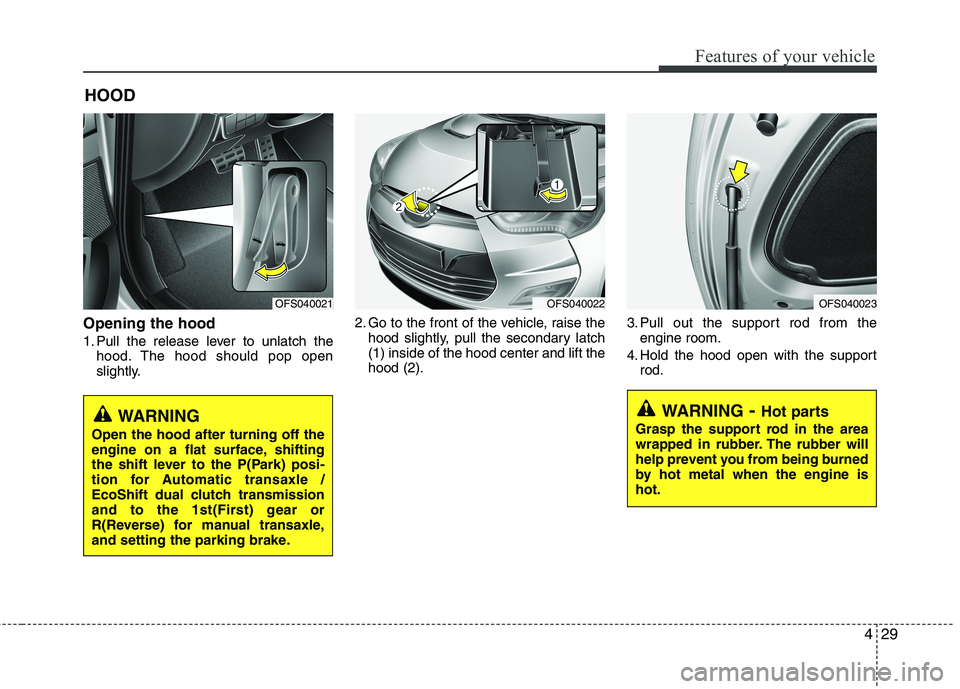
Opening the hood
1. Pull the release lever to unlatch the
hood. The hood should pop open
slightly.2. Go to the front of the vehicle, raise the
hood slightly, pull the secondary latch
(1) inside of the hood center and lift the
hood (2).3. Pull out the support rod from the
engine room.
4. Hold the hood open with the support
rod.
HOOD
WARNING- Hot parts
Grasp the support rod in the area
wrapped in rubber. The rubber will
help prevent you from being burned
by hot metal when the engine is
hot.WARNING
Open the hood after turning off the
engine on a flat surface, shifting
the shift lever to the P(Park) posi-
tion for Automatic transaxle /
EcoShift dual clutch transmission
and to the 1st(First) gear or
R(Reverse) for manual transaxle,
and setting the parking brake.
OFS040021OFS040022OFS040023
Page 107 of 372
431
Features of your vehicle
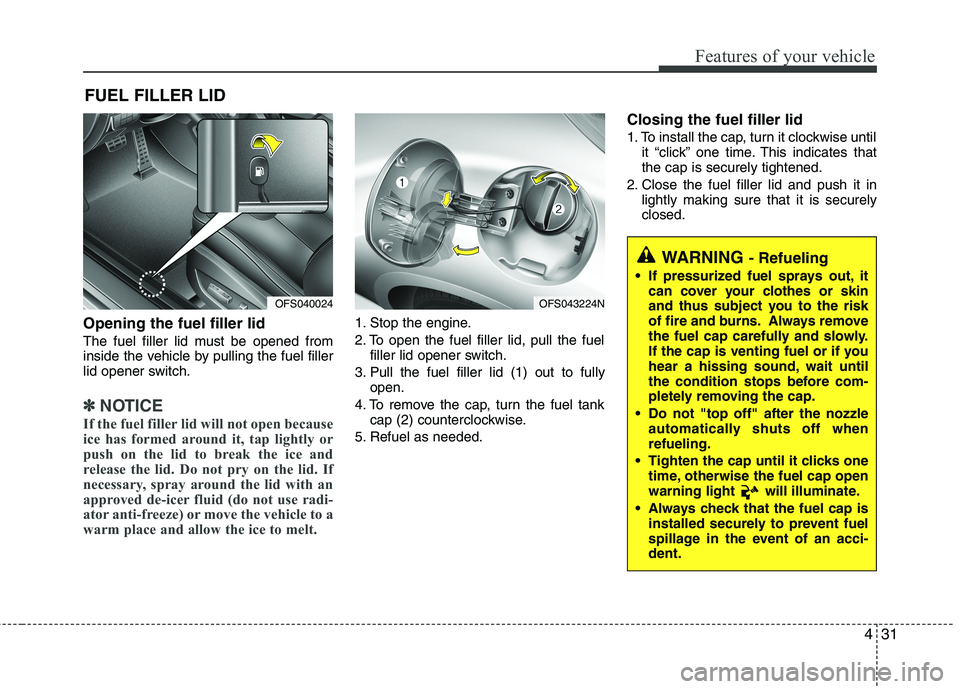
Opening the fuel filler lid
The fuel filler lid must be opened from
inside the vehicle by pulling the fuel filler
lid opener switch.
✽ ✽
NOTICE
If the fuel filler lid will not open because
ice has formed around it, tap lightly or
push on the lid to break the ice and
release the lid. Do not pry on the lid. If
necessary, spray around the lid with an
approved de-icer fluid (do not use radi-
ator anti-freeze) or move the vehicle to a
warm place and allow the ice to melt.
1. Stop the engine.
2. To open the fuel filler lid, pull the fuel
filler lid opener switch.
3. Pull the fuel filler lid (1) out to fully
open.
4. To remove the cap, turn the fuel tank
cap (2) counterclockwise.
5. Refuel as needed.
Closing the fuel filler lid
1. To install the cap, turn it clockwise until
it “click” one time. This indicates that
the cap is securely tightened.
2. Close the fuel filler lid and push it in
lightly making sure that it is securely
closed.
FUEL FILLER LID
OFS043224N
WARNING - Refueling
If pressurized fuel sprays out, it
can cover your clothes or skin
and thus subject you to the risk
of fire and burns. Always remove
the fuel cap carefully and slowly.
If the cap is venting fuel or if you
hear a hissing sound, wait until
the condition stops before com-
pletely removing the cap.
Do not "top off" after the nozzle
automatically shuts off when
refueling.
Tighten the cap until it clicks one
time, otherwise the fuel cap open
warning light will illuminate.
Always check that the fuel cap is
installed securely to prevent fuel
spillage in the event of an acci-
dent.
OFS040024