change time HYUNDAI VELOSTER 2013 Owners Manual
[x] Cancel search | Manufacturer: HYUNDAI, Model Year: 2013, Model line: VELOSTER, Model: HYUNDAI VELOSTER 2013Pages: 372, PDF Size: 22.04 MB
Page 1 of 372
All information in this Owner's Manual is current at the time of publication.
However, Hyundai reserves the right to make changes at any time so that
our policy of continual product improvement may be carried out.
This manual applies to all Hyundai models and includes descriptions and
explanations of optional as well as standard equipment. As a result, you may
find material in this manual that does not apply to your specific vehicle.
O OW
WN
NE
ER
R'
'S
S M
MA
AN
NU
UA
AL
L
Operation
Maintenance
Specifications
Page 23 of 372
35
Safety features of your vehicle
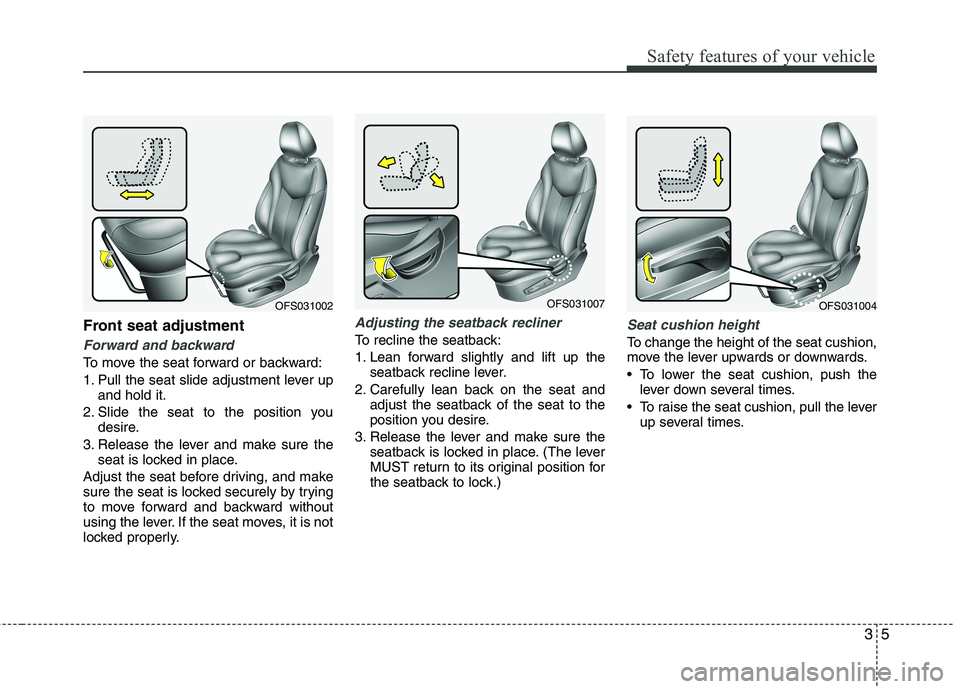
Front seat adjustment
Forward and backward
To move the seat forward or backward:
1. Pull the seat slide adjustment lever up
and hold it.
2. Slide the seat to the position you
desire.
3. Release the lever and make sure the
seat is locked in place.
Adjust the seat before driving, and make
sure the seat is locked securely by trying
to move forward and backward without
using the lever. If the seat moves, it is not
locked properly.
Adjusting the seatback recliner
To recline the seatback:
1. Lean forward slightly and lift up the
seatback recline lever.
2. Carefully lean back on the seat and
adjust the seatback of the seat to the
position you desire.
3. Release the lever and make sure the
seatback is locked in place. (The lever
MUST return to its original position for
the seatback to lock.)Seat cushion height
To change the height of the seat cushion,
move the lever upwards or downwards.
• To lower the seat cushion, push the
lever down several times.
To raise the seat cushion, pull the lever
up several times.
OFS031007OFS031004OFS031002
Page 86 of 372
Features of your vehicle
10 4
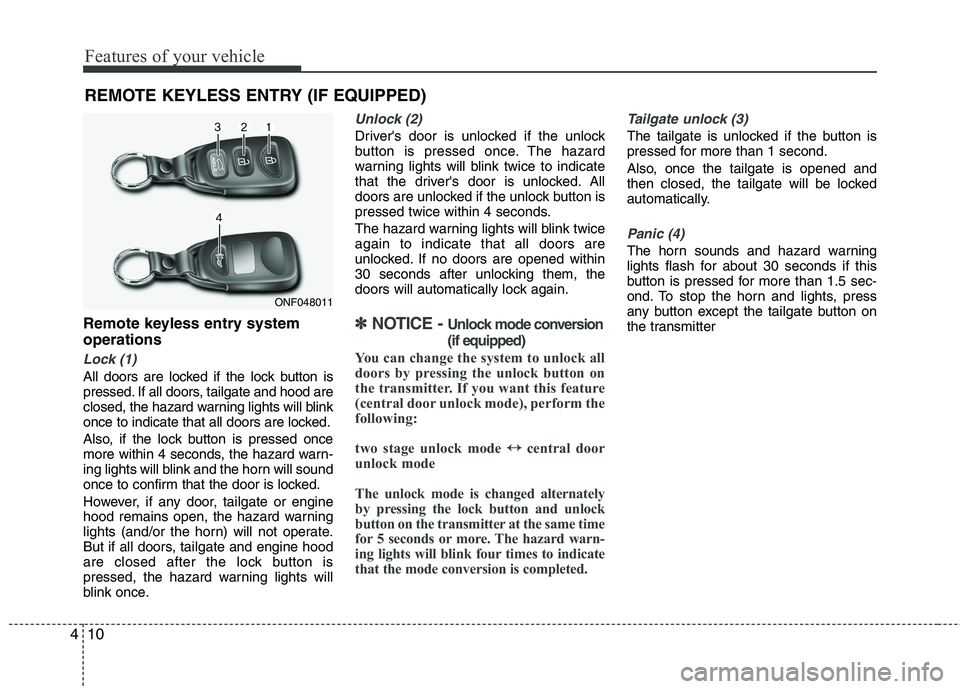
Remote keyless entry system
operations
Lock (1)
All doors are locked if the lock button is
pressed. If all doors, tailgate and hood are
closed, the hazard warning lights will blink
once to indicate that all doors are locked.
Also, if the lock button is pressed once
more within 4 seconds, the hazard warn-
ing lights will blink and the horn will sound
once to confirm that the door is locked.
However, if any door, tailgate or engine
hood remains open, the hazard warning
lights (and/or the horn) will not operate.
But if all doors, tailgate and engine hood
are closed after the lock button is
pressed, the hazard warning lights will
blink once.
Unlock (2)
Driver's door is unlocked if the unlock
button is pressed once. The hazard
warning lights will blink twice to indicate
that the driver's door is unlocked. All
doors are unlocked if the unlock button is
pressed twice within 4 seconds.
The hazard warning lights will blink twice
again to indicate that all doors are
unlocked. If no doors are opened within
30 seconds after unlocking them, the
doors will automatically lock again.
✽ ✽
NOTICE - Unlock mode conversion
(if equipped)
You can change the system to unlock all
doors by pressing the unlock button on
the transmitter. If you want this feature
(central door unlock mode), perform the
following:
two stage unlock mode ↔ ↔
central door
unlock mode
The unlock mode is changed alternately
by pressing the lock button and unlock
button on the transmitter at the same time
for 5 seconds or more. The hazard warn-
ing lights will blink four times to indicate
that the mode conversion is completed.
Tailgate unlock (3)
The tailgate is unlocked if the button is
pressed for more than 1 second.
Also, once the tailgate is opened and
then closed, the tailgate will be locked
automatically.
Panic (4)
The horn sounds and hazard warning
lights flash for about 30 seconds if this
button is pressed for more than 1.5 sec-
ond. To stop the horn and lights, press
any button except the tailgate button on
the transmitter
REMOTE KEYLESS ENTRY (IF EQUIPPED)
ONF048011
Page 94 of 372
Features of your vehicle
18 4
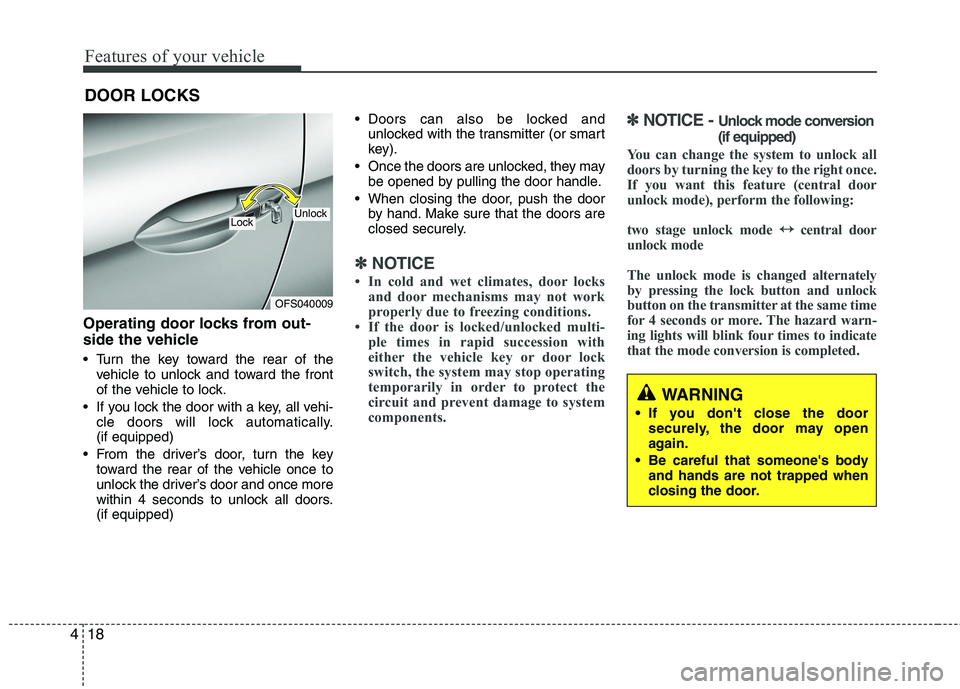
Operating door locks from out-
side the vehicle
Turn the key toward the rear of the
vehicle to unlock and toward the front
of the vehicle to lock.
If you lock the door with a key, all vehi-
cle doors will lock automatically.
(if equipped)
From the driver’s door, turn the key
toward the rear of the vehicle once to
unlock the driver’s door and once more
within 4 seconds to unlock all doors.
(if equipped) Doors can also be locked and
unlocked with the transmitter (or smart
key).
Once the doors are unlocked, they may
be opened by pulling the door handle.
When closing the door, push the door
by hand. Make sure that the doors are
closed securely.
✽ ✽
NOTICE
• In cold and wet climates, door locks
and door mechanisms may not work
properly due to freezing conditions.
• If the door is locked/unlocked multi-
ple times in rapid succession with
either the vehicle key or door lock
switch, the system may stop operating
temporarily in order to protect the
circuit and prevent damage to system
components.
✽ ✽
NOTICE - Unlock mode conversion
(if equipped)
You can change the system to unlock all
doors by turning the key to the right once.
If you want this feature (central door
unlock mode), perform the following:
two stage unlock mode ↔ ↔
central door
unlock mode
The unlock mode is changed alternately
by pressing the lock button and unlock
button on the transmitter at the same time
for 4 seconds or more. The hazard warn-
ing lights will blink four times to indicate
that the mode conversion is completed.
DOOR LOCKS
OFS040009
UnlockLock
WARNING
If you don't close the door
securely, the door may open
again.
Be careful that someone's body
and hands are not trapped when
closing the door.
Page 114 of 372
Features of your vehicle
38 4
Electric power steering (EPS)
The power steering uses a motor to
assist you in steering the vehicle. If the
engine is off or if the power steering sys-
tem becomes inoperative, the vehicle
may still be steered, but it will require
increased steering effort.
The motor driven power steering is con-
trolled by a power steering control unit
which senses the steering wheel torque
and vehicle speed to command the
motor.
The steering effort increases as the vehi-
cle’s speed increases and the effort
decreases as the vehicle’s speed
decreases for optimum steering control.
Should you notice any change in the
effort required to steer during normal
vehicle operation, have the power steer-
ing checked by an authorized HYUNDAI
dealer.
✽ ✽
NOTICE
The following symptoms may occur dur-
ing normal vehicle operation:
• The EPS warning light does not illu-
minate.
• The steering gets effort increases after
turning the ignition switch on. This
happens as the system performs the
EPS system diagnostics. When the
diagnostics is completed, the steering
wheel will return to its normal condi-
tion.
• A click noise may be heard from the
EPS relay after the ignition switch is
turned to the ON or LOCK (OFF)
position.
• A motor noise may be heard when the
vehicle is at a stop or at a low driving
speed.
• If the Electric Power Steering System
does not operate normally, the warning
light will illuminate on the instrument
cluster. The steering wheel may
become difficult to control or operate
abnormally. Take your vehicle to an
authorized HYUNDAI dealer and have
the vehicle checked as soon as possible.
• When you operate the steering wheel in
low temperature, abnormal noise could
occur. If temperature rises, the noise will
disappear. This is a normal condition.
(Continued)
STEERING WHEEL
CAUTION
If the Electric Power Steering
System does not operate normal-
ly, the warning light will illuminate
on the instrument cluster. The
steering wheel may become diffi-
cult to control or operate abnor-
mally. Take your vehicle to an
authorized HYUNDAI dealer and
have the vehicle checked as soon
as possible.
When you operate the steering
wheel in low temperatures, an
abnormal noise could occur. If
temperature rises, the noise will
disappear. This is a normal condi-
tion.
When the vehicle is stationary, if
you turn the steering wheel all the
way to the left or right continu-
ously, the steering wheel may
increase. This is not a system
malfunction. As time passes, the
steering wheel will return to its
normal condition.
Page 162 of 372
Features of your vehicle
86 4
✽
✽
NOTICE
• While using the air conditioning sys-
tem, monitor the engine temperature
gauge closely while driving up hills or
in heavy traffic when outside temper-
atures are high. Air conditioning sys-
tem operation may cause engine over-
heating. Continue to use the blower
fan but turn the air conditioning sys-
tem off if the engine temperature
gauge indicates engine overheating.
• Opening the windows in humid
weather while air conditioning oper-
ates may create water droplets inside
the vehicle. Since excessive water
droplets may cause damage to electri-
cal equipment, air conditioning
should only be used with the windows
closed.
Air conditioning system operation tips
If the vehicle has been parked in direct
sunlight during hot weather, open the
windows for a short time to let the hot
air inside the vehicle escape.
To help reduce moisture inside of the
windows on rainy or humid days,
decrease the humidity inside the vehi-
cle by operating the air conditioning
system.
During air conditioning system opera-
tion, you may occasionally notice a
slight change in engine speed as the
air conditioning compressor cycles.
This is a normal system operation
characteristic.
Use the air conditioning system every
month for a few minutes to ensure
maximum system performance.
When using the air conditioning sys-
tem, you may notice clear water drip-
ping (or even puddling) on the ground
under the passenger side of the vehi-
cle. This is a normal system operation
characteristic. Operating the air conditioning system
in the recirculated air position provides
maximum cooling, however, continual
operation in this mode may cause the
air inside the vehicle to become stale.
During cooling operation, you may
occasionally notice a misty air flow
because of rapid cooling and humid air
intake. This is a normal system opera-
tion characteristic.
If you operate air conditioner exces-
sively, the difference between the tem-
perature of the outside air and that of
the windshield could cause the outer
surface of the windshield to fog up,
causing loss of visibility. In this case,
set the mode selection knob or button
to the position and fan speed con-
trol to the lower speed.
Page 163 of 372
487
Features of your vehicle
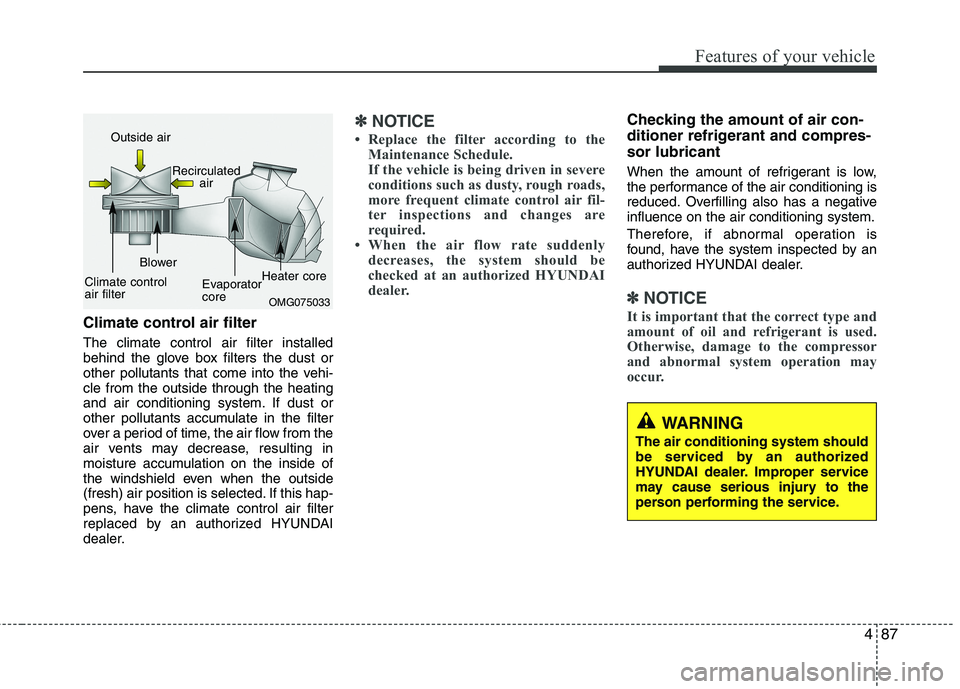
Climate control air filter
The climate control air filter installed
behind the glove box filters the dust or
other pollutants that come into the vehi-
cle from the outside through the heating
and air conditioning system. If dust or
other pollutants accumulate in the filter
over a period of time, the air flow from the
air vents may decrease, resulting in
moisture accumulation on the inside of
the windshield even when the outside
(fresh) air position is selected. If this hap-
pens, have the climate control air filter
replaced by an authorized HYUNDAI
dealer.
✽ ✽
NOTICE
• Replace the filter according to the
Maintenance Schedule.
If the vehicle is being driven in severe
conditions such as dusty, rough roads,
more frequent climate control air fil-
ter inspections and changes are
required.
• When the air flow rate suddenly
decreases, the system should be
checked at an authorized HYUNDAI
dealer.
Checking the amount of air con-
ditioner refrigerant and compres-
sor lubricant
When the amount of refrigerant is low,
the performance of the air conditioning is
reduced. Overfilling also has a negative
influence on the air conditioning system.
Therefore, if abnormal operation is
found, have the system inspected by an
authorized HYUNDAI dealer.
✽ ✽
NOTICE
It is important that the correct type and
amount of oil and refrigerant is used.
Otherwise, damage to the compressor
and abnormal system operation may
occur.
WARNING
The air conditioning system should
be serviced by an authorized
HYUNDAI dealer. Improper service
may cause serious injury to the
person performing the service.
OMG075033
Outside air
Recirculated
air
Climate control
air filterBlower
Evaporator
coreHeater core
Page 183 of 372
Driving your vehicle
2 5
WARNING- ENGINE EXHAUST CAN BE DANGEROUS!
Engine exhaust fumes can be extremely dangerous. If, at any time, you smell exhaust fumes inside the vehicle, open the win-
dows immediately.
• Do not inhale exhaust fumes.
Exhaust fumes contain carbon monoxide, a colorless, odorless gas that can cause unconsciousness and death by asphyxia-
tion.
The exhaust system should be checked whenever the vehicle is raised to change the oil or for any other purpose. If you hear
a change in the sound of the exhaust or if you drive over something that strikes the underneath side of the car, have the
exhaust system checked as soon as possible by an authorized HYUNDAI dealer.
Letting the engine idle in your garage, even with the garage door open, is a hazardous practice. Never run the engine in your
garage any longer than it takes to start the engine and back the car out.
If it is necessary to idle the engine for a prolonged period with people inside the car, be sure to do so only in an open area
with the air intake set at "Fresh" and fan operating at one of the higher speeds so fresh air is drawn into the interior.
If you must drive with the tailgate open because you are carrying objects that make this necessary:
1. Close all windows.
2. Open side vents.
3. Set the air intake control at "Fresh", the air flow control at "Floor" or "Face" and the fan at one of the higher speeds.
To assure proper operation of the ventilation system, be sure the ventilation air intakes located just in front of the windshield are
kept clear of snow, ice, leaves or other obstructions.
Page 190 of 372
59
Driving your vehicle
ACC(Accessory)
• with manual transaxle
Press the engine start/stop button when
the button is in the OFF position without
depressing the clutch pedal.
• with Automatic transaxle / EcoShift dual
clutch transmission
Press the engine start/stop button when
the button is in the OFF position without
depressing the brake pedal.
If you leave the engine start/stop button
in the ACC position for more than 1 hour,
the button is turned off automatically to
prevent the battery from discharging.
ON
• with manual transaxle
Press the engine start/stop button when
the button is in the ACC position without
depressing the clutch pedal.
• with Automatic transaxle / EcoShift dual
clutch transmission
Press the engine start/stop button when
the button is in the ACC position without
depressing the brake pedal.
The warning lights can be checked
before the engine is started. Do not leave
the button in the ON position if the engine
is not running to prevent the battery from
discharging.
START
• with manual transaxle
To start the engine, depress the clutch
pedal and brake pedal, then press the
engine start/stop button with the shift
lever in the N(Neutral) position.
• with Automatic transaxle / EcoShift dual
clutch transmission
To start the engine, depress the brake
pedal and press the engine start/stop
button with the shift lever in the P(Park)
or the N (Neutral) position.
✽ ✽
NOTICE
• If you press the engine start/stop but-
ton without depressing the clutch
pedal on manual transaxle vehicles or
without depressing the brake pedal on
Automatic transaxle / EcoShift dual
clutch transmission vehicles, the
engine will not start and the engine
start/stop button changes as follows:
OFF→ →
ACC → →
ON → →
OFF
• If you leave the engine start/stop but-
ton in the ACC or the ON position for
a long time, the battery may be dis-
charged.
Page 200 of 372
519
Driving your vehicle
R (Reverse)
Use this position to drive the vehicle
backward.
N (Neutral)
The wheels and transaxle are not locked.
The vehicle will roll freely even on the
slightest incline unless the parking brake
or service brakes are applied.
D (Drive)
This is the normal forward driving posi-
tion. The transaxle will automatically shift
through a 6-gear sequence, providing the
best fuel economy and power.
For extra power when passing another
vehicle or climbing grades, depress the
accelerator fully, at which time the
transaxle will automatically downshift to
the next lower gear.Sports mode
Whether the vehicle is stationary or in
motion, sports mode is selected by push-
ing the shift lever from the D (Drive) posi-
tion into the manual gate. To return to D
(Drive) range operation, push the shift
lever back into the main gate.
In sports mode, moving the shift lever
backwards and forwards will allow you to
make gearshifts rapidly.
Up (+) : Push the lever forward once to
shift up one gear.
Down (-) : Pull the lever backwards once
to shift down one gear.DS mode (Drive Sporty) - EcoShift
dual clutch
transmission
Ds mode supports the performance
mode for driver. To shift the Ds mode,
shift the transaxle to Ds mode which is
center of sports mode. If you shift [+] or
[–] gear, the mode is change to sports
mode. The transmission shift is automat-
ically changed at higher engine speeds
by engine load, your driving style, vehicle
condition.
In Ds mode, while coasting downhill, the
engine does not support the vehicle to
slow down.
In Ds mode, if you control the paddle
shifter, the gear will be changed to sports
mode. If the gear is changed to D (Drive),
the gear will be changed to D (Drive)
mode.
✽ ✽
NOTICE- EcoShift dual clutch
transmission
While stopping the vehicle by applying
parking brake in D gear, even if you
release the parking brake, the vehicle
may not move. In this case, you can
drive the vehicle by applying the foot
brake and release, applying the acceler-
ator or shifting the lever (D → →
N → →
D).
CAUTION
Always come to a complete stop
before shifting into or out of
Reverse (R) or Drive (D) to prevent
damage to the transaxle, except as
explained in “Rocking the vehicle”
in this section.