manual transmission HYUNDAI VELOSTER 2021 Owners Manual
[x] Cancel search | Manufacturer: HYUNDAI, Model Year: 2021, Model line: VELOSTER, Model: HYUNDAI VELOSTER 2021Pages: 482, PDF Size: 37.54 MB
Page 6 of 482
F4
INTRODUCTION
Congratulations, and thank you for choosing HYUNDAI. We are pleased to welcome you to the growing number of
discerning people who drive HYUNDAIs. We are very proud of the advanced engineering and high-quality construc-
tion of each HYUNDAI we build.
Your Owner's Manual will introduce you to the features and operation of your new HYUNDAI. To become familiar with
your new HYUNDAI, so that you can fully enjoy it, read this Owner's Manual carefully before driving your new vehicle.
This manual contains important safety information and instructions intended to familiarize you with your vehicle's con-
trols and safety features so you can safely operate your vehicle.
This manual also contains information on maintenance designed to enhance safe operation of the vehicle. It is recom-
mended that all service and maintenance on your vehicle be performed by an authorized HYUNDAI dealer. HYUNDAI
dealers are prepared to provide high-quality service, maintenance and any other assistance that may be required.
This Owner's Manual should be considered a permanent part of your vehicle, and should be kept in the vehicle so you
can refer to it at any time. The manual should stay with the vehicle if you sell it to provide the next owner with impor-
tant operating, safety and maintenance information.
HYUNDAI MOTOR AMERICA
Copyright 2020 HYUNDAI Motor America. All rights reserved. No part of this publication may be reproduced, stored
in any retrieval system or transmitted in any form or by any means without the prior written permission of HYUNDAI
Motor America.Severe engine and transmission damage may result from the use of poor quality fuels and lubricants that
do not meet HYUNDAI specifications. You must always use high quality fuels and lubricants that meet the
specifications listed on Page 8-7 in the Vehicle Specifications section of the Owner's Manual.
CAUTION
Page 18 of 482
I IN
NS
ST
TR
RU
UM
ME
EN
NT
T
P
PA
AN
NE
EL
L
O
OV
VE
ER
RV
VI
IE
EW
W
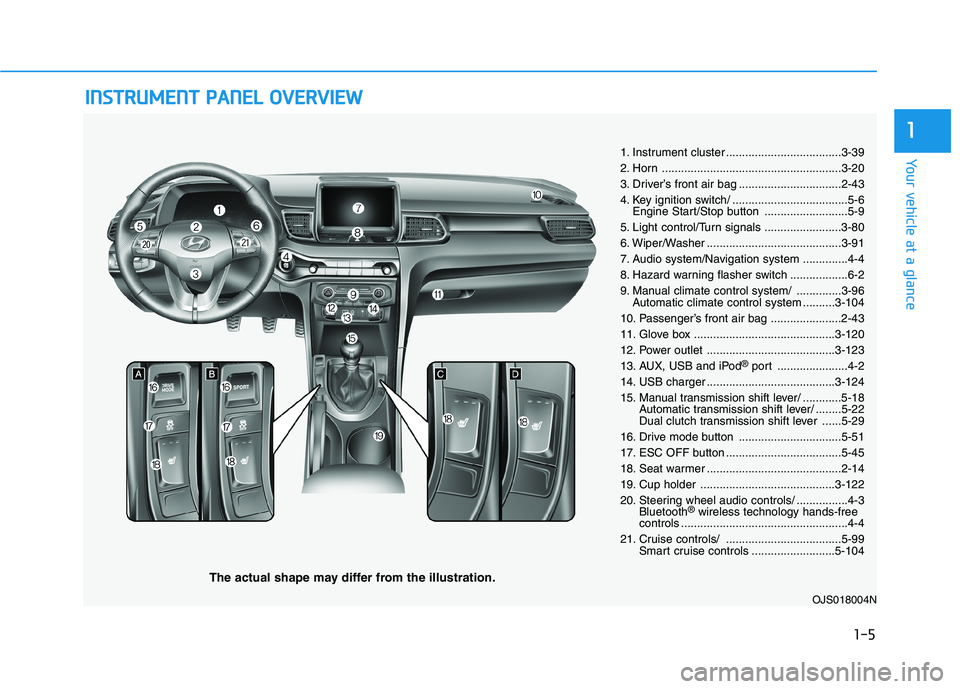
The actual shape may differ from the illustration.
1-5
Your vehicle at a glance
1
1. Instrument cluster ....................................3-39
2. Horn ........................................................3-20
3. Driver’s front air bag ................................2-43
4. Key ignition switch/ ....................................5-6
Engine Start/Stop button ..........................5-9
5. Light control/Turn signals ........................3-80
6. Wiper/Washer ..........................................3-91
7. Audio system/Navigation system ..............4-4
8. Hazard warning flasher switch ..................6-2
9. Manual climate control system/ ..............3-96
Automatic climate control system ..........3-104
10. Passenger’s front air bag ......................2-43
11. Glove box ............................................3-120
12. Power outlet ........................................3-123
13. AUX, USB and iPod
®port ......................4-2
14. USB charger ........................................3-124
15. Manual transmission shift lever/ ............5-18
Automatic transmission shift lever/ ........5-22
Dual clutch transmission shift lever ......5-29
16. Drive mode button ................................5-51
17. ESC OFF button ....................................5-45
18. Seat warmer ..........................................2-14
19. Cup holder ..........................................3-122
20. Steering wheel audio controls/ ................4-3
Bluetooth
®wireless technology hands-free
controls ....................................................4-4
21. Cruise controls/ ....................................5-99
Smart cruise controls ..........................5-104
OJS018004N
Page 126 of 482
3-44
Convenient features of your vehicle
Information
• If the vehicle is not on level ground
or the battery power has been inter-
rupted, the range function may not
operate correctly.
• The range may differ from the actu-
al driving distance as it is only an
estimate of the available driving
range for the vehicle and driving
conditions.
• The trip computer may not register
additional fuel if less than 1.6 gallon
(6 liters) of fuel are added to the
vehicle.
• The range may vary significantly
based on driving conditions, driving
habits, and condition of the vehicle.
Transmission shift indicator
Manual transmission shift indi-
cator (if equipped)
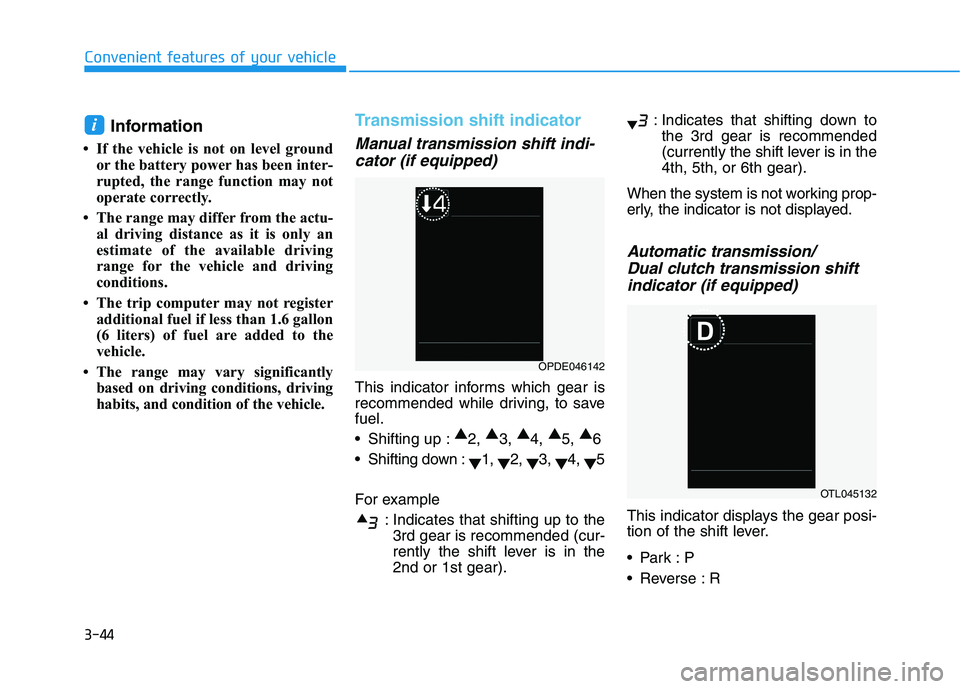
This indicator informs which gear is
recommended while driving, to save
fuel.
Shifting up :▲
2, ▲
3, ▲
4, ▲
5, ▲
6
Shifting down :
▼1,
▼2,
▼3,
▼4,
▼5
For example
: Indicates that shifting up to the
3rd gear is recommended (cur-
rently the shift lever is in the
2nd or 1st gear).: Indicates that shifting down to
the 3rd gear is recommended
(currently the shift lever is in the
4th, 5th, or 6th gear).
When the system is not working prop-
erly, the indicator is not displayed.
Automatic transmission/
Dual clutch transmission shift
indicator (if equipped)
This indicator displays the gear posi-
tion of the shift lever.
Reverse : R
i
OPDE046142
OTL045132
Page 127 of 482
3-45
Convenient features of your vehicle
3
Neutral : N
Manual shift mode
- Auto Transmission : 1, 2, 3, 4, 5, 6
- Dual Clutch Transmission : D1,
D2, D3, D4, D5, D6, D7
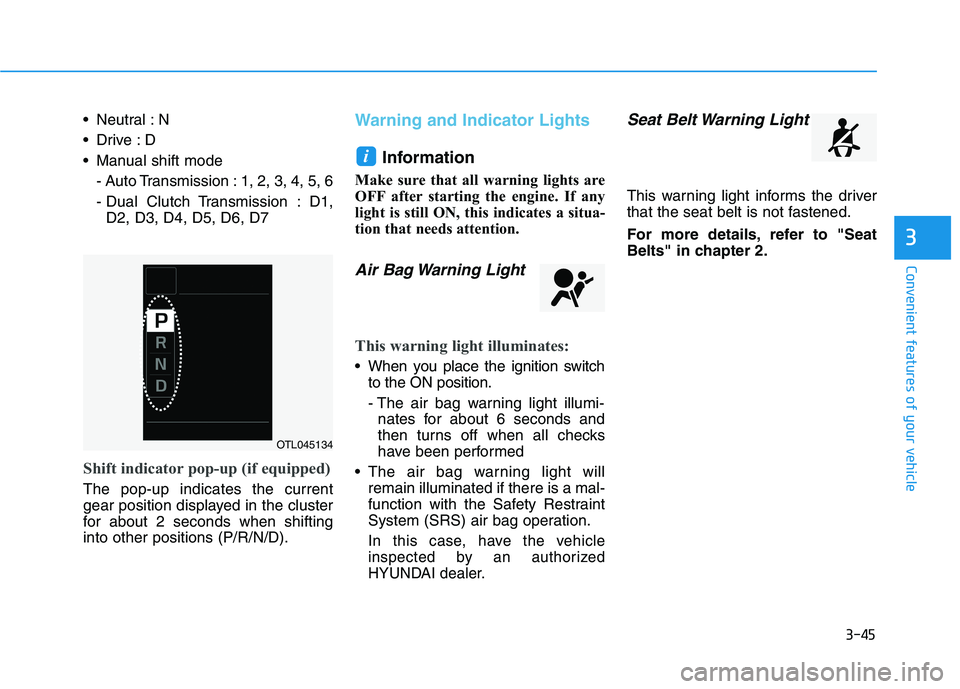
Shift indicator pop-up (if equipped)
The pop-up indicates the current
gear position displayed in the cluster
for about 2 seconds when shifting
into other positions (P/R/N/D).
Warning and Indicator Lights
Information
Make sure that all warning lights are
OFF after starting the engine. If any
light is still ON, this indicates a situa-
tion that needs attention.
Air Bag Warning Light
This warning light illuminates:
When you place the ignition switch
to the ON position.
- The air bag warning light illumi-
nates for about 6 seconds and
then turns off when all checks
have been performed
The air bag warning light will
remain illuminated if there is a mal-
function with the Safety Restraint
System (SRS) air bag operation.
In this case, have the vehicle
inspected by an authorized
HYUNDAI dealer.
Seat Belt Warning Light
This warning light informs the driver
that the seat belt is not fastened.
For more details, refer to "Seat
Belts" in chapter 2.
i
OTL045134
Page 139 of 482
3-57
Convenient features of your vehicle
3
Low key battery
(for smart key system)
This warning message is displayed if
the battery of the smart key is dis-
charged while changing the Engine
Start/Stop button to the OFF position.
Press brake pedal to start
engine (for smart key system
and automatic transmission/
dual clutch transmission)
This warning message is displayed if
the Engine Start/Stop button
changes to the ACC position twice
by pressing the button repeatedly
without depressing the brake pedal.
You can start the vehicle by depress-
ing the brake pedal and then press-
ing the Engine Start/Stop button.
Press clutch pedal to start
engine (for smart key system
and manual transmission)
This warning message is displayed if
the Engine Start/Stop button
changes to the ACC position twice
by pressing the button repeatedly
without depressing the clutch pedal.
You can start the engine by depress-
ing the clutch pedal to.
Key not in vehicle
(for smart key system)
This warning message is displayed if
the smart key is not in the vehicle
when you press the Engine Start/
Stop button.
When attempting to start the vehicle,
always have the smart key with you.
Key not detected
(for smart key system)
This warning message is displayed if
the smart key is not detected when you
press the Engine Start/Stop button.
Press START button again
(for smart key system)
This message is displayed if you
were unable to start the vehicle when
the Engine Start/Stop button was
pressed.
If this occurs, attempt to start the
engine by pressing the Engine Start/
Stop button again.
If the warning message appears
each time you press the Engine
Start/Stop button, have your vehicle
inspected by an authorized
HYUNDAI dealer.
Page 146 of 482
3-64
Convenient features of your vehicle
Shift to P to edit settings
This warning message appears if
you try to adjust the User Settings
while driving.
- Manual transmission
For your safety, change the User
Settings after parking the vehicle,
applying the parking brake and mov-
ing the shift lever to neutral.
- Automatic transmission /
dual clutch transmission
For your safety, change the User
Settings after parking the vehicle,
applying the parking brake and mov-
ing the shift lever to P (Park).
Quick guide help
This mode provides quick guides for
the systems in the User Settings
mode.
Select an item, press and hold the OK
button.
For more details about each sys-
tem, refer to this Owner's Manual.
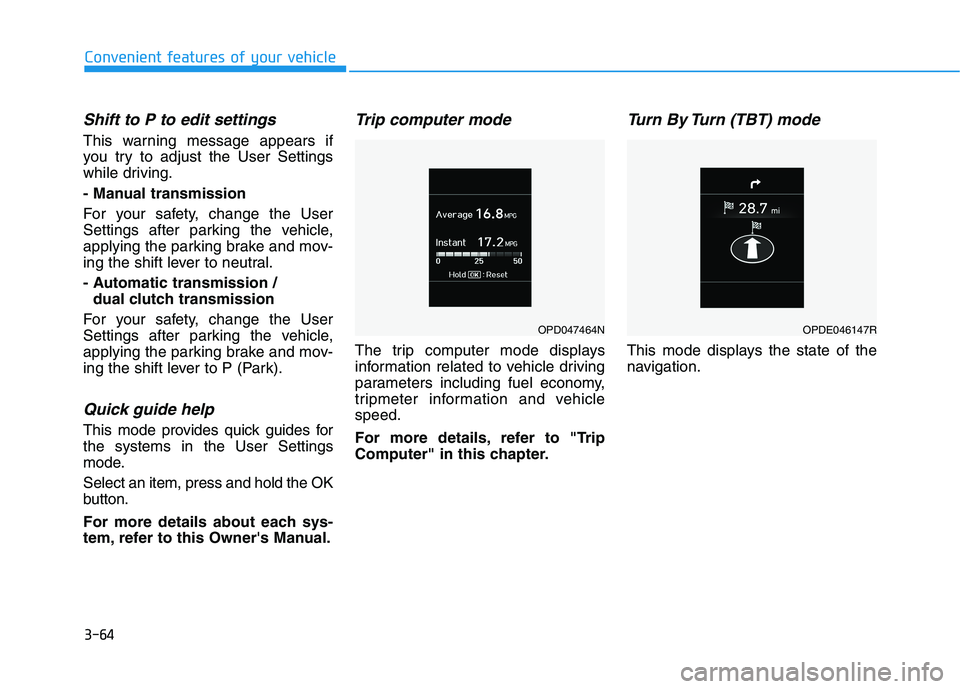
Trip computer mode
The trip computer mode displays
information related to vehicle driving
parameters including fuel economy,
tripmeter information and vehicle
speed.
For more details, refer to "Trip
Computer" in this chapter.
Turn By Turn (TBT) mode
This mode displays the state of the
navigation.
OPD047464NOPDE046147R
Page 161 of 482
3-79
Convenient features of your vehicle
3
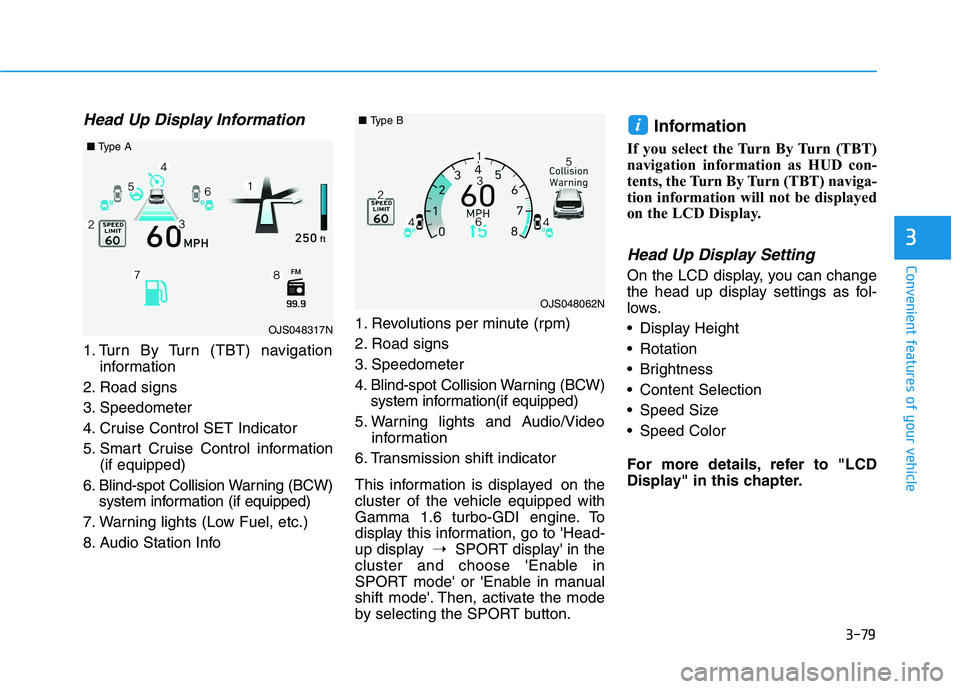
Head Up Display Information
1. Turn By Turn (TBT) navigation
information
2. Road signs
3. Speedometer
4. Cruise Control SET Indicator
5. Smart Cruise Control information
(if equipped)
6. Blind-spot Collision Warning (BCW)
system information (if equipped)
7. Warning lights (Low Fuel, etc.)
8. Audio Station Info1. Revolutions per minute (rpm)
2. Road signs
3. Speedometer
4. Blind-spot Collision Warning (BCW)
system information(if equipped)
5. Warning lights and Audio/Video
information
6. Transmission shift indicator
This information is displayed on the
cluster of the vehicle equipped with
Gamma 1.6 turbo-GDI engine. To
display this information, go to 'Head-
up display➝SPORT display' in the
cluster and choose 'Enable in
SPORT mode' or 'Enable in manual
shift mode'. Then, activate the mode
by selecting the SPORT button.
Information
If you select the Turn By Turn (TBT)
navigation information as HUD con-
tents, the Turn By Turn (TBT) naviga-
tion information will not be displayed
on the LCD Display.
Head Up Display Setting
On the LCD display, you can change
the head up display settings as fol-
lows.
Display Height
Rotation
Brightness
Content Selection
Speed Size
Speed Color
For more details, refer to "LCD
Display" in this chapter.
i
OJS048317N
■Type A
OJS048062N
■Type B
Page 217 of 482
Driving your vehicle
5
Before Driving ........................................................5-4
Before Entering the Vehicle ...........................................5-4
Before Starting ..................................................................5-4
Ignition Switch ........................................................5-6
Key Ignition Switch ...........................................................5-6
Engine Start/Stop Button................................................5-9
Manual Transmission ...........................................5-18
Manual Transmission Operation ..................................5-18
Good Driving Practices ..................................................5-20
Automatic Transmission ......................................5-22
Automatic Transmission Operation .............................5-22
Good Driving Practices ..................................................5-27
Dual clutch Transmission ....................................5-29
Dual Clutch Transmission Operation ..........................5-29
LCD display for transmission temperature and
warning message.............................................................5-31
Good Driving Practices ..................................................5-38
Braking System ....................................................5-40
Power Brakes ...................................................................5-40
Disc Brakes Wear Indicator ..........................................5-41
Parking Brake .................................................................5-41
Anti-lock Brake System (ABS) ....................................5-43
Electronic Stability Control (ESC)................................5-45
Vehicle Stability Management (VSM).........................5-47Hill-Start Assist Control (HAC) ....................................5-48
Good Braking Practices .................................................5-49
Drive Mode Integrated Control System ............5-51
DRIVE MODE (with Automatic Transmission/
Dual Clutch Transmission) .............................................5-51
SPORT MODE (with Manual Transmission) ..............5-53
Blind-Spot Collision Warning (BCW) System...5-55
BCW (Blind-Spot Collision Warning) ..........................5-56
RCCW (Rear Cross-Traffic Collision Warning) .........5-58
Blind Spot Collision Warning - Sensor Location .....5-60
Limitations of the System .............................................5-61
Forward Collision-Avoidance Assist (FCA)
System (Camera) ..................................................5-63
System Setting and Activation.....................................5-63
FCA Warning Message and System Control ............5-65
FCA Sensor .......................................................................5-67
System Malfunction .......................................................5-68
Limitations of the System .............................................5-70
Forward Collision-Avoidance Assist (FCA)
System (Fusion Sensor) ......................................5-75
System Setting and Activation.....................................5-75
FCA Warning Message and System Control ............5-77
FCA Sensor .......................................................................5-79
System Malfunction .......................................................5-80
Limitations of the System .............................................5-82
Page 222 of 482
5-6
Key Ignition Switch
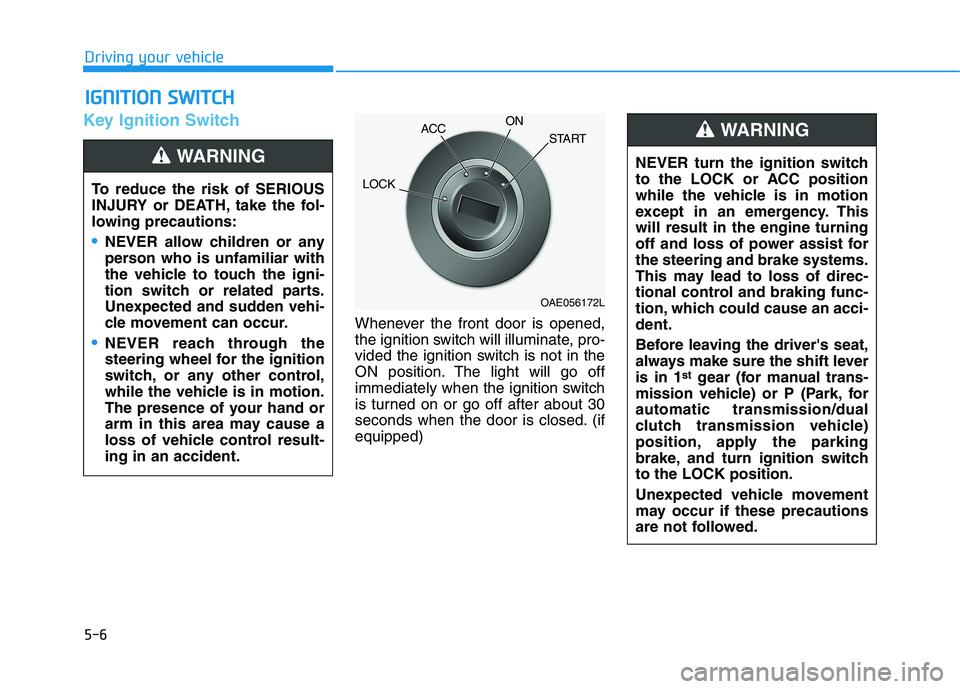
Whenever the front door is opened,
the ignition switch will illuminate, pro-
vided the ignition switch is not in the
ON position. The light will go off
immediately when the ignition switch
is turned on or go off after about 30
seconds when the door is closed. (if
equipped)
I IG
GN
NI
IT
TI
IO
ON
N
S
SW
WI
IT
TC
CH
H
Driving your vehicle
To reduce the risk of SERIOUS
INJURY or DEATH, take the fol-
lowing precautions:
NEVER allow children or any
person who is unfamiliar with
the vehicle to touch the igni-
tion switch or related parts.
Unexpected and sudden vehi-
cle movement can occur.
NEVER reach through the
steering wheel for the ignition
switch, or any other control,
while the vehicle is in motion.
The presence of your hand or
arm in this area may cause a
loss of vehicle control result-
ing in an accident.
WARNING NEVER turn the ignition switch
to the LOCK or ACC position
while the vehicle is in motion
except in an emergency. This
will result in the engine turning
off and loss of power assist for
the steering and brake systems.
This may lead to loss of direc-
tional control and braking func-
tion, which could cause an acci-
dent.
Before leaving the driver's seat,
always make sure the shift lever
is in 1
stgear (for manual trans-
mission vehicle) or P (Park, for
automatic transmission/dual
clutch transmission vehicle)
position, apply the parking
brake, and turn ignition switch
to the LOCK position.
Unexpected vehicle movement
may occur if these precautions
are not followed.
WARNING
OAE056172L
LOCKACCON
START
Page 224 of 482
5-8
Starting the engine Vehicle with manual transmission:
1. Make sure the parking brake is
applied.
2. Make sure the shift lever is in neu-
tral.
3. Depress the clutch and brake ped-
als.
4. Turn the ignition switch to the
START position. Hold the key
(maximum of 10 seconds) until the
engine starts and release it.
Information
Depress the brake pedal and clutch
pedal until the engine starts.
Vehicle with automatic transmission/
dual clutch transmission:
1. Make sure the parking brake is
applied.
2. Make sure the shift lever is in P
(Park).
3. Depress the brake pedal.
4. Turn the ignition switch to the
START position. Hold the key
(maximum of 10 seconds) until the
engine starts and release it.
Information
• It is best to maintain a moderate
engine speed until the vehicle engine
comes up to normal operating tem-
perature. Avoid harsh or abrupt
acceleration or deceleration while
the engine is still cold.
• Whether the engine is cold or warm,
always start the vehicle with your
foot on the brake pedal. Do not
depress the accelerator while start-
ing the vehicle. Do not rev the
engine while warming it up.
To prevent damage to the vehicle:
Do not hold the ignition key in
the START position for more
than 10 seconds. Wait 5 to 10
seconds before trying again.
Do not push or tow your vehicle
to start the engine.
NOTICE
i
i
Driving your vehicle
Always wear appropriate shoes
when operating your vehicle.
Unsuitable shoes, such as high
heels, ski boots, sandals, flip-
flops, etc., may interfere with
your ability to use the brake and
accelerator pedals.
WARNING