brake HYUNDAI VELOSTER TURBO 2016 Owners Manual
[x] Cancel search | Manufacturer: HYUNDAI, Model Year: 2016, Model line: VELOSTER TURBO, Model: HYUNDAI VELOSTER TURBO 2016Pages: 406, PDF Size: 7.83 MB
Page 11 of 406
15
Introduction
Do not use methanol
Fuels containing methanol (wood alco-
hol) should not be used in your vehicle.
This type of fuel can reduce vehicle per-
formance and damage components of
the fuel system, engine control system
and emission control system.
Fuel Additives
HYUNDAI recommends that you use
good quality gasolines treated with deter-
gent additives such as TOP TIER
Detergent Gasoline, which help prevent
deposit formation in the engine. These
gasolines will help the engine run clean-
er and enhance performance of the
Emission Control System. For more infor-
mation on TOP TIER Detergent
Gasoline, please go to the website
(www.toptiergas.com)
For customers who do not use TOP Tier
Detergent Gasoline regularly, and have
problems starting or the engine does not
run smoothly, additives that you can buy
separately may be added to the gasoline.
If TOP TIER Detergent Gasoline is not
available, one bottle of additive added to
the fuel tank at every 12,000 km (7,500
mile) or every engine oil change is rec-
ommended. Additives are available from
your authorized HYUNDAI dealer along
with information on how to use them. Do
not mix other additives.
Operation in foreign countries
If you are going to drive your vehicle in
another country, be sure to:
• Observe all regulations regarding reg-
istration and insurance.
• Determine that acceptable fuel is avail-
able.No special break-in period is needed. By
following a few simple precautions for the
first 1,000 km (600 miles) you may add to
the performance, economy and life of
your vehicle.
• Do not race the engine.
• While driving, keep your engine speed
(rpm, or revolutions per minute)
between 2,000 rpm and 4,000 rpm.
• Do not maintain a single speed for long
periods of time, either fast or slow.
Varying engine speed is needed to
properly break-in the engine.
• Avoid hard stops, except in emergen-
cies, to allow the brakes to seat prop-
erly.
VEHICLE BREAK-IN PROCESS
Page 12 of 406
Introduction
6 1
VEHICLE DATA COLLECTION AND EVENT DATA RECORDERS
This vehicle is equipped with an event
data recorder (EDR). The main pur-
pose of an EDR is to record, in certain
crash or near crash-like situations,
such as an air bag deployment or hit-
ting a road obstacle, data that will
assist in understanding how a vehi-
cle's systems performed. The EDR is
designed to record data related to
vehicle dynamics and safety systems
for a short period of time, typically 30
seconds or less. The EDR in this vehi-
cle is designed to record such data
as:
• How various systems in your vehi-
cle were operating;
• Whether or not the driver and pas-
senger safety belts were buckled/
fastened;
• How far (if at all) the driver was
depressing the accelerator and/or
brake pedal; and,
• How fast the vehicle was traveling.These data can help provide a better
understanding of the circumstances
in which crashes and injuries occur.
NOTE: EDR data are recorded by your
vehicle only if a non-trivial crash situ-
ation occurs; no data are recorded by
the EDR under normal driving condi-
tions and no personal data (e.g.,
name, gender, age, and crash loca-
tion) are recorded. However, other
parties, such as law enforcement,
could combine the EDR data with the
type of personally identifying data
routinely acquired during a crash
investigation.To read data recorded by an EDR, spe-
cial equipment is required, and
access to the vehicle or the EDR is
needed. In addition to the vehicle
manufacturer, other parties, such as
law enforcement, that have the special
equipment, can read the information if
they have access to the vehicle or the
EDR.
Page 14 of 406
Your vehicle at a glance
2 2
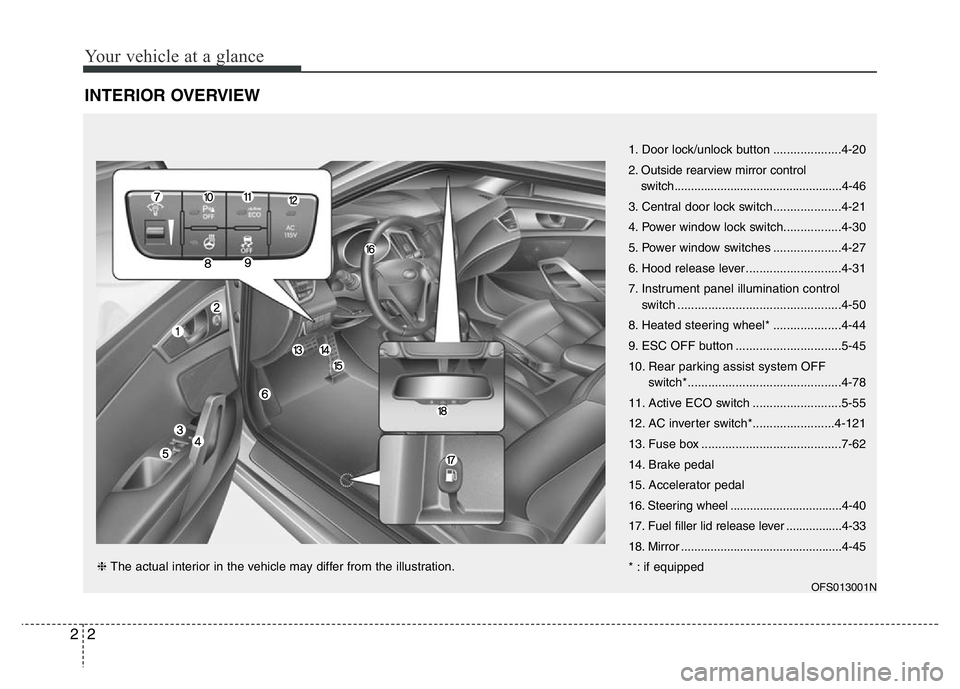
INTERIOR OVERVIEW
OFS013001N
1. Door lock/unlock button ....................4-20
2. Outside rearview mirror control
switch...................................................4-46
3. Central door lock switch....................4-21
4. Power window lock switch.................4-30
5. Power window switches ....................4-27
6. Hood release lever ............................4-31
7. Instrument panel illumination control
switch ................................................4-50
8. Heated steering wheel* ....................4-44
9. ESC OFF button ...............................5-45
10. Rear parking assist system OFF
switch*.............................................4-78
11. Active ECO switch ..........................5-55
12. AC inverter switch*........................4-121
13. Fuse box .........................................7-62
14. Brake pedal
15. Accelerator pedal
16. Steering wheel ..................................4-40
17. Fuel filler lid release lever .................4-33
18. Mirror .................................................4-45
* : if equipped ❈ The actual interior in the vehicle may differ from the illustration.
Page 15 of 406
23
Your vehicle at a glance
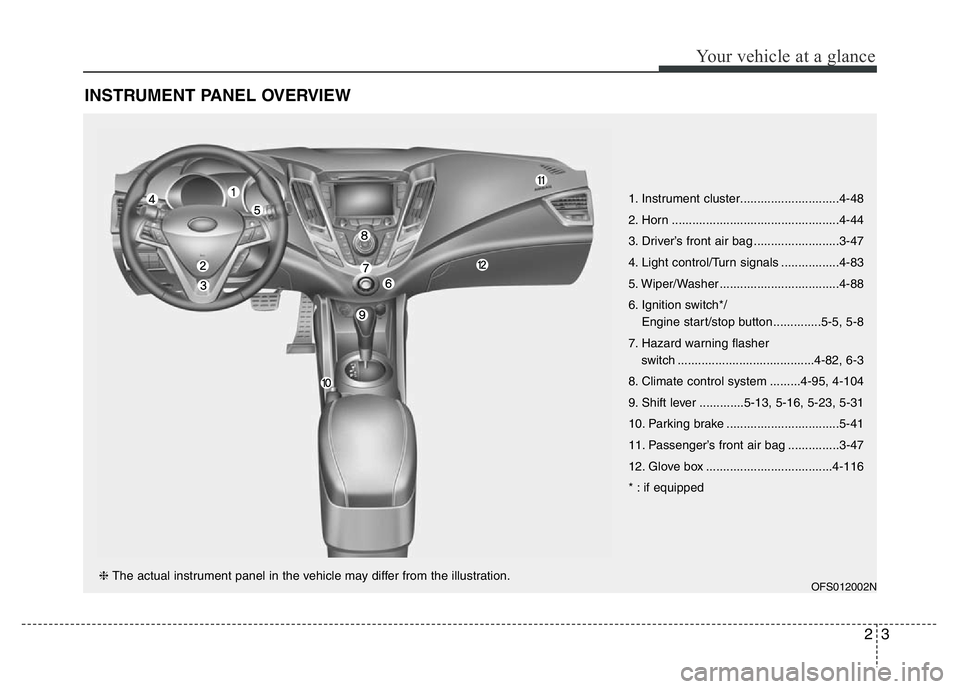
INSTRUMENT PANEL OVERVIEW
OFS012002N
1. Instrument cluster.............................4-48
2. Horn .................................................4-44
3. Driver’s front air bag .........................3-47
4. Light control/Turn signals .................4-83
5. Wiper/Washer ...................................4-88
6. Ignition switch*/
Engine start/stop button ..............5-5, 5-8
7. Hazard warning flasher
switch ........................................4-82, 6-3
8. Climate control system .........4-95, 4-104
9. Shift lever .............5-13, 5-16, 5-23, 5-31
10. Parking brake .................................5-41
11. Passenger’s front air bag ...............3-47
12. Glove box .....................................4-116
* : if equipped
❈ The actual instrument panel in the vehicle may differ from the illustration.
Page 16 of 406
Your vehicle at a glance
4 2
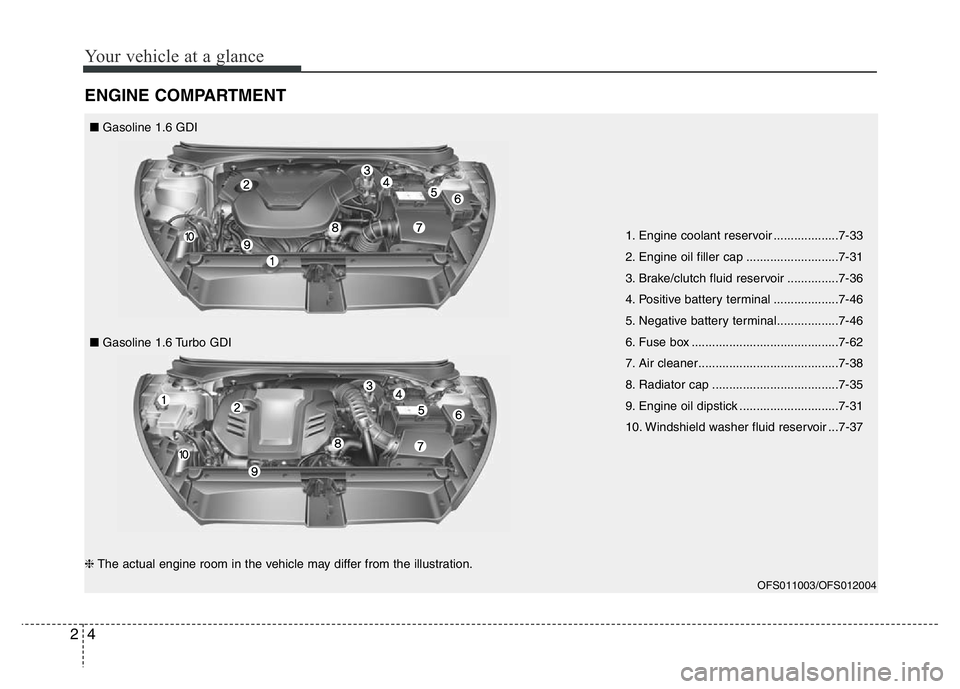
ENGINE COMPARTMENT
1. Engine coolant reservoir ...................7-33
2. Engine oil filler cap ...........................7-31
3. Brake/clutch fluid reservoir ...............7-36
4. Positive battery terminal ...................7-46
5. Negative battery terminal..................7-46
6. Fuse box ...........................................7-62
7. Air cleaner.........................................7-38
8. Radiator cap .....................................7-35
9. Engine oil dipstick .............................7-31
10. Windshield washer fluid reservoir ...7-37
OFS011003/OFS012004
❈The actual engine room in the vehicle may differ from the illustration. ■Gasoline 1.6 GDI
■Gasoline 1.6 Turbo GDI
Page 28 of 406
Safety features of your vehicle
12 3
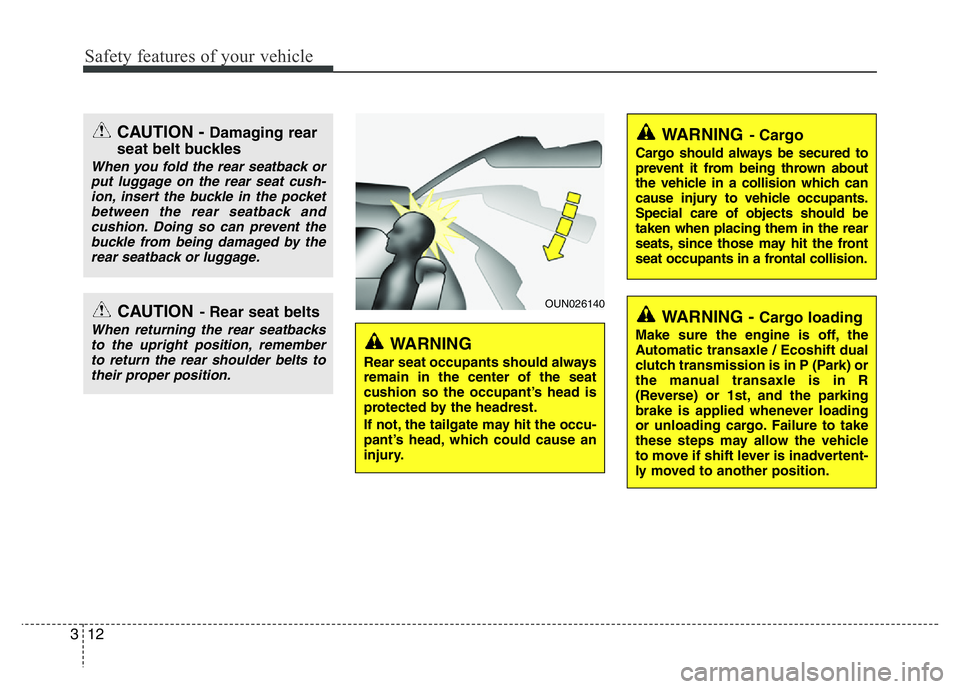
WARNING - Cargo loading
Make sure the engine is off, the
Automatic transaxle / Ecoshift dual
clutch transmission is in P (Park) or
the manual transaxle is in R
(Reverse) or 1st, and the parking
brake is applied whenever loading
or unloading cargo. Failure to take
these steps may allow the vehicle
to move if shift lever is inadvertent-
ly moved to another position.
WARNING- Cargo
Cargo should always be secured to
prevent it from being thrown about
the vehicle in a collision which can
cause injury to vehicle occupants.
Special care of objects should be
taken when placing them in the rear
seats, since those may hit the front
seat occupants in a frontal collision.
OUN026140
WARNING
Rear seat occupants should always
remain in the center of the seat
cushion so the occupant’s head is
protected by the headrest.
If not, the tailgate may hit the occu-
pant’s head, which could cause an
injury.
CAUTION - Damaging rear
seat belt buckles
When you fold the rear seatback or
put luggage on the rear seat cush-
ion, insert the buckle in the pocket
between the rear seatback and
cushion. Doing so can prevent the
buckle from being damaged by the
rear seatback or luggage.
CAUTION- Rear seat belts
When returning the rear seatbacks
to the upright position, remember
to return the rear shoulder belts to
their proper position.
Page 74 of 406
Safety features of your vehicle
58 3
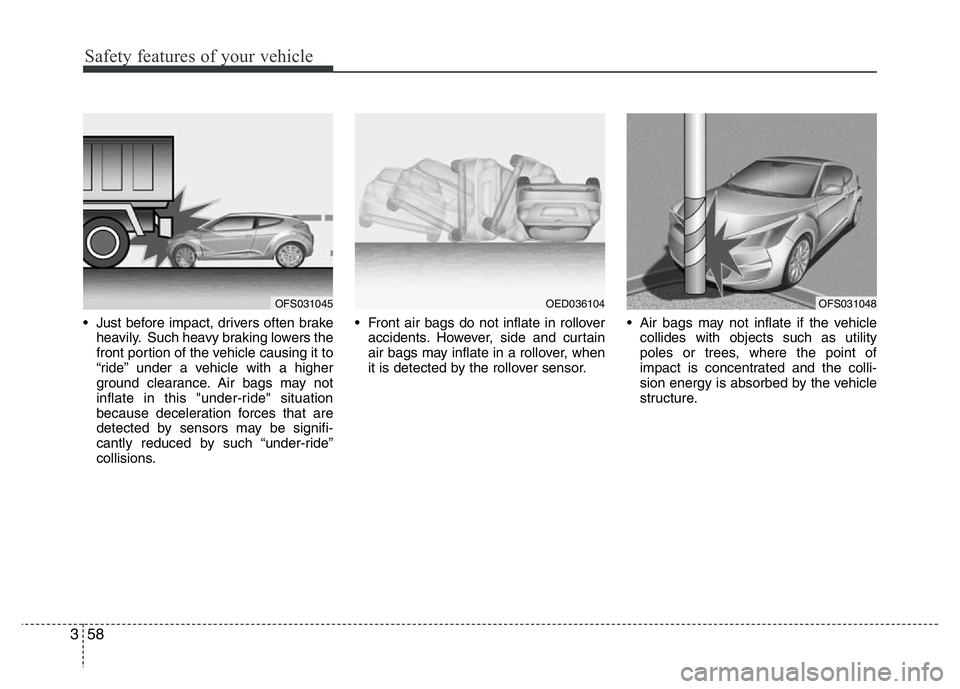
• Just before impact, drivers often brake
heavily. Such heavy braking lowers the
front portion of the vehicle causing it to
“ride” under a vehicle with a higher
ground clearance. Air bags may not
inflate in this "under-ride" situation
because deceleration forces that are
detected by sensors may be signifi-
cantly reduced by such “under-ride”
collisions.• Front air bags do not inflate in rollover
accidents. However, side and curtain
air bags may inflate in a rollover, when
it is detected by the rollover sensor.• Air bags may not inflate if the vehicle
collides with objects such as utility
poles or trees, where the point of
impact is concentrated and the colli-
sion energy is absorbed by the vehicle
structure.
OFS031045OED036104OFS031048
Page 97 of 406
Features of your vehicle
20 4
In case of an emergency
If the power door lock switch does not
operate electrically, the only way to lock
the door(s) is with the ignition key from
the outside key hole.
Doors without the outside key hole, you
can lock the door as follows:
1. Open the door.
2. Lock doors by pushing each lock but-
ton.
3. Close the door securely.
Once the tailgate is closed when the
power door lock switch does not operate
electrically, you will not be able to open
the tailgate.
✽NOTICE
Always remove the ignition key, engage
the parking brake, close all windows
and lock all doors when leaving your
vehicle unattended.
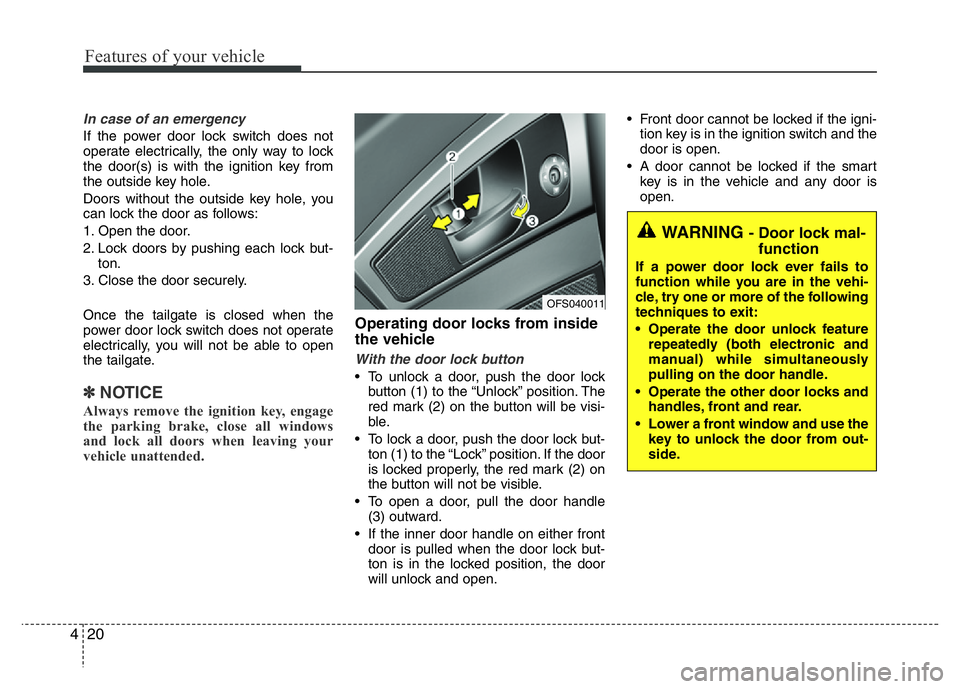
Operating door locks from inside
the vehicle
With the door lock button
• To unlock a door, push the door lock
button (1) to the “Unlock” position. The
red mark (2) on the button will be visi-
ble.
• To lock a door, push the door lock but-
ton (1) to the “Lock” position. If the door
is locked properly, the red mark (2) on
the button will not be visible.
• To open a door, pull the door handle
(3) outward.
• If the inner door handle on either front
door is pulled when the door lock but-
ton is in the locked position, the door
will unlock and open.• Front door cannot be locked if the igni-
tion key is in the ignition switch and the
door is open.
• A door cannot be locked if the smart
key is in the vehicle and any door is
open.
WARNING - Door lock mal-
function
If a power door lock ever fails to
function while you are in the vehi-
cle, try one or more of the following
techniques to exit:
• Operate the door unlock feature
repeatedly (both electronic and
manual) while simultaneously
pulling on the door handle.
• Operate the other door locks and
handles, front and rear.
• Lower a front window and use the
key to unlock the door from out-
side.
OFS040011
Page 98 of 406
421
Features of your vehicle
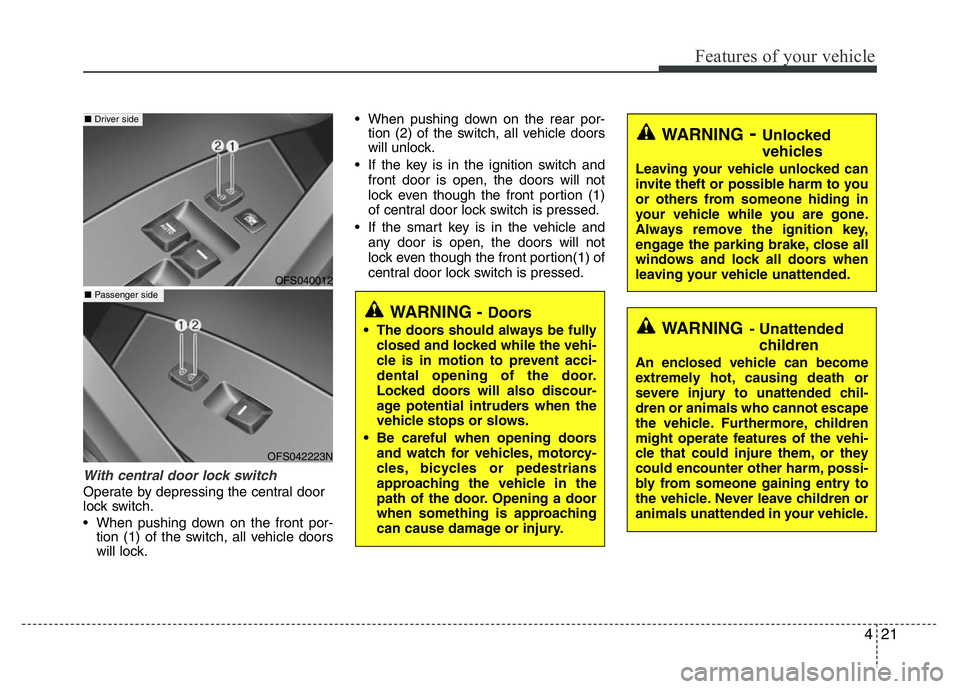
With central door lock switch
Operate by depressing the central door
lock switch.
• When pushing down on the front por-
tion (1) of the switch, all vehicle doors
will lock.• When pushing down on the rear por-
tion (2) of the switch, all vehicle doors
will unlock.
• If the key is in the ignition switch and
front door is open, the doors will not
lock even though the front portion (1)
of central door lock switch is pressed.
• If the smart key is in the vehicle and
any door is open, the doors will not
lock even though the front portion(1) of
central door lock switch is pressed.
WARNING- Unlocked
vehicles
Leaving your vehicle unlocked can
invite theft or possible harm to you
or others from someone hiding in
your vehicle while you are gone.
Always remove the ignition key,
engage the parking brake, close all
windows and lock all doors when
leaving your vehicle unattended.
WARNING- Unattended
children
An enclosed vehicle can become
extremely hot, causing death or
severe injury to unattended chil-
dren or animals who cannot escape
the vehicle. Furthermore, children
might operate features of the vehi-
cle that could injure them, or they
could encounter other harm, possi-
bly from someone gaining entry to
the vehicle. Never leave children or
animals unattended in your vehicle.
WARNING - Doors
• The doors should always be fully
closed and locked while the vehi-
cle is in motion to prevent acci-
dental opening of the door.
Locked doors will also discour-
age potential intruders when the
vehicle stops or slows.
• Be careful when opening doors
and watch for vehicles, motorcy-
cles, bicycles or pedestrians
approaching the vehicle in the
path of the door. Opening a door
when something is approaching
can cause damage or injury.
OFS040012
OFS042223N
■ Driver side
■ Passenger side
Page 108 of 406
431
Features of your vehicle
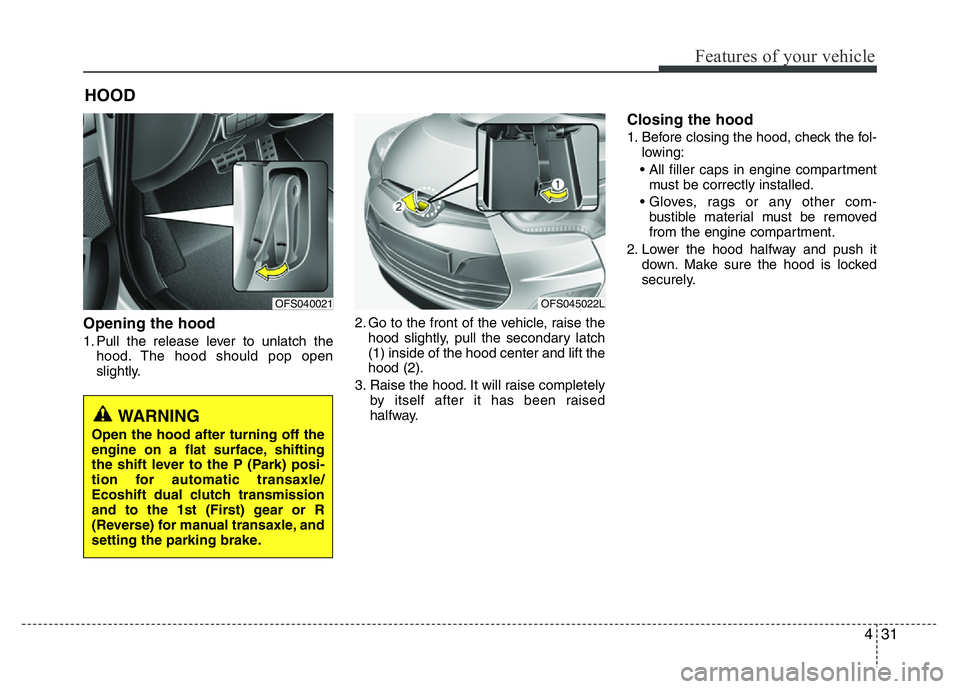
Opening the hood
1. Pull the release lever to unlatch the
hood. The hood should pop open
slightly.2. Go to the front of the vehicle, raise the
hood slightly, pull the secondary latch
(1) inside of the hood center and lift the
hood (2).
3. Raise the hood. It will raise completely
by itself after it has been raised
halfway.
Closing the hood
1. Before closing the hood, check the fol-
lowing:
• All filler caps in engine compartment
must be correctly installed.
• Gloves, rags or any other com-
bustible material must be removed
from the engine compartment.
2. Lower the hood halfway and push it
down. Make sure the hood is locked
securely.
HOOD
WARNING
Open the hood after turning off the
engine on a flat surface, shifting
the shift lever to the P (Park) posi-
tion for automatic transaxle/
Ecoshift dual clutch transmission
and to the 1st (First) gear or R
(Reverse) for manual transaxle, and
setting the parking brake.
OFS040021OFS045022L