audio HYUNDAI VERACRUZ 2008 Owner's Manual
[x] Cancel search | Manufacturer: HYUNDAI, Model Year: 2008, Model line: VERACRUZ, Model: HYUNDAI VERACRUZ 2008Pages: 440, PDF Size: 8.08 MB
Page 234 of 440
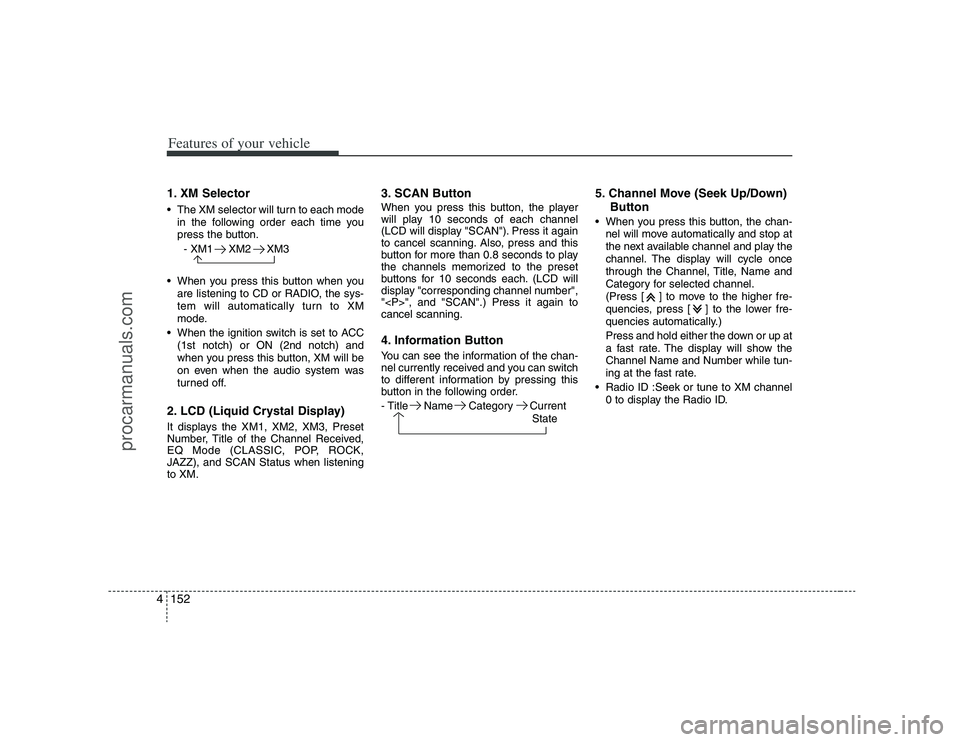
Features of your vehicle152 41. XM Selector The XM selector will turn to each mode
in the following order each time you
press the button.
- XM1 XM2 XM3
When you press this button when you
are listening to CD or RADIO, the sys-
tem will automatically turn to XM
mode.
When the ignition switch is set to ACC
(1st notch) or ON (2nd notch) and
when you press this button, XM will be
on even when the audio system was
turned off.2. LCD (Liquid Crystal Display)It displays the XM1, XM2, XM3, Preset
Number, Title of the Channel Received,
EQ Mode (CLASSIC, POP, ROCK,
JAZZ), and SCAN Status when listening
to XM.
3. SCAN ButtonWhen you press this button, the player
will play 10 seconds of each channel
(LCD will display "SCAN"). Press it again
to cancel scanning. Also, press and this
button for more than 0.8 seconds to play
the channels memorized to the preset
buttons for 10 seconds each. (LCD will
display "corresponding channel number",
"
", and "SCAN".) Press it again to
cancel scanning.4. Information ButtonYou can see the information of the chan-
nel currently received and you can switch
to different information by pressing this
button in the following order.
- Title Name Category Current
State
5. Channel Move (Seek Up/Down)
Button When you press this button, the chan-
nel will move automatically and stop at
the next available channel and play the
channel. The display will cycle once
through the Channel, Title, Name and
Category for selected channel.
(Press [ ] to move to the higher fre-
quencies, press [ ] to the lower fre-
quencies automatically.)
Press and hold either the down or up at
a fast rate. The display will show the
Channel Name and Number while tun-
ing at the fast rate.
Radio ID :Seek or tune to XM channel
0 to display the Radio ID.
procarmanuals.com
Page 236 of 440
Features of your vehicle154 4
EN M466NRSE
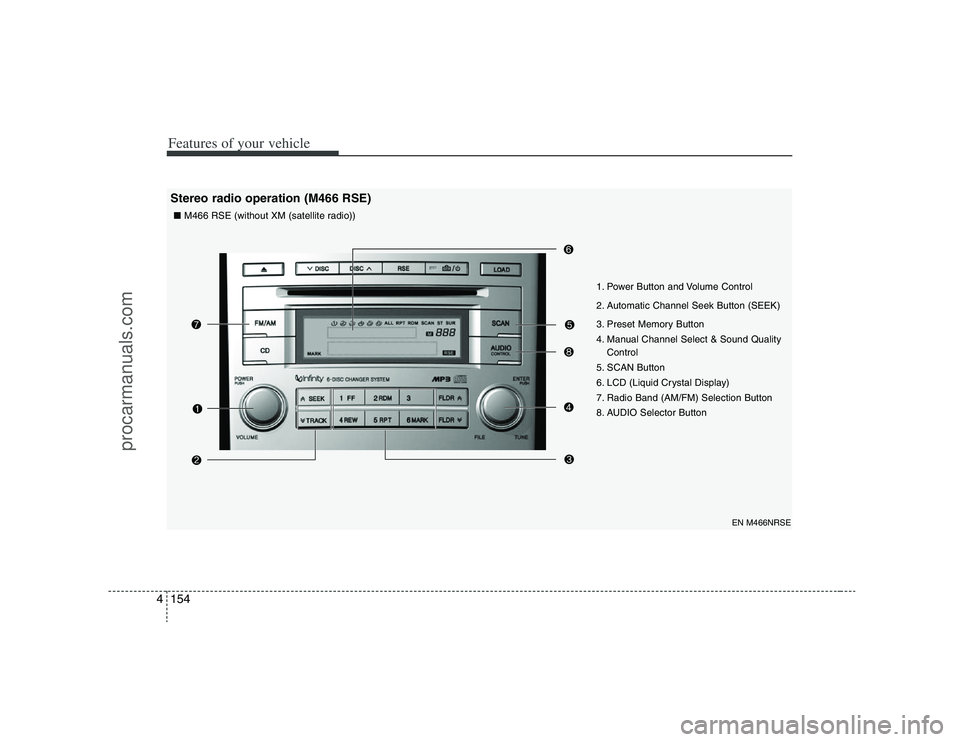
1. Power Button and Volume Control
2. Automatic Channel Seek Button (SEEK)
3. Preset Memory Button
4. Manual Channel Select & Sound Quality
Control
5. SCAN Button
6. LCD (Liquid Crystal Display)
7. Radio Band (AM/FM) Selection Button
8. AUDIO Selector Button
Stereo radio operation (M466 RSE)■ M466 RSE (without XM (satellite radio))
procarmanuals.com
Page 238 of 440
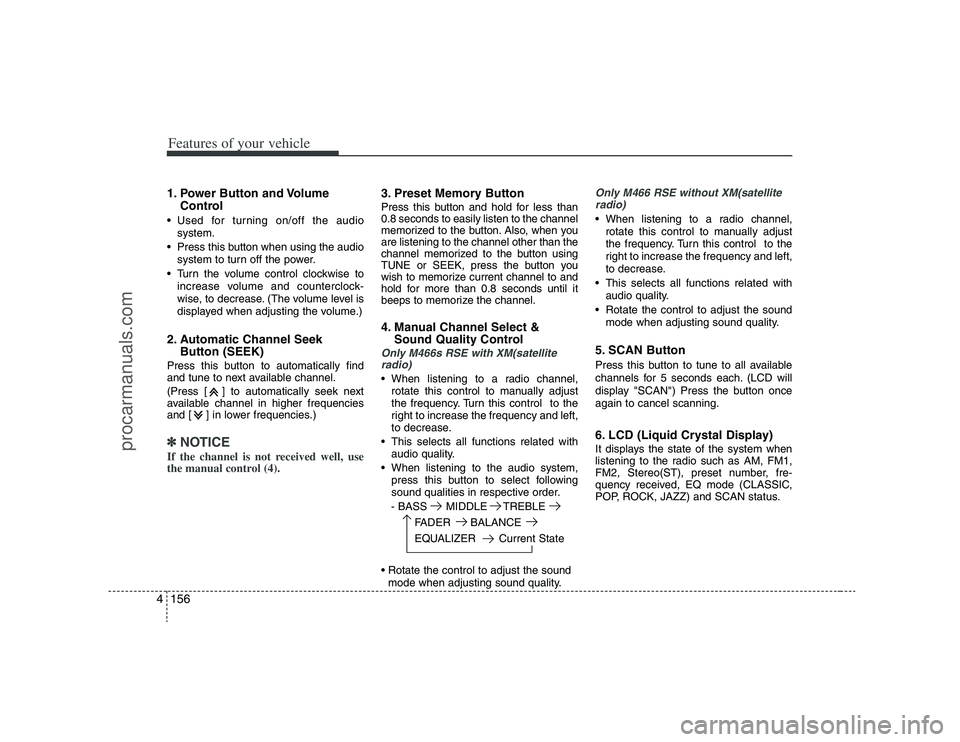
Features of your vehicle156 41. Power Button and Volume
Control Used for turning on/off the audio
system.
Press this button when using the audio
system to turn off the power.
Turn the volume control clockwise to
increase volume and counterclock-
wise, to decrease. (The volume level is
displayed when adjusting the volume.)2. Automatic Channel Seek
Button (SEEK)Press this button to automatically find
and tune to next available channel.
(Press [ ] to automatically seek next
available channel in higher frequencies
and [ ] in lower frequencies.)✽ ✽
NOTICEIf the channel is not received well, use
the manual control (4).
3. Preset Memory ButtonPress this button and hold for less than
0.8 seconds to easily listen to the channel
memorized to the button. Also, when you
are listening to the channel other than the
channel memorized to the button using
TUNE or SEEK, press the button you
wish to memorize current channel to and
hold for more than 0.8 seconds until it
beeps to memorize the channel.4. Manual Channel Select &
Sound Quality ControlOnly M466s RSE with XM(satellite
radio) When listening to a radio channel,
rotate this control to manually adjust
the frequency. Turn this control to the
right to increase the frequency and left,
to decrease.
This selects all functions related with
audio quality.
When listening to the audio system,
press this button to select following
sound qualities in respective order.
- BASS MIDDLE TREBLE
FADER BALANCE
EQUALIZER Current State
mode when adjusting sound quality.
Only M466 RSE without XM(satellite
radio) When listening to a radio channel,
rotate this control to manually adjust
the frequency. Turn this control to the
right to increase the frequency and left,
to decrease.
This selects all functions related with
audio quality.
Rotate the control to adjust the sound
mode when adjusting sound quality.5. SCAN ButtonPress this button to tune to all available
channels for 5 seconds each. (LCD will
display "SCAN") Press the button once
again to cancel scanning.6. LCD (Liquid Crystal Display)It displays the state of the system when
listening to the radio such as AM, FM1,
FM2, Stereo(ST), preset number, fre-
quency received, EQ mode (CLASSIC,
POP, ROCK, JAZZ) and SCAN status.
procarmanuals.com
Page 239 of 440
4157
Features of your vehicle
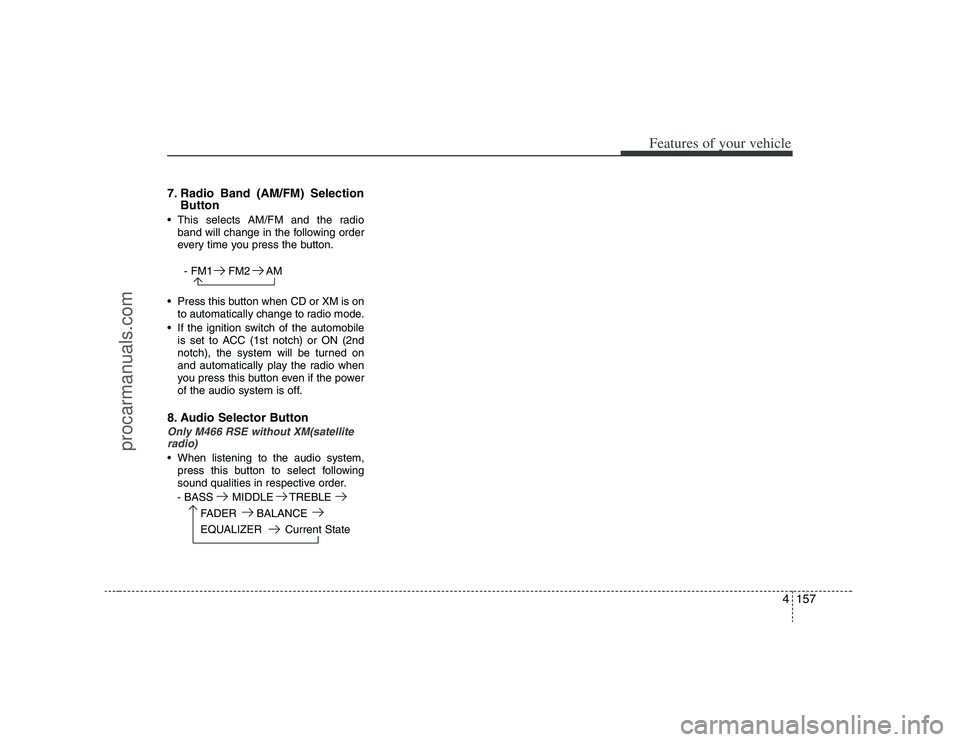
7. Radio Band (AM/FM) Selection
Button This selects AM/FM and the radio
band will change in the following order
every time you press the button.
- FM1 FM2 AM
Press this button when CD or XM is on
to automatically change to radio mode.
If the ignition switch of the automobile
is set to ACC (1st notch) or ON (2nd
notch), the system will be turned on
and automatically play the radio when
you press this button even if the power
of the audio system is off.8. Audio Selector ButtonOnly M466 RSE without XM(satellite
radio) When listening to the audio system,
press this button to select following
sound qualities in respective order.
- BASS MIDDLE TREBLE
FADER BALANCE
EQUALIZER Current State
procarmanuals.com
Page 242 of 440
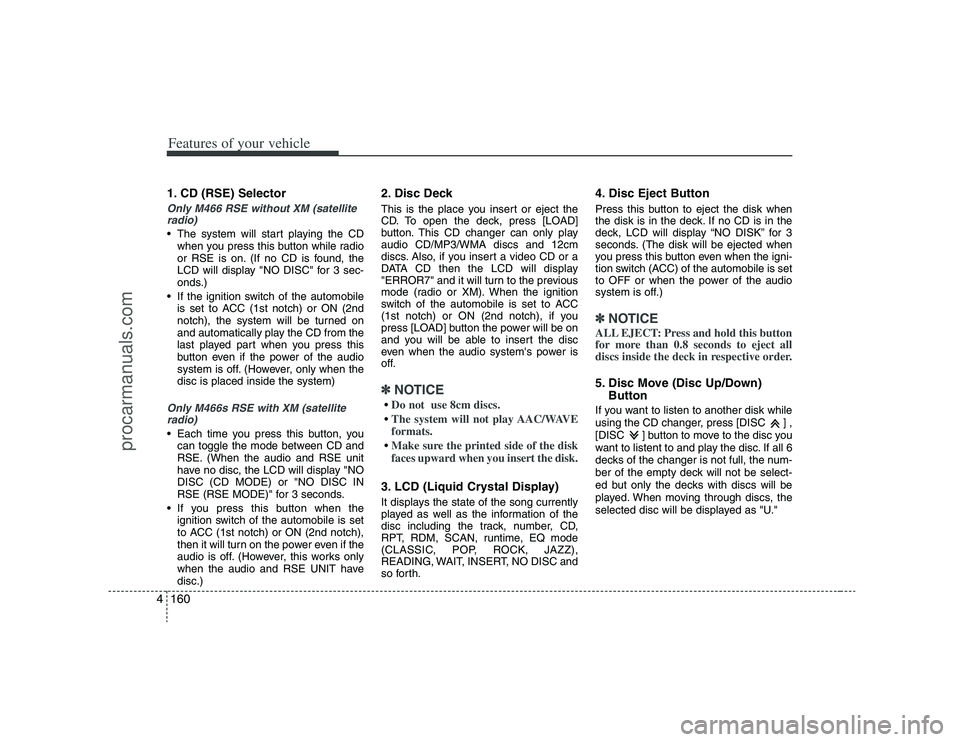
Features of your vehicle160 41. CD (RSE) SelectorOnly M466 RSE without XM (satellite
radio) The system will start playing the CD
when you press this button while radio
or RSE is on. (If no CD is found, the
LCD will display "NO DISC" for 3 sec-
onds.)
If the ignition switch of the automobile
is set to ACC (1st notch) or ON (2nd
notch), the system will be turned on
and automatically play the CD from the
last played part when you press this
button even if the power of the audio
system is off. (However, only when the
disc is placed inside the system)Only M466s RSE with XM (satellite
radio) Each time you press this button, you
can toggle the mode between CD and
RSE. (When the audio and RSE unit
have no disc, the LCD will display "NO
DISC (CD MODE) or "NO DISC IN
RSE (RSE MODE)" for 3 seconds.
If you press this button when the
ignition switch of the automobile is set
to ACC (1st notch) or ON (2nd notch),
then it will turn on the power even if the
audio is off. (However, this works only
when the audio and RSE UNIT have
disc.)
2. Disc DeckThis is the place you insert or eject the
CD. To open the deck, press [LOAD]
button. This CD changer can only play
audio CD/MP3/WMA discs and 12cm
discs. Also, if you insert a video CD or a
DATA CD then the LCD will display
"ERROR7" and it will turn to the previous
mode (radio or XM). When the ignition
switch of the automobile is set to ACC
(1st notch) or ON (2nd notch), if you
press [LOAD] button the power will be on
and you will be able to insert the disc
even when the audio system's power is
off.✽ ✽
NOTICEDo not use 8cm discs.The system will not play AAC/WAVE
formats.Make sure the printed side of the disk
faces upward when you insert the disk.3. LCD (Liquid Crystal Display)It displays the state of the song currently
played as well as the information of the
disc including the track, number, CD,
RPT, RDM, SCAN, runtime, EQ mode
(CLASSIC, POP, ROCK, JAZZ),
READING, WAIT, INSERT, NO DISC and
so forth.
4. Disc Eject ButtonPress this button to eject the disk when
the disk is in the deck. If no CD is in the
deck, LCD will display “NO DISK” for 3
seconds. (The disk will be ejected when
you press this button even when the igni-
tion switch (ACC) of the automobile is set
to OFF or when the power of the audio
system is off.)✽ ✽
NOTICEALL EJECT: Press and hold this button
for more than 0.8 seconds to eject all
discs inside the deck in respective order.5. Disc Move (Disc Up/Down)
ButtonIf you want to listen to another disk while
using the CD changer, press [DISC ] ,
[DISC ] button to move to the disc you
want to listent to and play the disc. If all 6
decks of the changer is not full, the num-
ber of the empty deck will not be select-
ed but only the decks with discs will be
played. When moving through discs, the
selected disc will be displayed as "U."
procarmanuals.com
Page 244 of 440
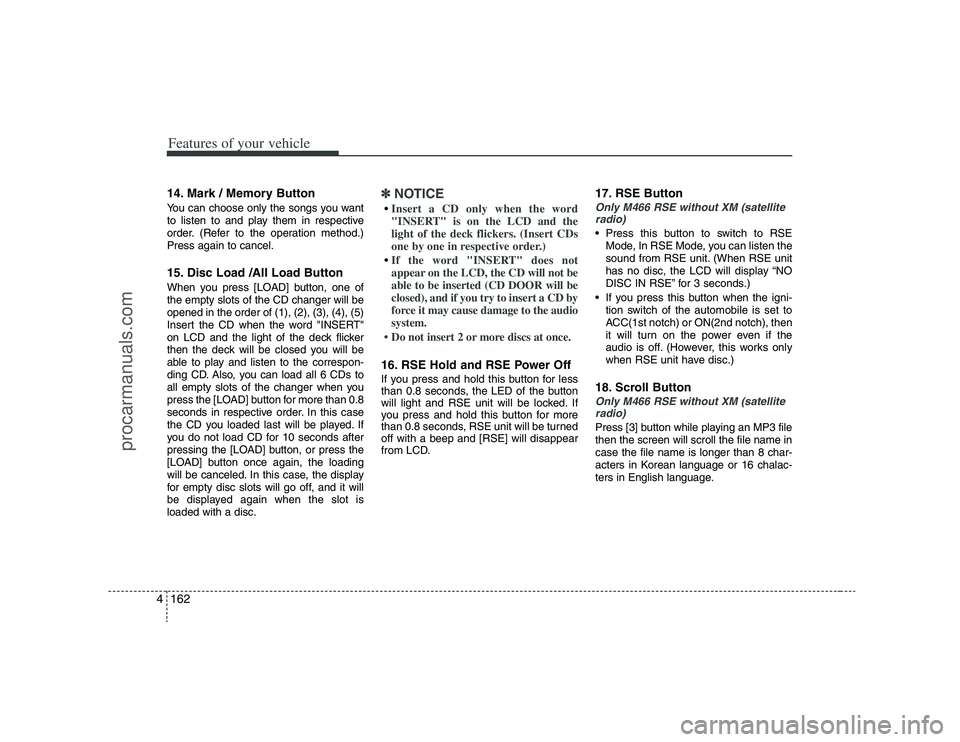
Features of your vehicle162 414. Mark / Memory ButtonYou can choose only the songs you want
to listen to and play them in respective
order. (Refer to the operation method.)
Press again to cancel.15. Disc Load /All Load ButtonWhen you press [LOAD] button, one of
the empty slots of the CD changer will be
opened in the order of (1), (2), (3), (4), (5)
Insert the CD when the word "INSERT"
on LCD and the light of the deck flicker
then the deck will be closed you will be
able to play and listen to the correspon-
ding CD. Also, you can load all 6 CDs to
all empty slots of the changer when you
press the [LOAD] button for more than 0.8
seconds in respective order. In this case
the CD you loaded last will be played. If
you do not load CD for 10 seconds after
pressing the [LOAD] button, or press the
[LOAD] button once again, the loading
will be canceled. In this case, the display
for empty disc slots will go off, and it will
be displayed again when the slot is
loaded with a disc.
✽ ✽
NOTICEInsert a CD only when the word
"INSERT" is on the LCD and the
light of the deck flickers. (Insert CDs
one by one in respective order.)If the word "INSERT" does not
appear on the LCD, the CD will not be
able to be inserted (CD DOOR will be
closed), and if you try to insert a CD by
force it may cause damage to the audio
system.
• Do not insert 2 or more discs at once.16. RSE Hold and RSE Power OffIf you press and hold this button for less
than 0.8 seconds, the LED of the button
will light and RSE unit will be locked. If
you press and hold this button for more
than 0.8 seconds, RSE unit will be turned
off with a beep and [RSE] will disappear
from LCD.
17. RSE ButtonOnly M466 RSE without XM (satellite
radio) Press this button to switch to RSE
Mode, In RSE Mode, you can listen the
sound from RSE unit. (When RSE unit
has no disc, the LCD will display “NO
DISC IN RSE” for 3 seconds.)
If you press this button when the igni-
tion switch of the automobile is set to
ACC(1st notch) or ON(2nd notch), then
it will turn on the power even if the
audio is off. (However, this works only
when RSE unit have disc.)18. Scroll ButtonOnly M466 RSE without XM (satellite
radio)Press [3] button while playing an MP3 file
then the screen will scroll the file name in
case the file name is longer than 8 char-
acters in Korean language or 16 chalac-
ters in English language.
procarmanuals.com
Page 246 of 440
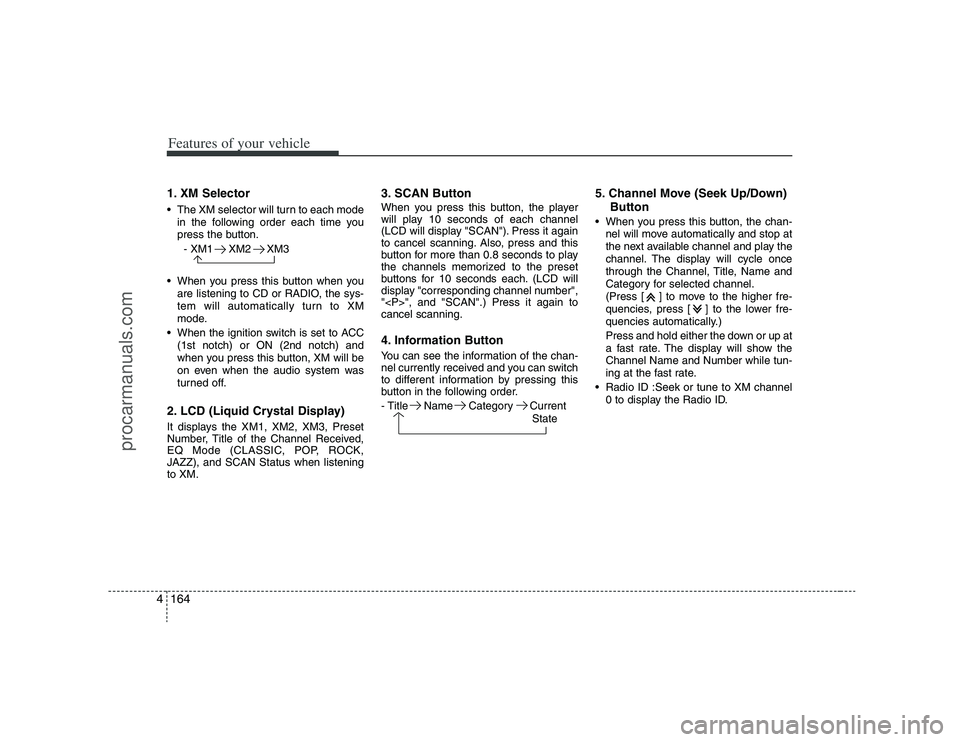
Features of your vehicle164 41. XM Selector The XM selector will turn to each mode
in the following order each time you
press the button.
- XM1 XM2 XM3
When you press this button when you
are listening to CD or RADIO, the sys-
tem will automatically turn to XM
mode.
When the ignition switch is set to ACC
(1st notch) or ON (2nd notch) and
when you press this button, XM will be
on even when the audio system was
turned off.2. LCD (Liquid Crystal Display)It displays the XM1, XM2, XM3, Preset
Number, Title of the Channel Received,
EQ Mode (CLASSIC, POP, ROCK,
JAZZ), and SCAN Status when listening
to XM.
3. SCAN ButtonWhen you press this button, the player
will play 10 seconds of each channel
(LCD will display "SCAN"). Press it again
to cancel scanning. Also, press and this
button for more than 0.8 seconds to play
the channels memorized to the preset
buttons for 10 seconds each. (LCD will
display "corresponding channel number",
"
", and "SCAN".) Press it again to
cancel scanning.4. Information ButtonYou can see the information of the chan-
nel currently received and you can switch
to different information by pressing this
button in the following order.
- Title Name Category Current
State
5. Channel Move (Seek Up/Down)
Button When you press this button, the chan-
nel will move automatically and stop at
the next available channel and play the
channel. The display will cycle once
through the Channel, Title, Name and
Category for selected channel.
(Press [ ] to move to the higher fre-
quencies, press [ ] to the lower fre-
quencies automatically.)
Press and hold either the down or up at
a fast rate. The display will show the
Channel Name and Number while tun-
ing at the fast rate.
Radio ID :Seek or tune to XM channel
0 to display the Radio ID.
procarmanuals.com
Page 249 of 440
4167
Features of your vehicle
✽ ✽
NOTICEThe RSE requires a few seconds of set
up time after the ignition switch is
turned ON or to ACC mode.Your RSE system is already set up and
ready for use, and can be turned on by
pushing the POWER/VOLUMEknob on
the RSE control panel or the POWER
ON/OFFbutton on the remote
controller. The vehicle's ignition must be
turned on or in accessory power mode.
The RSE system can also be turned OFF
by the Audio Unit.
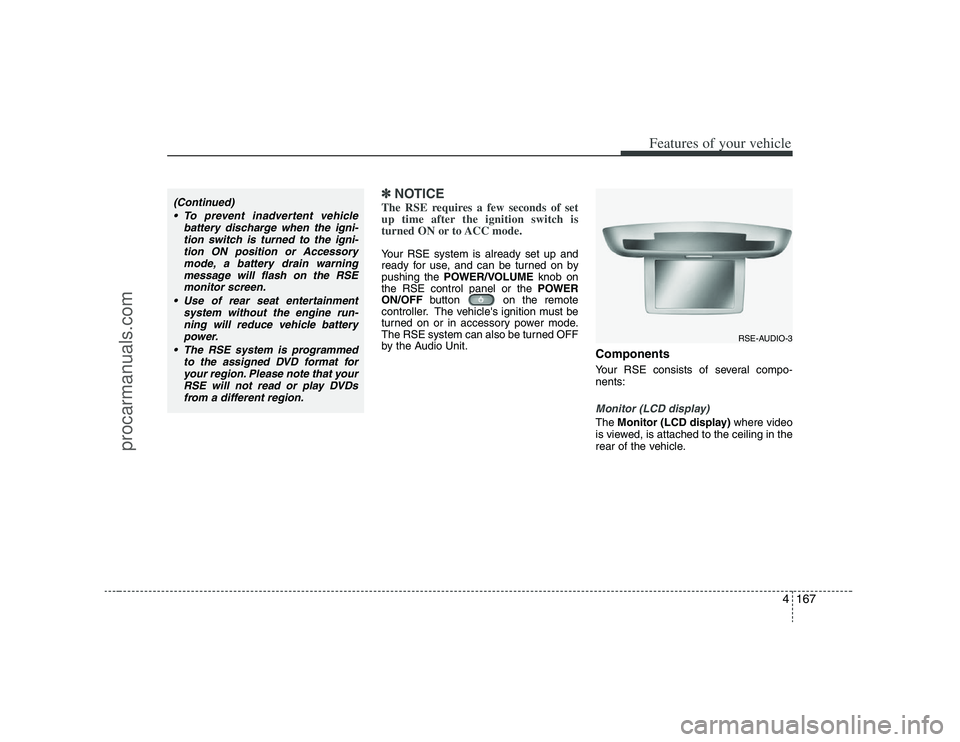
ComponentsYour RSE consists of several compo-
nents:Monitor (LCD display)The Monitor (LCD display)where video
is viewed, is attached to the ceiling in the
rear of the vehicle.
(Continued)
To prevent inadvertent vehicle
battery discharge when the igni-
tion switch is turned to the igni-
tion ON position or Accessory
mode, a battery drain warning
message will flash on the RSE
monitor screen.
Use of rear seat entertainment
system without the engine run-
ning will reduce vehicle battery
power.
The RSE system is programmed
to the assigned DVD format for
your region. Please note that your
RSE will not read or play DVDs
from a different region.
RSE-AUDIO-3
procarmanuals.com
Page 250 of 440
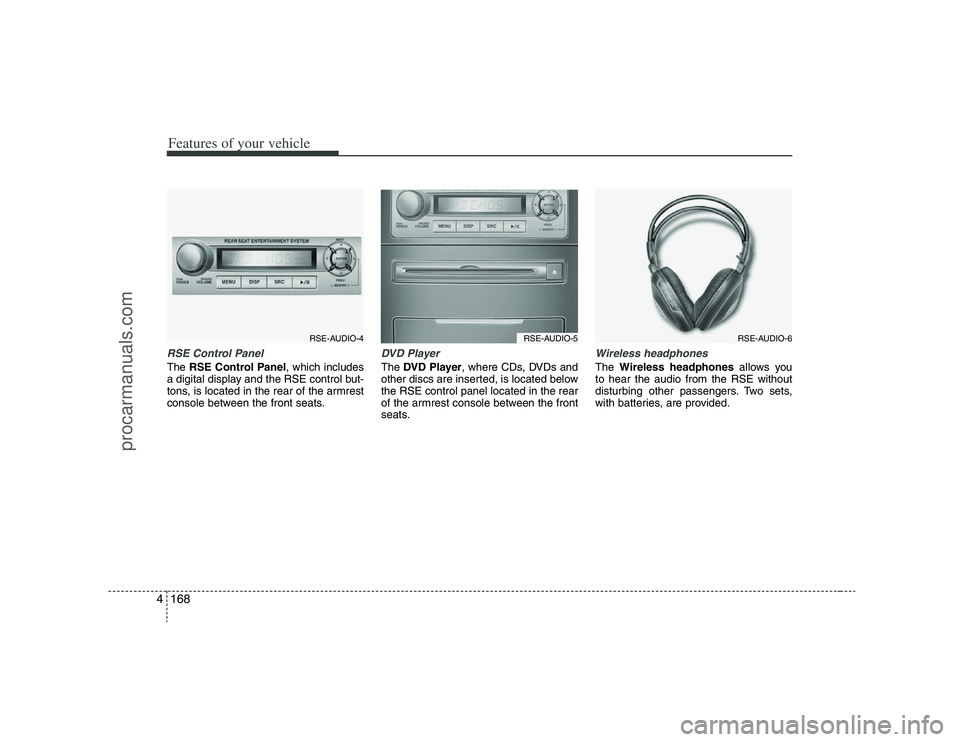
Features of your vehicle168 4RSE Control PanelThe RSE Control Panel, which includes
a digital display and the RSE control but-
tons, is located in the rear of the armrest
console between the front seats.
DVD PlayerThe DVD Player, where CDs, DVDs and
other discs are inserted, is located below
the RSE control panel located in the rear
of the armrest console between the front
seats.
Wireless headphonesThe Wireless headphonesallows you
to hear the audio from the RSE without
disturbing other passengers. Two sets,
with batteries, are provided.
RSE-AUDIO-4
RSE-AUDIO-5
RSE-AUDIO-6
procarmanuals.com
Page 251 of 440
4169
Features of your vehicle
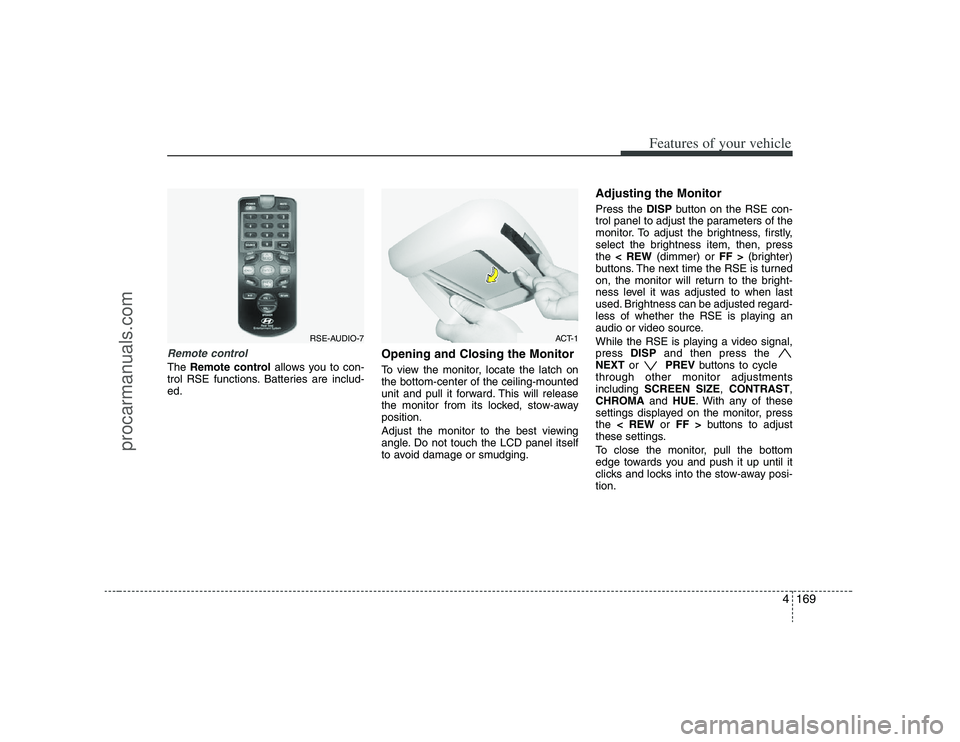
Remote controlThe Remote controlallows you to con-
trol RSE functions. Batteries are includ-
ed.
Opening and Closing the MonitorTo view the monitor, locate the latch on
the bottom-center of the ceiling-mounted
unit and pull it forward. This will release
the monitor from its locked, stow-away
position.
Adjust the monitor to the best viewing
angle. Do not touch the LCD panel itself
to avoid damage or smudging.
Adjusting the MonitorPress the DISPbutton on the RSE con-
trol panel to adjust the parameters of the
monitor. To adjust the brightness, firstly,
select the brightness item, then, press
the < REW(dimmer) or FF >(brighter)
buttons. The next time the RSE is turned
on, the monitor will return to the bright-
ness level it was adjusted to when last
used. Brightness can be adjusted regard-
less of whether the RSE is playing an
audio or video source.
While the RSE is playing a video signal,
press DISPand then press the
NEXTor PREVbuttons to cycle
through other monitor adjustments
including SCREEN SIZE,CONTRAST,
CHROMAand HUE. With any of these
settings displayed on the monitor, press
the < REWor FF >buttons to adjust
these settings.
To close the monitor, pull the bottom
edge towards you and push it up until it
clicks and locks into the stow-away posi-
tion.
RSE-AUDIO-7
ACT-1
procarmanuals.com