AWD HYUNDAI VERACRUZ 2008 Owners Manual
[x] Cancel search | Manufacturer: HYUNDAI, Model Year: 2008, Model line: VERACRUZ, Model: HYUNDAI VERACRUZ 2008Pages: 440, PDF Size: 8.08 MB
Page 16 of 440
17
Introduction
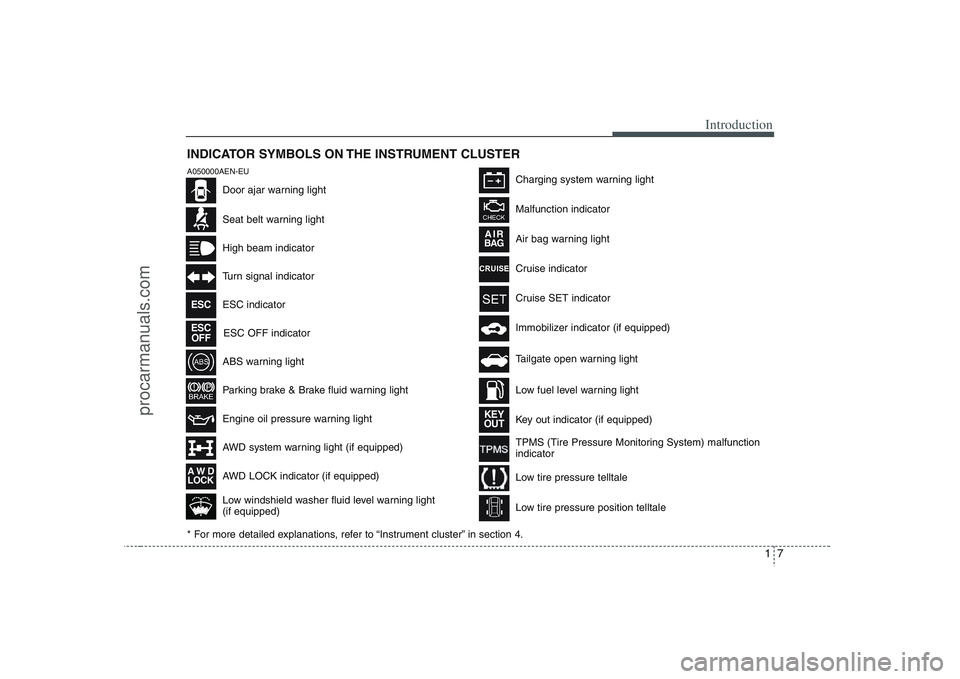
INDICATOR SYMBOLS ON THE INSTRUMENT CLUSTER
Seat belt warning lightHigh beam indicatorTurn signal indicatorABS warning lightParking brake & Brake fluid warning lightEngine oil pressure warning lightAWD system warning light (if equipped)
AWD LOCK indicator (if equipped) ESC indicator
ESC OFF indicator
Malfunction indicator
Air bag warning lightCruise indicator Cruise SET indicatorImmobilizer indicator (if equipped) Tailgate open warning light Low fuel level warning light
* For more detailed explanations, refer to “Instrument cluster” in section 4.Charging system warning light
Low windshield washer fluid level warning light
(if equipped)
A050000AEN-EU
Door ajar warning light
Key out indicator (if equipped)
KEY
OUT
AW D
LOCK
AIRBAG
ESCESC
OFF
TPMS (Tire Pressure Monitoring System) malfunction
indicator Low tire pressure telltaleLow tire pressure position telltale
procarmanuals.com
Page 18 of 440
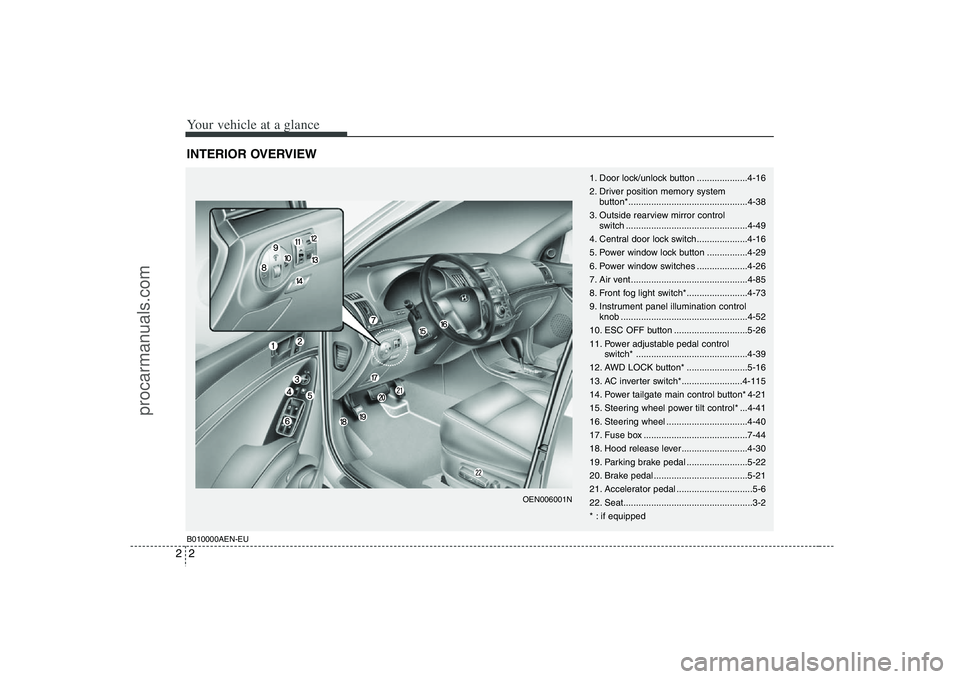
Your vehicle at a glance2 2INTERIOR OVERVIEW
1. Door lock/unlock button ....................4-16
2. Driver position memory system
button*...............................................4-38
3. Outside rearview mirror control
switch ................................................4-49
4. Central door lock switch....................4-16
5. Power window lock button ................4-29
6. Power window switches ....................4-26
7. Air vent ..............................................4-85
8. Front fog light switch*........................4-73
9. Instrument panel illumination control
knob ..................................................4-52
10. ESC OFF button .............................5-26
11. Power adjustable pedal control
switch* ............................................4-39
12. AWD LOCK button* ........................5-16
13. AC inverter switch*........................4-115
14. Power tailgate main control button* 4-21
15. Steering wheel power tilt control* ...4-41
16. Steering wheel ................................4-40
17. Fuse box .........................................7-44
18. Hood release lever ..........................4-30
19. Parking brake pedal ........................5-22
20. Brake pedal .....................................5-21
21. Accelerator pedal ..............................5-6
22. Seat...................................................3-2
* : if equipped
B010000AEN-EUOEN006001N
procarmanuals.com
Page 148 of 440
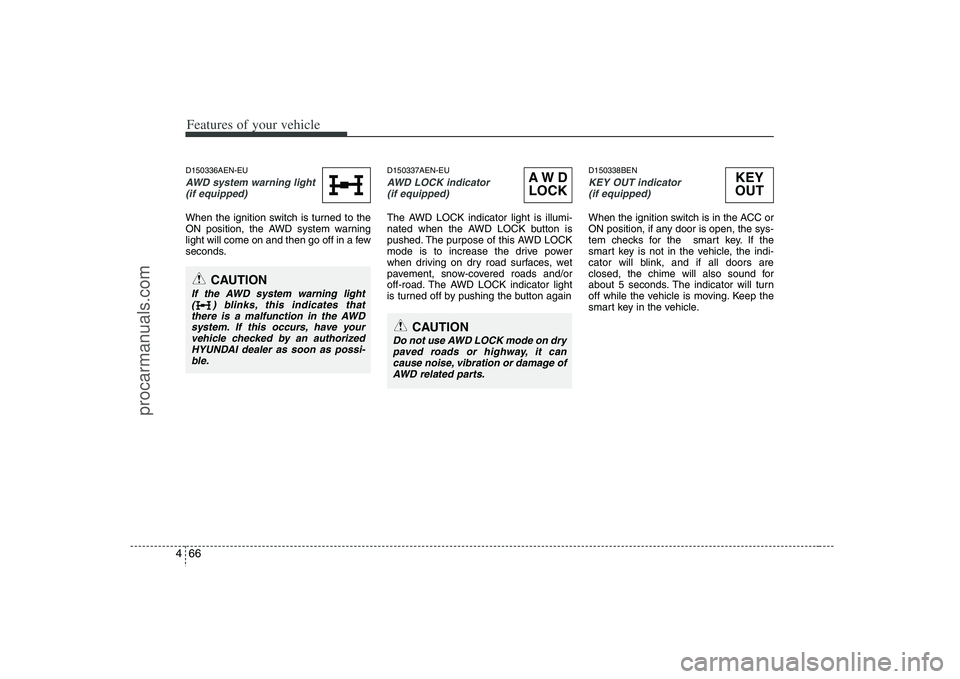
Features of your vehicle66 4D150336AEN-EUAWD system warning light
(if equipped) When the ignition switch is turned to the
ON position, the AWD system warning
light will come on and then go off in a few
seconds.
D150337AEN-EUAWD LOCK indicator
(if equipped) The AWD LOCK indicator light is illumi-
nated when the AWD LOCK button is
pushed. The purpose of this AWD LOCK
mode is to increase the drive power
when driving on dry road surfaces, wet
pavement, snow-covered roads and/or
off-road. The AWD LOCK indicator light
is turned off by pushing the button again
D150338BENKEY OUT indicator
(if equipped)When the ignition switch is in the ACC or
ON position, if any door is open, the sys-
tem checks for the smart key. If the
smart key is not in the vehicle, the indi-
cator will blink, and if all doors are
closed, the chime will also sound for
about 5 seconds. The indicator will turn
off while the vehicle is moving. Keep the
smart key in the vehicle.
CAUTION
If the AWD system warning light
( ) blinks, this indicates that
there is a malfunction in the AWD
system. If this occurs, have your
vehicle checked by an authorized
HYUNDAI dealer as soon as possi-
ble.
KEY
OUT
CAUTION
Do not use AWD LOCK mode on dry
paved roads or highway, it can
cause noise, vibration or damage of
AWD related parts.
AW D
LOCK
procarmanuals.com
Page 272 of 440
5
Before driving / 5-3
Key positions / 5-4
Starting the engine / 5-6
Automatic transaxle / 5-8
All wheel drive (AWD) / 5-14
Brake system / 5-21
Cruise control system / 5-31
Economical operation / 5-35
Special driving conditions / 5-37
Winter driving / 5-42
Trailer towing / 5-46
Vehicle load limit / 5-54
Vehicle weight / 5-58
Driving your vehicle
procarmanuals.com
Page 285 of 440
Driving your vehicle14 5
E060203AUNMoving up a steep grade from a stand-
ing startTo move up a steep grade from a stand-
ing start, depress the brake pedal, shift
the shift lever to D (Drive). Select the
appropriate gear depending on load
weight and steepness of the grade, and
release the parking brake. Depress the
accelerator gradually while releasing the
service brakes.
When accelerating from a stop on a
steep hill, the vehicle may have a ten-
dency to roll backwards. Shifting the
shift lever into 2 (Second Gear) will
help prevent the vehicle from rolling
backwards.
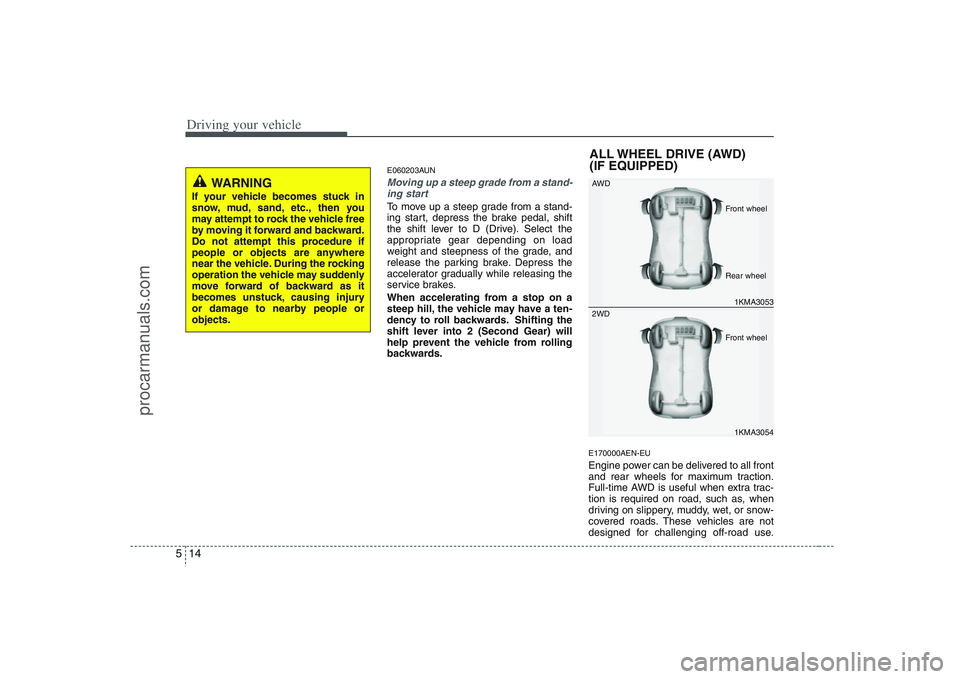
E170000AEN-EUEngine power can be delivered to all front
and rear wheels for maximum traction.
Full-time AWD is useful when extra trac-
tion is required on road, such as, when
driving on slippery, muddy, wet, or snow-
covered roads. These vehicles are not
designed for challenging off-road use.
WARNING
If your vehicle becomes stuck in
snow, mud, sand, etc., then you
may attempt to rock the vehicle free
by moving it forward and backward.
Do not attempt this procedure if
people or objects are anywhere
near the vehicle. During the rocking
operation the vehicle may suddenly
move forward of backward as it
becomes unstuck, causing injury
or damage to nearby people or
objects.
ALL WHEEL DRIVE (AWD)
(IF EQUIPPED)
1KMA3053 AWD1KMA3054
2WDFront wheel
Front wheel Rear wheel
procarmanuals.com
Page 287 of 440
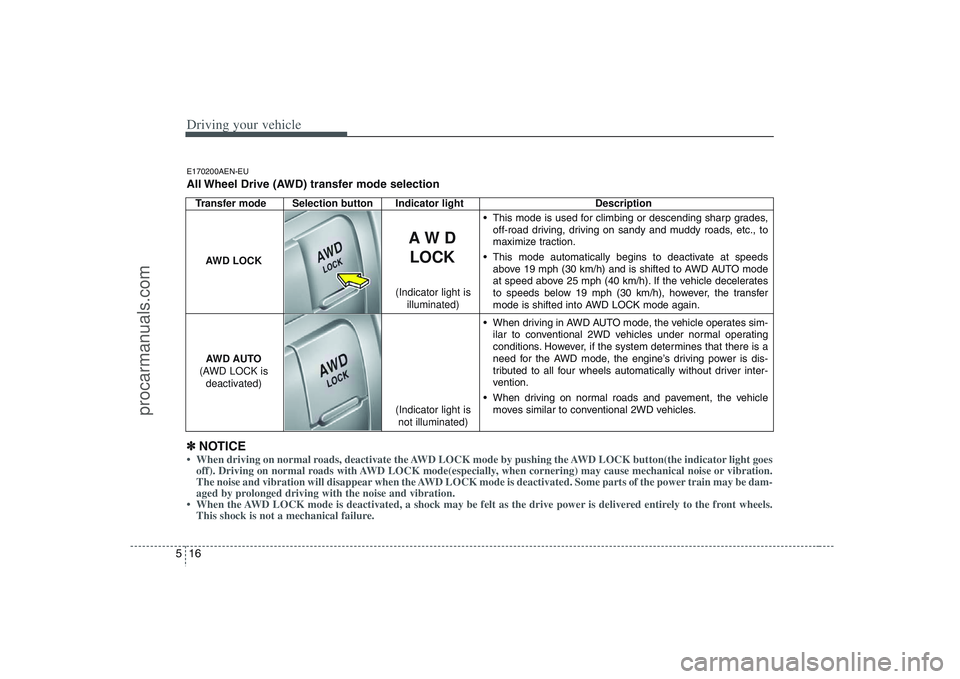
Driving your vehicle16 5Transfer mode Selection button Indicator light Description
This mode is used for climbing or descending sharp grades,
off-road driving, driving on sandy and muddy roads, etc., to
maximize traction.
This mode automatically begins to deactivate at speeds
above 19 mph (30 km/h) and is shifted to AWD AUTO mode
at speed above 25 mph (40 km/h). If the vehicle decelerates
to speeds below 19 mph (30 km/h), however, the transfer
mode is shifted into AWD LOCK mode again.
When driving in AWD AUTO mode, the vehicle operates sim-
ilar to conventional 2WD vehicles under normal operating
conditions. However, if the system determines that there is a
need for the AWD mode, the engine’s driving power is dis-
tributed to all four wheels automatically without driver inter-
vention.
When driving on normal roads and pavement, the vehicle
moves similar to conventional 2WD vehicles.
AW D
LOCK
AWD LOCK
AWD AUTO
(AWD LOCK is
deactivated)
(Indicator light is
not illuminated) (Indicator light is
illuminated)
✽ ✽
NOTICE• When driving on normal roads, deactivate the AWD LOCK mode by pushing the AWD LOCK button(the indicator light goes
off). Driving on normal roads with AWD LOCK mode(especially, when cornering) may cause mechanical noise or vibration.
The noise and vibration will disappear when the AWD LOCK mode is deactivated. Some parts of the power train may be dam-
aged by prolonged driving with the noise and vibration.
• When the AWD LOCK mode is deactivated, a shock may be felt as the drive power is delivered entirely to the front wheels.
This shock is not a mechanical failure.E170200AEN-EUAll Wheel Drive (AWD) transfer mode selection
procarmanuals.com
Page 289 of 440
Driving your vehicle18 5 You must consciously take the effort to
learn how to corner in an AWD vehicle.
Do not rely on your experience in con-
ventional 2WD vehicles in choosing
safe cornering speed in AWD mode.
For starters, you must drive more slow-
ly in AWD.
Drive carefully off-road because your
vehicle may be damaged by rocks or
roots of trees. Become familiar with the
off-road conditions where you are
going to drive before you begin driving.
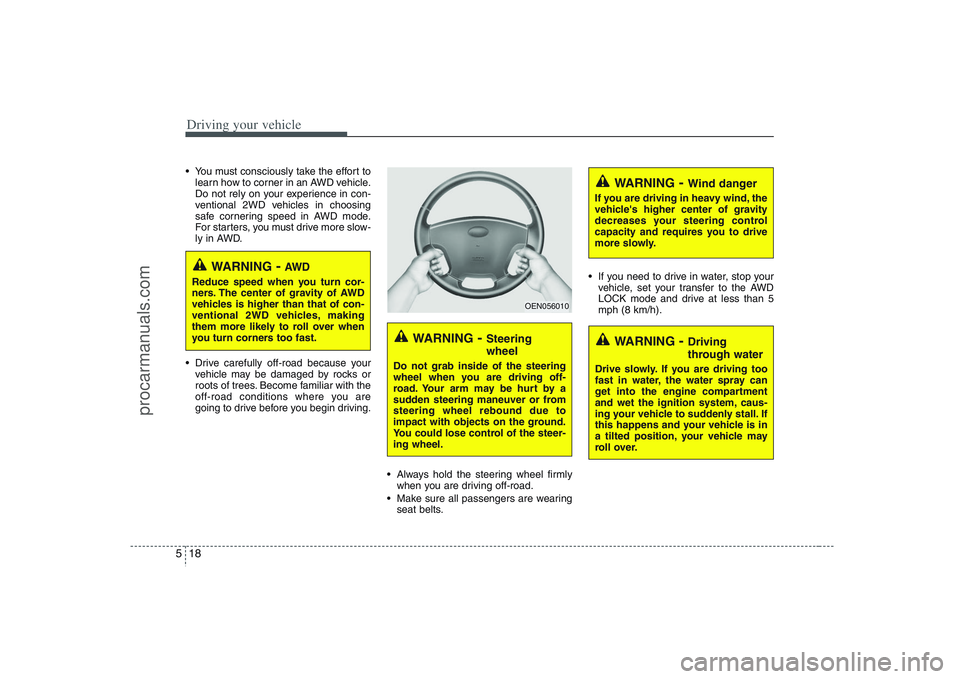
Always hold the steering wheel firmly
when you are driving off-road.
Make sure all passengers are wearing
seat belts. If you need to drive in water, stop your
vehicle, set your transfer to the AWD
LOCK mode and drive at less than 5
mph (8 km/h).
WARNING
- AW D
Reduce speed when you turn cor-
ners. The center of gravity of AWD
vehicles is higher than that of con-
ventional 2WD vehicles, making
them more likely to roll over when
you turn corners too fast.
WARNING
- Steering
wheel
Do not grab inside of the steering
wheel when you are driving off-
road. Your arm may be hurt by a
sudden steering maneuver or from
steering wheel rebound due to
impact with objects on the ground.
You could lose control of the steer-
ing wheel.
WARNING
- Wind danger
If you are driving in heavy wind, the
vehicle's higher center of gravity
decreases your steering control
capacity and requires you to drive
more slowly.
WARNING
- Driving
through water
Drive slowly. If you are driving too
fast in water, the water spray can
get into the engine compartment
and wet the ignition system, caus-
ing your vehicle to suddenly stall. If
this happens and your vehicle is in
a tilted position, your vehicle may
roll over.
OEN056010
procarmanuals.com
Page 290 of 440
519
Driving your vehicle
✽ ✽
NOTICE• Do not drive in water if the level is
higher than the bottom of the vehicle.
• Check your brake condition once you
are out of mud or water. Press the
brake pedal several times as you move
slowly until you feel normal braking
forces return.
• Shorten your scheduled maintenance
interval if you drive in off-road condi-
tions such as sand, mud or water (see
“Maintenance under severe usage
conditions” in section 7). Always wash
your car thoroughly after off road use,
especially cleaning the under side of
the vehicle.
• Since the driving torque is always
applied to the 4 wheels the perform-
ance of the AWD vehicle is greatly
affected by the condition of the tires.
Be sure to equip the vehicle with four
tires of the same size and type.
• A full time all wheel drive vehicle can-
not be towed by an ordinary tow
truck. Make sure that the vehicle is
placed on a flat bed truck for moving.
WARNING -
AWD driving
Avoid high cornering speed.
Do not make quick steering
wheel movements, such as sharp
lane changes or fast, sharp turns.
The risk of rollover is greatly
increased if you lose control of
your vehicle at high speed.
In a collision, an unbelted person
is significantly more likely to die
compared to a person wearing a
seat belt.
Loss of control often occurs if
two or more wheels drop off the
roadway and the driver over
steers to re-enter the roadway. In
the event your vehicle leaves the
roadway, do not steer sharply.
Instead, slow down before pulling
back into the travel lanes.
CAUTION -
Mud or snow
If one of the front or rear wheels
begins to spin in mud, snow, etc.
the vehicle can sometimes be driv-
en out by depressing the accelera-
tor pedal further; however avoid
running the engine continuously at
high rpm because doing so could
damage the AWD system.
procarmanuals.com
Page 291 of 440
Driving your vehicle20 5E170400AEN E170600AEN-EU
E170700AEN-EU
Full-time AWD vehicles must be tested
on a special four wheel chassis
dynamometer.✽ ✽
NOTICENever engage the parking brake while
performing these tests. An AWD vehicle should not be tested
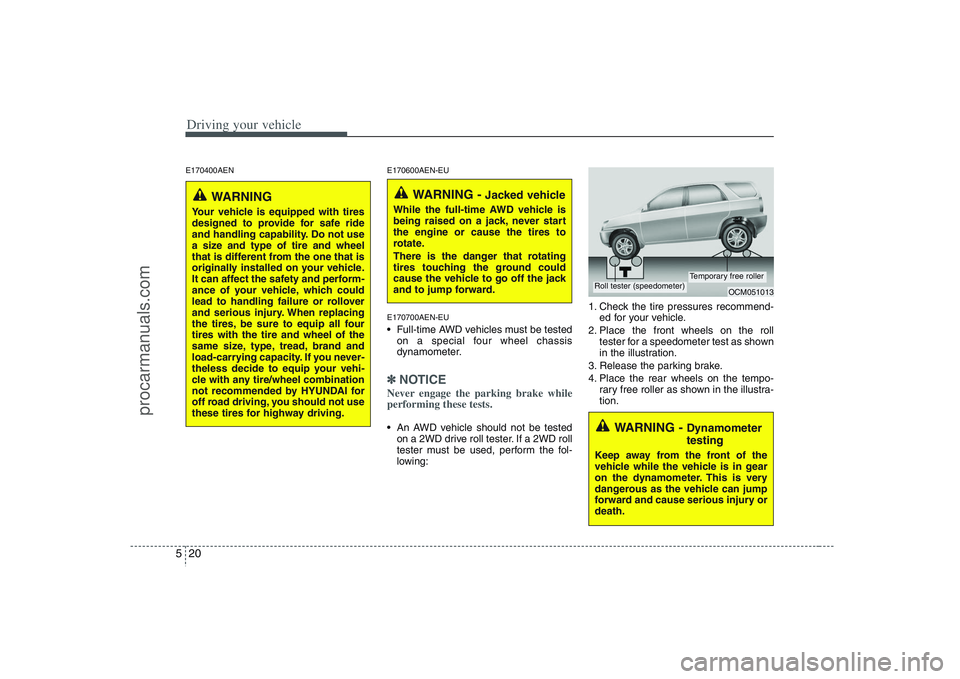
on a 2WD drive roll tester. If a 2WD roll
tester must be used, perform the fol-
lowing:1. Check the tire pressures recommend-
ed for your vehicle.
2. Place the front wheels on the roll
tester for a speedometer test as shown
in the illustration.
3. Release the parking brake.
4. Place the rear wheels on the tempo-
rary free roller as shown in the illustra-
tion.
WARNING -
Dynamometer
testing
Keep away from the front of the
vehicle while the vehicle is in gear
on the dynamometer. This is very
dangerous as the vehicle can jump
forward and cause serious injury or
death.
WARNING -
Jacked vehicle
While the full-time AWD vehicle is
being raised on a jack, never start
the engine or cause the tires to
rotate.
There is the danger that rotating
tires touching the ground could
cause the vehicle to go off the jack
and to jump forward.
OCM051013
Roll tester (speedometer)
Temporary free roller
WARNING
Your vehicle is equipped with tires
designed to provide for safe ride
and handling capability. Do not use
a size and type of tire and wheel
that is different from the one that is
originally installed on your vehicle.
It can affect the safety and perform-
ance of your vehicle, which could
lead to handling failure or rollover
and serious injury. When replacing
the tires, be sure to equip all four
tires with the tire and wheel of the
same size, type, tread, brand and
load-carrying capacity. If you never-
theless decide to equip your vehi-
cle with any tire/wheel combination
not recommended by HYUNDAI for
off road driving, you should not use
these tires for highway driving.
procarmanuals.com
Page 314 of 440
543
Driving your vehicle
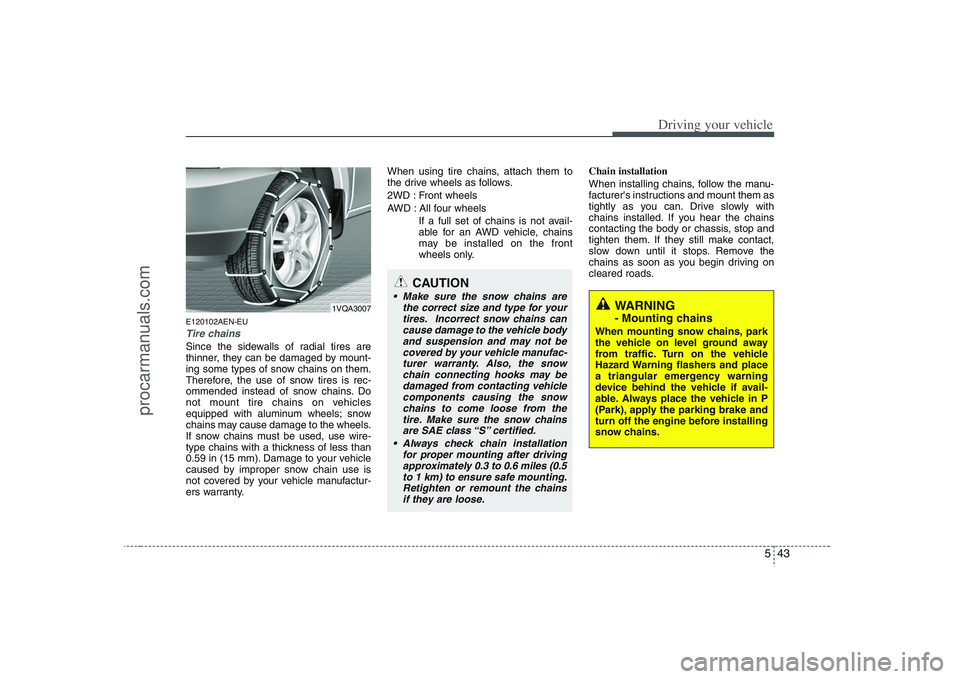
E120102AEN-EUTire chains Since the sidewalls of radial tires are
thinner, they can be damaged by mount-
ing some types of snow chains on them.
Therefore, the use of snow tires is rec-
ommended instead of snow chains. Do
not mount tire chains on vehicles
equipped with aluminum wheels; snow
chains may cause damage to the wheels.
If snow chains must be used, use wire-
type chains with a thickness of less than
0.59 in (15 mm). Damage to your vehicle
caused by improper snow chain use is
not covered by your vehicle manufactur-
ers warranty.When using tire chains, attach them to
the drive wheels as follows.
2WD : Front wheels
AWD : All four wheels
If a full set of chains is not avail-
able for an AWD vehicle, chains
may be installed on the front
wheels only.Chain installation
When installing chains, follow the manu-
facturer's instructions and mount them as
tightly as you can. Drive slowly with
chains installed. If you hear the chains
contacting the body or chassis, stop and
tighten them. If they still make contact,
slow down until it stops. Remove the
chains as soon as you begin driving on
cleared roads.
CAUTION
Make sure the snow chains are
the correct size and type for your
tires. Incorrect snow chains can
cause damage to the vehicle body
and suspension and may not be
covered by your vehicle manufac-
turer warranty. Also, the snow
chain connecting hooks may be
damaged from contacting vehicle
components causing the snow
chains to come loose from the
tire. Make sure the snow chains
are SAE class “S” certified.
Always check chain installation
for proper mounting after driving
approximately 0.3 to 0.6 miles (0.5
to 1 km) to ensure safe mounting.
Retighten or remount the chains
if they are loose.
WARNING - Mounting chains
When mounting snow chains, park
the vehicle on level ground away
from traffic. Turn on the vehicle
Hazard Warning flashers and place
a triangular emergency warning
device behind the vehicle if avail-
able. Always place the vehicle in P
(Park), apply the parking brake and
turn off the engine before installing
snow chains.
1VQA3007
procarmanuals.com