sensor HYUNDAI VERACRUZ 2010 Owner's Manual
[x] Cancel search | Manufacturer: HYUNDAI, Model Year: 2010, Model line: VERACRUZ, Model: HYUNDAI VERACRUZ 2010Pages: 425, PDF Size: 8.65 MB
Page 324 of 425
What to do in an emergency
8 6
✽
✽
NOTICE
If the TPMS and Low Tire Pressure
indicators do not illuminate for 3
seconds when the ignition switch is
turned to the ON position or engine
is running, or if they remain illumi-
nated after coming on for approxi-
mately 3 seconds, take your car to
your nearest authorized HYUNDAI
dealer and have the system checked.
F060100BEN
Low tire pressure tell-
tale
When the tire pressure monitoring
system warning indicators are illumi-
nated, one or more of your tires is
significantly under-inflated.
Immediately reduce your speed,
avoid hard cornering and anticipate
increased stopping distances. You
should stop and check your tires as
soon as possible. Inflate the tires to
the proper pressure as indicated on
the vehicle’s placard or tire inflation
pressure label located on the driver’s
side center pillar outer panel. If you
cannot reach a service station or if
the tire cannot hold the newly added
air, replace the low pressure tire with
the compact spare tire.
Then the TPMS malfunction indicator
may turn on and the Low Tire
Pressure telltale still turn on after
restarting and about 20 minutes of
continuous driving before you have
the low-pressure tire repaired and
replaced on the vehicle.✽ ✽
NOTICE
The compact spare tire is not
equipped with a tire pressure sensor.
procarmanuals.com
Page 325 of 425
69
What to do in an emergency
F060200BEN
TPMS (Tire Pressure
Monitoring System)
malfunction indicator
The TPMS malfunction indicator
comes on and stays on when there is
a problem with the Tire Pressure
Monitoring System. If the system is
able to correctly detect an under-
inflation warning at the same time as
system failure then it will illuminate
both the TPMS malfunction and the
low tire pressure telltale e.g. if Front
Left sensor fails, the TPMS malfunc-
tion indicator illuminates, but if the
Front Right, Rear Left, or Rear Right
tire is under-inflated, the low tire
pressure telltale may illuminate
together with the TPMS malfunction
indicator.
Have the system checked by an
authorized HYUNDAI dealer as soon
as possible to determine the cause
of the problem.WARNING - Low pressure
damage
Significantly low tire pressure
makes the vehicle unstable and
can contribute to loss of vehicle
control and increased braking
distances.
Continued driving on low pres-
sure tires can cause the tires to
overheat and fail.CAUTION
In winter or cold weather, the
low tire pressure telltale may be
illuminated if the tire pressure
was adjusted to the recom-
mended tire inflation pressure
in warm weather. It does not
mean your TPMS is malfunction-
ing because the decreased tem-
perature leads to a proportional
lowering of tire pressure.
When you drive your vehicle
from a warm area to a cold area
or from a cold area to a warm
area, or the outside temperature
is greatly higher or lower, you
should check the tire inflation
pressure and adjust the tires to
the recommended tire inflation
pressure.TPMS
procarmanuals.com
Page 326 of 425
What to do in an emergency
10 6
F060300BEN
Changing a tire with TPMS
If you have a flat tire, the Low Tire
Pressure telltale will turn on. Have
the flat tire repaired by an authorized
HYUNDAI dealer as soon as possi-
ble or replace the flat tire with the
compact spare tire.
Each wheel is equipped with a tire
pressure sensor mounted inside the
tire behind the valve stem. You must
use TPMS specific wheels. It is rec-
ommended that you always have
your tires serviced by an authorized
HYUNDAI dealer.
Even if you replace the low pressure
tire with the compact spare tire, the
Low Tire Pressure telltale will remain
on until the low pressure tire is
repaired and placed on the vehicle.After you replace the low pressure
tire with the compact spare tire, the
TPMS malfunction indicator may be
illuminated after a few minutes
because the compact spare tire does
not have a sensor.
Once the low pressure tire is re-
inflated to the recommended pres-
sure and installed on the vehicle, the
TPMS malfunction indicator and the
low tire pressure telltale will extin-
guish within a few minutes.
If the indicators are not extinguished
after a few minutes, please visit an
authorized HYUNDAI dealer.
You may not be able identify a low
tire by simply looking at it. Always
use a good quality tire pressure
gauge to measure the tire's inflation
pressure. Please note that a tire that
is hot (from being driven) will have a
higher pressure measurement than a
tire that is cold (from sitting station-
ary for at least 3 hours and driven
less than 1 mile (1.6 km) during that
3 hour period).CAUTION
The TPMS malfunction indica-
tor may be illuminated if the
vehicle is moving around elec-
tric power supply cables or
radios transmitter such as at
police stations, government
and public offices, broadcast-
ing stations, military installa-
tions, airports, or transmitting
towers, etc. This can interfere
with normal operation of the
Tire Pressure Monitoring
System (TPMS).
The TPMS malfunction indica-
tor may be illuminated if snow
chains or some electronic
devices, such as notebook
computers, accessory GPS
devices, etc, are used in the
vehicle. This can interfere with
normal operation of the Tire
Pressure Monitoring System
(TPMS).
CAUTION
NEVER use a puncture-repair-
ing agent to repair and/or inflate
a low pressure tire. The tire
sealant can damage the tire
pressure sensor. If used, you
will have to replace the tire pres-
sure sensor.
procarmanuals.com
Page 363 of 425
Maintenance
22 7
Replace the filter according to the
Maintenance Schedule.
If the vehicle is operated in extremely
dusty or sandy areas, replace the ele-
ment more often than the usual recom-
mended intervals. (Refer to
“Maintenance under severe usage condi-
tions” in this section.)
G170100AEN
Filter inspection
The climate control air filter should be
replaced according to the Maintenance
Schedule. If the vehicle is operated in
severely air-polluted cities or on dusty
rough roads for a long period, it should
be inspected more frequently and
replaced earlier. When you replace the
climate control air filter, replace it per-
forming the following procedure, and be
careful to avoid damaging other compo-
nents.
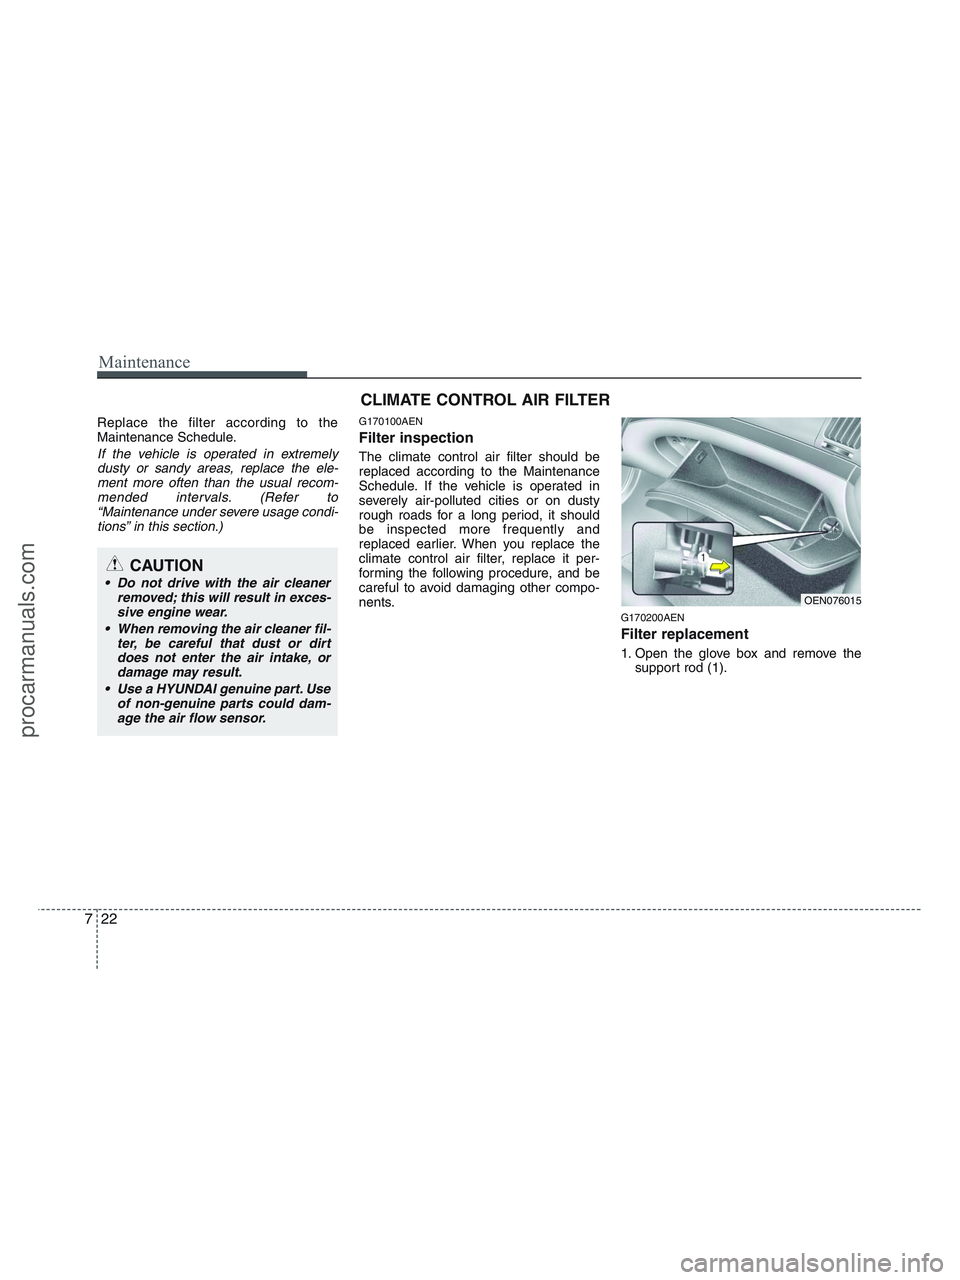
G170200AEN
Filter replacement
1. Open the glove box and remove the
support rod (1).
CAUTION
Do not drive with the air cleaner
removed; this will result in exces-
sive engine wear.
When removing the air cleaner fil-
ter, be careful that dust or dirt
does not enter the air intake, or
damage may result.
Use a HYUNDAI genuine part. Use
of non-genuine parts could dam-
age the air flow sensor.
CLIMATE CONTROL AIR FILTER
OEN076015
procarmanuals.com
Page 389 of 425
Maintenance
48 7
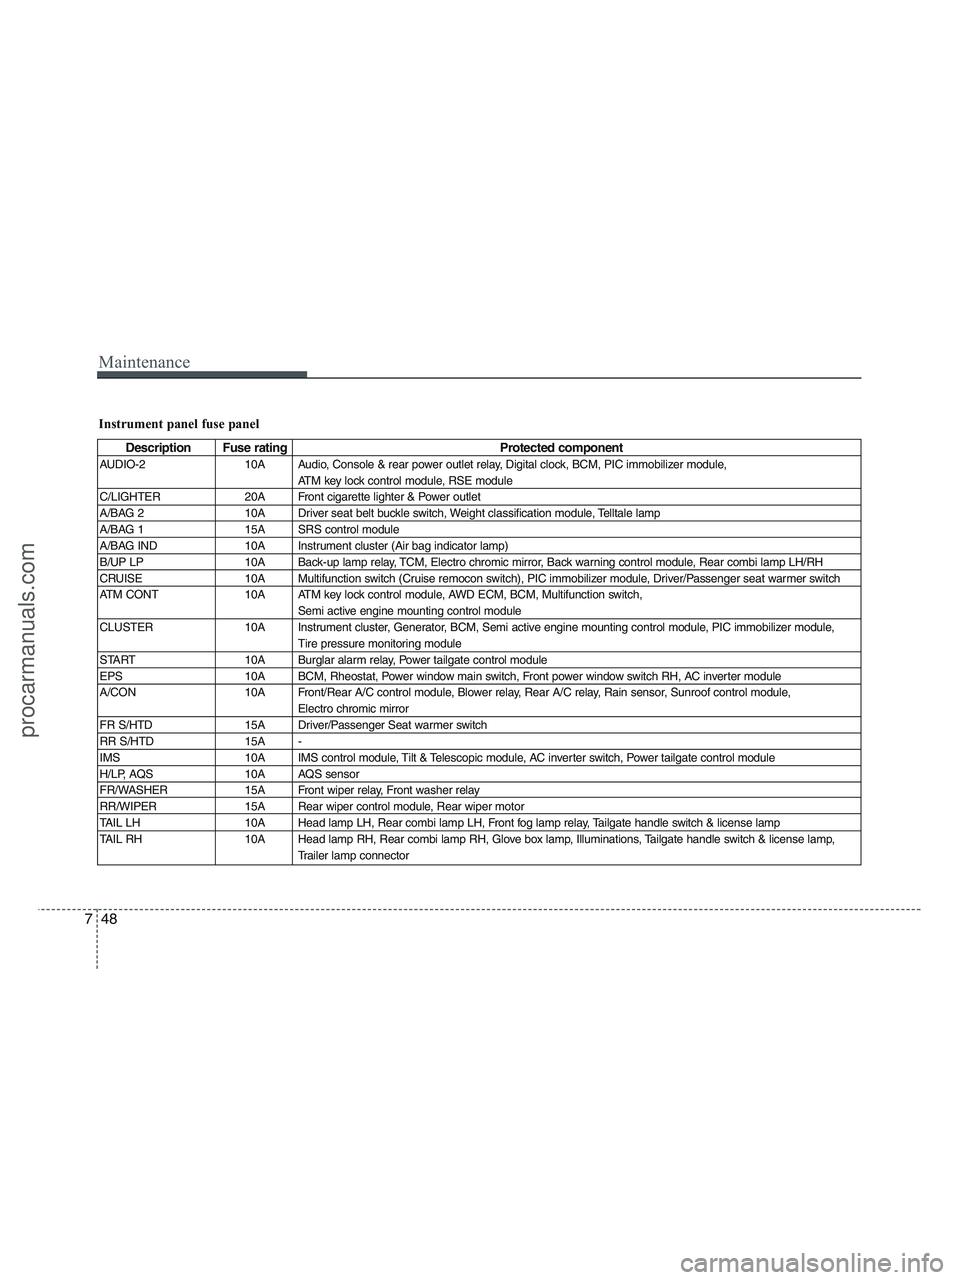
Instrument panel fuse panel
Description Fuse rating Protected component
AUDIO-2 10A Audio, Console & rear power outlet relay, Digital clock, BCM, PIC immobilizer module,
ATM key lock control module, RSE module
C/LIGHTER 20A Front cigarette lighter & Power outlet
A/BAG 2 10A Driver seat belt buckle switch, Weight classification module, Telltale lamp
A/BAG 1 15A SRS control module
A/BAG IND 10A Instrument cluster (Air bag indicator lamp)
B/UP LP 10A Back-up lamp relay, TCM, Electro chromic mirror, Back warning control module, Rear combi lamp LH/RH
CRUISE 10A Multifunction switch (Cruise remocon switch), PIC immobilizer module, Driver/Passenger seat warmer switch
ATM CONT 10A ATM key lock control module, AWD ECM, BCM, Multifunction switch,
Semi active engine mounting control module
CLUSTER 10A Instrument cluster, Generator, BCM, Semi active engine mounting control module, PIC immobilizer module,
Tire pressure monitoring module
START 10A Burglar alarm relay, Power tailgate control module
EPS 10A BCM, Rheostat, Power window main switch, Front power window switch RH, AC inverter module
A/CON 10A Front/Rear A/C control module, Blower relay, Rear A/C relay, Rain sensor, Sunroof control module,
Electro chromic mirror
FR S/HTD 15A Driver/Passenger Seat warmer switch
RR S/HTD 15A -
IMS 10A IMS control module, Tilt & Telescopic module, AC inverter switch, Power tailgate control module
H/LP, AQS 10A AQS sensor
FR/WASHER 15A Front wiper relay, Front washer relay
RR/WIPER 15A Rear wiper control module, Rear wiper motor
TAIL LH 10A Head lamp LH, Rear combi lamp LH, Front fog lamp relay, Tailgate handle switch & license lamp
TAIL RH 10A Head lamp RH, Rear combi lamp RH, Glove box lamp, Illuminations, Tailgate handle switch & license lamp,
Trailer lamp connector
procarmanuals.com
Page 391 of 425
Maintenance
50 7
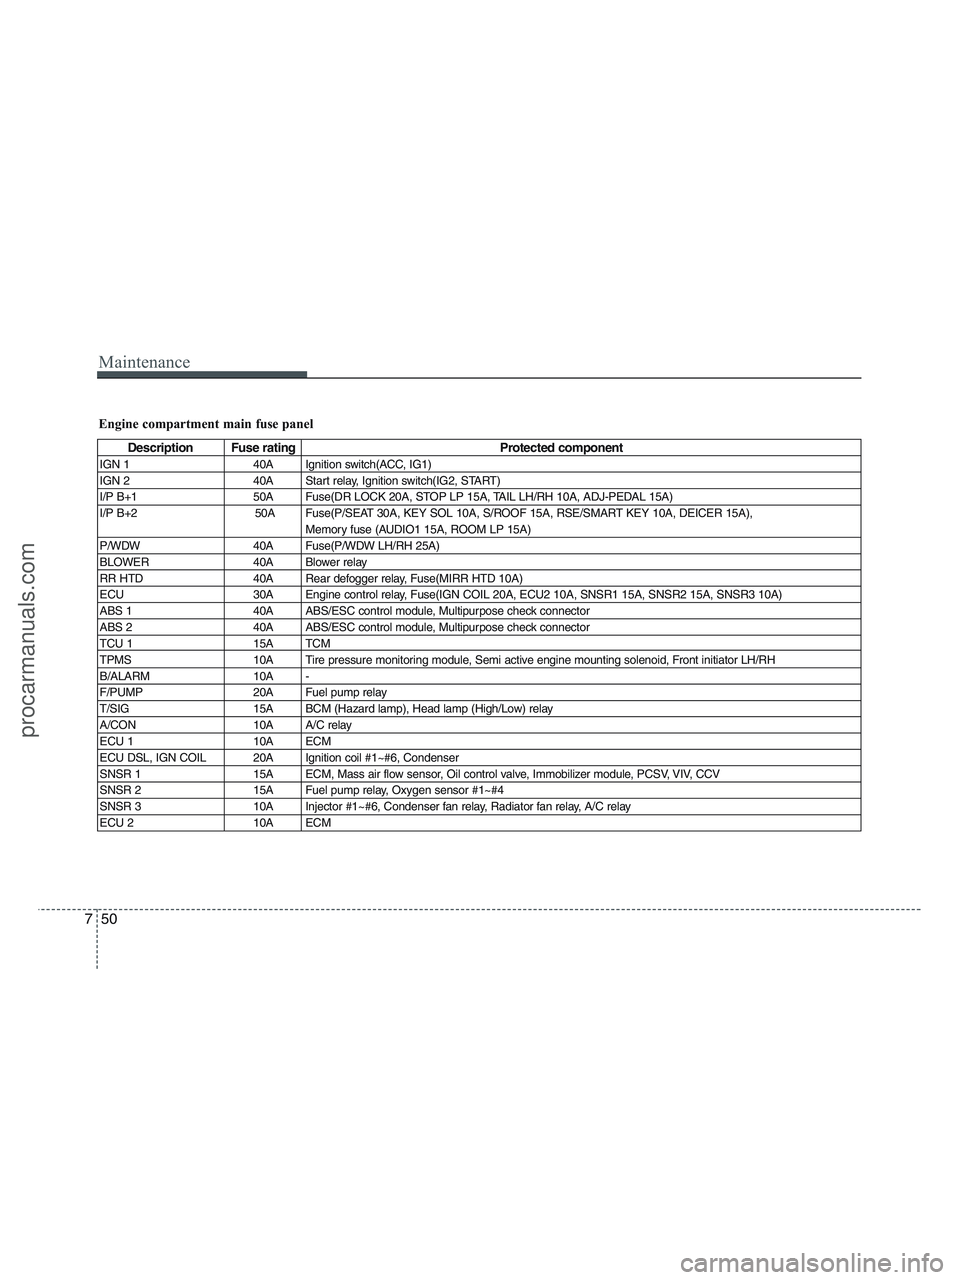
Engine compartment main fuse panel
Description Fuse rating Protected component
IGN 1 40A Ignition switch(ACC, IG1)
IGN 2 40A Start relay, Ignition switch(IG2, START)
I/P B+1 50A Fuse(DR LOCK 20A, STOP LP 15A, TAIL LH/RH 10A, ADJ-PEDAL 15A)
I/P B+2 50A Fuse(P/SEAT 30A, KEY SOL 10A, S/ROOF 15A, RSE/SMART KEY 10A, DEICER 15A),
Memory fuse (AUDIO1 15A, ROOM LP 15A)
P/WDW 40A Fuse(P/WDW LH/RH 25A)
BLOWER 40A Blower relay
RR HTD 40A Rear defogger relay, Fuse(MIRR HTD 10A)
ECU 30A Engine control relay, Fuse(IGN COIL 20A, ECU2 10A, SNSR1 15A, SNSR2 15A, SNSR3 10A)
ABS 1 40A ABS/ESC control module, Multipurpose check connector
ABS 2 40A ABS/ESC control module, Multipurpose check connector
TCU 1 15A TCM
TPMS 10A Tire pressure monitoring module, Semi active engine mounting solenoid, Front initiator LH/RH
B/ALARM 10A -
F/PUMP 20A Fuel pump relay
T/SIG 15A BCM (Hazard lamp), Head lamp (High/Low) relay
A/CON 10A A/C relay
ECU 1 10A ECM
ECU DSL, IGN COIL 20A Ignition coil #1~#6, Condenser
SNSR 1 15A ECM, Mass air flow sensor, Oil control valve, Immobilizer module, PCSV, VIV, CCV
SNSR 2 15A Fuel pump relay, Oxygen sensor #1~#4
SNSR 3 10A Injector #1~#6, Condenser fan relay, Radiator fan relay, A/C relay
ECU 2 10A ECM
procarmanuals.com