tailgate HYUNDAI VERACRUZ 2010 Owner's Manual
[x] Cancel search | Manufacturer: HYUNDAI, Model Year: 2010, Model line: VERACRUZ, Model: HYUNDAI VERACRUZ 2010Pages: 425, PDF Size: 8.65 MB
Page 163 of 425
481
Features of your vehicle
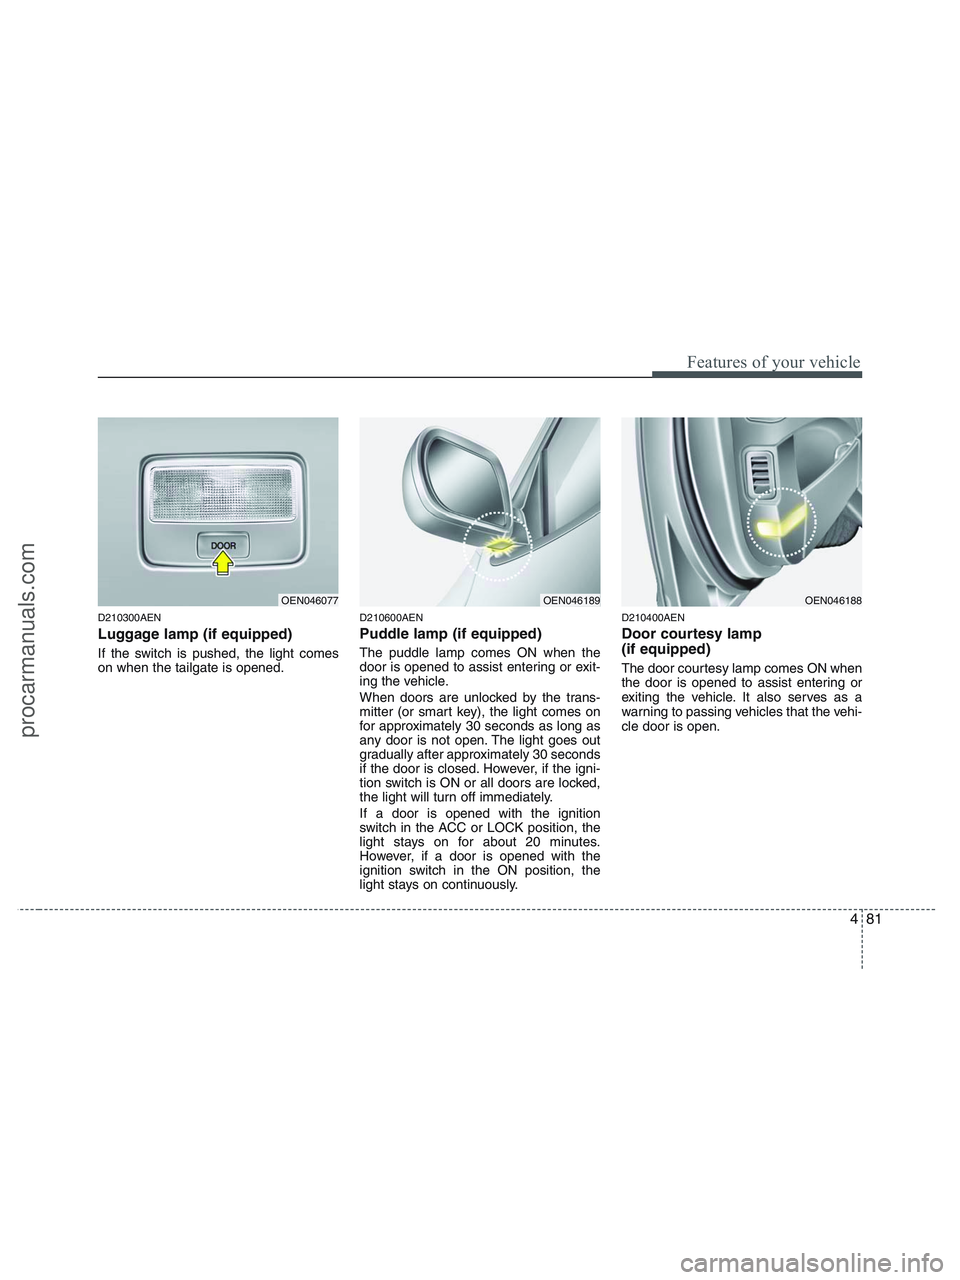
D210300AEN
Luggage lamp (if equipped)
If the switch is pushed, the light comes
on when the tailgate is opened.
D210600AEN
Puddle lamp (if equipped)
The puddle lamp comes ON when the
door is opened to assist entering or exit-
ing the vehicle.
When doors are unlocked by the trans-
mitter (or smart key), the light comes on
for approximately 30 seconds as long as
any door is not open. The light goes out
gradually after approximately 30 seconds
if the door is closed. However, if the igni-
tion switch is ON or all doors are locked,
the light will turn off immediately.
If a door is opened with the ignition
switch in the ACC or LOCK position, the
light stays on for about 20 minutes.
However, if a door is opened with the
ignition switch in the ON position, the
light stays on continuously.
D210400AEN
Door courtesy lamp
(if equipped)
The door courtesy lamp comes ON when
the door is opened to assist entering or
exiting the vehicle. It also serves as a
warning to passing vehicles that the vehi-
cle door is open.
OEN046077OEN046189OEN046188
procarmanuals.com
Page 260 of 425
Driving your vehicle
2 5
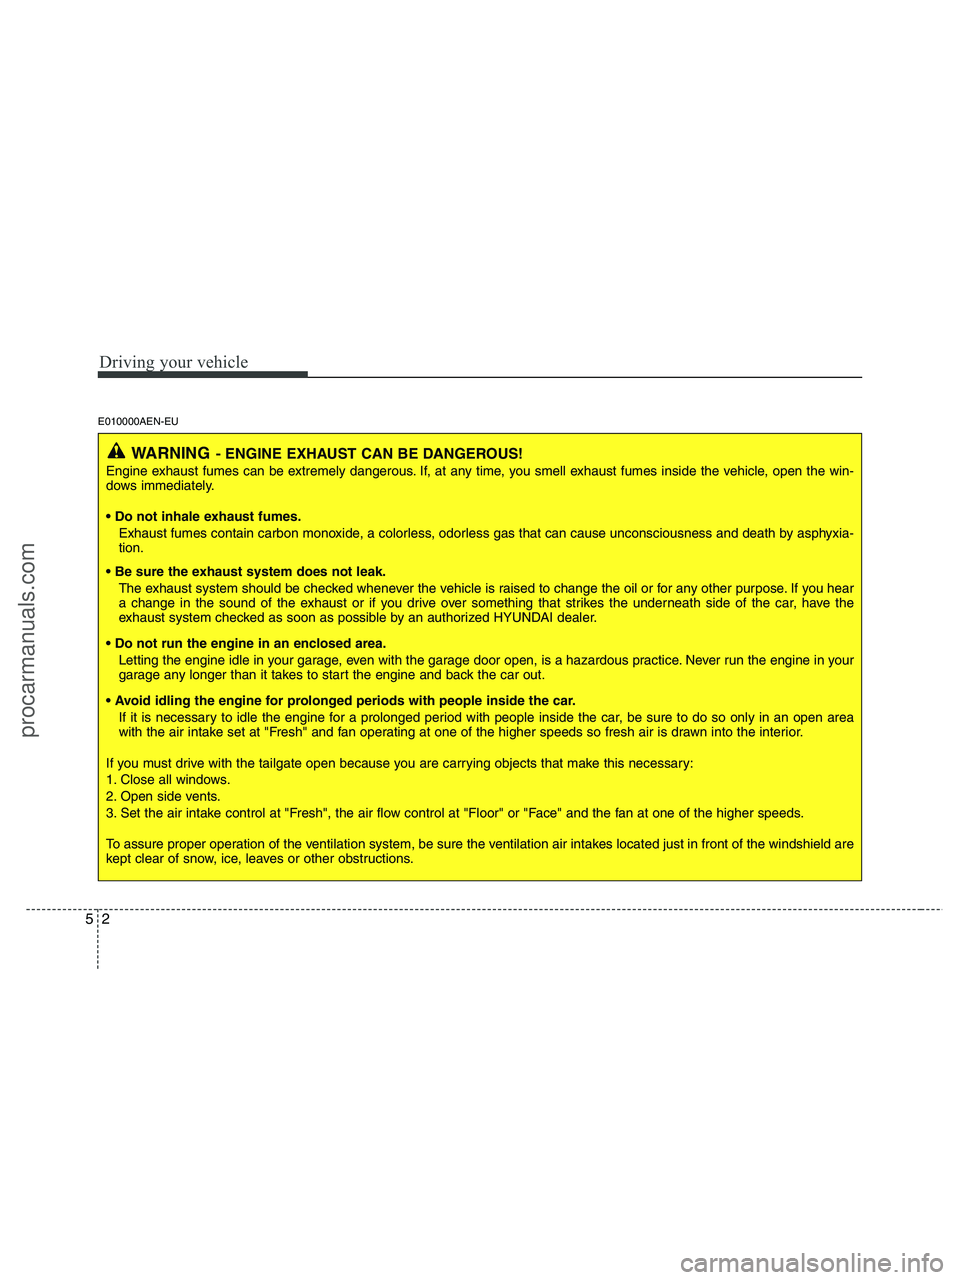
E010000AEN-EU
WARNING- ENGINE EXHAUST CAN BE DANGEROUS!
Engine exhaust fumes can be extremely dangerous. If, at any time, you smell exhaust fumes inside the vehicle, open the win-
dows immediately.
• Do not inhale exhaust fumes.
Exhaust fumes contain carbon monoxide, a colorless, odorless gas that can cause unconsciousness and death by asphyxia-
tion.
The exhaust system should be checked whenever the vehicle is raised to change the oil or for any other purpose. If you hear
a change in the sound of the exhaust or if you drive over something that strikes the underneath side of the car, have the
exhaust system checked as soon as possible by an authorized HYUNDAI dealer.
Letting the engine idle in your garage, even with the garage door open, is a hazardous practice. Never run the engine in your
garage any longer than it takes to start the engine and back the car out.
If it is necessary to idle the engine for a prolonged period with people inside the car, be sure to do so only in an open area
with the air intake set at "Fresh" and fan operating at one of the higher speeds so fresh air is drawn into the interior.
If you must drive with the tailgate open because you are carrying objects that make this necessary:
1. Close all windows.
2. Open side vents.
3. Set the air intake control at "Fresh", the air flow control at "Floor" or "Face" and the fan at one of the higher speeds.
To assure proper operation of the ventilation system, be sure the ventilation air intakes located just in front of the windshield are
kept clear of snow, ice, leaves or other obstructions.
procarmanuals.com
Page 329 of 425
613
What to do in an emergency
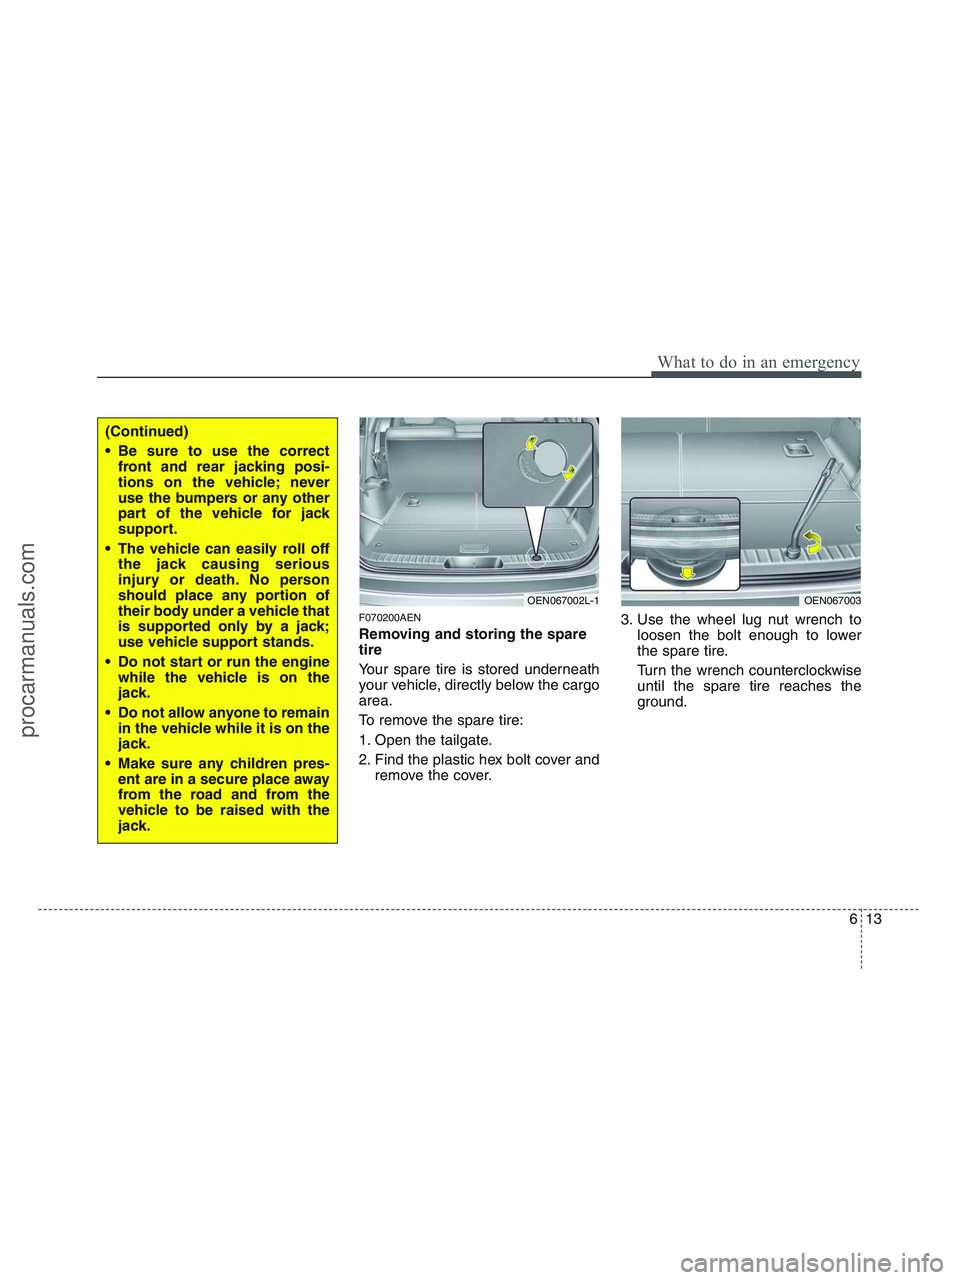
F070200AEN
Removing and storing the spare
tire
Your spare tire is stored underneath
your vehicle, directly below the cargo
area.
To remove the spare tire:
1. Open the tailgate.
2. Find the plastic hex bolt cover and
remove the cover.3. Use the wheel lug nut wrench to
loosen the bolt enough to lower
the spare tire.
Turn the wrench counterclockwise
until the spare tire reaches the
ground.
OEN067002L-1OEN067003
(Continued)
Be sure to use the correct
front and rear jacking posi-
tions on the vehicle; never
use the bumpers or any other
part of the vehicle for jack
support.
The vehicle can easily roll off
the jack causing serious
injury or death. No person
should place any portion of
their body under a vehicle that
is supported only by a jack;
use vehicle support stands.
Do not start or run the engine
while the vehicle is on the
jack.
Do not allow anyone to remain
in the vehicle while it is on the
jack.
Make sure any children pres-
ent are in a secure place away
from the road and from the
vehicle to be raised with the
jack.
procarmanuals.com
Page 338 of 425
What to do in an emergency
22 6
When towing your vehicle in an emer-
gency without wheel dollies :
1. Set the ignition switch in the ACC posi-
tion.
2. Place the transaxle shift lever in N
(Neutral).
3. Release the parking brake.
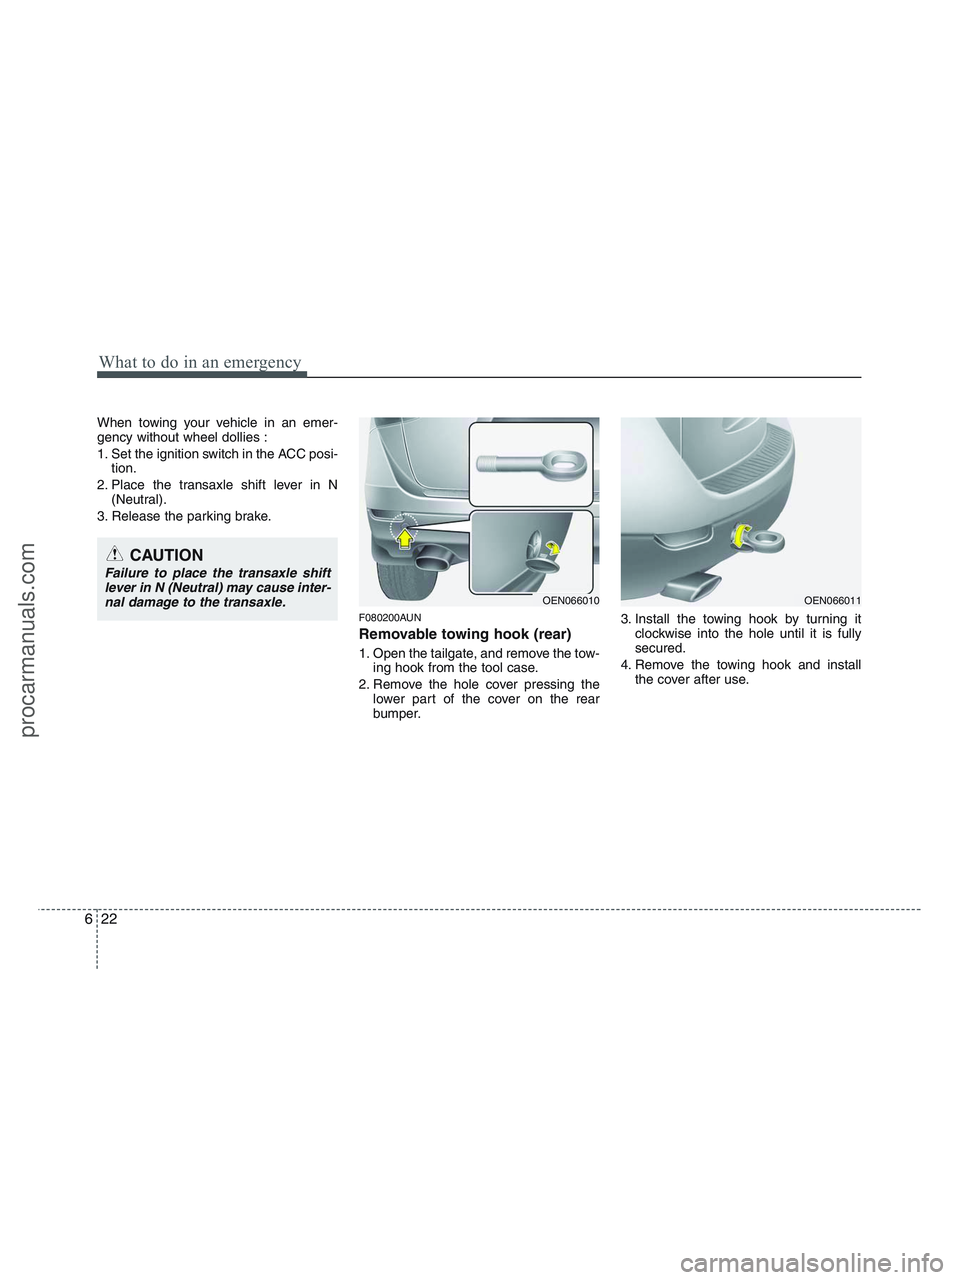
F080200AUN
Removable towing hook (rear)
1. Open the tailgate, and remove the tow-
ing hook from the tool case.
2. Remove the hole cover pressing the
lower part of the cover on the rear
bumper.3. Install the towing hook by turning it
clockwise into the hole until it is fully
secured.
4. Remove the towing hook and install
the cover after use.
CAUTION
Failure to place the transaxle shift
lever in N (Neutral) may cause inter-
nal damage to the transaxle.
OEN066010OEN066011
procarmanuals.com
Page 370 of 425
729
Maintenance
G190400AEN
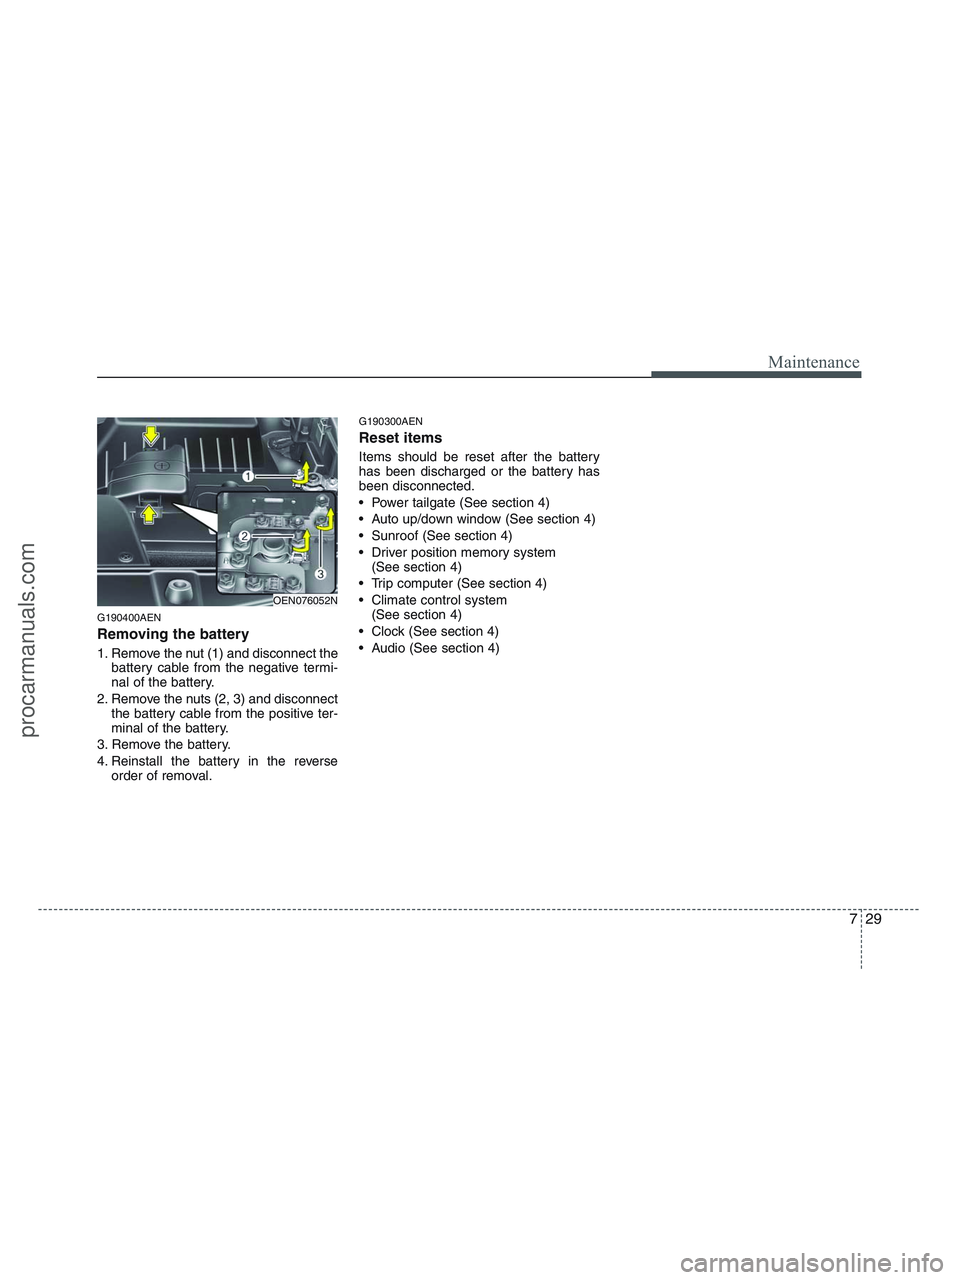
Removing the battery
1. Remove the nut (1) and disconnect the
battery cable from the negative termi-
nal of the battery.
2. Remove the nuts (2, 3) and disconnect
the battery cable from the positive ter-
minal of the battery.
3. Remove the battery.
4. Reinstall the battery in the reverse
order of removal.
G190300AEN
Reset items
Items should be reset after the battery
has been discharged or the battery has
been disconnected.
Power tailgate (See section 4)
Auto up/down window (See section 4)
Sunroof (See section 4)
Driver position memory system
(See section 4)
Trip computer (See section 4)
Climate control system
(See section 4)
Clock (See section 4)
Audio (See section 4)
OEN076052N
procarmanuals.com
Page 389 of 425
Maintenance
48 7
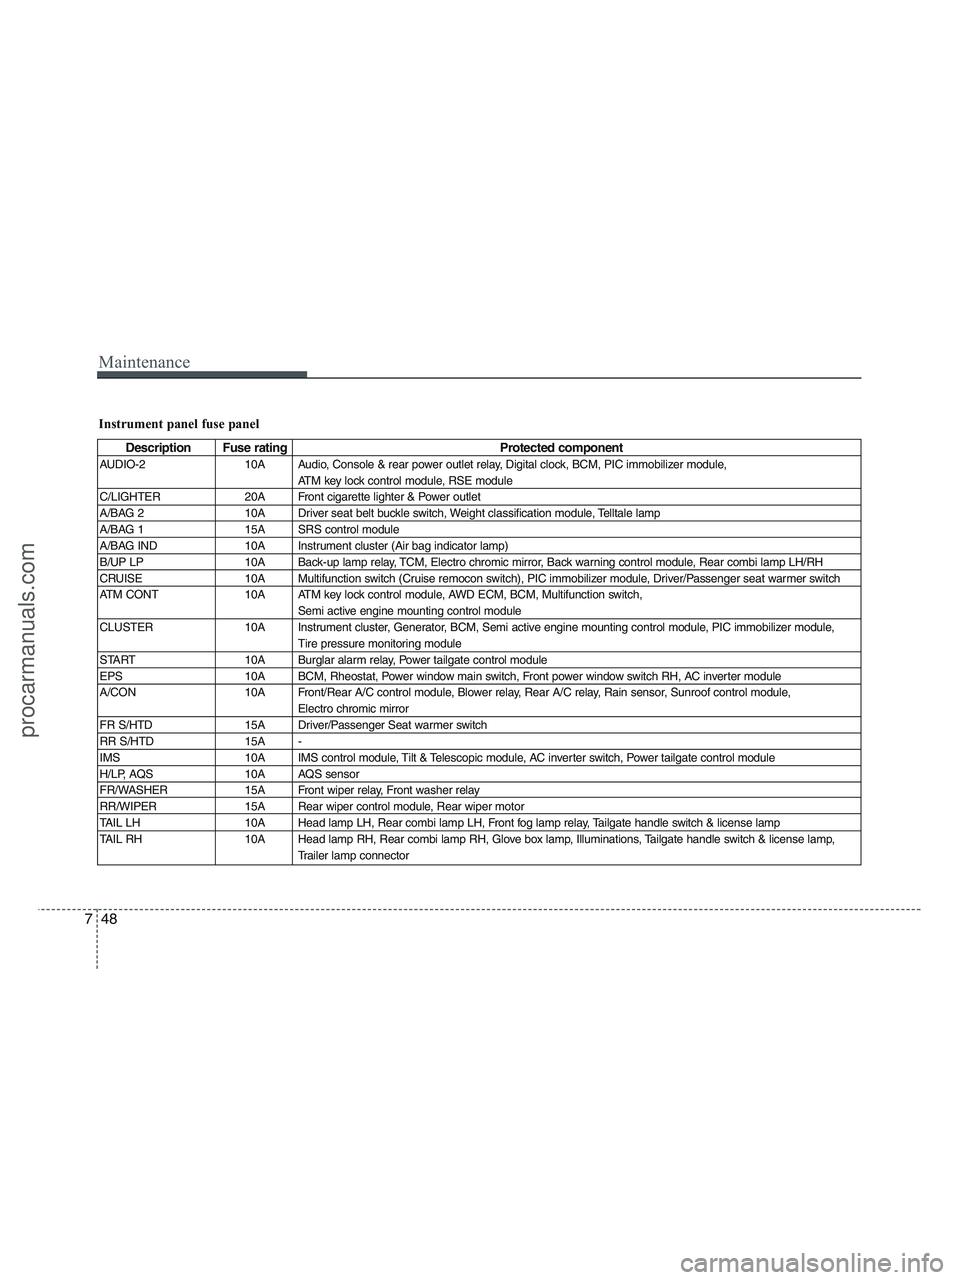
Instrument panel fuse panel
Description Fuse rating Protected component
AUDIO-2 10A Audio, Console & rear power outlet relay, Digital clock, BCM, PIC immobilizer module,
ATM key lock control module, RSE module
C/LIGHTER 20A Front cigarette lighter & Power outlet
A/BAG 2 10A Driver seat belt buckle switch, Weight classification module, Telltale lamp
A/BAG 1 15A SRS control module
A/BAG IND 10A Instrument cluster (Air bag indicator lamp)
B/UP LP 10A Back-up lamp relay, TCM, Electro chromic mirror, Back warning control module, Rear combi lamp LH/RH
CRUISE 10A Multifunction switch (Cruise remocon switch), PIC immobilizer module, Driver/Passenger seat warmer switch
ATM CONT 10A ATM key lock control module, AWD ECM, BCM, Multifunction switch,
Semi active engine mounting control module
CLUSTER 10A Instrument cluster, Generator, BCM, Semi active engine mounting control module, PIC immobilizer module,
Tire pressure monitoring module
START 10A Burglar alarm relay, Power tailgate control module
EPS 10A BCM, Rheostat, Power window main switch, Front power window switch RH, AC inverter module
A/CON 10A Front/Rear A/C control module, Blower relay, Rear A/C relay, Rain sensor, Sunroof control module,
Electro chromic mirror
FR S/HTD 15A Driver/Passenger Seat warmer switch
RR S/HTD 15A -
IMS 10A IMS control module, Tilt & Telescopic module, AC inverter switch, Power tailgate control module
H/LP, AQS 10A AQS sensor
FR/WASHER 15A Front wiper relay, Front washer relay
RR/WIPER 15A Rear wiper control module, Rear wiper motor
TAIL LH 10A Head lamp LH, Rear combi lamp LH, Front fog lamp relay, Tailgate handle switch & license lamp
TAIL RH 10A Head lamp RH, Rear combi lamp RH, Glove box lamp, Illuminations, Tailgate handle switch & license lamp,
Trailer lamp connector
procarmanuals.com
Page 390 of 425
749
Maintenance
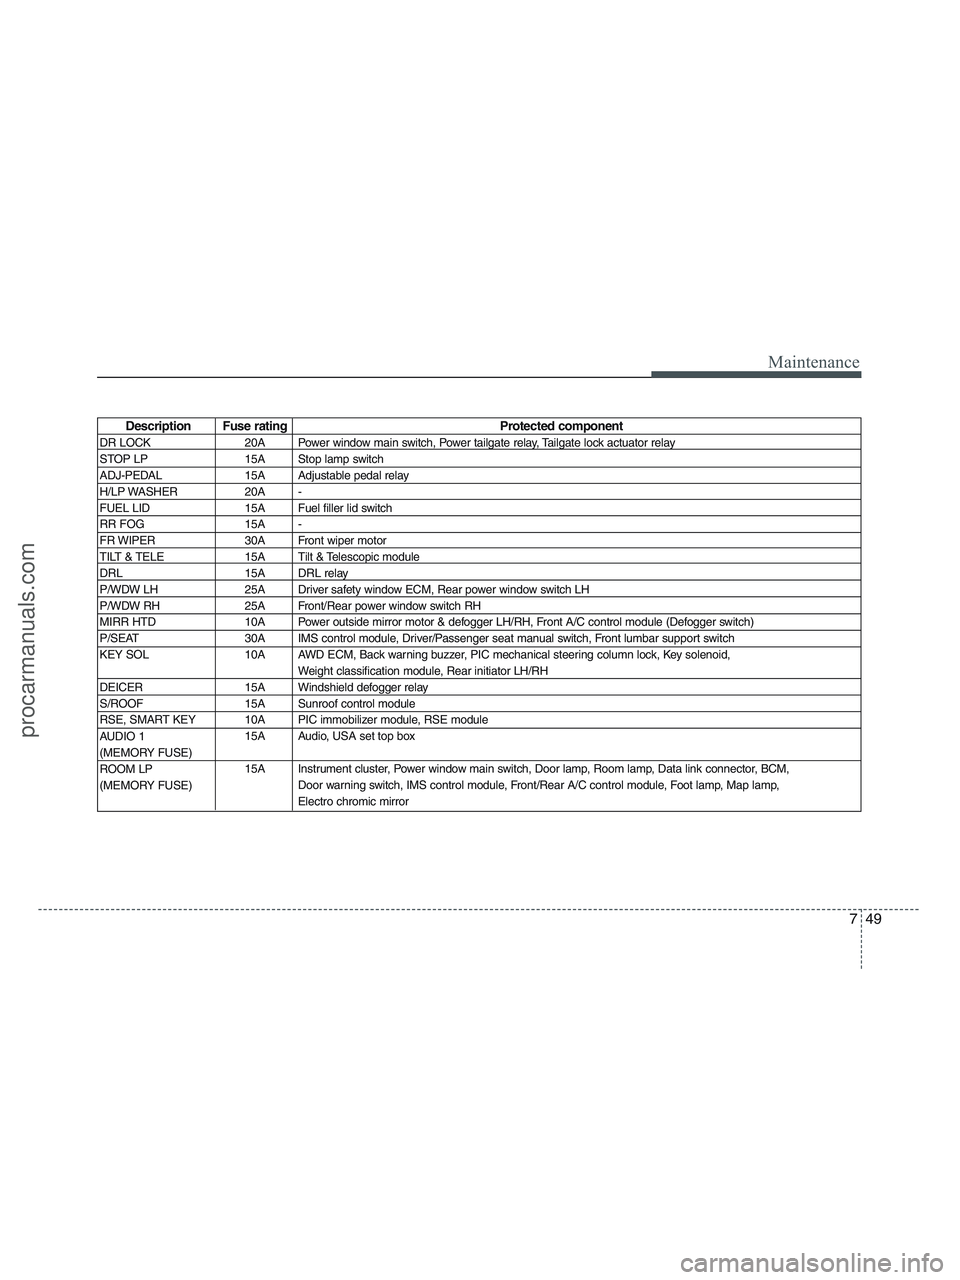
Description Fuse rating Protected component
DR LOCK 20A Power window main switch, Power tailgate relay, Tailgate lock actuator relay
STOP LP 15A Stop lamp switch
ADJ-PEDAL 15A Adjustable pedal relay
H/LP WASHER 20A -
FUEL LID 15A Fuel filler lid switch
RR FOG 15A -
FR WIPER 30A Front wiper motor
TILT & TELE 15A Tilt & Telescopic module
DRL 15A DRL relay
P/WDW LH 25A Driver safety window ECM, Rear power window switch LH
P/WDW RH 25A Front/Rear power window switch RH
MIRR HTD 10A Power outside mirror motor & defogger LH/RH, Front A/C control module (Defogger switch)
P/SEAT 30A IMS control module, Driver/Passenger seat manual switch, Front lumbar support switch
KEY SOL 10A AWD ECM, Back warning buzzer, PIC mechanical steering column lock, Key solenoid,
Weight classification module, Rear initiator LH/RH
DEICER 15A Windshield defogger relay
S/ROOF 15A Sunroof control module
RSE, SMART KEY 10A PIC immobilizer module, RSE module
15A Audio, USA set top box
15A Instrument cluster, Power window main switch, Door lamp, Room lamp, Data link connector, BCM,
Door warning switch, IMS control module, Front/Rear A/C control module, Foot lamp, Map lamp,
Electro chromic mirror
AUDIO 1
(MEMORY FUSE)
ROOM LP
(MEMORY FUSE)
procarmanuals.com
Page 396 of 425
755
Maintenance
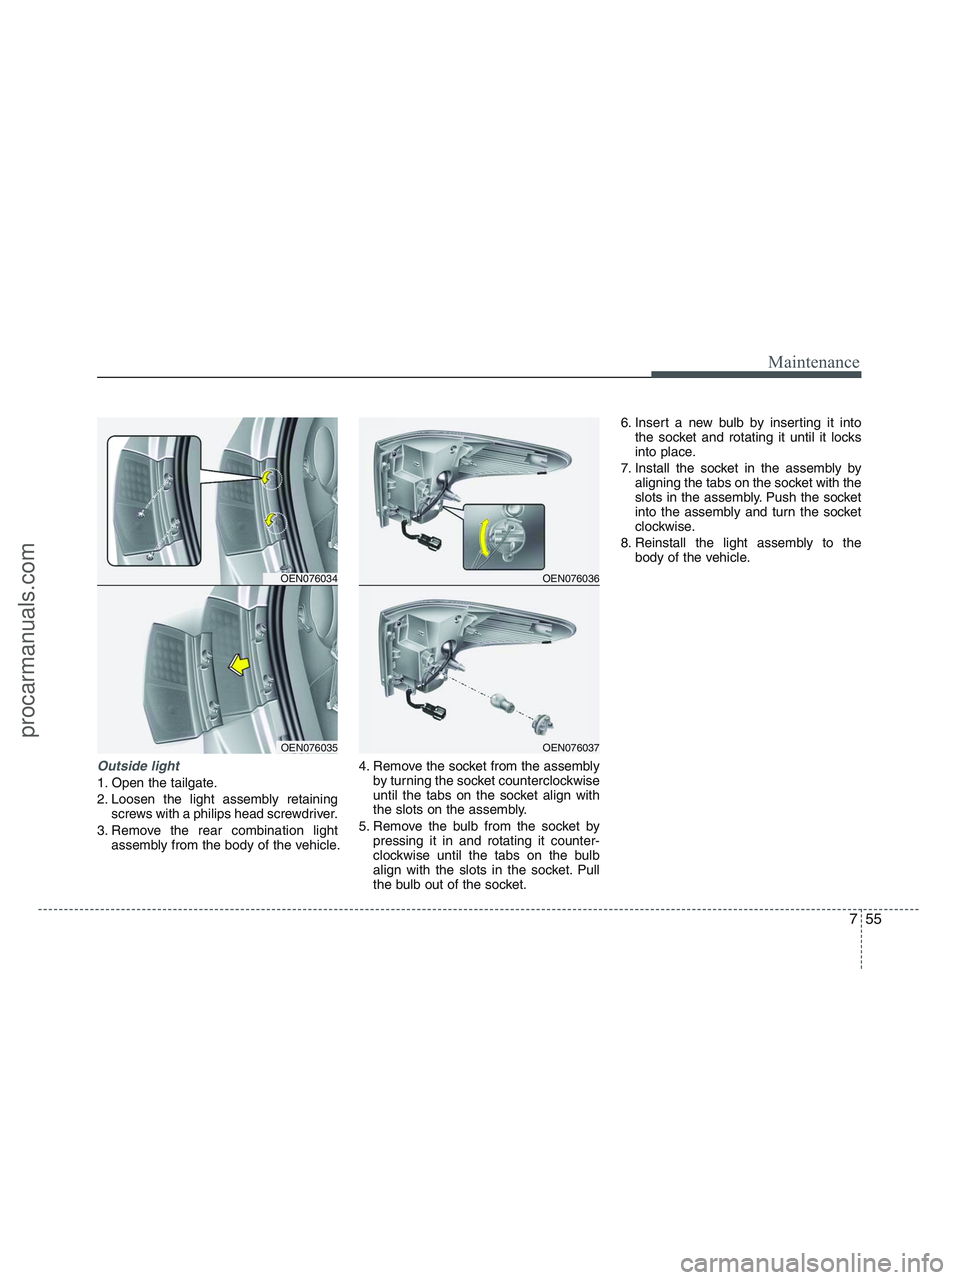
Outside light
1. Open the tailgate.
2. Loosen the light assembly retaining
screws with a philips head screwdriver.
3. Remove the rear combination light
assembly from the body of the vehicle.4. Remove the socket from the assembly
by turning the socket counterclockwise
until the tabs on the socket align with
the slots on the assembly.
5. Remove the bulb from the socket by
pressing it in and rotating it counter-
clockwise until the tabs on the bulb
align with the slots in the socket. Pull
the bulb out of the socket.6. Insert a new bulb by inserting it into
the socket and rotating it until it locks
into place.
7. Install the socket in the assembly by
aligning the tabs on the socket with the
slots in the assembly. Push the socket
into the assembly and turn the socket
clockwise.
8. Reinstall the light assembly to the
body of the vehicle.
OEN076034
OEN076035
OEN076036
OEN076037
procarmanuals.com
Page 397 of 425
Maintenance
56 7
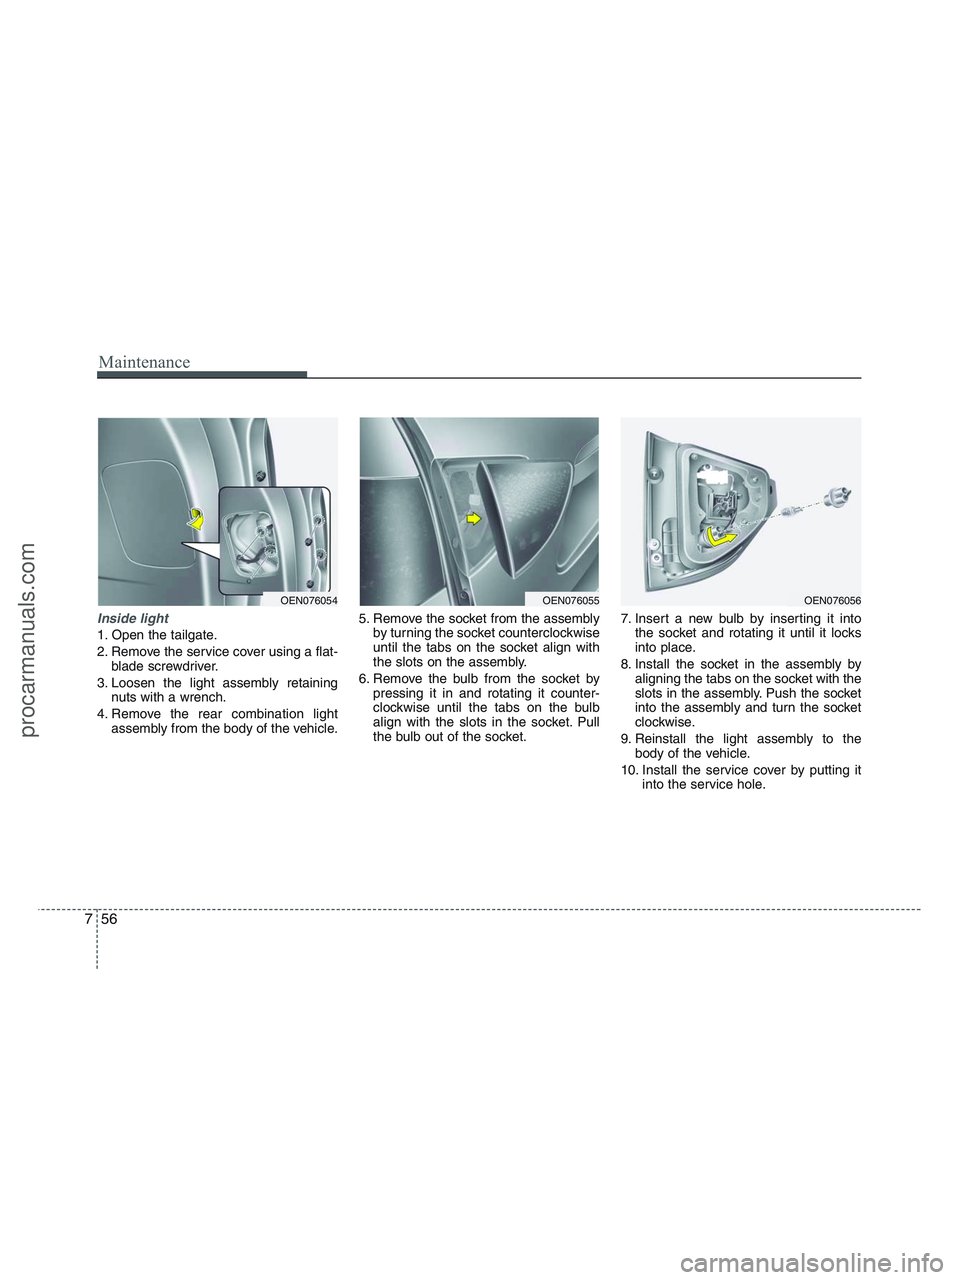
Inside light
1. Open the tailgate.
2. Remove the service cover using a flat-
blade screwdriver.
3. Loosen the light assembly retaining
nuts with a wrench.
4. Remove the rear combination light
assembly from the body of the vehicle.5. Remove the socket from the assembly
by turning the socket counterclockwise
until the tabs on the socket align with
the slots on the assembly.
6. Remove the bulb from the socket by
pressing it in and rotating it counter-
clockwise until the tabs on the bulb
align with the slots in the socket. Pull
the bulb out of the socket.7. Insert a new bulb by inserting it into
the socket and rotating it until it locks
into place.
8. Install the socket in the assembly by
aligning the tabs on the socket with the
slots in the assembly. Push the socket
into the assembly and turn the socket
clockwise.
9. Reinstall the light assembly to the
body of the vehicle.
10. Install the service cover by putting it
into the service hole.
OEN076054OEN076055OEN076056
procarmanuals.com
Page 424 of 425
Index
6I
Luggage box ······························································4-111
Sunglass holder··························································4-110
Sunroof···········································································4-33
Tailgate···········································································4-18
Emergency tailgate safety release ·······························4-19
Power ON/OFF button ················································4-22
Power tailgate ······························································4-20
Theft-alarm system ························································4-12
Tires pressure monitoring system (TPMS)······················6-7
Changing a tire with TPMS·········································6-10
Low tire pressure position telltale ·································6-8
Low tire pressure telltale ···············································6-8
TPMS (Tire pressure monitoring system)
malfunction indicator ·················································6-9
Tire specification and pressure label ·······························8-6
Tires and wheels ·····················································7-30, 8-3
All season tires ····························································7-41
Checking tire inflation pressure ··································7-31
Compact spare tire replacement ··································7-35
Radial-ply tires ····························································7-42
Recommended cold tire inflation pressures ················7-30
Snow tires ····································································7-41
Summer tires································································7-41
Tire care ·······································································7-30
Tire chains ···································································7-42
Tire maintenance ·························································7-35Tire replacement ··························································7-34
Tire rotation ·································································7-32
Tire sidewall labeling ··················································7-36
Tire terminology and definitions ·································7-39
Tire traction ·································································7-35
Wheel alignment and tire balance ·······························7-33
Wheel replacement ······················································7-35
Towing ···········································································6-21
Emergency towing ·······················································6-23
Removable towing hook (rear) ····································6-22
Tie-down hook (for flatbed towing) ····························6-25
Trailer towing·································································5-46
Hitches ·········································································5-47
Safety chains································································5-47
Trailer brakes ·······························································5-47
Trailer connector··························································5-53
Weight of the trailer (tongue) ······································5-52
Vehicle break-in process ··················································1-5
Vehicle certification label ················································8-6
Vehicle data collection and event data recorders·············1-6
Vehicle identification number (VIN) ·······························8-6
Vehicle load limit ···························································5-54
Cargo capacity ·····························································5-54
Certification label ························································5-56
Seating capacity ···························································5-54
Tire and loading information label ······························5-54
T
V
procarmanuals.com