climate settings INFINITI FX 2012 User Guide
[x] Cancel search | Manufacturer: INFINITI, Model Year: 2012, Model line: FX, Model: INFINITI FX 2012Pages: 522, PDF Size: 3.51 MB
Page 197 of 522
4-20Monitor, climate, audio, phone and voice recognition systems
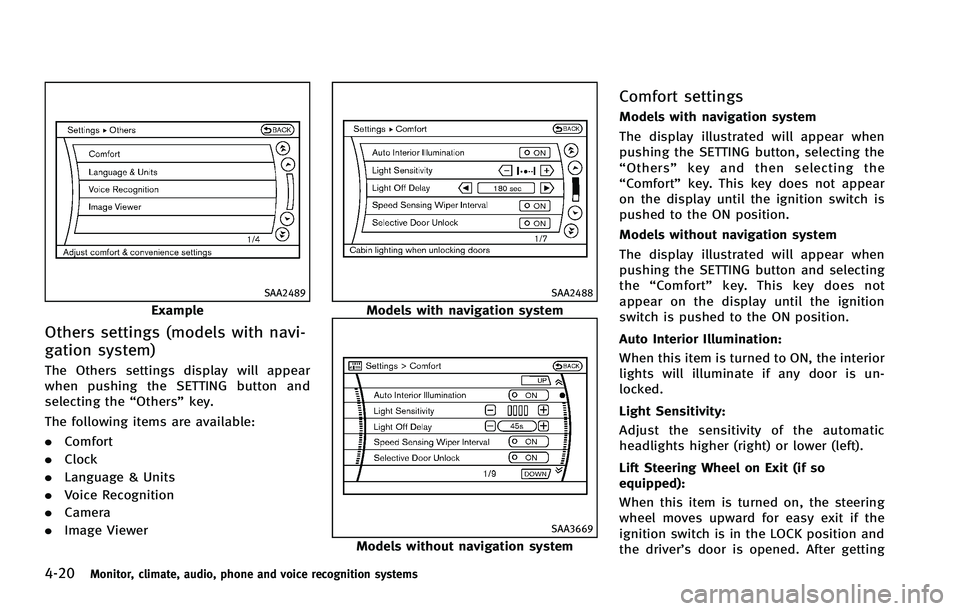
SAA2489
Example
Others settings (models with navi-
gation system)
The Others settings display will appear
when pushing the SETTING button and
selecting the“Others”key.
The following items are available:
. Comfort
. Clock
. Language & Units
. Voice Recognition
. Camera
. Image Viewer
SAA2488
Models with navigation system
SAA3669
Models without navigation system
Comfort settings
Models with navigation system
The display illustrated will appear when
pushing the SETTING button, selecting the
“Others” key and then selecting the
“Comfort” key. This key does not appear
on the display until the ignition switch is
pushed to the ON position.
Models without navigation system
The display illustrated will appear when
pushing the SETTING button and selecting
the “Comfort” key. This key does not
appear on the display until the ignition
switch is pushed to the ON position.
Auto Interior Illumination:
When this item is turned to ON, the interior
lights will illuminate if any door is un-
locked.
Light Sensitivity:
Adjust the sensitivity of the automatic
headlights higher (right) or lower (left).
Lift Steering Wheel on Exit (if so
equipped):
When this item is turned on, the steering
wheel moves upward for easy exit if the
ignition switch is in the LOCK position and
the driver’s door is opened. After getting
Page 198 of 522

into the vehicle and pushing the ignition
switch to the ACC position, the steering
wheel moves to the previous position.
Slide Driver Seat Back on Exit (if so
equipped):
When this item is turned on, the driver’s
seat moves backward for easy exit if the
ignition switch is in the OFF position and
the driver’s door is opened. After getting
into the vehicle and pushing the ignition
switch to the ACC position, the driver’s seat
moves to the previous position.
Light Off Delay:
Choose the duration of the automatic
headlight off timer from 0, 30, 45, 60, 90,
120, 150 and 180 second periods.
Speed Sensing Wiper Interval (if so
equipped):
When this item is turned to ON, the wiper
interval is adjusted automatically accord-
ing to the vehicle speed.
Selective Door Unlock:
When this item is turned to ON, only the
driver’s door is unlocked first after the door
unlock operation. When the door handle
request switch on the driver’s or front
passenger’s side door is pushed to beunlocked, only the corresponding door is
unlocked first. All the doors can be
unlocked if the door unlock operation is
performed again within 60 seconds.
When this item is turned to OFF, all the
doors will be unlocked after the door
unlock operation is performed once.
Intelligent Key Lock/Unlock:
When this item is turned to ON, door lock/
unlock function by pushing the door
handle request switch will be activated.
Return All Settings to Default:
Select this item and then select “YES”to
return all settings to the default.
SAA3007
Models with navigation system
SAA3014
Models without navigation system
Monitor, climate, audio, phone and voice recognition systems4-21
Page 199 of 522
4-22Monitor, climate, audio, phone and voice recognition systems
Language & Units settings
Models with navigation system
The display illustrated will appear when
pushing the SETTING button, selecting the
“Others” key and then selecting the
“Language & Units” key.
Models without navigation system
The display illustrated will appear when
pushing the SETTING button and selecting
the “Language & Units” key.
Select Language:
Select the “Select Language” key. Choose
“English”, “Français” or“Español” for your
favorite display appearance.
If you select the “Français”key, the French
language will be displayed, so please use
the French Owner’s Manual. To obtain a
French Owner’ s Manual, see “Owner’ s
Manual/Service Manual order information”
(P.9-32).
Select Units:
Select the “Select Units” key. Choose“US”
(Mile, 8F, MPG) or “Metric”(km,8C, L/100
km) for your favorite display appearance. Select Units (Tire Pressure):
Choose the “Select Units (Tire Pressure)”
key and push the ENTER button. From the
following display, select “kPa”or“psi”.
*When the ignition switch is in the ACC
position, the “Select Units (Tire Pressure)”
key is not displayed.
Voice Recognition settings (models
with navigation system)
For details about the “Voice Recognition”
settings, see “INFINITI Voice Recognition
System (models with navigation system)”
(P.4-120).
SAA2491
Image Viewer (models with naviga-
tion system)
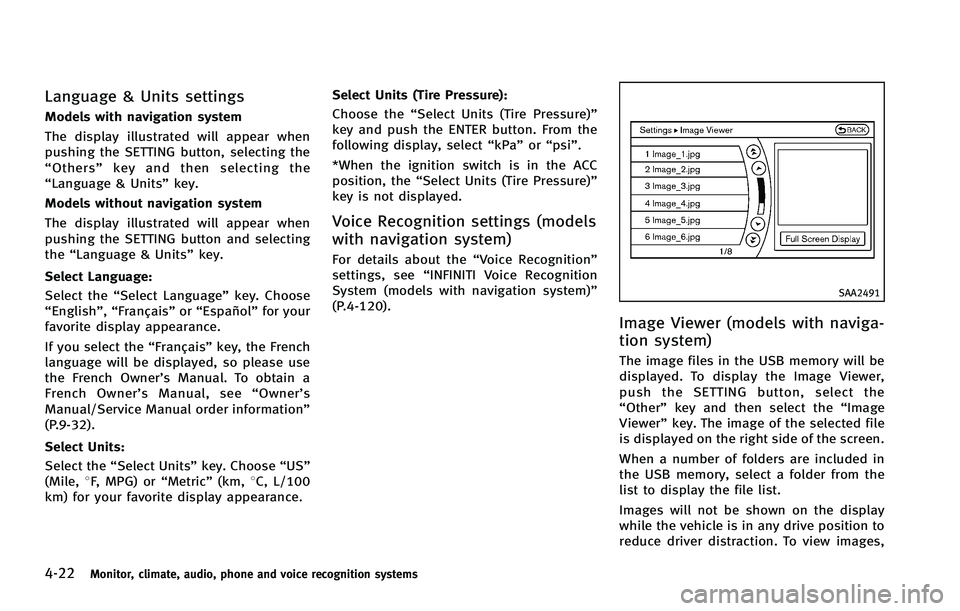
The image files in the USB memory will be
displayed. To display the Image Viewer,
push the SETTING button, select the
“Other” key and then select the “Image
Viewer” key. The image of the selected file
is displayed on the right side of the screen.
When a number of folders are included in
the USB memory, select a folder from the
list to display the file list.
Images will not be shown on the display
while the vehicle is in any drive position to
reduce driver distraction. To view images,
Page 200 of 522
stop the vehicle in a safe location and
apply the parking brake.
SAA2492
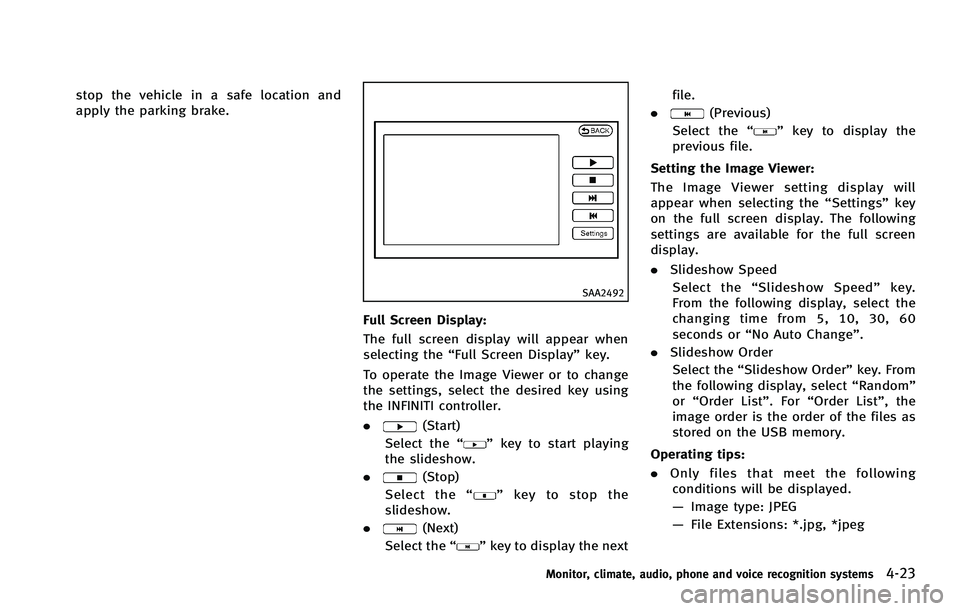
Full Screen Display:
The full screen display will appear when
selecting the“Full Screen Display” key.
To operate the Image Viewer or to change
the settings, select the desired key using
the INFINITI controller.
.
(Start)
Select the “
”key to start playing
the slideshow.
.
(Stop)
Select the “
”key to stop the
slideshow.
.
(Next)
Select the “
”key to display the next file.
.
(Previous)
Select the “
”key to display the
previous file.
Setting the Image Viewer:
The Image Viewer setting display will
appear when selecting the “Settings”key
on the full screen display. The following
settings are available for the full screen
display.
. Slideshow Speed
Select the “Slideshow Speed” key.
From the following display, select the
changing time from 5, 10, 30, 60
seconds or “No Auto Change”.
. Slideshow Order
Select the “Slideshow Order” key. From
the following display, select “Random”
or “Order List”. For “Order List”, the
image order is the order of the files as
stored on the USB memory.
Operating tips:
. Only files that meet the following
conditions will be displayed.
— Image type: JPEG
— File Extensions: *.jpg, *jpeg
Monitor, climate, audio, phone and voice recognition systems4-23
Page 207 of 522

4-30Monitor, climate, audio, phone and voice recognition systems
PREDICTIVE COURSE LINE SETTINGS
To turn ON or OFF the predictive course line
display, push theSETTINGbutton, select
the “Camera” key and push the ENTER
button.
Predictive Course Lines:
When this item is turned on, the predicted
course lines will be displayed on the
monitor when the selector lever is in the
R (Reverse) position.
HOW TO ADJUST SCREEN
To adjust the Display ON/OFF, Brightness,
Tint, Color, Contrast and Black Level of the
rearview monitor, push the SETTINGbutton
with the rearview monitor on, select the
“Display” key on the screen and select the
item key and adjust the level using the
INFINITI controller.
Do not adjust the Brightness, Tint, Color,
Contrast and Black Level of the rearview
monitor while the vehicle is moving. Make
sure the parking brake is firmly applied
and the engine is not running.
OPERATING TIPS
. When the selector lever is shifted to the
R (Reverse) position, the monitor
screen automatically changes to the
rearview monitor mode.
. It may take some time until the rearview
monitor is displayed after the selector
lever has been shifted to R from
another position or to another position
from R. Objects may be distorted
momentarily until the rearview monitor
screen is displayed completely.
. When the temperature is extremely high
or low, the screen may not clearly
display objects. This is not a malfunc-
tion.
. When strong light directly enters the
camera, objects may not be displayed
clearly. This is not a malfunction.
. Vertical lines may be seen in objects on
the screen. This is due to strong
reflected light from the bumper. This
is not a malfunction.
. The screen may flicker under fluores-
cent light. This is not a malfunction.
. The colors of objects on the rearview
monitor may differ somewhat from
those of the actual object. .
Objects on the monitor may not be clear
in a dark place or at night. This is not a
malfunction.
. If dirt, rain or snow attaches to the
camera, the rearview monitor may not
clearly display objects. Clean the cam-
era.
. Do not use alcohol, benzine or thinner
to clean the camera. This will cause
discoloration. To clean the camera,
wipe with a cloth dampened with
diluted mild cleaning agent and then
wipe with a dry cloth.
. Do not damage the camera as the
monitor screen may be adversely af-
fected.
. Do not use wax on the camera window.
Wipe off any wax with a clean cloth
dampened with mild detergent diluted
with water.
Page 214 of 522
when a corner of the vehicle moves closer
to an object.
The corner sonar indicator
*4can be
turned off. See “Around view monitor
settings” (P.4-41).
CAUTION
The turn signal light may overlap with the
side-of-vehicle line. This is not a malfunc-
tion.
Infrared illumination:
The images on the front-side view can be
displayed at night using the infrared
illumination on the outside mirror.SAA2629
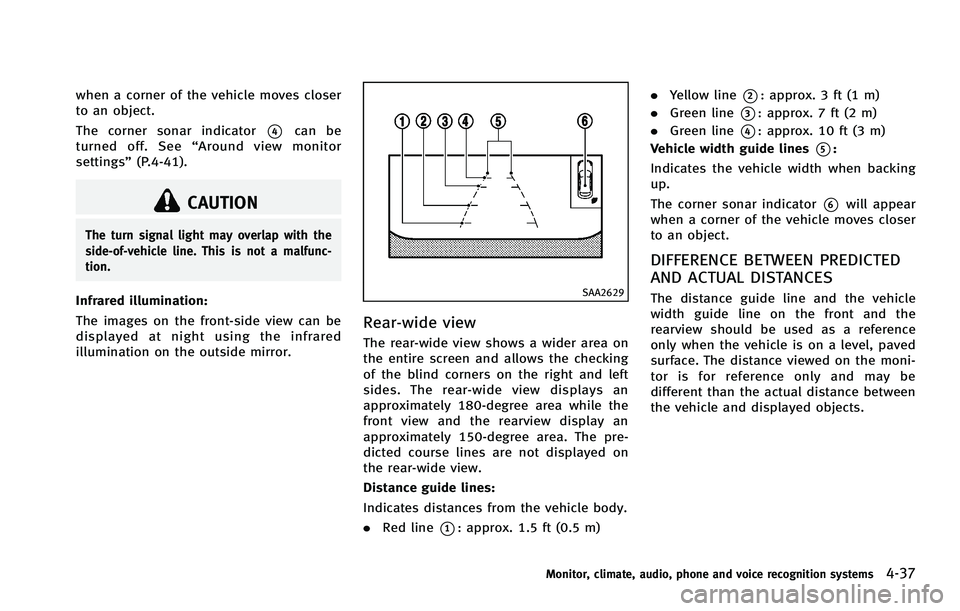
Rear-wide view
The rear-wide view shows a wider area on
the entire screen and allows the checking
of the blind corners on the right and left
sides. The rear-wide view displays an
approximately 180-degree area while the
front view and the rearview display an
approximately 150-degree area. The pre-
dicted course lines are not displayed on
the rear-wide view.
Distance guide lines:
Indicates distances from the vehicle body.
.Red line
*1: approx. 1.5 ft (0.5 m) .
Yellow line
*2: approx. 3 ft (1 m)
. Green line
*3: approx. 7 ft (2 m)
. Green line
*4: approx. 10 ft (3 m)
Vehicle width guide lines
*5:
Indicates the vehicle width when backing
up.
The corner sonar indicator
*6will appear
when a corner of the vehicle moves closer
to an object.
DIFFERENCE BETWEEN PREDICTED
AND ACTUAL DISTANCES
The distance guide line and the vehicle
width guide line on the front and the
rearview should be used as a reference
only when the vehicle is on a level, paved
surface. The distance viewed on the moni-
tor is for reference only and may be
different than the actual distance between
the vehicle and displayed objects.
Monitor, climate, audio, phone and voice recognition systems4-37
Page 218 of 522
SAA3649
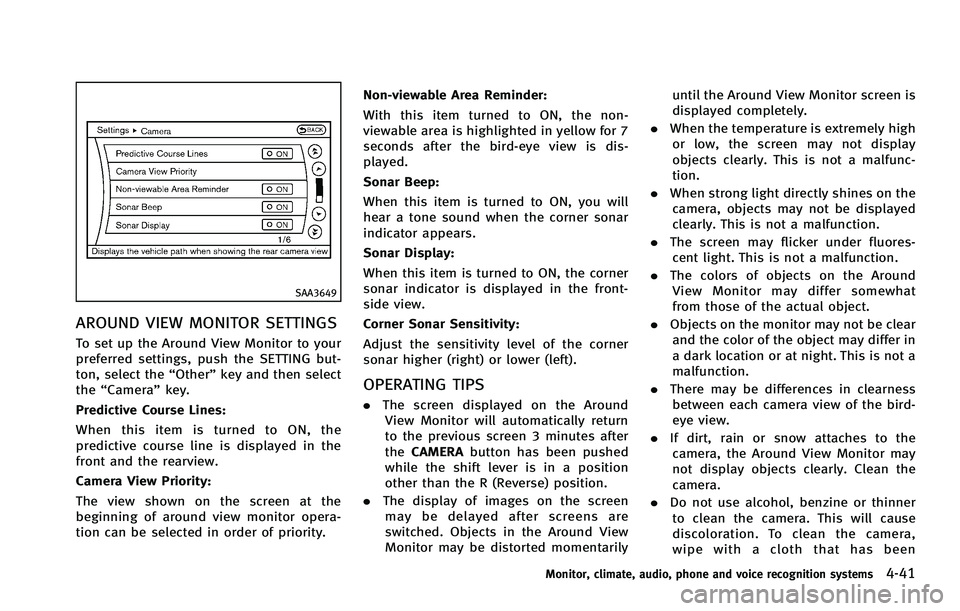
AROUND VIEW MONITOR SETTINGS
To set up the Around View Monitor to your
preferred settings, push the SETTING but-
ton, select the“Other”key and then select
the “Camera ”key.
Predictive Course Lines:
When this item is turned to ON, the
predictive course line is displayed in the
front and the rearview.
Camera View Priority:
The view shown on the screen at the
beginning of around view monitor opera-
tion can be selected in order of priority. Non-viewable Area Reminder:
With this item turned to ON, the non-
viewable area is highlighted in yellow for 7
seconds after the bird-eye view is dis-
played.
Sonar Beep:
When this item is turned to ON, you will
hear a tone sound when the corner sonar
indicator appears.
Sonar Display:
When this item is turned to ON, the corner
sonar indicator is displayed in the front-
side view.
Corner Sonar Sensitivity:
Adjust the sensitivity level of the corner
sonar higher (right) or lower (left).
OPERATING TIPS
.
The screen displayed on the Around
View Monitor will automatically return
to the previous screen 3 minutes after
the CAMERA button has been pushed
while the shift lever is in a position
other than the R (Reverse) position.
. The display of images on the screen
may be delayed after screens are
switched. Objects in the Around View
Monitor may be distorted momentarily until the Around View Monitor screen is
displayed completely.
. When the temperature is extremely high
or low, the screen may not display
objects clearly. This is not a malfunc-
tion.
. When strong light directly shines on the
camera, objects may not be displayed
clearly. This is not a malfunction.
. The screen may flicker under fluores-
cent light. This is not a malfunction.
. The colors of objects on the Around
View Monitor may differ somewhat
from those of the actual object.
. Objects on the monitor may not be clear
and the color of the object may differ in
a dark location or at night. This is not a
malfunction.
. There may be differences in clearness
between each camera view of the bird-
eye view.
. If dirt, rain or snow attaches to the
camera, the Around View Monitor may
not display objects clearly. Clean the
camera.
. Do not use alcohol, benzine or thinner
to clean the camera. This will cause
discoloration. To clean the camera,
wipe with a cloth that has been
Monitor, climate, audio, phone and voice recognition systems4-41
Page 245 of 522

4-68Monitor, climate, audio, phone and voice recognition systems
death.
CAUTION
.Only operate the DVD while the vehicle
engine is running. Operating the DVD for
extended periods of time with the
engine OFF can discharge the vehicle
battery.
. Do not allow the system to get wet.
Excessive moisture such as spilled
liquids may cause the system to mal-
function.
. While playing VIDEO-CD media, this DVD
player does not guarantee complete
functionality of all VIDEO-CD formats.
SAA3650
DVD drive
The DVD slot is located on the center
INFINITI control panel. Insert a DVD into the
slot with the label side facing up. The DVD
will be guided automatically into the slot.
When ejecting the DVD, push the EJECT
button
*1.
Display settings
To adjust the front display mode, push the
SETTING button while the DVD is being
played, select the “Others”key and then
select the “Display”key.
To adjust the display ON/OFF, brightness, tint, color and contrast, select the
“Display
Adjustment” key and then select each key.
Then you can adjust each item using the
INFINITI controller. After changes have
been made push the BACK button to save
the setting.
Page 246 of 522
SAA2497
Playing a DVD
DISC·AUX button:
Park the vehicle in a safe location for the
front seat occupants to operate the DVD
drive while watching the images.
Push the DISC·AUX button on the instru-
ment panel and turn the display to the DVD
mode.
When a DVD is loaded, it will be replayed
automatically.
The operation screen will be turned on
when the DISC·AUX button located on the
instrument panel is pushed while a DVD is
being played, and it will turn off auto-matically after a period of time. To turn it
on again, push the DISC·AUX button again.
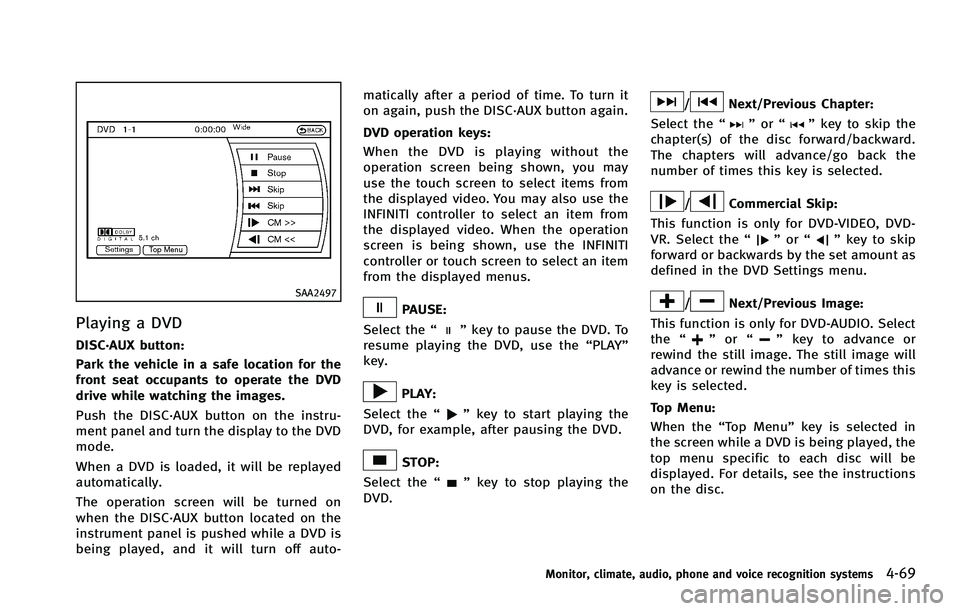
DVD operation keys:
When the DVD is playing without the
operation screen being shown, you may
use the touch screen to select items from
the displayed video. You may also use the
INFINITI controller to select an item from
the displayed video. When the operation
screen is being shown, use the INFINITI
controller or touch screen to select an item
from the displayed menus.
PAUSE:
Select the “
”key to pause the DVD. To
resume playing the DVD, use the “PLAY”
key.
PLAY:
Select the “
”key to start playing the
DVD, for example, after pausing the DVD.
STOP:
Select the “
”key to stop playing the
DVD.
/Next/Previous Chapter:
Select the “
”or “”key to skip the
chapter(s) of the disc forward/backward.
The chapters will advance/go back the
number of times this key is selected.
/Commercial Skip:
This function is only for DVD-VIDEO, DVD-
VR. Select the “
”or “”key to skip
forward or backwards by the set amount as
defined in the DVD Settings menu.
/Next/Previous Image:
This function is only for DVD-AUDIO. Select
the “
”or “”key to advance or
rewind the still image. The still image will
advance or rewind the number of times this
key is selected.
Top Menu:
When the “Top Menu” key is selected in
the screen while a DVD is being played, the
top menu specific to each disc will be
displayed. For details, see the instructions
on the disc.
Monitor, climate, audio, phone and voice recognition systems4-69
Page 247 of 522
4-70Monitor, climate, audio, phone and voice recognition systems
SAA2498
Example
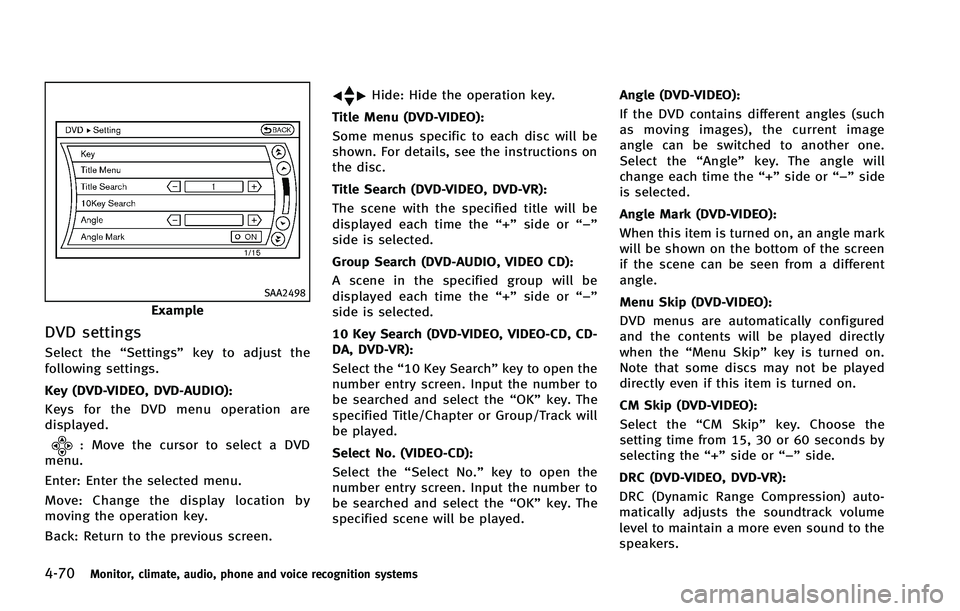
DVD settings
Select the“Settings”key to adjust the
following settings.
Key (DVD-VIDEO, DVD-AUDIO):
Keys for the DVD menu operation are
displayed.
: Move the cursor to select a DVD
menu.
Enter: Enter the selected menu.
Move: Change the display location by
moving the operation key.
Back: Return to the previous screen.
Hide: Hide the operation key.
Title Menu (DVD-VIDEO):
Some menus specific to each disc will be
shown. For details, see the instructions on
the disc.
Title Search (DVD-VIDEO, DVD-VR):
The scene with the specified title will be
displayed each time the “+”side or “−”
side is selected.
Group Search (DVD-AUDIO, VIDEO CD):
A scene in the specified group will be
displayed each time the “+”side or “−”
side is selected.
10 Key Search (DVD-VIDEO, VIDEO-CD, CD-
DA, DVD-VR):
Select the “10 Key Search” key to open the
number entry screen. Input the number to
be searched and select the “OK”key. The
specified Title/Chapter or Group/Track will
be played.
Select No. (VIDEO-CD):
Select the “Select No.” key to open the
number entry screen. Input the number to
be searched and select the “OK”key. The
specified scene will be played. Angle (DVD-VIDEO):
If the DVD contains different angles (such
as moving images), the current image
angle can be switched to another one.
Select the “Angle” key. The angle will
change each time the “+”side or “−”side
is selected.
Angle Mark (DVD-VIDEO):
When this item is turned on, an angle mark
will be shown on the bottom of the screen
if the scene can be seen from a different
angle.
Menu Skip (DVD-VIDEO):
DVD menus are automatically configured
and the contents will be played directly
when the “Menu Skip” key is turned on.
Note that some discs may not be played
directly even if this item is turned on.
CM Skip (DVD-VIDEO):
Select the “CM Skip” key. Choose the
setting time from 15, 30 or 60 seconds by
selecting the “+”side or “−”side.
DRC
(DVD-VIDEO, DVD-VR):
DRC (Dynamic Range Compression) auto-
matically adjusts the soundtrack volume
level to maintain a more even sound to the
speakers.