seat adjustment INFINITI G-CONVERTIBLE 2012 Owners Manual
[x] Cancel search | Manufacturer: INFINITI, Model Year: 2012, Model line: G-CONVERTIBLE, Model: INFINITI G-CONVERTIBLE 2012Pages: 474, PDF Size: 3.63 MB
Page 6 of 474
Illustrated table of contents0
Safety—Seats, seat belts and supplemental restraint
system1
Instruments and controls
Pre-driving checks and adjustments
Monitor, climate, audio, phone and voice recognition
systems
Starting and driving
In case of emergency
Appearance and care
Maintenance and do-it-yourself
Technical and consumer information
Index
2
3
4
5
6
7
8
9
10
Table of
Contents
Page 21 of 474
1-2Safety—Seats, seat belts and supplemental restraint system
GUID-7F05BB69-4CF6-44E1-A566-DF8949BB8587
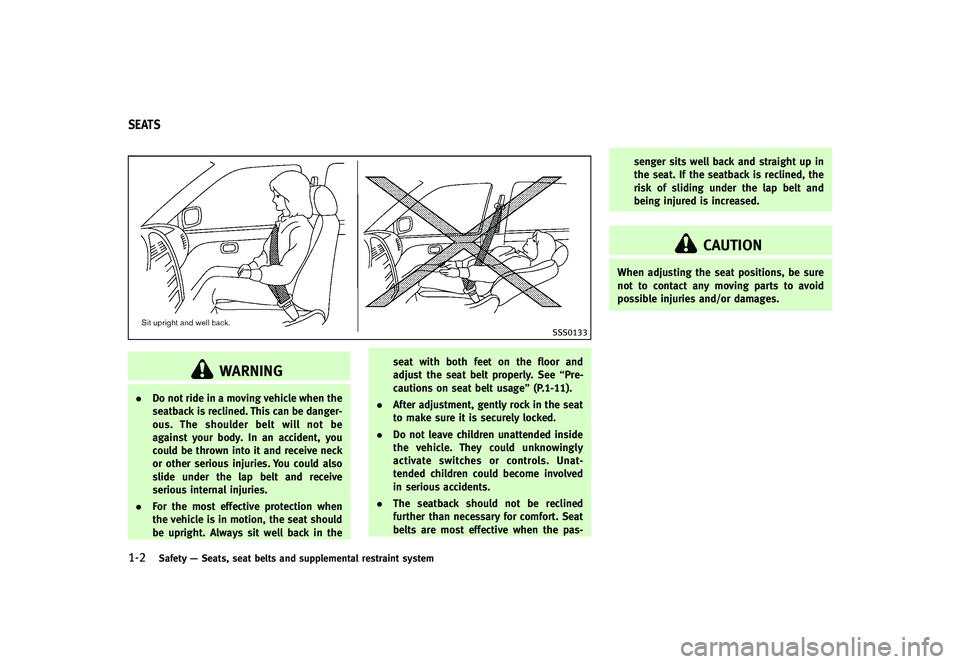
SSS0133
WARNING
. Do not ride in a moving vehicle when the
seatback is reclined. This can be danger-
ous. The shoulder belt will not be
against your body. In an accident, you
could be thrown into it and receive neck
or other serious injuries. You could also
slide under the lap belt and receive
serious internal injuries.
. For the most effective protection when
the vehicle is in motion, the seat should
be upright. Always sit well back in the seat with both feet on the floor and
adjust the seat belt properly. See
“Pre-
cautions on seat belt usage” (P.1-11).
. After adjustment, gently rock in the seat
to make sure it is securely locked.
. Do not leave children unattended inside
the vehicle. They could unknowingly
activate switches or controls. Unat-
tended children could become involved
in serious accidents.
. The seatback should not be reclined
further than necessary for comfort. Seat
belts are most effective when the pas- senger sits well back and straight up in
the seat. If the seatback is reclined, the
risk of sliding under the lap belt and
being injured is increased.
CAUTION
When adjusting the seat positions, be sure
not to contact any moving parts to avoid
possible injuries and/or damages.
SEATS
Page 22 of 474
FRONT SEATSGUID-62D628C7-949F-4159-ADC8-ABF609CC4B8A
Front power seat adjustmentGUID-685BB5F9-0E84-4F1D-956F-3A0406D03632Operating tips:GUID-D73A39BF-43C8-459F-9C24-47B7F579C407.The power seat motor has an auto-reset
overload protection circuit. If the motor
stops during operation, wait 30 sec-
onds, then reactivate the switch.
. Do not operate the power seat switch
for a long period of time when the
engine is off. This will discharge the
battery.
See “Automatic drive positioner” (P.3-38)
for the seat position memory function (if so
equipped).
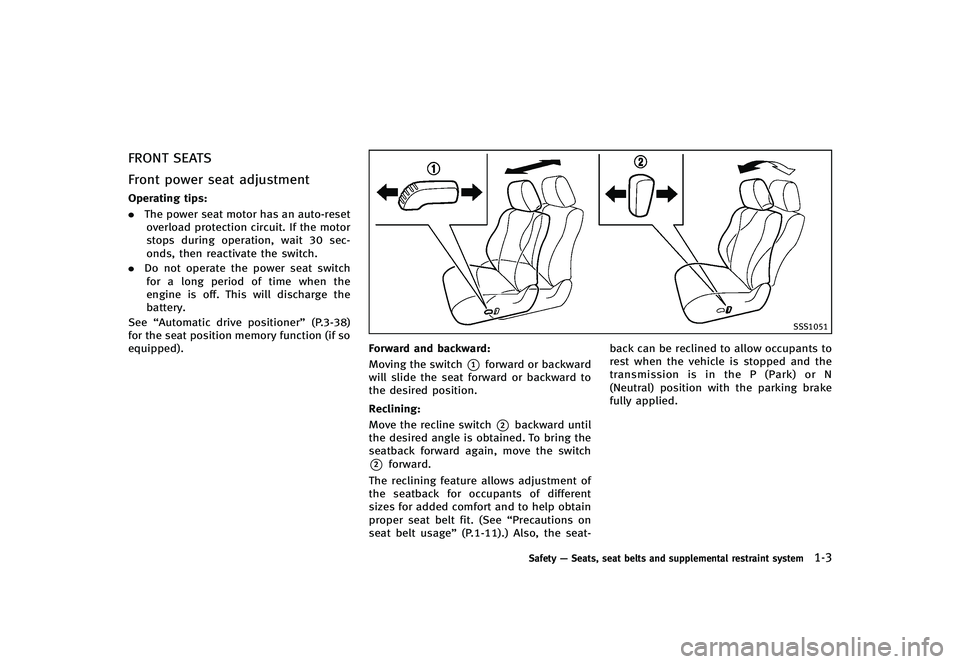
SSS1051
Forward and backward:GUID-D73A39BF-43C8-459F-9C24-47B7F579C407Moving the switch*1forward or backward
will slide the seat forward or backward to
the desired position.
Reclining:
GUID-D73A39BF-43C8-459F-9C24-47B7F579C407Move the recline switch*2backward until
the desired angle is obtained. To bring the
seatback forward again, move the switch
*2forward.
The reclining feature allows adjustment of
the seatback for occupants of different
sizes for added comfort and to help obtain
proper seat belt fit. (See “Precautions on
seat belt usage” (P.1-11).) Also, the seat- back can be reclined to allow occupants to
rest when the vehicle is stopped and the
transmission is in the P (Park) or N
(Neutral) position with the parking brake
fully applied.
Safety
—Seats, seat belts and supplemental restraint system1-3
Page 26 of 474
.When the selector lever is not in the P
(Park) position (Automatic Transmis-
sion model’s driver’s seat) or the
parking brake is not applied (Manual
Transmission model’s driver’s seat).
. When the door is closed.
. While the automatic drive positioner
operates (if so equipped).
. When the automatic drive positioner
switches are pushed (if so equipped).
. When the seatback switch
*2is
pushed.
. When the seat position is adjusted.
Note that the seat must be moved to the
front-most position by operating the walk-
in function or the seat adjusting switches
after the battery is disconnected. Other-
wise, the seat will not move backward
during the walk-in function.
HEAD RESTRAINTSGUID-F668742C-7157-4FDF-89FF-379FEF676D0B
WARNING
Head restraints supplement the other vehi-
cle safety systems. They may provide addi-
tional protection against injury in certain
rear end collisions. Adjust the head re-
straints properly, as specified in this sec- tion. Check the adjustment after someone
else uses the seat. Do not attach anything
to the head restraint stalks or remove the
head restraint. Do not use the seat if the
head restraint has been removed. If the
head restraint was removed, reinstall and
properly adjust the head restraint before an
occupant uses the seating position. Failure
to follow these instructions can reduce the
effectiveness of the head restraints. This
may increase the risk of serious injury or
death in a collision.
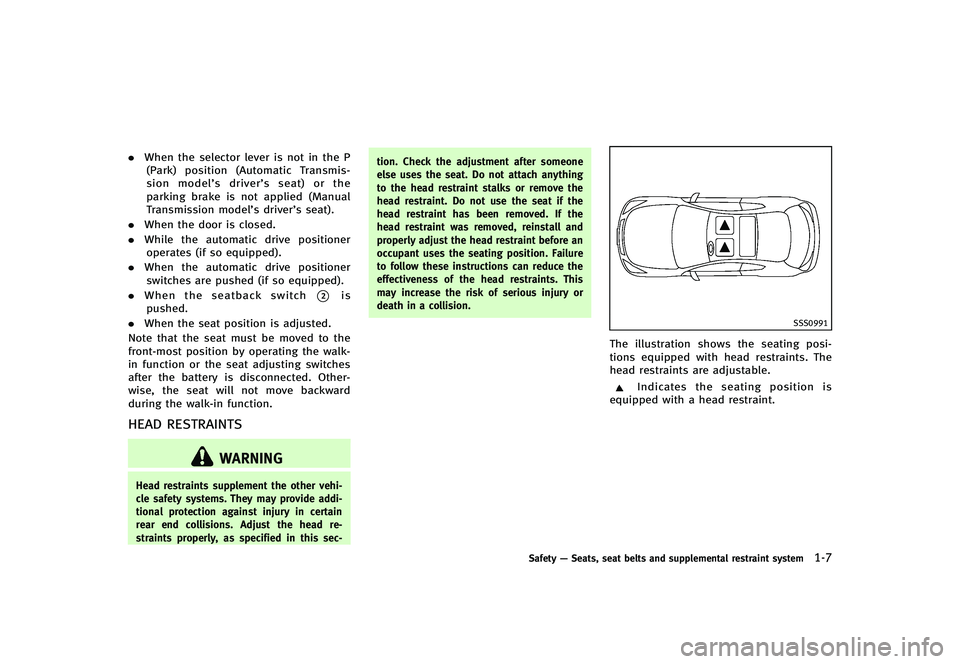
SSS0991
The illustration shows the seating posi-
tions equipped with head restraints. The
head restraints are adjustable.
Indicates the seating position is
equipped with a head restraint.
Safety —Seats, seat belts and supplemental restraint system1-7
Page 27 of 474
1-8Safety—Seats, seat belts and supplemental restraint system
SSS0992
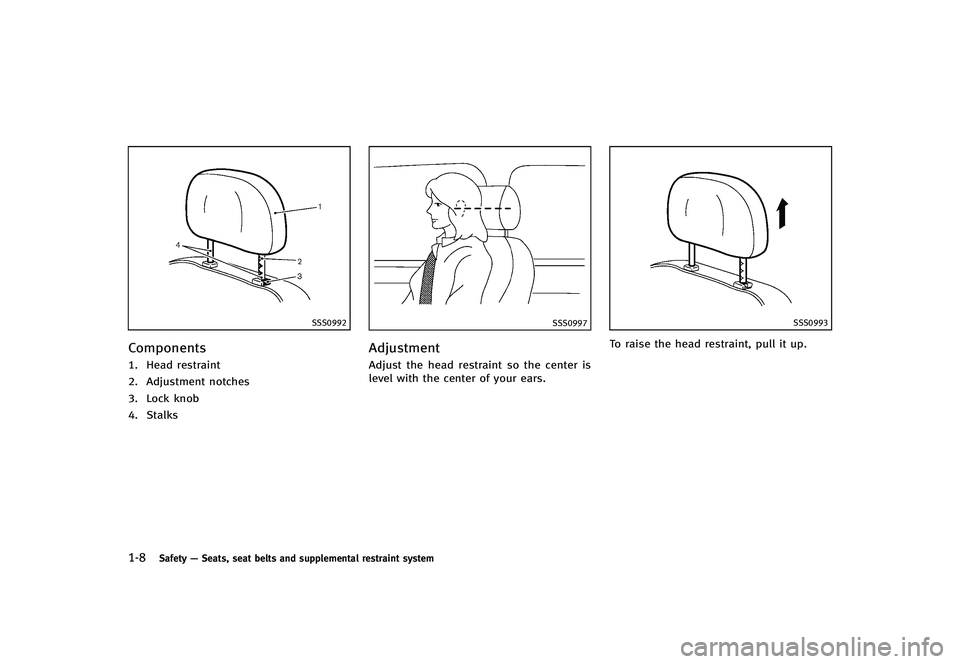
ComponentsGUID-582A0987-41E4-4EEC-946E-D80554620F951. Head restraint
2. Adjustment notches
3. Lock knob
4. Stalks
SSS0997
AdjustmentGUID-3BF9CAE8-6E89-4B9C-9BF3-DF7D757AC66EAdjust the head restraint so the center is
level with the center of your ears.
SSS0993
To raise the head restraint, pull it up.
Page 29 of 474
1-10Safety—Seats, seat belts and supplemental restraint system
SSS0996
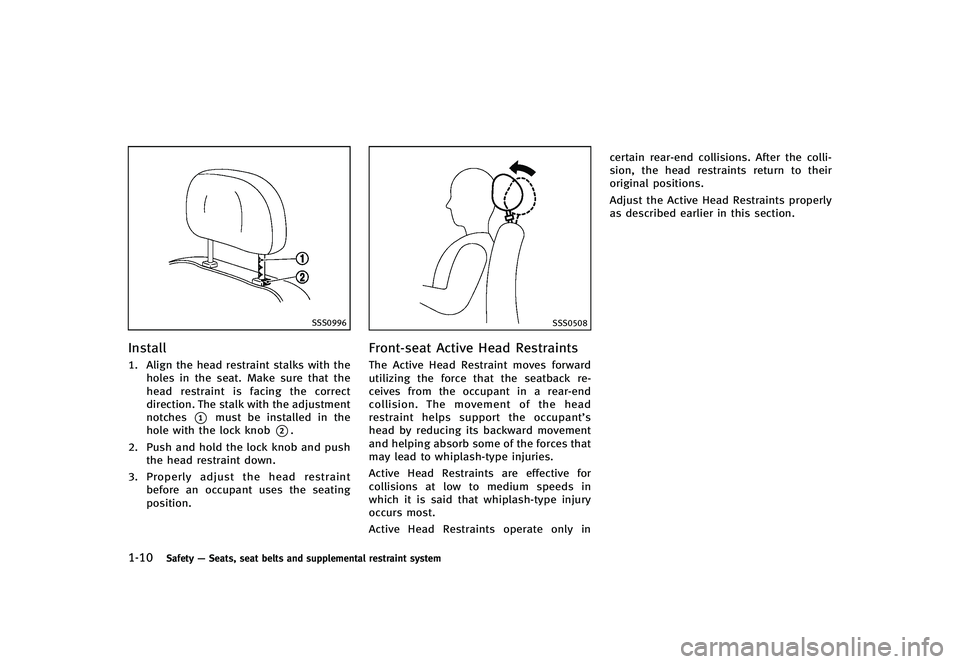
InstallGUID-5A848332-C8CD-4277-B184-110D654E0B511. Align the head restraint stalks with the
holes in the seat. Make sure that the
head restraint is facing the correct
direction. The stalk with the adjustment
notches
*1must be installed in the
hole with the lock knob
*2.
2. Push and hold the lock knob and push the head restraint down.
3. Properly adjust the head restraint
before an occupant uses the seating
position.
SSS0508
Front-seat Active Head RestraintsGUID-0E0CAE61-FD39-4AD6-AAE1-11101907AD71The Active Head Restraint moves forward
utilizing the force that the seatback re-
ceives from the occupant in a rear-end
collision. The movement of the head
restraint helps support the occupant’s
head by reducing its backward movement
and helping absorb some of the forces that
may lead to whiplash-type injuries.
Active Head Restraints are effective for
collisions at low to medium speeds in
which it is said that whiplash-type injury
occurs most.
Active Head Restraints operate only in certain rear-end collisions. After the colli-
sion, the head restraints return to their
original positions.
Adjust the Active Head Restraints properly
as described earlier in this section.
Page 39 of 474
1-20Safety—Seats, seat belts and supplemental restraint system
child and another passenger.
—INFINITI recommends that all child
restraints be installed in the rear
seat. Studies show that children are
safer when properly restrained in the
rear seat than in the front seat. If you
must install a forward-facing child
restraint in the front seat, see “For-
ward-facing child restraint installa-
tion using the seat belts” (P.1-28).
—Even with the INFINITI Advanced Air
Bag System, never install a rear-
facing child restraint in the front
seat. An inflating air bag could
seriously injure or kill a child. A
rear-facing child restraint must only
be used in the rear seat.
—Be sure to purchase a child restraint
that will fit the child and vehicle.
Some child restraints may not fit
properly in your vehicle.
—Child restraint anchor points aredesigned to withstand loads from
child restraints that are properly
fitted.
—Never use the anchor points foradult seat belts or harnesses.
—Keep seatbacks as upright as pos-sible after fitting the child restraint.
—Infants and children should alwaysbe placed in an appropriate child
restraint while in the vehicle.
. This vehicle is not equipped with upper
tethers. A child restraint system requir-
ing the use of a top tether strap cannot
be properly installed and should not be
used in this vehicle.
. When the child restraint is not in use,
keep it secured with the lower anchors
or a seat belt. In a sudden stop or
collision, loose objects can injure occu-
pants or damage the vehicle.
CAUTION
A child restraint in a closed vehicle can
become very hot. Check the seating surface
and buckles before placing a child in the
child restraint.
This vehicle is equipped with lower an-
chors for child restraint installation. Some
child restraints include rigid or webbing-
mounted attachments that can be con- nected to these anchors. For details, see
“Child restraint lower anchors”
(P.1-21).
LATCH child restraints generally require the
use of a top tether strap. However, this
vehicle does not have top tether anchor
locations. Do not install a child restraints
in this vehicle that requires the use of a top
tether strap.
If you do not have a child restraint with
lower anchor attachments, the vehicle seat
belts can be used.
Several manufacturers offer child restraints
for infants and small children of various
sizes. When selecting any child restraint,
keep the following points in mind:
. Choose only a restraint with a label
certifying that it complies with Federal
Motor Vehicle Safety Standard 213 or
Canadian Motor Vehicle Safety Stan-
dard 213.
. Check the child restraint in your vehicle
to be sure it is compatible with the
vehicle’s seat and seat belt system.
. If the child restraint is compatible with
your vehicle, place your child in the
child restraint and check the various
adjustments to be sure the child
restraint is compatible with your child.
Page 48 of 474
2. Position the child restraint on the seat.Always follow the child restraint man-
ufacturer’s instructions.
The back of the child restraint should
be secured against the vehicle seat-
back.
If necessary, adjust or remove the head
restraint to obtain the correct child
restraint fit. If the head restraint is
removed, store it in a secure place. Be
sure to reinstall the head restraint
when the child restraint is removed.
See “Head restraints” (P.1-7) for head
restraint adjustment, removal and in-
stallation information.
For models with a head restraint speak-
er (if so equipped), the head restraint
cannot be removed.
If the seating position does not have an
adjustable head restraint and it is
interfering with the proper child re-
straint fit, try another seating position
or a different child restraint.
SSS0360B
Forward-facing —step 3
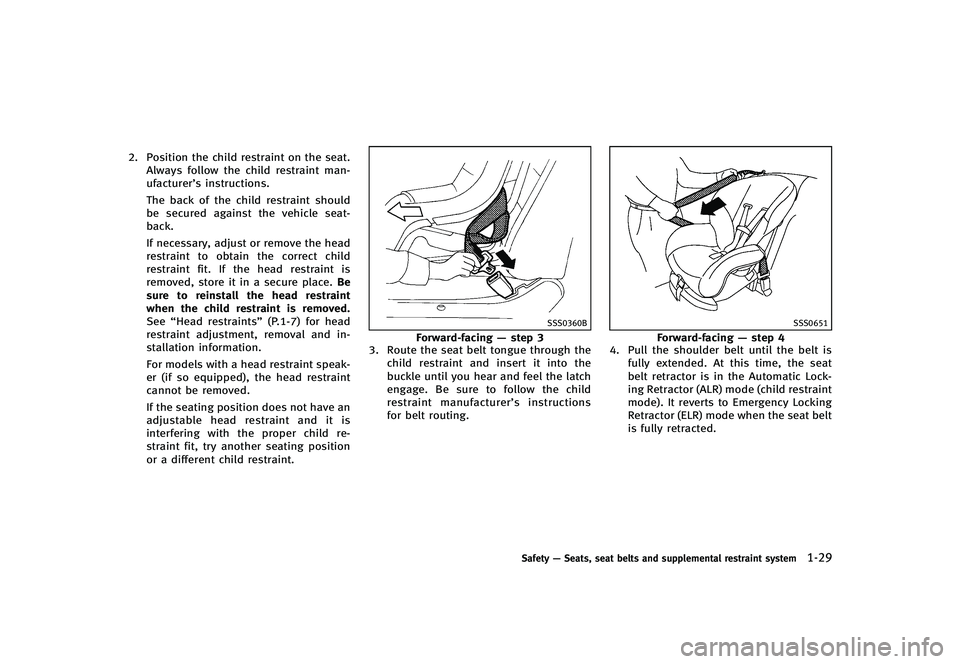
3. Route the seat belt tongue through the
child restraint and insert it into the
buckle until you hear and feel the latch
engage. Be sure to follow the child
restraint manufacturer’s instructions
for belt routing.
SSS0651
Forward-facing —step 4
4. Pull the shoulder belt until the belt is
fully extended. At this time, the seat
belt retractor is in the Automatic Lock-
ing Retractor (ALR) mode (child restraint
mode). It reverts to Emergency Locking
Retractor (ELR) mode when the seat belt
is fully retracted.
Safety —Seats, seat belts and supplemental restraint system1-29
Page 51 of 474
1-32Safety—Seats, seat belts and supplemental restraint system
LRS0455
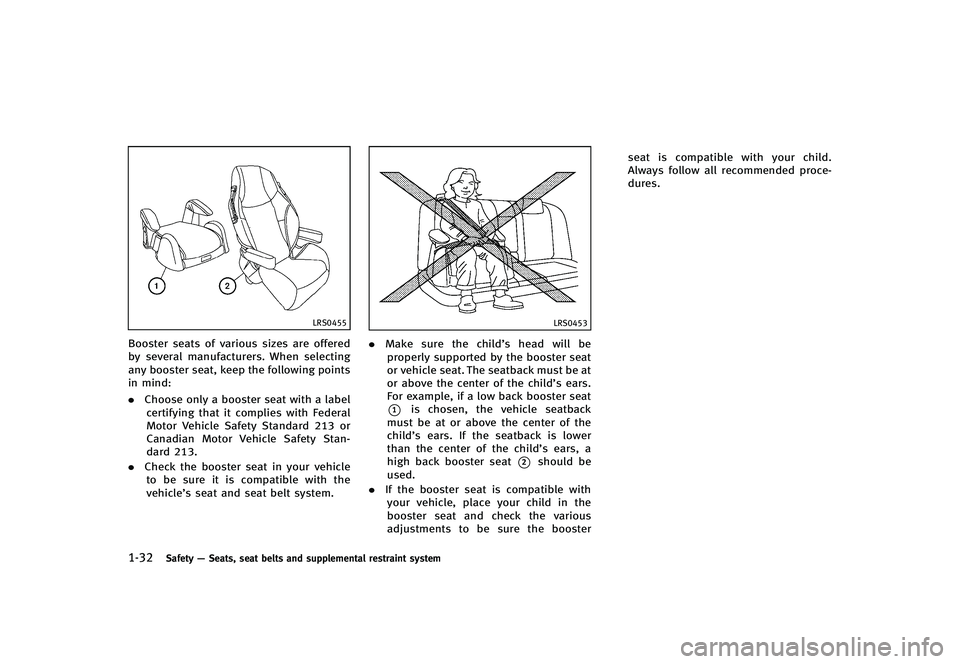
Booster seats of various sizes are offered
by several manufacturers. When selecting
any booster seat, keep the following points
in mind:
. Choose only a booster seat with a label
certifying that it complies with Federal
Motor Vehicle Safety Standard 213 or
Canadian Motor Vehicle Safety Stan-
dard 213.
. Check the booster seat in your vehicle
to be sure it is compatible with the
vehicle’s seat and seat belt system.
LRS0453
. Make sure the child’s head will be
properly supported by the booster seat
or vehicle seat. The seatback must be at
or above the center of the child’s ears.
For example, if a low back booster seat
*1is chosen, the vehicle seatback
must be at or above the center of the
child’s ears. If the seatback is lower
than the center of the child’s ears, a
high back booster seat
*2should be
used.
. If the booster seat is compatible with
your vehicle, place your child in the
booster seat and check the various
adjustments to be sure the booster seat is compatible with your child.
Always follow all recommended proce-
dures.
Page 53 of 474
1-34Safety—Seats, seat belts and supplemental restraint system
LRS0454
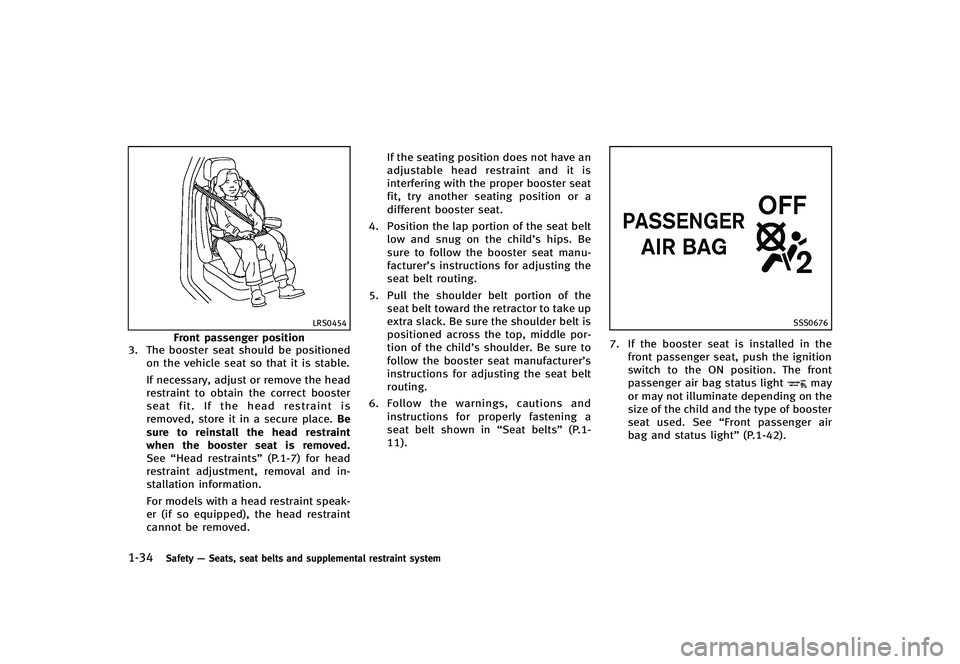
Front passenger position
3. The booster seat should be positioned
on the vehicle seat so that it is stable.
If necessary, adjust or remove the head
restraint to obtain the correct booster
seat fit. If the head restraint is
removed, store it in a secure place. Be
sure to reinstall the head restraint
when the booster seat is removed.
See “Head restraints” (P.1-7) for head
restraint adjustment, removal and in-
stallation information.
For models with a head restraint speak-
er (if so equipped), the head restraint
cannot be removed. If the seating position does not have an
adjustable head restraint and it is
interfering with the proper booster seat
fit, try another seating position or a
different booster seat.
4. Position the lap portion of the seat belt low and snug on the child’s hips. Be
sure to follow the booster seat manu-
facturer’s instructions for adjusting the
seat belt routing.
5. Pull the shoulder belt portion of the seat belt toward the retractor to take up
extra slack. Be sure the shoulder belt is
positioned across the top, middle por-
tion of the child’s shoulder. Be sure to
follow the booster seat manufacturer’s
instructions for adjusting the seat belt
routing.
6. Follow the warnings, cautions and
instructions for properly fastening a
seat belt shown in “Seat belts”(P.1-
11).
SSS0676
7. If the booster seat is installed in the
front passenger seat, push the ignition
switch to the ON position. The front
passenger air bag status light
may
or may not illuminate depending on the
size of the child and the type of booster
seat used. See “Front passenger air
bag and status light” (P.1-42).