mirror INFINITI G35 2003 Owners Manual
[x] Cancel search | Manufacturer: INFINITI, Model Year: 2003, Model line: G35, Model: INFINITI G35 2003Pages: 256, PDF Size: 3.37 MB
Page 54 of 256
2 Instruments and controls Instrument panel ....................................................... 2-2
Meters and gauges ................................................... 2-3
Speedometer and odometer ................................ 2-4
Tachometer .......................................................... 2-4
Engine coolant temperature gauge ...................... 2-5
Fuel gauge ........................................................... 2-5
Compass display ...................................................... 2-6
Warning/indicator lights and audible reminders ........ 2-9
Checking bulbs ..................................................... 2-9
Warning lights....................................................... 2-9
Indicator lights .................................................... 2-11
Audible reminders .............................................. 2-13
Security systems ..................................................... 2-13
Vehicle security system ...................................... 2-13
Infiniti Vehicle Immobilizer System ................... 2-14
Windshield wiper and washer switch ...................... 2-16
Rear window and outside mirror (if so equipped)
defroster switch ....................................................... 2-16
Headlight and turn signal switch ............................. 2-17
Xenon headlights (if so equipped) ..................... 2-17
Headlight switch ................................................. 2-17
Turn signal switch .............................................. 2-19
Fog light switch ....................................................... 2-20
Hazard warning flasher switch ................................ 2-20 Horn......................................................................... 2-21
Heated seats (if so equipped) ................................. 2-21
Vehicle dynamics control (VDC) off switch ............ 2-22
Clock ....................................................................... 2-23
Adjusting the time............................................... 2-23
Power outlet ............................................................ 2-23
Cigarette lighter and ashtray (accessory) ............... 2-24
Storage .................................................................... 2-25
Instrument pocket (Except for Navigation system
equipped models) ............................................... 2-25
Pocket (Manual transmission model) ................. 2-25
Glasses case ...................................................... 2-26
Cup holder .......................................................... 2-26
Glove box ........................................................... 2-27
Upper glove box (Except for Navigation system
equipped models) ............................................... 2-28
Console box ....................................................... 2-28
Rear armrest pocket ........................................... 2-29
Cargo net............................................................ 2-29
Coat hook (Coupe) ............................................. 2-30
Stowing golf bags ............................................... 2-30
Windows .................................................................. 2-31
Power windows .................................................. 2-31
Automatic adjusting function (Coupe) ................ 2-33
Z 02.7.29/V35-D/V5.0
X
Page 55 of 256
Sunroof (if so equipped) ......................................... 2-33
Automatic sunroof .............................................. 2-33
Interior light ............................................................. 2-35
Interior light......................................................... 2-35
Map light ............................................................. 2-35
Rear personal light ............................................. 2-36
Vanity mirror light (if so equipped) .......................... 2-36
Trunk light ............................................................... 2-37
HomeLink
Universal Transceiver
(if so equipped) ....................................................... 2-37 Programming HomeLink
................................... 2-38
Programming HomeLink
for Canadian
customers ........................................................... 2-39
Operating the HomeLink
Universal
Transceiver ......................................................... 2-39
Programming trouble diagnosis.......................... 2-39
Clearing the programmed information................ 2-40
Reprogramming a single HomeLink
button...... 2-40
If your vehicle is stolen ...................................... 2-40
Z 02.7.29/V35-D/V5.0
X
Page 56 of 256
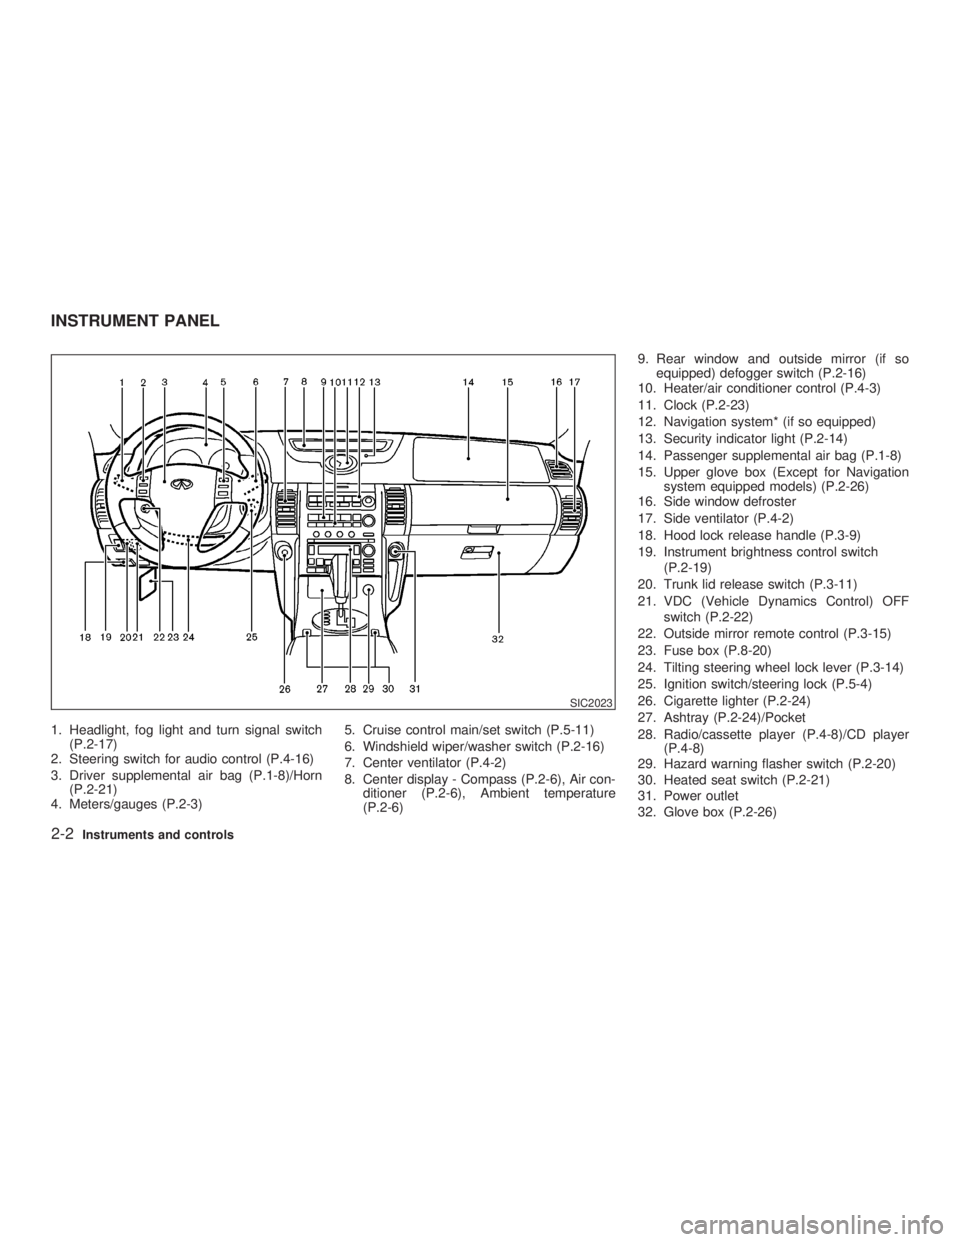
1. Headlight, fog light and turn signal switch
(P.2-17)
2. Steering switch for audio control (P.4-16)
3. Driver supplemental air bag (P.1-8)/Horn
(P.2-21)
4. Meters/gauges (P.2-3) 5. Cruise control main/set switch (P.5-11)
6. Windshield wiper/washer switch (P.2-16)
7. Center ventilator (P.4-2)
8. Center display - Compass (P.2-6), Air con-
ditioner (P.2-6), Ambient temperature
(P.2-6) 9. Rear window and outside mirror (if so
equipped) defogger switch (P.2-16)
10. Heater/air conditioner control (P.4-3)
11. Clock (P.2-23)
12. Navigation system* (if so equipped)
13. Security indicator light (P.2-14)
14. Passenger supplemental air bag (P.1-8)
15. Upper glove box (Except for Navigation
system equipped models) (P.2-26)
16. Side window defroster
17. Side ventilator (P.4-2)
18. Hood lock release handle (P.3-9)
19. Instrument brightness control switch
(P.2-19)
20. Trunk lid release switch (P.3-11)
21. VDC (Vehicle Dynamics Control) OFF
switch (P.2-22)
22. Outside mirror remote control (P.3-15)
23. Fuse box (P.8-20)
24. Tilting steering wheel lock lever (P.3-14)
25. Ignition switch/steering lock (P.5-4)
26. Cigarette lighter (P.2-24)
27. Ashtray (P.2-24)/Pocket
28. Radio/cassette player (P.4-8)/CD player
(P.4-8)
29. Hazard warning flasher switch (P.2-20)
30. Heated seat switch (P.2-21)
31. Power outlet
32. Glove box (P.2-26) SIC2023INSTRUMENT PANEL
2-2 Instruments and controls
Z 02.7.29/V35-D/V5.0
X
Page 70 of 256

The windshield wiper and washer operates
when the ignition key is in the ON position.
Push the lever down to operate the wiper.
Intermittent operation can be adjusted by turn-
ing the knob. Also, the intermittent operation
speed varies in accordance with the vehicle
speed. (e.g. When the vehicle speed is high,
the intermittent operation speed will be faster.)
Pull the lever toward you to operate the
washer. Then the wiper will also operate sev-
eral times. WARNING In freezing temperatures the washer so-
lution may freeze on the windshield and
obscure your vision which may lead to
an accident. Warm the windshield with
the defroster before you wash the wind-
shield.
CAUTION The following could damage the washer
system:
O Do not operate the washer continu-
ously for more than 30 seconds.
O Do not operate the washer if the res-
ervoir tank is empty. To defog/defrost the rear window glass and
outside mirrors (if so equipped), start the en-
gine and push the switch on. The indicator light
will come on. Push the switch again to turn the
defroster off.
It will automatically turn off in approximately 15
minutes.
CAUTION When cleaning the inner side of the rear
window, be careful not to scratch or
damage the rear window defroster.SIC2024 SIC1831
WINDSHIELD WIPER AND
WASHER SWITCH REAR WINDOW AND OUTSIDE
MIRROR (if so equipped)
DEFROSTER SWITCH
2-16 Instruments and controls
Z 02.7.29/V35-D/V5.0
X
Page 89 of 256

1. Press the switch to the CLOSE/UP side to
tilt up the sunroof.
2. Press and hold the switch to the
CLOSE/UP side for approximately 3 sec-
onds while the sunroof is tilted up.
3. Release the switch once, then press and
hold the switch to the CLOSE/UP side
again for approximately 10 seconds until
the sunroof moves automatically.
4. The sunroof will automatically open and
then close all the way.
If you failed at procedure 3. repeat all the
procedures from No. 1.
Have your INFINITI retailer check and repair
the sunroof.
INTERIOR LIGHT The interior light has a two-position switch.
When the switch is in the door position, the
light will illuminate when a door is opened.
The light will stay on for about 30 seconds
when:
O The doors are unlocked by the keyfob, a
key or the power door lock switch while all
doors are closed.
O The driver's door is opened and then closed
while the key is removed from the ignition
switch. O The key is removed from the ignition switch
while all doors are closed.
The light will turn off while the 30 second timer
is activated, when:
O The driver's door is locked either with the
keyfob, a key or the power door lock switch.
O The ignition switch is turned ON.
MAP LIGHT When the switch is pushed in, the light will turn
on. When the switch is pushed again, the light
will turn off.
When the map light switch is in the ON
position, it will automatically turn off 30
minutes after the ignition switch has been
turned to the OFF position. To turn on the
light again, turn the ignition switch to the
ON position.
The map, personal, and vanity mirror lights will
automatically turn off 30 minutes after the
latest operation of the following with the igni-
tion switch in the ACC or OFF position:
O Opening or closing any door
O Locking or unlocking with the keyfob, a key
or the power door lock switch.
O Inserting or removing a key from the ignition
switch SIC1857
INTERIOR LIGHT
Instruments and controls
2-35
Z 02.7.29/V35-D/V5.0
X
Page 90 of 256

These lights will turn on again when any of the
above operations is performed after the lights
have turned off automatically. (The lights will
turn off 30 minutes after the latest operation of
the above as well.)
CAUTIONO Turn off the map, personal and vanity
mirror lights when you leave the ve-
hicle.
O Do not use for extended periods of
time with the engine stopped. This
could result in a discharged battery.
REAR PERSONAL LIGHT The rear personal light has a three-position
switch.
When the switch is in the door position, the
light will illuminate when the door is opened.
When the personal light switch is in the ON
position, it will automatically turn off 30
minutes after the ignition switch has been
turned to the OFF position. To turn on the
light again, turn the ignition switch to the
ON position. The light on the vanity mirror will turn on when
the cover on the vanity mirror is opened.
When the vanity mirror light stays on, it will
automatically turn off 30 minutes after the
ignition switch has been turned to the OFF
position. To turn on the light again, turn the
ignition switch to the ON position. SIC1858 SIC1859
VANITY MIRROR LIGHT (if so
equipped)
2-36 Instruments and controls
Z 02.7.29/V35-D/V5.0
X
Page 95 of 256
3 Pre-driving checks and adjustments Keys .......................................................................... 3-2
Doors ......................................................................... 3-3
Locking with key (Driver's side) ........................... 3-3
Windows open/close with key .............................. 3-3
Locking with inside lock knob............................... 3-4
Locking with power door lock switch.................... 3-4
Child safety rear door lock ................................... 3-5
Remote keyless entry system ................................... 3-5
How to use remote keyless entry system ............ 3-5
Battery replacement ............................................. 3-8
Hood ........................................................................ 3-10
Trunk lid .................................................................. 3-10
Opener operation ............................................... 3-11
Interior trunk lid release ..................................... 3-12
Secondary trunk lid release ............................... 3-13 Fuel filler lid ............................................................. 3-14
Opening the filler lid ........................................... 3-14
Fuel filler cap ...................................................... 3-14
Steering wheel ........................................................ 3-16
Tilt operation....................................................... 3-16
Sun visors ............................................................... 3-16
Mirrors ..................................................................... 3-17
Automatic anti-glare inside mirror (if so
equipped)............................................................ 3-17
Outside mirrors ................................................... 3-18
Automatic seat positioner (if so equipped) ............. 3-19
Automatic seat positioner operation ................... 3-19
Procedure for storing memory............................ 3-19
Cancel switch ..................................................... 3-21
Z 02.7.29/V35-D/V5.0
X
Page 111 of 256
CAUTIONStore the main sun visor after storing
the extension sun visor.
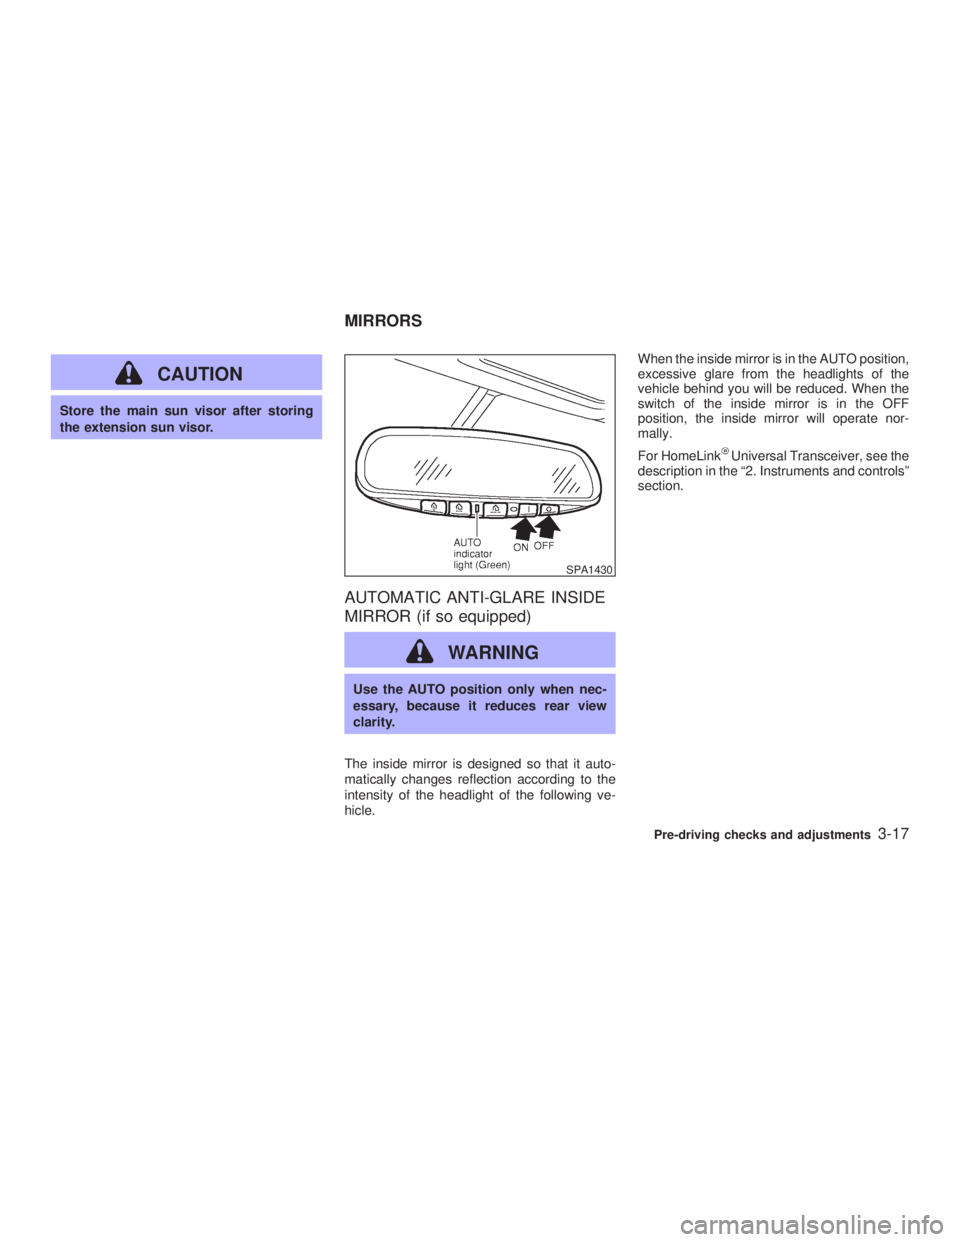
AUTOMATIC ANTI-GLARE INSIDE
MIRROR (if so equipped)
WARNING Use the AUTO position only when nec-
essary, because it reduces rear view
clarity.
The inside mirror is designed so that it auto-
matically changes reflection according to the
intensity of the headlight of the following ve-
hicle. When the inside mirror is in the AUTO position,
excessive glare from the headlights of the
vehicle behind you will be reduced. When the
switch of the inside mirror is in the OFF
position, the inside mirror will operate nor-
mally.
For HomeLink Universal Transceiver, see the
description in the ª2. Instruments and controlsº
section. SPA1430
MIRRORS
Pre-driving checks and adjustments
3-17
Z 02.7.29/V35-D/V5.0
X
Page 112 of 256

OUTSIDE MIRRORS
WARNINGObjects viewed in the outside mirror on
the passenger side are closer than they
appear. Be careful when moving to the
right. Using only this mirror could cause
an accident. Use inside mirror or glance
over your shoulder to properly judge
distances to other objects.
The outside mirror adjustment will operate only when the ignition switch is in the ACC or ON
position.
Turn the control knob right or left to select the
right or left outside mirror, then adjust.
Foldable outside mirrors Push the outside mirror backward to fold it.SPA1390 MPA0008
3-18 Pre-driving checks and adjustments
Z 02.7.29/V35-D/V5.0
X
Page 141 of 256
O Make sure the area around the vehicle is
clear.
O Maintenance items should be checked pe-
riodically, e.g., each time you check engine
oil.
O Check that all windows and lights are clean.
O Visually inspect tires for their appearance
and condition. Also, check tires for proper
inflation.
O Lock all doors.
O Position seat and adjust head restraints.
O Adjust inside and outside mirrors.
O Fasten seat belts and ask all passengers to
do likewise.
O Check the operation of warning lights when
key is turned to the ON (3) position. 1. Apply the parking brake.
2. Automatic transmission:
Move the selector lever to P (Park) or N
(Neutral). (P preferred.)
The starter is designed not to operate if the
selector lever is in one of the driving posi-
tions.
Manual transmission:
Move the shift lever to N (Neutral) position,
and depress the clutch pedal to the floor
while cranking the engine.
The starter is designed not to operate un-
less the clutch pedal is fully depressed.
3. Crank the engine with your foot off the
accelerator pedal by turning the ignition
key to START. Release the key when the
engine starts. If the engine starts, but fails
to run, repeat the above procedure.
O If the engine is very hard to start in ex-
tremely cold weather or when restarting,
depress the accelerator pedal a little (ap-
proximately 1/5 to the floor) and hold it then
crank the engine. Release the key and the
accelerator pedal when the engine starts.
O If the engine is very hard to start because it
is flooded, depress the accelerator pedal all the way to the floor and hold it. Crank the
engine for 5 to 6 seconds. After cranking
the engine, release the accelerator pedal.
Crank the engine with your foot off the
accelerator pedal by turning the ignition
key to START. Release the key when the
engine starts. If the engine starts, but fails
to run, repeat the above procedure.
CAUTION Do not operate the starter for more than
15 seconds at a time. If the engine does
not start, turn the key off and wait 10
seconds before cranking again, other-
wise the starter could be damaged.
4. Warm-up
Allow the engine to idle for at least 30
seconds after starting. Drive at moderate
speed for a short distance first, especially in
cold weather.BEFORE STARTING THE ENGINE STARTING THE ENGINE
Starting and driving
5-7
Z 02.7.29/V35-D/V5.0
X