reset INFINITI G35 2003 Owners Manual
[x] Cancel search | Manufacturer: INFINITI, Model Year: 2003, Model line: G35, Model: INFINITI G35 2003Pages: 256, PDF Size: 3.37 MB
Page 10 of 256

FRONT POWER SEAT
ADJUSTMENT (if so equipped)
WARNINGO Do not adjust the driver's seat while
driving so full attention may be given
to vehicle operation.
O Do not leave children unattended in-
side the vehicle. They could unknow-
ingly activate switches or controls.
Unattended children could become
involved in serious accidents.
Operating tips O The seat motor has an auto-reset overload
protection circuit. If the motor stops during
operation, wait 30 seconds, then reactivate
the switch.
O Do not operate the power seat for a long
period of time when the engine is off. This
will discharge the battery.
See ªAutomatic seat positionerº in the ª3.
Pre-driving checks and adjustmentsº for auto-
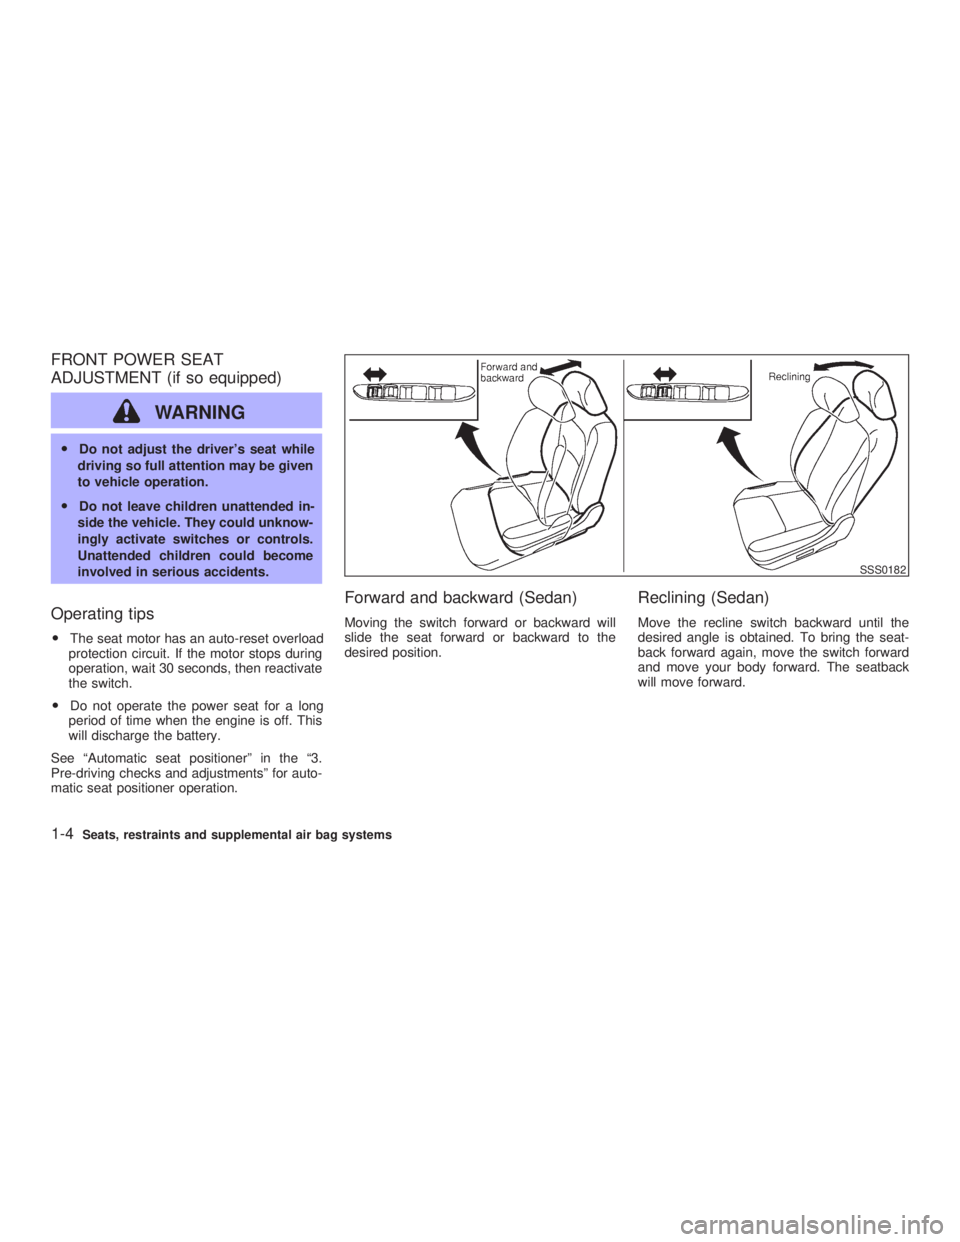
matic seat positioner operation. Forward and backward (Sedan) Moving the switch forward or backward will
slide the seat forward or backward to the
desired position.
Reclining (Sedan) Move the recline switch backward until the
desired angle is obtained. To bring the seat-
back forward again, move the switch forward
and move your body forward. The seatback
will move forward. SSS0182
1-4 Seats, restraints and supplemental air bag systems
Z 02.7.29/V35-D/V5.0
X
Page 57 of 256

See the page indicated in parentheses for
operating details.
*: Refer to the separate Navigation System
Owner's Manual.
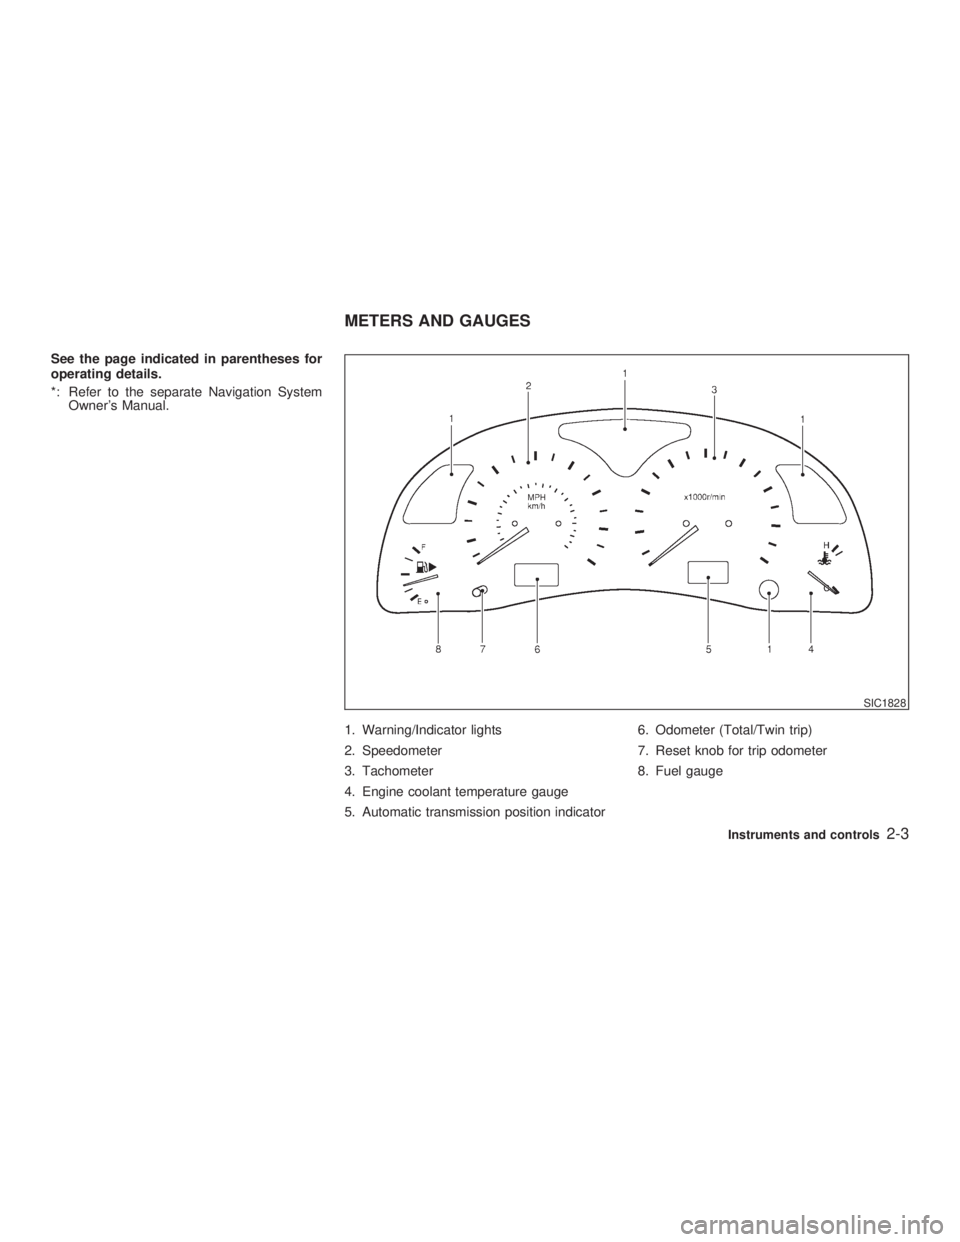
1. Warning/Indicator lights
2. Speedometer
3. Tachometer
4. Engine coolant temperature gauge
5. Automatic transmission position indicator 6. Odometer (Total/Twin trip)
7. Reset knob for trip odometer
8. Fuel gauge SIC1828METERS AND GAUGES
Instruments and controls
2-3
Z 02.7.29/V35-D/V5.0
X
Page 58 of 256

SPEEDOMETER AND ODOMETER
Speedometer The speedometer indicates vehicle speed.
Odometer/Twin trip odometer The odometer/twin trip odometer are displayed
when the ignition key is in the ON position.
The odometer records the total distance the
vehicle has been driven.
The twin trip odometer records the distance of
individual trips. Changing the display:
Pushing the reset knob changes the display as
follows:
TRIP A ! TRIP B ! TRIP A
Resetting the trip odometer:
Pushing the reset knob for more than 1 second
resets the trip odometer to zero.
TACHOMETER The tachometer indicates engine speed in
revolutions per minute (r/min).
CAUTION When engine speed approaches the red
zone, shift to a higher gear. Operating
the engine in the red zone may cause
serious engine damage.SIC1826 SIC1827
2-4 Instruments and controls
Z 02.7.29/V35-D/V5.0
X
Page 104 of 256

1. Pull the hood lock release handle
j 1
lo-
cated below the instrument panel; the hood
will then spring up slightly.
2. Raise the lever
j 2
at the front of the hood
with your fingertips and raise the hood.
3. Insert the assist bar into the slot
j 3
in the
front edge of the hood.
4. When closing the hood, reset the assist bar
to its original position, then slowly close the
hood and make sure it locks into place.
WARNING O Make sure the hood is completely
closed and latched before driving.
Failure to do so could cause the hood
to fly open and result in an accident.
O If you see steam or smoke coming
from the engine compartment, to
avoid injury do not open the hood. WARNING O Do not drive with the trunk lid open.
This could allow dangerous exhaust
gases to be drawn into the vehicle.
See ªPrecautions when starting and
drivingº in the ª5. Starting and driv-
ingº section for exhaust gas.
O Closely supervise children when they
are around cars to prevent them from
playing and becoming locked in the
trunk where they could be seriously
injured. Keep the car locked with the
trunk closed when not in use, and
prevent children's access to car keys. SPA1423
HOOD TRUNK LID
3-10 Pre-driving checks and adjustments
Z 02.7.29/V35-D/V5.0
X
Page 114 of 256

any positions other than ON.
4. Push the SET switch and, within 5 seconds,
push the memory switch 1 or 2 fully for at
least 1 second.
The indicator light for the pushed memory
switch will come on and stay on for approxi-
mately 5 seconds after pushing the switch.
After the indicator light goes off, the se-
lected positions are stored in the selected
memory (1 or 2).
If memory is stored in the same memory
switch, the previous memory will be de-
leted.
Confirming memory storage O Turn the ignition ON and push the SET
switch. If the main memory has not been
stored, the indicator light will come on for
approximately 0.5 seconds. When the
memory has stored the position, the indica-
tor light will stay on for approximately 5
seconds.
O If the battery cable is disconnected, or if the
fuse blows, the memory will be canceled. In
such a case, reset the desired positions
using the following procedures.
1. Open and close the driver's door more than two times with the ignition key in the LOCK
position.
2. Reset the desired position using the previ-
ous procedure.
Selecting the memorized position 1. A/T models:
Set the automatic transmission selector le-
ver to the P (Park) position.
M/T models:
Apply the parking brake securely when the
vehicle is stopped.
2. Turn the ignition ON.
3. Push the memory switch 1 or 2 fully for at
least 1 second.
The driver's seat will move to the memo-
rized position with the indicator light flash-
ing. Then the light will stay on for approxi-
mately 5 seconds.
When memory switch 1 or 2 is pushed with the
driver's door open and then the key inserted
into the ignition switch within approximately 1
minute, the driver's seat will move to the
memorized position. (AT models only) System operation The automatic drive positioner system will not
work or will stop operating under the following
conditions:
O when the vehicle speed is above 4 MPH (7
km/h).
O when any two or more of the memory
switches are simultaneously pressed while
the automatic drive positioner is operating.
O when the adjusting switch for the driver's
seat is turned on while the automatic drive
positioner is operating.
O when the cancel switch is pushed to cancel.
O when the memory switch 1 or 2 is not
pushed for at least 1 second.
O when the seat has already been moved to
the memorized position.
O when no seat position is stored in the
memory switch.
O when the parking brake is not applied. Ð
M/T models
O when the vehicle speed is above 4 MPH (7
km/h) while the parking brake is applied. Ð
M/T models
To restart the drive positioner system,
move the parking brake to off and on.
3-20 Pre-driving checks and adjustments
Z 02.7.29/V35-D/V5.0
X
Page 126 of 256

1. CD EJECT button
2. CD play button
3. TAPE play button
4. Audio display 5. FM/AM band select button
6. SAT (satellite) channel select button
7. SEEK/APS REW, APS FF/TRACK
CHANGE button 8. POWER on/off button
9. CD LOAD button
10. Volume control button
11. AUDIO (BASS, TREBLE, FADER, BAL-
ANCE, SCV and NR (Dolby)) button
12. PTY (Program type)/CAT (Category) but-
ton
13. RPT (repeat) play/DISP (Display) button
14. SCAN tuning button
15. Station and preset (FM/AM)/CD insert or
CD play select button
16. AUTO.P (Automatic preset) button
17. TAPE EJECT button
18. RADIO TUNE/FF z REW/AUDIO (Bass,
treble, fader, and balance, SCV and NR
(Dolby)) ADJUSTING button SAA0637
4-10 Heater, air conditioner and audio systems
Z 02.7.29/V35-D/V5.0
X
Page 129 of 256

1. Tune to the desired station using the SEEK,
SCAN or TUNE button.
2. Select the desired station/channel and
keep pushing any of the desired
station/channel memory buttons (1 to 6)
until a beep sound is heard. (The radio
mutes when the select button is pushed.)
3. The channel indicator will then come on
and the sound will resume. Memorizing is
now complete.
4. Other buttons can be set in the same
manner.
If the battery cable is disconnected, or if the
fuse blows, the radio memory will be can-
celled. In that case, reset the desired stations.
Automatic preset:
To select the preset FM, AM, SAT or PTY
station/channel, push the AUTO.P button for
less than 1.5 seconds.
To preset the FM, AM, SAT or PTY
station/channel, push the AUTO.P button for
more than 1.5 seconds.
(CAT) Program type/category:
When the PTY button is pressed during FM
mode, the PTY name of the current tuned
station is displayed. When the PTY (CAT) button is pressed during
the satellite radio mode, the category name of
the current channel is displayed. During this
time if the PTY data code is zero, or the data is
unreadable; the display will show NONE.
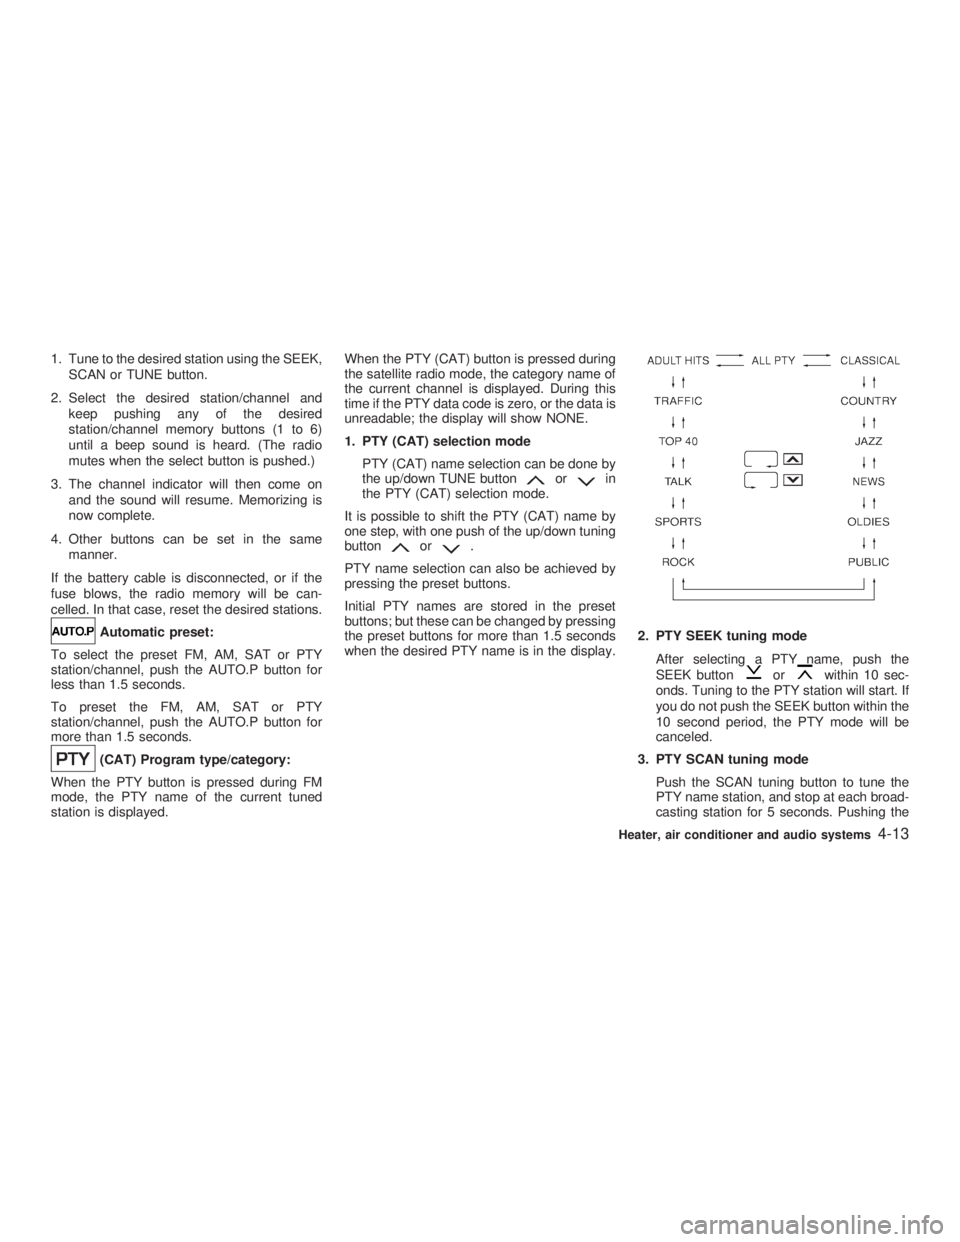
1. PTY (CAT) selection mode
PTY (CAT) name selection can be done by
the up/down TUNE button or in
the PTY (CAT) selection mode.
It is possible to shift the PTY (CAT) name by
one step, with one push of the up/down tuning
button or .
PTY name selection can also be achieved by
pressing the preset buttons.
Initial PTY names are stored in the preset
buttons; but these can be changed by pressing
the preset buttons for more than 1.5 seconds
when the desired PTY name is in the display. 2. PTY SEEK tuning mode
After selecting a PTY name, push the
SEEK button or within 10 sec-
onds. Tuning to the PTY station will start. If
you do not push the SEEK button within the
10 second period, the PTY mode will be
canceled.
3. PTY SCAN tuning mode
Push the SCAN tuning button to tune the
PTY name station, and stop at each broad-
casting station for 5 seconds. Pushing the Heater, air conditioner and audio systems
4-13
Z 02.7.29/V35-D/V5.0
X
Page 150 of 256

To set at cruising speed, accelerate your
vehicle to the desired speed, push the
COAST/SET switch and release it. (The SET
indicator light will come on.) Take your foot off
the accelerator pedal. Your vehicle will main-
tain the set speed.
O To pass another vehicle, depress the
accelerator pedal. When you release the
pedal, the vehicle will return to the previ-
ously set speed.
O The vehicle may not maintain the set speed
when going up or down steep hills. If this
happens, drive without the cruise control.
To cancel the preset speed, follow either of
these three methods:
a) Push the cancel switch; The SET indicator
light will go out.
b) Tap the brake pedal; The SET indicator
light will go out.
c) Turn the main switch off. Both the CRUISE
indicator and SET indicator lights will go
out.
O If you depress the brake pedal while push-
ing the RES/ACCEL set switch and reset at
the cruising speed, turn the main switch off
once and then turn it on again.
O The cruise control will automatically be can- celled if the vehicle slows down below
approximately 8 MPH (13 km/h).
O Depress the clutch pedal (manual transmis-
sion), or move the selector lever to N (Neu-
tral) position (automatic transmission). The
SET indicator light will go out.
To reset at a faster cruising speed, use one
of the following three methods:
a) Depress the accelerator pedal. When the
vehicle attains the desired speed, push and
release the COAST/SET switch.
b) Push and hold the RES/ACCEL set switch.
When the vehicle attains the speed you
desire, release the switch.
c) Push, then quickly release the RES/ACCEL
set switch. Each time you do this, the set
speed will increase by about 1 MPH (1.6
km/h).
To reset at a slower cruising speed, use one
of the following three methods:
a) Lightly tap the brake pedal. When the ve-
hicle attains the desired speed, push the
COAST/SET switch and release it.
b) Push and hold the COAST/SET switch.
Release the switch when the vehicle slows
down to the desired speed. c) Push, then quickly release the COAST/
SET switch. Each time you do this, the set
speed will decrease by about 1 MPH (1.6
km/h).
To resume the preset speed, push and re-
lease the RES/ACCEL set switch. The vehicle
will resume the last set cruising speed when
the vehicle speed is over 25 MPH (40 km/h).
5-16 Starting and driving
Z 02.7.29/V35-D/V5.0
X
Page 243 of 256

If you believe that your vehicle has a defect
which could cause a crash or could cause
injury or death, you should immediately
inform the National Highway Traffic Safety
Administration
(NHTSA) in addition to no-
tifying INFINITI.
If
NHTSA receives similar complaints, it
may open an investigation, and if it finds
that a safety defect exists in a group of
vehicles, it may order a recall and remedy
campaign. However,
NHTSA cannot be-
come involved in individual problems be-
tween you, your retailer, or INFINITI.
To contact
NHTSA , you may call the Auto
Safety Hotline toll-free at 1-888-327-4236.
You may also write to:
NHTSA , U.S. De-
partment of Transportation, Washington,
D.C. 20590. You can also obtain other
information about motor vehicle safety from
the Hotline. You may notify INFINITI by contacting our
Consumer Affairs Department, toll-free, at
1-800-662-6200.
In Hawaii call (808) 836-0888. Due to legal requirements in some states/
areas, your vehicle may be required to be in
what is called the ªready conditionº for an
Inspection/Maintenance (I/M) test of the emis-
sion control system.
The vehicle is set to the ªready conditionº
when it is driven through certain driving pat-
terns. Usually, the ªready conditionº can be
obtained by ordinary usage of the vehicle.
If a powertrain system component is repaired
or the battery is disconnected, the vehicle may
be reset to a not ªready conditionº. Before
taking the I/M test, drive the vehicle through
the following pattern to set the vehicle to the
ready condition. If you cannot or do not want to
perform the driving pattern, an INFINITI re-
tailer can conduct it for you.
WARNING Always drive the vehicle in a safe and
prudent manner according to traffic con-
ditions, and obey all traffic laws.
1. Start the engine. Allow the engine to idle
until the engine coolant temperature gauge
needle points between the C and H (normal
operating temperature). 2. Accelerate the vehicle to 55 MPH (88
km/h), then quickly release the accelerator
pedal completely and keep it released for at
least 6 seconds.
3. Quickly depress the accelerator pedal for a
moment, then drive the vehicle at a speed
of 53 to 60 MPH (86 to 96 km/h) for at least
5 minutes.
4. Stop the vehicle. Leave the engine running.
5. Accelerate the vehicle to 35 MPH (55 km/h)
and maintain the speed for 20 seconds.
6. Repeat steps 4 and 5 at least 3 times.
7. Accelerate the vehicle to 55 MPH (88 km/h)
and maintain the speed for at least 3 min-
utes.
8. Stop the vehicle. Place the automatic trans-
mission selector lever in the ªPº or ªNº
position or the manual transmission shift
lever in the ªNº position.
9. Turn the engine off.
10.Repeat steps 1 through 8 at least one more
time.
If step 1 through 7 is interrupted, repeat the
preceding step. Any safe driving mode is ac-
ceptable between steps. Do not stop the en-
gine until step 7 is completed.REPORTING SAFETY DEFECTS
(US only) READINESS FOR INSPECTION/
MAINTENANCE (I/M) TEST (US
only)
Technical and consumer information
10-21
Z 02.7.29/V35-D/V5.0
X