four wheel drive INFINITI M HYBRID 2013 Owner's Manual
[x] Cancel search | Manufacturer: INFINITI, Model Year: 2013, Model line: M HYBRID, Model: INFINITI M HYBRID 2013Pages: 530, PDF Size: 3.71 MB
Page 101 of 530
2-16Instruments and controls
stop the vehicle as soon as possible.
Driving with under-inflated tires may
permanently damage the tires and in-
crease the likelihood of tire failure.
Serious vehicle damage could occur
and may lead to an accident and could
result in serious personal injury. Check
the tire pressure for all four tires. Adjust
the tire pressure to the recommended
COLD tire pressure shown on the Tire
and Loading Information label to turn
the low tire pressure warning light OFF. If
the light still illuminates while driving
after adjusting the tire pressure, a tire
may be flat. If you have a flat tire,
replace it with a spare tire as soon as
possible.
. When a spare tire is mounted or a wheel
is replaced, the TPMS will not function
and the low tire pressure warning light
will flash for approximately 1 minute.
The light will remain on after the 1
minute. Contact your INFINITI retailer as
soon as possible for tire replacement
and/or system resetting.
. Replacing tires with those not originally
specified by INFINITI could affect the
proper operation of the TPMS.CAUTION
.The TPMS is not a substitute for the
regular tire pressure check. Be sure to
check the tire pressure regularly.
. If the vehicle is being driven at speeds of
less than 16 MPH (25 km/h), the TPMS
may not operate correctly.
. Be sure to install the specified size of
tires to the four wheels correctly.
Master warning light
When the ignition switch is in the ON
position, the master warning light illumi-
nates if any of the following are displayed
on the dot matrix liquid crystal display:
.No key warning
. Low fuel warning
. Low washer fluid warning
. Parking brake release warning
. Door/trunk open warning
. Loose fuel cap warning
. Check tire pressure warning
. Intelligent Key system warning
. SHIFT “P”warning .
Hybrid system over heat warning
See “Dot matrix liquid crystal display” later
in this section.
Preview Function warning light
(orange; if so equipped)
The light comes on if there is a malfunction
in the Brake Assist (with Preview Function)
system.
If the warning light comes on, park the
vehicle in a safe place. Stop the hybrid
system, restart the hybrid system, then
resume driving.
If the indicator stays on, it may indicate
that the system is malfunctioning.
Although the vehicle is still driveable
under normal conditions, have the vehicle
checked at an INFINITI retailer.
Seat belt warning light and
chime
The light and chime remind you to fasten
seat belts. The light illuminates whenever
the ignition switch is pushed to the ON
position, and will remain illuminated until
the driver’s seat belt is fastened. At the
same time, the chime will sound for about
6 seconds unless the driver’s seat belt is
securely fastened.
Page 183 of 530
3-28Pre-driving checks and adjustments
switch.
4. The outside mirror surface moves downward.
When one of the following conditions has
occurred, the outside mirror surface will
return to its original position.
. The selector lever is moved to any
position other than R (Reverse).
. The outside mirror control switch is set
to the center position.
. The ignition switch is pushed to the OFF
position.
Automatic anti-glare
The outside rearview mirror is designed so
that it automatically changes reflection
according to the intensity of the headlights
of the vehicle following you.
The anti-glare system will be automatically
turned on when you push the ignition
switch to the “ON”position.
SIC3869
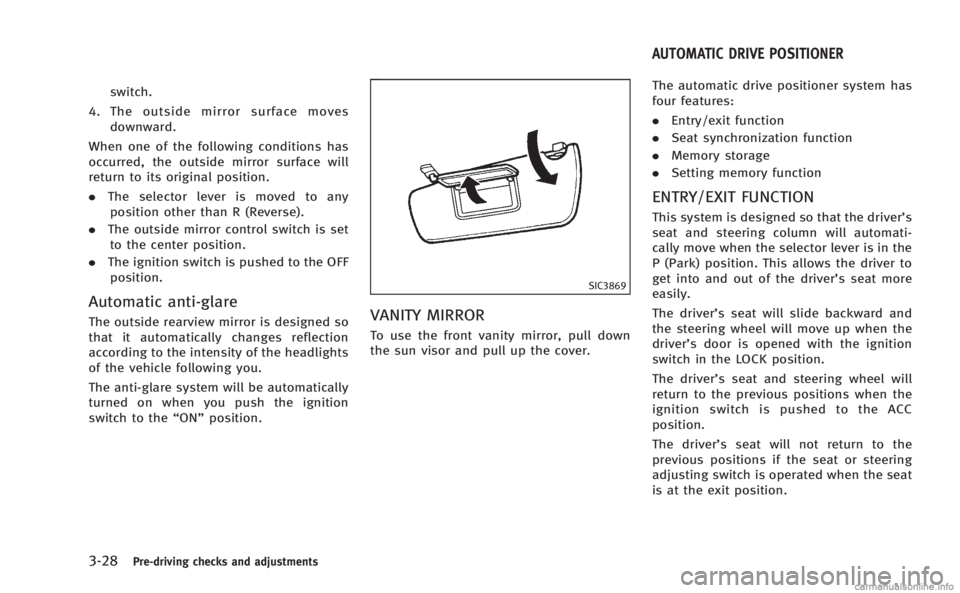
VANITY MIRROR
To use the front vanity mirror, pull down
the sun visor and pull up the cover. The automatic drive positioner system has
four features:
.
Entry/exit function
. Seat synchronization function
. Memory storage
. Setting memory function
ENTRY/EXIT FUNCTION
This system is designed so that the driver’s
seat and steering column will automati-
cally move when the selector lever is in the
P (Park) position. This allows the driver to
get into and out of the driver’s seat more
easily.
The driver’s seat will slide backward and
the steering wheel will move up when the
driver’s door is opened with the ignition
switch in the LOCK position.
The driver’s seat and steering wheel will
return to the previous positions when the
ignition switch is pushed to the ACC
position.
The driver’s seat will not return to the
previous positions if the seat or steering
adjusting switch is operated when the seat
is at the exit position.
AUTOMATIC DRIVE POSITIONER
Page 332 of 530

and it is the driver’s responsibility to
maintain correct tire pressure, even if
under-inflation has not reached the level
to trigger illumination of the TPMS low tire
pressure telltale.
Your vehicle has also been equipped with a
TPMS malfunction indicator to indicate
when the system is not operating properly.
The TPMS malfunction indicator is com-
bined with the low tire pressure telltale.
When the system detects a malfunction,
the telltale will flash for approximately one
minute and then remain continuously
illuminated. This sequence will continue
upon subsequent vehicle start-ups as long
as the malfunction exists. When the mal-
function indicator is illuminated, the sys-
tem may not be able to detect or signal low
tire pressure as intended. TPMS malfunc-
tions may occur for a variety of reasons,
including the installation of replacement or
alternate tires or wheels on the vehicle that
prevent the TPMS from functioning prop-
erly. Always check the TPMS malfunction
telltale after replacing one or more tires or
wheels on your vehicle to ensure that the
replacement or alternate tires and wheels
allow the TPMS to continue to function
properly.Additional information
. The TPMS does not monitor the tire
pressure of the spare tire.
. The TPMS will activate only when the
vehicle is driven at speeds above 16
MPH (25 km/h). Also, this system may
not detect a sudden drop in tire
pressure (for example a flat tire while
driving).
. The low tire pressure warning light does
not automatically turn off when the tire
pressure is adjusted. After the tire is
inflated to the recommended pressure,
the vehicle must be driven at speeds
above 16 MPH (25 km/h) to activate the
TPMS and turn off the low tire pressure
warning light. Use a tire pressure gauge
to check the tire pressure.
. The CHECK TIRE PRESSURE warning
appears in the dot matrix liquid crystal
display when the low tire pressure
warning light is illuminated and low
tire pressure is detected. The CHECK
TIRE PRESSURE warning turns off when
the low tire pressure warning light
turns off. The CHECK TIRE PRESSURE
warning does not appear if the tire
pressure warning light illuminates to
indicate a TPMS malfunction. .
Tire pressure rises and falls depending
on the heat caused by the vehicle’s
operation and the outside temperature.
Low outside temperature can lower the
temperature of the air inside the tire
which can cause a lower tire inflation
pressure. This may cause the low tire
pressure warning light to illuminate. If
the warning light illuminates in low
ambient temperature, check the tire
pressure for all four tires.
. You can also check the pressure of all
tires (except the spare tire) on the
display screen. The order of the tire
pressure figures displayed on the
screen does not correspond with the
actual order of the tire position. See
“TIRE PRESSURE information” in the“4.
Monitor, climate, audio, phone and
voice recognition systems” section.
For additional information, see “Low tire
pressure warning light” in the“2. Instru-
ments and controls” section and“Tire
Pressure Monitoring System (TPMS) ”in
the “6. In case of emergency” section.
Starting and driving5-5
Page 337 of 530
5-10Starting and driving
someone who does not carry the Intelligent
Key, to push the ignition switch to start the
hybrid system.
.The trunk area is not included in the
operating range but the Intelligent Key
may function.
. If the Intelligent Key is placed on the
instrument panel, rear parcel shelf,
inside the glove box or door pocket,
the Intelligent Key may not function.
. If the Intelligent Key is placed near the
door or window outside the vehicle, the
Intelligent Key may function.
CAUTION
When pressing the ignition to the OFF
position, make sure the button is not
pressed twice. This may unintentionally
leave the vehicle in ACC or ON mode. This
may discharge the 12-volt battery.
SSD0910
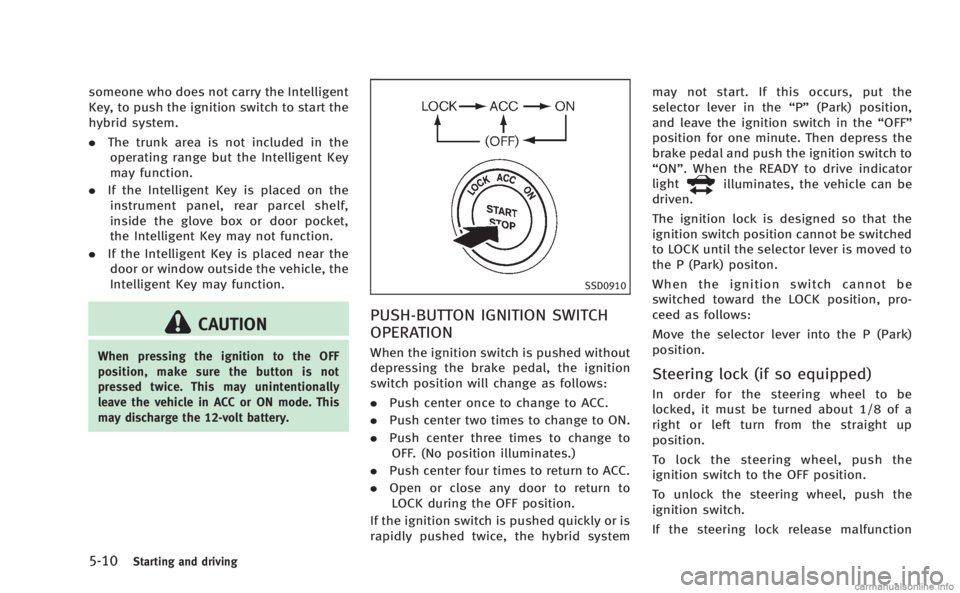
PUSH-BUTTON IGNITION SWITCH
OPERATION
When the ignition switch is pushed without
depressing the brake pedal, the ignition
switch position will change as follows:
. Push center once to change to ACC.
. Push center two times to change to ON.
. Push center three times to change to
OFF. (No position illuminates.)
. Push center four times to return to ACC.
. Open or close any door to return to
LOCK during the OFF position.
If the ignition switch is pushed quickly or is
rapidly pushed twice, the hybrid system may not start. If this occurs, put the
selector lever in the
“P”(Park) position,
and leave the ignition switch in the “OFF”
position for one minute. Then depress the
brake pedal and push the ignition switch to
“ON”. When the READY to drive indicator
light
illuminates, the vehicle can be
driven.
The ignition lock is designed so that the
ignition switch position cannot be switched
to LOCK until the selector lever is moved to
the P (Park) positon.
When the ignition switch cannot be
switched toward the LOCK position, pro-
ceed as follows:
Move the selector lever into the P (Park)
position.
Steering lock (if so equipped)
In order for the steering wheel to be
locked, it must be turned about 1/8 of a
right or left turn from the straight up
position.
To lock the steering wheel, push the
ignition switch to the OFF position.
To unlock the steering wheel, push the
ignition switch.
If the steering lock release malfunction
Page 346 of 530

SSD1024
Drive mode select switch
Four driving modes can be selected by
using the drive mode selector switch,
STANDARD, SPORT, ECO and SNOW. Select
the STANDARD mode for normal driving.
NOTE:
When the drive mode select switch selects
a mode, the mode may not switch quickly.
This is not a malfunction.
STANDARD MODE
Recommended for normal driving. Turn the
drive mode select switch to the
position. “STANDARD” appears in the
vehicle information display for 2 seconds.
SPORT MODE
Adjusts the engine and transmission
points to enhance performance. If the
vehicle is equipped with the active trace
control system, the amount of brake
control provided by active trace control is
reduced. (See “Vehicle Dynamic Control
(VDC) system” later in this section.) Turn
the drive mode select switch to the SPORT
position. “SPORT”appears in the vehicle
information display for 2 seconds.
NOTE:
In the SPORT mode, fuel economy may be
reduced.
SNOW MODE
Used on snowy roads or slippery areas.
When the SNOW mode is activated, engine
output is controlled to avoid wheel spin.
Turn the SNOW mode off for normal
driving. Turn the drive mode select switch
to the SNOW position. “SNOW”appears in
the vehicle information display for 2 seconds.
ECO MODE
Adjusts engine and transmission points to
enhance fuel economy.
NOTE:
Selecting this drive mode will not neces-
sarily improve fuel economy as many
driving factors influence its effectiveness.
Operation
Turn the drive mode select switch to the
ECO position.
“ECO”appears in the vehicle
information display for 2 seconds and the
ECO drive indicator light illuminates on the
instrument panel.
When the accelerator pedal is depressed
within the range of economy drive, the ECO
drive indicator light illuminates in green.
When the accelerator pedal is depressed
above the range of economy drive, the
color of the ECO drive indicator light
changes to orange. For ECO pedal system
equipped models see “ECO pedal system”
later in this section.
The ECO drive indicator light will not
illuminate in the following cases:
. When the selector lever is in the R
(Reverse) position.
Starting and driving5-19
INFINITI DRIVE MODE SELECTOR
Page 424 of 530
an INFINITI retailer.
How to handle the sensor
The sensor for the Preview Function is
common with Intelligent Cruise Control and
is located below the front bumper.
To keep the Preview Function operating
properly, be sure to observe the following:
.Always keep the sensor clean. Wipe
with a soft cloth carefully so as not to
damage the sensor.
. Do not strike or damage the areas
around the sensor. Do not touch or
remove the screw located on the
sensor. Doing so could cause failure
or malfunction. If the sensor is da-
maged due to an accident, contact an
INFINITI retailer.
. Do not attach a sticker (including
transparent material) or install an
accessory near the sensor. This could
cause failure or malfunction.
ANTI-LOCK BRAKING SYSTEM (ABS)
WARNING
. The Anti-lock Braking System (ABS) is a
sophisticated device, but it cannot pre-
vent accidents resulting from careless or
dangerous driving techniques. It can
help maintain vehicle control during
braking on slippery surfaces. Remember
that stopping distances on slippery
surfaces will be longer than on normal
surfaces even with ABS. Stopping dis-
tances may also be longer on rough,
gravel or snow covered roads, or if you
are using tire chains. Always maintain a
safe distance from the vehicle in front of
you. Ultimately, the driver is responsible
for safety.
. Tire type and condition may also affect
braking effectiveness.
—When replacing tires, install the
specified size of tires on all four
wheels.
—When installing a spare tire, make
sure that it is the proper size and
type as specified on the Tire and
Loading Information label. See “Tireand loading information label”
in the
“9. Technical and consumer informa-
tion” section of this manual.
—For detailed information, see
“Wheels and tires” in the“8. Main-
tenance and do-it-yourself” section
of this manual.
The Anti-lock Braking System (ABS) con-
trols the brakes so the wheels do not lock
during hard braking or when braking on
slippery surfaces. The system detects the
rotation speed at each wheel and varies
the brake fluid pressure to prevent each
wheel from locking and sliding. By pre-
venting each wheel from locking, the
system helps the driver maintain steering
control and helps to minimize swerving
and spinning on slippery surfaces.
Using the system
Depress the brake pedal and hold it down.
Depress the brake pedal with firm steady
pressure, but do not pump the brakes. The
ABS will operate to prevent the wheels
from locking up. Steer the vehicle to avoid
obstacles.
Starting and driving5-97
Page 426 of 530
flashes so note the following:
.The road may be slippery or the system
may determine some action is required
to help keep the vehicle on the steered
path.
. You may feel a pulsation in the brake
pedal and hear a noise or vibration
from under the hood. This is normal
and indicates that the VDC system is
working properly.
. Adjust your speed and driving to the
road conditions.
See “Vehicle Dynamic Control (VDC) warn-
ing light” in the“2. Instruments and
controls” section.
If a malfunction occurs in the system, the
VDC warning light
illuminates in the
instrument panel. The VDC system auto-
matically turns off.
The VDC OFF switch is used to turn off the
VDC system. The VDC off indicator
illuminates to indicate the VDC system is
off. When the VDC switch is used to turn off
the system, the VDC system still operates
to prevent one drive wheel from slipping by
transferring power to a non slipping drive
wheel. The VDC warning light
flashes if
this occurs. All other VDC functions are off,
except for rise-up and build-up and brake force distribution, and the VDC warning
light
will not flash. The VDC system is
automatically reset to on when the ignition
switch is placed in the off position then
back to the on position.
See “Vehicle Dynamic Control (VDC) warn-
ing light” in the“2. Instruments and
controls” section and “Vehicle Dynamic
Control (VDC) off indicator light” in the“2.
Instruments and controls” section.
The computer has a built-in diagnostic
feature that tests the system each time you
start the hybrid system and move the
vehicle forward or in reverse at a slow
speed. When the self-test occurs, you may
hear a “clunk” noise and/or feel a pulsa-
tion in the brake pedal. This is normal and
is not an indication of a malfunction.
ACTIVE TRACE CONTROL (if so
equipped)
This system senses driving based on the
driver’s steering and acceleration/braking
patterns, and individually controls the
braking and application of engine or motor
torque to each of the four wheels to help
smooth vehicle response.
When the drive mode selector switch is set
to the “SPORT” mode, the amount of brake control provided by active trace control is
reduced.
When the VDC OFF switch is used to turn off
the VDC system, the active trace control
system is also turned off.
If the active trace control is not functioning
properly, the IBA OFF indicator light illumi-
nates in the instrument panel.
RISE-UP AND BUILD-UP
The system gradually adjusts braking
power during normal braking to help
provide an enhanced brake feel.
BRAKE FORCE DISTRIBUTION
During braking while driving through turns,
the system optimizes the distribution of
force to each of the four wheels depending
on the radius of the turn.
WARNING
.
The VDC system is designed to help the
driver maintain stability but does not
prevent accidents due to abrupt steering
operation at high speeds or by careless
or dangerous driving techniques. Reduce
vehicle speed and be especially careful
when driving and cornering on slippery
Starting and driving5-99
Page 428 of 530

The hill start assist system automatically
keeps the brakes applied to help prevent
the vehicle from rolling backwards in the
time it takes the driver to release the brake
pedal and apply the accelerator when the
vehicle is stopped on a hill.
The hill start assist system will operate
automatically under the following condi-
tions:
.The transmission is shifted to a forward
or reverse gear.
. The vehicle is stopped completely on a
hill by applying the brake.
The maximum holding time is 2 seconds.
After 2 seconds the vehicle will begin to
roll back and the hill start assist system
will stop operating completely.
The hill start assist system will not operate
when the transmission is shifted to the N
(Neutral) or P (Park) position or on a flat
and level road.
When staring the vehicle on a steep uphill
grade, wait one second after shifting the
selector lever into the driving position.FREEING A FROZEN DOOR LOCK
To prevent a door lock from freezing, apply
deicer through the key hole. If the lock
becomes frozen, heat the key before
inserting it into the key hole or use the
Intelligent Key system.
ANTIFREEZE
In the winter when it is anticipated that the
outside temperature will drop below 328F
(08C), check antifreeze to assure proper
winter protection. For additional informa-
tion, see “Engine cooling system” in the
“8. Maintenance and do-it-yourself” sec-
tion.
12-VOLT BATTERY
If the 12-volt battery is not fully charged
during extremely cold weather conditions,
the 12-volt battery fluid may freeze and
damage the 12-volt battery. To maintain
maximum efficiency, the 12-volt battery
should be checked regularly. For additional
information, see “12-volt battery” in the
“8. Maintenance and do-it-yourself” sec-
tion.
DRAINING OF COOLANT WATER
If the vehicle is to be left outside without
antifreeze, drain the cooling system, in-
cluding the engine block. Refill before
operating the vehicle. For details, see
“Engine cooling system” in the“8. Main-
tenance and do-it-yourself” section and
“Inverter cooling system” in the“8. Main-
tenance and do-it-yourself” section.
TIRE EQUIPMENT
SUMMER tires have a tread designed to
provide superior performance on dry pave-
ment. However, the performance of these
tires will be substantially reduced in snowy
and icy conditions. If you operate your
vehicle on snowy or icy roads, INFINITI
recommends the use of MUD & SNOW or
ALL SEASON tires on all four wheels.
Consult an INFINITI retailer for the tire
type, size, speed rating and availability
information.
For additional traction on icy roads,
studded tires may be used. However, some
U.S. states and Canadian provinces prohi-
bit their use. Check local, state and
provincial laws before installing studded
tires.
Starting and driving5-101
COLD WEATHER DRIVING
Page 445 of 530
6-14In case of emergency
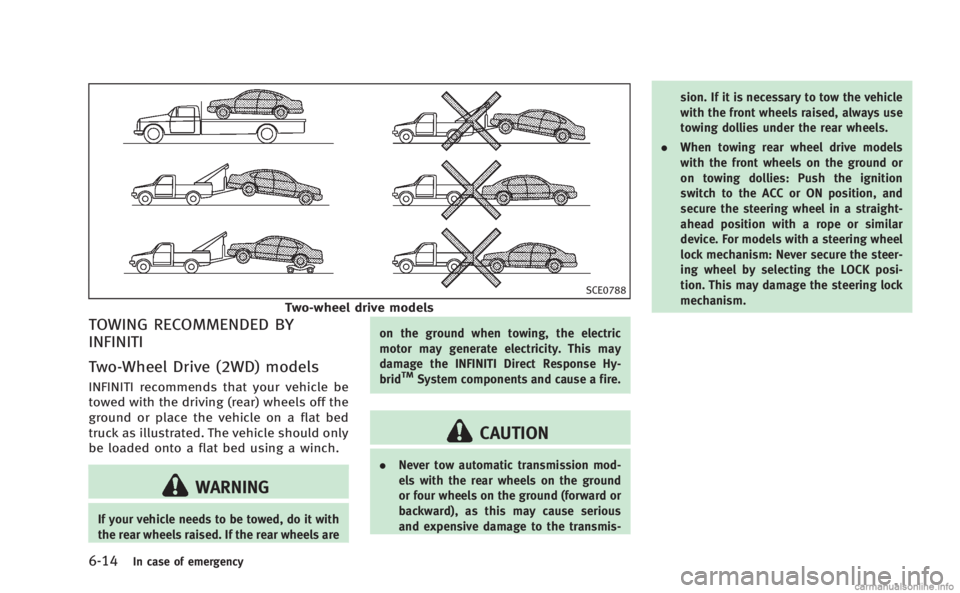
SCE0788
Two-wheel drive models
TOWING RECOMMENDED BY
INFINITI
Two-Wheel Drive (2WD) models
INFINITI recommends that your vehicle be
towed with the driving (rear) wheels off the
ground or place the vehicle on a flat bed
truck as illustrated. The vehicle should only
be loaded onto a flat bed using a winch.
WARNING
If your vehicle needs to be towed, do it with
the rear wheels raised. If the rear wheels areon the ground when towing, the electric
motor may generate electricity. This may
damage the INFINITI Direct Response Hy-
brid
TMSystem components and cause a fire.
CAUTION
.
Never tow automatic transmission mod-
els with the rear wheels on the ground
or four wheels on the ground (forward or
backward), as this may cause serious
and expensive damage to the transmis- sion. If it is necessary to tow the vehicle
with the front wheels raised, always use
towing dollies under the rear wheels.
. When towing rear wheel drive models
with the front wheels on the ground or
on towing dollies: Push the ignition
switch to the ACC or ON position, and
secure the steering wheel in a straight-
ahead position with a rope or similar
device. For models with a steering wheel
lock mechanism: Never secure the steer-
ing wheel by selecting the LOCK posi-
tion. This may damage the steering lock
mechanism.
Page 514 of 530
Do not tow a trailer with your
vehicle.
FLAT TOWING
Towing your vehicle with all four wheels on
the ground is sometimes called flat towing.
This method is sometimes used when
towing a vehicle behind a recreational
vehicle, such as a motor home.
CAUTION
.Failure to follow these guidelines can
result in severe transmission damage.
. Whenever flat towing your vehicle, al-
ways tow forward, never backward.
. DO NOT tow any automatic transmission
vehicle with all four wheels on the
ground (flat towing). Doing so WILL
DAMAGE internal transmission parts
due to lack of transmission lubrication.
. For emergency towing procedures refer
to“Towing recommended by INFINITI” in
the “6. In case of emergency” section of
this manual.
Automatic transmission
To tow a vehicle equipped with an auto-
matic transmission, an appropriate vehicle
dolly MUST be placed under the towed
vehicle’s drive wheels. Alwaysfollow the
dolly manufacturer’ s recommendations
when using their product. DOT (Department Of Transportation) Qual-
ity Grades: All passenger car tires must
conform to federal safety requirements in
addition to these grades.
Quality grades can be found where applic-
able on the tire sidewall between tread
shoulder and maximum section width. For
example:
Treadwear 200 Traction AA Temperature A
TREADWEAR
The treadwear grade is a comparative
rating based on the wear rate of the tire
when tested under controlled conditions
on a specified government test course. For
example, a tire graded 150 would wear one
and one-half (1 1/2) times as well on the
government course as a tire graded 100.
The relative performance of tires depends
upon actual conditions of their use, how-
ever, and may depart significantly from the
norm due to variations in driving habits,
service practices and differences in road
characteristics and climate.
Technical and consumer information9-17
TOWING A TRAILER
UNIFORM TIRE QUALITY GRADING