start stop button INFINITI Q50 2014 Owner's Manual
[x] Cancel search | Manufacturer: INFINITI, Model Year: 2014, Model line: Q50, Model: INFINITI Q50 2014Pages: 394, PDF Size: 1.99 MB
Page 109 of 394

2-32Instruments and controls
tampered with again.
The alarm is activated by:
. Unlocking the door or opening the trunk
lid without using the button on the
Intelligent Key, the door handle request
switch, one touch unlock sensor or the
mechanical key. (Even if the door is
opened by releasing the door inside
lock knob, the alarm will activate.)
. Opening the hood.
How to stop an activated alarm
The alarm will stop by unlocking a door by
pushing the UNLOCK button on the Intelli-
gent Key, the door handle request switch,
touching the one touch unlock sensor or
using the mechanical key. The alarm will
not stop if the ignition switch is pushed to
the ACC or ON position.
If the system does not operate as de-
scribed above, have it checked by an
INFINITI retailer.
INFINITI VEHICLE IMMOBILIZER
SYSTEM
The INFINITI Vehicle Immobilizer System
will not allow the engine to start without
the use of the registered Intelligent Key.
Never leave these keys in the vehicle.
FCC Notice:
For USA:
This device complies with Part 15 of the
FCC Rules. Operation is subject to the
following two conditions: (1) This device
may not cause harmful interference, and
(2) this device must accept any interfer-
ence received, including interference that
may cause undesired operation.
NOTE:
Changes or modifications not expressly
approved by the party responsible for
compliance could void the user’s authority
to operate the equipment.
For Canada:
This device complies with RSS-210 of
Industry Canada. Operation is subject to
the following two conditions: (1) this
device may not cause interference, and
(2) this device must accept any interfer-
ence, including interference that may cause undesired operation of the device.
Page 161 of 394
3-22Pre-driving checks and adjustments
.Push the power door lock switch to the
UNLOCK position.
To lock, close the fuel-filler door securely
and lock all doors by operating the door
handle request switch, the LOCK button on
the Intelligent Key, the mechanical key or
the power door lock switch.
FUEL-FILLER CAP
WARNING
. Gasoline is extremely flammable and
highly explosive under certain condi-
tions. You could be burned or seriously
injured if it is misused or mishandled.
Always stop engine and do not smoke or
allow open flames or sparks near the
vehicle when refueling.
. Do not attempt to top off the fuel tank
after the fuel pump nozzle shuts off
automatically. Continued refueling may
cause fuel overflow, resulting in fuel
spray and possibly a fire.
. Use only an original equipment type
fuel-filler cap as a replacement. It has a
built-in safety valve needed for proper
operation of the fuel system and emis-
sion control system. An incorrect cap can result in a serious malfunction and
possible injury. It could also cause the
Malfunction Indicator Light (MIL) to
come on.
. Never pour fuel into the throttle body to
attempt to start your vehicle.
. Do not fill a portable fuel container in
the vehicle or trailer. Static electricity
can cause an explosion of flammable
liquid, vapor or gas in any vehicle or
trailer. To reduce the risk of serious
injury or death when filling portable fuel
containers:
—Always place the container on the
ground when filling.
—Do not use electronic devices whenfilling.
—Keep the pump nozzle in contact
with the container while you are
filling it.
—Use only approved portable fuelcontainers for flammable liquid.
CAUTION
. If fuel is spilled on the vehicle body,
flush it away with water to avoid paint
damage.
. Insert the cap straight into the fuel-filler
tube, then tighten the fuel-filler cap until
a single click is heard. Failure to tighten
the fuel-filler cap properly may cause the
Malfunction Indicator Light (MIL) to
illuminate. If thelight illuminates
because the fuel-filler cap is loose or
missing, tighten or install the cap and
continue to drive the vehicle. The
light should turn off after a few driving
trips. If thelight does not turn off
after a few driving trips, have the vehicle
inspected by an INFINITI retailer.
. The Loose Fuel Cap warning will appear
if the fuel-filler cap is not properly
tightened. It may take a few driving
trips for the warning to be displayed.
Failure to tighten the fuel-filler cap
properly after the Loose Fuel Cap warn-
ing appears may cause the
Mal-
function Indicator Light (MIL) to
illuminate.
Page 185 of 394
5-10Starting and driving
Don’t drive if your ability to operate your
vehicle is impaired by alcohol, drugs, or
some other physical condition.
INTELLIGENT ALL-WHEEL DRIVE
(AWD) DRIVING SAFETY PRECAU-
TIONS (AWD models)
WARNING
.Do not drive beyond the performance
capability of the tires, even with Intelli-
gent AWD engaged. Accelerating quickly,
sharp steering maneuvers or sudden
braking may cause loss of control.
. Always use tires of the same type, size,
brand, construction (bias, bias-belted or
radial), and tread pattern on all four
wheels. Install tire chains on the rear
wheels when driving on slippery roads
and drive carefully.
. This vehicle is not designed for off-road
(rough road) use. Do not drive on sandy
or muddy roads that tires may get stuck
in.
. For AWD equipped vehicles, do not
attempt to raise two wheels off the
ground and shift the transmission to any D (Drive) or R (Reverse) position with
the engine running. Doing so may result
in drivetrain damage or unexpected
vehicle movement which could result in
serious vehicle damage or personal
injury.
. Do not attempt to test an AWD equipped
vehicle on a 2-wheel dynamometer (such
as the dynamometers used by some
states for emissions testing), or similar
equipment even if the other two wheels
are raised off the ground. Make sure you
inform test facility personnel that your
vehicle is equipped with AWD before it is
placed on a dynamometer. Using the
wrong test equipment may result in
drivetrain damage or unexpected vehicle
movement which could result in serious
vehicle damage or personal injury.
. When a wheel is off the ground due to an
unlevel surface, do not spin the wheel
excessively.
WARNING
Do not operate the push-button ignition
switch while driving the vehicle except in an
emergency. (The engine will stop when the
ignition switch is pushed 3 consecutive
times or the ignition switch is pushed and
held for more than 2 seconds.) If the engine
stops while the vehicle is being driven, this
could lead to a crash and serious injury.
Before operating the push-button ignition
switch, be sure to move the shift lever to
the P (Park) position.
PUSH-BUTTON IGNITION SWITCH
Page 189 of 394
5-14Starting and driving
1. Apply the parking brake.
2. Move the shift lever to the P (Park) or N(Neutral) position. (P is recommended.)
The starter is designed not to operate
unless the shift lever is in either of the
above positions.
3. Push the ignition switch to the ON position. Depress the brake pedal and
push the ignition switch to start the
engine.
To start the engine immediately, push
and release the ignition switch while
depressing the brake pedal with the
ignition switch in any position.
.If the engine is very hard to start inextremely cold weather or when
restarting, depress the accelerator
pedal a little (approximately 1/3 to
the floor) and while holding, crank
the engine. Release the accelerator
pedal when the engine starts.
.If the engine is very hard to startbecause it is flooded, depress the
accelerator pedal all the way to the
floor and hold it. Push the ignition
switch to the ON position to start
cranking the engine. After 5 or 6
seconds, stop cranking by pushing
the ignition switch to OFF. After cranking the engine, release the
accelerator pedal. Crank the engine
with your foot off the accelerator
pedal
by depressing the brake pedal
and pushing the push-button igni-
tion switch to start the engine. If the
engine starts, but fails to run, repeat
the above procedure.
CAUTION
Do not operate the starter for more than 15
seconds at a time. If the engine does not
start, push the ignition switch to OFF and
wait 10 seconds before cranking again,
otherwise the starter could be damaged.
4. Warm-up
Allow the engine to idle for at least 30
seconds after starting. Do not race the
engine while warming it up. Drive at
moderate speed for a short distance
first, especially in cold weather. In cold
weather, keep the engine running for a
minimum of 2 - 3 minutes before
shutting it off. Starting and stopping
the engine over a short period of time
may make the vehicle more difficult to
start. When racing the engine up to 4,500
rpm or more under no load condition,
the engine will enter the fuel cut mode.
5. To stop the engine, shift the shift lever to the P (Park) position and push the
ignition switch to the OFF position.
NOTE:
Care should be taken to avoid situations
that can lead to potential battery dis-
charge and potential no-start conditions
such as:
1. Installation or extended use of electro-
nic accessories that consume battery
power when the engine is not running
(Phone chargers, GPS, DVD players,
etc.)
2. Vehicle is not driven regularly and/or
only driven short distances.
In these cases, the battery may need to be
charged to maintain battery health.
STARTING THE ENGINE
Page 190 of 394
AUTOMATIC TRANSMISSION
The automatic transmission in your vehicle
is electronically controlled by a transmis-
sion control module to produce maximum
efficiency and smooth operation.
Shown on the following pages are the
recommended operating procedures for
this transmission. Follow these procedures
for maximum vehicle performance and
driving enjoyment.
Starting the vehicle
After starting the engine, fully depress the
foot brake pedal and push the shift lever
button before shifting the shift lever to the
R (Reverse), N (Neutral), D (Drive) or
Manual shift mode position. Be sure the
vehicle is fully stopped before attempting
to shift the shift lever.
This Automatic Transmission (AT) model is
designed so that the foot brake pedal
must be depressed before shifting from P
(Park) to any drive position while the
ignition switch is in the ON position.
The shift lever cannot be moved out of the
P (Park) position and into any of the other
gear positions if the ignition switch is
pushed to the LOCK, OFF or ACC position.1. Keep the foot brake pedal depressed
and push the shift lever button to shift
into a driving gear.
2. Release the parking brake and foot brake, then gradually start the vehicle
in motion.
WARNING
. Do not depress the accelerator pedal
while shifting from P (Park) or N
(Neutral) to R (Reverse), D (Drive) or
manual shift mode. Always depress the
brake pedal until shifting is completed.
Failure to do so could cause you to lose
control and have an accident.
. Cold engine idle speed is high, so use
caution when shifting into a forward or
reverse gear before the engine has
warmed up.
. Never shift to P (Park) or R (Reverse)
while vehicle is moving forward. Never
shift to P (Park) or D (Drive) while vehicle
is moving rearward. Failure to do so
could cause you to lose control and have
an accident.
CAUTION
.When stopping the vehicle on an uphill
grade, do not hold the vehicle by
depressing the accelerator pedal. The
foot brake should be used for this
purpose.
. Do not downshift abruptly on slippery
roads. This may cause a loss of control.
. Except in an emergency, do not shift to
the N (Neutral) position while driving.
Coasting with the transmission in the N
(Neutral) position may cause serious
damage to the transmission.
Starting and driving5-15
DRIVING THE VEHICLE
Page 191 of 394
5-16Starting and driving
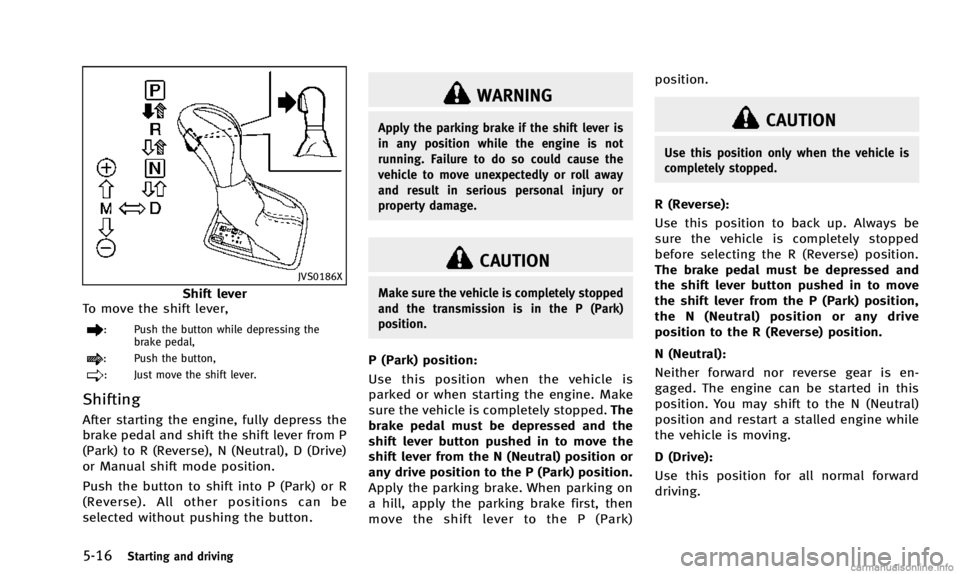
JVS0186X
Shift lever
To move the shift lever,
: Push the button while depressing the brake pedal,
: Push the button,
: Just move the shift lever.
Shifting
After starting the engine, fully depress the
brake pedal and shift the shift lever from P
(Park) to R (Reverse), N (Neutral), D (Drive)
or Manual shift mode position.
Push the button to shift into P (Park) or R
(Reverse). All other positions can be
selected without pushing the button.
WARNING
Apply the parking brake if the shift lever is
in any position while the engine is not
running. Failure to do so could cause the
vehicle to move unexpectedly or roll away
and result in serious personal injury or
property damage.
CAUTION
Make sure the vehicle is completely stopped
and the transmission is in the P (Park)
position.
P (Park) position:
Use this position when the vehicle is
parked or when starting the engine. Make
sure the vehicle is completely stopped. The
brake pedal must be depressed and the
shift lever button pushed in to move the
shift lever from the N (Neutral) position or
any drive position to the P (Park) position.
Apply the parking brake. When parking on
a hill, apply the parking brake first, then
move the shift lever to the P (Park) position.
CAUTION
Use this position only when the vehicle is
completely stopped.
R (Reverse):
Use this position to back up. Always be
sure the vehicle is completely stopped
before selecting the R (Reverse) position.
The brake pedal must be depressed and
the shift lever button pushed in to move
the shift lever from the P (Park) position,
the N (Neutral) position or any drive
position to the R (Reverse) position.
N (Neutral):
Neither forward nor reverse gear is en-
gaged. The engine can be started in this
position. You may shift to the N (Neutral)
position and restart a stalled engine while
the vehicle is moving.
D (Drive):
Use this position for all normal forward
driving.
Page 193 of 394

5-18Starting and driving
.In the manual shift mode, the transmis-
sion automatically shifts down to 1st
gear before the vehicle comes to a
stop. When accelerating again, it is
necessary to shift up to the desired
range.
Accelerator downshift —In D (Drive)
position —
For passing or hill climbing, fully depress
the accelerator pedal to the floor. This
shifts the transmission down into the lower
gear, depending on the vehicle speed.
Fail-safe
When the fail-safe operation occurs, note
that the transmission will be locked in any
of the forward gears according to the
condition.
If the vehicle is driven under extreme
conditions, such as excessive wheel spin-
ning and subsequent hard braking, the
fail-safe system may be activated. This will
occur even if all electrical circuits are
functioning properly. In this case, push
the ignition switch to the OFF position and
wait for 3 seconds. Then push the ignition
switch back to the ON position. The vehicle
should return to its normal operating
condition. If it does not return to its normal operating condition, have an
INFINITI retailer check the transmission
and repair if necessary.
JVS0188X
Shift lock release
If the battery charge is low or discharged,
the shift lever may not be moved from the P
(Park) position even with the brake pedal
depressed and the shift lever button
pushed.
To move the shift lever, perform the
following procedure:
1. Push the ignition switch to the OFF or
LOCK position.
2. Apply the parking brake.
3. Remove the shift lock cover
*Ausing a
suitable tool.
Page 207 of 394

5-32Starting and driving
JVS0308X
Driver assist system lane indicator
LDW system operation
The LDW system provides a lane departure
warning function when the vehicle is driven
at speeds of approximately 45 MPH (70
km/h) and above. When the vehicle
approaches either the left or the right side
of the traveling lane, a warning chime will
sound and the driver assist system lane
indicator (orange) in the vehicle informa-
tion display will blink to alert the driver.
The warning function will stop when the
vehicle returns inside of the lane markers.
The LDW system is not designed to warn
under the following conditions..
When you operate the lane change
signal and change traveling lanes in
the direction of the signal. (The LDW
system will become operable again
approximately 2 seconds after the lane
change signal is turned off.)
. When the vehicle speed lowers to less
than approximately 45 MPH (70 km/h).
. When the Blind Spot Intervention
TM
(BSI) system activates an audible warn-
ing or steering control.
After the above conditions have finished
and the necessary operating conditions are
satisfied, the LDW functions will resume.
Temporary disabled status at high
temperature
If the vehicle is parked in direct sunlight
under high temperature conditions (over
approximately 1048 F (408C) and then
started, the LDW system may be deacti-
vated automatically. The high cabin tem-
perature warning message will appear in
the vehicle information display.
When the interior temperature is reduced,
the LDW system will resume operating
automatically.
JVS0246X
Turning the LDW system ON/OFF
Perform the following steps to turn the
LDW system on or off.
1. Push the MENU button
*1and touch
[Driver Assistance] on the lower dis-
play.
2. Touch [Lane Assist].
3. Touch [Lane Departure Warning] to turn the system ON/OFF.
Page 210 of 394

The warning and assist functions will stop
when the vehicle returns to a position
inside of the lane marker.
JVS0206X
Dynamic driver assistance switch
The LDP system turns on when the dynamic
driver assistance switch on the steering
wheel is pushed when the [Lane Departure
Prevention] is enabled in the settings menu
on the lower display. The driver assist
system lane indicator (green) illuminates in
the vehicle information display when the
LDP system is turned on.
JVS0246X
How to enable/disable the LDP
system
Perform the following steps to enable or
disable the LDP system.
1. Push the MENU button
*1and touch
[Driver Assistance] on the lower dis-
play.
2. Touch [Lane Assist].
3. Touch [Lane Departure Prevention] to enable or disable the system.
Starting and driving5-35