fuel INFINITI Q50 2018 Owner's Guide
[x] Cancel search | Manufacturer: INFINITI, Model Year: 2018, Model line: Q50, Model: INFINITI Q50 2018Pages: 458, PDF Size: 2.13 MB
Page 163 of 458

3-18Pre-driving checks and adjustments
Unlocking doors, trunk lid and fuel-
filler door
1. Push the UNLOCKbuttonon the
Intelligent Key once.
2. The hazard indicator flashes once. The driver’s door will unlock.
3. Push the UNLOCK
buttonon the
Intelligent Key again within 1 minute.
4. The hazard indicator flashes once again. All the doors, trunk lid and the fuel-filler
door will unlock.
All doors, trunk lid and the fuel-filler door
will be locked automatically unless one of
the following operations is performed within
1 minute after pushing the UNLOCK
button on the Intelligent Key while the doors
are locked. If during this 1-minute time
period, the UNLOCK
button on the
Intelligent Key is pushed, all doors will be
locked automatically after another 1 minute.
. Opening any door
. Pushing the ignition switch
Opening windows (if so equipped)
The UNLOCKbuttonoperation also
allows you to open the window that is
equipped with the automatic open/close
function. (See “Power windows” (P.2-50).)
To open the window, push the door UN- LOCK
button on the Intelligent Key
for about 3 seconds after the door is
unlocked.
To stop opening, release the UNLOCK
button.
If the window open operation is stopped in
mid-operation while pushing the UNLOCK
button, release and push the
UNLOCKbuttonagain until the
window opens completely.
Window cannot be closed using the Intelli-
gent Key.
The door window can also be operated by
turning the mechanical key in a door lock.
(See “Doors” (P.3-4).)
Opening moonroof (if so equipped)
The moonroof can be opened by pushing the
UNLOCKbuttonon the Intelligent
Key. This function will not operate while the
moonroof timer is activated or when the
windows need to be initialized.
To open the moonroof, push the UNLOCK
buttonon the Intelligent Key for
about 3 seconds after the door is unlocked.
To stop opening, release the UNLOCK
button.
Opening trunk lid
1. Push the TRUNKbuttonon the
Intelligent Key for more than 1 second.
2. The trunk will unlatch.
3. Raise the trunk lid to open the trunk.
Using panic alarm
If you are near your vehicle and feel
threatened, you may activate the alarm to
call attention as follows:
1. Push the PANIC
buttonon the key
for more than 1 second.
2. The theft warning alarm and headlights will stay on for 25 seconds.
3. The panic alarm stops when:
.It has run for 25 seconds, or.Any of the buttons on the Intelligent Key are pushed. (Note: PANIC
buttonor TRUNKbuttonshould be pushed for more than 1
second.)
Remote engine start (if so equipped)
The remote engine startbuttonis on
the Intelligent Key if the vehicle has remote
engine start function. This function allows
the engine to start from outside the vehicle.
See “Remote engine start” (P.3-20) for more
details.
Page 171 of 458

3-26Pre-driving checks and adjustments
that people become locked inside the trunk
or in the event of the loss of electrical power
such as a discharged battery.
Releasing inside the trunk
To open the trunk lid from the inside, pull the
release handleuntil the lock releases and
push up on the trunk lid. The release lever is
made of a material that glows in the dark
after a brief exposure to ambient light.
The handle is located on the back of the
trunk lid as illustrated.
Releasing from the rear seat
You can access the release handle through
the trunk pass-through (rear seat armrest).
(See “Armrest” (P.1-7).)
To open the trunk lid from the rear seat, pull
the release handle towards front of vehicle
until the lock releases.
If you cannot reach the release handle,
contact an INFINITI retailer.SPA2735
OPENING THE FUEL-FILLER
DOOR
To open the fuel-filler door, unlock the fuel-
filler door by using one of the following
operations, then push the upper left side of
the door.
. Touch the one touch unlock sensor on
one of the front door handles and then
push the door handle request switch
while carrying the Intelligent Key.
. Push the UNLOCK button on the Intel-
ligent Key twice.
. Insert the mechanical key into the door
lock cylinder and turn it to the rear of the
vehicle twice. .
Push the power door lock switch to the
UNLOCK position.
To lock, close the fuel-filler door securely
and lock all doors by operating the door
handle request switch, the LOCK button on
the Intelligent Key, the mechanical key or the
power door lock switch.
FUEL-FILLER CAP
WARNING
. Gasoline is extremely flammable and
highly explosive under certain condi-
tions. You could be burned or ser-
iously injured if it is misused or
mishandled. Always stop engine and
do not smoke or allow open flames or
sparks near the vehicle when refuel-
ing.
. Do not attempt to top off the fuel
tank after the fuel pump nozzle shuts
off automatically. Continued refuel-
ing may cause fuel overflow, resulting
in fuel spray and possibly a fire.
. Use only an original equipment type
fuel-filler cap as a replacement. It has
a built-in safety valve needed for
proper operation of the fuel system
and emission control system. An in-
correct cap can result in a serious
FUEL-FILLER DOOR
Page 172 of 458
malfunction and possible injury. It
could also cause the Malfunction
Indicator Light (MIL) to come on.
. Never pour fuel into the throttle body
to attempt to start your vehicle.
. Do not fill a portable fuel container in
the vehicle or trailer. Static electricity
can cause an explosion of flammable
liquid, vapor or gas in any vehicle or
trailer. To reduce the risk of serious
injury or death when filling portable
fuel containers:
— Always place the container on the ground when filling.
— Do not use electronic devices when filling.
— Keep the pump nozzle in contact with the container while you are
filling it.
— Use only approved portable fuel containers for flammable liquid.
CAUTION
. If fuel is spilled on the vehicle body,
flush it away with water to avoid
paint damage. .
Insert the cap straight into the fuel-
filler tube, then tighten the fuel-filler
cap until a single click is heard. Failure
to tighten the fuel-filler cap properly
may cause the
Malfunction In-
dicator Light (MIL) to illuminate. If
the
light illuminates because the
fuel-filler cap is loose or missing,
tighten or install the cap and con-
tinue to drive the vehicle. The
light should turn off after a few
driving trips. If thelight does
not turn off after a few driving trips,
have the vehicle inspected. It is
recommended you visit an INFINITI
retailer for this service.
. The Loose Fuel Cap warning will
appear if the fuel-filler cap is not
properly tightened. It may take a few
driving trips for the warning to be
displayed. Failure to tighten the fuel-
filler cap properly after the Loose
Fuel Cap warning appears may cause
the
Malfunction Indicator Light
(MIL) to illuminate.
. For additional information, see “Mal-
function Indicator Light (MIL)” (P.2-
17).
JVP0204X
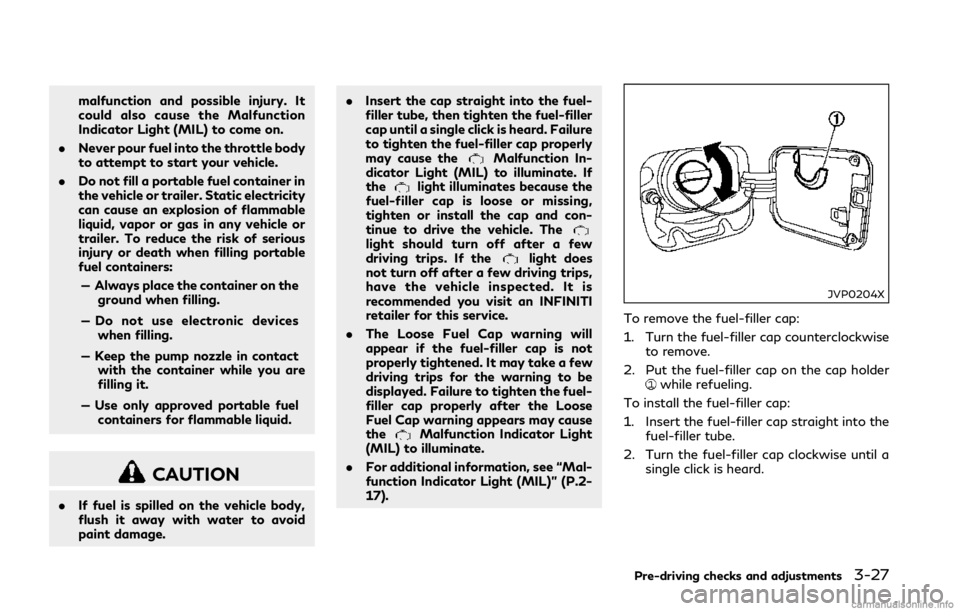
To remove the fuel-filler cap:
1. Turn the fuel-filler cap counterclockwise
to remove.
2. Put the fuel-filler cap on the cap holder
while refueling.
To install the fuel-filler cap:
1. Insert the fuel-filler cap straight into the fuel-filler tube.
2. Turn the fuel-filler cap clockwise until a single click is heard.
Pre-driving checks and adjustments3-27
Page 173 of 458

3-28Pre-driving checks and adjustments
JVP0455X
Loose Fuel Cap warning
The Loose Fuel Cap warning appears in the
vehicle information display when the fuel-
filler cap is not tightened correctly after the
vehicle has been refueled. It may take a few
driving trips for the warning to be displayed.
To turn off the warning, perform the
following:
1. Remove and install the fuel-filler cap assoon as possible. (See “Fuel-filler cap”
(P.3-26).)
2. Tighten the fuel-filler cap until a single click is heard.
3. Push the
orswitchon the
steering wheel for longer than 1 second to turn off the Loose Fuel Cap warning
after tightening the fuel-filler cap.
WARNING
.
Do not adjust the steering wheel
while driving. You could lose control
of your vehicle and cause an accident.
. Do not adjust the steering wheel any
closer to you than is necessary for
proper steering operation and com-
fort. The driver’s air bag inflates with
great force. If you are unrestrained,
leaning forward, sitting sideways or
out of position in any way, you are at
greater risk of injury or death in a
crash. You may also receive serious or
fatal injuries from the air bag if you
are up against it when it inflates.
Always sit back against the seatback
and as far away as practical from the
steering wheel. Always use the seat
belts.
TILT/TELESCOPIC STEERING
Page 186 of 458

System malfunction ................................................. 5-121
System maintenance................................................ 5-121
Break-in schedule........................................................... 5-122
Fuel Efficient Driving Tips........................................... 5-122
Increasing fuel economy .............................................. 5-123
Intelligent All-Wheel Drive (AWD) (if
so equipped) ................................................................... 5-124
Parking/parking on hills............................................... 5-126
Power steering................................................................ 5-127 Electric power steering type ................................. 5-127
Hydraulic pump electric power
steering type.............................................................. 5-127
Direct Adaptive Steering type ............................. 5-128
Brake system.................................................................. 5-130
Braking precautions................................................ 5-130
Parking brake break-in .......................................... 5-130
Brake assist...................................................................... 5-131 Brake assist................................................................ 5-131
Anti-lock Braking System (ABS) .......................... 5-131
Vehicle Dynamic Control (VDC) system.................. 5-132 Brake force distribution.......................................... 5-133 Active trace control ..................................................... 5-134
Hill Start Assist system............................................... 5-136
Chassis control.............................................................. 5-136
Idling Stop System (if so equipped) ......................... 5-137
Retrograde movement control function ......... 5-138
Idling Stop System display.................................. 5-138
Idling Stop OFF switch........................................ 5-140
Cold weather driving.................................................... 5-141
Freeing a frozen door lock................................... 5-141
Antifreeze ................................................................. 5-141
Battery....................................................................... 5-141
Draining of coolant water.................................... 5-141
Tire equipment ........................................................ 5-141
Special winter equipment.................................... 5-142
Driving on snow or ice ......................................... 5-142
Engine block heater (if so equipped)................ 5-142
Active noise cancellation/Active
sound enhancement..................................................... 5-143
Active noise cancellation..................................... 5-144
Active sound enhancement ................................ 5-144
Page 188 of 458
THREE-WAY CATALYST
The three-way catalyst is an emission con-
trol device installed in the exhaust system.
Exhaust gases in the three-way catalyst are
burned at high temperatures to help reduce
pollutants.
WARNING
.The exhaust gas and the exhaust
system are very hot. Keep people,
animals or flammable materials away
from the exhaust system compo-
nents.
. Do not stop or park the vehicle over
flammable materials such as dry
grass, waste paper or rags. They
may ignite and cause a fire.
CAUTION
.Do not use leaded gasoline. Deposits
from leaded gasoline seriously reduce
the three-way catalyst’s ability to
help reduce exhaust pollutants.
. Keep your engine tuned up. Malfunc-
tions in the ignition, fuel injection, or
electrical systems can cause overrich fuel flow into the three-way catalyst,
causing it to overheat. Do not keep
driving if the engine misfires, or if
noticeable loss of performance or
other unusual operating conditions
are detected. Have the vehicle in-
spected promptly. It is recommended
you visit an INFINITI retailer for this
service.
. Avoid driving with an extremely low
fuel level. Running out of fuel could
cause the engine to misfire, damaging
the three-way catalyst.
. Do not race the engine while warming
it up.
. Do not push or tow your vehicle to
start the engine.
TIRE PRESSURE MONITORING
SYSTEM (TPMS)
Each tire, including the spare (if provided),
should be checked monthly when cold and
inflated to the inflation pressure recom-
mended by the vehicle manufacturer on the
vehicle placard or tire inflation pressure
label. (If your vehicle has tires of a different
size than the size indicated on the vehicle
placard or tire inflation pressure label, you
should determine the proper tire inflation
pressure for those tires.) As an added safety feature, your vehicle has
been equipped with a Tire Pressure Mon-
itoring System (TPMS) that illuminates a low
tire pressure telltale when one or more of
your tires is significantly under-inflated.
Accordingly, when the low tire pressure
telltale illuminates, you should stop and
check your tires as soon as possible, and
inflate them to the proper pressure. Driving
on a significantly under-inflated tire causes
the tire to overheat and can lead to tire
failure. Under-inflation also reduces fuel
efficiency and tire tread life, and may affect
the vehicle’s handling and stopping ability.
For models with run-flat tires, if the vehicle
is being driven with one or more flat tires,
the low tire pressure warning light will
illuminate continuously and a chime will
sound for 10 seconds. The flat tire warning
will also appear in the vehicle information
display. The chime will only sound at the first
indication of a flat tire, and the warning light
will illuminate continuously. When the flat
tire warning is activated, it is recommended
you have the system reset and the tire
checked and replaced if necessary by an
INFINITI retailer. Even if the tire is inflated
to the specified COLD tire pressure, the
warning light will continue to illuminate until
the system is reset by an INFINITI retailer.
Your vehicle can be driven for a limited time
on a flat tire. See “Run-flat tires” (P.8-39).
Starting and driving5-5
Page 197 of 458

5-14Starting and driving
JVS0404X
INTELLIGENT KEY BATTERY DIS-
CHARGE
If the battery of the Intelligent Key is
discharged, or environmental conditions in-
terfere with the Intelligent Key operation,
start the engine according to the following
procedure:
1. Move the shift lever to the P (Park)position.
2. Firmly apply the foot brake.
3. Touch the ignition switch with the Intelligent Key as illustrated. (A chime
will sound.)
4. Push the ignition switch while depressing the brake pedal within 10 seconds after
the chime sounds. The engine will start.
After step 3 is performed, when the ignition
switch is pushed without depressing the
brake pedal, the ignition switch position will
change to ACC.
NOTE:
. When the ignition switch is pushed to
the ACC or ON position or the engine is
started by the above procedures, the
Intelligent Key battery discharge indi-
cator appears in the vehicle information
display even if the Intelligent Key is
inside the vehicle. This is not a malfunc-
tion. To turn off the Intelligent Key
battery discharge indicator, touch the
ignition switch with the Intelligent Key
again.
. If the Intelligent Key battery discharge
indicator appears, replace the battery as
soon as possible. (See “Intelligent Key
battery replacement” (P.8-26).) .
Make sure the area around the vehicle is
clear.
. Check fluid levels such as engine oil,
coolant, brake fluid and window washer
fluid as frequently as possible, or at least
whenever you refuel.
. Check that all windows and lights are
clean.
. Visually inspect tires for their appearance
and condition. Also check tires for proper
inflation.
. Lock all doors.
. Position seat and adjust head restraints.
. Adjust inside and outside mirrors.
. Fasten seat belts and ask all passengers
to do likewise.
. Check the operation of warning lights
when the ignition switch is pushed to the
ON position. (See “Warning lights, in-
dicator lights and audible reminders”
(P.2-10).)
BEFORE STARTING THE ENGINE
Page 198 of 458
1. Apply the parking brake.
2. Move the shift lever to the P (Park) or N(Neutral) position. (P is recommended.)
The starter is designed not to operate
unless the shift lever is in either of the
above positions.
3. Push the ignition switch to the ON position. Depress the brake pedal and
push the ignition switch to start the
engine.
To start the engine immediately, push
and release the ignition switch while
depressing the brake pedal with the
ignition switch in any position.
.If the engine is very hard to start inextremely cold weather or when re-
starting, depress the accelerator ped-
al a little (approximately 1/3 to the
floor) and while holding, crank the
engine. Release the accelerator pedal
when the engine starts.
.If the engine is very hard to start
because it is flooded, depress the
accelerator pedal all the way to the
floor and hold it. Push the ignition
switch to the ON position to start
cranking the engine. After 5 or 6
seconds, stop cranking by pushing
the ignition switch to OFF. After
cranking the engine, release the accel-
erator pedal. Crank the engine withyour foot off the accelerator pedal
by
depressing the brake pedal and push-
ing the push-button ignition switch to
start the engine. If the engine starts,
but fails to run, repeat the above
procedure.
CAUTION
Do not operate the starter for more than
15 seconds at a time. If the engine does
not start, push the ignition switch to
OFF and wait 10 seconds before crank-
ing again, otherwise the starter could be
damaged.
4. Warm-up
Allow the engine to idle for at least 30
seconds after starting. Do not race the
engine while warming it up. Drive at
moderate speed for a short distance
first, especially in cold weather. In cold
weather, keep the engine running for a
minimum of 2 - 3 minutes before shut-
ting it off. Starting and stopping the
engine over a short period of time may
make the vehicle more difficult to start.
When racing the engine up to 4,500 rpm
or more under no load condition, the
engine will enter the fuel cut mode. 5. To stop the engine, shift the shift lever to
the P (Park) position and push the
ignition switch to the OFF position.
NOTE:
Care should be taken to avoid situations
that can lead to potential battery discharge
and potential no-start conditions such as:
1. Installation or extended use of electro-
nic accessories that consume battery
power when the engine is not running
(Phone chargers, GPS, DVD players,
etc.)
2. Vehicle is not driven regularly and/or
only driven short distances.
In these cases, the battery may need to be
charged to maintain battery health.
REMOTE START (if so equipped)
Vehicles started with the remote engine
start function require the ignition switch to
be placed in the ON position before the shift
lever can be moved from the P (Park)
position. To place the ignition switch in the
ON position, perform the following steps:
1. Make sure that the Intelligent Key is on you.
2. Depress the brake pedal.
3. Push the ignition switch once to the ON position.
Starting and driving5-15
STARTING THE ENGINE
Page 202 of 458

1M(1st):
Use this position when climbing steep hills
slowly or driving slowly through deep snow,
or for maximum engine braking on steep
downhill grades.
. Remember not to drive at high speeds for
extended periods of time in lower than
7th gear. This reduces fuel economy.
. Moving the shift lever rapidly to the same
side twice will shift the ranges in succes-
sion.
. In the manual shift mode, the transmis-
sion may not shift to the selected gear
or may automatically shift to the other
gear. This helps maintain driving per-
formance and reduces the chance of
vehicle damage or loss of control.
. When the transmission does not shift to
the selected gear, the Automatic Trans-
mission (AT) position indicator (in the
vehicle information display) will blink
and the buzzer will sound.
. In the manual shift mode, the transmis-
sion automatically shifts down to 1st
gear before the vehicle comes to a stop.
When accelerating again, it is necessary
to shift up to the desired range.Accelerator downshift — In D (Drive)
position —
For passing or hill climbing, fully depress the
accelerator pedal to the floor. This shifts the
transmission down into the lower gear,
depending on the vehicle speed.
Fail-safe
When the fail-safe operation occurs, note
that the transmission will be locked in any of
the forward gears according to the condi-
tion.
If the vehicle is driven under extreme
conditions, such as excessive wheel spinning
and subsequent hard braking, the fail-safe
system may be activated. This will occur
even if all electrical circuits are functioning
properly. In this case, push the ignition
switch to the OFF position and wait for 3
seconds. Then push the ignition switch back
to the ON position. The vehicle should
return to its normal operating condition. If
it does not return to its normal operating
condition, have the transmission checked
and repaired, if necessary. It is recom-
mended you visit an INFINITI retailer for
this service.
JVS0188X
Shift lock release
If the battery charge is low or discharged,
the shift lever may not be moved from the P
(Park) position even with the brake pedal
depressed and the shift lever button pushed.
To move the shift lever, perform the follow-
ing procedure:
1. Push the ignition switch to the OFF or
LOCK position.
2. Apply the parking brake.
3. Remove the shift lock cover
using a
suitable tool.
4. Push down the shift lock
using
mechanical key as illustrated.
Starting and driving5-19
Page 206 of 458

SPORT+ MODE (if so equipped)
In addition to the characteristics of the
SPORT mode, this mode heightens steering
response and changes the setting of VDC
(Vehicle Dynamic Control) for a more sporty
driving experience.
NOTE:
.VDC operation is reduced when the
INFINITI Drive Mode Selector is used
to select the SPORT+ mode (if so
equipped). The VDC system may not
operate in the same circumstances when
compared to operation in the standard
mode. To help prevent accidents drive
carefully, avoid careless or dangerous
driving techniques and be especially
careful when driving and cornering on
slippery surfaces.
. In the SPORT+ mode, fuel economy may
be reduced.
SPORT MODE
. Adjusts the engine and transmission
points for a higher response.
. The setting of the steering system is
adjusted to provide a quick steering
response and a heavy steering effort.
. The setting of the suspension system is
adjusted to increase the damping force.
(if so equipped) NOTE:
In the SPORT mode, fuel economy may be
reduced.
SNOW MODE
Changes the engine characteristics to aid
driving on slippery roads.
ECO MODE (if so equipped)
Assists the driver’s eco-driving. The engine
and transmission points are adjusted for
improved fuel economy, providing such a
driving features as smooth starting or con-
stant cruising.
NOTE:
Selecting the ECO mode will not necessarily
improve fuel economy as many driving
factors influence its effectiveness.
Operation
Select the ECO mode using the INFINITI
Drive Mode Selector. The ECO drive indica-
tor light on the instrument panel illuminates.
When the accelerator pedal is depressed
within the range of economy drive, the ECO
drive indicator light illuminates in green.
When the accelerator pedal is depressed
above the range of economy drive, the ECO
drive indicator light turns off. For ECO pedal
system equipped models, see “ECO pedal
system” (P.5-23). The ECO drive indicator light will not
illuminate in the following cases:
.
When the shift lever is in the R (Reverse)
position.
. When the vehicle speed is below 2 MPH
(3.2 km/h) or over 90 MPH (144 km/h).
. When the cruise control (if so equipped)
or the Intelligent Cruise Control (ICC)
system (if so equipped) is operated.
ECO pedal system (if so equipped)
The ECO pedal system helps assist the driver
to improve fuel economy by increasing the
reaction force of the accelerator pedal.
When the ECO drive indicator light is
blinking or remains off, the ECO pedal
system increases the reaction force of the
accelerator pedal.
Starting and driving5-23