ECO mode INFINITI Q50-HYBRID 2014 User Guide
[x] Cancel search | Manufacturer: INFINITI, Model Year: 2014, Model line: Q50-HYBRID, Model: INFINITI Q50-HYBRID 2014Pages: 402, PDF Size: 2.83 MB
Page 116 of 402
4. Current fuel consumption and
average fuel consumption (MPG, l
(liter)/100 km or km/l)
Current fuel consumption:
The current fuel consumption mode shows
the current fuel consumption.
Average fuel consumption:
The average fuel consumption mode shows
the average fuel consumption since the
last reset. Resetting is done by pushing the
orswitch for longer than 1
second.
The average fuel consumption is also reset
on the lower display. See the Infiniti
InTouch Owner’s Manual.
The display is updated every 30 seconds.
At about the first 1/3 mile (500 m) after a
reset, the display shows “——”.
5. Average speed (MPH or km/h)
The average speed mode shows the
average vehicle speed since the last reset.
Resetting is done by pushing the
orswitch for longer than 1 second.
The display is updated every 30 seconds.
The first 30 seconds after a reset, the
display shows “——”.
6. Elapsed time and trip odometer
(mile or km)
Elapsed time:
The elapsed time mode shows the time
since the last reset. Resetting is done by
pushing the
orswitch for longer
than 1 second. (The trip odometer is also
reset at the same time.)
Trip odometer:
The trip odometer mode shows the total
distance the vehicle has been driven since
the last reset. Resetting is done by pushing
the
orswitch for longer than 1
second. (The elapsed time is also reset at
the same time.)
7. Distance to empty (dte —mile or
km)
The distance to empty (dte) mode provides
you with an estimation of the distance that
can be driven before refueling. The dte is
constantly being calculated, based on the
amount of fuel in the fuel tank and the
actual fuel consumption.
The display is updated every 30 seconds.
The dte mode includes a low range warning
feature. If the fuel level is low, the warning
is displayed on the screen. When the fuel level drops even lower, the
dte display will change to
“——”.
. If the amount of fuel added is small, the
display just before the ignition switch
is pushed to the OFF position may
continue to be displayed.
. When driving uphill or rounding curves,
the fuel in the tank shifts, which may
momentarily change the display.
8. Engine coolant temperature
gauge
This gauge indicates the temperature of
the engine coolant. If the engine coolant is
overheated, the color of gauge will change
to the red.
The engine coolant temperature varies with
the outside air temperature and driving
conditions.
CAUTION
If the engine is overheated, continued
operation of the vehicle may seriously
damage the engine. See “If your vehicle
overheats” (P.6-7) for immediate action
required.
Instruments and controls2-33
Page 122 of 402
JVI0737X
Type A
JVI0738X
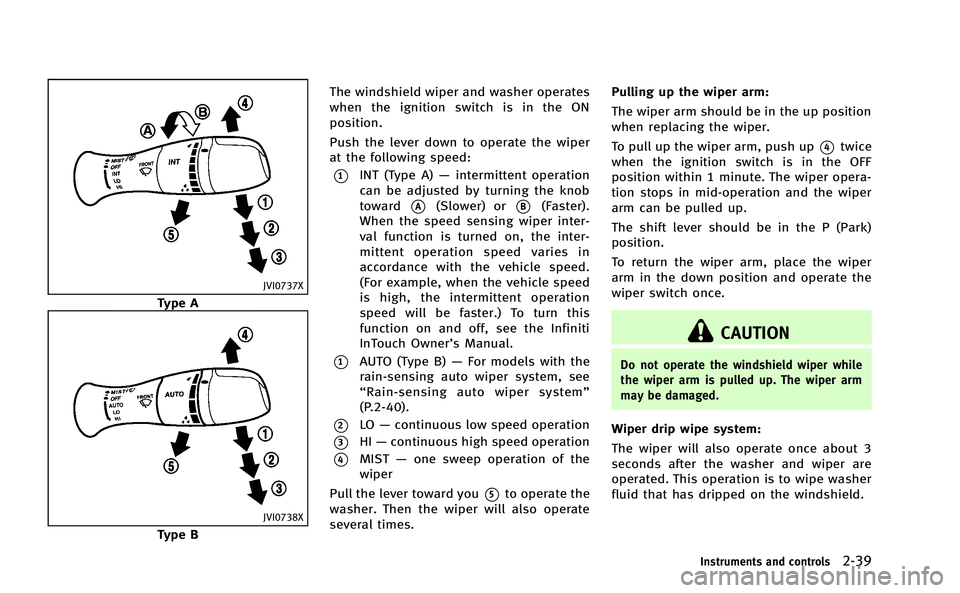
Type BThe windshield wiper and washer operates
when the ignition switch is in the ON
position.
Push the lever down to operate the wiper
at the following speed:
*1INT (Type A)
—intermittent operation
can be adjusted by turning the knob
toward
*A(Slower) or*B(Faster).
When the speed sensing wiper inter-
val function is turned on, the inter-
mittent operation speed varies in
accordance with the vehicle speed.
(For example, when the vehicle speed
is high, the intermittent operation
speed will be faster.) To turn this
function on and off, see the Infiniti
InTouch Owner’s Manual.
*1AUTO (Type B) —For models with the
rain-sensing auto wiper system, see
“ Rain-sensing auto wiper system”
(P.2-40).
*2LO —continuous low speed operation
*3HI —continuous high speed operation
*4MIST —one sweep operation of the
wiper
Pull the lever toward you
*5to operate the
washer. Then the wiper will also operate
several times. Pulling up the wiper arm:
The wiper arm should be in the up position
when replacing the wiper.
To pull up the wiper arm, push up
*4twice
when the ignition switch is in the OFF
position within 1 minute. The wiper opera-
tion stops in mid-operation and the wiper
arm can be pulled up.
The shift lever should be in the P (Park)
position.
To return the wiper arm, place the wiper
arm in the down position and operate the
wiper switch once.
CAUTION
Do not operate the windshield wiper while
the wiper arm is pulled up. The wiper arm
may be damaged.
Wiper drip wipe system:
The wiper will also operate once about 3
seconds after the washer and wiper are
operated. This operation is to wipe washer
fluid that has dripped on the windshield.
Instruments and controls2-39
Page 129 of 402
2-46Instruments and controls
the steering wheel is turned.
AFS will also adjust the headlight to a
proper axis automatically, depending on
the number of occupants in the vehicle, the
load the vehicle is carrying and the road
conditions.
If the AFS warning appears in the vehicle
information display after the ignition
switch has been pushed to the ON posi-
tion, this may indicate that the AFS is not
functioning properly. Have the system
checked by an INFINITI retailer. When the
hybrid system is started, the headlights
will vibrate to check the system condition.
This is not a malfunction.
JVI0644X
JVI0661M
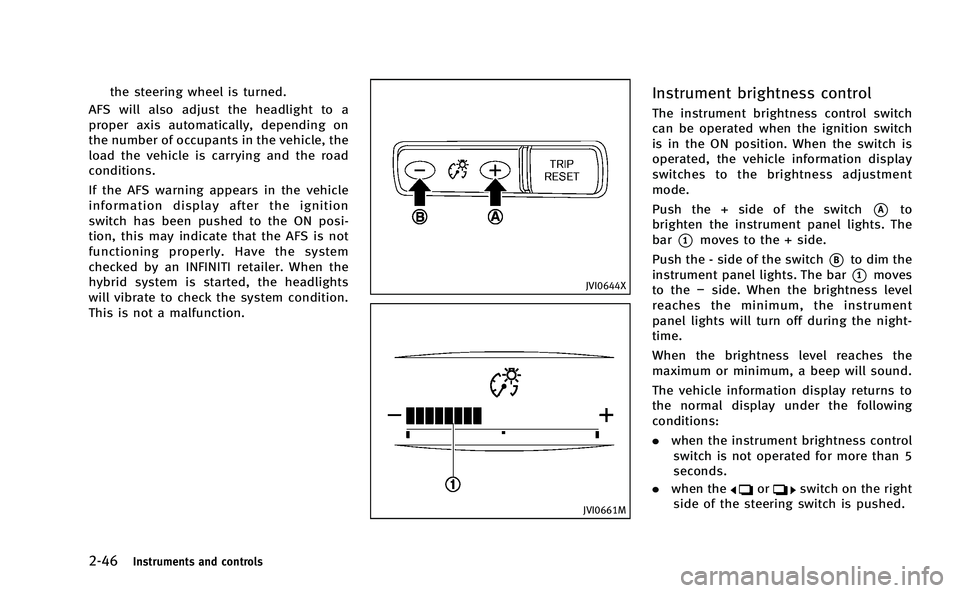
Instrument brightness control
The instrument brightness control switch
can be operated when the ignition switch
is in the ON position. When the switch is
operated, the vehicle information display
switches to the brightness adjustment
mode.
Push the + side of the switch
*Ato
brighten the instrument panel lights. The
bar
*1moves to the + side.
Push the - side of the switch
*Bto dim the
instrument panel lights. The bar
*1moves
to the −side. When the brightness level
reaches the minimum, the instrument
panel lights will turn off during the night-
time.
When the brightness level reaches the
maximum or minimum, a beep will sound.
The vehicle information display returns to
the normal display under the following
conditions:
. when the instrument brightness control
switch is not operated for more than 5
seconds.
. when the
orswitch on the right
side of the steering switch is pushed.
Page 147 of 402
2-64Instruments and controls
button. During programming, your hand-
held transmitter may automatically stop
transmitting. Continue to press and hold
the desired HomeLink
®button while you
press and re-press (“cycle”) your hand-
held transmitter every two seconds until
the frequency signal has been learned. The
HomeLink
®indicator light will flash slowly
and then rapidly after several seconds
upon successful programming. DO NOT
release until the HomeLink
®indicator light
flashes slowly and then rapidly. When the
indicator light flashes rapidly, both buttons
may be released. The rapid flashing
indicates successful programming.
Proceed with “Programming HomeLink
®”
step 3 to complete.
Remember to plug the device back in when
programming is completed.
OPERATING THE HomeLink®UNI-
VERSAL TRANSCEIVER
The HomeLink®Universal Transceiver, after
it is programmed, can be used to activate
the programmed device. To operate, simply
press and release the appropriate pro-
grammed HomeLink
®Universal Transceiver
button. The amber indicator light will
illuminate while the signal is being trans- mitted.
For convenience, the hand-held transmitter
of the device may also be used at any time.
PROGRAMMING TROUBLESHOOT-
ING
If the HomeLink®does not quickly learn
the hand-held transmitter information:
. replace the hand-held transmitter bat-
teries with new batteries.
. position the hand-held transmitter with
its battery area facing away from the
HomeLink
®surface.
. press and hold both the HomeLink®
and hand-held transmitter buttons
without interruption.
. position the hand-held transmitter 1-3
in (26-76 mm) away from the
HomeLink
®surface. Hold the transmit-
ter in that position for up to 15
seconds. If HomeLink
®is not pro-
grammed within that time, try holding
the transmitter in another position -
keeping the indicator light in view at all
times.
If you have any questions or are having
difficulty programming your HomeLink
®
buttons, refer to the HomeLink®web site
at: www.homelink.com or 1-800-355-3515.
CLEARING THE PROGRAMMED IN-
FORMATION
The following procedure clears the pro-
grammed information from both buttons.
Individual buttons cannot be cleared.
However, individual buttons can be repro-
grammed, see “Reprogramming a single
HomeLink
®button” (P.2-64).
To clear all programming
1. Press and hold the two outer
HomeLink®buttons until the indicator
light begins to flash in approximately
10 seconds. Do not hold for longer than
20 seconds.
2. Release both buttons.
HomeLink
®is now in the programming
mode and can be programmed at any time
beginning with “Programming HomeLink
®”
- Step 1.
REPROGRAMMING A SINGLE
HomeLink®BUTTON
To reprogram a HomeLink®Universal
Transceiver button, complete the following.
1. Press and hold the desired HomeLink
®
button. Do notrelease the button.
Page 153 of 402
3-4Pre-driving checks and adjustments
WARNING
.Always have the doors locked while
driving. Along with the use of seat belts,
this provides greater safety in the event
of an accident by helping to prevent
persons from being thrown from the
vehicle. This also helps keep children
and others from unintentionally opening
the doors, and will help keep out
intruders.
. Before opening any door, always look for
and avoid oncoming traffic.
. Do not leave children unattended inside
the vehicle. They could unknowingly
activate switches or controls. Unat-
tended children could become involved
in serious accidents.
JVP0231X
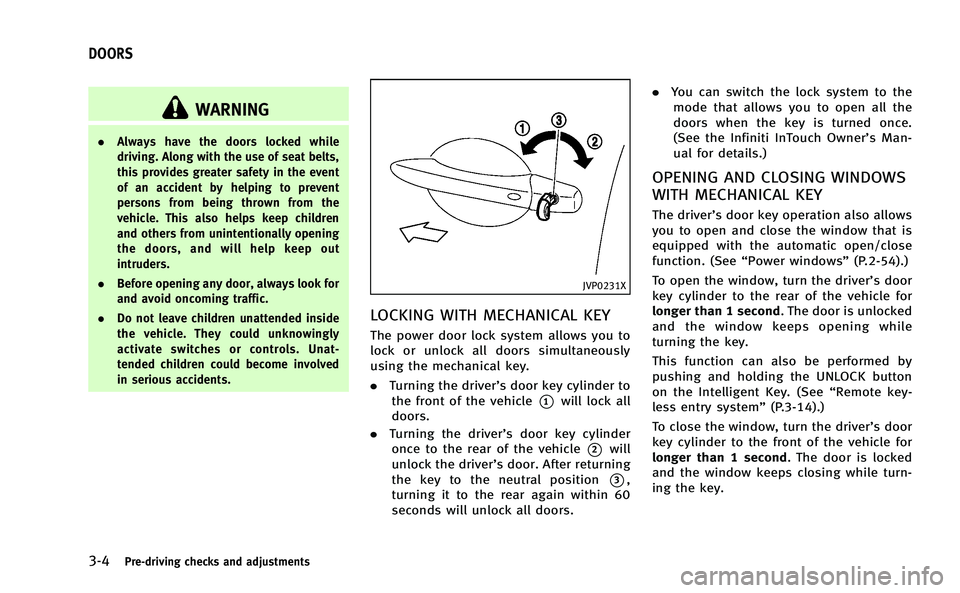
LOCKING WITH MECHANICAL KEY
The power door lock system allows you to
lock or unlock all doors simultaneously
using the mechanical key.
.Turning the driver’s door key cylinder to
the front of the vehicle
*1will lock all
doors.
. Turning the driver’s door key cylinder
once to the rear of the vehicle
*2will
unlock the driver’s door. After returning
the key to the neutral position
*3,
turning it to the rear again within 60
seconds will unlock all doors. .
You can switch the lock system to the
mode that allows you to open all the
doors when the key is turned once.
(See the Infiniti InTouch Owner’s Man-
ual for details.)
OPENING AND CLOSING WINDOWS
WITH MECHANICAL KEY
The driver’s door key operation also allows
you to open and close the window that is
equipped with the automatic open/close
function. (See “Power windows” (P.2-54).)
To open the window, turn the driver’s door
key cylinder to the rear of the vehicle for
longer than 1 second. The door is unlocked
and the window keeps opening while
turning the key.
This function can also be performed by
pushing and holding the UNLOCK button
on the Intelligent Key. (See “Remote key-
less entry system” (P.3-14).)
To close the window, turn the driver’s door
key cylinder to the front of the vehicle for
longer than 1 second. The door is locked
and the window keeps closing while turn-
ing the key.
DOORS
Page 163 of 402
3-14Pre-driving checks and adjustments
LOG-IN FUNCTION
After setting up the user information, the
system will automatically recognize the
user upon turning on the vehicle.
There will be a personalized welcome
greeting and screen prompt to log-in.
This feature allows 4 drivers to use their
own registration, drive mode, driving posi-
tion, air conditioner, and auto settings and
memorizes these custom settings.
The log-in user can be changed on the
welcome greeting screen or the User List
screen. For more details, see the Infiniti
InTouch Owner’s Manual.
The log-in function is linked to the follow-
ing items:
.Meter
. Audio
. Navigation system display (if so
equipped)
. Navigation settings (if so equipped)
. Air conditioner
. Automatic drive positioner (if so
equipped)
. Engine·Transmission
. Steering .
Active trace control
. Driver assistance (if so equipped)WARNING
The Intelligent Key transmits radio waves
when the buttons are pushed. The FAA
advises that the radio waves may affect
aircraft navigation and communication sys-
tems. Do not operate the Intelligent Key
while on an airplane. Make sure the buttons
are not operated unintentionally when the
unit is stored during a flight.
It is possible to lock/unlock all doors and
fuel-filler door, open the trunk lid, activate
the panic alarm and open the windows by
pushing the buttons on the Intelligent Key
from outside the vehicle.
Before locking the doors, make sure the
Intelligent Key is not left in the vehicle.
The remote keyless entry function can
operate at a distance of approximately 33
ft (10 m) from the vehicle. (The effective
distance depends upon the conditions
around the vehicle.)
As many as 4 Intelligent Keys can be used
with one vehicle. For information concern-
ing the purchase and use of additional
Intelligent Keys, contact an INFINITI retai-
ler.
REMOTE KEYLESS ENTRY SYSTEM
Page 165 of 402
3-16Pre-driving checks and adjustments
following operations is performed within 1
minute after pushing the UNLOCK
*2
button on the Intelligent Key while the
doors are locked. If during this 1-minute
time period, the UNLOCK
*2button on
the Intelligent Key is pushed, all doors will
be locked automatically after another 1
minute.
. Opening any door
. Pushing the ignition switch
Opening windows (if so equipped)
The UNLOCKbutton*2operation also
allows you to open the window that is
equipped with the automatic open/close
function. (See “Power windows” (P.2-54).)
To open the window, push the door
UNLOCK
*2button on the Intelligent
Key for about 3 seconds after the door is
unlocked.
To stop opening, release the UNLOCK
button*2.
If the window open operation is stopped in
mid-operation while pushing the UNLOCK
button*2, release and push the
UNLOCKbutton*2again until the
window opens completely.
Window cannot be closed using the In- telligent Key.
The door window can also be operated by
turning the mechanical key in a door lock.
(See
“Doors” (P.3-4).)
Opening moonroof (if so equipped)
The moonroof can be opened by pushing
the UNLOCKbutton*2on the Intelli-
gent Key. This function will not operate
while the moonroof timer is activated or
when the windows need to be initialized.
To open the moonroof, push the UNLOCK
button*2on the Intelligent Key for
about 3 seconds after the door is unlocked.
To stop opening, release the UNLOCK
button*2.
Opening trunk lid
1. Push the TRUNKbutton*3on the
Intelligent Key for more than 1 second.
2. The trunk will unlatch.
3. Raise the trunk lid to open the trunk.
Using panic alarm
If you are near your vehicle and feel
threatened, you may activate the alarm to
call attention as follows:
1. Push the PANIC
button*4on the key for
more than 1 second.
2. The theft warning alarm and headlights will stay on for 25 seconds.
3. The panic alarm stops when:
.It has run for 25 seconds, or.Any of the buttons on the Intelligent Key are pushed. (Note: PANIC
button*4or TRUNKbutton*3
should be pushed for more than 1
second.)
Setting hazard indicator and horn
mode
This vehicle is set in hazard indicator and
horn mode when you first receive the
vehicle.
In hazard indicator and horn mode, when
the LOCK
button*1is pushed, the
hazard indicator flashes twice and the horn
chirps once. When the UNLOCK
button
*2is pushed, the hazard indicator flashes
once.
If horns are not necessary, the system can
be switched to the hazard indicator mode.
In hazard indicator mode, when the LOCK
button*1is pushed, the hazard
indicator flashes twice. When the UNLOCK
button*2is pushed, neither the
Page 167 of 402
3-18Pre-driving checks and adjustments
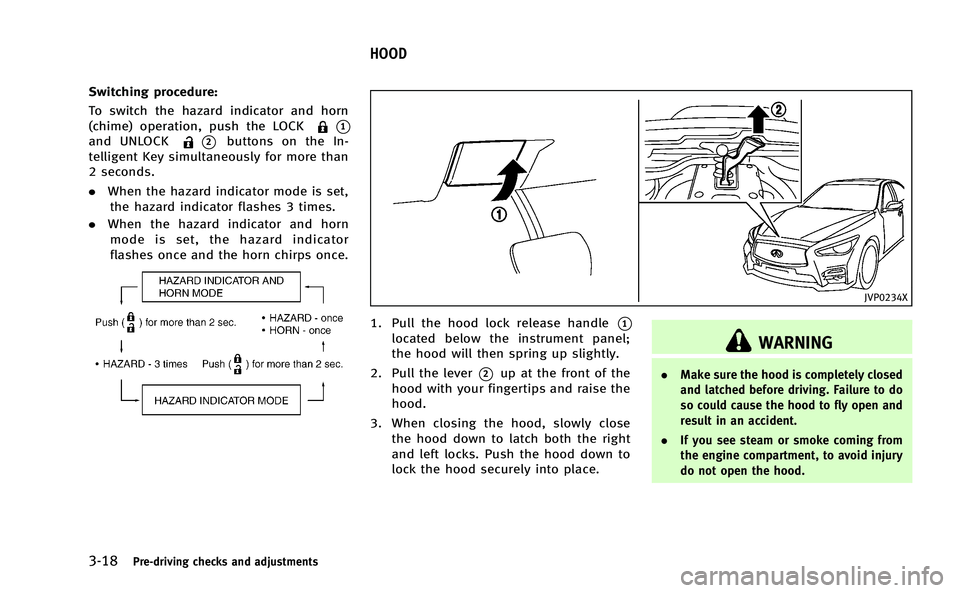
Switching procedure:
To switch the hazard indicator and horn
(chime) operation, push the LOCK
*1
and UNLOCK*2buttons on the In-
telligent Key simultaneously for more than
2 seconds.
. When the hazard indicator mode is set,
the hazard indicator flashes 3 times.
. When the hazard indicator and horn
mode is set, the hazard indicator
flashes once and the horn chirps once.
JVP0234X
1. Pull the hood lock release handle*1
located below the instrument panel;
the hood will then spring up slightly.
2. Pull the lever
*2up at the front of the
hood with your fingertips and raise the
hood.
3. When closing the hood, slowly close the hood down to latch both the right
and left locks. Push the hood down to
lock the hood securely into place.
WARNING
. Make sure the hood is completely closed
and latched before driving. Failure to do
so could cause the hood to fly open and
result in an accident.
. If you see steam or smoke coming from
the engine compartment, to avoid injury
do not open the hood.
HOOD
Page 184 of 402
WINDOW ANTENNA
The antenna pattern is printed inside the
rear window.
CAUTION
.Do not place metalized film near the rear
window glass or attach any metal parts
to it. This may cause poor reception or
noise.
. When cleaning the inside of the rear
window, be careful not to scratch or
damage the rear window antenna.
Lightly wipe along the antenna with a
dampened soft cloth.
SAA3602
SATELLITE ANTENNA
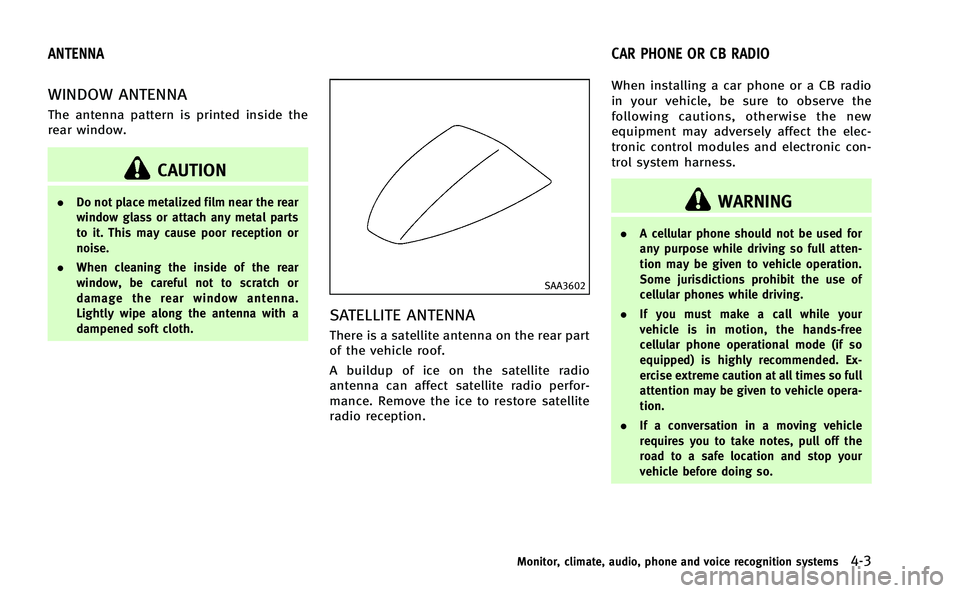
There is a satellite antenna on the rear part
of the vehicle roof.
A buildup of ice on the satellite radio
antenna can affect satellite radio perfor-
mance. Remove the ice to restore satellite
radio reception. When installing a car phone or a CB radio
in your vehicle, be sure to observe the
following cautions, otherwise the new
equipment may adversely affect the elec-
tronic control modules and electronic con-
trol system harness.
WARNING
.
A cellular phone should not be used for
any purpose while driving so full atten-
tion may be given to vehicle operation.
Some jurisdictions prohibit the use of
cellular phones while driving.
. If you must make a call while your
vehicle is in motion, the hands-free
cellular phone operational mode (if so
equipped) is highly recommended. Ex-
ercise extreme caution at all times so full
attention may be given to vehicle opera-
tion.
. If a conversation in a moving vehicle
requires you to take notes, pull off the
road to a safe location and stop your
vehicle before doing so.
Monitor, climate, audio, phone and voice recognition systems4-3
ANTENNA CAR PHONE OR CB RADIO
Page 186 of 402
5 Starting and driving
Precautions when starting and driving................. 5-3
Exhaust gas (carbon monoxide) ....................... 5-3
Three-way catalyst........................................... 5-4
Tire Pressure Monitoring System (TPMS).......... 5-4
Avoiding collision and rollover......................... 5-8
Off-road recovery............................................. 5-8
Rapid air pressure loss ................................... 5-8
Drinking alcohol/drugs and driving ................. 5-9
Intelligent All-Wheel Drive (AWD) driving safety
precautions (AWD models)............................. 5-10
Push-button ignition switch ............................... 5-10 Operating range for hybrid system
start function ................................................ 5-11
Push-button ignition switch operation ........... 5-11
Push-button ignition switch positions ............ 5-12
Emergency hybrid system shut off ................. 5-12
Intelligent Key battery discharge ................... 5-13
Before starting the INFINITI Direct Response
Hybrid
®System ................................................. 5-13
Starting the INFINITI Direct Response
Hybrid
®System ................................................. 5-14
Driving the vehicle ............................................. 5-14 Automatic transmission ................................. 5-14
Parking brake .................................................... 5-20
INFINITI Drive Mode Selector .............................. 5-21 STANDARD mode.......................................... 5-21
SPORT mode ................................................ 5-21
SNOW mode ................................................ 5-21
ECO mode.................................................... 5-21
PERSONAL mode .......................................... 5-23
Active Lane Control (if so equipped) .................. 5-24
Precautions on Active Lane Control .............. 5-25
Active Lane Control operation ...................... 5-27
Automatic deactivation................................. 5-29
Lane camera unit maintenance .................... 5-29
Lane Departure Warning (LDW) system/Lane
Departure Prevention (LDP) system (if
so equipped)..................................................... 5-30 Lane Departure Warning (LDW) system......... 5-31
Lane Departure Prevention (LDP) system ...... 5-33
System maintenance.................................... 5-36
Blind Spot Warning/Blind Spot Intervention
TM/
Back-up Collision Intervention systems (if
so equipped)..................................................... 5-37
Blind Spot Warning (BSW) system/Blind Spot
Intervention
TM(BSI) system.......................... 5-37
BSW/BSI driving situations .......................... 5-43
Back-up Collision Intervention
(BCI) system ................................................ 5-48
System maintenance.................................... 5-55