lock INFINITI Q50-HYBRID 2014 Owners Manual
[x] Cancel search | Manufacturer: INFINITI, Model Year: 2014, Model line: Q50-HYBRID, Model: INFINITI Q50-HYBRID 2014Pages: 402, PDF Size: 2.83 MB
Page 22 of 402
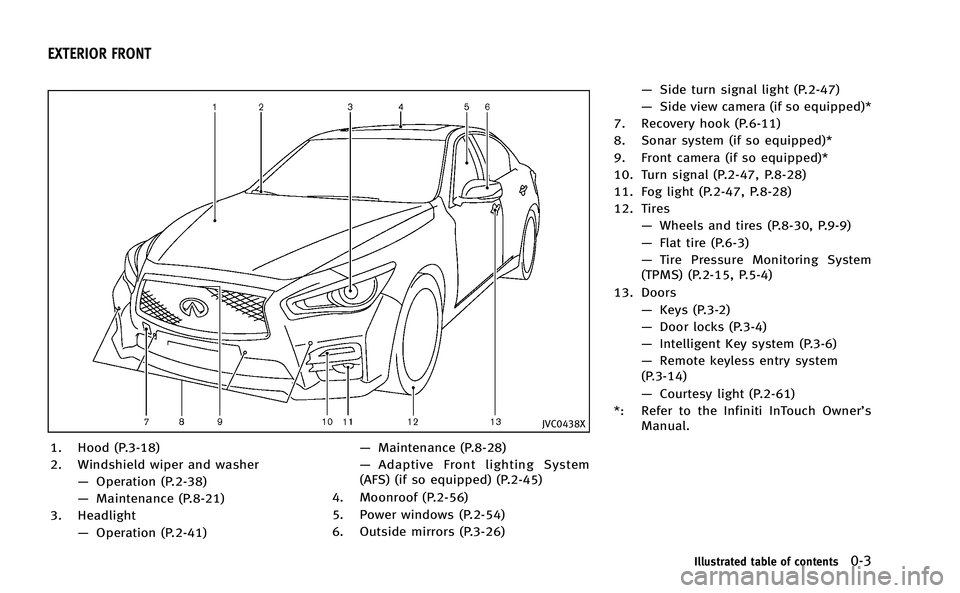
JVC0438X
1. Hood (P.3-18)
2. Windshield wiper and washer—Operation (P.2-38)
— Maintenance (P.8-21)
3. Headlight —Operation (P.2-41) —
Maintenance (P.8-28)
— Adaptive Front lighting System
(AFS) (if so equipped) (P.2-45)
4. Moonroof (P.2-56)
5. Power windows (P.2-54)
6. Outside mirrors (P.3-26) —
Side turn signal light (P.2-47)
— Side view camera (if so equipped)*
7. Recovery hook (P.6-11)
8. Sonar system (if so equipped)*
9. Front camera (if so equipped)*
10. Turn signal (P.2-47, P.8-28)
11. Fog light (P.2-47, P.8-28)
12. Tires —Wheels and tires (P.8-30, P.9-9)
— Flat tire (P.6-3)
— Tire Pressure Monitoring System
(TPMS) (P.2-15, P.5-4)
13. Doors —Keys (P.3-2)
— Door locks (P.3-4)
— Intelligent Key system (P.3-6)
— Remote keyless entry system
(P.3-14)
— Courtesy light (P.2-61)
*: Refer to the Infiniti InTouch Owner’s Manual.
Illustrated table of contents0-3
EXTERIOR FRONT
Page 23 of 402
0-4Illustrated table of contents
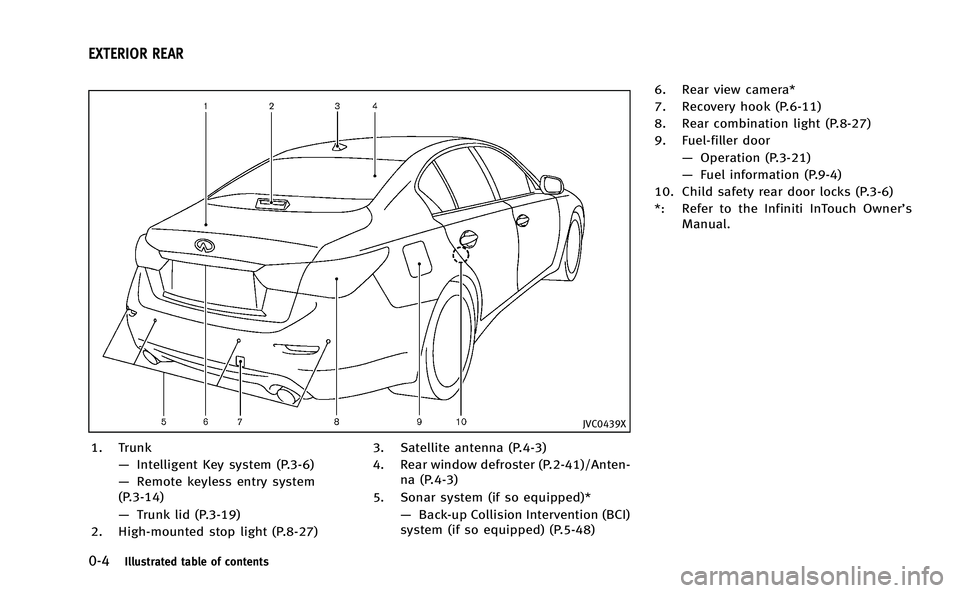
JVC0439X
1. Trunk—Intelligent Key system (P.3-6)
— Remote keyless entry system
(P.3-14)
— Trunk lid (P.3-19)
2. High-mounted stop light (P.8-27) 3. Satellite antenna (P.4-3)
4. Rear window defroster (P.2-41)/Anten-
na (P.4-3)
5. Sonar system (if so equipped)* —Back-up Collision Intervention (BCI)
system (if so equipped) (P.5-48) 6. Rear view camera*
7. Recovery hook (P.6-11)
8. Rear combination light (P.8-27)
9. Fuel-filler door
—Operation (P.3-21)
— Fuel information (P.9-4)
10. Child safety rear door locks (P.3-6)
*: Refer to the Infiniti InTouch Owner’s Manual.
EXTERIOR REAR
Page 27 of 402
0-8Illustrated table of contents
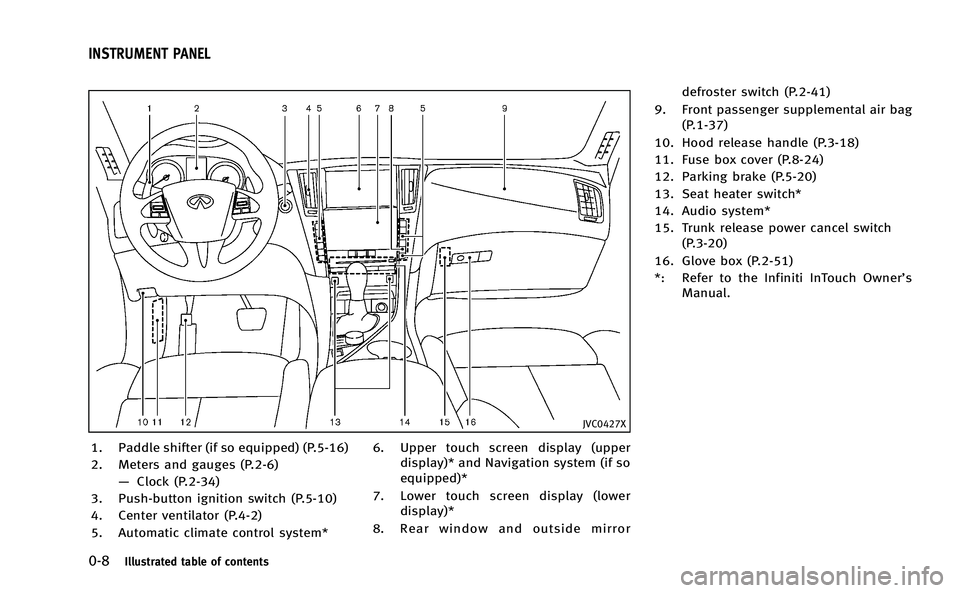
JVC0427X
1. Paddle shifter (if so equipped) (P.5-16)
2. Meters and gauges (P.2-6)—Clock (P.2-34)
3. Push-button ignition switch (P.5-10)
4. Center ventilator (P.4-2)
5. Automatic climate control system* 6. Upper touch screen display (upper
display)* and Navigation system (if so
equipped)*
7. Lower touch screen display (lower display)*
8. Rear window and outside mirror defroster switch (P.2-41)
9. Front passenger supplemental air bag (P.1-37)
10. Hood release handle (P.3-18)
11. Fuse box cover (P.8-24)
12. Parking brake (P.5-20)
13. Seat heater switch*
14. Audio system*
15. Trunk release power cancel switch (P.3-20)
16. Glove box (P.2-51)
*: Refer to the Infiniti InTouch Owner’s Manual.
INSTRUMENT PANEL
Page 30 of 402
Warninglight Name Page
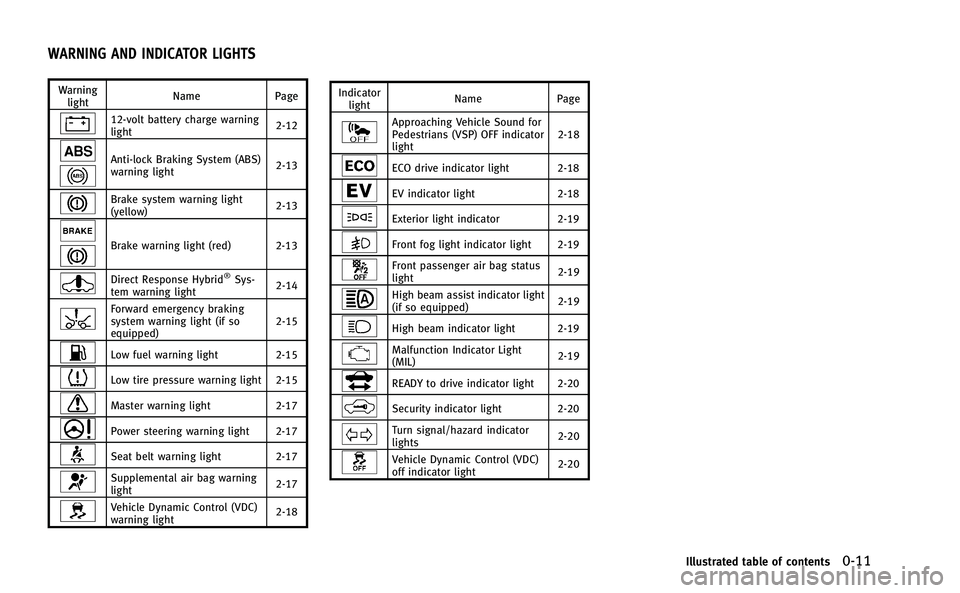
12-volt battery charge warning
light
2-12
Anti-lock Braking System (ABS)
warning light2-13
Brake system warning light
(yellow)
2-13
Brake warning light (red) 2-13
Direct Response Hybrid®Sys-
tem warning light 2-14
Forward emergency braking
system warning light (if so
equipped)2-15
Low fuel warning light
2-15
Low tire pressure warning light 2-15
Master warning light 2-17
Power steering warning light 2-17
Seat belt warning light 2-17
Supplemental air bag warning
light 2-17
Vehicle Dynamic Control (VDC)
warning light2-18Indicator
light Name Page
Approaching Vehicle Sound for
Pedestrians (VSP) OFF indicator
light 2-18
ECO drive indicator light 2-18
EV indicator light
2-18
Exterior light indicator2-19
Front fog light indicator light 2-19
Front passenger air bag status
light 2-19
High beam assist indicator light
(if so equipped)2-19
High beam indicator light 2-19
Malfunction Indicator Light
(MIL)2-19
READY to drive indicator light 2-20
Security indicator light 2-20
Turn signal/hazard indicator
lights2-20
Vehicle Dynamic Control (VDC)
off indicator light2-20
Illustrated table of contents0-11
WARNING AND INDICATOR LIGHTS
Page 37 of 402
1-6Safety—Seats, seat belts and supplemental restraint system
JVR0089X
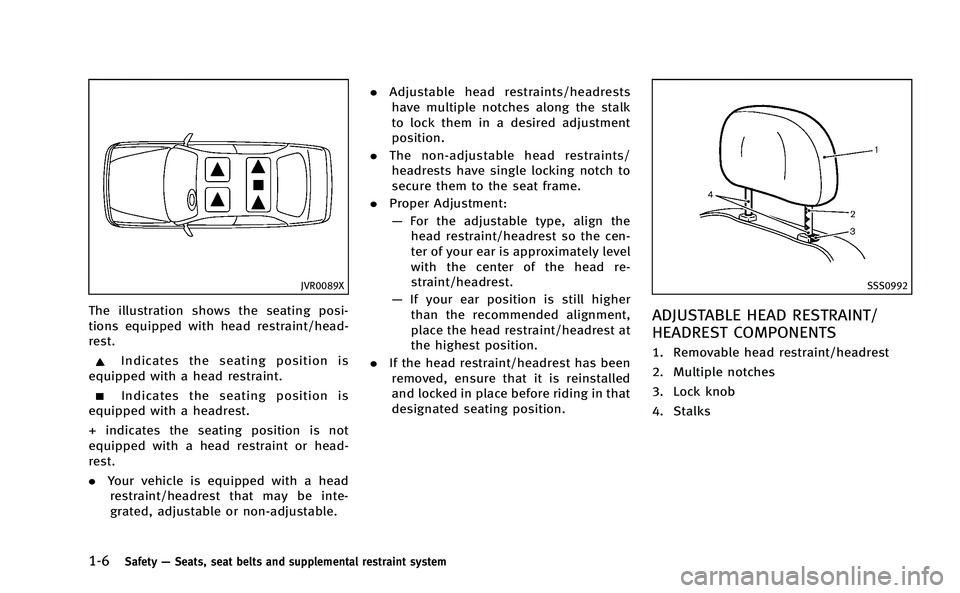
The illustration shows the seating posi-
tions equipped with head restraint/head-
rest.
Indicates the seating position is
equipped with a head restraint.
Indicates the seating position is
equipped with a headrest.
+ indicates the seating position is not
equipped with a head restraint or head-
rest.
. Your vehicle is equipped with a head
restraint/headrest that may be inte-
grated, adjustable or non-adjustable. .
Adjustable head restraints/headrests
have multiple notches along the stalk
to lock them in a desired adjustment
position.
. The non-adjustable head restraints/
headrests have single locking notch to
secure them to the seat frame.
. Proper Adjustment:
— For the adjustable type, align the
head restraint/headrest so the cen-
ter of your ear is approximately level
with the center of the head re-
straint/headrest.
— If your ear position is still higher
than the recommended alignment,
place the head restraint/headrest at
the highest position.
. If the head restraint/headrest has been
removed, ensure that it is reinstalled
and locked in place before riding in that
designated seating position.
SSS0992
ADJUSTABLE HEAD RESTRAINT/
HEADREST COMPONENTS
1. Removable head restraint/headrest
2. Multiple notches
3. Lock knob
4. Stalks
Page 38 of 402
JVR0203X
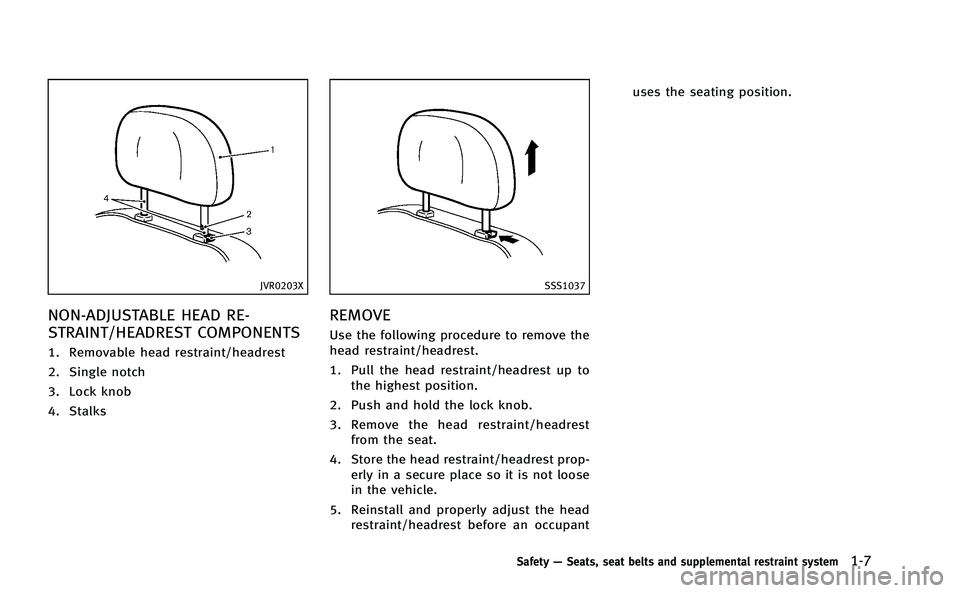
NON-ADJUSTABLE HEAD RE-
STRAINT/HEADREST COMPONENTS
1. Removable head restraint/headrest
2. Single notch
3. Lock knob
4. Stalks
SSS1037
REMOVE
Use the following procedure to remove the
head restraint/headrest.
1. Pull the head restraint/headrest up tothe highest position.
2. Push and hold the lock knob.
3. Remove the head restraint/headrest from the seat.
4. Store the head restraint/headrest prop- erly in a secure place so it is not loose
in the vehicle.
5. Reinstall and properly adjust the head restraint/headrest before an occupant uses the seating position.
Safety
—Seats, seat belts and supplemental restraint system1-7
Page 39 of 402
1-8Safety—Seats, seat belts and supplemental restraint system
SSS1038
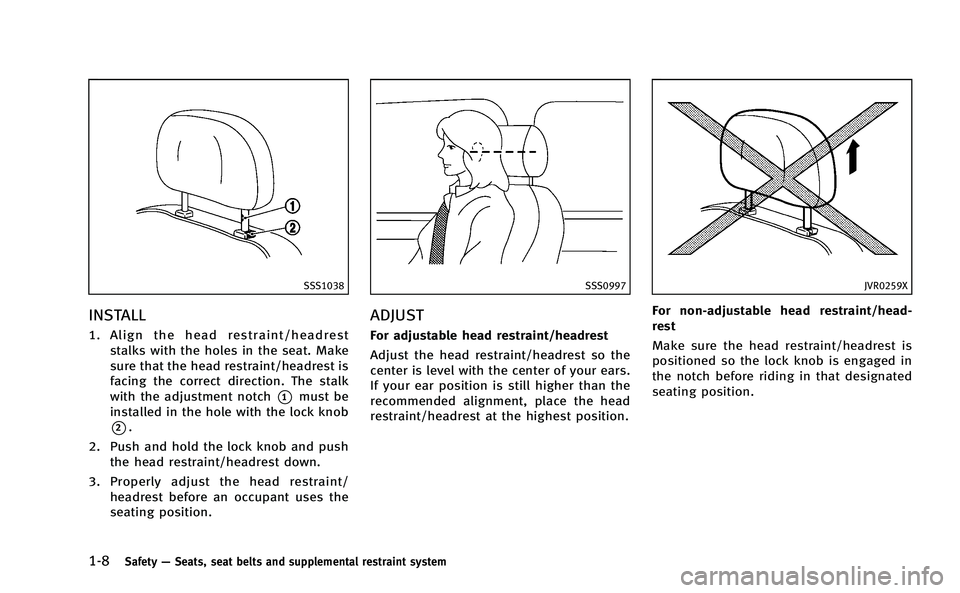
INSTALL
1. Align the head restraint/headrest
stalks with the holes in the seat. Make
sure that the head restraint/headrest is
facing the correct direction. The stalk
with the adjustment notch
*1must be
installed in the hole with the lock knob
*2.
2. Push and hold the lock knob and push the head restraint/headrest down.
3. Properly adjust the head restraint/ headrest before an occupant uses the
seating position.
SSS0997
ADJUST
For adjustable head restraint/headrest
Adjust the head restraint/headrest so the
center is level with the center of your ears.
If your ear position is still higher than the
recommended alignment, place the head
restraint/headrest at the highest position.
JVR0259X
For non-adjustable head restraint/head-
rest
Make sure the head restraint/headrest is
positioned so the lock knob is engaged in
the notch before riding in that designated
seating position.
Page 40 of 402
SSS1035
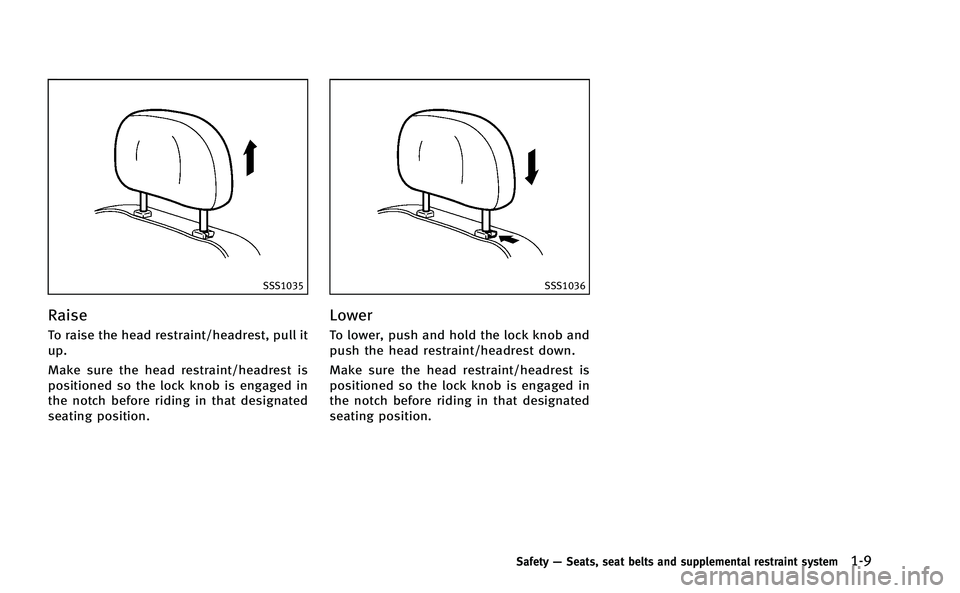
Raise
To raise the head restraint/headrest, pull it
up.
Make sure the head restraint/headrest is
positioned so the lock knob is engaged in
the notch before riding in that designated
seating position.
SSS1036
Lower
To lower, push and hold the lock knob and
push the head restraint/headrest down.
Make sure the head restraint/headrest is
positioned so the lock knob is engaged in
the notch before riding in that designated
seating position.
Safety—Seats, seat belts and supplemental restraint system1-9
Page 44 of 402
not be able to retract the seat belt. After a
few minutes, the motor reactivates and
retracts the seat belt. If the seat belt still
cannot be retracted by the motor, the pre-
crash seat belt system has a malfunction.
Have your INFINITI retailer check and repair
the system.
THREE-POINT TYPE SEAT BELT
WARNING
.Every person who drives or rides in this
vehicle should use a seat belt at all
times.
. Do not ride in a moving vehicle when the
seatback is reclined. This can be danger-
ous. The shoulder belt will not be
against your body. In an accident, you
could be thrown into it and receive neck
or other serious injuries. You could also
slide under the lap belt and receive
serious internal injuries.
. For the most effective protection when
the vehicle is in motion, the seat should
be upright. Always sit well back in the
seat with both feet on the floor and
adjust the seat belt properly. .
Do not allow children to play with the
seat belts. Most seating positions are
equipped with Automatic Locking Re-
tractor (ALR) mode seat belts. If the seat
belt becomes wrapped around a child’s
neck with the ALR mode activated, the
child can be seriously injured or killed if
the seat belt retracts and becomes tight.
This can occur even if the vehicle is
parked. Unbuckle the seat belt to release
the child. If the seat belt can not be
unbuckled or is already unbuckled,
release the child by cutting the seat belt
with a suitable tool (such as a knife or
scissors) to release the seat belt.SSS0292
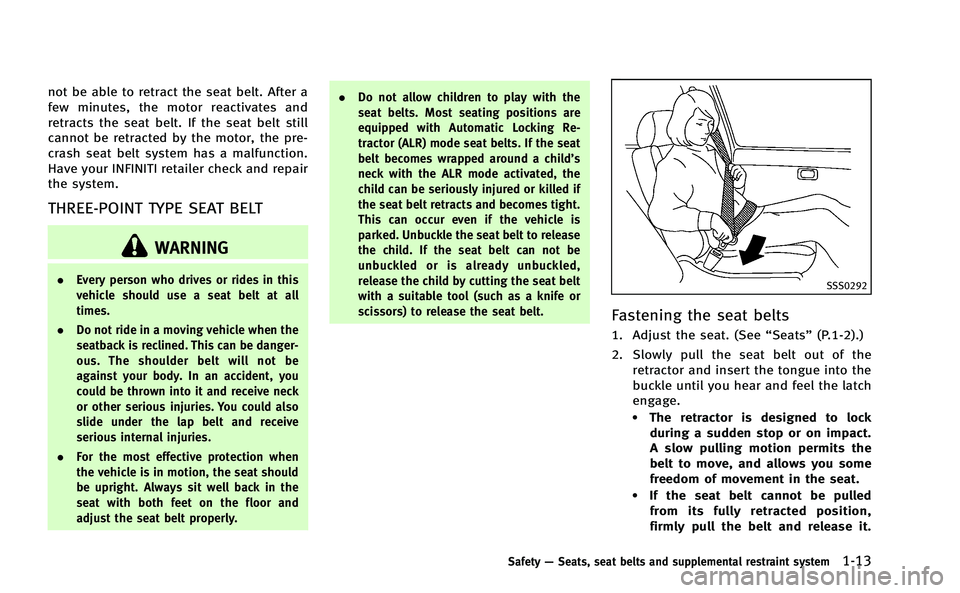
Fastening the seat belts
1. Adjust the seat. (See “Seats”(P.1-2).)
2. Slowly pull the seat belt out of the retractor and insert the tongue into the
buckle until you hear and feel the latch
engage.
.The retractor is designed to lockduring a sudden stop or on impact.
A slow pulling motion permits the
belt to move, and allows you some
freedom of movement in the seat.
.If the seat belt cannot be pulledfrom its fully retracted position,
firmly pull the belt and release it.
Safety —Seats, seat belts and supplemental restraint system1-13
Page 45 of 402
1-14Safety—Seats, seat belts and supplemental restraint system
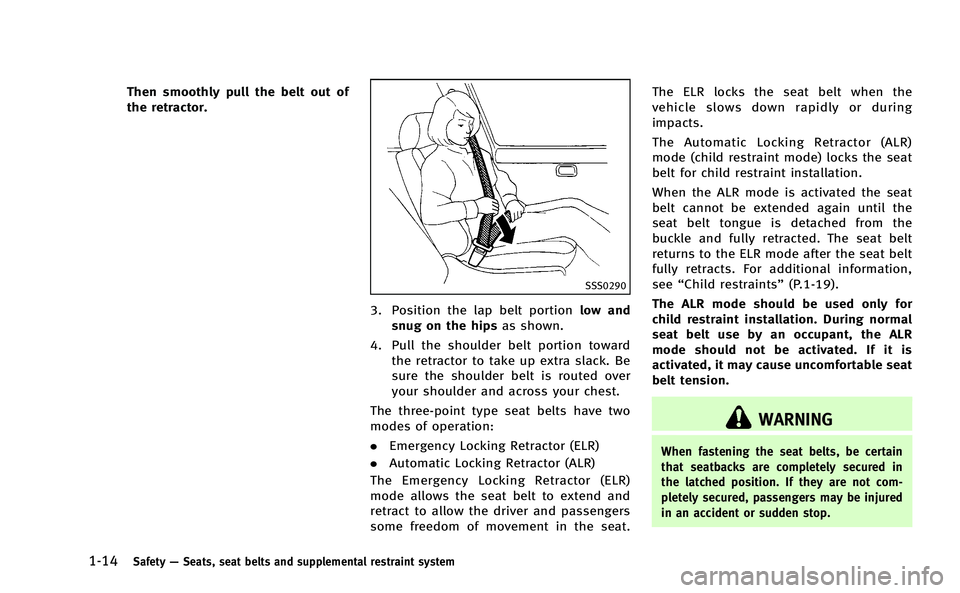
Then smoothly pull the belt out of
the retractor.
SSS0290
3. Position the lap belt portion low and
snug on the hips as shown.
4. Pull the shoulder belt portion toward the retractor to take up extra slack. Be
sure the shoulder belt is routed over
your shoulder and across your chest.
The three-point type seat belts have two
modes of operation:
. Emergency Locking Retractor (ELR)
. Automatic Locking Retractor (ALR)
The Emergency Locking Retractor (ELR)
mode allows the seat belt to extend and
retract to allow the driver and passengers
some freedom of movement in the seat. The ELR locks the seat belt when the
vehicle slows down rapidly or during
impacts.
The Automatic Locking Retractor (ALR)
mode (child restraint mode) locks the seat
belt for child restraint installation.
When the ALR mode is activated the seat
belt cannot be extended again until the
seat belt tongue is detached from the
buckle and fully retracted. The seat belt
returns to the ELR mode after the seat belt
fully retracts. For additional information,
see
“Child restraints” (P.1-19).
The ALR mode should be used only for
child restraint installation. During normal
seat belt use by an occupant, the ALR
mode should not be activated. If it is
activated, it may cause uncomfortable seat
belt tension.
WARNING
When fastening the seat belts, be certain
that seatbacks are completely secured in
the latched position. If they are not com-
pletely secured, passengers may be injured
in an accident or sudden stop.