key INFINITI Q50 HYBRID 2018 Quick Reference Guide
[x] Cancel search | Manufacturer: INFINITI, Model Year: 2018, Model line: Q50 HYBRID, Model: INFINITI Q50 HYBRID 2018Pages: 24, PDF Size: 2.14 MB
Page 2 of 24

• VEHICLE OWNER’S MANUAL
• INFINITI CLIENT SUPPORT 1-800-662-6200 Support is always available if your Infiniti retailer cannot assist you or you would like to provide INFINITI directly with comments or questions.
• INFINITI ROADSIDE ASSISTANCE 1-800-662-6200 (option 1) As part of the Infiniti Total Ownership Experience®, Roadside Assistance
is available to you, 24 hours a day 365 days a year, for emergency
roadside assistance.
• INFINITI ELITE® EXTENDED PROTECTION PROGRAM 1-800-662-6200 Infiniti Elite® Assurance Products provide you with quality, long-term protection
and enhanced peace of mind.
• INFINITI FINANCIAL SERVICES CLIENT SUPPORT 1-800-627-4437 For client support with your Infiniti Financial Services loan or lease.
• INFINITI FINANCIAL SERVICES www.infinitifinance.com Use the IFS Online Account Manager to check your account status, schedule recurring payments and access important forms.
• OWNER PORTAL 1-855-444-7244 www.owners.InfinitiUSA.com/iowners Your Infiniti Owner Portal account contains your personal preferences, vehicle information and links to key vehicle features and services.
• INFINITI INTOUCH™ 1-855-444-7244 usa.infinitiintouch.com This suite of digital alerts and remote services is your direct link to personal security, convenience and confidence.
• SiriusXM® RADIO 1-877-447-0011 For support with your SiriusXM® subscription.
• INFINITI USA.COM www.InfinitiUSA.com/bluetooth Reference this site for a list of compatible cellular phones and instructions on how to pair your cellular phone to your vehicle.
• INFINITI ELECTRONIC QUICK REFERENCE GUIDE (Use the Quick Response (QR) code or URL on this page or on the back cover).
Helpful Resources
BELOW IS A LIST OF HELPFUL RESOURCES THAT CAN BE USED TO LEARN MORE ABOUT THE VEHICLE’S SYSTEMS AND FEATURE OPERATIONS.
To view detailed instructional videos, go to
www.infinitiownersinfo.mobi/2018/q50
or snap this barcode with an
appropriate barcode reader.
Page 10 of 24

7
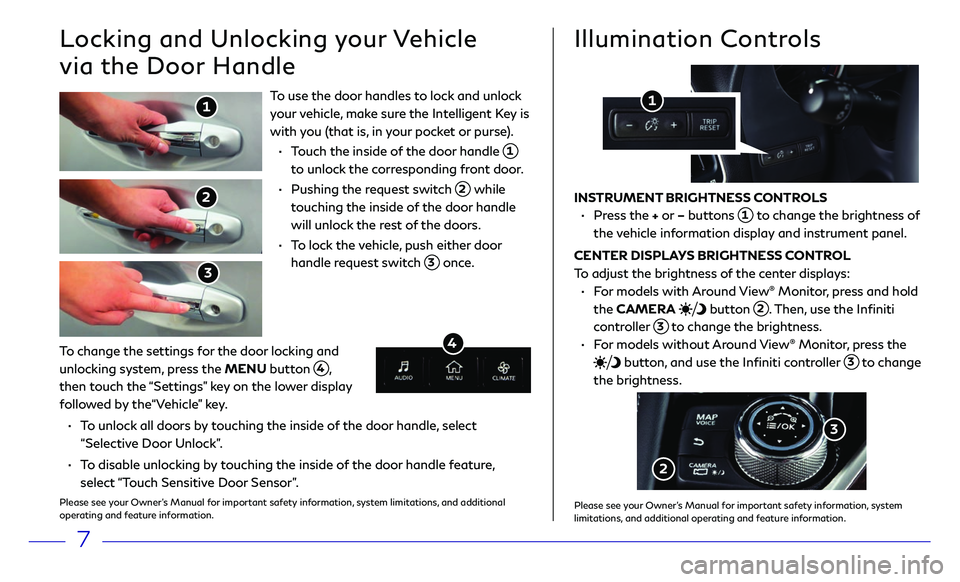
To use the door handles to lock and unlock
your vehicle, make sure the Intelligent Key is
with you (that is, in your pocket or purse).
• Touch the inside of the door handle 1
to unlock the corresponding front door.
• Pushing the r equest switch 2 while
touching the inside of the door handle
will unlock the rest of the doors.
• To lock the vehicle, push either door
handle request switch 3 once.
Locking and Unlocking your Vehicle
via the Door Handle
1
2
3
Illumination Controls
INSTRUMENT BRIGHTNESS CONTROLS
• Press the + or – buttons 1 to change the brightness of
the vehicle information display and instrument panel.
CENTER DISPLAYS BRIGHTNESS CONTROL
To adjust the brightness of the center displays:
• For models with Around View® Monitor, press and hold
the CAMERA
button 2. Then, use the Infiniti
controller 3 to change the brightness.
• For models without Around View® Monitor, press the
button, and use the Infiniti controller 3 to change
the brightness.
1
2
To change the settings for the door locking and
unlocking system, press the MENU button
4, then touch the “Settings” key on the lower display
followed by the“Vehicle” key.
• To unlock all doors by touching the inside of the door handle, select
“Selective Door Unlock”.
• To disable unlocking by touching the inside of the door handle feature,
select “Touch Sensitive Door Sensor”.
Please see your Owner’s Manual for important safety information, system limitations, and additional
operating and feature information.
4
3
Please see your Owner’s Manual for important safety information, system limitations, and additional operating and feature information.
Page 11 of 24

Wiper and Washer Switch
Move the lever 1 up or down to one of the following
positions to operate the windshield wipers:
MIST
One sweep operation
OFF Wipers ar e off
AUTO Speed-sensing and r ain-sensing automatic wipe
LO Continuous wipe, slow
HI Continuous wipe, fast
To adjust the wiper sensitivity for the AUTO setting,
twist the control ring
2.
Pull the lever 1 toward you operate the
windshield washer.
1
2
Please see your Owner’s Manual for important safety information, system limitations, and additional operating and feature information.
8
PULLING UP THE WIPER ARM
The wiper arm should be in the up position when
replacing the wiper.
• With the shift le ver in the P (PARK) position,
place the ignition switch in the OFF position.
• Within 1 minut e, push the wiper switch 1 to the
MIST position twice. The wiper operation stops in
mid-operation and the wiper arm can be pulled up.
• To return the wiper arm, place the wiper arm in the
down position and operate the wiper switch once.
To turn the rain sensor function on and off:
1. Press the MENU button below the lower display.
2. Touch the “Settings” key and then the “Vehicle” key 3 on the display.
3. Touch the “Rain Sensor” key 4 to toggle the feature ON and OFF.
When the rain-sensing function is disabled, the AUTO position on the wiper stalk will
work in conventional intermittent mode.
4
3
Page 12 of 24

9
Seat Adjustments
1 Seat cushion f orward, backward, up and down adjustments
2 Seatback recline adjustment
3 Lumbar support adjustment
4 Thigh support adjustmen t
1 2 3
4
To adjust the time and the appearance of the clock
on the display:
1. Press the MENU button 1 below the lower
display. Then, touch the “Settings” key on the
lower display.
2. Locate and touch the “Clock” key to adjust
“On-Screen Clock”, “Daylight Savings Time”,
“Clock Format (24h)”, and “Time Zone”.
Clock Set/Adjustment
1
The driver’s seat and steering column will automatically
move when the shift lever is in the P (PARK) position
to allow the driver to get in and out of the driver’s seat
more easily. “Lift Steering Wheel on Exit” and “Slide
Driver Seat Back on Exit” can be turned on or off in
the “Settings” menu under “Vehicle Settings” on the
lower display.
SEAT BACK/LIFT STEERING WHEEL ON EXIT
Please see your Owner’s Manual for important safety information, system limitations, and additional operating and
feature information. Please see your Owner’s Manual for important safety
information, system limitations, and additional operating and feature
information.
Page 13 of 24

10
Audio Control Menu
To adjust the audio settings:
1. Press the button 1 on the bottom left of the
screen at any time.
2. Then, select the setting
you would like to adjust
on the screen
2.
2
Heater and Air Conditioner (automatic)
The climate controls can be adjusted using the buttons on either side of the
lower display or through the “CLIMATE” screen
1 on the lower display.
• To access the “CLIMATE” screen 1, press the CLIMATE button 2 below
the lower display.
HEATED STEERING WHEEL
To turn the heated steering wheel on or off, touch the “Steering Heater” key
3 on the lower display.
1
2
3
1
Please see your Owner’s Manual for important safety information, system limitations, and additional operating and feature information. Please see your Owner’s Manual for important safety information, system
limitations, and additional operating and feature information.
Page 14 of 24

11
Connecting your Cellular Phone
or Device via Bluetooth
®*
Using Bluetooth® technology, you can connect (pair) your cellular phone
with the in-vehicle system for hands-free use of your cellular phone.
1. Press the MENU button below the lower display.
2. Touch the “Settings” key on the lower display.
3. Touch “Phone/Mail”.
4. Touch “Connect Device”.
5. Touch “Add New (X/5
Free)”.
6. Follow the instructions on the “Connect Device” screen. When a PIN
appears on the screen, operate the Bluetooth® device to enter/confirm
the PIN.
For any Bluetooth
® connectivity issues, reboot your cellular phone or device.
* Some jurisdictions prohibit the use of cellular telephones while driving.
Please see your Owner’s Manual for important safety information, system limitations, and additional
operating and feature information.
SYSTEM OPERATING TIPS
• The interior of the vehicle should be as quiet as possible.
• Speak naturally. Speaking too fast, too slow, too soft, or
too loud makes voice recognition more difficult.
• Confirm that the correct voice commands are
being used. Glance at the screen to see the currently
available commands.
USING THE VOICE RECOGNITION SYSTEM
• Press the button 1 on the steering wheel, and a list of
commands will appear on the screen.
• After the tone sounds, speak the command.
• To skip the voice prompt and give the command immediately, press the button 1 on the steering wheel to interrupt the
system. Speak the next command after the tone sounds.
• To cancel the command, press and hold the button 1 on
the steering wheel.
Please see your Owner’s Manual for important safety information, system limitations,
and additional operating and feature information.
Voice Recognition
1
Page 17 of 24

14
Navigation System
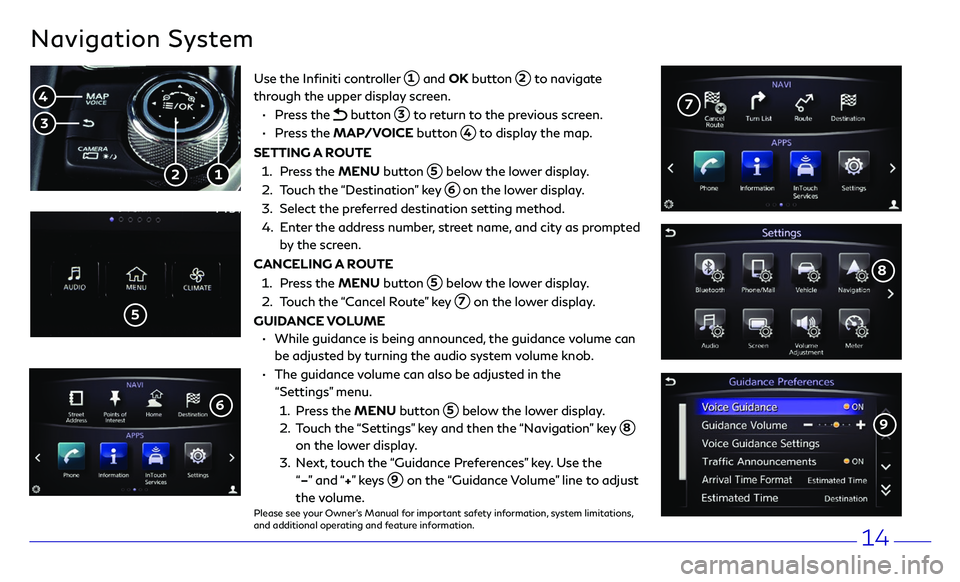
Use the Infiniti controller 1 and OK button 2 to navigate
through the upper display screen.
• Press the button 3 to return to the previous screen.
• Press the MAP/VOICE button 4 to display the map.
SETTING A ROUTE
1. Press the MENU button 5 below the lower display .
2. Touch the “Destination” key 6 on the lower display.
3. Select the pr eferred destination setting method.
4. Enter the address number, street name, and city as prompted
by the screen.
CANCELING A ROUTE
1. Press the MENU button 5 below the lower display .
2. Touch the “Cancel Route” key 7 on the lower display.
GUIDANCE VOLUME
• While guidanc e is being announced, the guidance volume can
be adjusted by turning the audio system volume knob.
• The guidanc e volume can also be adjusted in the
“Settings” menu.
1. Press the MENU button 5 below the lower display .
2. Touch the “Settings” key and then the “Navigation” key 8
on the lower display.
3. Next, touch the “Guidance Preferences” key. Use the
“–” and “+” ke y s
9 on the “Guidance Volume” line to adjust
the volume.Please see your Owner’s Manual for important safety information, system limitations,
and additional operating and feature information.
1 2
4
3
5
7
8
9
6
Page 18 of 24

15
Infiniti InTouch™ Services
• Automatic Collision
Notification
• Emergency Calling
• Report Stolen Vehicle
• Alarm Notification
• Maintenance Alert
• Vehicle Health Report
• Scheduled Maintenance
Notification
• Remote Door Lock/Unlock
• Remote Light and Horn
• Remote Engine Start/Stop
• Maximum Speed Alert
• Valet Alert
• Curfew Alert
• Destination Send-to-Vehicle
• Connected Search
The following services can also
be accessed by touching the
headset icon 4.
• Infiniti Personal Assistant
• Enhanced Roadside Assistance
1
Infiniti InTouch ™ Services combine personalized
convenience settings and personal security features
to compliment the Total Ownership Experience®. Fo r
more details on Infiniti InTouch Services or to enroll
your vehicle, please visit usa.infinitiintouch.com or
call 1-855-444-7244.
To access Infiniti InTouch Services:
1. Press the MENU button 1 under the
lower display.
2. Select the “InTouch Services” key 2 on the
lower display.
· Press the in-vehicle telematics SOS button 3
(if so equipped) in case of an emergency, located
above and in front of the rearview mirror. Available services include, but are
not limited to:
INFINITI INTOUCH SERVICES ENROLLMENT
1. Create an Infiniti Owner Portal account.
(https://owners.infinitiusa.com/iowners/)
2. From your Infiniti Owner Portal account, enroll
in Infiniti InTouch Services.
3. Download the Infiniti InTouch Services
companion app from the App store and
log in using your Infiniti Owner Portal ID
and password.
Please see your Owner’s Manual for important safety information,
system limitations, and additional operating and feature information.
2
3
4