lock INFINITI Q60 2019 User Guide
[x] Cancel search | Manufacturer: INFINITI, Model Year: 2019, Model line: Q60, Model: INFINITI Q60 2019Pages: 468, PDF Size: 2.18 MB
Page 36 of 468
1-16Safety — Seats, seat belts and supplemental restraint system
restrict further belt movement.
If the retractor does not lock during this
check, get the system checked. It is recom-
mended you visit an INFINITI retailer for this
service, or to learn more about seat belt
operation.
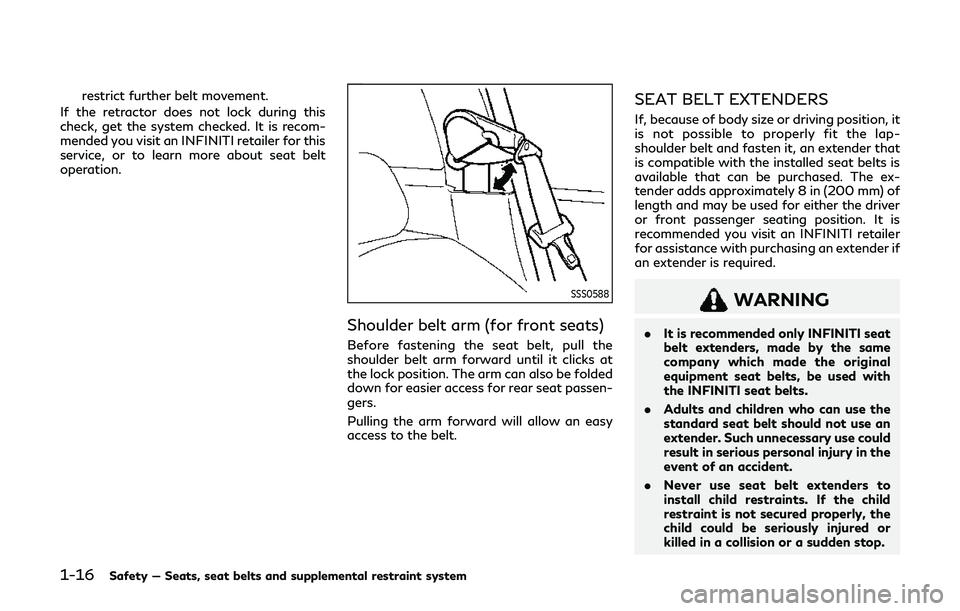
SSS0588
Shoulder belt arm (for front seats)
Before fastening the seat belt, pull the
shoulder belt arm forward until it clicks at
the lock position. The arm can also be folded
down for easier access for rear seat passen-
gers.
Pulling the arm forward will allow an easy
access to the belt.
SEAT BELT EXTENDERS
If, because of body size or driving position, it
is not possible to properly fit the lap-
shoulder belt and fasten it, an extender that
is compatible with the installed seat belts is
available that can be purchased. The ex-
tender adds approximately 8 in (200 mm) of
length and may be used for either the driver
or front passenger seating position. It is
recommended you visit an INFINITI retailer
for assistance with purchasing an extender if
an extender is required.
WARNING
. It is recommended only INFINITI seat
belt extenders, made by the same
company which made the original
equipment seat belts, be used with
the INFINITI seat belts.
. Adults and children who can use the
standard seat belt should not use an
extender. Such unnecessary use could
result in serious personal injury in the
event of an accident.
. Never use seat belt extenders to
install child restraints. If the child
restraint is not secured properly, the
child could be seriously injured or
killed in a collision or a sudden stop.
Page 37 of 468

SEAT BELT MAINTENANCE
.To clean the seat belt webbing, apply a
mild soap solution or any solution re-
commended for cleaning upholstery or
carpets. Then, wipe with a cloth and
allow the seat belts to dry in the shade.
Do not allow the seat belts to retract
until they are completely dry.
. If dirt builds up in the shoulder belt guide
of the seat belt anchors, the seat belts
may retract slowly. Wipe the shoulder
belt guide with a clean, dry cloth.
. Periodically check to see that the seat
belt and the metal components such as
buckles, tongues, retractors, flexible
wires and anchors work properly. If loose
parts, deterioration, cuts or other da-
mage on the webbing is found, the entire
seat belt assembly should be replaced.WARNING
Do not allow children to play with the
seat belts. Most seating positions are
equipped with Automatic Locking Re-
tractor (ALR) mode seat belts. If the seat
belt becomes wrapped around a child’s
neck with the ALR mode activated, the
child can be seriously injured or killed if
the seat belt retracts and becomes tight.
This can occur even if the vehicle is
parked. Unbuckle the seat belt to release
the child.
Children need adults to help protect them.
They need to be properly restrained.
In addition to the general information in this
manual, child safety information is available
from many other sources, including doctors,
teachers, government traffic safety offices,
and community organizations. Every child is
different, so be sure to learn the best way to
transport your child.
There are three basic types of child restraint
systems:
. Rear-facing child restraint
. Forward-facing child restraint
. Booster seat
The proper restraint depends on the child’s size. Generally, infants up to about 1 year
and less than 20 lbs (9 kg) should be placed
in rear-facing child restraints. Forward-
facing child restraints are available for
children who outgrow rear-facing child re-
straints and are at least 1 year old. Booster
seats are used to help position a vehicle lap/
shoulder belt on a child who can no longer
use a forward-facing child restraint.
WARNING
Infants and children need special protec-
tion. The vehicle’s seat belts may not fit
them properly. The shoulder belt may
come too close to the face or neck. The
lap belt may not fit over their small hip
bones. In an accident, an improperly
fitting seat belt could cause serious or
fatal injury. Always use appropriate
child restraints.
All U.S. states and Canadian provinces or
territories require the use of approved child
restraints for infants and small children. See
“Child restraints” (P.1-19).
A child restraint may be secured in the
vehicle by using either the LATCH (Lower
Anchor and Tethers for CHildren) system or
with the vehicle seat belt. See “Child re-
straints” (P.1-19) for more information.
Safety — Seats, seat belts and supplemental restraint system1-17
CHILD SAFETY
Page 45 of 468
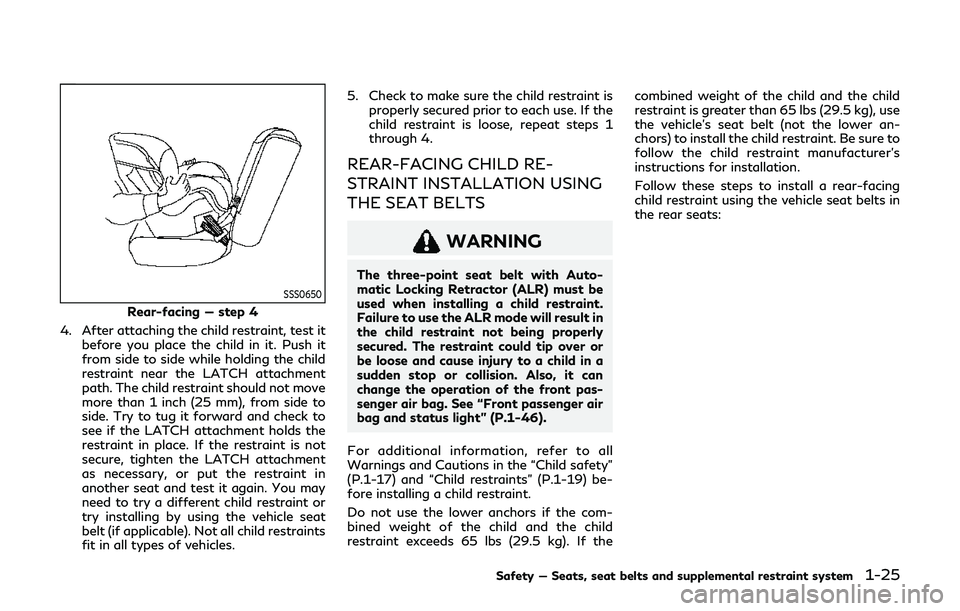
SSS0650
Rear-facing — step 4
4. After attaching the child restraint, test it before you place the child in it. Push it
from side to side while holding the child
restraint near the LATCH attachment
path. The child restraint should not move
more than 1 inch (25 mm), from side to
side. Try to tug it forward and check to
see if the LATCH attachment holds the
restraint in place. If the restraint is not
secure, tighten the LATCH attachment
as necessary, or put the restraint in
another seat and test it again. You may
need to try a different child restraint or
try installing by using the vehicle seat
belt (if applicable). Not all child restraints
fit in all types of vehicles. 5. Check to make sure the child restraint is
properly secured prior to each use. If the
child restraint is loose, repeat steps 1
through 4.
REAR-FACING CHILD RE-
STRAINT INSTALLATION USING
THE SEAT BELTS
WARNING
The three-point seat belt with Auto-
matic Locking Retractor (ALR) must be
used when installing a child restraint.
Failure to use the ALR mode will result in
the child restraint not being properly
secured. The restraint could tip over or
be loose and cause injury to a child in a
sudden stop or collision. Also, it can
change the operation of the front pas-
senger air bag. See “Front passenger air
bag and status light” (P.1-46).
For additional information, refer to all
Warnings and Cautions in the “Child safety”
(P.1-17) and “Child restraints” (P.1-19) be-
fore installing a child restraint.
Do not use the lower anchors if the com-
bined weight of the child and the child
restraint exceeds 65 lbs (29.5 kg). If the combined weight of the child and the child
restraint is greater than 65 lbs (29.5 kg), use
the vehicle’s seat belt (not the lower an-
chors) to install the child restraint. Be sure to
follow the child restraint manufacturer’s
instructions for installation.
Follow these steps to install a rear-facing
child restraint using the vehicle seat belts in
the rear seats:
Safety — Seats, seat belts and supplemental restraint system1-25
Page 46 of 468

1-26Safety — Seats, seat belts and supplemental restraint system
SSS0100
Rear-facing — step 1
1. Child restraints for infants must be used
in the rear-facing direction and there-
fore must not be used in the front seat.
Position the child restraint on the seat.
Always follow the restraint manufac-
turer’s instructions.
SSS0654
Rear-facing — step 2
2. Route the seat belt tongue through the child restraint and insert it into the buckle
until you hear and feel the latch engage.
Be sure to follow the child restraint
manufacturer’s instructions for belt
routing.
SSS0655
Rear-facing — step 3
3. Pull the shoulder belt until the belt is fully extended. At this time, the seat belt
retractor is in the Automatic Locking
Retractor (ALR) mode (child restraint
mode). It reverts to the Emergency
Locking Retractor (ELR) mode when
the seat belt is fully retracted.
Page 48 of 468
1-28Safety — Seats, seat belts and supplemental restraint system
use. If the seat belt is not locked, repeat
steps 1 through 6.
After the child restraint is removed and the
seat belt fully retracted, the ALR mode (child
restraint mode) is canceled.
FORWARD-FACING CHILD RE-
STRAINT INSTALLATION USING
LATCH
Refer to all Warnings and Cautions in the
“Child safety” and “Child restraints” sections
before installing a child restraint.
Do not use the lower anchors if the com-
bined weight of the child and the child
restraint exceeds 65 lbs (29.5 kg). If the
combined weight of the child and the child
restraint is greater than 65 lbs (29.5 kg), use
the vehicle’s seat belt (not the lower an-
chors) to install the child restraint. Be sure to
follow the child restraint manufacturer’s
instructions for installation.
Follow these steps to install a forward-
facing child restraint using the LATCH
system:
1. Position the child restraint on the seat. Always follow the child restraint manu-
facturer’s instructions.
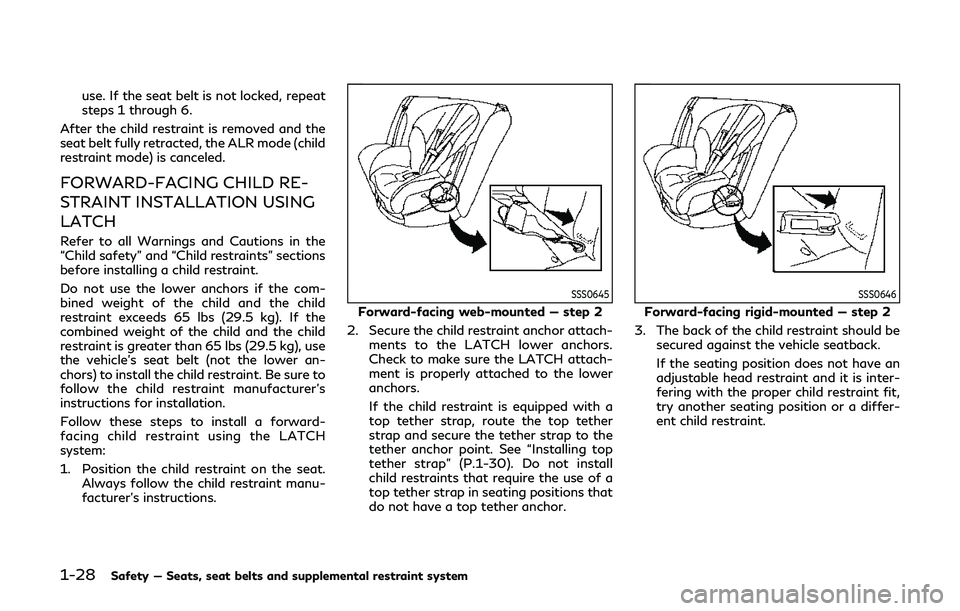
SSS0645
Forward-facing web-mounted — step 2
2. Secure the child restraint anchor attach- ments to the LATCH lower anchors.
Check to make sure the LATCH attach-
ment is properly attached to the lower
anchors.
If the child restraint is equipped with a
top tether strap, route the top tether
strap and secure the tether strap to the
tether anchor point. See “Installing top
tether strap” (P.1-30). Do not install
child restraints that require the use of a
top tether strap in seating positions that
do not have a top tether anchor.
SSS0646
Forward-facing rigid-mounted — step 2
3. The back of the child restraint should be secured against the vehicle seatback.
If the seating position does not have an
adjustable head restraint and it is inter-
fering with the proper child restraint fit,
try another seating position or a differ-
ent child restraint.
Page 50 of 468
1-30Safety — Seats, seat belts and supplemental restraint system
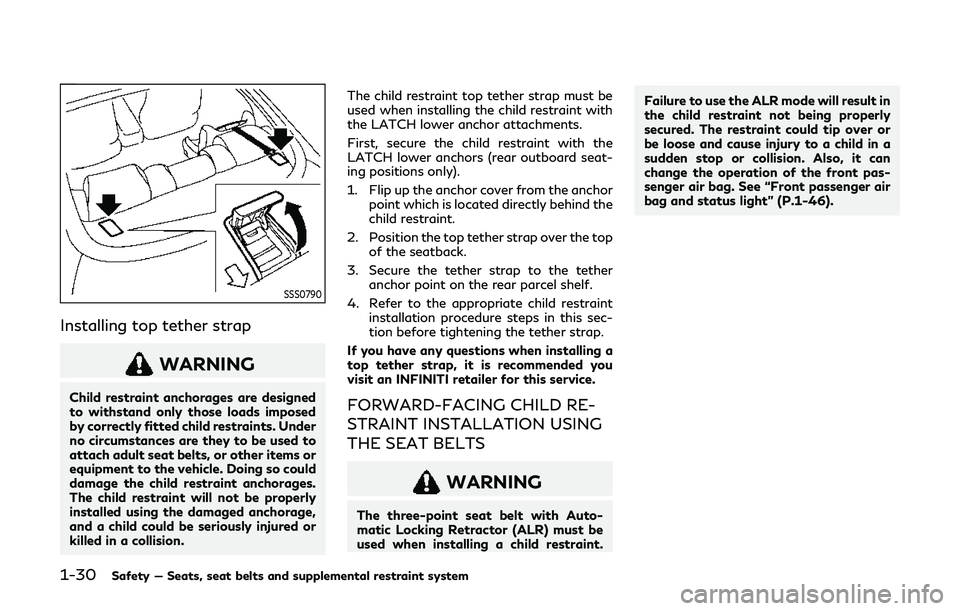
SSS0790
Installing top tether strap
WARNING
Child restraint anchorages are designed
to withstand only those loads imposed
by correctly fitted child restraints. Under
no circumstances are they to be used to
attach adult seat belts, or other items or
equipment to the vehicle. Doing so could
damage the child restraint anchorages.
The child restraint will not be properly
installed using the damaged anchorage,
and a child could be seriously injured or
killed in a collision.The child restraint top tether strap must be
used when installing the child restraint with
the LATCH lower anchor attachments.
First, secure the child restraint with the
LATCH lower anchors (rear outboard seat-
ing positions only).
1. Flip up the anchor cover from the anchor
point which is located directly behind the
child restraint.
2. Position the top tether strap over the top of the seatback.
3. Secure the tether strap to the tether anchor point on the rear parcel shelf.
4. Refer to the appropriate child restraint installation procedure steps in this sec-
tion before tightening the tether strap.
If you have any questions when installing a
top tether strap, it is recommended you
visit an INFINITI retailer for this service.FORWARD-FACING CHILD RE-
STRAINT INSTALLATION USING
THE SEAT BELTS
WARNING
The three-point seat belt with Auto-
matic Locking Retractor (ALR) must be
used when installing a child restraint. Failure to use the ALR mode will result in
the child restraint not being properly
secured. The restraint could tip over or
be loose and cause injury to a child in a
sudden stop or collision. Also, it can
change the operation of the front pas-
senger air bag. See “Front passenger air
bag and status light” (P.1-46).
Page 52 of 468
1-32Safety — Seats, seat belts and supplemental restraint system
SSS0651
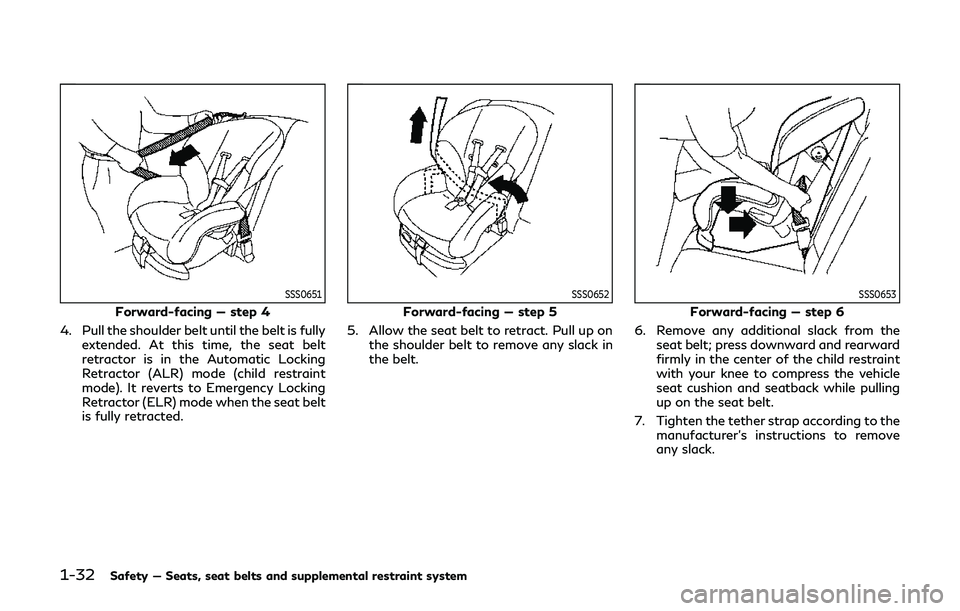
Forward-facing — step 4
4. Pull the shoulder belt until the belt is fully extended. At this time, the seat belt
retractor is in the Automatic Locking
Retractor (ALR) mode (child restraint
mode). It reverts to Emergency Locking
Retractor (ELR) mode when the seat belt
is fully retracted.
SSS0652
Forward-facing — step 5
5. Allow the seat belt to retract. Pull up on the shoulder belt to remove any slack in
the belt.
SSS0653
Forward-facing — step 6
6. Remove any additional slack from the seat belt; press downward and rearward
firmly in the center of the child restraint
with your knee to compress the vehicle
seat cushion and seatback while pulling
up on the seat belt.
7. Tighten the tether strap according to the manufacturer’s instructions to remove
any slack.
Page 53 of 468
SSS0641
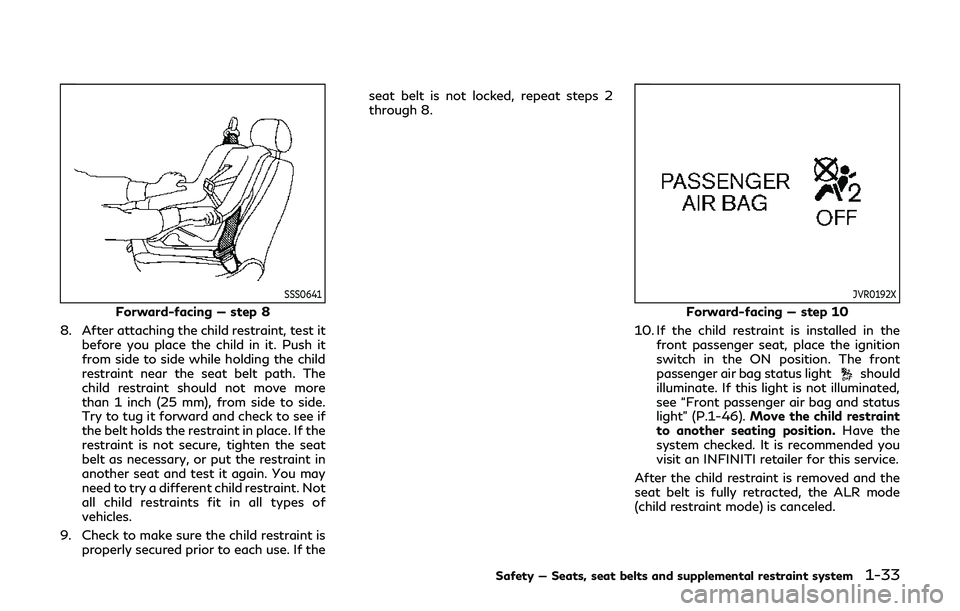
Forward-facing — step 8
8. After attaching the child restraint, test it before you place the child in it. Push it
from side to side while holding the child
restraint near the seat belt path. The
child restraint should not move more
than 1 inch (25 mm), from side to side.
Try to tug it forward and check to see if
the belt holds the restraint in place. If the
restraint is not secure, tighten the seat
belt as necessary, or put the restraint in
another seat and test it again. You may
need to try a different child restraint. Not
all child restraints fit in all types of
vehicles.
9. Check to make sure the child restraint is properly secured prior to each use. If the seat belt is not locked, repeat steps 2
through 8.
JVR0192X
Forward-facing — step 10
10. If the child restraint is installed in the front passenger seat, place the ignition
switch in the ON position. The front
passenger air bag status light
should
illuminate. If this light is not illuminated,
see “Front passenger air bag and status
light” (P.1-46). Move the child restraint
to another seating position. Have the
system checked. It is recommended you
visit an INFINITI retailer for this service.
After the child restraint is removed and the
seat belt is fully retracted, the ALR mode
(child restraint mode) is canceled.
Safety — Seats, seat belts and supplemental restraint system1-33
Page 56 of 468
1-36Safety — Seats, seat belts and supplemental restraint system
Booster seat installation
CAUTION
To avoid injury to child, do not use the
lap/shoulder belt Automatic Locking
Retractor (ALR) mode when using a
booster seat with the seat belts.
Refer to all Warnings and Cautions in the
“Child safety”, “Child restraints” and “Boos-
ter seats” sections earlier in this section
before installing a child restraint.
Follow these steps to install a booster seat in
the rear seat or in the front passenger seat:
SSS0640
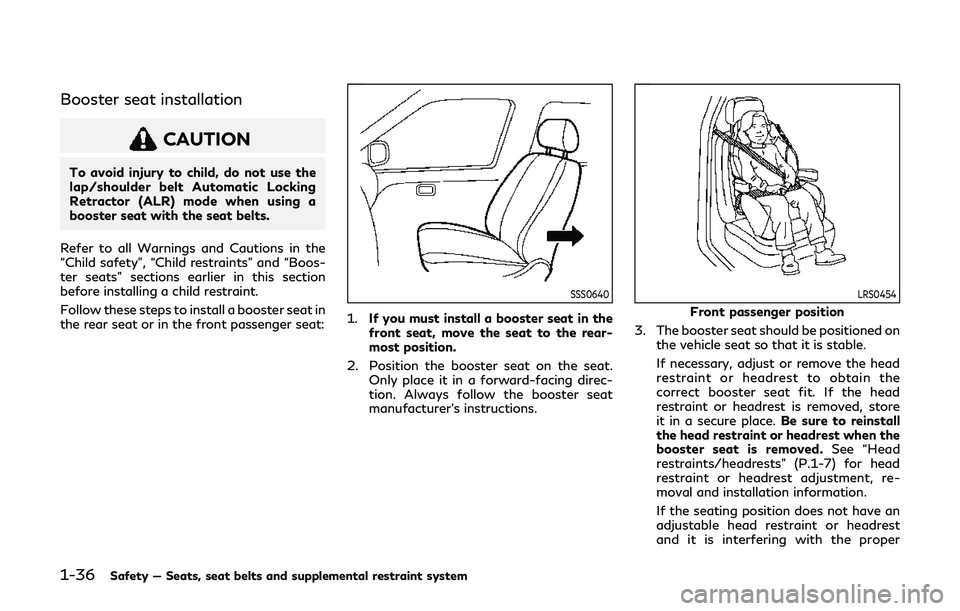
1. If you must install a booster seat in the
front seat, move the seat to the rear-
most position.
2. Position the booster seat on the seat. Only place it in a forward-facing direc-
tion. Always follow the booster seat
manufacturer’s instructions.
LRS0454
Front passenger position
3. The booster seat should be positioned on the vehicle seat so that it is stable.
If necessary, adjust or remove the head
restraint or headrest to obtain the
correct booster seat fit. If the head
restraint or headrest is removed, store
it in a secure place. Be sure to reinstall
the head restraint or headrest when the
booster seat is removed. See “Head
restraints/headrests” (P.1-7) for head
restraint or headrest adjustment, re-
moval and installation information.
If the seating position does not have an
adjustable head restraint or headrest
and it is interfering with the proper
Page 69 of 468

restraint being used. If the front passenger
air bag status light is not illuminated (in-
dicating that the air bag might inflate in a
crash), it could be that the child restraint or
seat belt is not being used properly. Make
sure that the child restraint is installed
properly, the seat belt is used properly and
the occupant is positioned properly. If the
front passenger air bag status light is still not
illuminated, reposition the occupant or child
restraint in a rear seat.
If the front passenger air bag status light will
not illuminate even though you believe that
the child restraint, the seat belts and the
occupant are properly positioned, it is re-
commended that you take your vehicle to an
INFINITI retailer. An INFINITI retailer can
check system status by using a special tool.
However, until you have confirmed with
your retailer that your air bag is working
properly, reposition the occupant or child
restraint in a rear seat.
The INFINITI Advanced Air Bag System and
front passenger air bag status light will take
a few seconds to register a change in the
passenger seat status. This is normal system
operation and does not indicate a malfunc-
tion.
If a malfunction occurs in the front passen-
ger air bag system, the supplemental air bag
warning light
, located in the meter and
gauges area of the instrument panel, will be illuminated (blinking or steadily lit). Have the
system checked. It is recommended you visit
an INFINITI retailer for this service.
Normal operation:
In order for the occupant classification
sensor system to classify the front passen-
ger based on weight, please follow the
precautions and steps outlined below:
Precautions
.
Make sure that there are no objects
weighing over 9.1 lbs (4 kg) hanging on
the seat or placed in the seatback pocket.
. Make sure that a child restraint or other
object is not pressing against the rear of
the seatback.
. Make sure that a rear passenger is not
pushing or pulling on the back of the
front passenger seat.
. Make sure that the front passenger seat
or seatback is not forced back against an
object on the seat or floor behind it.
. Make sure that there is no object placed
under the front passenger seat.
. Make sure that the front passenger seat
head restraint does not contact the roof
when adjusting the front passenger seat.
Steps
1. Adjust the seat as outlined in “Seats” (P.1-2). Sit upright, leaning against the
seatback, and centered on the seat cushion with your feet comfortably ex-
tended to the floor.
2. Make sure there are no objects on your lap.
3. Fasten the seat belt as outlined in “Seat belts” (P.1-11). Front passenger seat belt
buckle status is monitored by the occu-
pant classification sensor system, and is
used as an input to determine occupancy
status. So, it is highly recommended that
the front passenger fastens his/her seat
belt.
4. Remain in this position for 30 seconds allowing the system to classify the front
passenger before the vehicle is put into
motion.
5. Ensure proper classification by checking the front passenger air bag status light.
NOTE:
This vehicle’s occupant classification sensor
system generally keeps the classification
locked during driving, so it is important that
you confirm that the front passenger is
properly classified prior to driving. How-
ever, the occupant classification sensor may
recalculate the weight of the occupant
under some conditions (both while driving
and when stopped), so the front passenger
seat occupant should continue to remain
seated as outlined above.
Safety — Seats, seat belts and supplemental restraint system1-49