display INFINITI Q60 COUPE 2020 Quick Reference Guide
[x] Cancel search | Manufacturer: INFINITI, Model Year: 2020, Model line: Q60 COUPE, Model: INFINITI Q60 COUPE 2020Pages: 28, PDF Size: 3.59 MB
Page 3 of 28
Additional information about your vehicle is also available in your Owner’s Manual, INFINITI InTouch™ Owner’s Manual and at www.InfinitiUSA.com.
Table of Contents
•
A cellular telephone should not
be used for any purpose while
driving so full attention may be
given to vehicle operation.
•
Always wear your seat belt.
• Supplemental air bags do not
replace proper seat belt usage. •
Children 12 and under
should always ride in the
rear seat properly secured
in child restraints or seat
belts according to their age
and weight.
• Do not drink and drive. For more information, refer to the “Safety — Seats,
seat belts and supplemental restraint system (section
1)”, the “Monitor, climate, audio, phone and voice
recognition systems (section 4)” and the “Starting
and driving (section 5)” of your Owner’s Manual.
PLEASE SEE YOUR OWNER’S MANUAL FOR IMPORTANT SAFETY INFORMATION AND SYSTEM OPERATION LIMITATIONS.
Cockpit Overview ........................................................................\
............. 1
Instrument Panel ........................................................................\
............ 3
Meters and Gauges ........................................................................\
........ 5
Infiniti Intelligent Key System .............................................................. 7
Automatic Drive Positioner (if so equipped) .................................... 8
Starting/Stopping the Engine ............................................................. 8
Automatic Anti-Glare Rearview Mirror with
HomeLink
® Universal Transceiver (if so equipped) ..........................9
Heater and Air Conditioner (automatic) .......................................... 10
Wiper and Washer Switch .................................................................. 11
Vehicle Information Display ................................................................ 12
Fuel-filler Door ........................................................................\
............... 13
Passenger Rear Seat Entry/Exit ....................................................... 13Clock Set/Adjustment ........................................................................\
.
13
Connecting your Cellular Phone or Device via Bluetooth
® ......... 14
Bluetooth® Hands-free Phone System ............................................ 15
Bluetooth® Streaming Audio .............................................................. 16
FM/AM/HD Radio®/SiriusXM® Radio (if so equipped) .............. 16
Apple CarPlay®........................................................................\
............... 17
Android Auto™ ........................................................................\
............... 18
Navigation System (if so equipped) .................................................. 19
INFINITI InTouch™ Services (if so equipped) ................................. 20
Upper Display (Shortcut Menu) ......................................................... 21
Direct Adaptive Steering (if so equipped) ....................................... 22
Cruise Control (if so equipped) .......................................................... 23
Page 5 of 28

2
Cockpit Overview
Vehicle information display switches
Intelligent Cruise Control switches (if so equipped)
Wiper and washer switch
Paddle shifters (if so equipped)
Combined turn signal/Headlight control switch
Upper display control switches
Audio and Bluetooth® control switches
Instrument brightness control switches and Trip Reset switch
(behind steering wheel)
Page 7 of 28

4
Instrument Panel
Multi-function control touch-screen/Around View®
Monitor display (if so equipped)
Lower display menu buttons
Climate control panel
• Heater and air conditioning (automatic)
• Front/Rear window defroster
Audio controls
Heated seat switches (if so equipped)
Shift lever
Infiniti multi-function controller
Drive mode switch
Parking brake (behind steering wheel)
Lower switch bank
• Vehicle Dynamic Control (VDC) OFF switch
• Trunk release switch
Page 9 of 28

6
Meters and Gauges
Tachometer
Engine coolant temperature gauge
Shift lever indicator
Vehicle information display
Speedometer
Fuel gauge
Page 10 of 28
7
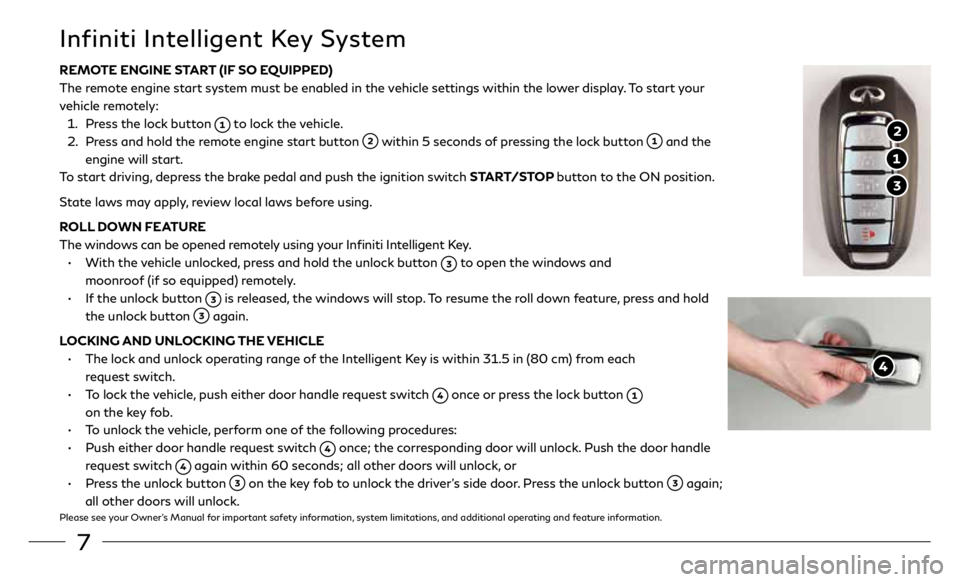
REMOTE ENGINE START (IF SO EQUIPPED)
The remote engine start system must be enabled in the vehicle settings within the lower display. To start your
vehicle remotely:
1. Press the lock button
to lock the vehicle.
2. Press and hold the remote engine start button
within 5 seconds of pressing the lock button and the
engine will start.
To start driving, depress the brake pedal and push the ignition switch START/STOP button to the ON position.
State laws may apply, review local laws before using.
ROLL DOWN FEATURE
The windows can be opened remotely using your Infiniti Intelligent Key.
•
With the vehicle unlocked, press and hold the unlock button
to open the windows and
moonroof (if so equipped) remotely.
• If the unlock button
is released, the windows will stop. To resume the roll down feature, press and hold
the unlock button
again.
LOCKING AND UNLOCKING THE VEHICLE
• The lock and unlock operating range of the Intelligent Key is within 31.5 in (80 cm) from each
request switch.
• To lock the vehicle, push either door handle request switch
once or press the lock button
on the key fob.
• To unlock the vehicle, perform one of the following procedures:
• Push either door handle request switch
once; the corresponding door will unlock. Push the door handle
request switch
again within 60 seconds; all other doors will unlock, or
• Press the unlock button
on the key fob to unlock the driver’s side door. Press the unlock button again;
all other doors will unlock.
Please see your Owner’s Manual for important safety information, system limitations, and additional operating and feature information.
Infiniti Intelligent Key System
Page 11 of 28
8
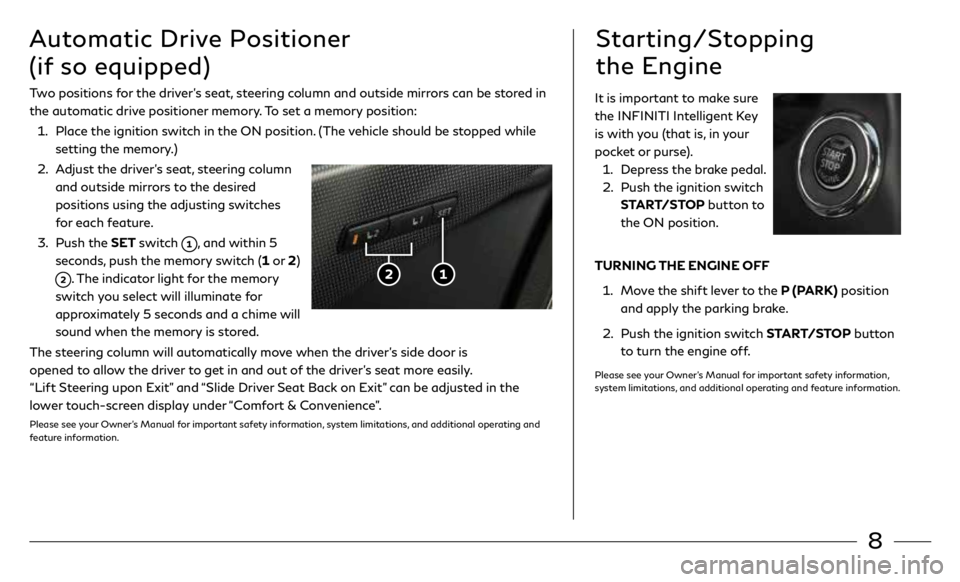
Two positions for the driver’s seat, steering column and outside mirrors can be stored in
the automatic drive positioner memory. To set a memory position:
1. Place the ignition switch in the ON position. (The vehicle should be stopped while
setting the memory.)
2. Adjust the driver’s seat, steering column
and outside mirrors to the desired
positions using the adjusting switches
for each feature.
3. Push the SET switch
, and within 5
seconds, push the memory switch (1 or 2)
. The indicator light for the memory
switch you select will illuminate for
approximately 5 seconds and a chime will
sound when the memory is stored.
The steering column will automatically move when the driver’s side door is
opened to allow the driver to get in and out of the driver’s seat more easily.
“Lift Steering upon Exit” and “Slide Driver Seat Back on Exit” can be adjusted in the
lower touch-screen display under “Comfort & Convenience”.
Please see your Owner’s Manual for important safety information, system limitations, and additional operating and
feature information.
Automatic Drive Positioner
(if so equipped)Starting/Stopping
the Engine
It is important to make sure
the INFINITI Intelligent Key
is with you (that is, in your
pocket or purse).
1. Depress the brake pedal.
2. Push the ignition switch
START/STOP button to
the ON position.
TURNING THE ENGINE OFF
1. Move the shift lever to the P (PARK) position
and apply the parking brake.
2. Push the ignition switch START/STOP button
to turn the engine off.
Please see your Owner’s Manual for important safety information,
system limitations, and additional operating and feature information.
Page 13 of 28
10
Heater and Air Conditioner (automatic)
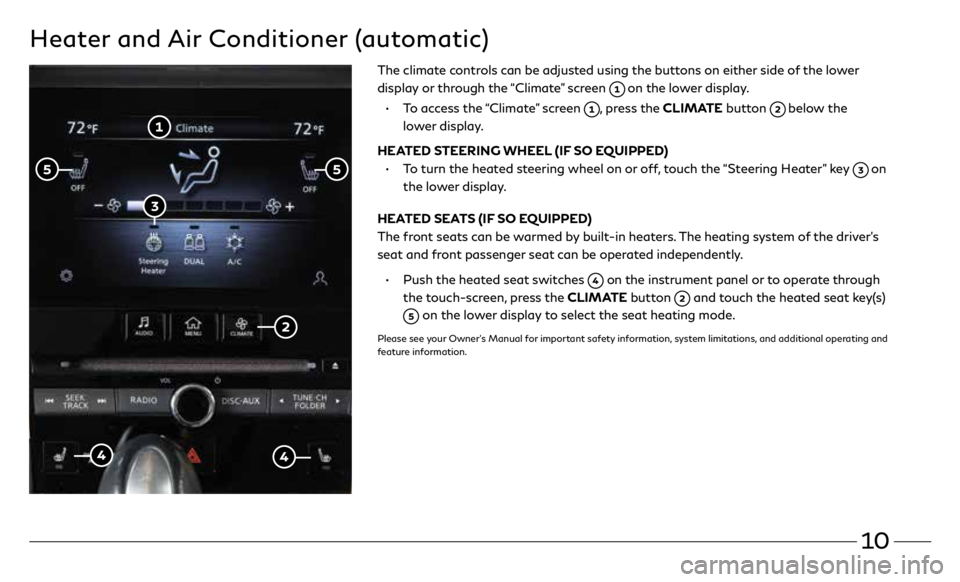
The climate controls can be adjusted using the buttons on either side of the lower
display or through the “Climate” screen
on the lower display.
• To access the “Climate” screen
, press the CLIMATE button below the
lower display.
HEATED STEERING WHEEL (IF SO EQUIPPED)
• To turn the heated steering wheel on or off, touch the “Steering Heater” key
on
the lower display.
HEATED SEATS (IF SO EQUIPPED)
The front seats can be warmed by built-in heaters. The heating system of the driver’s
seat and front passenger seat can be operated independently.
• Push the heated seat switches
on the instrument panel or to operate through
the touch-screen, press the CLIMATE button
and touch the heated seat key(s)
on the lower display to select the seat heating mode.
Please see your Owner’s Manual for important safety information, system limitations, and additional operating and
feature information.
Page 14 of 28
11
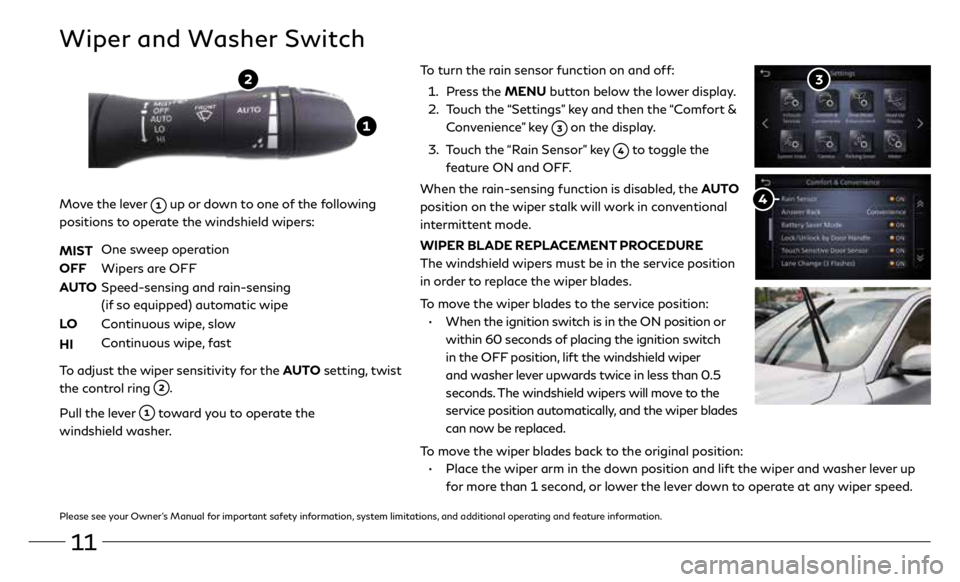
To turn the rain sensor function on and off:
1. Press the MENU button below the lower display.
2. Touch the “Settings” key and then the “Comfort &
Convenience” key
on the display.
3. Touch the “Rain Sensor” key
to toggle the
feature ON and OFF.
When the rain-sensing function is disabled, the AUTO
position on the wiper stalk will work in conventional
intermittent mode.
WIPER BLADE REPLACEMENT PROCEDURE
The windshield wipers must be in the service position
in order to replace the wiper blades.
To move the wiper blades to the service position:
• When the ignition switch is in the ON position or
within 60 seconds of placing the ignition switch
in the OFF position, lift the windshield wiper
and washer lever upwards twice in less than 0.5
seconds. The windshield wipers will move to the
service position automatically, and the wiper blades
can now be replaced.
To move the wiper blades back to the original position:
• Place the wiper arm in the down position and lift the wiper and washer lever up
for more than 1 second, or lower the lever down to operate at any wiper speed.
Wiper and Washer Switch
Move the lever up or down to one of the following
positions to operate the windshield wipers:
MIST
One sweep operation
OFF Wipers are OFF
AUTO Speed-sensing and rain-sensing
(if so equipped) automatic wipe
LO Continuous wipe, slow
HI Continuous wipe, fast
To adjust the wiper sensitivity for the AUTO setting, twist
the control ring
.
Pull the lever
toward you to operate the
windshield washer.
Please see your Owner’s Manual for important safety information, system limitations, and additional operating and feature information.
Page 15 of 28
12
Vehicle Information Display
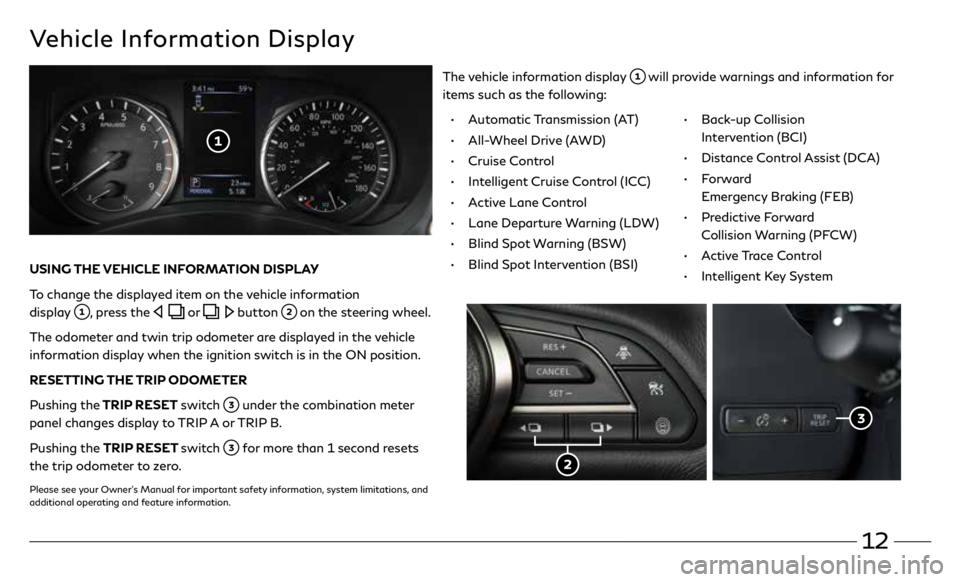
The vehicle information display will provide warnings and information for
items such as the following:
USING THE VEHICLE INFORMATION DISPLAY
To change the displayed item on the vehicle information
display
, press the or button on the steering wheel.
The odometer and twin trip odometer are displayed in the vehicle
information display when the ignition switch is in the ON position.
RESETTING THE TRIP ODOMETER
Pushing the TRIP RESET switch
under the combination meter
panel changes display to TRIP A or TRIP B.
Pushing the TRIP RESET switch
for more than 1 second resets
the trip odometer to zero.
Please see your Owner’s Manual for important safety information, system limitations, and
additional operating and feature information.
• Automatic Transmission (AT)
• All-Wheel Drive (AWD)
• Cruise Control
• Intelligent Cruise Control (ICC)
• Active Lane Control
• Lane Departure Warning (LDW)
• Blind Spot Warning (BSW)
• Blind Spot Intervention (BSI)
• Back-up Collision
Intervention (BCI)
• Distance Control Assist (DCA)
• Forward
Emergency Braking (FEB)
• Predictive Forward
Collision Warning (PFCW)
• Active Trace Control
• Intelligent Key System
Page 16 of 28
13
Fuel-filler Door
Passenger Rear Seat Entry/Exit
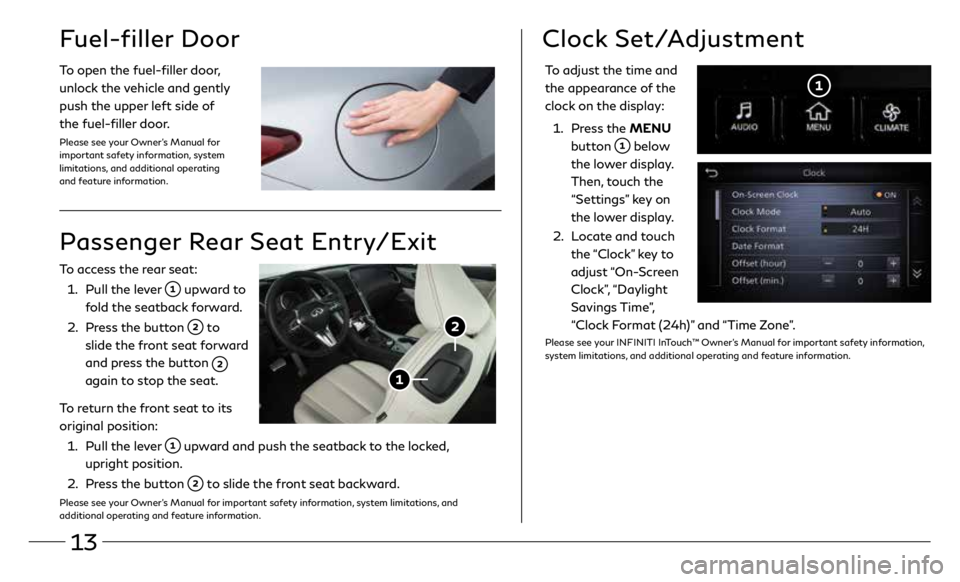
To access the rear seat:
1. Pull the lever
upward to
fold the seatback forward.
2. Press the button
to
slide the front seat forward
and press the button
again to stop the seat.
To return the front seat to its
original position:
1. Pull the lever
upward and push the seatback to the locked,
upright position.
2. Press the button
to slide the front seat backward.
Please see your Owner’s Manual for important safety information, system limitations, and
additional operating and feature information.
To open the fuel-filler door,
unlock the vehicle and gently
push the upper left side of
the fuel-filler door.
Please see your Owner’s Manual for
important safety information, system
limitations, and additional operating
and feature information.
To adjust the time and
the appearance of the
clock on the display:
1. Press the MENU
button
below
the lower display.
Then, touch the
“Settings” key on
the lower display.
2. Locate and touch
the “Clock” key to
adjust “On-Screen
Clock”, “Daylight
Savings Time”,
“Clock Format (24h)” and “Time Zone”.
Please see your INFINITI InTouch™ Owner’s Manual for important safety information,
system limitations, and additional operating and feature information.
Clock Set/Adjustment