INFINITI QX30 2017 Quick Reference Guide
Manufacturer: INFINITI, Model Year: 2017, Model line: QX30, Model: INFINITI QX30 2017Pages: 24, PDF Size: 1 MB
Page 11 of 24
8
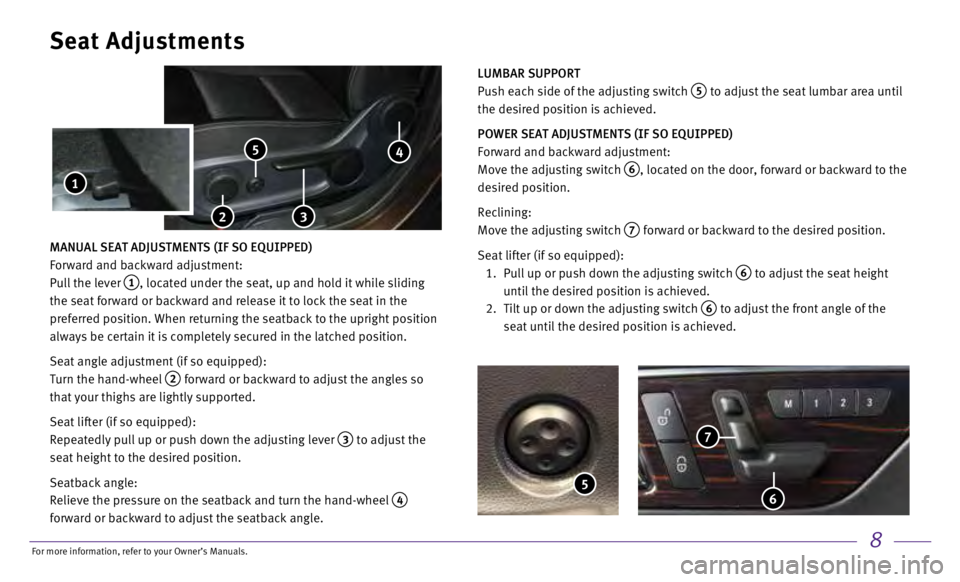
MANUAL SEAT ADJUSTMENTS (IF SO EQUIPPED)
Forward and backward adjustment:
Pull the lever
1, located under the seat, up and hold it while sliding
the seat forward or backward and release it to lock the seat in the
preferred position. When returning the seatback to the upright position \
always be certain it is completely secured in the latched position.
Seat angle adjustment (if so equipped):
Turn the hand-wheel
2 forward or backward to adjust the angles so
that your thighs are lightly supported.
Seat lifter (if so equipped):
Repeatedly pull up or push down the adjusting lever
3 to adjust the
seat height to the desired position.
Seatback angle:
Relieve the pressure on the seatback and turn the hand-wheel
4
forward or backward to adjust the seatback angle.
Seat Adjustments
2
5
LUMBAR SUPPORT
Push each side of the adjusting switch
5 to adjust the seat lumbar area until
the desired position is achieved.
POWER SEAT ADJUSTMENTS (IF SO EQUIPPED)
Forward and backward adjustment:
Move the adjusting switch
6, located on the door, forward or backward to the
desired position.
Reclining:
Move the adjusting switch
7 forward or backward to the desired position.
Seat lifter (if so equipped):
1.
Pull up or push down the adjusting switch 6 to adjust the seat height
until the desired position is achieved.
2.
Tilt up or down the adjusting switch 6 to adjust the front angle of the
seat until the desired position is achieved.
5 6
7
1
3
4
For more information, refer to your Owner
Page 12 of 24
9
Head Restraint Adjustment
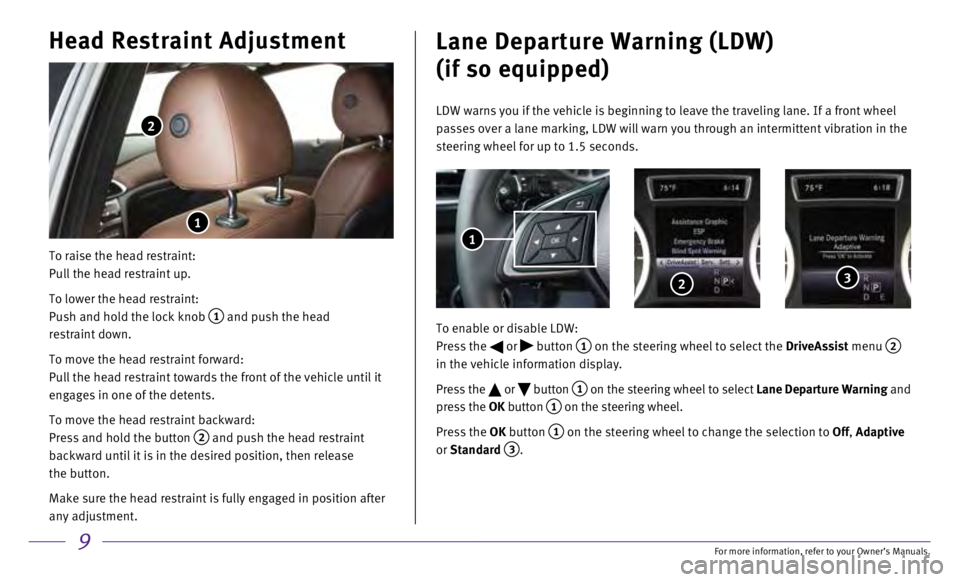
To raise the head restraint:
Pull the head restraint up.
To lower the head restraint:
Push and hold the lock knob
1 and push the head
restraint down.
To move the head restraint forward:
Pull the head restraint towards the front of the vehicle until it
engages in one of the detents.
To move the head restraint backward:
Press and hold the button
2 and push the head restraint
backward until it is in the desired position, then release
the button.
Make sure the head restraint is fully engaged in position after
any adjustment.
2
1
Lane Departure Warning (LDW)
(if so equipped)
LDW warns you if the vehicle is beginning to leave the traveling lane. I\
f a front wheel
passes over a lane marking, LDW will warn you through an intermittent vi\
bration in the
steering wheel for up to 1.5 seconds.
To enable or disable LDW:
Press the
or button 1 on the steering wheel to select the DriveAssist menu 2
in the vehicle information display.
Press the
or button 1 on the steering wheel to select Lane Departure Warning and
press the OK button
1 on the steering wheel.
Press the OK button
1 on the steering wheel to change the selection to Off, Adaptive
or Standard
3.
2 3
1
For more information, refer to your Owner
Page 13 of 24
10
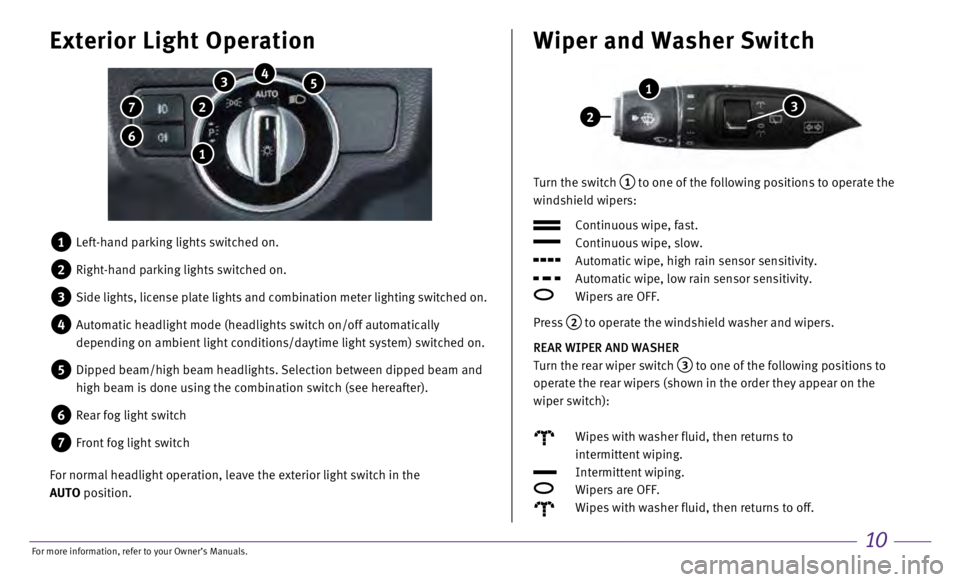
Turn the switch 1 to one of the following positions to operate the
windshield wipers:
Continuous wipe, fast.
Continuous wipe, slow.
Automatic wipe, high rain sensor sensitivity.
Automatic wipe, low rain sensor sensitivity.
Wipers are OFF.
Press
2 to operate the windshield washer and wipers.
REAR WIPER AND WASHER
Turn the rear wiper switch
3 to one of the following positions to
operate the rear wipers (shown in the order they appear on the
wiper switch):
Wipes with washer fluid, then returns to
intermittent wiping.
Intermittent wiping.
Wipers are OFF.
Wipes with washer fluid, then returns to off.
Wiper and Washer Switch
2
1
3
1 Left-hand parking lights switched on.
2 Right-hand parking lights switched on.
3 Side lights, license plate lights and combination meter lighting switche\
d on.
4 Automatic headlight mode (headlights switch on/off automatically
depending on ambient light conditions/daytime light system) switched on\
.
5 Dipped beam/high beam headlights. Selection between dipped beam and
high beam is done using the combination switch (see hereafter).
6 Rear fog light switch
7 Front fog light switch
For normal headlight operation, leave the exterior light switch in the
AUTO position.
Exterior Light Operation
7
6
5 4 3
1
2
For more information, refer to your Owner
Page 14 of 24
11
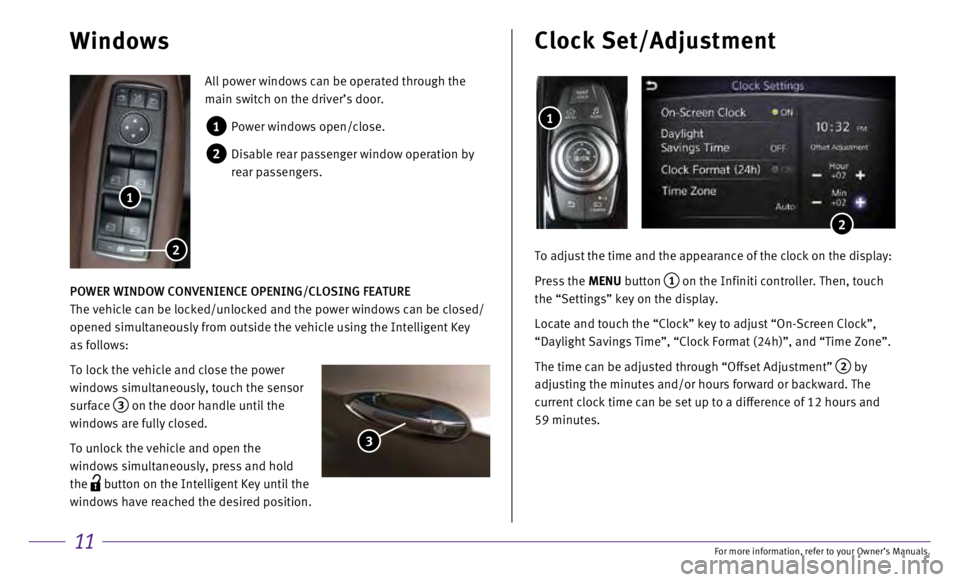
All power windows can be operated through the
main switch on the driver’s door.
1 Power windows open/close.
2 Disable rear passenger window operation by
rear passengers.
POWER WINDOW CONVENIENCE OPENING/CLOSING FEATURE
The vehicle can be locked/unlocked and the power windows can be closed/
opened simultaneously from outside the vehicle using the Intelligent Key\
as follows:
To lock the vehicle and close the power
windows simultaneously, touch the sensor
surface
3 on the door handle until the
windows are fully closed.
To unlock the vehicle and open the
windows simultaneously, press and hold
the
button on the Intelligent Key until the
windows have reached the desired position.
Windows
1
2
3
To adjust the time and the appearance of the clock on the display:
Press the
MENU button
1 on the Infiniti controller. Then, touch
the “Settings” key on the display.
Locate and touch the “Clock” key to adjust “On-Screen Clock”\
,
“Daylight Savings Time”, “Clock Format (24h)”, and “Tim\
e Zone”.
The time can be adjusted through “Offset Adjustment”
2 by
adjusting the minutes and/or hours forward or backward. The
current clock time can be set up to a difference of 12 hours and
59 minutes.
1
Clock Set/Adjustment
2
For more information, refer to your Owner
Page 15 of 24
12
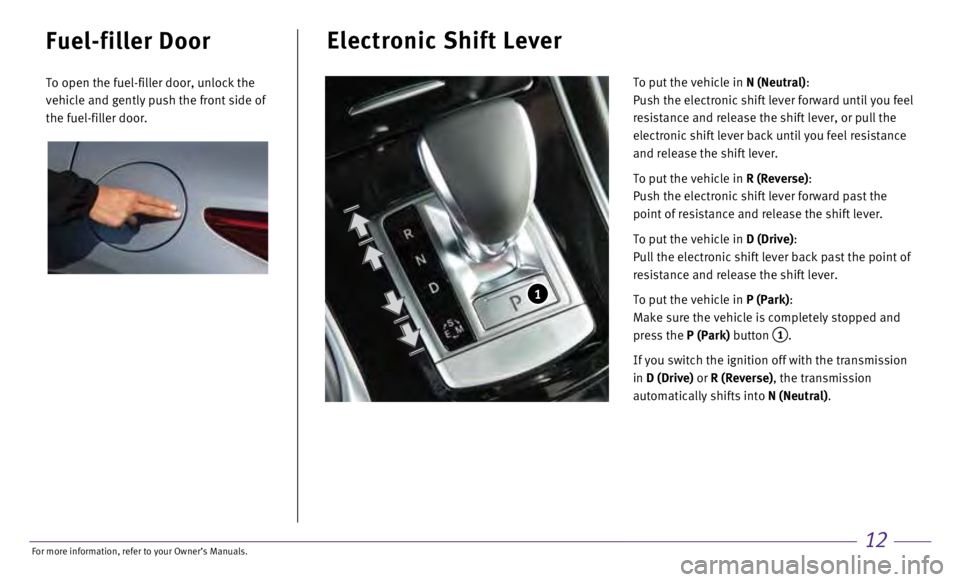
Electronic Shift Lever
To put the vehicle in N (Neutral):
Push the electronic shift lever forward until you feel
resistance and release the shift lever, or pull the
electronic shift lever back until you feel resistance
and release the shift lever.
To put the vehicle in R (Reverse):
Push the electronic shift lever forward past the
point of resistance and release the shift lever.
To put the vehicle in D (Drive):
Pull the electronic shift lever back past the point of
resistance and release the shift lever.
To put the vehicle in P (Park):
Make sure the vehicle is completely stopped and
press the P (Park) button
1.
If you switch the ignition off with the transmission
in D (Drive) or R (Reverse), the transmission
automatically shifts into N (Neutral).
1
Fuel-filler Door
To open the fuel-filler door, unlock the
vehicle and gently push the front side of
the fuel-filler door.
For more information, refer to your Owner
Page 16 of 24
13
Idle Stop/Start (ISS)
The ISS activates to prevent unnecessary fuel consumption, exhaust emiss\
ions
and noise.
To activate the ISS system:
•
Bring the vehicle to a complete stop.
To restart the engine when the ISS system is active:
•
When the ISS system is active, the engine will restart as soon as you ta\
ke your foot off
the brake pedal.
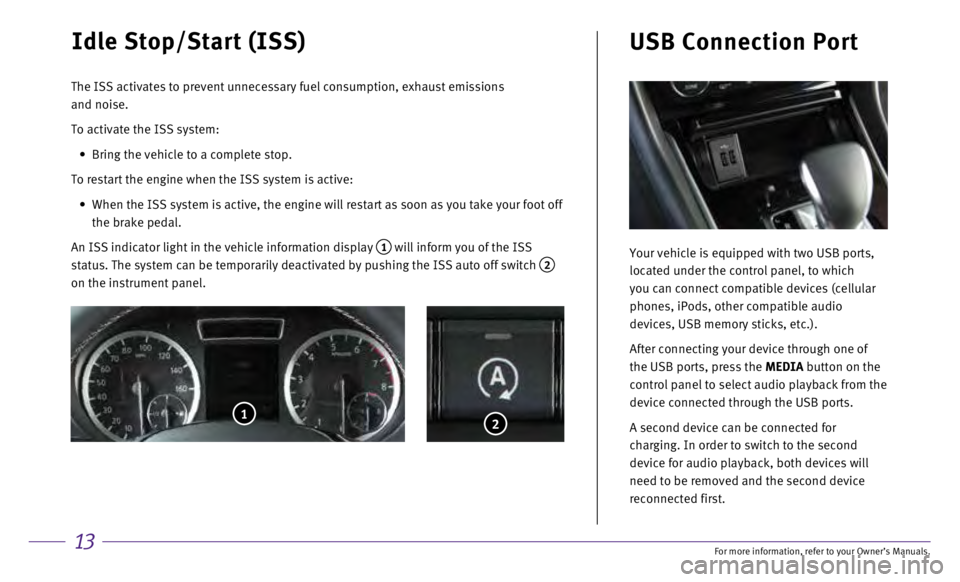
An ISS indicator light in the vehicle information display
1 will inform you of the ISS
status. The system can be temporarily deactivated by pushing the ISS aut\
o off switch
2 on the instrument panel.
2
Your vehicle is equipped with two USB ports,
located under the control panel, to which
you can connect compatible devices (cellular
phones, iPods, other compatible audio
devices, USB memory sticks, etc.).
After connecting your device through one of
the USB ports, press the MEDIA button on the
control panel to select audio playback from the
device connected through the USB ports.
A second device can be connected for
charging. In order to switch to the second
device for audio playback, both devices will
need to be removed and the second device
reconnected first.
USB Connection Port
1
For more information, refer to your Owner
Page 17 of 24
14
Mobile Apps are a limited selection of popular smartphone-based apps
that have been customized for in-vehicle use. Mobile Apps can be
accessed by connecting your compatible smartphone to the vehicle.
•
To use Mobile Apps, the Infiniti InTouch™ Apps must be installed
and running on the compatible smartphone. This app can be
downloaded from the application store.
•
Mobile Apps also require an active subscription and valid Infiniti
Owner Portal account.
INFINITI INTOUCH
™ MOBILE APPS ENROLLMENT AND ACTIVATION
1.
Create Infiniti Owner Portal account.
(http://owners.infinitiusa.com/iowners/)
2.
From within your Infiniti Owner Portal account, enroll in Infiniti
InTouch Mobile Apps.
3.
Download the Infiniti InTouch companion app from the App store
and login using your Infiniti Owner Portal ID and Password.
4.
Connect your Android device by Bluetooth® and your Apple device
by USB cable to your vehicle.
Infiniti InTouch™ Mobile Apps
(if so equipped)
If you have a compatible Bluetooth® device with streaming audio (A2DP and AVRCP
profiles), you can set up a wireless connection between your Bluetooth® device and
the in-vehicle audio system, enabling you to listen to the audio from yo\
ur device
through the vehicle’s audio system.
After connecting your Bluetooth
® device, press the MEDIA button on the control
panel to switch to Bluetooth® Streaming Audio.
Bluetooth® Streaming Audio
Connecting your Cellular Phone or
Device via Bluetooth
®,1,2
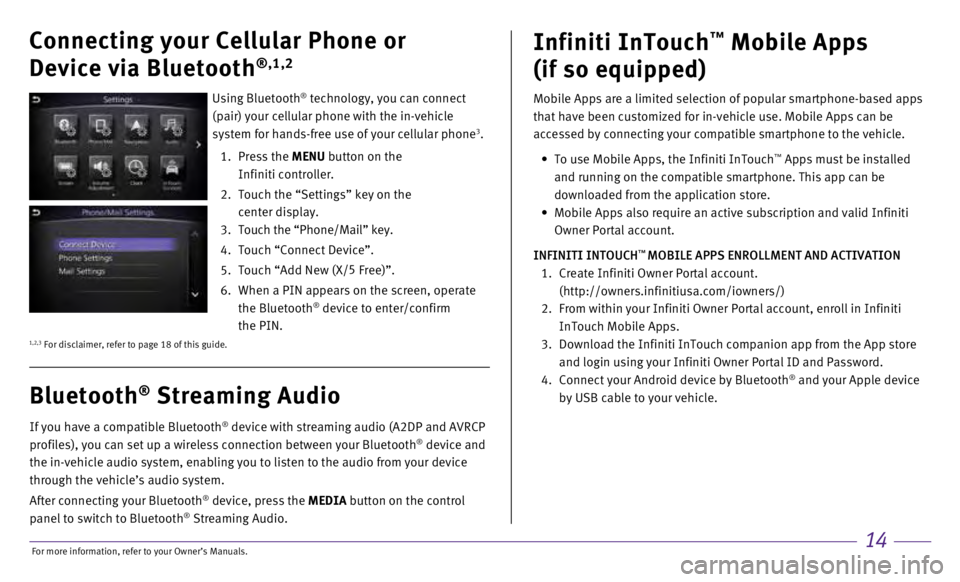
Using Bluetooth® technology, you can connect
(pair) your cellular phone with the in-vehicle
system for hands-free use of your cellular phone
3.
1.
Press the
MENU button on the
Infiniti controller.
2.
Touch the “Settings” key on the
center display.
3
.
Touch the “Phone/Mail” key.
4.
Touch “Connect Device”.
5.
Touch “Add New (X/ 5
Free)”.
6.
When a PIN appears on the screen, operate
the Bluetooth® device to enter/confirm
the PIN.
1,2,3 For disclaimer, refer to page 18 of this guide.
For more information, refer to your Owner
Page 18 of 24
15
Infiniti InTouch™ Services4 (if so equipped)
Infiniti InTouch ™ Services combine personalized convenience settings and personal
security features to compliment the Total Ownership Experience®. For more details on
Infiniti InTouch Services or to enroll your vehicle, please visit usa.infinitiintouch.com or call
1-855-444-7244. Available services include, but are not limited to: •
Automatic Collision Notification
•
Alarm Notification
•
Maintenance Alert
•
Scheduled Maintenance Notification
•
Report Stolen Vehicle
•
Emergency Call
•
Enhanced Roadside Assistance
•
My Schedule
•
Destination Assistance
•
Destination Send-to-Vehicle
•
Connected Search
•
Drive Zone
•
Maximum Speed Alert
•
Mobile Information Service
•
Valet Alert
INFINITI INTOUCH SERVICES ENROLLMENT
1.
Create Infiniti Owner Portal account.
(https://owners.infinitiusa.com/iowners/)
2.
From within your Infiniti Owner Portal account,
enroll in Infiniti InTouch Services.
3.
Download the Infiniti InTouch Services companion
app from the App store and login using your Infiniti
Owner Portal ID and Password.
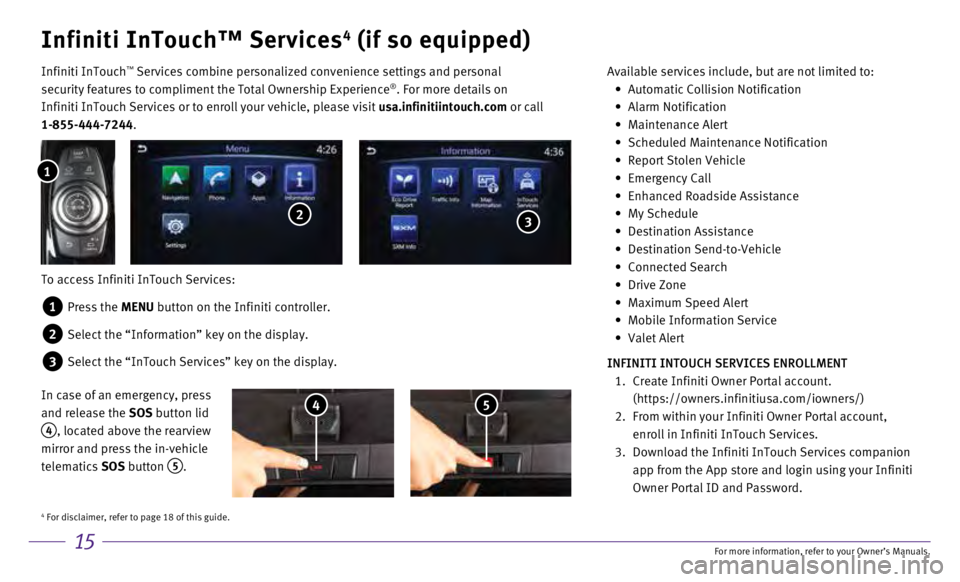
To access Infiniti InTouch Services:
1 Press the MENU button on the Infiniti controller.
2 Select the “Information” key on the display.
3 Select the “InTouch Services” key on the display.
1
2 3
In case of an emergency, press
and release the SOS button lid
4, located above the rearview
mirror and press the in-vehicle
telematics SOS button
5.
4 5
4 For disclaimer, refer to page 18 of this guide.
For more information, refer to your Owner
Page 19 of 24
16
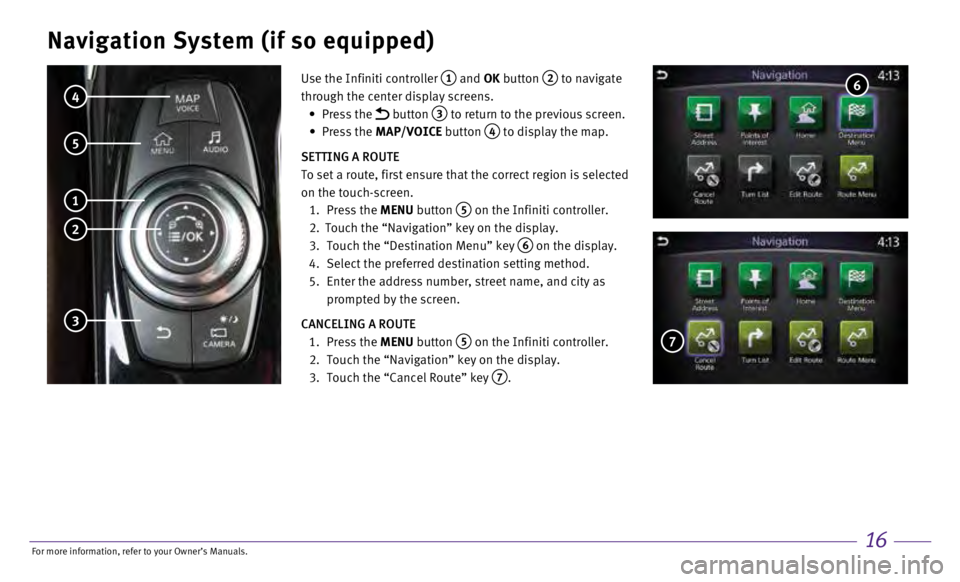
Navigation System (if so equipped)
Use the Infiniti controller 1 and OK button 2 to navigate
through the center display screens.
•
Press the
button 3 to return to the previous screen.
•
Press the MAP/VOICE button
4 to display the map.
SETTING A ROUTE
To set a route, first ensure that the correct region is selected
on the touch-screen.
1.
Press the
MENU button
5 on the Infiniti controller.
2.
Touch the “Navigation” key on the display.
3.
Touch the “Destination Menu” key 6 on the display.
4.
Select the preferred destination setting method.
5.
Enter the address number, street name, and city as
prompted by the screen.
CANCELING A ROUTE
1.
Press
the MENU button
5 on the Infiniti controller.
2.
Touch the “Navigation” key on the display.
3.
Touch the “Cancel Route” key 7.
4
5
1
2
3
6
7
For more information, refer to your Owner
Page 20 of 24
17
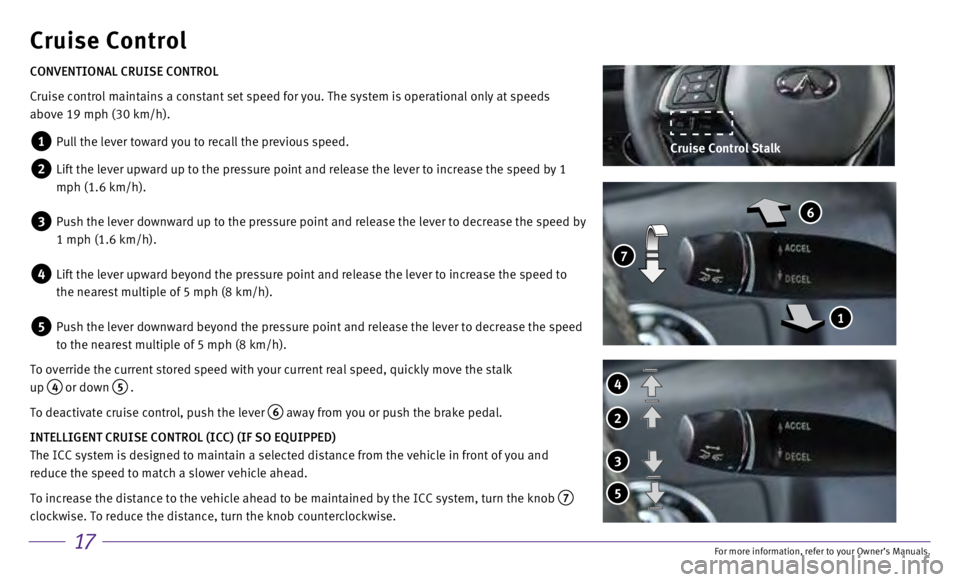
Cruise Control
CONVENTIONAL CRUISE CONTROL
Cruise control maintains a constant set speed for you. The system is ope\
rational only at speeds
above 19 mph (30 km/h).
1 Pull the lever toward you to recall the previous speed.
2 Lift the lever upward up to the pressure point and release the lever to increase the speed by 1
mph (1.6 km/h).
3 Push the lever downward up to the pressure point and release the lever t\
o decrease the speed by
1 mph (1.6 km/h).
4 Lift the lever upward beyond the pressure point and release the lever to increase the speed to
the nearest multiple of 5 mph (8 km/h).
5 Push the lever downward beyond the pressure point and release the lev er to decrease the speed
to the nearest multiple of 5 mph (8 km/h).
To override the current stored speed with your current real speed, quick\
ly move the stalk
up
4 or down 5 .
To deactivate cruise control, push the lever
6 away from you or push the brake pedal.
INTELLIGENT CRUISE CONTROL (ICC) (IF SO EQUIPPED)
The ICC system is designed to maintain a selected distance from the vehi\
cle in front of you and
reduce the speed to match a slower vehicle ahead.
To increase the distance to the vehicle ahead to be maintained by the IC\
C system, turn the knob
7
clockwise. To reduce the distance, turn the knob counterclockwise.
4
2
3
5
7
6
1
Cruise Control Stalk
For more information, refer to your Owner