brake light INFINITI QX30 2017 Quick Reference Guide
[x] Cancel search | Manufacturer: INFINITI, Model Year: 2017, Model line: QX30, Model: INFINITI QX30 2017Pages: 24, PDF Size: 1 MB
Page 3 of 24

Additional information about your vehicle is also available in your Owne\
r’s Manual, Navigation System Owner’s Manual and at www.InfinitiUSA.com.
Table of Contents
• A cellular telephone should not
be used for any purpose while
driving so full attention may be
given to vehicle operation.
•
Always wear your seat belt.
•
Supplemental air bags do not
replace proper seat belt usage. • Children 12 and under
should always ride in the
rear seat properly secured
in child restraints or seat
belts according to their age
and weight.
• Do not drink and drive. For more information, refer to the “Safety — Seats, seat
belts and supplemental restraint system (section 1)”,
the “Display screen, heater and air conditioner, and
audio system (section 4)” and the “Starting and driving
(section 5)” of your Owner’s Manual.
PLEASE SEE YOUR OWNER’S MANUAL FOR IMPORTANT SAFETY INFORMATION AND S\
YSTEM OPERATION LIMITATIONS.
Cockpit Overview ........................................................................\
......
1
Instrument Panel ........................................................................\
...... 3
Meters and Gauges
........................................................................\
... 5
Opening the Liftgate
........................................................................\
. 7
Hood Latch
........................................................................\
............... 7
Sun Visors
........................................................................\
................ 7
Parking Brake
........................................................................\
........... 7
Seat Adjustments
........................................................................\
..... 8
Head Restraint Adjustment
............................................................... 9
Lane Departure Warning (LDW) (if so equipped)
................................9
Exterior Light Operation
.................................................................. 10
Wiper and Washer Switch
............................................................... 10Windows
........................................................................\
...............
11
Clock Set/Adjustment ....................................................................11
Fuel-filler Door
........................................................................\
.......12
Electronic Shift Lever
.....................................................................12
Idle Start/Stop (ISS)
.....................................................................13
USB Connection Port...................................................................... 13 Connecting your Cellular Phone or Device via Bluetooth
® ............... 14
Bluetooth® Streaming Audio .......................................................... 14
Infiniti InTouch™ Mobile Apps (if so equipped) ............................14
Infiniti InTouch™ Services (if so equipped)
...................................15
Navigation System (if so equipped)
............................................... 16
Cruise Control
........................................................................\
........ 17
Page 7 of 24

4
Instrument Panel
1 Multi-function Control touch-screen / RearView Monitor display / Aroun d View® Monitor
display (if so equipped)
2 Audio system
3 Control panel switches
•
Seat heating (if so equipped)
•
Hazard light switch
•
Idle Stop/Start (ISS) OFF switch
•
Electronic Parking Sensor OFF switch
4 Climate control panel
•
Heater and air conditioning (automatic)
•
Front/Rear window defroster
5 Electronic shift lever
6 P (Park) button
7 Drive mode switch
8 Infiniti multi-function controller
9 Parking brake
10 External light switches
For more information, refer to your Owner
Page 10 of 24

7
Opening the Liftgate
Hood Latch
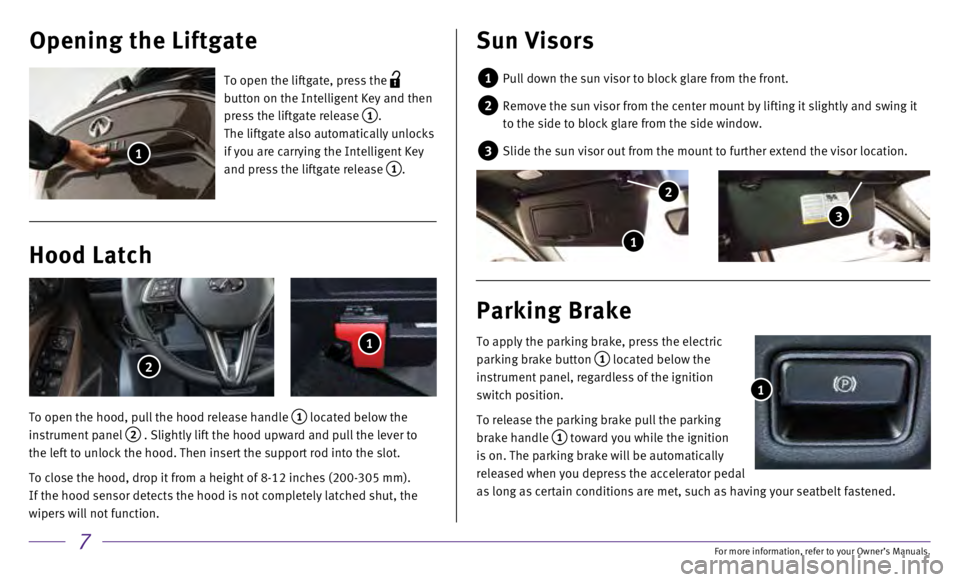
To open the liftgate, press the
button on the Intelligent Key and then
press the liftgate release
1.
The liftgate also automatically unlocks
if you are carrying the Intelligent Key
and press the liftgate release
1.
To open the hood, pull the hood release handle
1 located below the
instrument panel 2 . Slightly lift the hood upward and pull the lever to
the left to unlock the hood. Then insert the support rod into the slot.
To close the hood, drop it from a height of 8-12 inches (200-305 mm). \
If the hood sensor detects the hood is not completely latched shut, the \
wipers will not function.
1
1
1
Sun Visors
1 Pull down the sun visor to block glare from the front.
2 Remove the sun visor from the center mount by lifting it slightly and sw\
ing it
to the side to block glare from the side window.
3 Slide the sun visor out from the mount to further extend the visor locat\
ion.
To apply the parking brake, press the electric
parking brake button
1 located below the
instrument panel, regardless of the ignition
switch position.
To release the parking brake pull the parking
brake handle
1 toward you while the ignition
is on. The parking brake will be automatically
released when you depress the accelerator pedal
as long as certain conditions are met, such as having your seatbelt fast\
ened.
Parking Brake
1
2
3
1
2
For more information, refer to your Owner
Page 16 of 24

13
Idle Stop/Start (ISS)
The ISS activates to prevent unnecessary fuel consumption, exhaust emiss\
ions
and noise.
To activate the ISS system:
•
Bring the vehicle to a complete stop.
To restart the engine when the ISS system is active:
•
When the ISS system is active, the engine will restart as soon as you ta\
ke your foot off
the brake pedal.
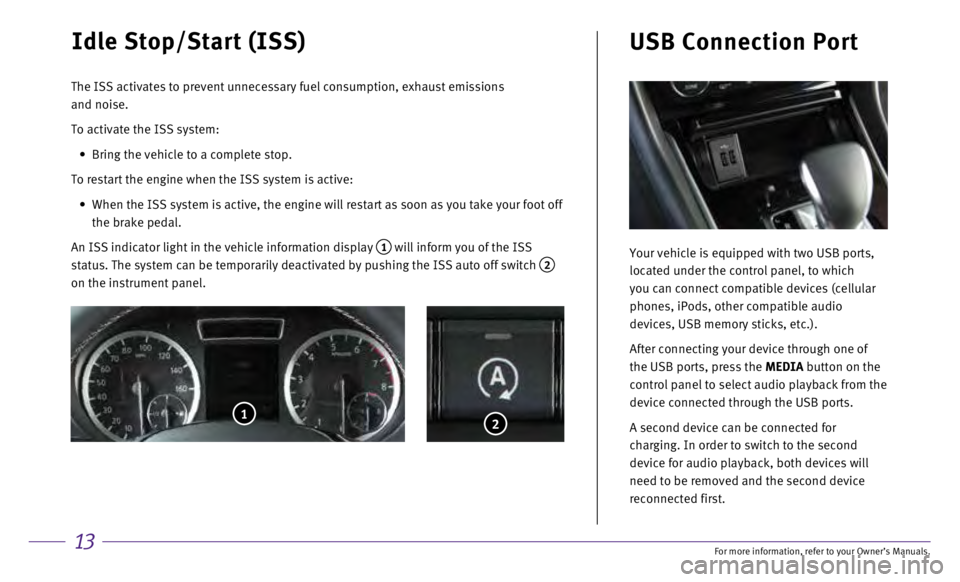
An ISS indicator light in the vehicle information display
1 will inform you of the ISS
status. The system can be temporarily deactivated by pushing the ISS aut\
o off switch
2 on the instrument panel.
2
Your vehicle is equipped with two USB ports,
located under the control panel, to which
you can connect compatible devices (cellular
phones, iPods, other compatible audio
devices, USB memory sticks, etc.).
After connecting your device through one of
the USB ports, press the MEDIA button on the
control panel to select audio playback from the
device connected through the USB ports.
A second device can be connected for
charging. In order to switch to the second
device for audio playback, both devices will
need to be removed and the second device
reconnected first.
USB Connection Port
1
For more information, refer to your Owner