AUX INFINITI QX30 2019 Owners Manual
[x] Cancel search | Manufacturer: INFINITI, Model Year: 2019, Model line: QX30, Model: INFINITI QX30 2019Pages: 283, PDF Size: 1.58 MB
Page 12 of 283
1. Introduction
IC Regulatory information
The antenna cannot be removed (and chan-
ged) by user.
NOTE
This device complies with Industry Canada
license-exempt RSS standard(s). Operation
is subject to the following two conditions: (1)
This device may not cause interference, and
(2) this device must accept any interference,
including interference that may cause un-
desired operation of the device.
CAUTION:Radio Frequency Radiation Ex-
posure
This equipment complies with IC radiation
exposure limits set forth for uncontrolled
environment and meets RSS-102 of the IC
radio frequency (RF) Exposure rules. This
equipment has very low levels of RF energy
that it deemed to comply without maximum
permissive exposure evaluation (MPE). But it
is desirable that it should be installed and
operated with at least 20cm and more
between the radiator and person’s body.
Co-location: This transmitter must not be
co-located or operated in conjunction with
any other antenna or transmitter.
This Class B digital apparatus meets all requirements of the Canadian Interference-
Causing Equipment Regulations.
For Canadian customers:
L’antenne ne peut être enlevée (et modifié)
par l’utilisateur.
NOTE
Le présent appareil est conforme aux CNR
d’Industrie Canada applicables aux appareils
radio exempts de licence. L’exploitation est
autorisée aux deux conditions suivantes: (1)
l’appareil ne doit pas produire de brouillage,
et (2) l’utilisateur de l’appareil doit accepter
tout brouillage radioélectrique subi, même si
le brouillage est susceptible d’en compro-
mettre le fonctionnement.
LICENSES
TELEMATIC CONTROL UNIT
GEN2K (if so equipped)
A. INTRODUCTION
This product Telematic Control Unit Gen2K
incorporates the following software:
(1) the software developed by, or developed
for, Ficosa International, S.A. (“Ficosa”),
(2) the software owned by third party and
licensed to Ficosa,
(3) the software licensed under the GNU
GENERAL PUBLIC LICENSE, Version 2
(“GPL”),
(4) the software licensed under the GNU
LIBRARY GENERAL PUBLIC LICENSE,
Version 2.0 or the GNU LESSER GENERAL
PUBLIC LICENSE, Version 2.1 (collectively
“LGPL”), the Mozilla Public license v2
(“MPL”), the GPL-2.0 license with-
OpenSSL-exception (“GPLOpenSSL”) and
GNU GENERAL PUBLIC LICENSE, Version
3 with GCC exception (together with the
GPL software, jointly “Copyleft Software”),
and/or
(5) open sourced software licensed under
terms and conditions other than Copyleft
1-6
Page 26 of 283
2. Getting started
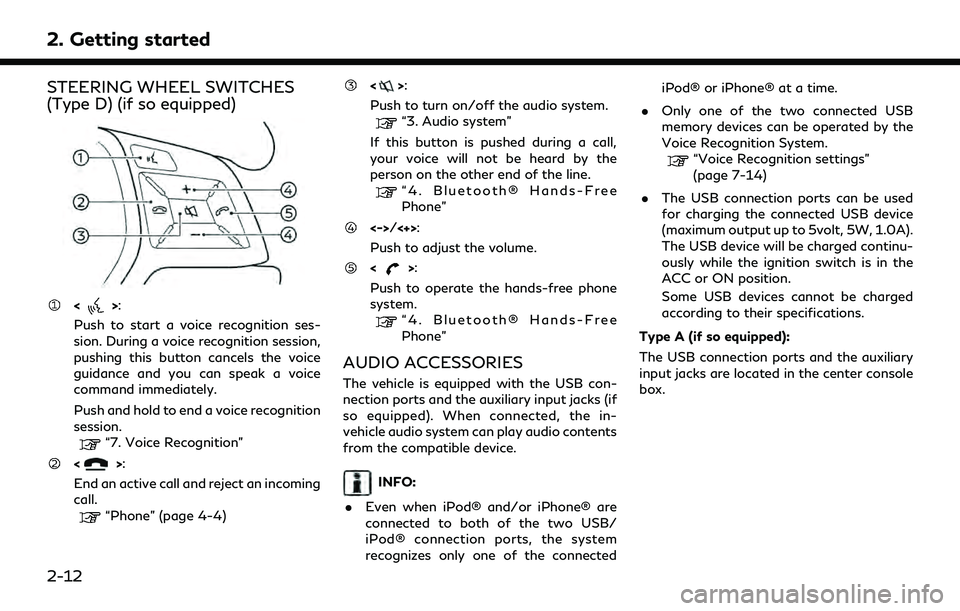
STEERING WHEEL SWITCHES
(Type D) (if so equipped)
<>:
Push to start a voice recognition ses-
sion. During a voice recognition session,
pushing this button cancels the voice
guidance and you can speak a voice
command immediately.
Push and hold to end a voice recognition
session.
“7. Voice Recognition”
<>:
End an active call and reject an incoming
call.
“Phone” (page 4-4)
<>:
Push to turn on/off the audio system.
“3. Audio system”
If this button is pushed during a call,
your voice will not be heard by the
person on the other end of the line.
“4. Bluetooth® Hands-Free
Phone”
<->/<+>:
Push to adjust the volume.
<>:
Push to operate the hands-free phone
system.
“4. Bluetooth® Hands-Free
Phone”
AUDIO ACCESSORIES
The vehicle is equipped with the USB con-
nection ports and the auxiliary input jacks (if
so equipped). When connected, the in-
vehicle audio system can play audio contents
from the compatible device.
INFO:
. Even when iPod® and/or iPhone® are
connected to both of the two USB/
iPod® connection ports, the system
recognizes only one of the connected iPod® or iPhone® at a time.
. Only one of the two connected USB
memory devices can be operated by the
Voice Recognition System.
“Voice Recognition settings”
(page 7-14)
. The USB connection ports can be used
for charging the connected USB device
(maximum output up to 5volt, 5W, 1.0A).
The USB device will be charged continu-
ously while the ignition switch is in the
ACC or ON position.
Some USB devices cannot be charged
according to their specifications.
Type A (if so equipped):
The USB connection ports and the auxiliary
input jacks are located in the center console
box.
2-12
Page 27 of 283
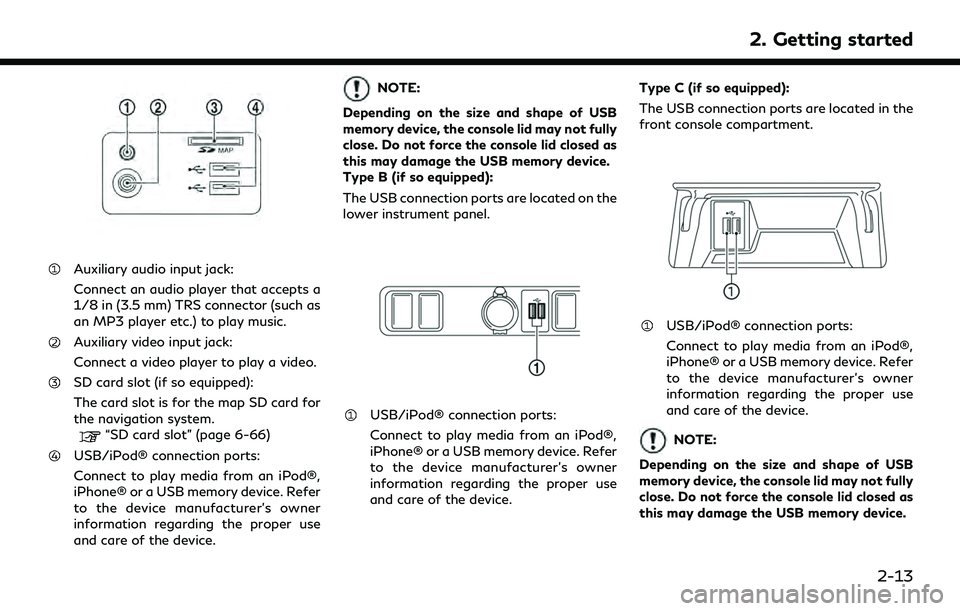
Auxiliary audio input jack:
Connect an audio player that accepts a
1/8 in (3.5 mm) TRS connector (such as
an MP3 player etc.) to play music.
Auxiliary video input jack:
Connect a video player to play a video.
SD card slot (if so equipped):
The card slot is for the map SD card for
the navigation system.
“SD card slot” (page 6-66)
USB/iPod® connection ports:
Connect to play media from an iPod®,
iPhone® or a USB memory device. Refer
to the device manufacturer’s owner
information regarding the proper use
and care of the device.
NOTE:
Depending on the size and shape of USB
memory device, the console lid may not fully
close. Do not force the console lid closed as
this may damage the USB memory device.
Type B (if so equipped):
The USB connection ports are located on the
lower instrument panel.
USB/iPod® connection ports:
Connect to play media from an iPod®,
iPhone® or a USB memory device. Refer
to the device manufacturer’s owner
information regarding the proper use
and care of the device. Type C (if so equipped):
The USB connection ports are located in the
front console compartment.
USB/iPod® connection ports:
Connect to play media from an iPod®,
iPhone® or a USB memory device. Refer
to the device manufacturer’s owner
information regarding the proper use
and care of the device.
NOTE:
Depending on the size and shape of USB
memory device, the console lid may not fully
close. Do not force the console lid closed as
this may damage the USB memory device.
2. Getting started
2-13
Page 49 of 283
3 Audio system
Audio operation precautions ......................................... 3-2Radio ........................................................................\
....... 3-2
Compact Disc (CD) player ........................................ 3-4
Digital Versatile Disc (DVD) player (if
so equipped) .................................................................. 3-5
USB (Universal Serial Bus) connection port ........ 3-8
Compressed Audio Files (MP3/WMA/AAC) ..... 3-9
Bluetooth® streaming audio .................................. 3-13
Names and functions of audio control buttons ..... 3-14 Audio main buttons (Type A) (if so equipped) ..... 3-14
Audio main buttons (Type B) (if so equipped) .... 3-15
Audio main buttons (Type C) (if so equipped) .... 3-16
Steering wheel mounted audio control buttons
(Type A) (if so equipped) ......................................... 3-17
Steering wheel mounted audio control buttons
(Type B) (if so equipped) ......................................... 3-17
Steering wheel mounted audio control buttons
(Type C) (if so equipped) ......................................... 3-18
Steering wheel mounted audio control buttons
(Type D) (if so equipped) ......................................... 3-18
Audio operations ............................................................ 3-18 Audio main operation .............................................. 3-18
Radio ........................................................................\
.... 3-20
Compact Disc (CD) player ...................................... 3-25 Digital Versatile Disc (DVD) player (if
so equipped) ............................................................. 3-27
USB (Universal Serial Bus) connection port .... 3-30
iPod® player ............................................................. 3-33
Bluetooth® streaming audio ................................ 3-36
Auxilliary (AUX) devices (if so equipped) .......... 3-39
Audio settings ................................................................ 3-40
Disc/USB memory device care and cleaning ......... 3-43 Discs ........................................................................\
.... 3-43
USB memory device ............................................... 3-43
Gracenote® End User License Agreement ............. 3-43
Mobile Entertainment System (MES) (if
so equipped) ................................................................... 3-44 Precautions ............................................................... 3-45
Technical information ............................................ 3-45
Remote controller and headphones ................... 3-54
Rear media interface .............................................. 3-59
Activating rear displays ......................................... 3-59
Operations on rear displays ................................ 3-60
Setting and information ........................................ 3-61
Controlling the rear system on the
front display .............................................................. 3-62
Operating tips .......................................................... 3-63
Care and maintenance ........................................... 3-65
Page 87 of 283
AUXILLIARY (AUX) DEVICES (if so
equipped)
Precautions
In some countries, images cannot be dis-
played in the vehicle at any time for
regulatory reasons.
Connecting auxiliary devices
The auxiliary audio input jack accepts any
standard analog audio input such as from a
portable cassette player, CD player or MP3
player.
A video player can be connected to the
auxiliary video input jack to play movies.
Auxiliary audio input jack location:
“Audio accessories” (page 2-12)
INFO:
Insert a 1/8 in (3.5 mm) stereo mini plug in
the audio input jack. If a cable with a mono
plug is used, the audio output may not
function normally.
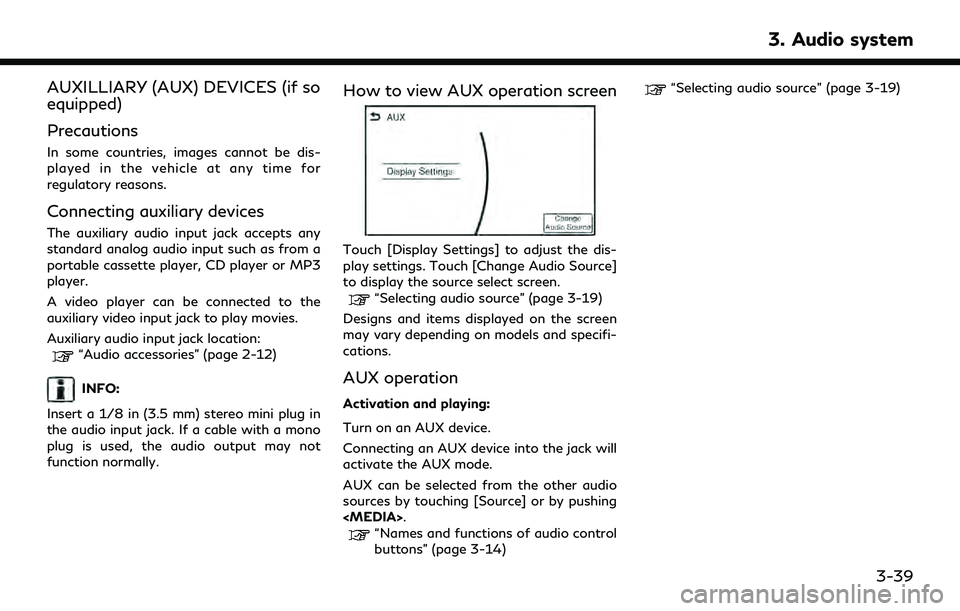
How to view AUX operation screen
Touch [Display Settings] to adjust the dis-
play settings. Touch [Change Audio Source]
to display the source select screen.
“Selecting audio source” (page 3-19)
Designs and items displayed on the screen
may vary depending on models and specifi-
cations.
AUX operation
Activation and playing:
Turn on an AUX device.
Connecting an AUX device into the jack will
activate the AUX mode.
AUX can be selected from the other audio
sources by touching [Source] or by pushing
“Names and functions of audio control
buttons” (page 3-14)
“Selecting audio source” (page 3-19)
3. Audio system
3-39
Page 90 of 283
![INFINITI QX30 2019 Owners Manual 3. Audio system
[Language]Changeable items will vary depending on the type of DVD.
For DVD-V:
Audible language can be changed by touching [+]/[-].
For Video CD:
Select the sound setting from Main audi INFINITI QX30 2019 Owners Manual 3. Audio system
[Language]Changeable items will vary depending on the type of DVD.
For DVD-V:
Audible language can be changed by touching [+]/[-].
For Video CD:
Select the sound setting from Main audi](/img/42/41115/w960_41115-89.png)
3. Audio system
[Language]Changeable items will vary depending on the type of DVD.
For DVD-V:
Audible language can be changed by touching [+]/[-].
For Video CD:
Select the sound setting from Main audio, Sub audio and Main/Sub audio.
For DVD VR:
Select the sound setting from Main audio 1, Sub audio 1, Main/Sub audio 1, Main audio 2, Sub audio 2 and
Main/Sub audio 2.
[Subtitle] The subtitle language can be changed by touching [+]/[-].
[DVD Screen Settings] Touch to adjust the DVD aspect ratio.
[PG/PL Mode] Touch to switch the PG/PL mode setting.
INFO:
The Available setting items differ depending on the DVD. . [AUX Settings]
Setting Items Action
[Image ON]/[Image OFF] The image display on the display can be turned on/off.
[AUX Image Display] The image display size setting can be selected from [Normal], [Wide] and [Cinema].
[Volume Setting] The volume setting can be selected from [Low], [Medium] and [High].
3-42
Page 92 of 283
3. Audio system
use the Gracenote Data, the Gracenote
Software, and Gracenote Servers will termi-
nate if you violate these restrictions. If your
license terminates, you agree to cease any
and all use of the Gracenote Data, the
Gracenote Software, and Gracenote Ser-
vers. Gracenote reserves all rights in Grace-
note Data, the Gracenote Software, and the
Gracenote Servers, including all ownership
rights. Under no circumstances will Grace-
note become liable for any payment to you
for any information that you provide. You
agree that Gracenote, Inc. may enforce its
rights under this Agreement against you
directly in its own name.
The Gracenote service uses a unique identi-
fier to track queries for statistical purposes.
The purpose of a randomly assigned numeric
identifier is to allow the Gracenote service to
count queries without knowing anything
about who you are. For more information,
see the web page for the Gracenote Privacy
Policy for the Gracenote service.
The Gracenote Software and each item of
Gracenote Data is licensed to you “AS IS”.
Gracenote makes no representations or
warranties, express or implied, regarding
the accuracy of any Gracenote Data from
the Gracenote Servers. Gracenote reservesthe right to delete data from the Gracenote
Servers or to change data categories for any
cause that Gracenote seems sufficient. No
warranty is made that the Gracenote Soft-
ware or Gracenote Servers are error-free or
that functioning of Gracenote Software or
Gracenote Servers will be uninterrupted.
Gracenote is not obligated to provide you
with new enhanced or additional data types
or categories that Gracenote may provide in
the future and is free to discontinue its
services at any time.
GRACENOTE DISCLAIMS ALL WARRAN-
TIES EXPRESS OR IMPLIED, INCLUDING,
BUT NOT LIMITED TO, IMPLIED WAR-
RANTIES OF MERCHANTABILITY, FIT-
NESS FOR A PARTICULAR PURPOSE,
TITLE, AND NON-INFRINGEMENT.
GRACENOTE DOES NOTWARRANT THE
RESULTS THAT WILL BE OBTAINED BY
YOUR USE OF THE GRACENOTE SOFT-
WARE OR ANY GRACENOTE SERVER. IN
NO CASE WILL GRACENOTE BE LIABLE
FOR ANY CONSEQUENTIAL OR INCI-
DENTAL DAMAGES OR FOR ANY LOST
PROFITS OR LOST REVENUES.
© Gracenote, Inc. 2009MOBILE ENTERTAINMENT
SYSTEM (MES) (if so equipped)
If your vehicle is equipped with the Mobile
Entertainment System (MES), you can enjoy
playing audio and movie files on the rear
displays with images and sound.
Playable source:
. DVD (if so equipped)
. AUX device (if so equipped)
. USB memory device (connected to the
rear USB connection port)
. HDMI device
The front and left/right rear displays can
show different sources individually.
CD/DVD (if so equipped) slot location:
“Names and functions of audio control
buttons” (page 3-14)
Auxiliary input jack location (if so equipped):
“Audio accessories” (page 2-12)
Rear media interface (USB and HDMI con-
nection ports) location:
“Rear media interface” (page 3-59)
3-44
Page 102 of 283
3. Audio system
Sorenson Spark Video decoder:
This product contains an officially licensed
Sorenson Spark optimized video decoder
licensed from Sorenson Media, Inc.
Natune surround sound:
Natune surround sound is a
general term for the family
of the latest acoustic signal
processing technology pro-
duced by DiMAGIC Co., Ltd.
REMOTE CONTROLLER AND
HEADPHONES
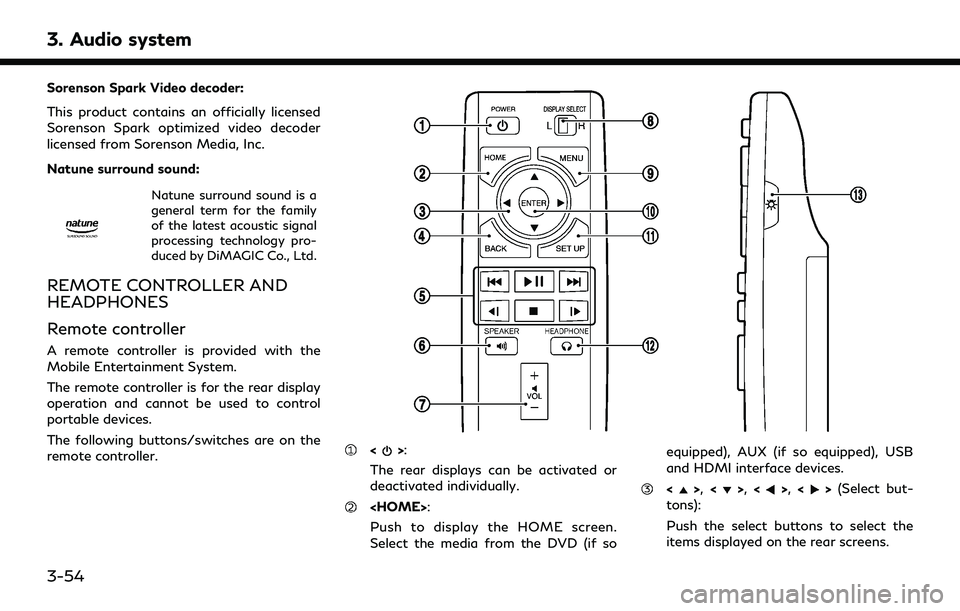
Remote controller
A remote controller is provided with the
Mobile Entertainment System.
The remote controller is for the rear display
operation and cannot be used to control
portable devices.
The following buttons/switches are on the
remote controller.
<>:
The rear displays can be activated or
deactivated individually.
Push to display the HOME screen.
Select the media from the DVD (if so equipped), AUX (if so equipped), USB
and HDMI interface devices.
<>,
<>,<>,<>(Select but-
tons):
Push the select buttons to select the
items displayed on the rear screens.
3-54
Page 108 of 283
3. Audio system
NOTE:
. The rear displays may turn off auto-
matically when the temperature is high
to protect the display screens from
being damaged.
. The movement of the images displayed
on the rear displays could slow down
when the temperature is below 32°F
(0°C ) but this is not a malfunction. The
movement will return to normal when
the temperature rises between 32°F
(0°C) and 122°F (50°C).
. The following conditions may occur but
these are characteristics of the crystal
display and are not malfunctions:
— Black spots, bright spots and after-
images appear on this display.
— The screen appears faint or dimmed
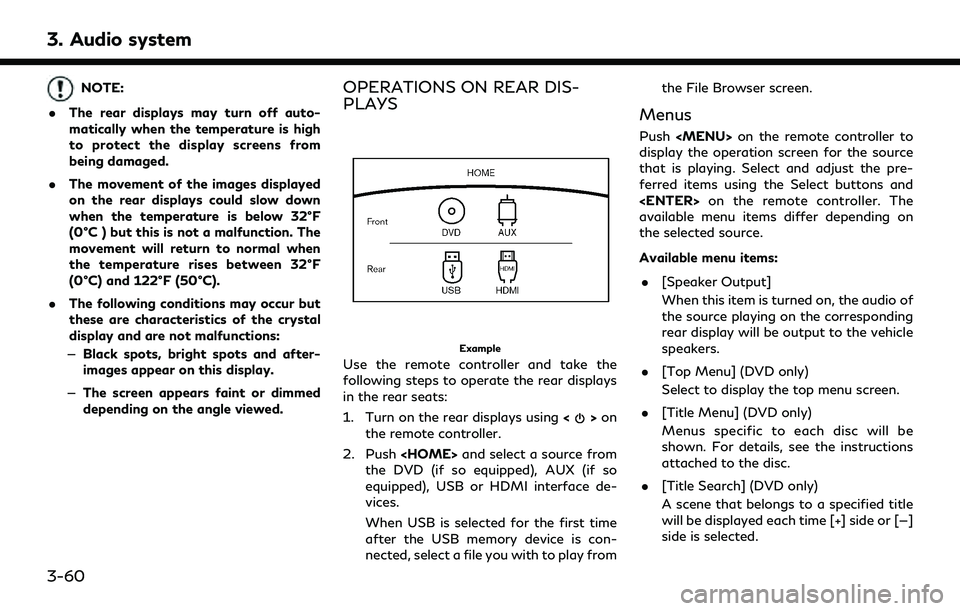
depending on the angle viewed.OPERATIONS ON REAR DIS-
PLAYS
Example
Use the remote controller and take the
following steps to operate the rear displays
in the rear seats:
1. Turn on the rear displays using <
>on
the remote controller.
2. Push
the DVD (if so equipped), AUX (if so
equipped), USB or HDMI interface de-
vices.
When USB is selected for the first time
after the USB memory device is con-
nected, select a file you with to play from the File Browser screen.
Menus
Push
Page 113 of 283
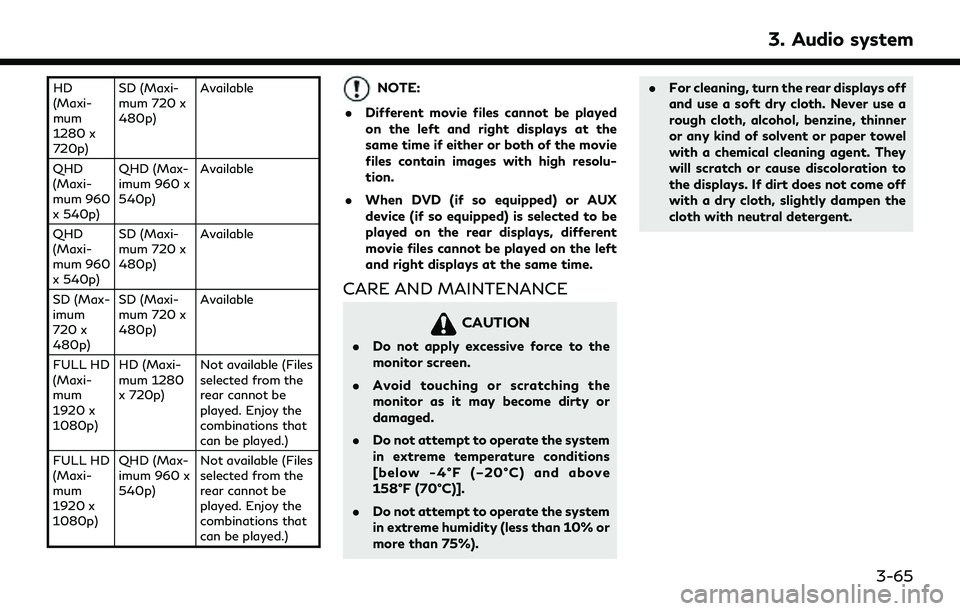
HD
(Maxi-
mum
1280 x
720p)SD (Maxi-
mum 720 x
480p)
Available
QHD
(Maxi-
mum 960
x 540p) QHD (Max-
imum 960 x
540p)
Available
QHD
(Maxi-
mum 960
x 540p) SD (Maxi-
mum 720 x
480p)
Available
SD (Max-
imum
720 x
480p) SD (Maxi-
mum 720 x
480p)
Available
FULL HD
(Maxi-
mum
1920 x
1080p) HD (Maxi-
mum 1280
x 720p)
Not available (Files
selected from the
rear cannot be
played. Enjoy the
combinations that
can be played.)
FULL HD
(Maxi-
mum
1920 x
1080p) QHD (Max-
imum 960 x
540p)
Not available (Files
selected from the
rear cannot be
played. Enjoy the
combinations that
can be played.)NOTE:
. Different movie files cannot be played
on the left and right displays at the
same time if either or both of the movie
files contain images with high resolu-
tion.
. When DVD (if so equipped) or AUX
device (if so equipped) is selected to be
played on the rear displays, different
movie files cannot be played on the left
and right displays at the same time.
CARE AND MAINTENANCE
CAUTION
.Do not apply excessive force to the
monitor screen.
. Avoid touching or scratching the
monitor as it may become dirty or
damaged.
. Do not attempt to operate the system
in extreme temperature conditions
[below -4°F (–20°C) and above
158°F (70°C)].
. Do not attempt to operate the system
in extreme humidity (less than 10% or
more than 75%). .
For cleaning, turn the rear displays off
and use a soft dry cloth. Never use a
rough cloth, alcohol, benzine, thinner
or any kind of solvent or paper towel
with a chemical cleaning agent. They
will scratch or cause discoloration to
the displays. If dirt does not come off
with a dry cloth, slightly dampen the
cloth with neutral detergent.
3. Audio system
3-65