tow INFINITI QX50 2014 User Guide
[x] Cancel search | Manufacturer: INFINITI, Model Year: 2014, Model line: QX50, Model: INFINITI QX50 2014Pages: 498, PDF Size: 2.47 MB
Page 120 of 498

SIC3637
To stow the cargo cover, remove it from the
hooks and hold until it is retracted. Make
sure that the cargo cover is snapped into
the holders
*2to keep it from moving
around while driving.
SIC3638
To remove the cargo cover, stow the cover
and pull the holder to the opposite side
*3.
WARNING
. Never put anything on the cargo cover,
no matter how small. Any object on it
could cause an injury in an accident or
sudden stop.
. Do not leave the cargo cover in the
vehicle with it disengaged from the
holder.
. Properly secure all cargo with ropes or straps to help prevent it from sliding or
shifting. Do not place cargo higher than
the seatbacks. In a sudden stop or
collision, unsecured cargo could cause
personal injury.
. If the cargo cover contacts the top tether
strap when it is attached to the top
tether anchor, remove the cargo cover
from the vehicle or secure it on the cargo
floor below its attachment location. If
the cargo cover is not removed, it may
damage the top tether strap during a
collision. Your child could be seriously
injured or killed in a collision if the child
restraint top tether strap is damaged.
. Do not allow cargo to contact the top
tether strap when it is attached to the
top tether anchor. Properly secure the
cargo so it does not contact the top
tether strap. Cargo that is not properly
secured or cargo that contacts the top
tether strap may damage the top tether
strap during a collision. Your child could
be seriously injured or killed in a
collision if the child restraint top tether
strap is damaged.
. Do not use the cargo cover if the rear
seats are folded down.
Instruments and controls2-49
Page 140 of 498

WARNING
.Radio waves could adversely affect
electric medical equipment. Those who
use a pacemaker should contact the
electric medical equipment manufacturer
for the possible influences before use.
. The Intelligent Key transmits radio
waves when the buttons are pushed.
The FAA advises that the radio waves
may affect aircraft navigation and com-
munication systems. Do not operate the
Intelligent Key while on an airplane.
Make sure that the buttons are not
operated unintentionally when the unit
is stored for a flight.
The Intelligent Key system can operate all
the door locks using the remote controller
function or pushing the request switch on
the vehicle without taking the key out from
a pocket or purse. The operating environ-
ment and/or conditions may affect the
Intelligent Key system operation.
Be sure to read the following before using
the Intelligent Key system.
CAUTION
.Be sure to carry the Intelligent Key with
you when operating the vehicle.
. Never leave the Intelligent Key in the
vehicle when you leave the vehicle.
The Intelligent Key is always communicat-
ing with the vehicle as it receives radio
waves. The Intelligent Key system trans-
mits weak radio waves. Environmental
conditions may interfere with the operation
of the Intelligent Key system under the
following operating conditions.
.When operating near a location where
strong radio waves are transmitted,
such as a TV tower, power station and
broadcasting station.
. When in possession of wireless equip-
ment, such as a cellular telephone,
transceiver, and CB radio.
. When the Intelligent Key is in contact
with or covered by metallic materials.
. When any type of radio wave remote
control is used nearby.
. When the Intelligent Key is placed near
an electric appliance such as a perso- nal computer.
. When the vehicle is parked near a
parking meter.
In such cases, correct the operating condi-
tions before using the Intelligent Key
function or use the mechanical key.
Although the life of the battery varies
depending on the operating conditions,
the battery’s life is approximately 2 years.
If the battery is discharged, replace it with
a new one.
Since the Intelligent Key is continuously
receiving radio waves, if the key is left near
equipment which transmits strong radio
waves, such as signals from a TV and
personal computer, the battery life may
become shorter.
For information regarding replacement of a
battery, see “Intelligent Key battery repla-
cement” (P.8-24).
As many as 4 Intelligent Keys can be
registered and used with one vehicle. For
information about the purchase and use of
additional Intelligent Keys, contact an
INFINITI retailer.
Pre-driving checks and adjustments3-7
INTELLIGENT KEY SYSTEM
Page 158 of 498

Adjusting outside mirrors
The outside mirror control switch is located
on the armrest.
The outside mirror will operate only when
the ignition switch is in the ACC or ON
position.
Turn the switch right or left to select the
right or left side mirror
*1, then adjust
using the control switch
*2.
Defrosting outside mirrors
The outside mirrors will be heated when
the rear window defroster switch is oper-
ated.SPA1829
Foldable outside mirrors
Fold the outside mirror by pushing it
toward the rear of the vehicle.
Reverse tilt-down feature (if so
equipped)
When backing up the vehicle, the right or
left outside mirror will turn downward
automatically to provide better rear visibi-
lity.
1. Push the ignition switch to the ON position.
2. Move the shift lever to the R (Reverse) position. 3. Choose the right or left outside mirror
by operating the outside mirror control
switch.
4. The selected outside mirror surface moves downward.
When one of the following conditions has
occurred, the selected outside mirror sur-
face will return to its original position.
. The shift lever is moved to any position
other than R (Reverse).
. The outside mirror control switch is set
to the center position.
. The ignition switch is pushed to the OFF
position.
Pre-driving checks and adjustments3-25
Page 169 of 498

4-6Monitor, climate, audio, phone and voice recognition systems
HOW TO USE INFINITI CONTROLLER
Choose an item on the display using the
main directional buttons
*2(or additional
directional buttons
*6with navigation
system) or center dial
*3, and push the
ENTER button
*1for operation.
If you push the BACKbutton
*4before the
setup is completed, the setup will be
canceled and/or the display will return to
the previous screen. This button can also
be used to delete characters that have
been input.
After the setup is completed, push the
BACK button
*4and return to the previous
screen.
For the VOICEbutton
*5functions, refer to
the separate Navigation System Owner’s
Manual.
HOW TO USE TOUCH SCREEN
(models with navigation system)
CAUTION
. The glass screen on the liquid crystal
display may break if it is hit with a hard
or sharp object. If the glass screen
breaks, do not touch it. Doing so could result in an injury.
. To clean the display, use a soft, dry
cloth. If additional cleaning is necessary,
use a small amount of neutral detergent
with a soft cloth. Never use a rough
cloth, alcohol, benzine, thinner or any
kind of solvent or paper towel with a
chemical cleaning agent. They will
scratch or deteriorate the panel.
. Do not splash any liquid such as water
or car fragrance on the display. Contact
with liquid will cause the system to
malfunction.
To ensure safe driving, some functions
cannot be operated while driving.
The on-screen functions that are not
available while driving will be “grayed
out” or muted.
Park the vehicle in a safe location and then
operate the navigation system.
WARNING
. ALWAYS give your full attention to
driving.
. Avoid using vehicle features that could distract you. If distracted, you could lose
control of your vehicle and cause an
accident.
Page 203 of 498

4-40Monitor, climate, audio, phone and voice recognition systems
the place*B. Note that any object on the
hill is viewed in the monitor closer than it
appears.
SAA1923
Moving near a projecting object
The predictive course lines*Ado not
touch the object in the display. However,
the vehicle may hit the object if it projects
over the actual moving course.
SAA1980
Moving closer to a projecting object
The position*Cis shown further than the
position
*Bin the display. However, the
position
*Cis actually at the same
distance as the position
*A. The vehicle
may hit the object when moving toward the
position
*Aif the object projects over the
Page 313 of 498

5-4Starting and driving
cause a fire.
CAUTION
.Do not use leaded gasoline. Deposits
from leaded gasoline seriously reduce
the three-way catalyst’s ability to help
reduce exhaust pollutants.
. Keep your engine tuned up. Malfunctions
in the ignition, fuel injection, or elec-
trical systems can cause overrich fuel
flow into the three-way catalyst, causing
it to overheat. Do not keep driving if the
engine misfires, or if noticeable loss of
performance or other unusual operating
conditions are detected. Have the vehicle
inspected promptly by an INFINITI retai-
ler.
. Avoid driving with an extremely low fuel
level. Running out of fuel could cause
the engine to misfire, damaging the
three-way catalyst.
. Do not race the engine while warming it
up.
. Do not push or tow your vehicle to start
the engine.
TIRE PRESSURE MONITORING SYS-
TEM (TPMS)
Each tire, including the spare (if provided),
should be checked monthly when cold and
inflated to the inflation pressure recom-
mended by the vehicle manufacturer on the
vehicle placard or tire inflation pressure
label. (If your vehicle has tires of a different
size than the size indicated on the vehicle
placard or tire inflation pressure label, you
should determine the proper tire inflation
pressure for those tires.)
As an added safety feature, your vehicle
has been equipped with a Tire Pressure
Monitoring System (TPMS) that illuminates
a low tire pressure telltale when one or
more of your tires is significantly under-
inflated. Accordingly, when the low tire
pressure telltale illuminates, you should
stop and check your tires as soon as
possible, and inflate them to the proper
pressure. Driving on a significantly under-
inflated tire causes the tire to overheat and
can lead to tire failure. Under-inflation also
reduces fuel efficiency and tire tread life,
and may affect the vehicle’s handling and
stopping ability.
Please note that the TPMS is not a
substitute for proper tire maintenance, and it is the driver’
s responsibility to
maintain correct tire pressure, even if
under-inflation has not reached the level
to trigger illumination of the TPMS low tire
pressure telltale.
Your vehicle has also been equipped with a
TPMS malfunction indicator to indicate
when the system is not operating properly.
The TPMS malfunction indicator is com-
bined with the low tire pressure telltale.
When the system detects a malfunction,
the telltale will flash for approximately one
minute and then remain continuously
illuminated. This sequence will continue
upon subsequent vehicle start-ups as long
as the malfunction exists. When the mal-
function indicator is illuminated, the sys-
tem may not be able to detect or signal low
tire pressure as intended. TPMS malfunc-
tions may occur for a variety of reasons,
including the installation of replacement or
alternate tires or wheels on the vehicle that
prevent the TPMS from functioning prop-
erly. Always check the TPMS malfunction
telltale after replacing one or more tires or
wheels on your vehicle to ensure that the
replacement or alternate tires and wheels
allow the TPMS to continue to function
properly.
Page 320 of 498

to LOCK until the shift lever is moved to the
P (Park) position.
When the ignition switch cannot be
switched toward the LOCK position, pro-
ceed as follows:
1. Move the shift lever into the P (Park)position.
2. Push the ignition switch to the OFF position. The ignition switch position
indicator will not illuminate.
3. Open the door. The ignition switch will change to the LOCK position.
The shift lever can be moved from the P
(Park) position if the ignition switch is in
the ON position and the brake pedal is
depressed.
If the battery of the vehicle is discharged,
the push-button ignition switch cannot be
turned from the LOCK position.
Some indicators and warnings for opera-
tion are displayed on the dot matrix liquid
crystal display between the speedometer
and tachometer. (See “Dot matrix liquid
crystal display” (P.2-19).)PUSH-BUTTON IGNITION SWITCH
POSITIONS
LOCK (Normal parking position)
The ignition switch can only be locked in
this position.
The ignition switch will be unlocked when
it is pushed to the ACC position while
carrying the Intelligent Key or with the
Intelligent Key inserted in the port.
ACC (Accessories)
This position activates electrical acces-
sories such as the radio, when the engine
is not running.
ON (Normal operating position)
This position turns on the ignition system
and electrical accessories.
OFF
The engine can be turned off in this
position.
The ignition lock is designed so that the
ignition switch cannot be switched to the
LOCK position until the shift lever is moved
to the P (Park) position.
CAUTION
Do not leave the vehicle with the push-
button ignition switch in ACC or ON posi-
tions when the engine is not running for an
extended period. This can discharge the
battery.
EMERGENCY ENGINE SHUT OFF
To shut off the engine in an emergency
situation while driving perform the follow-
ing procedure:
.Rapidly push the push-button ignition
switch 3 consecutive times in less than
1.5 seconds, or
. Push and hold the push button ignition
switch for more than 2 seconds.
Starting and driving5-11
Page 391 of 498

5-82Starting and driving
SD1006MA
WARNING
.Do not stop or park the vehicle over
flammable materials such as dry grass,
waste paper or rags. They may ignite and
cause a fire.
. Never leave the engine running while the
vehicle is unattended.
. Do not leave children unattended inside
the vehicle. They could unknowingly
activate switches or controls. Unat-
tended children could become involved
in serious accidents. .
Safe parking procedures require that
both the parking brake be applied and
the transmission be placed in the P
(Park) position. Failure to do so could
cause the vehicle to move unexpectedly
or roll away and result in an accident.
. Make sure the automatic transmission
shift lever has been pushed as far
forward as it can go and cannot be
moved without depressing the foot
brake pedal.
1. Firmly apply the parking brake.
2. Move the shift lever to the P (Park)
position.
3. To help prevent the vehicle from rolling into the street when parked on a
sloping drive way, it is a good practice
to turn the wheels as illustrated.
.HEADED DOWNHILL WITH CURB:*1
Turn the wheels into the curb and
move the vehicle forward until the
curb side wheel gently touches the
curb.
.HEADED UPHILL WITH CURB:*2
Turn the wheels away from the curb
and move the vehicle back until the
curb side wheel gently touches the
curb.
.HEADED UPHILL OR DOWNHILL, NO
CURB:
*3
Turn the wheels toward the side of
the road so the vehicle will move
away from the center of the road if it
moves.
4. Push the ignition switch to the OFF position.
PARKING/PARKING ON HILLS
Page 402 of 498

6 In case of emergency
Hazard warning flasher switch ............................. 6-2
Roadside assistance program .............................. 6-2
Emergency engine shut off .................................. 6-3
Flat tire................................................................ 6-3Tire Pressure Monitoring System (TPMS) ........ 6-3
Changing a flat tire ......................................... 6-4 Jump starting ...................................................... 6-8
Push starting .................................................... 6-10
If your vehicle overheats ................................... 6-10
Towing your vehicle .......................................... 6-11
Towing recommended by INFINITI ................. 6-12
Vehicle recovery (freeing a stuck vehicle) ..... 6-14
Page 408 of 498

SCE0661
Installing the spare tire
The T-type spare tire is designed for
emergency use. (See specific instructions
under the heading“Wheels and tires” (P.8-
30).)
1. Clean any mud or dirt from the surface between the wheel and hub.
2. Carefully put the spare tire on and tighten the wheel nuts finger tight.
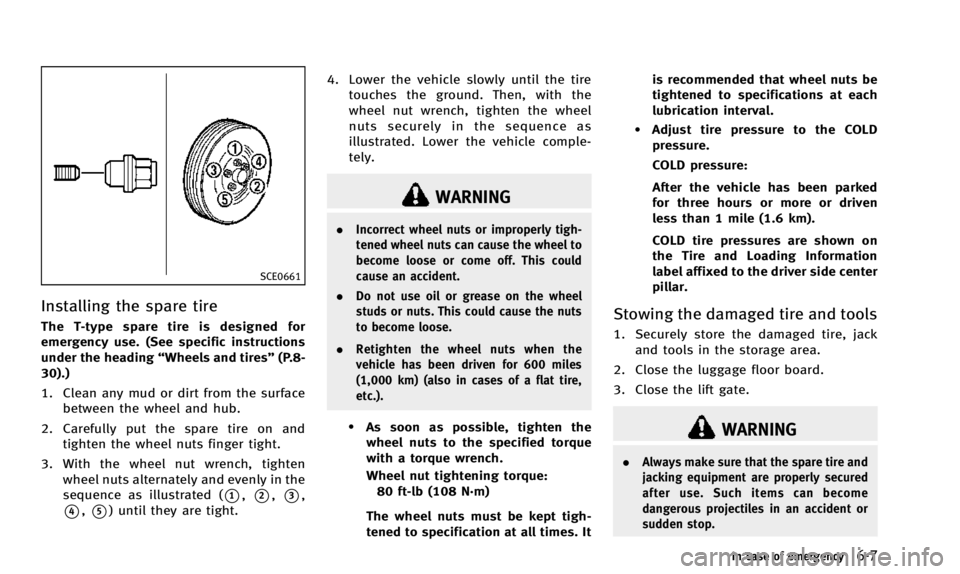
3. With the wheel nut wrench, tighten wheel nuts alternately and evenly in the
sequence as illustrated (
*1,*2,*3,
*4,*5) until they are tight. 4. Lower the vehicle slowly until the tire
touches the ground. Then, with the
wheel nut wrench, tighten the wheel
nuts securely in the sequence as
illustrated. Lower the vehicle comple-
tely.
WARNING
. Incorrect wheel nuts or improperly tigh-
tened wheel nuts can cause the wheel to
become loose or come off. This could
cause an accident.
. Do not use oil or grease on the wheel
studs or nuts. This could cause the nuts
to become loose.
. Retighten the wheel nuts when the
vehicle has been driven for 600 miles
(1,000 km) (also in cases of a flat tire,
etc.).
.As soon as possible, tighten the
wheel nuts to the specified torque
with a torque wrench.
Wheel nut tightening torque: 80 ft-lb (108 N·m)
The wheel nuts must be kept tigh-
tened to specification at all times. It is recommended that wheel nuts be
tightened to specifications at each
lubrication interval.
.Adjust tire pressure to the COLD
pressure.
COLD pressure:
After the vehicle has been parked
for three hours or more or driven
less than 1 mile (1.6 km).
COLD tire pressures are shown on
the Tire and Loading Information
label affixed to the driver side center
pillar.
Stowing the damaged tire and tools
1. Securely store the damaged tire, jack and tools in the storage area.
2. Close the luggage floor board.
3. Close the lift gate.
WARNING
. Always make sure that the spare tire and
jacking equipment are properly secured
after use. Such items can become
dangerous projectiles in an accident or
sudden stop.
In case of emergency6-7